На чтение 11 мин Просмотров 4.4к.

Сергей Сакадынский
Работал в сфере IT-консалтинга, занимался созданием и администрированием интернет-ресурсов. 10 лет опыта работы по проектированию и обслуживанию компьютерных сетей.
Задать вопрос
Tenda AC11 – гигабитный двухдиапазонный роутер в стильном дизайне. Как и другие продукты этой линейки, он выделяется нестандартным внешним видом. Технические характеристики устройства тоже на уровне. При этом цена заметно ниже, чем у конкурентов. Представляем вам небольшой обзор этого маршрутизатора и инструкцию по его настройке.
Содержание
- Обзор и технические характеристики
- Индикаторы и разъемы
- Подключение
- Вход в настройки роутера
- Автоматическая настройка
- Ручная настройка
- Подключение и параметры Wi-Fi
- Настройка IP TV
- Смена пароля
- Режим повторителя
- Настройка через мобильное приложение
- Обновление прошивки
- Сброс настроек
Обзор и технические характеристики
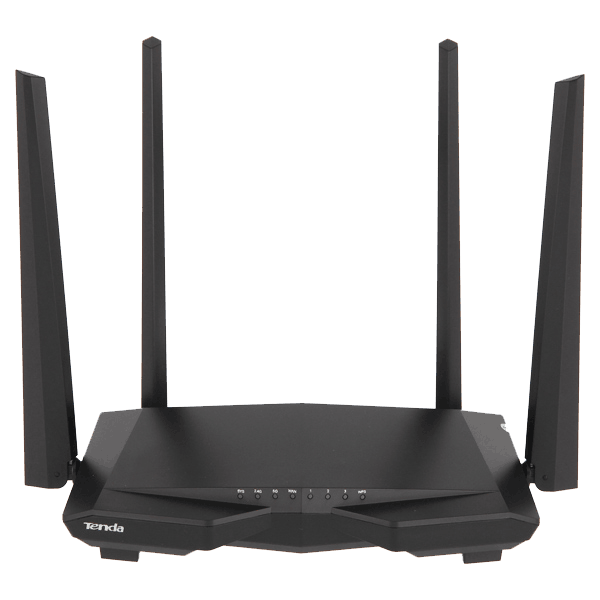
Роутеры Тенда всегда выглядят стильно, и АС11 не исключение. Корпус выполнен из чёрного матового пластика и выглядит футуристически. Сразу обращают на себя внимание пять антенн. Они несъемные, при этом свободно поворачиваются в двух плоскостях и устанавливаются в любом положении.
Внутри прячется мощный процессор, работающий на частоте 1 ГГц. Его возможностей с запасом хватит для онлайн-игр, просмотра видео и одновременной работы с несколькими устройствами.
Бесспорное достоинство этого маршрутизатора – скорость. Гигабитные сетевые порты в сочетании с двухдиапазонным Wi-Fi до 1167 Мбит/сек позволяют в полной мере использовать высокоскоростное подключение к интернету.
Характеристики Tenda AC11 позволяют обеспечить качественным интернетом квартиру, небольшой офис или частный дом.
Отзывы пользователей почти без исключения положительные. Недостатки в большей степени касаются второстепенных параметров, не влияющих на работу. Так, отмечается избыточная яркость индикаторов: светят не хуже ночника, в спальне лучше не ставить. Но эта проблема решается настройкой отключения индикации по расписанию.
Также сигнал Wi-Fi на частоте 5 ГГц плохо проходит через бетонные стены. Но в этом диапазоне это типичная проблема большинства роутеров.
Высокая скорость по доступной цене
Оригинальный дизайн
Простая и быстрая настройка
Большая площадь покрытия
Слишком яркие светодиодные индикаторы
Слабый сигнал Wi-Fi 5 ГГц
Нет USB-порта
Только три сетевых порта
Индикаторы и разъемы
На передней панели роутера расположены четыре индикатора, чрезмерная яркость которых так донимает некоторых пользователей.
SYS информирует о нормальной работе устройства. WAN сообщает, подключен ли интернет. Если индикатор не горит, сигнал в кабеле отсутствует. Индикация LAN показывает активность подключенных по кабелю устройств. Wi-Fi отвечает за беспроводную сеть.
В настройках роутера индикацию можно отключить совсем или по расписанию.
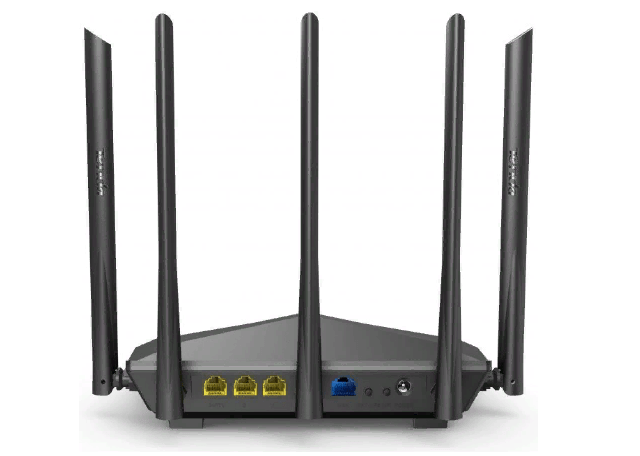
На задней панели слева на право расположены три жёлтых сетевых порта LAN и порт для подключения интернета WAN синего цвета. Рядом совмещённая кнопка сброса настроек и включения режима WPS. Далее кнопка включения/выключения Wi-Fi. И крайний справа разъём адаптера питания.
Подключение
После распаковки АС11 и выбора места для установки подключите блок питания в соответствующее гнездо и кабель провайдера в порт WAN. Должны загореться индикаторы SYS, Wi-Fi и WAN.
Если вы будете настраивать роутер с компьютера, один из жёлтых разъёмов LAN соедините кабелем (он идёт в комплекте) с сетевой картой компьютера.
Настройка может быть выполнена и через беспроводное подключение. Сеть Wi-Fi на роутере уже настроена. Параметры для входа вы найдёте на этикетке на нижней панели.
Вход в настройки роутера
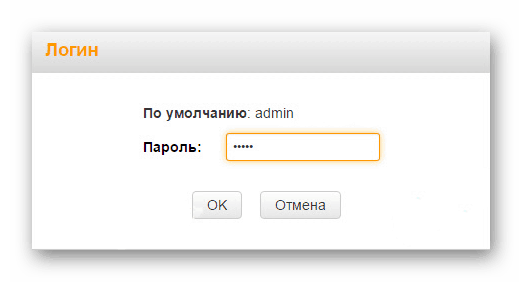
После того, как вы подключились по проводу или через Wi-Fi, откройте браузер и введите в адресной строке стандартный IP 192.168.0.1 или tendawifi.com. Появится окно входа, в котором нужно ввести пароль.
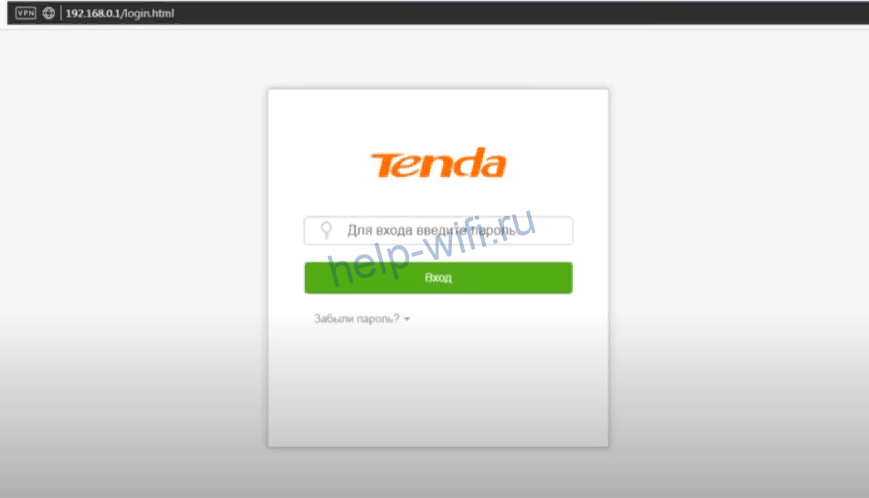
По умолчанию это слово admin. Откроется веб-интерфейс вашего АС11.
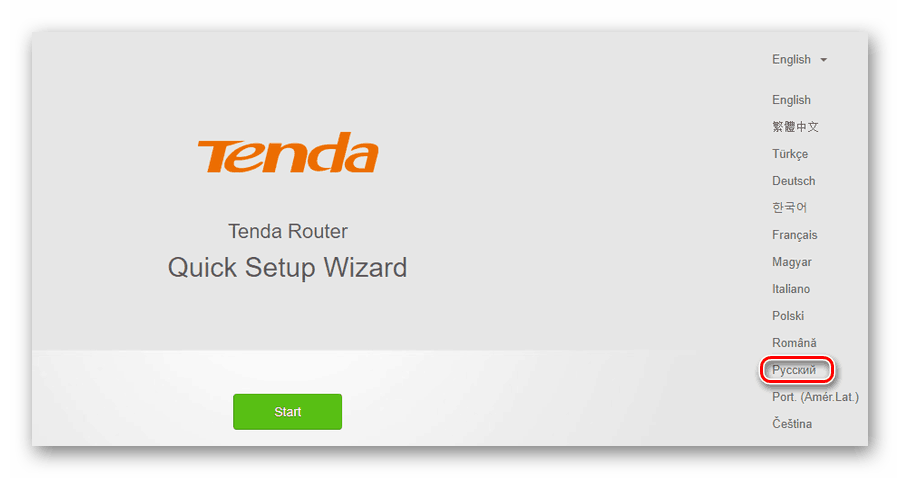
Автоматическая настройка
Встроенное программное обеспечение поможет настроить роутер Tenda в автоматическом режиме. Для этого в открывшемся окне просто нажмите кнопку «Старт».
Язык интерфейса по умолчанию должен быть русским. Но могут быть сюрпризы, если ваш роутер куплен на Алиэкспресс. Если вдруг вы обнаружили надписи иероглифами, не пугайтесь. У Tenda мультиязычный интерфейс. Русский язык можно выбрать в выпадающем меню в правом верхнем углу.

В следующем окне программа предложит выбрать тип подключения. Он зависит от вашего провайдера. Сейчас везде в основном используется динамический IP. Даже «Билайн» отказался от L2TP в пользу этого типа подключения. Здесь даже настраивать ничего не нужно. Интернет работает сразу, достаточно воткнуть кабель в разъём WAN-порта.
Но у вас может быть PPPoE, статический IP или что-то другое. Выбираем нужный тип из списка согласно инструкции провайдера.

Скорее всего, понадобится дополнительная информация – логин, пароль, адрес сервера. Всё это должно быть указано в договоре на подключение интернета.
Здесь же нужно определиться с МАС-адресом – оставить как есть, клонировать или ввести вручную. Эту информацию тоже уточняйте у провайдера.
После ввода всех данных жмём «Далее» и переходим в следующее окно. Здесь мы будем настраивать беспроводную сеть.

Придумайте имя сети (SSID) или оставьте значение по умолчанию. Задайте пароль. Желательно посложней – чтобы в нём были буквы, цифры и символы.
Чтобы составить надежную комбинацию, воспользуйтесь нашим генератором паролей. Сгенерированные пароли отображаются только на вашем компьютере или телефоне, нигде не хранятся и сбрасываются сразу, как только вы уходите со страницы.
[password-generator]
Здесь же в нижнем поле программа предлагает поменять стандартный пароль admin. Это тоже нужно сделать, чтобы к вашему роутеру не подключились посторонние.
Если вы всё сделали правильно, после нажатия на кнопку «Далее» появится уведомление о том, что интернет подключен.

Поскольку вы задали другие параметры Wi-Fi, переподключитесь к беспроводной сети. Для кабельного подключения делать ничего не нужно.
Ручная настройка
Настройка в ручном режиме может потребоваться для корректировки параметров. Для этого перейдите по адресу 192.168.0.1 или tendawifi.com. Потребуется ввести новый пароль доступа, который вы придумали во время быстрой настройки. Откроется главная страница веб-интерфейса.

В меню справа вы видите разделы, в которых можно изменить настройки интернета, локальной сети, Wi-Fi и другие параметры.
Если после быстрой настройки интернет не заработал, откорректируйте параметры вручную.
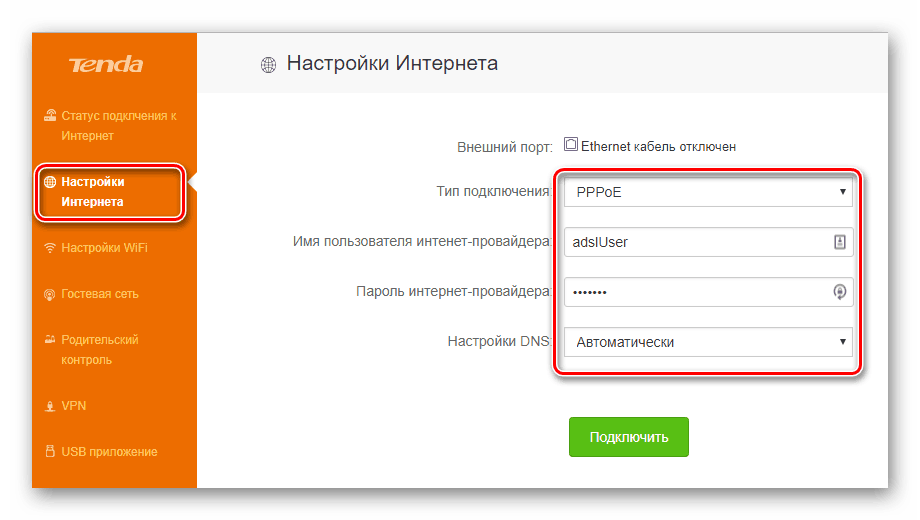
Для этого в меню выберите раздел «Настройки интернета». Здесь нужно выбрать ваш тип подключения. С динамическим IP всё должно работать без дополнительных настроек. Проблемы чаще всего возникают с другими типами подключения.
В случае, если ваш провайдер использует статические адреса, вам нужно выбрать тип подключения «Статический IP» и вручную ввести IP-адрес, адрес шлюза, маску подсети и DNS-сервер.

Для PPPoE требуется указать логин и пароль. А для L2TP и PPTP ещё и адрес сервера.
Вся эта информация предоставляется провайдером в договоре. Если у вас её нет, обратитесь в службу поддержки.
После ввода всех данных нажмите кнопку «Подключить» внизу страницы. После чего статус подключения должен измениться на «Подключено».
Подключение и параметры Wi-Fi
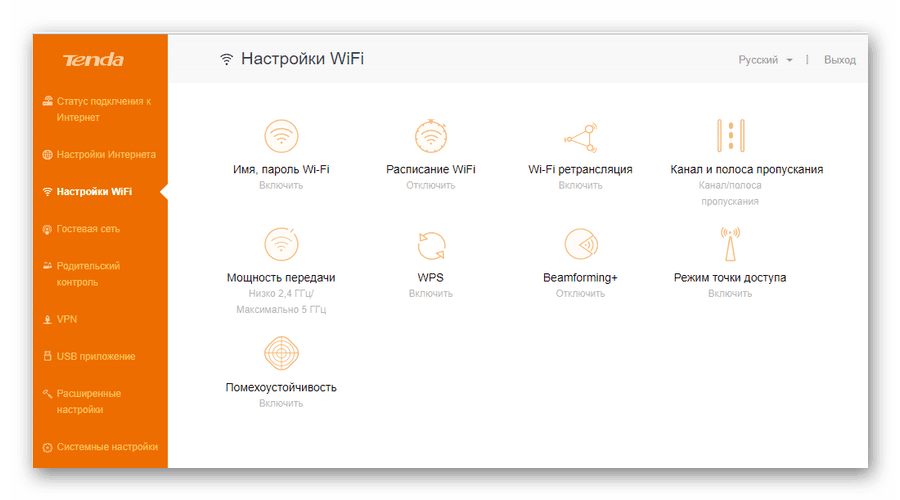
Для настройки беспроводной сети перейдите в раздел «Настройки Wi-Fi».
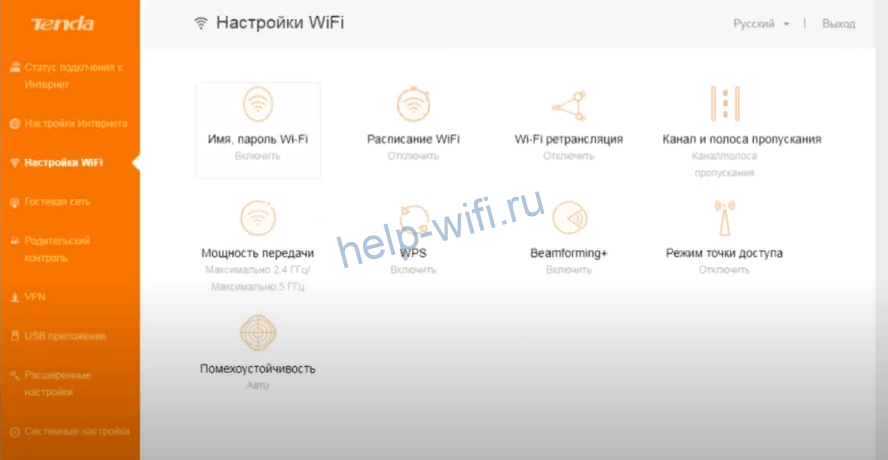
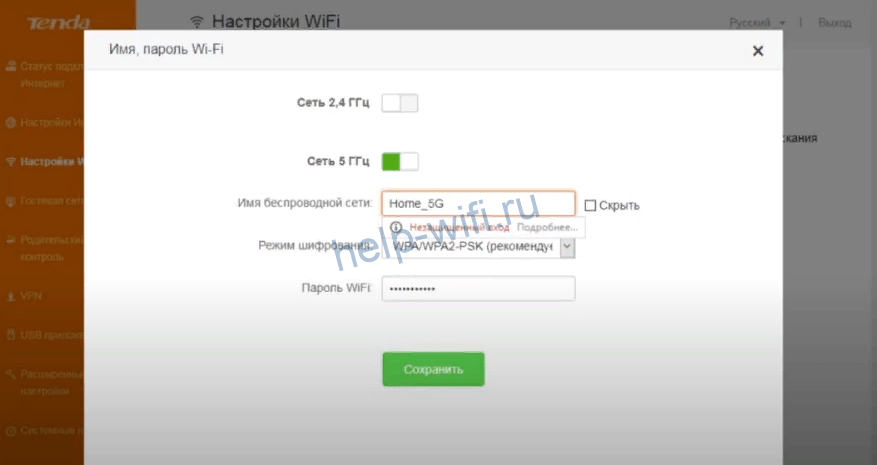
Для изменения SSID и пароля выберите первый пункт – «Имя, пароль Wi-Fi». Здесь можно включить или выключить вещание беспроводной сети и установить параметры безопасности.
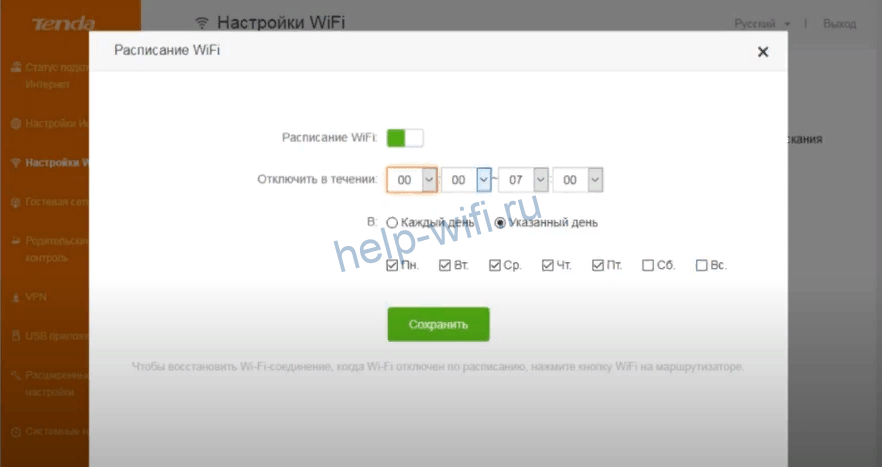
На вкладке «Расписание Wi-Fi» можно задать время включения и отключения беспроводной сети. Например, когда вы на работе, вещание может автоматически выключаться.
На вкладке «Канал и полоса пропускания» можно при необходимости вручную выбрать канал и его ширину. Обычно эти параметры менять не рекомендуется. Сетевой режим лучше выбрать смешанный, чтобы у старых смартфонов и ноутбуков не возникло проблем с подключением.

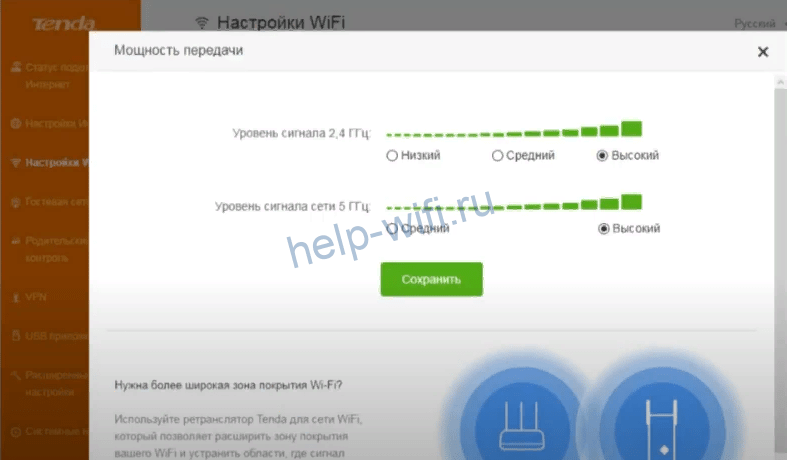
Во вкладке «Мощность передачи» можно отрегулировать уровень сигнала для каждого диапазона. Если у вас все устройства находятся рядом с роутером, сигнал можно уменьшить. А когда возникают проблемы с покрытием, наоборот, увеличить мощность.
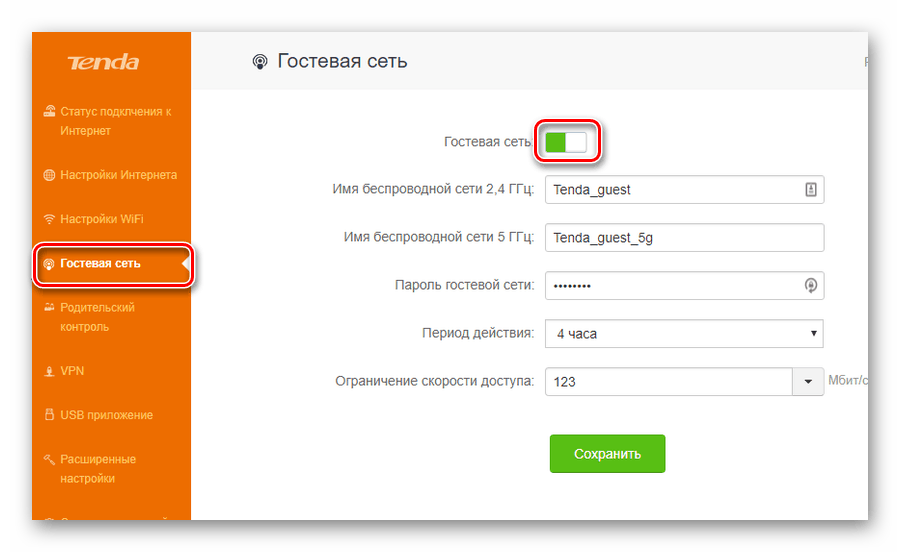
Гостевая сеть с ограниченными параметрами доступа настраивается отдельно в соответствующем разделе меню.
Настройка IP TV
IPTV на роутерах Tenda не требует сложной настройки. По умолчанию эта функция должна работать. Для её включения или выключения перейдите в раздел «Расширенные настройки» и выберите пункт IPTV.
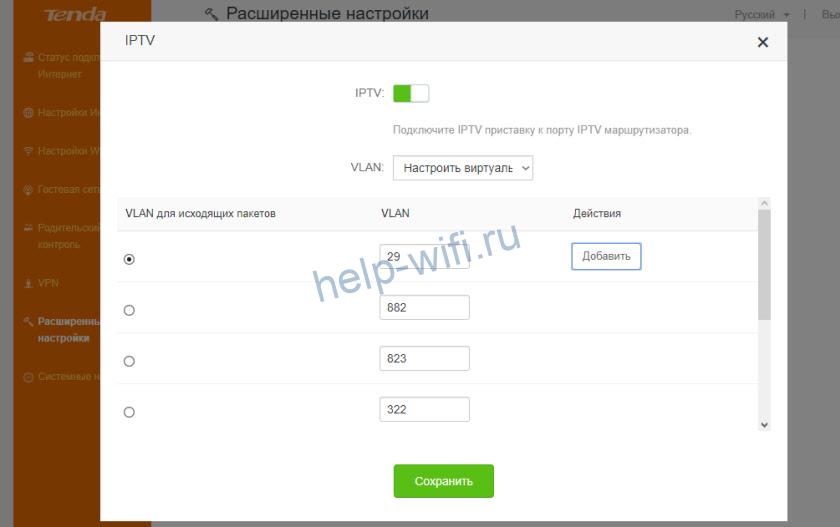
Переключатель в самом верху окна позволяет отключить или активировать функцию.
Смена пароля
Для того, чтобы изменить пароль доступа в веб-интерфейс, перейдите в раздел «Системные настройки» и выберите пункт «Ввести пароль». Появится окошко, в котором нужно сначала ввести старый пароль, а затем дважды новый.

Режим повторителя
Если вы хотите использовать ваш роутер в качестве усилителя сигнала (репитера) для увеличения радиуса действия сети другого маршрутизатора, включите нужный режим в настройках беспроводной сети.
Перейдите в раздел «Настройки Wi-Fi» и кликните пункт «Wi-Fi ретрансляция».

Активируйте режим репитера переключателем.
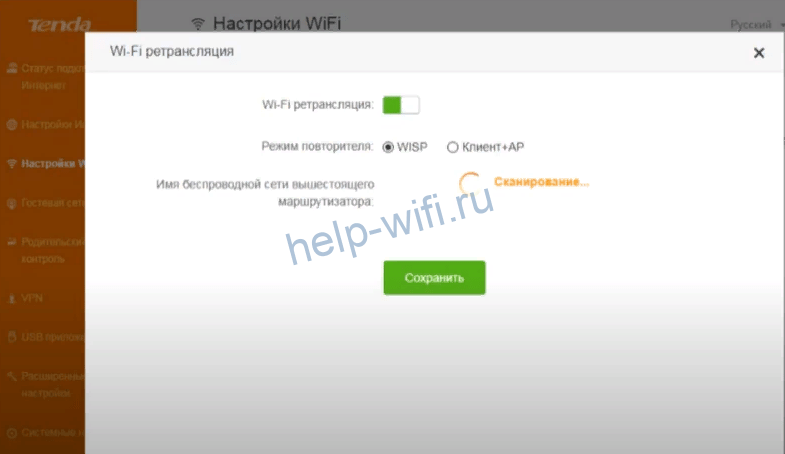
Дождитесь, пока маршрутизатор просканирует доступные сети, выберите из списка ту, которую собираетесь ретранслировать, введите пароль и перезагрузитесь. Ваше устройство начнёт работать в режиме репитера.
Настройка через мобильное приложение
Выполнить начальную настройку через мобильное приложение не получится, потому что предварительно необходимо активировать управление через приложение в настройках роутера. Сделать это можно в разделе «Расширенные настройки», пункт Tenda App.

Скачайте приложение Tenda App для Android или iPhone. Это можно сделать, сосканировав QR-код в меню настроек или воспользовавшись Google Play или AppStore.
Подключитесь к вашей беспроводной сети, запустите приложение и дождитесь, пока оно найдёт роутер. После чего нажмите кнопку «Управлять сейчас».
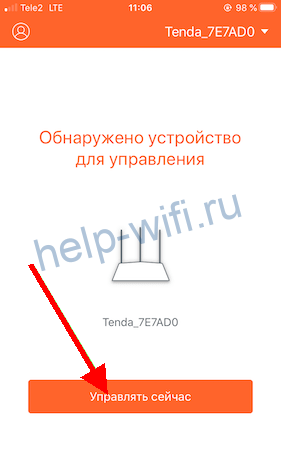
Потребуется ввести пароль от веб-интерфейса. Теперь вы сможете управлять функциями вашего роутера со смартфона.
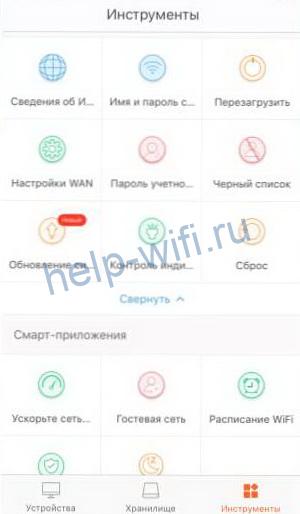
Обновление прошивки
Самый удобный способ обновить прошивку роутера автоматически. Для этого перейдите в раздел «Системные настройки», пункт «Обновление ПО». Галочка должна стоять напротив «Онлайн обновление».
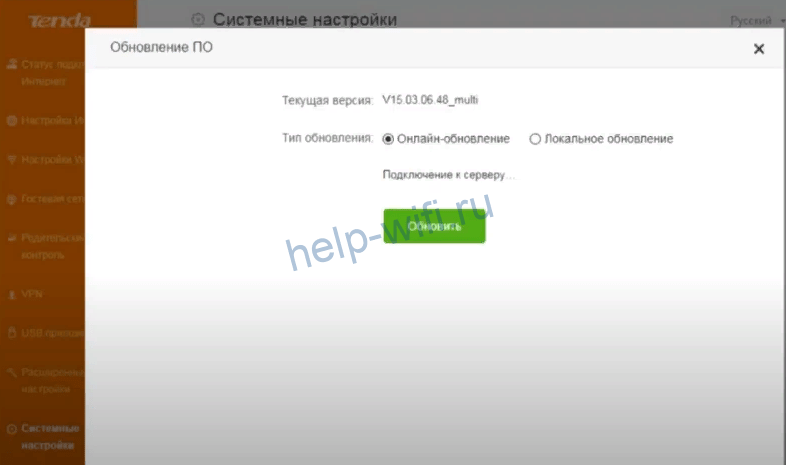
Если есть новая версия прошивки, программа об этом сообщит. Нажмите кнопку «Обновить» и дождитесь завершения процесса.
Можно обновить программное обеспечение в ручном режиме. Этот вариант придётся использовать, когда нужна перепрошивка на русский язык. Если вы купили роутер с английским или китайским интерфейсом, в режиме автоматического обновления он будет загружать ПО на своём языке.
В окне «Обновление ПО» установите галочку напротив пункта «Локальное обновление». Предварительно скачайте русскую прошивку для вашей модели с сайта Tenda и сохраните её на компьютер. Через обзор укажите путь к файлу и нажмите кнопку «Обновить».
Сброс настроек
Для того, чтобы восстановить заводские настройки роутера, есть два способа. Первый – сбросить параметры через веб-интерфейс. В разделе «Системные настройки» найдите пункт «Перезагрузка и сброс».
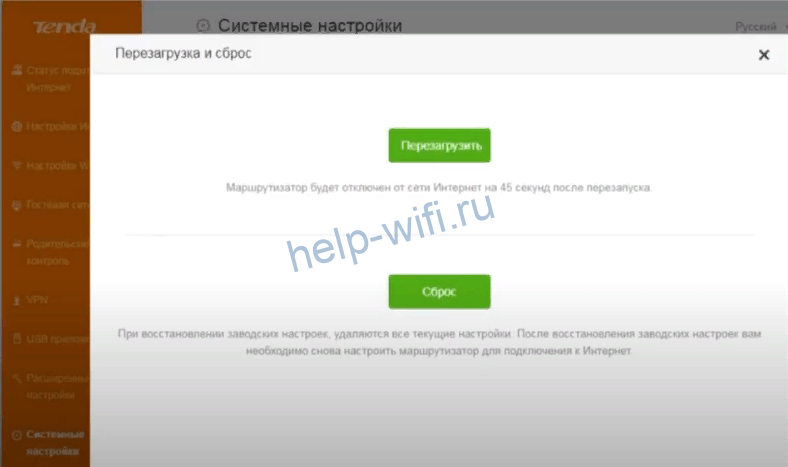
В открывшемся окне нажмите кнопку «Сброс». Роутер перезагрузится с заводскими настройками.
Если вы не можете войти в веб-интерфейс (забыли пароль), воспользуйтесь кнопкой RESET на задней панели. Её нужно нажать и удерживать около десяти секунд. Роутер должен быть включен в сеть. Индикаторы мигнут и начнётся загрузка. Маршрутизатор включится с параметрами по умолчанию.
Двухдиапазонный гигабитный WiFi-маршрутизатор AC1200
Руководство по установке
Содержимое пакета
- Беспроводной маршрутизатор x 1
- Адаптер питания x 1
- Кабель Ethernet x 1
- Руководство по быстрой установке x 1

http://download.cloud.tenda.com.cn/down/app
Для включает функцию (загружает. пожалуйста, перейдите к www.tenclacrtcom корова теряет руководство Leer.
Подключите роутер
Если тип подключения вашего исходного маршрутизатора — PPPoE, и вы хотите импортировать имя пользователя и пароль PPPoE с исходного маршрутизатора на новый маршрутизатор, начните с шага 1. В противном случае начните с шага 2.
Шаг 1: Импортируйте имя пользователя и пароль PPPoE в новый маршрутизатор.

- Включите свой оригинальный и новый роутеры.
- Подключите порт WAN исходного маршрутизатора к порту LAN (порт 1, 2 или 3/IPTV) нового маршрутизатора с помощью кабеля Ethernet. Когда светодиодные индикаторы WAN и LAN перестанут быстро мигать и станут постоянно гореть, это означает, что имя пользователя и пароль PPPoE успешно импортированы на новый маршрутизатор.
- Удалите оригинальный роутер.
Шаг 2. Подключите маршрутизатор к Интернету.

- Включите новый роутер.
- Подключите порт WAN нового маршрутизатора к порту LAN вашего модема или разъему Ethernet с помощью кабеля Ethernet. Светодиодный индикатор WAN загорается.
Подключите ваше устройство к новому маршрутизатору
Вариант 1: Подключите беспроводное устройство, например смартфон, к беспроводной сети маршрутизатора. Имя WiFi по умолчанию (SSID) беспроводной сети указано на нижней панели маршрутизатора. По умолчанию пароля нет.
Вариант 2. Подключите проводное устройство, например компьютер, к порту LAN (порт 1, 2 или 3/IPTV) маршрутизатора с помощью кабеля Ethernet. Светодиодный индикатор LAN мигнет дважды.

Настройте новый роутер
Шаг 1: Войдите в web UI роутера.
Начать web браузере на устройстве, которое было подключено к новому маршрутизатору, и посетите сайт tenawifIcom.

Шаг 2: Настройте маршрутизатор (здесь для иллюстрации используется PPPoE).
Вариант 1. Если вы импортируете имя и пароль использования PPPoE из исходного маршрутизатора, задайте имя WiFi и пароль WiFi и нажмите OK, чтобы применить настройки.

Вариант 2: Если вы добавляете первый маршрутизатор дома, введите имя пользователя и пароль от вашего интернет-провайдера, а также установите имя WiFi и пароль WiFi. Нажмите OK, чтобы применить настройки.

Сделанный. Вы можете подключиться к беспроводной сети с именем и паролем WIFI, которые вы установили, или подключить компьютер к одному из портов 1, 2 и 3/IPTV маршрутизатора, используя кабель Ethernet для доступа в Интернет.![]() Tips
Tips
— Если вышеуказанная страница не появляется, обратитесь к 01 в FAQ.
— Если вы по-прежнему не можете получить доступ к Интернету после ccalloutatIcs, обратитесь к 02 в разделе часто задаваемых вопросов.
Светодиодные индикаторы

| Светодиодный индикатор | Статус | Описание |
| SYS | Продано | Система запускается или работает неправильно (во время использования). |
| моргание | Маршрутизатор работает исправно. | |
| от | Система неисправна или маршрутизатор не включается должным образом. | |
| WAN | Горит постоянно | Порт WAN подключен правильно, но данные не передаются. |
| моргание | Данные передаются через порт WAN. | |
| от | Порт WAN отключен или неправильно подключен. | |
| ЛВС | Горит постоянно | Как минимум один порт LAN (порт 1,2 или 3/IPTV) подключен правильно. |
| Мигает дважды | Новое проводное устройство подключено к маршрутизатору. | |
| от | Проводное устройство не подключено ни к одному порту LAN маршрутизатора, или проводное устройство подключено неправильно. | |
| Wi-Fi | Горит постоянно | Включена хотя бы одна из беспроводных сетей 2.4 ГГц и 5 ГГц. |
| Быстро мигает | Данные передаются по беспроводной сети. | |
| Медленно мигает | Маршрутизатор выполняет согласование WPS. | |
| от | Функция беспроводной связи отключена. |
Разъем, порты и кнопки

| Разъем / порт / кнопка | Описание |
| МОЩНОСТЬ | Разъем питания. Используйте прилагаемый адаптер питания для подключения этого разъема к источнику питания. |
| WIFI | Кнопка Wi-Fi. Нажмите кнопку, чтобы включить или отключить беспроводные сети маршрутизатора. |
| RST / WPS | Используется для запуска процесса согласования WPS или для сброса маршрутизатора. – WPS: нажмите кнопку, и светодиодный индикатор WiFi начнет медленно мигать. В течение 2 минут включите функцию WPS на другом устройстве с поддержкой WPS, чтобы установить соединение WPS. – Сброс: когда светодиодный индикатор SYS мигает, удерживайте кнопку нажатой в течение примерно 8 секунд, а затем отпустите ее, когда загорятся все светодиодные индикаторы. Роутер восстановлен до заводских настроек. |
| WAN | WAN-порт 10/100/1000 Мбит/с с автосогласованием. Используется для подключения к модему или разъему Ethernet с помощью кабеля Ethernet для доступа в Интернет. |
| 1 2 | Порт LAN 10/100/1000 Мбит/с с автосогласованием. Используется для подключения к компьютерам, коммутаторам или точкам доступа. |
| 3/IPTV | Ethernet-порт 10/100/1000 Мбит/с с автоматическим согласованием. По умолчанию это порт LAN. Когда функция IPTV включена, она может служить только портом IPTV для подключения к телевизионной приставке. |
Q1: я не могу войти в web Пользовательский интерфейс маршрутизатора после входа в tendawifi.com, что мне делать?
– Для того, чтобы: Попробуйте следующие решения:
— Если вы используете беспроводное устройство, например смартфон, попробуйте следующие решения:
• Убедитесь, что вы подключились к беспроводной сети маршрутизатора.
• Убедитесь, что вы отключили сотовую сеть (мобильные данные) устройства.
— Если вы используете проводное устройство, например компьютер, попробуйте следующие решения:
• Убедитесь, что tendawithcom правильно введен в адресную строку, а не в строку поиска web браузер.
• Убедитесь, что компьютер правильно подключен к порту 1, 2 или 3/IPTV маршрутизатора с помощью кабеля Ethernet.
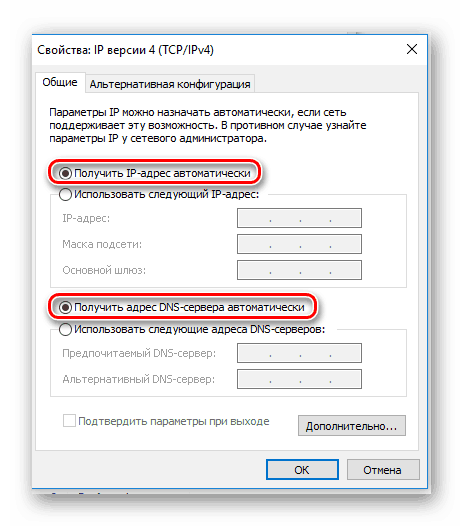
• Убедитесь, что компьютер настроен на автоматическое получение IP-адреса и автоматическое получение адреса DNS-сервера. Если проблема не устранена, попробуйте перезагрузить маршрутизатор.
02: Я не могу получить доступ к Интернету после настройки.
Что я должен делать?
-A2: сначала попробуйте следующие решения:
— Проверьте правильность подключения WAN-порта маршрутизатора к модему или разъему Ethernet (должен загореться светодиодный индикатор WAN).
— Войти в web Пользовательский интерфейс маршрутизатора и перейдите к настройкам Интернета. Следуйте инструкциям на странице, чтобы решить проблему. Если проблема не устранена, попробуйте следующие решения:
— Если ваши проводные устройства не могут получить доступ к Интернету:
• Проверьте правильность подключения вашего компьютера к портам 1, 2 или 3/IPTV.
• Убедитесь, что ваш компьютер настроен на автоматическое получение IP-адреса и автоматическое получение адреса DNS-сервера.
— Если ваши устройства с поддержкой WiFi не могут получить доступ к Интернету:
• Проверьте, подключено ли ваше беспроводное устройство к беспроводной сети маршрутизатора с установленным вами именем WiFi.
• Войдите в web пользовательского интерфейса и измените имя WiFi и пароль WiFi на странице настроек беспроводной сети. Затем повторите попытку.
Q3: Как изменить имена и пароли WiFi?
–A3: Выполните следующие действия: 0 Подключите ваше беспроводное устройство к беспроводной сети маршрутизатора или подключите компьютер к порту 1, 2 или 3/IPTV маршрутизатора с помощью кабеля Ethernet. 0 Начать web браузере и посетите сайт tenawifi.com или 192168.01, чтобы войти в web Пользовательский интерфейс роутера. 0 Перейдите на страницу настроек беспроводной сети, чтобы изменить и сохранить настройки.
04: Как перезагрузить роутер?
– A4: Попробуйте следующие методы:
Метод 1: Когда светодиодный индикатор SYS мигает, удерживайте кнопку WPS/RST в течение примерно 8 секунд и отпустите ее, когда загорятся все светодиодные индикаторы. Роутер восстановлен до заводских настроек.
Метод 2: Войти в web Пользовательский интерфейс маршрутизатора и перейдите на страницу администрирования для сброса.
A5: Почему я не могу найти сигнал WiF1 роутера?
A5: Подключите свой компьютер к портам 1, 2 или 3/IPTV маршрутизатора, чтобы войти в web UI.
Перейдите к настройкам беспроводной сети и попробуйте следующие методы:
— Убедитесь, что функция беспроводной связи включена. Если нет, включите его и сохраните настройку. Снова найдите сигнал WiFi на своем телефоне.
— Убедитесь, что функция Hide WiFi отключена. Если нет, отключите его и сохраните настройку. Снова найдите сигнал WiFi на своем телефоне.
— Убедитесь, что ваше имя WiFi не содержит китайских символов.
Q6: Почему мой телефон не может найти сигнал Win 5 ГГц?
A6: Попробуйте следующие решения:
— Если ваш смартфон может найти другую беспроводную сеть 5 ГГц, обратитесь к 05, чтобы найти решение.
— Только устройства, поддерживающие сеть 5 ГГц, могут найти беспроводную сеть 5 ГГц и подключиться к ней.
![]() Предупреждение о маркировке CE
Предупреждение о маркировке CE
Это продукт класса B. В домашних условиях этот продукт может вызывать радиопомехи, и в этом случае от пользователя может потребоваться принять соответствующие меры. Работа в диапазоне 5.15-5.25 ГГц разрешена только для использования внутри помещений. Это оборудование следует устанавливать и эксплуатировать на расстоянии не менее 20 см между устройством и вашим телом. Сетевая вилка используется в качестве устройства отключения, устройство отключения должно оставаться в рабочем состоянии.
ПРИМЕЧАНИЕ: (1) Производитель не несет ответственности за любые радио- или телевизионные помехи, вызванные несанкционированными модификациями этого оборудования. (2) Чтобы избежать ненужных радиационных помех, рекомендуется использовать экранированный кабель RJ45.
Декларация соответствия
Настоящим, SHENZHEN TENDA TECHNOLOGY CO., LTD. заявляет, что радиооборудование типа AC11 соответствует Директиве 2014/53/ЕС.
Полный текст декларации соответствия ЕС доступен по следующему адресу в Интернете: http://www.tendacn.com/en/service/download-cata-101.html
Рабочая частота: 2.4 ГГц: EU/2400-2483.5 МГц (CH1-CH13) 5 ГГц: EU/5150-5250 МГц (CH36-CH48) El RP
Мощность (макс.): 2.4 ГГц: 19.65 дБмВт 5 ГГц: 22.85 дБмВт
Версия программного обеспечения: V02.03.01.XX
Для стран ЕС / ЕАСТ этот продукт можно использовать в следующих странах:
| BE | 8G | CZ | H | t | EE | IE | EL | ES | FR | HR | IT | L | LV | |
| LT | LU | HU | w | Н.И. | AT | Пт. | L | 2] | SI | 5K | Fl | SE | UK |

Заявление FCC Это оборудование было протестировано и признано соответствующим ограничениям для цифровых устройств класса B в соответствии с частью 15 правил FCC. Эти ограничения предназначены для обеспечения разумной защиты от вредных помех при установке в жилых помещениях. Это оборудование генерирует, использует и может излучать радиочастотную энергию и, если оно не установлено и не используется в соответствии с инструкциями, может создавать вредные помехи для радиосвязи. Однако нет гарантии, что помехи не возникнут в конкретной установке. Если это оборудование создает вредные помехи для радио- или телевизионного приема, что можно определить, выключив и включив оборудование, пользователю рекомендуется попытаться устранить помехи одним или несколькими из следующих способов:
— Изменить ориентацию или местоположение приемной антенны.
— Увеличьте расстояние между оборудованием и приемником.
— подключить оборудование к розетке в цепи, отличной от той, к которой подключен приемник.
— Обратитесь за помощью к дилеру или опытному специалисту по радио / телевидению.
Устройство предназначено только для использования внутри помещений. Эксплуатация осуществляется при соблюдении следующих двух условий: (1) это устройство не должно создавать вредных помех, и (2) это устройство должно принимать любые получаемые помехи, включая помехи, которые могут вызвать нежелательную работу.
Заявление о радиационном воздействии
Это устройство соответствует пределам радиационного воздействия FCC, установленным для неконтролируемой среды, а также части 15 правил FCC RF. Это оборудование следует устанавливать и эксплуатировать на расстоянии не менее 20 см между устройством и вашим телом. Предупреждение. Любые изменения или модификации, не одобренные явным образом стороной, ответственной за соответствие требованиям, могут привести к аннулированию права пользователя на эксплуатацию данного оборудования. Этот передатчик не должен располагаться рядом или работать совместно с какой-либо другой антенной или передатчиком. Рабочая частота: 2412-2462 МГц, 5150-5250 МГц, 5725-5850 МГц
ПРИМЕЧАНИЕ: (1) Производитель не несет ответственности за любые радио- или телевизионные помехи, вызванные несанкционированными модификациями данного оборудования. (2) Во избежание ненужных помех излучения рекомендуется использовать экранированный кабель RJ45.![]()
 Внимание! Модель адаптера: BN073-Al2012E, BN073-Al2012B
Производитель: SHENZHEN HEWEISHUN NETWORK TECHNOLOGY CO., LTD.
Вход: 100–240 В переменного тока, 50/60 Гц, 0.4 А
Выход: 12V ![]() 1A
1A![]() : Том постоянного токаtage
: Том постоянного токаtage
![]() = ПЕРЕРАБОТКА Этот продукт отмечен символом селективной сортировки отходов электрического и электронного оборудования (WEEE). Это означает, что с этим продуктом необходимо обращаться в соответствии с европейской директивой 2012/19/ЕС, чтобы его можно было переработать или разобрать, чтобы свести к минимуму его воздействие на окружающую среду. Пользователь может передать свой продукт компетентной организации по переработке или продавцу, когда он покупает новое электрическое или электронное оборудование.
= ПЕРЕРАБОТКА Этот продукт отмечен символом селективной сортировки отходов электрического и электронного оборудования (WEEE). Это означает, что с этим продуктом необходимо обращаться в соответствии с европейской директивой 2012/19/ЕС, чтобы его можно было переработать или разобрать, чтобы свести к минимуму его воздействие на окружающую среду. Пользователь может передать свой продукт компетентной организации по переработке или продавцу, когда он покупает новое электрическое или электронное оборудование.
Рабочая температура: OT – 40°C Рабочая влажность: (10% – 90%) относительной влажности, без конденсации
Техническая поддержка Shenzhen Tenda Technology Co., Ltd. 6-8 этаж, башня E3, N0.1001, Zhongshanyuan Road, район Наньшань, Шэньчжэнь, Китай. 518052 Горячая линия в США: 1-800-570-5892 Бесплатный звонок: круглосуточно 7 дней в неделю Горячая линия в Гонконге: 24-00852 Международная горячая линия: +81931998 86-755 2765 (часовой пояс Китая) Webсайт: www.tendacn.com
E-mail: support@tenda.com.cn
Авторские права
@ 2020 Shenzhen Tenda Technology Co., Ltd. Все права защищены. Tenda является зарегистрированным товарным знаком, юридически принадлежащим Shenzhen Tenda Technology Co., Ltd. Другие названия брендов и продуктов, упомянутые здесь, являются товарными знаками или зарегистрированными товарными знаками соответствующих владельцев. Технические характеристики могут быть изменены без предварительного уведомления.
Документы / Ресурсы
 |
Tenda AC11 AC1200 Двухдиапазонный гигабитный Wi-Fi роутер [pdf] Руководство по установке AC11, AC1200, Двухдиапазонный гигабитный WiFi-маршрутизатор, AC11 AC1200 Двухдиапазонный гигабитный WiFi-маршрутизатор, AC1200 Двухдиапазонный гигабитный WiFi-маршрутизатор, Гигабитный WiFi-маршрутизатор, WiFi-маршрутизатор, Маршрутизатор |

- О Компании
- Контакты
- Новости компании
- Кочевые даты
- Видео
Все права защищены © 1999-2021
россия / Русский/ ru
Tenda Россия, Россия, 143441, Московская обл., Красногорский р-н, п/о Путилково, 72-й км МКАД, Бизнес-парк «Гринвуд», стр. 3, 5 этаж. Телефон

-
Contents
-
Table of Contents
-
Bookmarks
Quick Links
AC1200 Dual-band Router
User Guide
I
Related Manuals for Tenda AC11
Summary of Contents for Tenda AC11
-
Page 1
AC1200 Dual-band Router User Guide… -
Page 2
Tenda does not assume any liability that may occur due to the use or application of the product described herein. Every effort has been made in the preparation of this document to ensure accuracy of the contents, but all statements, information and recommendations in this document do not constitute the warranty of any kind, express or implied. -
Page 3
Thank you for choosing Tenda! Please read this user guide before you start. Conventions This user guide is applicable to the following routers. AC11 is used for illustration in this guide unless specified. The contained images and UI screenshots are subject to the actual products. -
Page 4
UI of the device. App User Guide It introduces how to use the Tenda WiFi App to configure and manage the router. It introduces the basic information of the device, including product overview, Data Sheet features, and specifications. -
Page 5: Table Of Contents
Get to know your device ………………….1 1.1 Overview ……………………..1 1.2 Appearance ……………………. 1 1.2.1 AC5 & AC8 …………………… 1 1.2.2 AC7 & AC11 ………………….3 1.2.3 AC6 & AC10 ………………….5 1.3 Label ………………………. 7 Web UI ……………………….8 2.1 Log in to the web UI ………………….
-
Page 6
5.1.4 Hide the WiFi network ……………….. 37 5.1.5 Connect to a hidden WiFi network …………….. 38 5.2 Guest network ……………………40 5.2.1 Overview …………………… 40 5.2.2 Set up the guest network ………………41 5.3 WiFi signal strength ………………….42 5.4 Wireless parameters ………………….43 5.5 Beamforming …………………… -
Page 7
11.3 LAN parameters ………………….. 98 11.4 Remote web-based management………………99 11.4.1 Overview ………………….99 11.4.2 Enable Tenda techical support to access the web UI ………. 100 11.5 Date & Time ……………………101 11.6 Device management …………………. 102 11.6.1 Reboot the router ………………..102 11.6.2 Reset the router ……………….. -
Page 8
Appendix ……………………….109 A.1 Configuring the computer to obtain an IPv4 address automatically…….. 109 A.1.1 Windows 10 ………………….109 A.1.2 Windows 8 ………………….112 A.1.3 Windows 7 ………………….114 A.2 Default parameters ………………….116 A.3 Acronyms and abbreviations ………………. 117… -
Page 9: Get To Know Your Device
1167 Mbps. It supports PPPoE user name and password migration for instant internet access, and IPv6 for smoother internet experience without network address translation (NAT). The wireless rate is illustrated with AC11 as an example. The highest wireless rate differs with product models. Appearance 1.2.1…
-
Page 10
LED indicator Status Description Solid on The router is starting or connected to the internet successfully. Slow blinking The router fails to connect to the internet. Fast blinking for A wired device is connected to or disconnected from the router. 3 seconds LED indicator Fast blinking for… -
Page 11: Ac7 & Ac11
1.2.2 AC7 & AC11 The Ethernet ports of AC7 are fast Ethernet ports, and those of AC11 are gigabit ports. Both products are similar in appearance. AC7 is used for illustration here. LED indicator LED indicator Status Description The router is starting.
-
Page 12
Port & button Port/Button Description Power jack. POWER Used to connect to the included power adapter. WiFi button. WIFI Used to enable/disable the WiFi network of the router. Used to start the WPS negotiation process, or to reset the router. WPS: Press the button of the router for 1 to 3 seconds. -
Page 13: Ac6 & Ac10
1.2.3 AC6 & AC10 The Ethernet ports of AC6 are fast Ethernet ports, and those of AC10 are gigabit ports. Both products are similar in appearance. AC10 is used for illustration here. LED indicator LED indicator Status Description The system is starting up, or does not work properly (during use). Solid on System LED Blinking…
-
Page 14
Port & Button Port/Button Description Power jack. POWER Used to connect to the included power adapter. 10/100/1000 Mbps auto-negotiation WAN port. (Default) Under the Router mode, connect this port to a modem or an Ethernet jack. ⚫ Under the WISP or Universal Repeater mode, DO NOT connect any device to this port. ⚫… -
Page 15: Label
The bottom label shows the login IP address, MAC address, serial number, SSID and PIN number of the router. See the following figure. Here AC11 is used for illustration. IP Address: It is the default address used to log in to the web UI of the router.
-
Page 16: Web Ui
Web UI Log in to the web UI Step 1 Connect your smartphone to the WiFi network of the router, or connect your computer to a LAN port. Step 2 Start a web browser on the device connected to the router, and visit tendawifi.com. —End…
-
Page 17: Log Out Of The Web Ui
The following page appears. If the above page doesn’t appear, try the following solutions: Ensure that the router is powered on properly. ⚫ If you are using a computer to access the page, check whether the computer obtains an IP address ⚫…
-
Page 18: Web Ui Layout
Web UI layout The web UI of the router consists of two parts, including the navigation bar and the configuration area. See the following figure. The functions and parameters shown in gray indicate that the functions are not supported or cannot be modified.
-
Page 19: Common Element
Common element The common elements used on the web UI are as follows. Common element Description It is used to save the current configurations and enable them to take effect. Cancell It is used to cancel the current configurations and restore the previous settings.
-
Page 20: Status
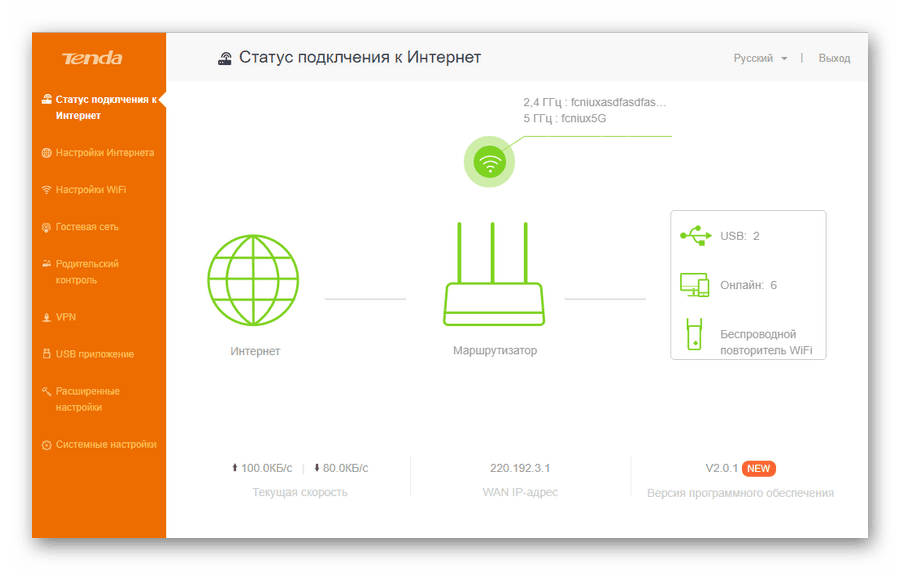
Status Log in to the web UI of the router and choose Status to enter the page. On this page, you can: View internet connection status − View online device information − View system information − View internet connection status You can view the internet connection status on this page.
-
Page 21
When a red cross and “Disconnected” are shown between the Internet and My Router, and Failed. Please confirm your user name and password and try again. is shown on the page, it indicates that the user name and password you entered were incorrect. Please navigate to the Internet Settings page to try again. -
Page 22
When a red cross and “Disconnected” are shown between the Internet and My Router, and Dial- up connection succeeded but the internet is inaccessible. Please contact your ISP. is shown on the page, contact your ISP for the problem. When a red cross and “Disconnected” are shown between the Internet and My Router, and router has obtained a valid IP address but cannot access the Internet. -
Page 23: View Online Device Information
View online device information This part shows the information of online devices, such as the number and real-time upload/download speed. To access the page, log in to the web UI of the router and choose Status > Online Devices and Real-Time Speed.
-
Page 24: View System Information
View system information This section shows the basic information of the router, including connection type, connection duration, WAN IP address and so on. To access the page, log in to the web UI of the router and choose Status > System Information. Parameter description Parameter Description…
-
Page 25: Internet Settings
Internet settings Overview On this page, you can complete the internet settings to achieve the shared internet access for multiple users. To access the page, log in to the web UI of the router and choose Internet Settings. The router supports multiple working mode, including router mode, WISP mode, universal repeater mode and AP mode.
-
Page 26: Serve As A Router
Serve as a router If you use the router for the first time or the router is restored to factory settings, follow the quick installation guide to configure the internet access. If you want to modify internet parameters or other settings, you can follow the instruction in this chapter. By default, the router works in the router mode.
-
Page 27
—End Wait a moment. When “Connected. You can access the internet.” is shown on the page, the router is connected to the internet. If you still cannot access the internet, try the following solutions: “Error: No response from the remote server. Please contact your ISP.”… -
Page 28: Set Up A Dynamic Ip Connection
4.2.2 Set up a dynamic IP connection Generally, accessing the internet through dynamic IP address is applicable in the following situations: Your ISP does not provide PPPoE user name and password, or any information − including IP address, subnet mask, default gateway and DNS server. You have a router with internet access and want to add another router.
-
Page 29: Set Up A Static Ip Connection
Wait a moment. When “Connected. You can access the internet.” is shown on the page, you can access the internet. If you still cannot access the internet, refer to 3.1 View internet connection status to find a solution. 4.2.3 Set up a static IP connection When your ISP provides you with information including IP address, subnet mask, default gateway and DNS server, you can choose this connection type to access the internet.
-
Page 30
If you still cannot access the internet, refer to 3.1 View internet connection status to find a solution. Parameter description Parameter Description IP Address When static IP address is chosen as the connection type, enter the fixed IP address Subnet Mask information provided by your ISP. -
Page 31: Serve As A Wifi Extender
Serve as a WiFi extender If you have a router which is connected to the internet and want to extend the WiFi coverage, you can refer to this chapter. Assume that the information of your existing WiFi network is as follows: WiFi name: My_home_WiFi −…
-
Page 32
If you are using a wireless device for configuration and are not directed to the Status page automatically, ensure that your wireless device is still connected to the WiFi network of the router. Step 3 Choose Internet Settings. Step 4 Set Operating Mode to WISP. -
Page 33
Step 8 Log in to the web UI of the router again, navigate to Status to ensure that Connected. You can access the internet. is shown on this page. The LAN IP address of the router will change. Please log in to the web UI of the router by visiting tendawifi.com. -
Page 34
smart phone to the WiFi network of the new router. You can find the WiFi name and password on the Wireless Settings > WiFi Name and Password page. If the network is not encrypted, you can also set a WiFi password on this page for security. If you cannot access the internet, try the following solutions: Ensure that the existing router is connected to the internet successfully. -
Page 35: Method 2: Set The Router To Universal Repeater Mode
Method 2: Set the router to universal repeater mode Configuring procedures: Step 1 Start a web browser on a device connected to the router and visit tendawifi.com to log in to the web UI of the router. If you use the router for the first time or have reset router, proceed with the following steps. If you have already configured the router, skip Step Step 2…
-
Page 36
Step 6 Enter the password of the selected WiFi network, which is TendaAC947 in this example. Step 7 Click Connect. The router will reboot to activate the settings. Step 8 Log in to the web UI of the router again, navigate to Status to ensure that Bridged in Universal Repeater mode is shown on this page. -
Page 37
To access the internet, connect your computer to a LAN port of the new router, or connect your smart phone to the WiFi network of the new router. You can find the WiFi name and password on the Wireless Settings > WiFi Name and Password page. -
Page 38: Serve As An Ap
Serve as an AP When you have a smart home gateway which only provides wired internet access, you can set the router to work in AP mode to provide wireless coverage. When the router is set to AP mode: Every physical port can be used as a LAN port. ⚫…
-
Page 39
If you are using a wireless device for configuration and are not directed to the Status page automatically, ensure that your wireless device is still connected to the WiFi network of the router. Step 3 Set the router to AP mode. Choose Internet Settings to access the configuration page. -
Page 40
Step 4 Connect the upstream device, such as a gateway, to any port of the router. —End Log in to the web UI of the router again, and navigate to Status to check if the AP mode is configured successfully as follows. If there is another network device with the same login domain name (tendawifi.com) with the router, log in to the upstream router and find the IP address obtained by the new router in the client list. -
Page 41
If you cannot access the internet, try the following solutions: Ensure that the existing router is connected to the internet successfully. ⚫ Ensure that your wireless devices are connected to the correct WiFi network of the new router. ⚫ If the computer connected to the router cannot access the internet, ensure that the computer is ⚫… -
Page 42: Wireless Settings
Wireless settings WiFi name and password 5.1.1 Overview On this page, you can configure basic WiFi parameters, such as the WiFi name and password. To access the configuration page, log in to the web UI of the router, and navigate to Wireless Settings >…
-
Page 43: Separate The 2.4 Ghz Wifi Name From 5 Ghz Wi-Fi Name
Parameter Description It specifies the encryption modes supported by the router, including: None: It indicates that a WiFi network is not encrypted and any clients can access ⚫ the network without a password. This option is not recommended as it leads to low network security.
-
Page 44: Change The Wifi Name And Wifi Password
The router supports both 2.4 GHz and 5 GHz WiFi networks. Assume that you want to change the 2.4 GHz WiFi name and password to John_Doe_2.4GHz and Tenda+Wireless24, and the 5 GHz WiFi name and password to John_Doe_5GHz and Tenda+Wireless5. Both networks adopt WPA/WPA2-PSK Mixed as the encryption type.
-
Page 45: Hide The Wifi Network
Change the WiFi Name of the 2.4 GHz network, which is John_Doe_2.4GHz in this example. Choose an Encryption Mode, which is WPA/WPA2-PSK Mixed in this example. Change the WiFi Password of the 2.4 GHz network, which is Tenda+Wireless24 in this example. Step 5 Change the parameters of the 5 GHz network.
-
Page 46: Connect To A Hidden Wifi Network
Step 3 Scroll the WiFi list to the bottom, and tap Other…. Step 4 Enter the WiFi name and password, which are John_Doe and Tenda+Wireless245 in this example. Step 5 Set security to WPA2/WPA3 (If WPA2/WPA3 is not available, choose WPA2).
-
Page 47
—End When completing the configurations, you can connect to the hidden WiFi network to access the internet. -
Page 48: Guest Network
Guest network 5.2.1 Overview In this module, you can enable/disable the guest network function and change the WiFi name and password of the guest network. A guest network can be set up with a shared bandwidth limit for visitors to access the internet and isolated from the main network.
-
Page 49: Set Up The Guest Network
Assume that the parameters you are going to set for the guest WiFi network: WiFi names for 2.4 GHz and 5 GHz networks: John_Doe and John_Doe_5G. − WiFi password for 2.4 GHz and 5 GHz networks: Tenda+245. − The shared bandwidth for guests: 2 Mbps.
-
Page 50: Wifi Signal Strength
WiFi signal strength In this module, you can adjust the wall-penetration capability and wireless coverage of the router. Not all routers support this function. The actual product prevails. To access the configuration page, log in to the web UI of the router and navigate to the Wireless Settings >…
-
Page 51: Wireless Parameters
Wireless parameters In this section, you can change network mode, wireless channel, and wireless bandwidth of 2.4 GHz and 5 GHz WiFi networks. To access the configuration page, log in to the web UI of the router, and choose Wireless Settings > Wireless Parameters.
-
Page 52
Parameter Description It specifies the operating channel of a WiFi network. By default, the wireless channel is Auto, which indicates that the router selects a channel for the Wireless WiFi network automatically. You are recommended to choose a channel with less interference Channel for better wireless transmission efficiency. -
Page 53: Beamforming
Beamforming Beamforming is a radio wave technology written into IEEE 802.11ac standard. With beamforming, the router transmits radio signal in the direction of the client, thus creating a stronger, faster and more reliable wireless communication. To access the page, log in to the web UI of the router and choose Wireless Settings > Beamforming.
-
Page 54: Wps
Press the WPS button on the router. If there is only one LED indicator, the LED indicator blinks fast, such as AC8; if the router has more than one LED indicator, the WiFi LED indicator blinks slowly, such as AC11. Step 2 Configure the WPS function on your wireless devices within 2 minutes.
-
Page 55: Connect To The Wifi Network Using The Pbc Button
Choose WPS connection. —End Wait a moment until the WPS negotiation is completed, and the phone is connected to the WiFi network. 5.6.2 Connect to the WiFi network using the PBC button Configuring procedures: Step 1 Start a web browser on a device connected to the router and visit tendawifi.com to log in to the web UI of the router.
-
Page 56
Step 2 Choose Wireless Settings > WPS. Step 3 Click PBC. Step 4 Configure the WPS function on your wireless devices within 2 minutes. Configurations on various devices may differ (Example: HUAWEI P10). Find WLAN settings on the phone. Tap , and choose WLAN settings. Choose WPS connection. -
Page 57: Connect To The Wifi Network Using The Pin Code
—End Wait until the smartphone or computer is connected to the WiFi network of the router successfully. 5.6.3 Connect to the WiFi network using the PIN code WPS connection using pin code is generally applied on a computer with a wireless adapter. Please refer to relevant adapter’s user guide for detailed instructions.
-
Page 58
Step 2 Enter the PIN code on the wireless device for connection. —End Wait until the smartphone or computer is connected to the WiFi network of the router successfully. -
Page 59: Bandwidth Control
Bandwidth control Overview By configuring this function, you can limit the upload and download speed of devices connected to the router and allocate the bandwidth reasonably. On this page you can: Set the upload and download speed limit − Add devices to the blacklist −…
-
Page 60
Parameter Description Device Name It specifies the device name of a blocked device. MAC Address It specifies the MAC address of a blocked device. Blacklisted Devices It is used to remove a blocked device from the blacklist. After being Unlimit removed from the blacklist, the device can reconnect to the router for internet access. -
Page 61: Set The Upload And Download Speed Limit
Set the upload and download speed limit Scenario: You want to allocate bandwidth equally and enable all connected devices to enjoy smooth 720p videos. Solution: Configure the bandwidth control function to meet the requirement. Configuring procedures: Step 1 Start a web browser on a device connected to the router and visit tendawifi.com to log in to the web UI of the router.
-
Page 62: Add Devices To The Blacklist
Add devices to the blacklist Add devices to the blacklist to block the internet access: Step 1 Start a web browser on a device connected to the router and visit tendawifi.com to log in to the web UI of the router. Step 2 Click Bandwidth Control.
-
Page 63: Remove Devices From The Blacklist
Remove devices from the blacklist Configuring procedures: Step 1 Start a web browser on a device connected to the router and visit tendawifi.com to log in to the web UI of the router. Step 2 Click Bandwidth Control > Blacklisted Devices. Step 3 Target the device and click Unlimit.
-
Page 64: Parental Controls
Parental controls Overview On the parental control page, you can view the information of online devices and configure their internet access options. To access the configuration page, log in to the web UI of the router, and navigate to the Parental Controls page.
-
Page 65: An Example Of Configuring Parental Controls
Parameter Description Allow access It specifies the time period when internet connection is allowed. during Repeat It specifies the dates when internet connection is allowed. It specifies the modes of website restrictions. ⚫ Disable: It specifies that all websites are accessible. Website Only Permit: It specifies that only the websites listed in Unblocked Websites ⚫…
-
Page 66
Step 7 Set Blocked Websites, which are facebook.com, twitter.com, youtube.com and instagram.com. Step 8 Click OK on the bottom of the page. —End After the configuration is completed, your daughter can access any websites except for facebook, twitter, youtube and instagram from 8:00 to 22:00 on weekends, and she cannot access the internet at all between 22:00 to 8:00. -
Page 67: Sleeping Mode
Sleeping mode LED control This page allows you to turn on and turn off the LED indicator of the router as required. To access the configuration page, log in to the web UI of the router and choose Sleeping Mode > LED Control.
-
Page 68: Wifi Schedule
WiFi schedule When the WiFi schedule function is enabled, the router disables the WiFi network during the specified period to reduce power consumption. To access the configuration page, log in to the web UI of the router, and choose Sleeping Mode > WiFi Schedule.
-
Page 69: Advanced
Advanced MAC address filter 9.1.1 Overview This function enables you to add devices to the whitelist or blacklist to enable or disable specified users to access the internet through the router. To access the configuration page, log in to the web UI of the router, and choose Advanced > MAC Address Filter.
-
Page 70
Goal: Only allow certain devices of family members to access the internet. Solution: You can configure the MAC address filter function to reach the goal. Assume the MAC address and connection status of your domestic devices are as follows. Device MAC address Status Your own phone… -
Page 71: Iptv
IPTV 9.2.1 Overview If the IPTV service is included in the broadband service you purchased, you can enable the IPTV function to enjoy both internet access and IPTV programs through the router at the same time. To access the configuration page, log in to the web UI of the router, and choose Advanced > IPTV. This function is disabled by default.
-
Page 72
Configuring procedures: Step 1 Set your router. Start a web browser on a device connected to the router and visit tendawifi.com to log in to the web UI of the router. Choose Advanced > IPTV. Set IPTV to Enable. Click OK at the bottom of the page. Click OK. -
Page 73: Ip-Mac Binding
IP-MAC binding 9.3.1 Overview Through the DHCP reservation function, specified clients can always obtain the same IP address when connecting to the router, ensuring that the router’s «Port Forwarding», «DDNS», «DMZ host» and other functions can function normally. This function takes effect only when the DHCP server function of the router is enabled.
-
Page 74
Step 4 Enter the MAC address of the client which needs a fixed IP address, which is D4:61:DA:1B:CD:89 in this example. Step 5 Click Step 6 Click OK at the bottom of the page. —End When the configuration is completed, the page is shown as below and the FTP server host always gets the same IP address when connecting to the router, which is 192.168.0.136 in this example. -
Page 75: Port Forwarding
Port forwarding 9.4.1 Overview By default, internet users cannot actively access the LAN of the router. The port forwarding function opens a port of the router, and binds the LAN server to the port using the server’s IP address and intranet service port. All access requests to the WAN port of the router will be directed to the server.
-
Page 76
Solution: You can configure the port forwarding function to reach the goal. Assume that the information of the FTP server includes: IP address: 192.168.0.136 − MAC address: D4:61:DA:1B:CD:89 − Service port: 21 − The WAN IP address of the router: 102.33.66.88. −… -
Page 77
Choose an Internal Port in the drop-down box, which is 21 in this example. Choose a protocol, which is Both in this example. Click Click OK on the bottom of the page. The port forwarding rule is added when the page is shown as below. Step 3 Assign a fixed IP address to the host where the server locates. -
Page 78
port number is not the same as the default intranet service port number, the visiting address should be: “Intranet service application layer protocol name://WAN IP address of the router:external port number”. In this example, the address is “ftp://102.33.66.88”. You can find the WAN IP address of the router View system information. -
Page 79
If you want to access the server within a LAN using a domain name, refer to the solution DDNS Port forwarding. After the configurations, if internet users still cannot access the FTP server, try the following methods: Ensure that the internal port number configured in the port forwarding function is the same as the ⚫… -
Page 80: Ddns
DDNS 9.5.1 Overview DDNS normally interworks with port forwarding, DMZ host and remote management, so that the internet users can be free from the influence of dynamic WAN IP address and access the internal server or the router’s web UI with a fixed domain name. To access the configuration page, log in to the web UI of the router, and choose Advanced >…
-
Page 81: Enable Internet Users To Access Lan Resources Using A Domain Name
9.5.2 Enable internet users to access LAN resources using a domain name Scenario: You have set up an FTP server within your LAN. Goal: Open the FTP server to internet users and enable family members who are not at home to access the resources of the FTP server from the internet with a domain name.
-
Page 82
Configuring procedures: Step 1 Start a web browser on a device connected to the router and visit tendawifi.com to log in to the web UI of the router. Step 2 Configure the DDNS function. Choose Advanced > DDNS. Set DDNS to Enable. Choose a service provider, which is oray.com in this example. -
Page 83
In this example, the address is ftp://o2849z7222.zicp.vip. Enter the user name and password to access the resources on the FTP server. After the configurations, if internet users still cannot access the FTP server, try the following methods: Ensure that the LAN port number configured in the port forwarding function is the same as the ⚫… -
Page 84: Dmz Host
DMZ host 9.6.1 Overview A DMZ host on a LAN is free from restrictions when communicating with the internet. It is useful for getting better and smoother experience in video conferences and online games. You can also set the host of a server within the LAN as a DMZ host when in need of accessing the server from the internet.
-
Page 85
The WAN IP address of the router: 102.33.66.88. − Please ensure that router obtains an IP address from the public network. This function may not work on a host with an IP address of a private network or an intranet IP address assigned by ISPs that start with 100. -
Page 86
Enter the MAC Address of the host of the FTP server, which is D4:61:DA:1B:CD:89 in this example. Click Click OK on the bottom of the page. —-End When the configurations are completed, users from the internet can access the DMZ host by visiting “Intranet service application layer protocol name://WAN IP address of the router”. -
Page 87
If you want to access the server within a LAN using a domain name, refer to the solution DDNS. After the configurations, if internet users still cannot access the FTP server, close the firewall, antivirus software and security guards on the host of the FTP server and try again. -
Page 88: Upnp
UPnP UPnP is short for Universal Plug and Play. This function enables the router open port automatically for UPnP-based programs. It is generally used for P2P programs, such as BitComet and AnyChat, and helps increase the download speed. To access the configuration page, log in to the web UI of the router, and choose Advanced > UPNP. This function is enabled by default.
-
Page 89: Firewall
Firewall The firewall function helps the router avoids the host on WAN to Ping the WAN IP address of the router to prevent from exposing itself, and meanwhile protect the router against external Ping attacks. To access the configuration page, log in to the web UI of the router, and choose Advanced > Firewall.
-
Page 90: Ipv6
IPv6 This router supports IPv4 and IPv6 dual stack protocols. In the IPv6 part, you can: Connect to the IPv6 network of ISPs − Change IPv6 LAN settings − View IPv6 connection status − 10.1 Connect to the IPv6 network of ISPs The router can access the IPv6 network of ISPs through three connection types.
-
Page 91
Parameter description Parameter Description It specifies the PPPoE user name and password provided by your ISP. PPPoE Username PPPoE Password IPv4 and IPv6 services share the same PPPoE account. When the option is selected, the LAN port of router obtains IPv6 prefix from its upstream device. -
Page 92
Configuring procedures: Step 1 Start a web browser on a device connected to the router and visit tendawifi.com to log in to the web UI of the router. Step 2 Choose IPv6. Step 3 Set the status of IPv6 to Step 4 Set the Connection Type to PPPoEv6. -
Page 93: Dhcpv6
Navigate to the IPv6 > IPv6 Status, ensure that the IPv6 WAN address is a global − unicast address. Ensure that devices connected to router obtain their IPv6 address through DHCPv6. − Consult your ISP. − 10.1.2 DHCPv6 DHCPv6 enables the router to obtain IPv6 address from DHCPv6 server to access the internet, which is applicable in the following scenarios: The ISP does not provide any PPPoEv6 user name and password.
-
Page 94: Static Ipv6
Parameter description Parameter Description When the option is selected, the LAN port of router obtains IPv6 prefix from its upstream device. IPv6 Address It is recommended to keep the default setting (Selected). If the LAN port cannot obtain Obtaining Method the PD prefix, it is because the upstream device does not support PD prefix delivery.
-
Page 95
Parameter description Parameter Description IPv6 Address It specifies the fixed IP address information provided by your ISP. Default IPv6 Gateway Primary IPv6 DNS If your ISP only provides one DNS server address, you can leave the Secondary IPv6 DNS blank. Secondary IPv6 DNS Access the internet through Static IPv6 The application scenario is shown as below. -
Page 96
Configuring procedures: Step 1 Start a web browser on a device connected to the router and visit tendawifi.com to log in to the web UI of the router. Step 2 Choose IPv6. Step 3 Set the status of IPv6 to Step 4 Set the connection type to Static IPv6. -
Page 97
If the IPv6 network test fails, try the following solutions: Ensure that you have entered the correct WAN IPv6 address. − Ensure that devices connected to router obtain their IPv6 address through DHCPv6. − Consult your ISP. −… -
Page 98: Ipv6 Lan Setup
10.2 IPv6 LAN setup To access the page, log in to the web UI of the router and choose IPv6 > IPv6 LAN Settings. You can change the IPv6 LAN settings here. Parameter description Parameter Description It specifies two types of IPv6 LAN address assignment. IPv6 LAN Auto: The router generates the IPv6 address according to its LAN IPv6 address.
-
Page 99
Parameter Description Start ID The configuration is required when the IPv6 DHCP type is set to Manual. It specifies the range of the last segment of the IPv6 address that the DHCPv6 server assigns End ID to the devices. Range: 1 to ffff. It specifies the LAN IPv6 DNS configuration method. -
Page 100: Ipv6 Status
10.3 IPv6 status To access the page, log in to the web UI of the router and choose IPv6 > IPv6 Status. You can change the IPv6 information of the router. Parameter description Parameter Description Connection Type It specifies the IPv6 connection type of the router. It specifies the WAN IPv6 address of the router.
-
Page 101: Administration
Administration 11.1 Login password To ensure network security, a login password is recommended. We recommend you set a complex login password by more types of characters, such as uppercase letters, lowercase letters, numbers and special characters. To access the login password configuration page, log in to the web UI and choose Administration > Login Password.
-
Page 102: Wan Parameters
11.2 WAN parameters 11.2.1 Change the server name and service name When the connection type is PPPoE, you may need to set the server name and service name. These parameters provided by your ISP, if any, need to be configured after you have set up your internet connection.
-
Page 103: Clone Wan Mac Address
MTU application description Application 1500 It is commonly used for non-ADSL and non-VPN dial-up connections. 1492, 1480 It is used for ADSL dial-up connections. It is the maximum value for the ping command. A packet with a larger size is 1472 fragmented.
-
Page 104: Change The Wan Speed
Step 3 Click the drop-down box of Clone MAC Address, and choose Clone Local Host MAC to copy the MAC address of the management device, or Manual to enter the desired MAC address. Step 4 Click OK on the bottom of the page. —End 11.2.4 Change the WAN Speed…
-
Page 105
Application 10 Mbps Half Duplex. It indicates that the WAN port is working at the speed of 10 10 Mbps HDX Mbps, but the port can only receive or send data packets alternately. 100 Mbps Full Duplex. It indicates that the WAN port is working at the speed of 100 100 Mbps FDX Mbps, and the port can receive and send data packets at the same time. -
Page 106: Lan Parameters
11.3 LAN parameters On this page, you can: Change the LAN IP address and subnet mask of the router. ◼ Change the DHCP server parameters of the router. ◼ The DHCP server can automatically assign IP address, subnet mask, gateway and other information to clients within the LAN.
-
Page 107: Remote Web-Based Management
Parameter Description It specifies the secondary DNS address of the router used to assign to the clients. It is Alternate DNS Server an optional field and is left blank by default. 11.4 Remote web-based management 11.4.1 Overview Generally, the web UI of the router can only be accessed on devices that are connected to the router by a LAN port or wireless connection.
-
Page 108: Enable Tenda Techical Support To Access The Web Ui
Step 3 Tick Enable of Remote Web-based Management function. Step 4 Set Management IP Address to Specific, and enter the IP address of Tenda technical support, which is 210.76.200.101 in this example. Step 5 Enter a port number used to access the router remotely.
-
Page 109: Date & Time
11.5 Date & Time If the system time of the router is incorrect, time-based functions of the router cannot take effect correctly, including the WiFi schedule, parental controls and automatic maintenance functions. The router supports the synchronization of time with the internet. when the router is connected to the internet, the router will calibrate the system time of the router.
-
Page 110: Device Management
11.6 Device management 11.6.1 Reboot the router If any parameter fails to take effect or the router does not work properly, you can try rebooting the router. Rebooting the router will disconnect all connections to the router. Reboot the router during leisure time.
-
Page 111
release it when all LED indicators light up. The router is reset. Reset the router on the web UI Step 1 Start a web browser on a device connected to the router and visit tendawifi.com to log in to the web UI of the router. Step 2 Choose Administration >… -
Page 112: Backup/Restore Configuration
11.6.3 Backup/Restore configuration In this module, you can back up the current configurations of the router to your computer. You are recommended to back up the configuration after the settings of the router are significantly changed, or the router works in a good condition. After you restore the router to factory settings or upgrade it, you can use this function to restore the configurations that have been backed up.
-
Page 113: Export System Log
Step 1 Start a web browser on a device connected to the router and visit tendawifi.com to log in to the web UI of the router. Step 2 Choose Administration > Device Management. Step 3 Click Restore. Step 4 Choose the configuration file to be restored (extension: cfg), and click Open. Step 5 Click OK in the popup window.
-
Page 114: Upgrade Firmware
11.6.5 Upgrade firmware This function enables the router to obtain the latest functions and more stable performance. The router supports online firmware upgrade and local firmware upgrade. Local upgrade In order to prevent the router from being damaged: Ensure that the firmware is applicable to the router. ⚫…
-
Page 115
Step 6 Click OK. —End Wait for a moment until the ongoing process finishes. Log in to the web UI of the router again. Choose Administration > Device Management and check whether the upgrade is successful based on the Current Firmware Version For better performance of the new firmware, you are recommended to reset the router to factory default settings and re-configure the router when the upgrading is completed. -
Page 116: Automatic Maintenance
Choose Administration > Device Management and check whether the upgrade is successful based on the Current Firmware Version For better performance of the new firmware, you are recommended to reset the router to factory default settings and re-configure the router when the upgrading is completed. 11.6.6 Automatic maintenance Automatic maintenance enables you to make the router restart regularly.
-
Page 117: Appendix
Appendix Configuring the computer to obtain an IPv4 address automatically Perform the Configuring procedures corresponding to Windows Windows 8 Windows 7 required. A computer installed with a wired network adapter is used as an example to describe the procedures. The procedures for configuring computers installed with a WiFi network adapter are similar.
-
Page 118
Step 3 Right click on the connection which is being connected, and then click Properties. Step 4 Double-click Internet Protocol Version 4 (TCP/IPv4). -
Page 119
Step 5 Select Obtain an IP address automatically and Obtain DNS server address automatically, and click OK. Step 6 Click Close in the Ethernet Properties window. —End… -
Page 120: Windows 8
A.1.2 Windows 8 Step 1 Right-click in the bottom right corner of the desktop and choose Open Network and Sharing Center. Step 2 Click Ethernet and then Properties. Step 3 Double-click Internet Protocol Version 4 (TCP/IPv4).
-
Page 121
Step 4 Select Obtain an IP address automatically and Obtain DNS server address automatically, and click OK. Step 5 Click OK in the Ethernet Properties window. —End… -
Page 122: Windows 7
A.1.3 Windows 7 Step 1 Click in the bottom right corner of the desktop and choose Open Network and Sharing Center. Step 2 Click Local Area Connection and then Properties.
-
Page 123
Step 3 Double-click Internet Protocol Version 4 (TCP/IPv4). Step 4 Select Obtain an IP address automatically and Obtain DNS server address automatically, and click OK. Step 5 Click OK in the Local Area Connection Properties window. —End… -
Page 124: Default Parameters
Default parameters Parameter Default IP address 192.168.0.1 Login Password None IP Address 192.168.0.1 Parameters Subnet Mask 255.255.255.0 DHCP Server Enabled Start IP Address 192.168.0.100 DHCP Server End IP Address 192.168.0.200 Preferred DNS Server 192.168.0.1 WiFi Name See the label on the bottom of the router WiFi Password None Wireless…
-
Page 125: Acronyms And Abbreviations
Acronyms and abbreviations Abbreviations Full spelling Advanced Encryption Standard Access Point DDNS Dynamic Domain Name Server DHCP Dynamic Host Configuration Protocol DHCPv6 Dynamic Host Configuration Protocol for IPv6 Demilitarized Zone Domain Name System Greenwich Mean Time Internet Protocol IPv4 Internet Protocol version 4 IPv6 Internet Protocol version 6 Local Area Network…
Содержание
- Настраиваем маршрутизатор Tenda
- Как зайти в настройки роутера
- Быстрая настройка
- Ручная настройка
- Дополнительные возможности
- Вопросы и ответы
Продукция китайской компании Tenda относительно недавно начала массовую экспансию на международные рынки. Поэтому, по сравнению с другими популярными брендами, она не так хорошо известна отечественному потребителю. Но благодаря сочетанию доступной цены и высокой степени инновационности, она становится все более популярной. Маршрутизаторы Tenda уже нередко встречаются в домашних сетях и сетях малых офисов. В связи с этим и вопрос о том, как их настраивать, приобретает все большую актуальность.
Простота настройки — еще один конек продукции Tenda. Единственным неудобством в этом процессе можно назвать лишь то, что не у всех моделей роутеров имеется интерфейс на русском языке. Поэтому дальнейшие пояснения будут производиться на примере роутера Tenda AC10U, где русскоязычный интерфейс присутствует.
Как зайти в настройки роутера
Процедура подключения к веб-интерфейсу роутера Tenda ничем не отличается от того, как это делается в устройствах от других производителей. Предварительно нужно выбрать место для маршрутизатора и соединить его через порт WAN с кабелем от провайдера, а через один из портов LAN — с компьютером. После этого:
- Проверить, чтобы настройки сетевого подключения на компьютере были выставлены на автоматическое получение IP-адреса.

- Открыть браузер и ввести адрес роутера. По умолчанию это 192.168.0.1.

- В окне авторизации ввести пароль
admin. Логин по умолчанию — тожеadmin. Он уже обычно прописан в верхней строке.


После этого произойдет перенаправление на страницу настроек маршрутизатора.
Быстрая настройка
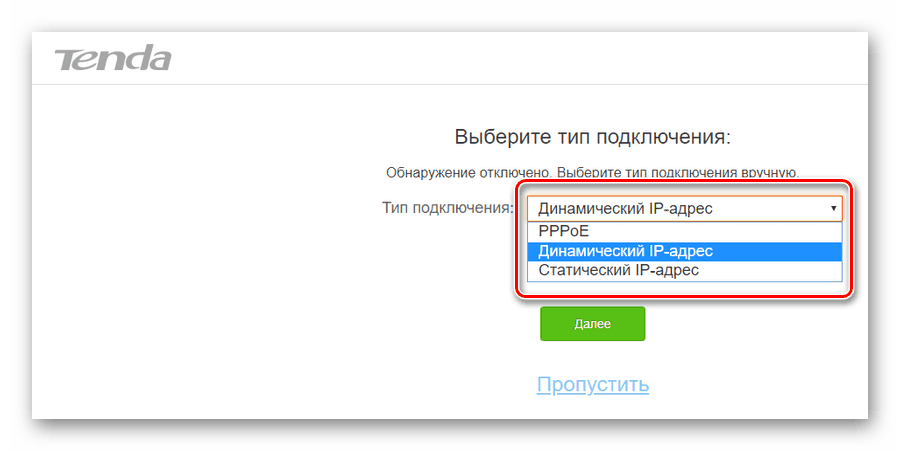
После того как юзер подключится к конфигурации роутера, автоматически открывается мастер быстрой настройки. Пользоваться им очень просто. Вначале рекомендуется проверить доступность русского языка:
Если этот вопрос не актуален — данный шаг можно пропустить. Затем:
- Нажав на кнопку «Старт», запустить мастер.

- Выбрать тип подключения к интернету согласно договору с провайдером.

- В зависимости от выбранного типа подключения, сделать следующее:

Далее будет необходимо настроить основные параметры Wi-Fi соединения. В этом же окне устанавливается пароль администратора для доступа к веб-интерфейсу роутера.
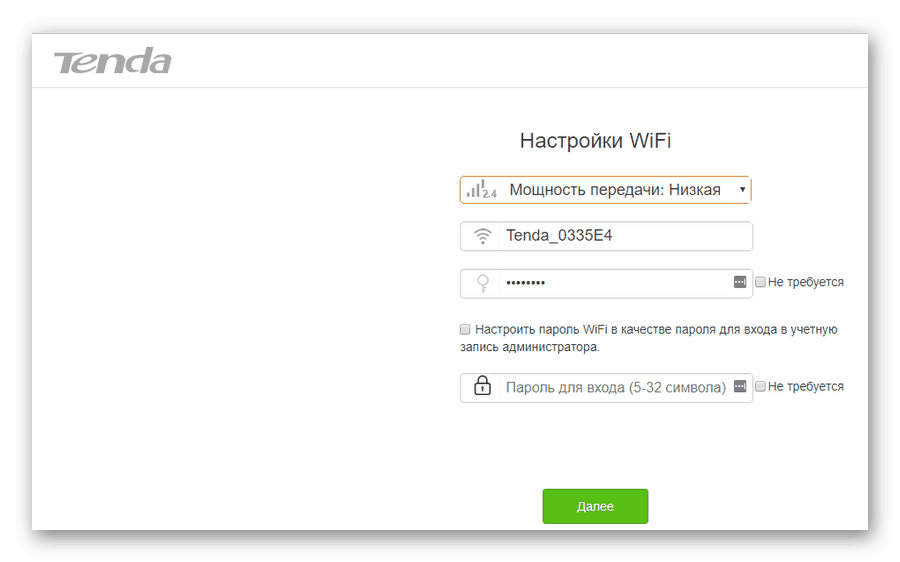
В верхнем поле пользователю предоставляется возможность отрегулировать радиус покрытия беспроводной сети, установив передатчик Wi-Fi на низкую или высокую мощность. Далее идут стандартные параметры имени сети и пароля для подключения к ней. Если отметить галочкой пункт «Не требуется», сеть будет открытой для доступа любого желающего, поэтому стоит серьезно подумать, прежде чем активировать этот параметр.
В последней строке устанавливается пароль администратора, с помощью которого в дальнейшем можно будет подключаться к конфигурации роутера. Там также имеется пункт, предлагающий установить для Wi-Fi и для администратора единый пароль, и отметка «Не требуется», позволяющая оставить доступ к веб-интерфейсу свободным. Целесообразность таких настроек, как и в предыдущем случае, весьма сомнительна и юзер должен осознавать все возможные последствия, прежде чем воспользоваться ими.
После установки параметров беспроводной сети перед пользователем откроется финальное окно мастера быстрой настройки.
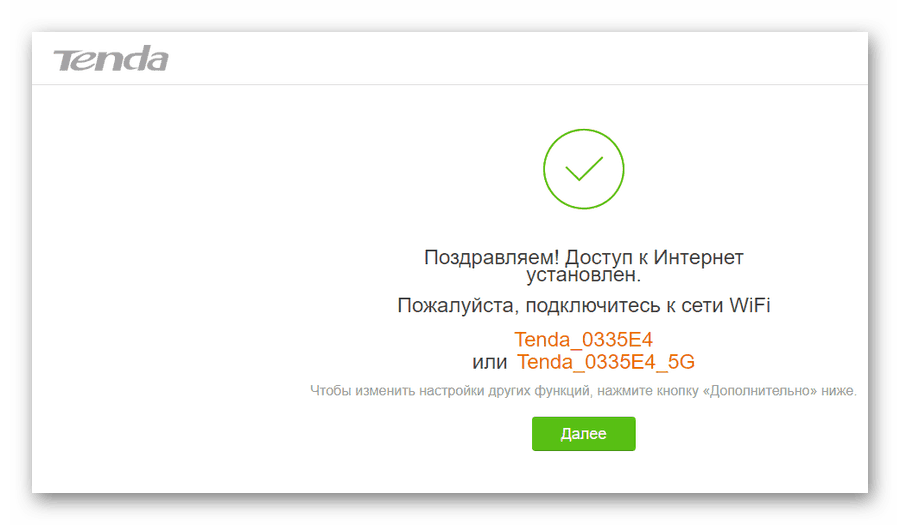
Нажатием на кнопку «Далее», осуществляется переход к установке дополнительных параметров.
Ручная настройка
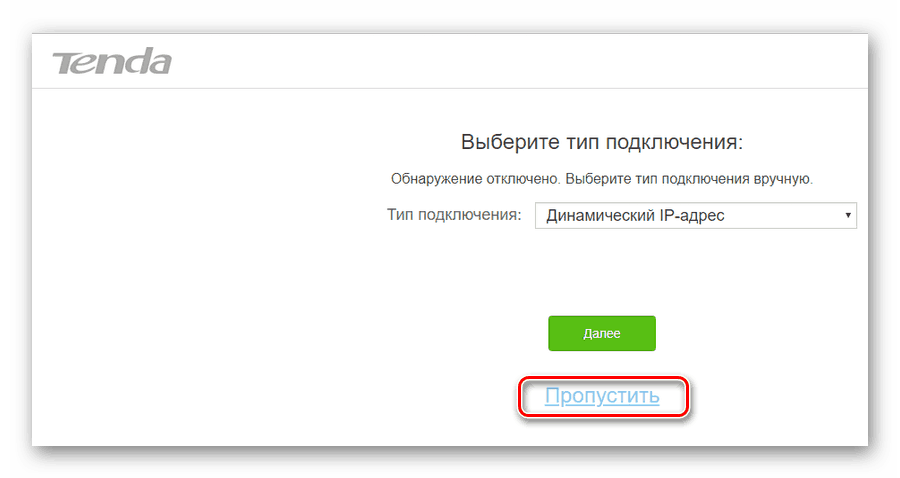
Зайти в режим ручной настройки роутера Tenda можно, лишь запустив мастер быстрой настройки и на этапе выбора типа подключения щелкнув по ссылке «Пропустить».
После этого откроется окно настройки беспроводной сети и установки пароля администратора, которое уже было описано выше. Нажав на кнопку «Далее», пользователь попадает на главную страницу конфигурации роутера:
Если говорить о ручной настройке интернет-соединения, то для юзера в ней мало смысла, так как зайдя в соответствующий раздел, можно увидеть точно такие же окна, какие появляются и во время работы мастера быстрой настройки:
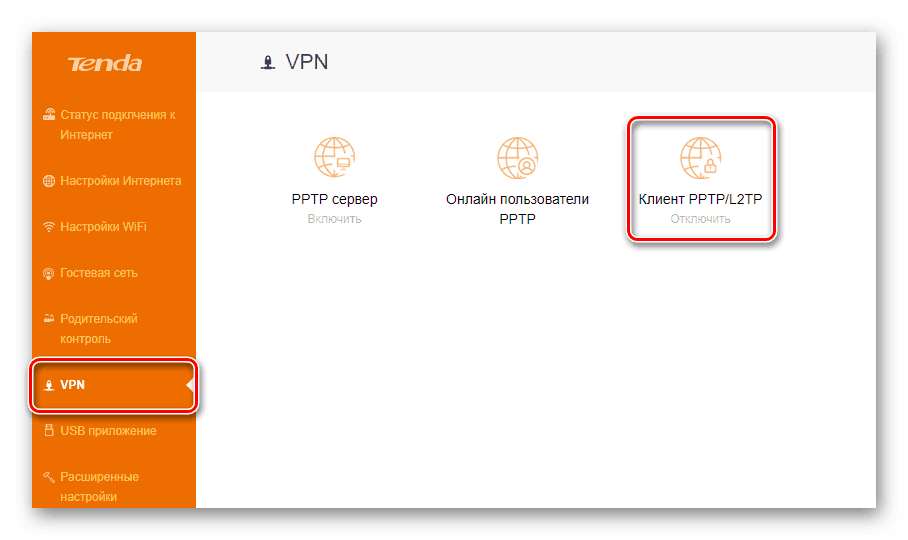
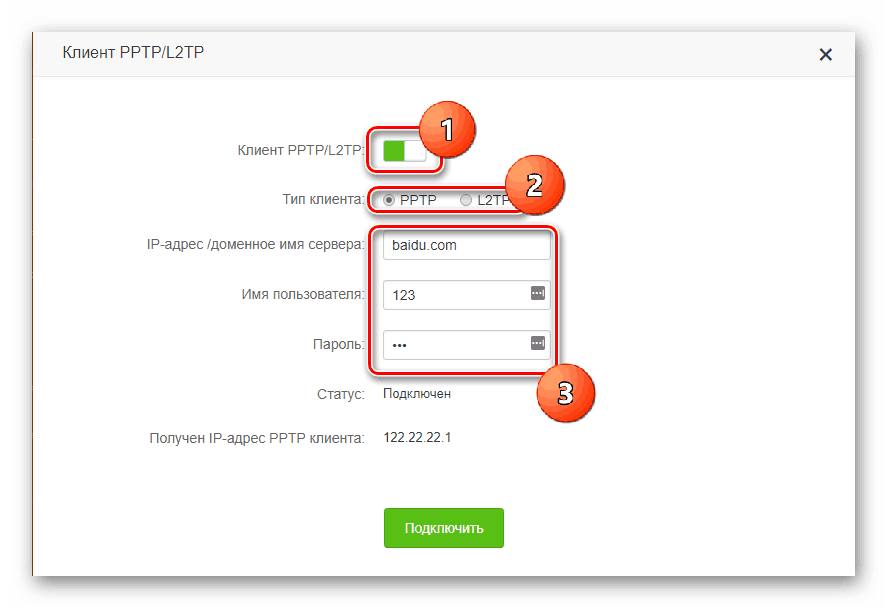
Исключением является лишь случай, когда провайдер работает через РРТР или L2TP-соединение, например, Билайн. Сконфигурировать его в режиме быстрой настройки не получится. Чтобы настроить такое соединение, нужно:
- Перейти в раздел «VPN» и там щелкнуть по пиктограмме «Клиент РРТР/L2TP».

- Убедиться, что клиент включен, выбрать тип подключения РРТР или L2TP и ввести адрес VPN-сервера, логин и пароль согласно данным полученным у провайдера.

Раздел, посвященный настройкам Wi-Fi соединения, имеет более богатое меню:
Помимо стандартных параметров, которые доступны в мастере быстрой настройки, там можно установить:
В расширенных настройках беспроводной сети присутствуют и другие интересные функции, набор которых может отличаться в зависимости от модели маршрутизатора. Все пункты меню снабжены подробными объяснениями, что делает настройку беспроводной сети максимально простой.
Дополнительные возможности
Кроме базовых функций, обеспечивающих доступ во всемирную сеть и раздачу Wi-Fi, в роутерах Тенда существует множество дополнительных возможностей, которые делают работу в сети более безопасной и комфортной. Остановимся подробнее на некоторых из них.
- Гостевая сеть. Активацией данной функции предоставляется доступ в интернет посетителям офиса, клиентам и любым посторонним людям. Этот доступ будет ограниченным и гости не смогут подключаться к ЛВС офиса. Кроме того, позволяется установить ограничения на период действия и скорость интернет-подключения гостевой сети.

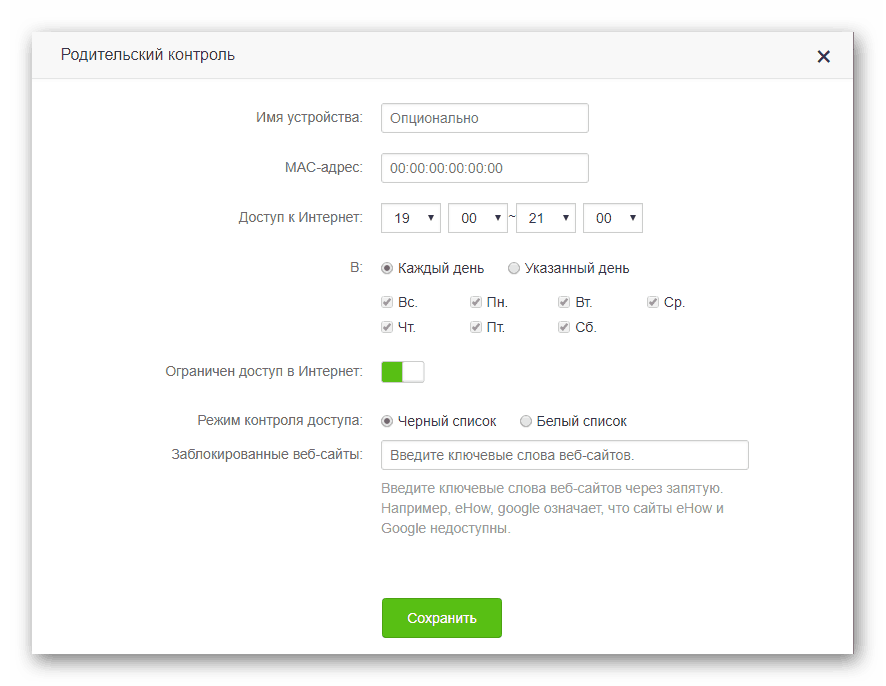
- Родительский контроль. Тем, кто хочет контролировать время нахождения ребенка за компьютером, достаточно в веб-интерфейсе роутера перейти в соответствующий раздел и нажать на кнопку «Добавить». Затем в открывшемся окне ввести МАС-адрес устройства, с которого ребенок выходит в сеть, и установить требуемые ограничения. Они задаются в режиме черного или белого списка по времени суток и дню недели. Кроме того, существует возможность включить запрет на посещение отдельных веб-ресурсов, вписав их имена в соответствующем поле.

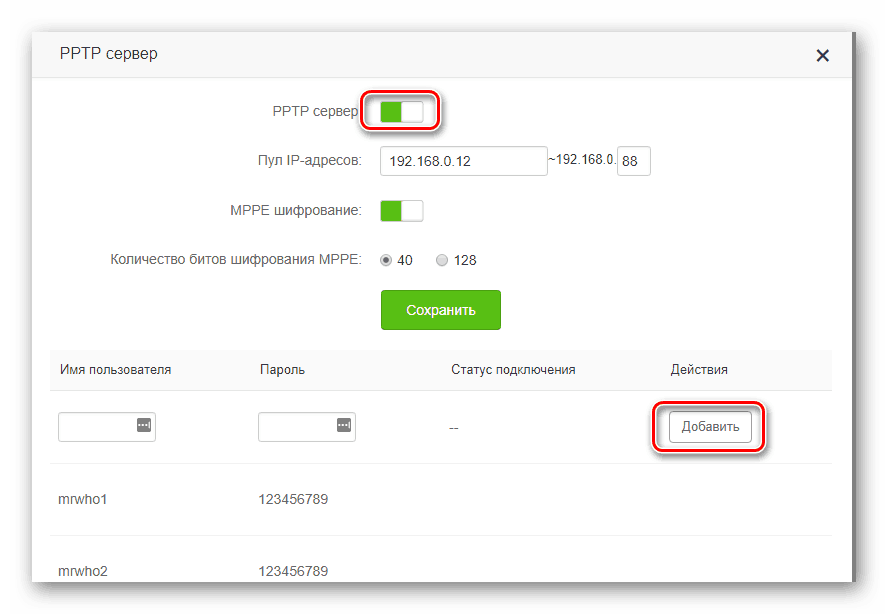
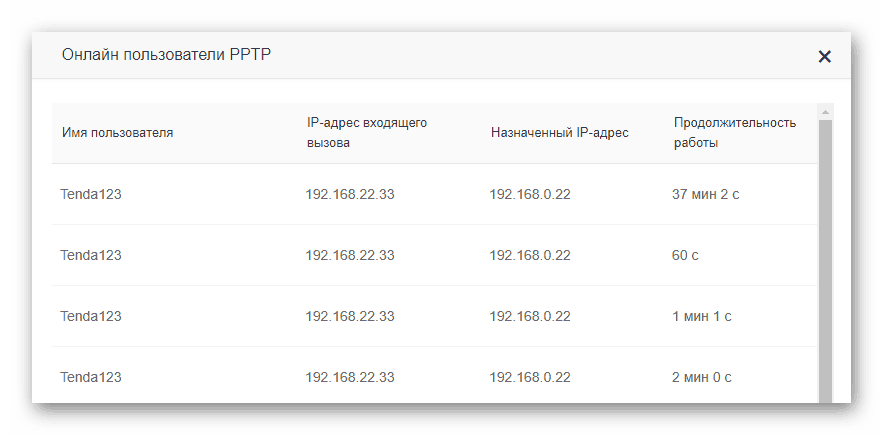
- VPN-сервер. Настройка роутера в данном качестве осуществляется в одноименном разделе конфигурации, о котором уже упоминалось при описании настройки L2TP-соединения. Чтобы активировать функцию VPN-сервера, необходимо перейти в подменю em>»РРТР сервер» и передвинуть виртуальный ползунок во включенное положение. Затем с помощью кнопки «Добавить» нужно ввести логины и пароли пользователей, которым будет разрешено задействовать данную функцию, и сохранить изменения.

После этого, перейдя по ссылке «Онлайн пользователи РРТР», можно контролировать, кто из юзеров удаленно подключился к сети через VPN и длительность его сеанса.

Описанными выше функциями перечень дополнительных возможностей, предоставляемых роутером Тенда, не ограничивается. Перейдя в раздел «Расширенные настройки», можно осуществить еще целый ряд интересных настроек. Они предельно просты и не требуют дополнительных пояснений. Более подробно можно остановиться разве что на функции Tenda App, которая является своеобразной фишкой компании.

Активировав данную функцию, можно скачать ссылку на установку мобильного приложения Tenda App через предоставленный QR-кодом. После установки этого мобильного приложения, открывается доступ к управлению роутером со своего смартфона или планшета, обойдясь таким образом без компьютера или ноутбука.
На этом обзор настройки роутера Tenda завершается. При этом следует отметить, что веб-интерфейс устройств Tenda F, FH, Tenda N несколько отличается от описанного выше. Но в целом он еще проще и пользователю, ознакомившемуся с данной статьей не составит труда произвести настройку и этих устройств.