-
SignaPay
Dejavoo Z8
Customer Support 800.944.1399 Hours: Monday – Friday 8:00AM – 6:00PM CST Print Summary ReportOn Screen HelpPower On / OffMy Favorites1. From the CREDIT SALE ENTER AMOUNT screen press F32. Scroll using the Arrow key select CORE SUMMARY REPORT press OK3. Report Prints — STOPFor Immediate assistance with all …
Dejavoo Z8 Payment Terminal, 2
-
First Data
FD130
First Data® FD130Quick Reference Guide{Restaurant}© 2013 First Data Corporation. All rights reserved. All trademarks, service marks and trade names referenced in this material are the property of their respective owners. 4400 0413 QRG-100310SE Use this function to add the tip amount to a transaction that is in the cu …
FD130 Touch terminals, 2
-
SAND
PS400 EFT-POS
SAND Information Technology System Co., Ltd NO. 22 Baoshi Garden,NO. 487 Tianlin Road, Shanghai China Tel: 86-21-24016333 Fax: 86-21-33675001 Zip:200233 PS400 EFT-POS MANUAL Sand Information Technology S …
PS400 EFT-POS Payment Terminal, 6
-
SmartPay
PAX S900
Thank you for choosing SmartpayGetting Started Guide | Smartpay PAX S900The S900 is a secure and robust mobile payment terminal. It connects to the internet via a GPRS/3G data sim card. Charging the terminalYou can charge the terminal by plugging it into the power. On mains power with the charging accessory provided …
PAX S900 Payment Terminal, 2
Recommended Documentation:
Банковский эквайринг позволяет расширить возможности обслуживания клиентов путем приема оплаты платёжными картами.
Подайте заявление на официальном сайте банка и дождитесь ответа.
Подключение самого POS-терминала к устройству и установку необходимого ПО для работы осуществляет сотрудник банка. При интеграции под OC Windows рекомендуется использовать вспомогательное ПО DUAL Connector. Работа с терминалами по протоколу INPAS реализована через службу DC Service, которая является частью Dual Connector 2.0.
Для настройки терминала:
1. Скачайте и распакуйте установщик INPAS Dual Connector;
Скачанный файл установщика можно найти в папке «Загрузки». Он может выглядеть так:

2. Запустите скачанный файл, дважды кликнув на него. Нажмите «Выборочная установка», чтобы продолжить;

3. На следующем шаге необходимо выбрать вариант Dual Connector 2.х и отключить опцию DC Proxy. При необходимости вы можете изменить путь установки. Нажмите Установить, чтобы продолжить;

4. В процессе установки будет установлена платформа Java, если ранее на компьютере она не была установлена. Нажмите Install, чтобы завершить установку Java;

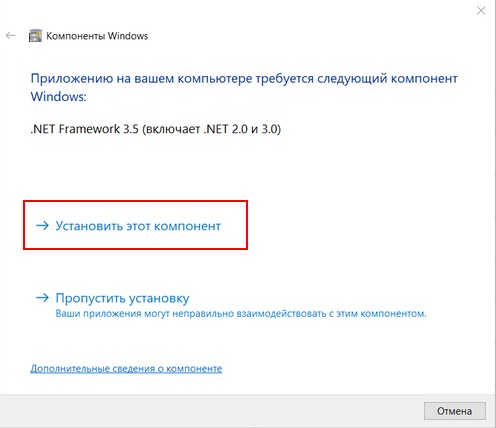
5. На некоторых версиях ОС Windows может потребоваться установка .Net Framework 3.5. Необходимо установку фреймворка выполнить не отдельно, а вкупе с Dual Connector 2.0.
Скачайте файл установки .Net Framework 3.5 по ссылке https://gbsmarket.ru/fls/net-framework-3-5-full/. Скачанный файл должен иметь имя dotnetfx35.exe. Переименуйте его, если имя отличается.
Скопируйте файл dotnetfx35.exe в ту же папку (директорию), где находится файл установки Dual Connector 2.0. В итоге это должно выглядеть, как на скриншоте;

6. После копирования файла dotnetfx35.exe, необходимо повторно запустить установщик Dual Connector 2.0. В процесс установки вы увидите сообщение о необходимости установить .Net Framework. Нажмите «Установить этот компонент»;
7. В случае успешной установки вы увидите окно с соответствующим сообщением. Включите опцию «Запустить DC Control» и нажмите «Завершить», чтобы закрыть установщик и перейти к процессу настройки подключения и проверки связи;

8. После установки Dual Connector 2.0 необходимо перезагрузить компьютер для запуска службы DC Service, которая отвечает за взаимодействие со сторонним ПО или сделать это вручную.
Для того чтобы запустить службу DC Service, откройте диспетчер задач и перейдите на вкладку «Службы».
Найдите в списке службу DC Service и запустите ее, после этого состояние службы изменится на «Выполняется»;

9. При подключении терминала через USB в приложении DC Control необходимо установить драйвера для терминала. Откройте вкладку USB Drivers, выберите производителя терминала и рекомендуемый драйвер, а затем нажмите «Установить».

10. В диспетчере устройств появится новое устройство в разделе «COM и LPT Порты». При этом терминал должен быть подключен к компьютеру.
11. Для того чтобы служба DC Service смогла соединиться с эквайринг-терминалом, необходимо указать корректные настройки подключения. Если терминал подключен через USB, необходимо указать номер COM-порта, который был создан при установке драйвера. После завершения настройки нажмите «Сохранить», чтобы изменения вступили в силу;

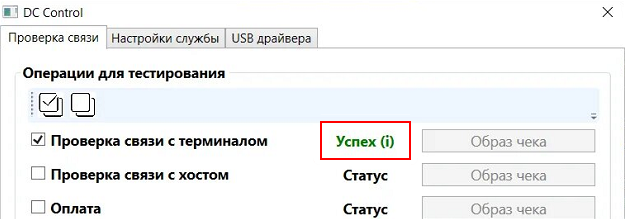
12. После завершения настройки необходимо убедиться, что связь с терминала устанавливается.
Перейдите на вкладку «Проверка связи» в приложении DC Control, включите пункт «Проверка связи с терминалом» и нажмите «Запуск».

Если все настройки выполнены верно, то вы увидите смену статуса на «Успех» в окне проверки связи
1. Откройте Меню → Настройки → Оборудование → Использовать банковский терминал и выберите ИНПАС;

2.Укажите ID терминала(номер TerminalID должен сообщить поставщик пинпада), TCP порт терминала указывается по умолчанию 9015;

3. Нажмите кнопку Сохранить. Устройство готово к работе. Можно приступать к продаже товара.
Skip to content
Join us for #PAXCON2023 from November 6th-8th
CONTENTS CHECKLIST
Please check the box contents after unpacking. If any components are missing, please contact the dealer.
| Name | Qty. |
| S300 PIN Pad | 1 |
| Power Supply | 1 |
| Power Adaper | 1 |
| Stylus Pen | 1 |
PRODUCT DESCRIPTION
The following section points out the various hardware features of the S300.
Front View:
![]()
Back View:
![]()
BASIC OPERATING INSTRUCTIONS
The following section provides basic operating instructions for the S300.
Power ON/OFF’
- Power ON: The terminal will automatically power on when connected for a power source.
- Power OFF: Disconnect the terminal from its power source to power off.
SAM Installation
- Remove SAM cover on back of terminal.
- Insert SAM card into corresponding card slot.
- Replace SAM cover.
CARD READERS
The S300 includes the following card readers:
Magnetic Stripe Card
Slide the card through the card reader slot from top to bottom or from bottom to top with the magnetic strip oriented towards the body of the device. Make sure that the card is fully inserted into the card reader while swiping the card.
IC/Smart Card Reader
Insert the card fully into the reader with the metallic contacts facing up and towards the device. Make sure that the card is fully inserted into the card reader while scanning the card.
Contactless Card Reader
The contactless card reader reads cards and devices placed roughly within an inch (2.5 mm). For best results, place as close to the reader as possible and center the card over the terminal’s screen.
CLEANING THE DEVICE
- Do not use industrial strength or abrasive cleaner.
- Do not immerse the device in water or liquid.
- Do not spray water or cleaner into EMV Card Reader or ports.
TERMINAL INSTALLATION AND USAGE TIPS
- If any cables become damaged, seek a replacement.
- Do not insert unknown materials into any port on the S300; this may cause serious damage.
- If repairs are required, please contact a professional technician instead of attempting them on your own.
- Avoid exposing the device to an excessively hot, dusty, or strong electromagnetic environment.
- Do not vibrate, shake, or drop the device.
CAUTION: Changes or modifications not expressly approved by the party responsible for compliance could void the user’s authority to operate the equipment.
Download Manual of PAX S300 Payment Terminal for Free or View it Online on All-Guides.com.

1

2

3

4

5

6

7

8

9

10

11

12

13

14

15

16

17

18

19

20

21

22

23

24

25

26

27

28

29

30

31

32

33

34

35

36

37

38

39

40

41

42

43

44

45

46

47

48

49

50

51

52

53

54

55

56

57

58

59

60

61

62

63

64

65

66

67

68

69

70

71

72

73

74

75

76

77

One Blue Hill Plaza, 16
th
Floor, PO Box 1546
Pearl River, NY 10965
1-800-PC-AMERICA, 1-800-722-6374
(Voice) 845-920-0800 (Fax) 845-920-0880
1 | P a g e
PAX S300 EMV Certified PINpad with
Heartland Payment Processing
pcAmerica now supports payment processing with EMV chip enabled cards through the PAX
S300 EMV PINpad device. This document provides step-by-step instructions on set up and usage
of the PAX S300 with Cash Register Express.
Note: The PAX S300 requires Cash Register Express version 12.70021 or higher to work and version
12.70110 or higher for serial communications support. The device must have settings pre-configured and
installed by your payment processor prior to integration with CRE.

PAX S300 -Quick Reference Guide
CREDIT SALE
Enter sale amount, press OK
Press OK again and pass terminal to customer
Customer inserts/swipes/taps card and confirms sale amount
TIP: Customer chooses: %, AMT or Skip then inputs amount and confirms total
Customer enters PIN #
Terminal will process transaction, press OK
Terminal prints merchant copy and prompts to print customer copy
REFUND
Press the TRANS to access Transaction Menu
Press 5 for Refund function
Enter Merchant Password, press OK
Enter Host Invoice # of the transaction to be refunded, press OK
Enter refund amount, press OK
Press OK again and pass terminal to customer
Customer inserts/swipes card and confirms sale amount
Menu Layout
For On/Off press yellow and [.,#*]
buttons at the same time.
Terminal will process refund, press OK
Terminal prints merchant copy and prompts to print customer copy
PRE-AUTHORIZATION
Terminal functions are arranged in
two menus: Transaction and
Administration
Press TRANS to access Transaction Menu
Press 2 for Pre-authorization function
Enter amount of pre-authorization, press OK
Scroll buttons are used to scroll
through to display menu options.
Press OK again and pass terminal to customer
Customer inserts/swipes card and confirms sale amount
Customer enters PIN #
Terminal will process transaction
Terminal prints merchant copy and prompts to print
customer copy
PRE-AUTHORIZATION COMPLETION
Press TRANS to access Transaction Menu
Press 3 for (pre-authorization) Completion function, press OK
Enter Record #, press OK
Confirm correct transaction to be completed, press OK
Enter final total amount of sale, press OK
Changing the Language
Press Menu to access
Admin menu.
Select 3 then 1
Confirm completion amount, press OK
Terminal prints merchant copy and prompts to print
FORCE CREDIT CARD TRANSACTION
Press TRANS to access Transaction Menu
Enter ADMIN password, press OK
Press OK until Merchant Language
Menu
Press 4 for Force Post, press OK
Enter Voice Authorization number, press OK
Choose Language
Customer swipes/inserts card
Enter amount of forced (manual) transaction, press OK
Customer enters PIN #
Terminal will process transaction
Terminal prints merchant copy and prompts to print customer copy
Innovative transaction processing
Press Cancel twice to return
to main screen.
PAX S90
DEBIT CARD SALE
Enter sale amount, then press OK
Press OK again and pass terminal to customer
TIP: Customer chooses % or AMT, inputs tip and confirms total amount
Customer inserts/swipes/taps card
CASHBACK: Customer chooses cashback amount, confirms fee and total
Customer chooses Checking or Savings account
Customer enters PIN #
Terminal will process transaction
Terminal prints merchant copy and prompts to print customer copy
DEBIT REFUND
Press Trans to access Transaction Menu
Press 5 for Refund function
Enter Merchant Password, press OK
Enter Host Invoice # of the transaction to be refunded, press OK
Enter refund amount, press OK
Press OK again and pass terminal to customer
Customer inserts/swipes card and confirms refund amount
Customer chooses Checking or Savings account
Customer enters PIN #
Terminal will process transaction
Terminal prints merchant copy and prompts to print customer
copy
PAX S300
Quick
Reference
Quick
Reference Guide
Guide
R E STAU R A N T
Loading & Changing the Paper
IMPORTANT NOTE: When terminal is in
training mode any Sale transactions will
not be processed. Please ensure you
turn Training OFF to begin accepting
payments.
Batch must be closed (settlement)
to be in training mode
Press Menu
Press/scroll to 8 for Training mode
Enter merchant password, press OK
Select Training YES/NO, press OK
CREDIT OR DEBIT CARD VOID
SETTLEMENT
Press Admin to access Admin Menu
Press 1 for Settlement, press OK
If you have pre-authorizations pending a pre-auth report will print
If you need to close any pending pre-authorizations:
Choose yes and follow pre-auth completion instructions
If you choose No pending pre-authorizations:
Confirm total Sales total, press OK
Confirm total Refunds, press OK
Confirm Net total press OK.
Confirm Totals match Settlement Batch, press OK
Print summary report.
Support
1-888-800-6622
Call Customer Service to:
Unlock terminal
Clear pending reversal
Clear pre-authorizations
Clear batch
To manually authorize transactions
please call the credit card issuer
09/2016
Press Trans to access Transaction Menu
Press 6 for Void function
Enter merchant password + OK
To Void last transaction press Yes
To Void other transaction press Other and enter Record #
Enter Record #, press OK
Confirm correct transaction and amount, press OK
Customer inserts/swipes card and confirms void amount
Customer enters PIN #
Terminal will process transaction
Terminal prints merchant copy and prompts to print
REPRINT RECEIPT
customer
Terminal prints merchant copy and prompts to print
Press Trans to access Transaction
customer copy
Menu Press 7 for Reprint function
To Reprint receipt for last transaction press Yes
To Reprint other transaction press Other
Enter Record # and press OK to confirm
Terminal will print receipt
Was this manual useful for you?
Yes
No
Thank you for your participation!
* Your assessment is very important for improving the workof artificial intelligence, which forms the content of this project