-
Contents
-
Table of Contents
-
Bookmarks
Quick Links
User’s Manual
N4310 Series
v1.0
Related Manuals for Thecus N4310 Series
Summary of Contents for Thecus N4310 Series
-
Page 1
User’s Manual N4310 Series v1.0… -
Page 2: Copyright And Trademark Notice
Thecus Technology Corporation is not responsible for any damage or loss of data deemed to be caused by its products. It is highly recommended that users conduct neces- sary back-up practices.
-
Page 3: Safety Warnings
�o ��T place Thecus IP storage on any uneven surfaces. ¾ �� ��T place Thecus IP storage in direct sunlight or expose it to other heat sourc� Thecus IP storage in direct sunlight or expose it to other heat sourc�…
-
Page 4: Table Of Contents
Table of Contents ™ Copyright and Trademark Notice……….ii About This Manual……………ii Limited Warranty……………..ii Safety Warnings…………….iii §Chapter 1: Introduction………….vii 1.1 Overview………………vii 1.2 Package Contents…………….vii 1.3 Front Panel ………………viii 1.4 Rear Panel………………ix §Chapter 2: Hardware Installation……….10 §Chapter 3: System Administration.
-
Page 5
3.3.13 Power Management………………..24 3.3.14 File System Check………………… 24 3.3.15 Wake�Up �n LA� (W�L)………………26 3.3.16 S�MP Support ………………….26 3.3.17 UI Login Function…………………. 27 3.3.18 �etworking……………………. 27 3.3.19 �ual Power ……………………. 28 3.4 Storage Management. -
Page 6
3.6.14 ThecusI�……………………79 3.7 Application Server…………….82 3.7.1 iTunes® Server (Built in)………………..82 3.7.2 Add�on �fficial Applications………………82 3.7.3 3rd party App Installation………………82 3.7.4 �fficial �AS Application……………….. 83 3.8 Backup…………………84 3.8.1 Rsync Target Server………………… 84 3.8.2 �ata Guard (Remote Backup). -
Page 7: Chapter 1: Introduction
The Thecus IP storage offers data mobility with a disk roaming feature that lets you swap working hard drives for use in other Thecus IP storage, securing the con- Thecus IP storage, securing the con- , securing the con- tinuity of data in the event of hardware failure.
-
Page 8: Front Panel
Front Panel • N4310: The Thecus N4310’s front panel shows the device’s indicators and hard disk install slots: Front Panel Item Description Solid blue: System ready 1. Power LED Blinking blue: Power on process Solid Red: System with error occurred Blinking white: Diagnostic mode kick-in 2.
-
Page 9: Rear Panel
Rear Panel • N4310: The N4310’s rear panel features ports and connectors. Back Panel Item Description 1. USB 3.0 Port USB 3.0 port for compatible USB devices, such as digital cameras, USB disks, and USB printers. 2. USB 3.0 Port USB 3.0 port for compatible USB devices, such as digital cameras, USB disks, and USB printers.
-
Page 10: Chapter 2: Hardware Installation
Your Thecus IP storage is designed for easy installation. To help you get started, the following chapter will help you quickly get your Thecus IP storage up and running. Please read it carefully to prevent damaging your unit during installation.
-
Page 11
Press the power button on the Front Panel to boot up the Thecus IP storage. N4310 power button Chapter 2: Hardware Installation… -
Page 12: Chapter 3: System Administration
The Thecus IP storage provides an easily accessible Web Administration Interface. With it, you can configure and monitor the Thecus IP storage anywhere on the network. Web Administration Interface Make sure your network is connected to the Internet. To access Thecus IP storage Web Administra- Thecus IP storage Web Administra- Web Administra-…
-
Page 13: Add Shortcut
Administrators can add or remove add shortcut functions to My Favorites by right clicking the mouse on the item. 3.2.2 Control Panel The Control Panel is where you will find all of the information screens and system settings of Thecus IP storage. Control Panel Item…
-
Page 14: Message Bar
3.2.3 Message Bar You can get quick information about your system status by moving your mouse over these icons. Message Bar Item Status Description Display the status of created RAID volume. Click to go to RAID Management page as RAID Management short cut.
-
Page 15: Language Selection
Information provides viewing on current Product info, System Status, Service Status and Logs. The menu bar allows you to see various aspects of the Thecus IP storage. From here, you can discov- Thecus IP storage. From here, you can discov- .
-
Page 16: System/Service Status
Hardware Information From the System Management category,, choose the Hardware Information item and the system will display the related HW details for the associated model. Below is an example of the information for a Thecus N4310. 3.3.4 Logs From the System Management category, choose the System Logs item and the System Logs screen will appear.
-
Page 17
See the following table for a detailed description of each item: System Logs Item Description Number of records to export This can be selected from a dropdown list to export the log(s) as a single file. Export log option This can be set to Auto Export or Auto Delete. The default logs displayed are for system events. -
Page 18: User Access Log
3.3.5 User Access Log The User Access Log Support section allows administrators to select the desired protocols to record user activity for. User Access Log User Access Log Item Description User access log Enable or disable the User Access Log service. Folder Select from the dropdown list where to store the user access log.
-
Page 19
To export details from the User Access Log as a single file from target folder, administrators must first select the desired number of records from the dropdown list and also select the “Auto export” option. Please choose the number of logs export and click “Apply” to activate these settings. Once (for example) 10,000 records have been reached, the log file will appear in /NAS_public/ access_log/ Chapter 3: System Administration… -
Page 20: Syslog Management
From the System Management category, choose the Date and Time item and the Date and Time screen appears. Set the desired Date, Time, and Time Zone. You can also elect to synchronize the sys- tem time on Thecus IP storage with an NTP (Network Time Protocol) Server. Chapter 3: System Administration…
-
Page 21: Otifications Configuration
NTP Service Select Disable to close the NTP server synchronization. S ync with e x ter nal NTP Select YES to allow Thecus IP storage to synchronize with an NTP server of your choice. Press Apply Server to change. 3.3.8…
-
Page 22: Scheduled �N/�Ff
From the System Management category, choose the Scheduled On/Off item and the Scheduled On/ Off screen appears. To designate a schedule for the Thecus IP storage to turn on and off, first enable the feature by checking the Enable Scheduled On/Off checkbox.
-
Page 23: Administrator Password
3.3.10 Administrator Password From the System Management category, choose the Administrator Password item and the Change Administrator Password screen appears. Enter a new password in the New Password box and con- firm your new password in the Confirm Password box. Press Apply to confirm password changes. See the following table for a detailed description of each item.
-
Page 24: Factory �Efault
From the System Management category, choose the Factory Default item and the Reset to Factory Default screen appears. Press Apply to reset Thecus IP storage to factory default settings. Resetting to factory defaults will not erase the data stored in the hard disks, but WILL revert all the settings to the factory default values 3.3.13…
-
Page 25
Once you click Next, you will see the following screen: Click Start to begin the file system check. Click Reboot to reboot the system. When the file system check is running, the system will show 20 lines of information until it is com- plete. -
Page 26: Wake�Up �N La� (W�L)
3.3.15 Wake-Up On LAN (WOL) The Thecus IP storage has the ability to be awoken from sleep mode via LAN port. From the System Management category, choose the WOL item, and the Wake-up On LAN screen ap- pears. From here, you can Enable or Disable.
-
Page 27: Ui Login Function
Display associated NIC port link status. MAC address MAC address of the network interface. Jumbo Frame Support Enable or disable Jumbo Frame Support of associate interface on your Thecus IP storage. IPv4/IPv6 Click to enable IPv4/IPv6 for TCP/IP. The default is IPv4 enabled. Mode It can choose a static IP or Dynamic IP.
-
Page 28: Ual Power
Gateway Gateway for associate NIC. Default gateway It can be chosen from a drop down list of default gateway that’s been used for the Thecus IP storage. • �nly use Jumbo Frame settings when operating in a Gigabit environment where all other clients have Jumbo Frame Setting enabled.
-
Page 29: Storage Management
Storage Management The Storage category displays the status of storage devices installed in the Thecus IP storage. It in- Thecus IP storage. It in- . It in- cludes storage configuration options such as RAID and disk settings, iSCSI and ISO Mount.
-
Page 30
You may also perform a disk SMART test; simply click “Test” to start the SMART test. The result is only for reference and the system will not take any action from its results. S2M2A2R2T2 Information Item Description Tray Number Tray the hard disk is installed in. Model Model name of the installed hard disk. -
Page 31: Rai� Management
From the Storage category, choose the RAID Management item and the RAID Management screen appears. This screen lists the RAID volumes currently residing in the Thecus IP storage. From this screen, you can get information about the status of your RAID volumes, as well as the capacities allocated for data.
-
Page 32
Using Create RAID, you can select stripe size, choose which disks are RAID disks or the Spare Disk. . RAID Configurations Item Description Disk No. Number assigned to the installed hard disks. Capacity (MB) Capacity of the installed hard disks. Model Model number of the installed hard disks. -
Page 33
If this RAID volume is meant to be the Master RAID volume, tick the Master RAID checkbox. In a multiple RAI� configuration, one RAI� volume must be designated as the Master RAI� volume. The Master RAI� volume will store all installed modules. -
Page 34
Please keep your USB disk in a safe place and also backup the encrypted key. There is no way to rescue data back if the key is lost. With RAI� volume encryption enabled, the system performance will go down. RAID volumes with encryption enabled will be displayed with a key lock symbol next to volume ID name. -
Page 35
Press “Yes” for RAID volume creation preparation. Then click “Finish” to start up with RAID volume building. Building a RAI� volume may be time consuming, depending on the size of hard drives and RAI� mode. In general, if the RAI� volume building process is up to “RAI�… -
Page 36: Raid Level
• RAID Level You can set the storage volume as JBOD, RAID 0, RAID 1, RAID 5, RAID 6, or RAID 10 (depending on model). Level JBOD RAID 0 RAID 1 RAID 5 RAID 6 RAID 10 Model N4310 …
-
Page 37: Remove Raid
• Remove RAID Click to remove the RAID volume. All user data and iSCSI created in the selected RAID volume will be deleted. To remove a RAID volume, follow the steps below: On the RAID List screen, select the RAID volume by clicking on its radio button, and click RAID Information to open the RAID Configuration screen.
-
Page 38: Expanding A Raid
Remove RAI� destroys all data in the selected RAI� volume. The data will be unrecoverable. • Expanding a RAID To expand a RAID 1, RAID 5, or RAID 6 volume, follow the steps below: Replace one of the hard drives in the RAID volume and allow it to automatically rebuild. Once rebuilt, you can continue to replace any remaining disks in the RAID array.
-
Page 39: Migrating A Raid
• Migrating a RAID Once a RAID volume has been created, you may want to move it to other physical drives or change the RAID array all together. To migrate a RAID 1, RAID 5 or RAID 6 volume, follow the steps below: From the RAID Configuration screen, click Migrate RAID.
-
Page 40
For RAID migration from R1 to R5 or R1 to R6, all services will restart and “iSCSI” volume will be in read only mode but read/write of the “user data” will be possible during the operation. The migration scheme below is based on Thecus IP Storage product’s maximum possible combination. For other model which supports less H��, please refer to the web UI while RAI�… -
Page 41: As Stacking
3.4.3 NAS Stacking The Thecus IP storage’s capacity can be expanded even further using the stackable function. With it, users can expand the capacity of their network storage systems up to 5 other stack target volumes which are located in different systems. These can be stacked through single network access like SMB or AFP acting as a share folder type.
-
Page 42
Next, input the target IP address of the stackable device and click the Discovery button. The system will list available target volumes from the inputted IP address. Once the volume IP has been set, you may need to input a valid user name and password to validate your access rights. -
Page 43
From the figure above, the Stacked Target name is “pmmeeting”. The figures below show the result before and after via Microsoft Network Access when settings have been completed. The Browseable setting is the same method used for setting a system share folder. It designates whether or not this folder will be visible through web disk. -
Page 44
The Public setting will be set the same way as the setting for the system share folder associated with the ACL permission is. If Public is set to Yes, all users will be able to access it, and ACL button will be grayed out. -
Page 45
In general, if the attached stack target device has been used by another Thecus NAS as stack target volume, then the Format item will be display and system will recognize it straight away and display its capacity. -
Page 46
D2 Stack Target ACL If the stack target Public setting set to Yes, then the ACL button will be grayed out. However, if Public setting is set to No, then the ACL button will be available for you to setup user access permissions for the stack target. -
Page 47: Is� Image Mounting
3.4.4 ISO Image Mounting The ISO Image Mounting feature is a very useful tool from the Thecus products. With it, users can mount an ISO file and have the export name display all the details from the mounted ISO file.
-
Page 48
The mounted ISO file will be located in the share folder of the same name as the file. Please refer the screen shot below. Here, the ISO file “Thecus 01” wasn’t assigned a mounting name, so the system automatically created a folder “Thecus 01”. -
Page 49: Iscsi
Click this to modify the iSCSI Target. Advanced There are 3 options (iSCSI CRC/Checksum, Max Connections, Error Recovery Level) These currently allow the Admin to Enable/Disable the Thecus IP storage associated with the iSCSI setting. Delete Click this to delete the iSCSI Target.
-
Page 50
The Create iSCSI Volume screen appears. Create iSCSI Volume Item Description iSCSI Target Volume Enable or Disable the iSCSI Target Volume. Target Name Name of the iSCSI Target. This name will be used by the Stackable NAS function to identify this ex- port share. -
Page 51: Modify Iscsi Volume
The iSCSI target volume creation will associate at least one LU� together. It can be assigned either “Thin�Provisioning” or “Instant Allocation”. Enable the iSCSI Target Volume by selecting Enable. Enter a Target Name. This will be used by the Stackable NAS function to identify this export share.
-
Page 52
• Expand Volume The iSCSI volume is now able to expand its capacity from unused space (Instant Allocation mode only). From the volume list, simply select the iSCSI volume you like to expand and click the Expand button: You will then see the dialog box displayed below. Drag the Expand Capacity bar to the size you want. Then press Expand to confirm the operation. -
Page 53
• Delete Volume To delete volume on the current RAID volume, follow the steps below: Under the Volume Allocation List, click Delete. The Space Allocation screen appears. Press YES. All data in the volume will be removed. • iSCSI Thin-Provisioning If iSCSI Thin-Provisioning is selected when creating an iSCSI target volume, virtual memory is as- iSCSI target volume, virtual memory is as- virtual memory is as-… -
Page 54
volume is available from the list. Please refer to the screenshot below. If creating an iSCSI target volume under “Instant Allocation”, physical memory is assign to the target, being limited by the available memory. For the iSCSI target volume created under “thin-provisioning”, virtual memory is assigned to the volume, which can go up to 16384GB (16TB). -
Page 55: Advance Option
• Advance Option There are 3 available options for the user to operate Thecus IP storage associated with iSCSI setting. The details are listed in the following screenshot. If the options are modified, the system will need to reboot for the changes to take place.
-
Page 56
iSCSI CRC/Checksum To enable this option, the initiator can connect with “Data digest” and “Header digest”. Max Connections The maximum number of iSCSI connections. Error Recovery Level The Error Recovery Level (ERL) is negotiated during a leading iSCSI connection login in traditional iSCSI (RFC 3720) and iSER (RFC 5046). -
Page 57: File Sharing/Privilege
If you have a Windows Active Directory Server (ADS) to handle the domain security in your network, you can simply enable the ADS support feature; the Thecus IP storage will connect with the ADS server and get all the information of the domain users and groups automatically. From the File Shar- ing/Privilege category, choose Authentication item and the ADS Support screen appears.
-
Page 58: Local User Configuration
The ��S server specified in the WA�/LA�1 configuration page should be able to correctly resolve the A�S server name. • The time zone setting between Thecus IP storage and A�S should be identical. • The system time difference between Thecus IP storage and A�S should be less than five minutes.
-
Page 59: Edit Users
• All users are automatically assigned to the ‘users’ group. • Edit Users Select an existing user from the Local User Configuration screen. Click on the Edit button, and the Local User Setting screen appears. From here, you can enter a new password and re-enter to confirm, or use the << or >> but- tons to have this user join or leave a group.
-
Page 60: Local Group Configuration
3.5.3 Local Group Configuration From the File Sharing/Privilege category, choose the Group item, and the Local Group Configuration screen appears. This screen allows you to Add, Edit, and Remove local groups. Local Group Configuration Item Description Press the Add button to add a user to the list of local groups. Press the Edit button to modify a selected group from the system.
-
Page 61: Batch Input
3.5.4 Batch Input The Thecus IP storage can also add users and groups in batch mode. This enables you to convenient- Thecus IP storage can also add users and groups in batch mode. This enables you to convenient- can also add users and groups in batch mode. This enables you to convenient- ly add numerous users and groups automatically by importing a simple comma-separated plain text (*.txt) file.
-
Page 62: Shared Folder
Shared Folder, and the Shared Folder screen ap- Shared Folder, and the Shared Folder screen ap- Folder, and the Shared Folder screen ap- pears. This screen allows you to create and configure folders on the Thecus IP storage volume. • Adding Folders On the Folder screen, press the Add button and the Add Folder screen appears.
-
Page 63: Remove Folders
you to change folder information. After entering the information, press Apply to save your changes. Modify Folder Item Description Folder Name Enter the name of the folder. Public Admit or deny public access to this folder. Press Apply to create the folder. Apply •…
-
Page 64: Nfs Share
• NFS Share To allow NFS access to the share folder, enable the NFS Service, and then set up hosts with access rights by clicking Add. NFS Share Item Description Hostname Enter the name or IP address of the host Privilege Host has either read only or writeable access to the folder.
-
Page 65
• Samba Configuration On the Folder screen, press the Samba button and the Samba Configuration screen appears. This screen allows you to setup samba configuration for associated folder. After entering the information, press Apply to activate input settings. Samba Configuration Item Description RAID ID… -
Page 66
ACL setting Item Description Deny Denies access to users or groups who are displayed in this column. Read Only Provides Read Only access to users or groups who are displayed in this column. Writable Provides Write access to users or groups who are displayed in this column. Recursive Enable to inherit the access right for all its sub-folders. -
Page 67: User Quota
3.5.6 User Quota The Thecus IP storage support local or AD users with storage quota limitations in each RAID volume of the system. To enable this function, simply click “Enable”, then apply. Next, each user can be setup a global storage quota size for each RAID volume. Simply click on “Quota Size”…
-
Page 68: User And Group Backup
3.5.7 User and Group Backup The user and group backup feature allow system users and groups to be backed up to another location and be restored if needed. Please note, when restoring previous backup users and groups, the current users and groups list will be replaced from this restore file’s contents.
-
Page 69: Ldap Support
3.5.8 LDAP Support The LDAP is another way to authenticate login users who have joined the LDAP server. You will need to fill in the LDAP server information to get LDAP authentication started. Please make sure that the LDAP server has a Samba sam and a POSIX ObjectClass account. A description of each item follows: LDAP Support Item…
-
Page 70: Network Service
• Samba is Native mode The Thecus IP storage is supported Samba mode options. In the ADS environment with “Native” mode selected then Thecus IP storage is capable to become local master position. •…
-
Page 71
The Thecus IP storage is supported recycle bin via SMB/CIFS protocol. Simply enable the “Recycle Bin” function and “Recycle Folder Display” then all of deleted files/folders will reside in the “_NAS_Recycle_(Associated RDID Volume)” share folder. For example, the system has created 2 RAID volumes with ID “RAIDpm” and ‘RAID”. Then it will have 2 recycle bin folder appear as “_NAS_Recycle_RAID”… -
Page 72: Afp (Apple �Etwork Setup)
If your AppleTalk network uses extended networks and is assigned with multiple zones, assign a zone name to the Thecus IP storage. If you do not want to assign a network zone, enter an asterisk (*) to use the default setting.
-
Page 73: Ftp
3.6.4 The Thecus IP storage can act as an FTP server, enabling users to download and upload files with their favorite FTP programs. From the Network Service category, choose the FTP item, and the FTP screen appears. You can change any of these items and press Apply to confirm your settings.
-
Page 74: Webservice
A description of each item follows: TFTP Item Description TFTP Enables TFTP Service on the Thecus IP storage. NICs Checked WAN/LAN1 or LAN2 to enable port use Port Specifies the port number of an incoming connection on a non-standard port.
-
Page 75: Upnp Service
This device supports UPnP Media server, which allows users to play media files with UPnP client (ex. DMA devices). Enable or disable Universal Plug and Play protocol. UPnP helps to find the IP address of Thecus IP storage. 3.6.8 Bonjour Setting Bonjour, is Apple Inc.
-
Page 76
3.6.10 DDNS To set up a server on the Internet and enable the users to connect to it easily, a fixed and easy-to remember host name is often required. However, if the ISP provides only dynamic IP address, the IP address of the server will change from time to time and is difficult to recall. -
Page 77: Upnp Port Management
3.6.11 UPnP Port Management One of the most convent way to allow users to access required services such as FTP, SSH, web disk and http etc. from Internet environment is setting UPnP port management. To set up this UPnP port forwarding feature, please be sure that the router has “UPnP Service” Enabled.
-
Page 78: Web�Av
3.6.13 Auto Thumbnail The auto thumbnail is a function on the GUI that can be used with the Thecus T-OnTheGo mobile application. It helps to resize a photo while when it is on written the NAS system. Enable this service allows you to speed up photo viewing on your Mobile device.
-
Page 79: Thecusi
3.6.14 ThecusID Creating a Thecus ID will give you full access to all that Thecus has to offer. After creating a Thecus ID, you‘ll receive a free* DDNS (i.e“yourname.thecuslink.com”.) You can use your DDNS to easily access your NAS, make use of the mobile T-OnTheGo™ app, and share links to files with your friends. In the future, free cloud backup of your NAS configuration file will also be provided.
-
Page 80
If you don’t have a Thecus ID, click “Register” and the screen below will appear. Please fill in the required information and click Apply. Register Thecus ID Item Description Thecus ID Input a valid email address. It will require confirmation to activate your Thecus… -
Page 81
Chapter 3: System Administration… -
Page 82: Application Server
Rescan interval in seconds. MP3 Tag Encode Specify tag encoding for MP3 files stored in Thecus IP storage. All ID3 tags will be sent out in UTF-8 for- Thecus IP storage. All ID3 tags will be sent out in UTF-8 for- .
-
Page 83: Fficial �As Application
3.7.4 Official NAS Application Click on Official NAS Application from the Application Server category, it will list the current system software and official application status. Chapter 3: System Administration…
-
Page 84: Backup
Backup There are a number of ways to back up data with the Thecus IP storage. 3.8.1 Rsync Target Server When it comes to backing up your data, it’s very important to have flexibility. Data guard provides you with many options, including full backup for all shares, custom backup for selected shares and iSCSI volume backup.
-
Page 85
Remote Data backup Item Description Add new task. Edit Edit select task. Remove Remove select task Start If associated task has been setup in schedule and like to start at once, click on to start task right away. Stop Stop the associated running task. The other scenario is if a task has been setup in real-time then clicking “Stop”… -
Page 86
Remote Data backup Item Description Full Backup The “Full backup” will have all shares from source backup to destination. It could also create shares automatically from destination if it is not existent. This only applies if the target server is the same model as the source. -
Page 87
• Full Backup Click on full backup and the setup screen appear as below. Fill in the remote target IP (Destination) and port (need to be changed only if this port is already in use). If encryption is required then enable it. Please make sure the associated target server also has encryption enabled. -
Page 88
-Fill out all the necessary details and choose your parameters Add Rsync Backup Task Item Description Task Name This is how this task will appear in the task list. Backup Type Real time: It will backup folders/files from source to target on the fly. On the other hand, any changes from the source will back up to the target right away. -
Page 89
From the task list, you can now see the newly added task “fullback01”. The backup is setup as “real time”. From the status field, “Processing” can be read as the back-up is performed on the fly. • Custom Backup The custom backup setting is similar to the full backup. The only differences are explained below: Inputs the share folder name of target sever where the source is going to backup. -
Page 90
Click “Next” and more setting appears. These are the as the settings for “Custom backup” Click “Finish” and the data guard task will appear in the list as shown below. From the task list, you can now see the newly added “customback01”. This backup is setup as “schedule”. -
Page 91
• iSCSI Backup If the source unit contains iSCSI volume, it can be backed up to the target unit as a single file. The procedure is the same as for the previous “Full backup” and “Custom backup”, select “iSCSI backup” from data guard wizard. -
Page 92
Click “Finish” and the data guard task will appear in the list as shown below. From the task list, you can now see the newly added “iscsiback”. This backup is setup as “schedule”. The source folder name will use iSCSI_+target volume name. So here it is displayed as “iSCSI_pmtest”. -
Page 93
This is a useful feature if the system configuration needs to be restored to a brand new unit. Let’s go thru the following example to see how it works. The original source system has 3 RAID volume, “RAID”, ‘RAID10” and “RAID20”, and has backed up the system configurations to the target server. -
Page 94
Click “Next” and a screen will appear as shown below. It has the listed available system configuration backup files. Select the one you want and click next. You also have the option to download the current system configuration before restoring from the backup file. After clicking “Next”, a screen will appear as shown below. -
Page 95
The backup configuration has different numbers of RAID volume than the current system (3 vs 1). It can be kept as the RAID volume mapping arranged by the system, then carry on to click “Finish”. This means that all 3 RAID volumes configuration such as share folder etc. will all restore to the current unit in the RAID volume “RAID”. -
Page 96: Ata Guard (Local Backup)
3.8.3 Data Guard (Local Backup) The Thecus product provides complete backup solution between Thecus NAS systems as well as between folders of local systems. Remote Data backup Item Description Add a new task. Edit Edit selected task. Remove Remove selected task.
-
Page 97
Local Data backup Item Description Import This is associated with external devices which are added to the system such as USB disk. You can select a folder from an external device and import it to the NAS as a share folder. Copy Copy folder to folder or NAS folder to external device or external device to NAS folder. -
Page 98
imported them to the NAS under the RAID60volume. Next, please select the path from the drop down list to save the log. Also, give the access permission whether these selected folders will be “Public” or not after the import. Read the notes and check the “Accept” box for confi rmation. If a share name already exists for the im- s and check the “Accept”… -
Page 99
Now, you will see in the data guard task list that you have created a task . And that the system has created 2 new share folders from the task just created. Copy: click on “Copy” and this screen appears. 3 different options can be selected, folder to folder, folder to external device or external device to folder. -
Page 100
• Folder to Folder • Folder to external device • External device to Folder Chapter 3: System Administration… -
Page 101
Let’s take “Folder to External device” as an example. In the source pane, select the desired RAID volume and its associated folder list will appear; same method in the target pane for the associated external device. Select a folder from the source pane which is going to be copy over, then select in target pane it’s destination. -
Page 102
Read the notes and check the “Accept” box for confirmation. Now, you will see in the data guard task list that you have created a task. Realtime Backup: click on “Realtime Backup” and this screen will appear. 2 different options can be selected from, folder to folder, folder to external device. Let’s take “Folder to Folder”… -
Page 103
Next, fill in the task name and related settings. Chapter 3: System Administration… -
Page 104
Realtime Backup Item Description Task Name Input the task name, length limited to 4~12 characters. Sync Type Select “Incremental” or “Synchronize”. Backup Symbolic Link Choose to backup symbolic link which is included in the source. Filter The filter can be set to be executed only in certain circumstances. If none of them has been selected, it will do the real time backup from the source to the destination in full. -
Page 105
Schedule Backup: click on “Schedule Backup” and this screen will. 2 different choices can be selected from, folder to folder, folder to external device. Let’s use “Folder to External device” backup for our example. From the NAS volume RAID in the Source pane select the folder “NAS_Public”, then in the target pane select the external USB disk folder “N10850”. -
Page 106
Read the notes and check the “Accept” box for confirmation. Now, you will see in the data guard task list that you have created a task. iSCSI Backup: click on “iSCSI Backup” and screen appear as below. It can be backup to two different storage pool, iSCSI to folder, iSCSI to external device. Chapter 3: System Administration… -
Page 107
Let’s take example to have “iSCSI to Folder” backup, from existed iSCSI volume “iSCSI_iscsiv502” to volume RAID folder “andy_local”. The source pane listed “iSCSI_iscsiv502” and “iSCSI_iscsiv50” where are iscsi volume has existed in this system with name “iSCSI_+iscsi target volume name”. Next, provide the task name and where the task log will store. -
Page 108
task list will have created task listed. To start the iSCSI volume backup, select the task and click “Start” from task bar. Once “Start” click, the associated iSCSI volume will not allow to I/O during backup processing. And the task status will change to ‘Processing”. States change to “Finish”… -
Page 109
iSCSI Import: click on “iSCSI Import” and screen appear as below. It can be imported from two different storage pools, folder to iSCSI or external device to iSCSI. It is depend on where iSCSI volume has backup to. Let’s take example to import “RAID folder to iSCSI” which is the iSCSI volume we have backup earlier to RAID volume folder andy_local than import to volume RAID. -
Page 110: Acl Backup And Restore
Next, provide where the task log will store. Reading the note and check on “Accept” for confirmation. Now, from the data guard task list will have created task listed. 3.8.4 ACL Backup and Restore The ACL backup and restore feature enables the system ACL (Access Control List) to be backed up on the RAID volume based to other location and restored if needed.
-
Page 111
For the ACL restore, it can be restored in the same system or used in another unit. For example, let’s restore the ACL backup file to another unit. This unit has a RAID volume “RAIDpm” with share folders as listed on right hand screen shot. After inputting the ACL backup file and clicking the “Next”… -
Page 112: Ata Burn
3.8.5 Data Burn The data burn is featured to support 3 different modes of data burning for files/folders to and from image file and physical optical disk. The 3 different modes are “Write Files/folders to disc”, “Write image to disk” and “Write files/folders to image”.
-
Page 113
Select from the installed USB burning devices. Please click the “detect disc” button to check the status once the disc is inserted. Select the burning speed from the drop down list. Select whether disc data verification is required or not. Click “Burn”… -
Page 114
Select the ISO file. Select from the installed USB burning devices. Please click the “detect disc” button to check the status once the disc is inserted. Select the burning speed from the drop down list. Select whether disc data verification is required or not. Click “Burn”… -
Page 115: External Devices
The Thecus IP storage supports printer server and UPS via USB interface. The integrated Print Server allows you to share a single USB printer with all users on the network. For the UPS, Thecus IP storage support via USB, Series and Network interface. The following section shows you how.
-
Page 116: Windows Xp Sp2
Click Next. Click Finish. �ote that if a multi�function (all�in�one) printer is attached to the Thecus IP Storage, usually only the printing and fax functions will work. �ther features, such as scanning, will probably not function.
-
Page 117
Select Add a network, wireless or Bluetooth printer. Select The printer that I want isn’t listed. You can press The printer that I want isn’t listed to go into next page without waiting for Searching for available printers to finish. Click Select a shared printer by name. -
Page 118
Type http://<Thecus_NAS>:631/printers/usb-printer in the box, where <Thecus_NAS_IP> is the IP address of Thecus IP storage. Click Next. Select or install a printer and then press OK. Windows will attempt to connect to the printer. You can choose to set this printer as the default printer by checking the Set as the default printer box. -
Page 119
Done! Click Finish. Chapter 3: System Administration… -
Page 120: Uninterrupted Power Source
3.9.2 Uninterrupted Power Source From the External Devices menu, choose the Uninterrupted Power Source item and the UPS Setting screen appears. Make any changes you wish, and press Apply to confirm changes. See the following table for a detailed description of each item. UPS Setting Item Description…
-
Page 121: Appendix A: Customer Support
Appendix A: Customer Support ™ If you are still experiencing problems with your Thecus IP storage, or require a Return Merchandise Authorization (RMA), feel free to contact technical support via our Technical Support Website: http://www.thecus.com/sp_tech.php Customers in the US should send all technical support enquiries to the US contact window included in the following web page: http://www.thecus.com/sp_tech.php…
-
Page 122: Appendix B: Raid Basics
• RAID Levels The Thecus IP storage supports standard RAID levels 0, 1, 5, 6, 10 and JBOD. You choose a RAID level when you create a system volume. The factors for selecting a RAID level are: Š…
-
Page 123
RAID. Since multiple disks are accessed at the same time, disk strip- ing enhances performance. The stripes can vary in size. Disk Usage When all disks are of the same size, and used in RAID, Thecus IP storage disk usage percentage is listed below: RAID Level… -
Page 124: Appendix C: Active Directory Basics
ADS lets Thecus IP storage integrate itself with the existing ADS in an office environment. This means the Thecus IP storage is able to recognize your office users and passwords on the ADS server. Other major benefits ADS support provides include: Easy integration of Thecus IP storage into the existing office IT infrastructure The Thecus IP storage acts as a member of the ADS.
-
Page 125: Appendix D: Licensing Information
Public License. Please see THE GNU General Public License for extra terms and conditions of this license. Source Code Availability Thecus Technology Corp. has exposed the full source code of the GPL licensed software. For more information on how you can obtain our source code, please visit our web site, http://www.thecus. com.
-
Page 126
• CGIC License Terms Basic License CGIC, copyright 1996, 1997, 1998, 1999, 2000, 2001, 2002, 2003, 2004 by Thomas Boutell and Boutell. Com, Inc. Permission is granted to use CGIC in any application, commercial or noncommercial, at no cost. HOWEVER, this copyright paragraph must appear on a “credits” page accessible in the public online and offline documentation of the program. -
Page 127
the recipients all the rights that you have. You must make sure that they, too, receive or can get the source code. And you must show them these terms so they know their rights. We protect your rights with two steps: (1) copyright the software, and (2) offer you this license which gives you legal permission to copy, distribute and/or modify the software. -
Page 128
warranty protection in exchange for a fee. You may modify your copy or copies of the Program or any portion of it, thus forming a work based on the Program, and copy and distribute such modifications or work under the terms of Sec- tion 1 above, provided that you also meet all of these conditions: You must cause the modified files to carry prominent notices stating that you changed the files and the date of any change. -
Page 129
ware interchange; or, Accompany it with a written offer, valid for at least three years, to give any third party, for a charge no more than your cost of physically performing source distribution, a complete machine- readable copy of the corresponding source code, to be distributed under the terms of Sections 1 and 2 above on a medium customarily used for software interchange;… -
Page 130
If, as a consequence of a court judgment or allegation of patent infringement or for any other reason (not limited to patent issues), conditions are imposed on you (whether by court order, agree- ment or otherwise) that contradict the conditions of this License, they do not excuse you from the conditions of this License. -
Page 131
rivatives of our free software and of promoting the sharing and reuse of software generally. NO WARRANTY BECAUSE THE PROGRAM IS LICENSED FREE OF CHARGE, THERE IS NO WARRANTY FOR THE PROGRAM, TO THE EXTENT PERMITTED BY APPLICABLE LAW. EXCEPT WHEN OTHERWISE STATED IN WRITING THE COPYRIGHT HOLDERS AND/OR OTHER PARTIES PROVIDE THE PROGRAM «AS IS»…
В представленном списке руководства для конкретной модели Жесткого диска или сетевого накопителя — Thecus N4310. Вы можете скачать инструкции к себе на компьютер или просмотреть онлайн на страницах сайта бесплатно или распечатать.
В случае если инструкция на русском не полная или нужна дополнительная информация по этому устройству, если вам нужны
дополнительные файлы: драйвера, дополнительное руководство пользователя (производители зачастую для каждого
продукта делают несколько различных документов технической помощи и руководств), свежая версия прошивки, то
вы можете задать вопрос администраторам или всем пользователям сайта, все постараются оперативно отреагировать
на ваш запрос и как можно быстрее помочь. Ваше устройство имеет характеристики:Линейка: N4310, Назначение: сетевой накопитель (NAS), Количество мест под HDD: 4, Форм-фактор мест под HDD: 3.5″, Внутренний интерфейс HDD: SATA, Возможность горячей замены HDD: есть, полные характеристики смотрите в следующей вкладке.
Для многих товаров, для работы с Thecus N4310 могут понадобиться различные дополнительные файлы: драйвера, патчи, обновления, программы установки. Вы можете скачать онлайн эти файлы для конкретнй модели Thecus N4310 или добавить свои для бесплатного скачивания другим посетителями.
Если вы не нашли файлов и документов для этой модели то можете посмотреть интсрукции для похожих товаров и моделей, так как они зачастую отличаются небольшим изменениями и взаимодополняемы.
Обязательно напишите несколько слов о преобретенном вами товаре, чтобы каждый мог ознакомиться с вашим отзывом или вопросом. Проявляйте активность что как можно бльше людей смогли узнать мнение настоящих людей которые уже пользовались Thecus N4310.
Основные и самые важные характеристики модели собраны из надежных источников и по характеристикам можно найти похожие модели.
| Общие характеристики | |
| Линейка | N4310 |
| Назначение | сетевой накопитель (NAS) |
| Количество мест под HDD | 4 |
| Форм-фактор мест под HDD | 3.5″ |
| Внутренний интерфейс HDD | SATA |
| Возможность горячей замены HDD | есть |
| Поддержка файловых систем на внутренних дисках | EXT4 |
| Режимы работы | RAID 0, RAID 1, RAID 10, RAID 5, RAID 6 |
| Интерфейс | |
| Подключение | Ethernet |
| Тип контроллера Ethernet | 1000 Мбит/с |
| Процессор и память | |
| Частота процессора | 1000 МГц |
| Тип оперативной памяти | DDR3 |
| Размер оперативной памяти | 1 Гб |
| Механика/Надежность | |
| Рабочая температура | 5 — 40 ?C |
| Сетевые функции | |
| Менеджеры закачек | BitTorrent |
| UPnP/DLNA-сервер | есть |
| FTP-сервер | есть |
| Принт-сервер | есть |
| Поддержка сетевого протокола iSCSI | есть |
| Дополнительно | |
| Общее количество разъемов USB Type A | 2 |
| Количество разъемов USB 3.0 Type A | 2 |
| Кнопка резервного копирования | есть |
| Шифрование данных | есть |
| Адаптер питания | есть |
| Размеры (ШхВхД) | 170x135x217 мм |
| Вес | 3000 г |
| Дополнительная информация | контроль и удаленное управление с T-OnTheGo; |
Здесь представлен список самых частых и распространенных поломок и неисправностей у Жестких дисков и сетевых накопителей. Если у вас такая поломка то вам повезло, это типовая неисправность для Thecus N4310 и вы можете задать вопрос о том как ее устранить и вам быстро ответят или же прочитайте в вопросах и ответах ниже.
| Название поломки | Описание поломки | Действие |
|---|---|---|
| Нарушение Работы Служебной Информации | ||
| Нарушение Работы Файловой Системы | ||
| Отказ Контроллера Hdd Или Неисправность Гермоблока | ||
| Нет Соединения С Ds | При Подключении К Ds С Любого Устройства Выдается Сообщение Об Отсутствии Соединения, Ping Не Проходит |
В нашей базе сейчас зарегестрированно 18 353 сервиса в 513 города России, Беларусии, Казахстана и Украины.
инструкцияThecus N4310

Getting Started
Install, Connect & Use Your Intelligent NAS
2014/7
Посмотреть инструкция для Thecus N4310 бесплатно. Руководство относится к категории сервера, 1 человек(а) дали ему среднюю оценку 7.3. Руководство доступно на следующих языках: английский. У вас есть вопрос о Thecus N4310 или вам нужна помощь? Задайте свой вопрос здесь
- Self-RAID Creation and Drive Capacity
- Quick Installation Guide
- Install Intelligent NAS
- After Self-RAID Creation, Set Up Your NAS in 2 Steps
- Starting to Use Intelligent NAS

Главная
| Thecus | |
| N4310 | N4310 | |
| сервер | |
| 4712505094014, 884956004011, 8849560040116, 0884956004011, 4058154112090, 0654166479639, 0747586543476 | |
| английский | |
| Руководство пользователя (PDF) |
Устройства хранения данных
| Дисковые накопители установлены | Нет |
| Тип установленного накопителя | — |
| Количество установленных накопителей | 0 |
| Общий объем установленной памяти | 0 TB |
| Поддерживаемые типы накопителей | HDD & SSD |
| Количество поддерживаемых дисков памяти | 4 |
| Максимальный поддерживаемый объем хранения | 0 TB |
| Интерфейс носителя памяти | SATA |
| Емкость накопителя | 0 GB |
| Размеры носителя памяти | 3.5 « |
| Поддержка RAID | Да |
| Уровни RAID | 0, 1,5, 6,10, JBOD |
| Отсеки накопителей с поддержкой hot-swap | Да |
Процессор
| Семейство процессоров | AMCC PowerPC |
| Тактовая частота процессора | 1 GHz |
| Модель процессора | APM86491RDK |
Память
| Оперативная память | 1 GB |
| Тип внутренней памяти | DDR3 |
Сеть
| Подключение Ethernet | Да |
| Wi-Fi | Нет |
| DHCP клиент | — |
| DHCP сервер | — |
| Поддержка iSCSI | Да |
Порты и интерфейсы
| Количество портов Ethernet LAN ( RJ-45) | 1 |
| Количество портов USB 2.0 | 0 |
| Количество портов USB 3.2 Gen 1 (3.1 Gen 1) Type-A | 2 |
| Количество оптоволоконных портов | 0 |
Дизайн
| Тип корпуса | Mini Tower |
| Цвет товара | Черный |
| Тип охлаждения | — |
| Материал корпуса | — |
Производительность
| Тип | NAS |
| Класс устройства | Малый и средний бизнес |
| Функция резервного копирования | Да |
| Многоязычная поддержка | Да |
| Алгоритмы шифрования данных | 128-bit AES, AES |
| Кнопка сброса установок | Да |
| Встроенный Bittorrent клиент | Да |
программное обеспечение
| Установленная операционная система | — |
| Поддерживаемые операционные системы Windows | Да |
| Поддерживаемые операционные системы Mac | Да |
| Поддерживаемые серверные операционные системы | Windows Home Server 2011, Windows MultiPoint Server 2011, Windows SBS 2011 Essentials, Windows SBS 2011 Standard, Windows Server 2003, Windows Server 2003 R2, Windows Server 2003 x64, Windows Server 2008, Windows Server 2008 R2, Windows Server 2008 R2 x64, Windows Server 2008 x64, Windows Server 2012, Windows Server 2012 R2, Windows Server 2012 R2 x64, Windows Server 2012 x64, Windows Small Business Server 2011 |
| Другие поддерживаемые операционные системы | Android |
Энергопитание
| Мощность блока питания | 60 W |
| Потребляемая мощность (в обычном режиме) | 29.5 W |
| Потребление энергии в спящем режиме | 10 W |
Вес и размеры
| Ширина | 170 mm |
| Глубина | 217 mm |
| Высота | 135 mm |
| Вес | 3000 g |
Условия эксплуатации
| Диапазон температур при эксплуатации | 5 — 40 °C |
| Диапазон относительной влажности при эксплуатации | 0 — 80 % |
Технические характеристики
| Сертификаты устойчивого развития | RoHS |
Сертификаты
| Сертификация | CE/FCC/C-Tick/VCCI/BSMI |
показать больше
Не можете найти ответ на свой вопрос в руководстве? Вы можете найти ответ на свой вопрос ниже, в разделе часто задаваемых вопросов о Thecus N4310.
Какие сертификаты Thecus N4310 имеет?
От чего зависит скорость загрузки в Интернете?
Какая высота Thecus N4310?
Какая ширина Thecus N4310?
Какая толщина Thecus N4310?
Инструкция Thecus N4310 доступно в русский?
Не нашли свой вопрос? Задайте свой вопрос здесь
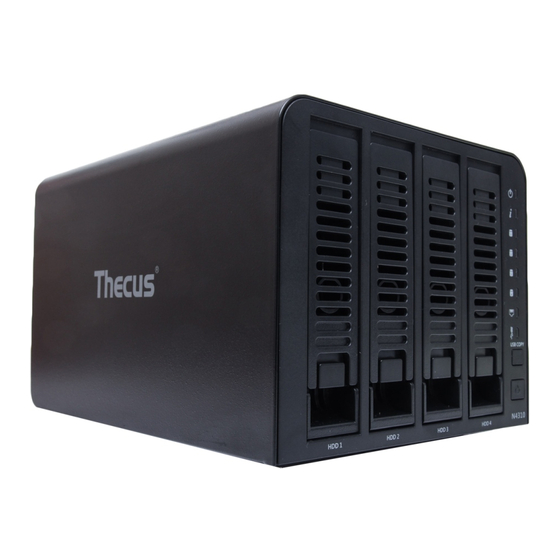
Тему облачных хранилищ мы затрагиваем в этом году довольно часто, мы постарались охватить и решения, нацеленные на домашнего пользователя и системы, способные обеспечить потребности предприятия. Подвести черту по уходящему году нам поможет новинка Thecus N4310, представленная осенью текущего года.

Внимательные читатели помнят наш тест модели Thecus N2310, ориентированной на домашнее использование. Тестируемый сегодня NAS стал старшим братом этого решения, удвоив количество посадочных мест, обновив начинку и практически избавившись от пластика.
Видео обзор Thecus N4310
Доступность Thecus N4310

На момент проведения тестирования средняя стоимость Thecus N4310, по данным сервиса Яндекс.Маркет, составляет 33035 рублей.
Комплектация
Поставляется Thecus N4310 в массивной упаковке со светлым оформлением, предусмотрена ручка для транспортировки. На гранях коробки выведена техническая информация и фотография устройства.
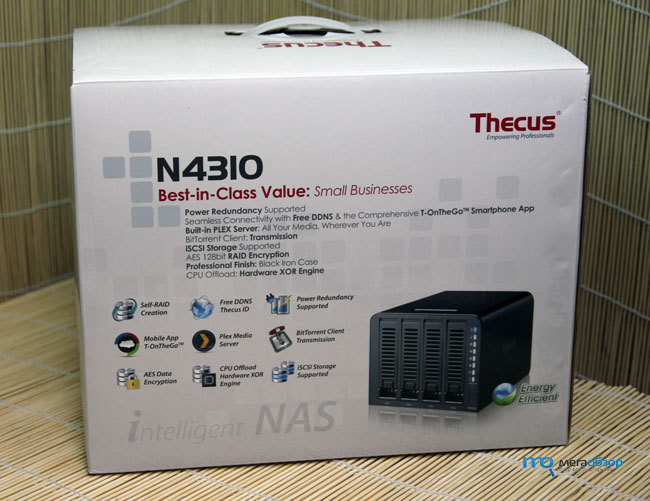
Внутри NAS надежно закреплен в пенопласт, этого достаточно, чтобы избежать лишней тряски и повреждений при падении коробки.
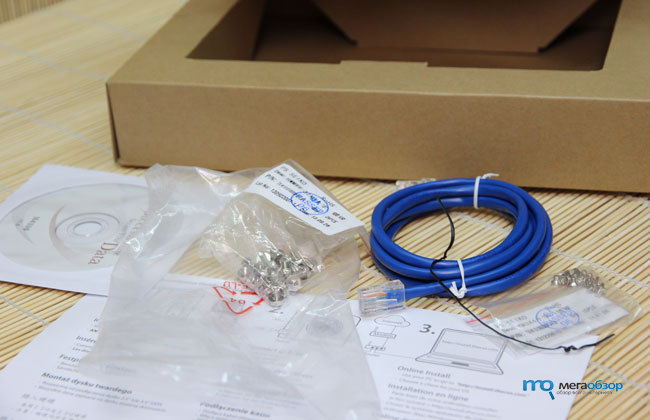
Все комплектующие собраны в отдельной коробке. Это сетевой кабель, внешний блок питания, кабель питания, набор креплений для корзин, краткая инструкция и винты меньшего диаметра.
Внешний вид
При первом взгляде на Thecus N4310 четко прослеживаются корни модели N2310. Тогда во время тестов мы упоминали компактные размеры, тут, несмотря на вдвое увеличенный по ширине корпус, он по-прежнему остается одним из самых компактных среди конкурентов с 4 посадочными местами.
И опять же, возвращаясь к тесту предшественника, нам очень не понравился глянцевый корпус. Тут же вопрос решен качественно, пластик заменен на металл с матовым покрытием. Про маркий корпус можно забыть, да и надежность конструкции стала выше.

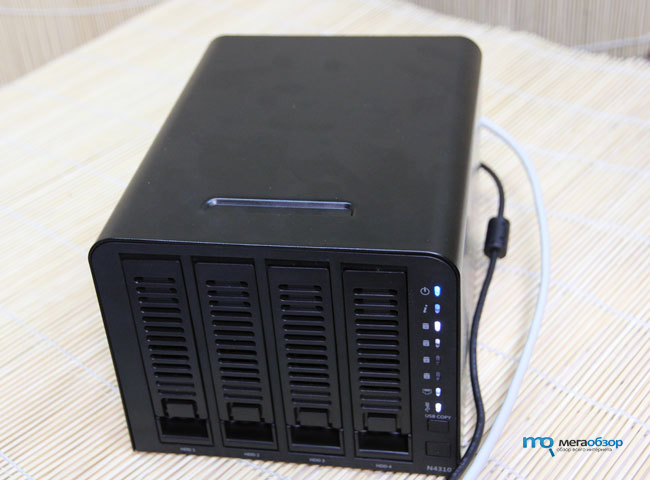
Посадочные корзины для дисков выведены на лицевую панель, здесь их 4. К сожалению, так и не предусмотрели замок для них. К плюсам стоит отнести то, что эти элементы также выполнены из металла, как и лицевая панель.

Справа от корзин выведены светодиодные индикаторы: активное питание, активность самого NAS, отдельные диоды для каждой из корзин, индикатор сетевой активности и информация по активному USB-накопителю.
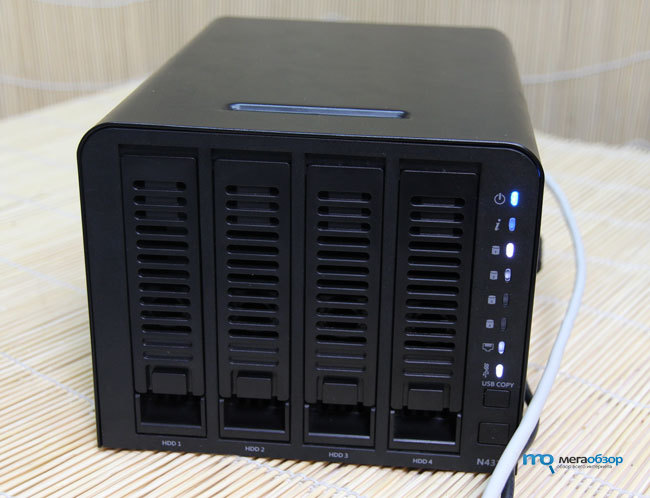
Ниже две механические кнопки: кнопка включения и кнопка копирования данных с USB-накопителя. Последняя позволяет очень просто и быстро провести копирование данных с флешки или внешнего жесткого диска. При наличии кард-ридера можно копировать и данные с карты памяти вашего смартфона.

Тыльная сторона Thecus N4310 также выполнена из металла. Основную площадь занимает решетка вентилятора. Сам вентилятор увеличился в размерах, это положительно сказалось на уровне шума, работает система на порядок тише, чем N2310.
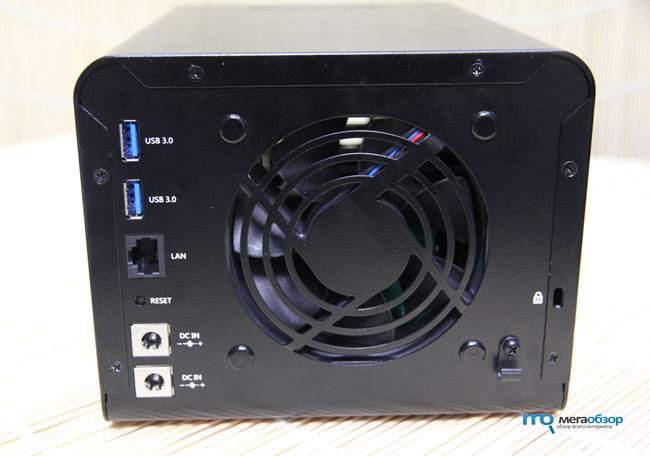
Левее выведен набор портов: два USB 3.0, LAN-порт, кнопка сброса настроек, два разъема питания. Второй разъем пригодится для резервирования питания.
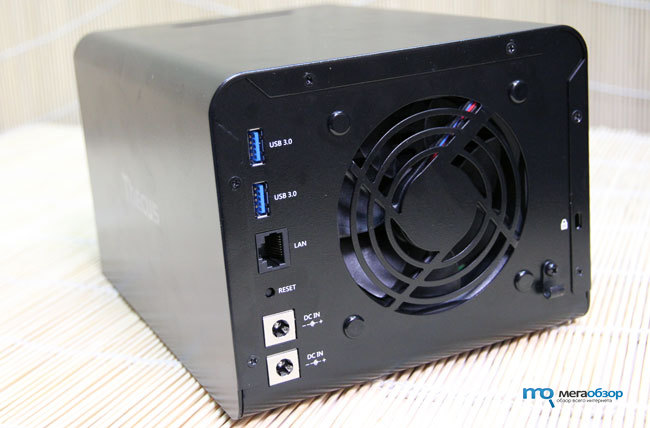
С правой стороны доступен разъем для установки защиты и пластиковый фиксатор для кабеля питания. Хотелось бы видеть здесь графический вывод в виде HDMI, но, к сожалению, этого модель лишена.
Начинка
Верхняя крышка здесь съемная, без лишней надобности не рекомендуем вмешиваться в начинку устройства, и, конечно же, предварительно обесточить устройство, если такая необходимость появилась.

Умная часть Thecus N4310 выведена на горизонтально расположенную плату. Основные элементы направлены в сторону посадочных мест. Еще одна плата отвечает за подключение дисков по SATA-интерфейсу.
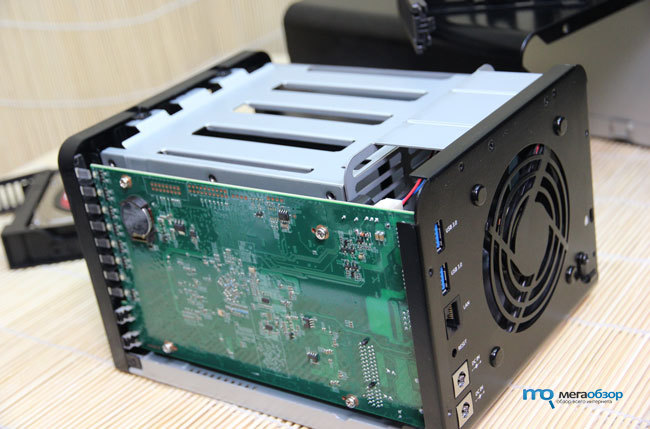
Система получила обновленный процессор Applied Micro Catalina 86491 с частотой 1 ГГц и 1 Гбайт оперативной памяти. Поддерживается работа RAID 0, 1, 5, 6, 10. Уровень быстродействия повышен.
За сетевое подключение отвечает LAN-порт с каналом 1000 Мбит/с.
Запуск
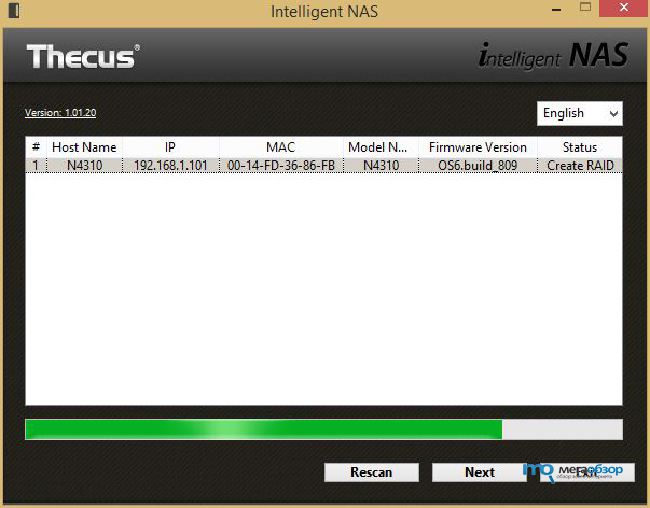
Thecus N4310 поддерживает установку дисков формата 2.5 и 3.5, все комплектующие имеются в запасе. После установки дисков в корзину, система при первом подключении проводит предварительную подготовку. Для старта пригодится фирменная утилита intelligent NAS, скачать ее необходимо с официального сайта.

Утилита сама проводит поиск NAS в локальной сети, пользователю лишь остается нажимать Далее.

Хотя один из этапов нужно пройти более внимательно, тут выбирается тип работы дисковой системы. Но какого-то опыта от пользователя не требуется, система сама проводит все дальнейшие манипуляции.
Управление
За управление отвечает операционная система Thecus OS6. Мы уже рассматривали ее в рамках нескольких тестов продукции этого производителя. Главным ее преимуществом стала ориентация на технически неподготовленного пользователя. Кстати, интерфейс хорошо адаптирован и под новомодное сенсорное управление.

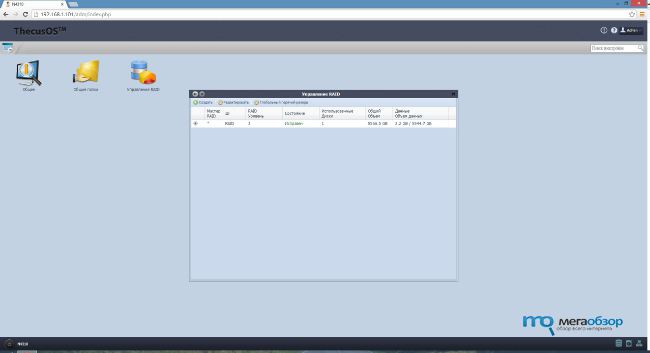

На главном окне выводятся избранные иконки доступа, этот список можно изменять самостоятельно.
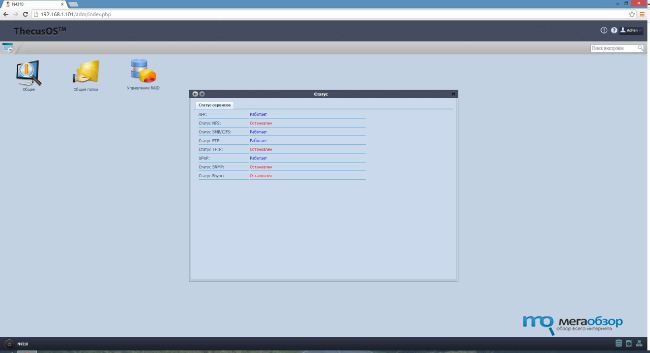

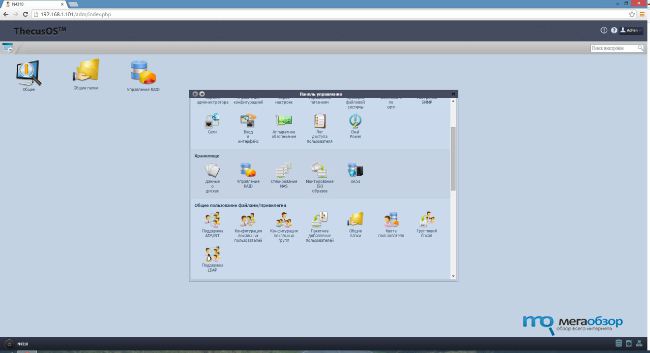

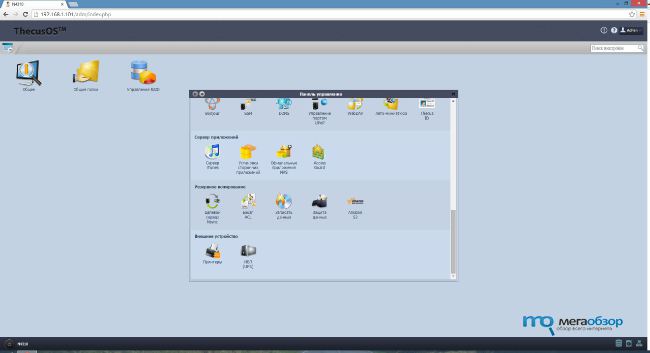
Весь набор настроек разделен на несколько вкладок. Все интуитивно понятно. В рамках данного теста я приведу лишь набор скриншотов наиболее интересных окон, подробнее можно посмотреть в видеообзоре, а текстовая часть хорошо рассмотрена в тесте Thecuc N2310.
Тесты
Энергопотребление
LAN Intel NAS Test
Шум
Итоги по Thecus N4310
Thecus N4310 продемонстрировал высокий запас производительности и хорошую скорость доступа к данным. При увеличении быстродействия удалось уменьшить общий уровень энергопотребления. Понравился полностью металлический корпус и наличие разъема питания для резервного питания, а также бесшумная работа системы охлаждения. К плюсам отнесем и возможность быстрого копирования данных с флеш-накопителей посредством двух USB 3.0 разъемов. Минусы: отсутствие замков на корзинах дисков и отсутствие графического вывода информации на внешние мониторы и ТВ.
Редакция благодарит Компанию Тайле, мастер дистрибутора продукции Thecus в России, за предоставленное сетевое хранилище данных- Thecus N4310.
Summary
Производитель Thecus
Категория Server
Документы, которые мы получаем от производителя устройства Thecus N4310 мы можем разделить на несколько групп. Это в частности:
— технические чертежи Thecus
— инструкции обслуживания N4310
— паспорта изделия Thecus
— информационные брошюры
— энергетические этикетки Thecus N4310
Все из них важны, однако самую важную информацию с точки зрения пользователя мы найдем в инструкции обслуживания Thecus N4310.
Группа документов, определяемая как инструкции обслуживания, делится также на более подробные типы, такие как: Инструкции монтажа Thecus N4310, инструкции обслуживания, короткие инструкции или инструкции пользователя Thecus N4310. В зависимости от потребностей, Вам необходимо поискать требуемый документ. На нашем сайте Вы можете просмотреть самую популярную инструкцию использования изделия Thecus N4310.
Полная инструкция обслуживания устройства Thecus N4310, как должна выглядеть?
Инструкция обслуживания, определяемая также как пособие пользователя, или просто «руководство» — это технический документ, цель которого заключается в использовании Thecus N4310 пользователями. Инструкции пишет, как правило технический писатель, языком, доступным для всех пользователей Thecus N4310.
Полная инструкция обслуживания Thecus, должна заключать несколько основных элементов. Часть из них менее важная, как например: обложка / титульный лист или авторские страницы. Однако остальная часть, должна дать нам важную с точки зрения пользователя информацию.
1. Вступление и рекомендации, как пользоваться инструкцией Thecus N4310 — В начале каждой инструкции, необходимо найти указания, как пользоваться данным пособием. Здесь должна находится информация, касающаяся местонахождения содержания Thecus N4310, FAQ и самых распространенных проблем — то есть мест, которые чаще всего ищут пользователи в каждой инструкции обслуживания
2. Содержание — индекс всех советов, касающихся Thecus N4310, которое найдем в данном документе
3. Советы по использованию основных функций устройства Thecus N4310 — которые должны облегчить нам первые шаги во время использования Thecus N4310
4. Troubleshooting — систематизированный ряд действия, который поможет нам диагностировать а в дальнейшем очередность решения важнейших проблем Thecus N4310
5. FAQ — чаще всего задаваемые вопросы
6. Контактные данные Информация о том, где искать контактные данные производителя / сервисного центра Thecus N4310 в данной стране, если самостоятельно не получится решить проблему.