-
Contents
-
Table of Contents
-
Bookmarks
Quick Links
TL-R600VPN
SafeStream
TM
Gigabit Broadband VPN Router
Rev: 1.0.0
1910010557
Related Manuals for TP-Link SafeStream TL-R600VPN
Summary of Contents for TP-Link SafeStream TL-R600VPN
-
Page 1
TL-R600VPN SafeStream Gigabit Broadband VPN Router Rev: 1.0.0 1910010557… -
Page 2
Specifications are subject to change without notice. is a registered trademark of TP-LINK TECHNOLOGIES CO., LTD. Other brands and product names are trademarks or registered trademarks of their respective holders. No part of the specifications may be reproduced in any form or by any means or used to make any derivative such as translation, transformation, or adaptation without permission fromTP-LINK TECHNOLOGIES CO., LTD. -
Page 3: Fcc Statement
FCC STATEMENT This equipment has been tested and found to comply with the limits for a Class A digital device, pursuant to part 15 of the FCC Rules. These limits are designed to provide reasonable protection against harmful interference when the equipment is operated in a commercial environment. This equipment generates, uses, and can radiate radio frequency energy and, if not installed and used in accordance with the instruction manual, may cause harmful interference to radio communications.
-
Page 4: Package Contents
2) Make sure that the package contains the above items. If any of the listed items are damaged or missing, please contact your distributor. Conventions The Router or TL-R600VPN mentioned in this guide stands for TL-R600VPN SafeStream Gigabit Broadband VPN Router without any explanation.
-
Page 5: Table Of Contents
CONTENTS Chapter 1. Introduction ………………1 1.1 Overview of the Router ………………..1 1.2 Features……………………. 1 1.3 Conventions……………………1 Chapter 2. Hardware installation …………….. 2 2.1 Panel Layout……………………2 2.1.1 …
-
Page 6
4.7.3 Target ……………………..40 4.7.4 Schedule ……………………41 4.8 IPsec VPN ……………………42 4.8.1 IKE……………………..42 4.8.2 IPsec……………………..44 4.8.3 SA List ……………………..48 4.9 PPTP VPN Server ………………….. 49 4.9.1 Server Settings…………………..49 4.9.2 … -
Page 7: Chapter 1. Introduction
1.1 Overview of the Router The TL-R600VPN SafeStream Gigabit Broadband VPN Router from TP-LINK provides multiple VPN protocols and high VPN performance. Abundant security strategies, such as SPI firewall, protect your network against the attacks and Access Control, provide online behavior management.
-
Page 8: Chapter 2. Hardware Installation
TL-R600VPN SafeStream Gigabit Broadband VPN Router User Guide Chapter 2. Hardware installation 2.1 Panel Layout 2.1.1 The Front Panel The Router’s LEDs are located on the front panel (Viewed from left to right). Figure 2-1 LED Descriptions: Name Status Indication Not lit The router is powered off.
-
Page 9: System Requirements
TL-R600VPN SafeStream Gigabit Broadband VPN Router User Guide Method one: Use the Factory Defaults function on System Tools -> Factory Defaults page in the router’s Web-based Utility. Method two: With the router powered on, use a pin to press and hold the RESET button (about 5 seconds) until the SYS LED lights up and flashes.
-
Page 10: Connecting The Router
TL-R600VPN SafeStream Gigabit Broadband VPN Router User Guide Note: If you intend to connect the Router to the ground via the PE(Protecting Earth)cable of AC power cord, please make sure the PE(Protecting Earth)cable in the electrical outlet is well grounded in advance.
-
Page 11
TL-R600VPN SafeStream Gigabit Broadband VPN Router User Guide Connect the PC(s) and all Switches/Hubs on your LAN to the LAN Ports on the router, shown in Figure 2-3. Connect the DSL/Cable modem to the WAN port on the router, shown in Figure 2-3. -
Page 12: Chapter 3. Quick Installation Guide
Gigabit Broadband VPN Router User Guide Chapter 3. Quick Installation Guide This chapter describes how to configure the basic functions of your TL-R600VPN SafeStreamTM Gigabit Broadband VPN Router. These procedures only take you a few minutes. You can access the Internet via the router immediately after it has been successfully configured.
-
Page 13
TL-R600VPN SafeStream Gigabit Broadband VPN Router User G uide Figure 3-2 Step 3: In the next screen, select General tab, highlight Internet Protocol (TCP/IP), and then click the Properties button. Figure 3-3… -
Page 14
TL-R600VPN SafeStream Gigabit Broadband VPN Router User Guide Step 4: Configure the IP address as shown in Figure 3-4. After that, click OK. Figure 3-4 Note: You can configure the PC to get an IP address automatically, select “Obtain an IP address automatically”… -
Page 15: Login
TL-R600VPN SafeStream Gigabit Broadband VPN Router User Guide If the result displayed is similar to the screen shown below, it means that your PC has not connected to the Router. Figure 3-6 You can check it follow the steps below:…
-
Page 16
TL-R600VPN SafeStream Gigabit Broadband VPN Ro uter User Guide Figure 3-7 Note: If the above screen (Figure 3-7) does not prompt, it means that your web-browser may be set to a proxy. Choose Tools menu→Internet Options→Connections→LAN Settings, in the screen that appears, cancel the Using Proxy checkbox, and click OK to finish it. -
Page 17
TL-R600VPN SafeStream Gigabit Broadband VPN Router User Guide Note: Four ways to connect to Internet are provided in Quick Setup. Please select one compatible with your ISP. If you are given another way not listed here, refer to Network→ WAN for detailed list. -
Page 18
TL-R600VPN SafeStream Gigabit Broadband VPN Router User Guide Step 7: After that, you will see the next screen. Click Finish to complete the quick installation. Figure 3-13… -
Page 19: Chapter 4. Configuring The Router
TL-R600VPN SafeStream Gigabit Broadband VPN Router User Guide Chapter 4. Configuring the Router It is recommended to use the “Quick Installation Guide” for first-time installation. For advanced users, if you want to know more about this device and make use of its functions adequately, you need to read this chapter and configure advanced settings though the Web-based Utility.
-
Page 20
TL-R600VPN SafeStream Gigabit Broadband VPN Router User Guide Figure 4-1 LAN — This field displays the current information for the LAN, including the “MAC address”, “IP address” and “Subnet Mask”. WAN — This field displays the parameters applied to the WAN port of the router, including “MAC address”, “IP address”, “Subnet Mask”, “Default Gateway”… -
Page 21: Quick Setup
TL-R600VPN SafeStream Gigabit Broadband VPN Router User Guide 4.2 Quick Setup Please refer to chapter 3″Quick Installation Guide». 4.3 Network Choose menu “Network”, the next submenus are shown below. Figure 4-2 Click any of them, and you will be able to configure the corresponding function. The detailed explanations for each submenu are provided below.
-
Page 22
TL-R600VPN SafeStream Gigabit Broadband VPN Router User Guide Figure 4-3 MTU Size — The normal MTU (Maximum Transmission Unit) value for most Ethernet networks is 1500 Bytes. For some ISPs you need to reduce the MTU. But this is rarely required, and should not be done unless you are sure it is necessary for your ISP connection. -
Page 23
TL-R600VPN SafeStream Gigabit Broadband VPN Router User Guide Static IP If you are given a fixed IP (static IP), please select Static IP (shown in Figure 4-4), and then fixed IP parameters specified by your ISP. Figure 4-4 IP Address — Enter the IP address in dotted-decimal notation provided by your ISP. -
Page 24
TL-R600VPN SafeStream Gigabit Broadband VPN Router User Guide Figure 4-5 User Name/Password — Enter the User Name and Password provided by your ISP. These fields are case-sensitive. Connect on Demand — You can configure the router to disconnect your Internet connection after a specified period of inactivity (Max Idle Time). -
Page 25
TL-R600VPN SafeStream Gigabit Broadband VPN Router User Guide Note: Only you have set the system time on System Tools→Time screen, will the Time-based Connecting function take effect. Connect Manually — You can configure the router to make it connect or disconnect manually. -
Page 26
TL-R600VPN SafeStream Gigabit Broadband VPN Router User Guide ISP Specified IP Address — If you know that your ISP does not automatically transmit your IP address to the router during login, select Use IP Address specified by ISP and enter the IP address in dotted-decimal notation, which your ISP provided. -
Page 27
TL-R600VPN SafeStream Gigabit Broadband VPN Router User Guide Connect on Demand — You can configure the router to disconnect your Internet connection after a specified period of the Internet connectivity (Max Idle Time). If your Internet connection has been terminated due to inactivity, Connect on Demand enables the router to automatically re-establish your connection as soon as you attempt to access the Internet again. -
Page 28
TL-R600VPN SafeStream Gigabit Broadband VPN Router User Guide Figure 4-8 User Name/Password — Enter the User Name and Password provided by your ISP. These fields are case-sensitive. Connect on Demand — You can configure the router to disconnect your Internet connection after a specified period of the Internet connectivity (Max Idle Time). -
Page 29
TL-R600VPN SafeStream Gigabit Broadband VPN Router User Guide Otherwise, enter the number in minutes that you wish to have the Internet connecting last unless a new link requested. Note: Sometimes the connection cannot be disconnected although you specify a time to Max Idle Time because some applications visit the Internet continually in the background. -
Page 30: Lan
TL-R600VPN SafeStream Gigabit Broadband VPN Router User Guide enter the number of minutes you want to have elapsed before your Internet connection terminates. Connect Automatically — Connect automatically after the router is disconnected. To use this option, click the radio button.
-
Page 31: Mac Clone
TL-R600VPN SafeStream Gigabit Broadband VPN Router User Guide Server and DMZ Host may change accordingly at the same time; you’d better re-configure it as well. 4.3.3 MAC Clone Choose menu “Network→MAC Clone”, you can configure the MAC address of the WAN on the screen below (shown in Figure 4-11).
-
Page 32: Dhcp
TL-R600VPN SafeStream Gigabit Broadband VPN Router User Guide 4.4 DHCP Choose menu “DHCP”, the next submenus are shown below. Figure 4-12 Click any of them, and you will be able to configure the corresponding function. The detailed explanations for each submenu are provided below.
-
Page 33: Dhcp Clients List
TL-R600VPN SafeStream Gigabit Broadband VPN Router User Guide Address Lease Time — This is the amount of time in which a network user will be allowed connection to the router with their current dynamic IP address. Enter the amount of time (in minutes), the range of the time is 1 ~ 2880 minutes.
-
Page 34
TL-R600VPN SafeStream Gigabit Broadband VPN Router User Guide Figure 4-15 MAC Address — This field displays the MAC address of the PC for which you want to reserve IP address. Assigned IP Address — This field displays the IP address of the router reserved. -
Page 35: Forwarding
TL-R600VPN SafeStream Gigabit Broadband VPN Router User Guide Click the Previous button to view the information in the previous screen, click the Next button to view the information in the next screen. 4.5 Forwarding Choose menu “Forwarding”, the next submenus are shown below.
-
Page 36
TL-R600VPN SafeStream Gigabit Broadband VPN Router User Guide To add/modify a virtual server entry: Step 1: Click Add New…/Modify shown in Figure 4-18, you will see a new screen shown in Figure 4-19. Step 2: Select the service you want from the “Common Service Port”, then the port and protocol value will be added to the corresponding field automatically, you only need to configure the IP address for the virtual server;… -
Page 37: Port Triggering
TL-R600VPN SafeStream Gigabit Broadband VPN Router User Guide 4.5.2 Port Triggering Choose menu “Forwarding→Port Triggering”, you can view and add port triggering in the next screen (shown in Figure 4-20). Some applications require multiple connections, like Internet games, video conferencing, Internet calling and so on.
-
Page 38
TL-R600VPN SafeStream Gigabit Broadband VPN Router User Guide To add/modify a port triggering entry: Step 1: Click Add New…/Modify shown in Figure 4-20, you will see a new screen shown in Figure 4-21. Step 2: Select the application you want from the “Common Applications”, then the Trigger port and Incoming ports will be added to the corresponding field automatically, you only need to configure the Trigger protocol and Incoming Protocol for the entry;… -
Page 39: Dmz
TL-R600VPN SafeStream Gigabit Broadband VPN Router User Guide 4.5.3 Choose menu “Forwarding→DMZ”, you can view and configure DMZ host in the screen (shown in Figure 4-22). The DMZ host feature allows one local host to be exposed to the Internet for a special-purpose service such as Internet gaming or videoconferencing.
-
Page 40: Security
TL-R600VPN SafeStream Gigabit Broadband VPN Router User Guide Figure 4-23 Current UPnP Status — If you want to use the Router’s UPnP function, please click Enable button. If you don’t want use the function, please click Disable button. Allowing the function may cause a risk to security;…
-
Page 41
TL-R600VPN SafeStream Gigabit Broadband VPN Router User Guide Figure 4-25 Firewall — Enable the general firewall or not. • SPI Firewall — SPI (Stateful Packet Inspection) keeps track of the state of network connections traveling across it. It distinguishes legitimate packets for different types of connections. -
Page 42: Advanced Security
TL-R600VPN SafeStream Gigabit Broadband VPN Router User Guide 4.6.2 Advanced Security Choose menu “Security→Advanced Security”, you can protect the Router from being attacked by TCP-SYN Flood, UDP Flood and ICMP-Flood in the next screen (shown in Figure 4-26). Figure 4-26 Packets Statistics Interval — This is the interval for capturing the statistics.
-
Page 43: Local Management
TL-R600VPN SafeStream Gigabit Broadband VPN Router User Guide 4.6.3 Local Management Choose menu “Security→Local Management ”, you can configure to prevent the local PCs from accessing the router’s web-based utility in the next screen (shown in Figure 4-27). Figure 4-27 Management Rules — Here displays the management rules •…
-
Page 44: Rule
TL-R600VPN SafeStream Gigabit Broadband VPN Router User Guide 4.7.1 Rule Choose menu “Access Control →Rule”, you can configure the Internet Access Control to manage Internet activities from LAN hosts in the next screen (shown in Figure 4-29). Figure 4-29 Enable Internet Access Control: Enable or disable the Internet Access Control.
-
Page 45: Host
TL-R600VPN SafeStream Gigabit Broadband VPN Router User Guide Figure 4-30 Step 3: Click the Save button. Other configurations for the entries as shown in Figure 4-29: Click the Delete button to delete the entry. Click the Enable All button to enable all the entries.
-
Page 46: Target
TL-R600VPN SafeStream Gigabit Broadband VPN Router User Guide Step 2: Select the Mode and enter the Host Description and LAN IP Address. Figure 4-32 Step 3: Click the Save button. Other configurations for the entries as shown in Figure 4-31: Click the Delete All button to delete all the entries.
-
Page 47: Schedule
TL-R600VPN SafeStream Gigabit Broadband VPN Router User Guide Figure 4-34 Step 3: Click the Save button. Other configurations for the entries as shown in Figure 4-33: Click the Delete All button to delete all the entries. Click the Previous button to view the information in the previous screen, click the Next button to view the information in the next screen.
-
Page 48: Ipsec Vpn
TL-R600VPN SafeStream Gigabit Broadband VPN Router User Guide To add/modify a target for Access Control Rule: Step 1: Click Add New…/Edit shown in Figure 4-35, you will see a new screen shown in Figure 4-36. Step 2: Enter the Schedule Description and select the days, and then specify the Start Time and Stop Time.
-
Page 49
TL-R600VPN SafeStream Gigabit Broadband VPN Router User Guide Figure 4-38 Policy Name: The unique name to the IKE policy for identification and management purposes. Exchange Mode: Displays the IKE Exchange Mode in phase 1, and the remote VPN peer uses the same mode. -
Page 50: Ipsec
TL-R600VPN SafeStream Gigabit Broadband VPN Router User Guide DH3: 1536 bits Pre-shared Key: The Pre-shared Key for IKE authentication, and ensure both the two peers use the same key. The key should consist of visible characters without blank space. To add/modify an IKE entry: Step 1: Click Add New…/Modify shown in Figure 4-38, you will see a new screen shown in…
-
Page 51
TL-R600VPN SafeStream Gigabit Broadband VPN Router User Guide Figure 4-40 IPSec: Enable or disable IPsec and click save to apply. Policy Name: The unique name to the IPsec policy for identification and management purposes. Local Subnet: The IP address range on your local LAN to identify which PCs on your LAN are covered by this policy. -
Page 52
TL-R600VPN SafeStream Gigabit Broadband VPN Router User Guide Figure 4-41 Policy Name: Enter the unique name to the IPsec policy for identification and management purposes. Local Subnet: Enter the IP address range on your local LAN to identify which PCs on your LAN are covered by this policy. -
Page 53
TL-R600VPN SafeStream Gigabit Broadband VPN Router User Guide Encryption Algorithm: Select the Encryption Algorithm for IPsec policy. The default value is “Auto”. Select the IKE Security Policy for IPsec policy. IKE Security Policy: Select the PFS (Perfect Forward Security) for IKE PFS Group: mode to enhance security. -
Page 54: Sa List
TL-R600VPN SafeStream Gigabit Broadband VPN Router User Guide authentication key at the other end of the tunnel, and vice versa. In Encryption Key: Specify the Inbound Encryption Key manually if ESP protocol The inbound key here must match the outbound Encryption Key at the other end of the tunnel, and vice versa.
-
Page 55: Pptp Vpn Server
TL-R600VPN SafeStream Gigabit Broadband VPN Router User Guide Figure 4-42 This page displays the connection status of the IPsec Policy. As Security Association is unidirec- tional, an ingoing SA and an outgoing SA are created to protect data flows for each tunnel after IPsec tunnel is successfully established.
-
Page 56: Account Settings
TL-R600VPN SafeStream Gigabit Broadband VPN Router User Guide MPPE Encryption – Enable or disable the MPPE Encryption. If enabled, the PPTP tunnel will be encrypted by MPPE. IP Range Start — Enter the start IP address to define a range for the server’s IP assignment.
-
Page 57: Connection Status
TL-R600VPN SafeStream Gigabit Broadband VPN Router User Guide Click the Previous button to view the information in the previous screen, click the Next button to view the information in the next screen. 4.9.3 Connection Status Choose the menu PPTP VPN Server→Connection Status, you can view the connection status of each user in the next screen (shown in Figure 4-47).
-
Page 58: Bandwidth Control
TL-R600VPN SafeStream Gigabit Broadband VPN Router User Guide To add/modify a static routing entry: Step 1: Click Add New…/Modify shown in Figure 4-48, you will see a new screen shown in Figure 4-49. Step 2: Enter the appropriate Destination IP Address, Subnet Mask and Default Gateway, and then select the status.
-
Page 59: Rule List
TL-R600VPN SafeStream Gigabit Broadband VPN Router User Guide Figure 4-51 Enable Bandwidth Control — Enable or disable the Bandwidth Control. Line Type — Select the Line Type of the WAN port. Egress/Ingress Bandwidth – Enter the Egress and Ingress Bandwidth through the WAN port.
-
Page 60: Ip & Mac Binding
TL-R600VPN SafeStream Gigabit Broadband VPN Router User Guide Figure 4-53 Step 3: Click the Save button. Other configurations for the entries as shown in Figure 4-52: Click the Delete All button to delete all the entries. Click the Previous button to view the information in the previous screen, click the Next button to view the information in the next screen.
-
Page 61
TL-R600VPN SafeStream Gigabit Broadband VPN Router User Guide MAC Address — This field displays the MAC address of the controlled computer in the LAN. IP Address — This field displays the assigned IP address of the controlled computer in the LAN. -
Page 62: Arp List
TL-R600VPN SafeStream Gigabit Broadband VPN Router User Guide Step 4: Click Back to return the previous screen. Note: You can click “to page” to edit the entry in the corresponding screen. Other configurations for the entries as shown in Figure 4-55: Click the Delete button to delete the entry.
-
Page 63: Dynamic Dns
TL-R600VPN SafeStream Gigabit Broadband VPN Router User Guide Click Delete to load the specific item to the IP & MAC Binding list. Click the Bind All button to bind all the current items, available after enable. Click the Load All button to load all items to the IP & MAC Binding list (shown in Figure 4-55).
-
Page 64: Peanuthull Ddns
TL-R600VPN SafeStream Gigabit Broadband VPN Router User Guide Click Logout to logout the DDNS service. The status of the DDNS service connection is displayed in the Connection Status field. 4.13.2 PeanutHull DDNS If your dynamic DNS Service Provider is www.oray.net, you can configure in the next screen (shown in Figure 4-60).
-
Page 65: No-Ip Ddns
TL-R600VPN SafeStream Gigabit Broadband VPN Router User Guide Figure 4-61 To set up for Comexe DDNS, follow these instructions: Step 1: Enter the domain name your dynamic DNS service provider offer. Step 2: Type the “User Name” and “Password” for your DDNS account.
-
Page 66: System Tools
TL-R600VPN SafeStream Gigabit Broadband VPN Router User Guide Figure 4-62 To set up for No-IP DDNS, follow these instructions: Step 1 Type the “User Name” and “Password” for your DDNS account. Step 2 Enter the Domain Name your dynamic DNS service provider offered.
-
Page 67: Time Settings
TL-R600VPN SafeStream Gigabit Broadband VPN Router User Guide 4.14.1 Time Settings Choose menu “System Tools→Time Settings”, you can configure the time on the screen (shown in Figure 4-64). Figure 4-64 Time zone — Select your local time zone from this pull down list.
-
Page 68: Diagnostic Tools
TL-R600VPN SafeStream Gigabit Broadband VPN Router User Guide 4.14.2 Diagnostic Tools Choose menu “System Tools→Diagnostic Tools”, you can test the connectivity between the router and the destination on this page. Figure 4-65 Diagnostic Tool — Choose the diagnostic tool. Ping and Tracert are available.
-
Page 69: Factory Defaults
Router’s current hardware version. To upgrade the router’s firmware, follow these instructions below: Step 1: Download a more recent firmware upgrade file from the TP-LINK website (http://www.tp-link.com). Step 2: Type the path and file name of the update file into the “File” field. Or click the Browse button to locate the update file.
-
Page 70: Backup And Restore
TL-R600VPN SafeStream Gigabit Broadband VPN Router User Guide Note: The default User Name is admin. The default Password is admin. The default IP Address is 192.168.0.1. The default Subnet Mask is 255.255.255.0. All settings you have saved will be lost when the default settings are restored.
-
Page 71: Reboot
TL-R600VPN SafeStream Gigabit Broadband VPN Router User Guide Figure 4-70 To restore the Router’s settings: Step 1: Click the Browse button to locate the update file for the device, or enter the exact path to the Setting file in the text box.
-
Page 72: Password
TL-R600VPN SafeStream Gigabit Broadband VPN Router User Guide Upgrade the firmware of the router (system will reboot automatically). Restore the router’s settings to factory default (system will reboot automatically). 4.14.7 Password Choose menu “System Tools→Password”, you can change the factory default user name and password of the router in the next screen (shown in Figure 4-72).
-
Page 73: Remote Management
TL-R600VPN SafeStream Gigabit Broadband VPN Router User Guide Figure 4-73 The router can keep logs of all traffic. You can query the logs to find what happened to the router. Click the Refresh button to refresh the logs. Click the Save Log button to save all the logs in a text file.
-
Page 74: Statistics
TL-R600VPN SafeStream Gigabit Broadband VPN Router User Guide Remote Management IP Address — This is the current address you will use when accessing your router from the Internet. The default IP address is 0.0.0.0. It means this function is disabled. To enable this function, change the default IP address to another IP address as desired.
-
Page 75
TL-R600VPN SafeStream Gigabit Broadband VPN Router User Guide IP Address The IP address whose statistics information are displayed MAC Address The total amount of packets received and transmitted by the Packets router Total The total amount of bytes received and transmitted by the router… -
Page 76: Appendix A: Specifications
TL-R600VPN SafeStream Gigabit Broadband VPN Router User Guide Appendix A: Specifications General IEEE 802.3、IEEE 802.3u、IEEE 802.3ab、TCP/ IP、DHCP、ICMP、 Standards and Protocols NAT、PPPoE、SNTP、HTTP、DNS Safety & Emission FCC、CE One 10/100/1000Mbps Auto-Negotiation WAN RJ45 port Ports Four 10/100/1000Mbps Auto-Negotiation LAN RJ45 ports 10BASE-T: UTP category 3, 4, 5 cable (maximum 100m) EIA/TIA-568 100Ω…
-
Page 77: Appendix B: Preventing Lightning
Please read the User Manual of the arrester carefully before installing it. 5) As for the signal line to which the interface modules of TL-R600VPN are connected, such as LAN’s Ethernet cable, ISDN line, telephone line, E1/T1 line, etc, a special lightning arrester should be installed at the input end of the signal line to enhance the lightning protection capability.
-
Page 78: Appendix C: Faq
TL-R600VPN SafeStream Gigabit Broadband VPN Router User Guide Appendix C: FAQ How do I configure the router to access Internet by ADSL users? Step 1: First, configure the ADSL modem in RFC1483 bridge model. Step 2: Connect the Ethernet cable from your ADSL modem to the WAN port on the router. The telephone cord plugs into the Line port of the ADSL modem.
-
Page 79
TL-R600VPN SafeStream Gigabit Broadband VPN Router User Guide How do I configure the router to access Internet by Ethernet users? Step 1: Login to the router, click the menu Network→WAN on the left of your browser, On the WAN screen, select “Dynamic IP” for «WAN Connection Type», and finish it by clicking Save. -
Page 80
TL-R600VPN SafeStream Gigabit Broadband VPN Router User Guide Figure 4 Note: Your opposite side should call your WAN IP, which is displayed on the “Status” page. Method two: Use DMZ Host Login to the router, click the menu Forwarding→DMZ. On the DMZ screen, select “Enable”, and enter your IP address into the “DMZ Host IP Address”… -
Page 81
TL-R600VPN SafeStream Gigabit Broadband VPN Router User Gu Figure 6 Note: If the above configuration takes effect, you should login the Router by entering http://192.168.0.1:88 (the router’s LAN IP address: Web Management Port) in the address field of the web browser. -
Page 82: Appendix D: Glossary
TL-R600VPN SafeStream Gigabit Broadband VPN Router User Guide Appendix D: Glossary DDNS (Dynamic Domain Name System) — The capability of assigning a fixed host and domain name to a dynamic Internet IP address. DHCP (Dynamic Host Configuration Protocol) — A protocol that automatically configure the TCP/IP parameters for the all the PCs that are connected to a DHCP server.
Комплект поставки
1
Описание устройства
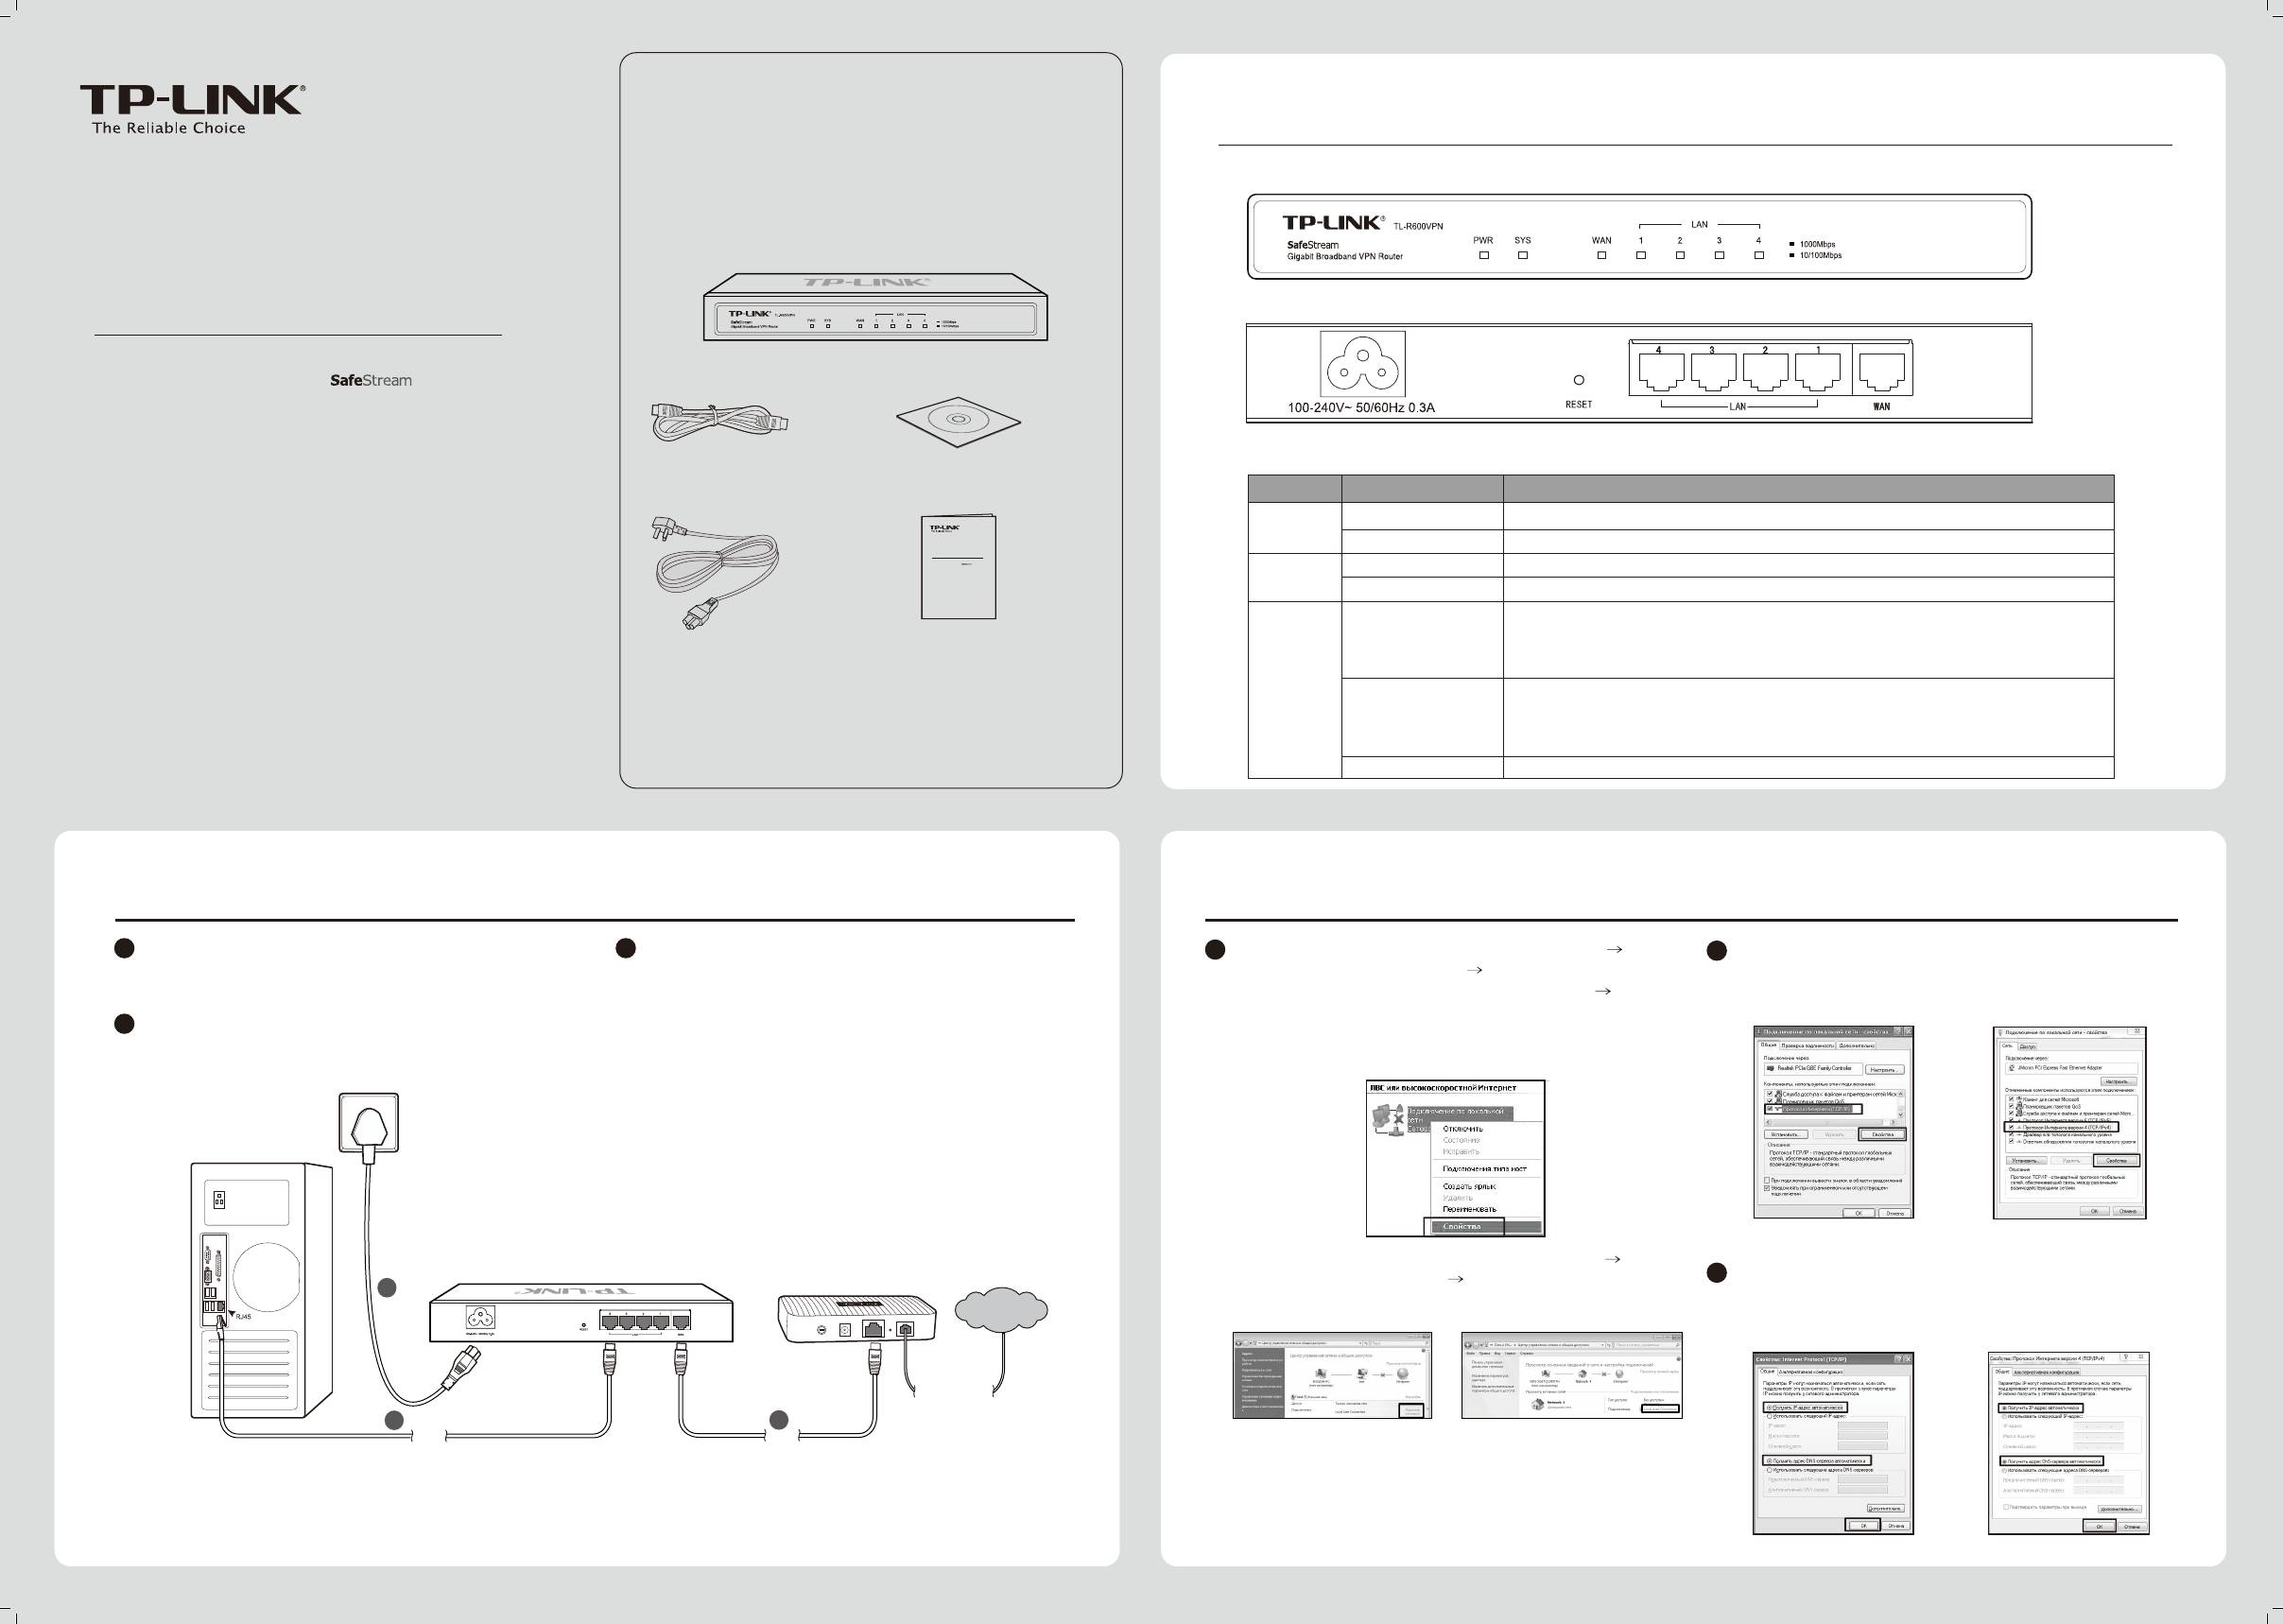
• Передняя панель
Примечание:
В данном руководстве для примера рассматривается
модель TL-R600VPN.
• Задняя панель
Руководство по быстрой настройке
Гигабитный широкополосный VPN-маршрутизатор
TL-R600VPN
на базе технологии
• Светодиодные индикаторы
Компакт-диск с материаламиКабель Ethernet
Название
Состояние
Обозначение
Горит (зелёный).
Маршрутизатор включён.
PWR
Маршрутизатор выключен.
Гигабитный широкополосный VPN-маршрутизатор
Руководство по быстрой настройке
Не горит.
на базе технологии
Мигает (зелёный).
Маршрутизатор работает правильно.
SYS
Вкл./Выкл.
В маршрутизаторе произошла аппаратная ошибка.
Горит
К соответствующему порту подключено устройство, но оно не активно (зелёный
Кабель питания
Руководство по быстрой настройке
свет индикатора означает, что устройство работает на скорости 1000 Мбит/с,
(зелёный/жёлтый).
жёлтый свет — 10/100 Мбит/с).
Примечание:
WAN, LAN
Мигает
Происходит передача/приём данных через соответствующий порт (зелёный свет
Кабель питания может отличаться от того, который указан
индикатора означает, что устройство работает на скорости 1000 Мбит/с, жёлтый
на рисунке, по причине различия местных требований к
(зелёный/жёлтый).
свет — 10/100 Мбит/с).
сетям электропитания.
Нет подключённых к соответствующему порту устройств.Не горит.
2
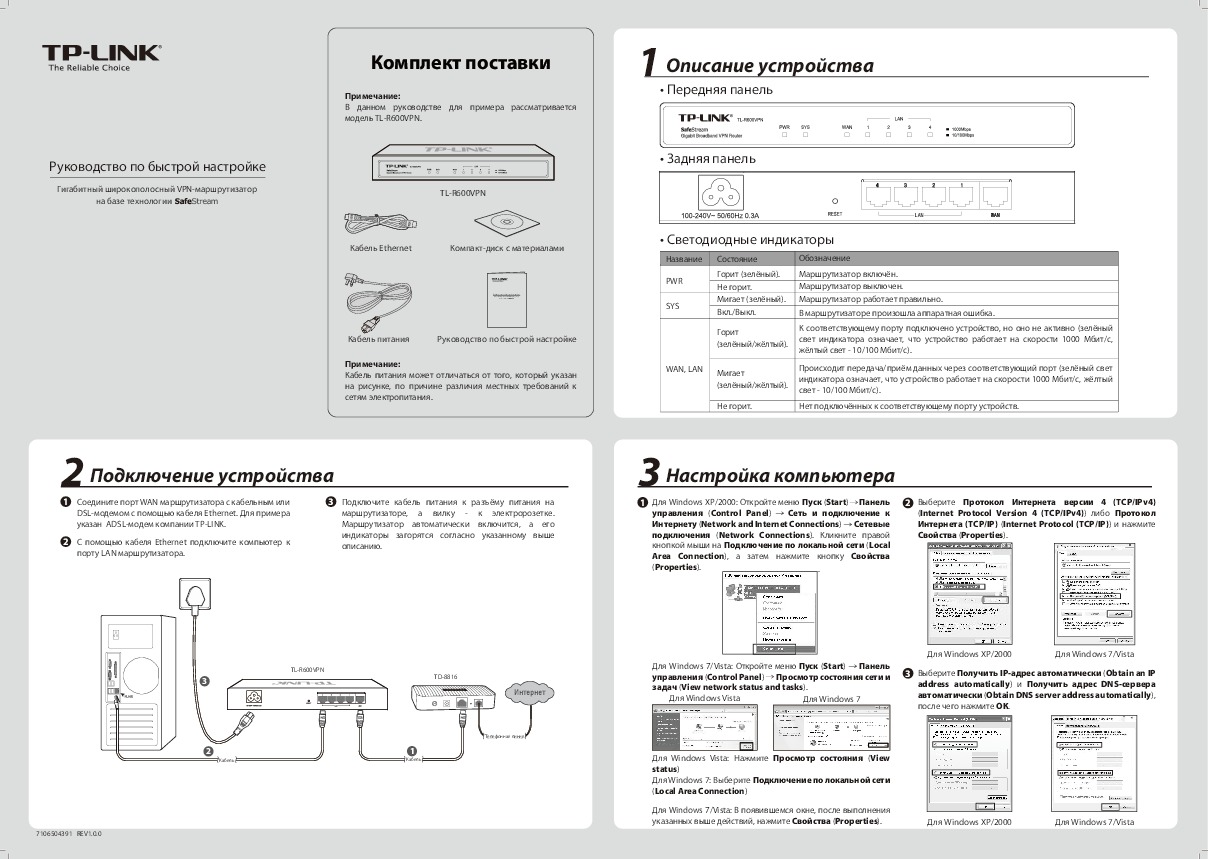
Подключение устройства
3
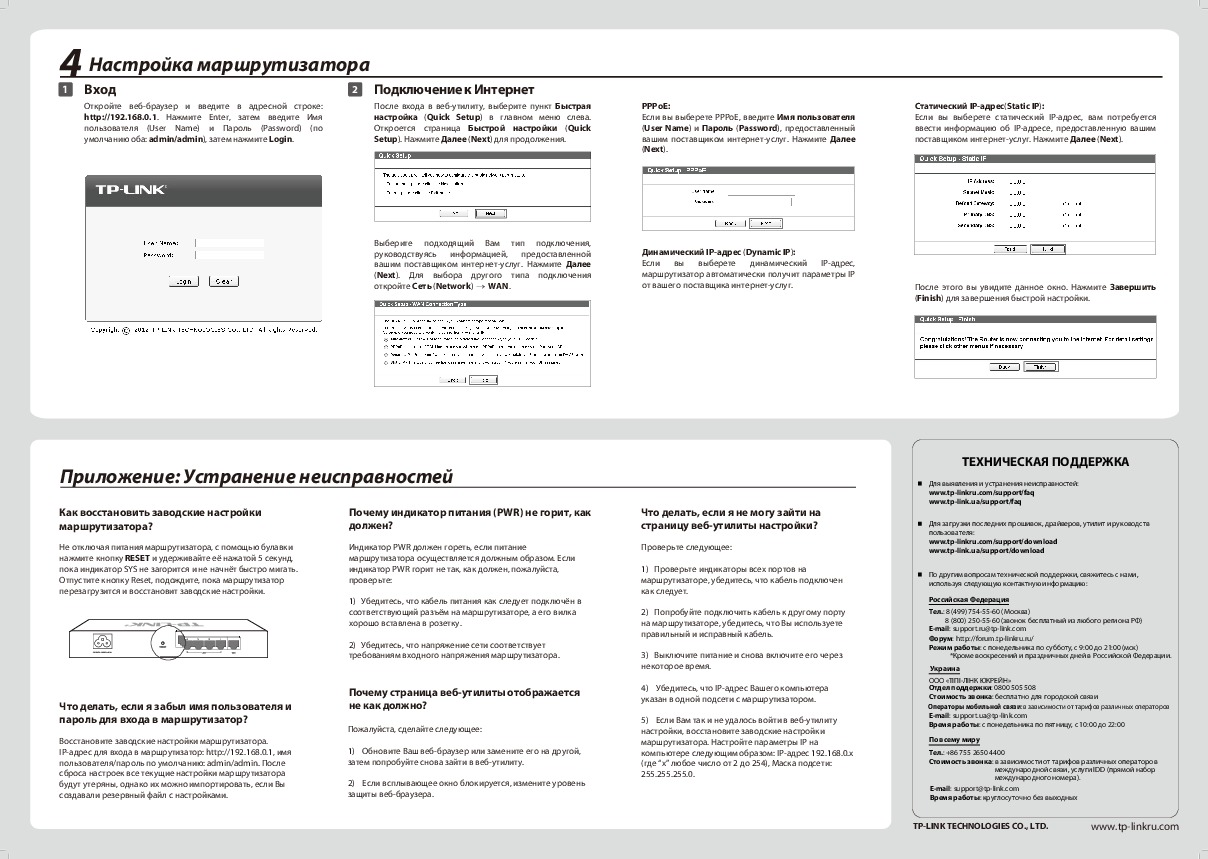
Настройка компьютера
1
Соедините порт WAN маршрутизатора с кабельным или
3
Подключите кабель питания к разъёму питания на
1
Для Windows XP/2000: Откройте меню Пуск (Start) Панель
2
Выберите Протокол Интернета версии 4 (TCP/IPv4)
DSL-модемом с помощью кабеля Ethernet. Для примера
маршрутизаторе, а вилку — к электророзетке.
управления (Control Panel) Сеть и подключение к
(Internet Protocol Version 4 (TCP/IPv4)) либо Протокол
указан ADSL-модем компании TP-LINK.
Маршрутизатор автоматически включится, а его
Интернету (Network and Internet Connections) Сетевые
Интернета (TCP/IP) (Internet Protocol (TCP/IP)) и нажмите
индикаторы загорятся согласно указанному выше
подключения (Network Connections). Кликните правой
Свойства (Properties).
2
С помощью кабеля Ethernet подключите компьютер к
описанию.
кнопкой мыши на Подключение по локальной сети (Local
порту LAN маршрутизатора.
Area Connection), а затем нажмите кнопку Свойства
(Properties).
Для Windows XP/2000
Для Windows 7/Vista
TL-R600VPN
Для Windows 7/Vista: Откройте меню Пуск (Start) Панель
3
TD-8816
управления (Control Panel) Просмотр состояния сети и
3
Выберите Получить IP-адрес автоматически (Obtain an IP
Интернет
задач (View network status and tasks).
address automatically) и Получить адрес DNS-сервера
Для Windows Vista
Для Windows 7
автоматически (Obtain DNS server address automatically),
после чего нажмите ОК.
Телефонная линия
2
1
Кабель
Кабель
Для Windows Vista: Нажмите
Просмотр состояния
(
View
status
)
Для Windows 7: Выберите
Подключение по локальной сети
(
Local Area Connection
)
Для Windows 7/Vista: В появившемся окне, после выполнения
указанных выше действий, нажмите Свойства (Properties).
Для Windows XP/2000 Для Windows 7/Vista
7106504391 REV1.0.0

Настройка маршрутизатора
4
1
Вход Подключение к Интернет
2
Откройте веб-браузер и введите в адресной строке:
После входа в веб-утилиту, выберите пункт Быстрая
PPPoE:
Статический IP-адрес(Static IP):
http://192.168.0.1. Нажмите Enter, затем введите Имя
настройка (Quick Setup) в главном меню слева.
Если вы выберете PPPoE, введите Имя пользователя
Если вы выберете статический IP-адрес, вам потребуется
пользователя (User Name) и Пароль (Password) (по
Откроется страница Быстрой настройки (Quick
(User Name) и Пароль (Password), предоставленный
ввести информацию об IP-адресе, предоставленную вашим
умолчанию оба: admin/admin), затем нажмите Login.
Setup). Нажмите Далее (Next) для продолжения.
вашим поставщиком интернет-услуг. Нажмите Далее
поставщиком интернет-услуг. Нажмите Далее (Next).
(Next).
Выберите подходящий Вам тип подключения,
руководствуясь информацией, предоставленной
Динамический IP-адрес (Dynamic IP):
вашим поставщиком интернет-услуг. Нажмите Далее
Если вы выберете динамический IP-адрес,
(Next). Для выбора другого типа подключения
маршрутизатор автоматически получит параметры IP
откройте Сеть (Network) WAN.
от вашего поставщика интернет-услуг.
После этого вы увидите данное окно. Нажмите Завершить
(Finish) для завершения быстрой настройки.
ТЕХНИЧЕСКАЯ ПОДДЕРЖКА
Приложение: Устранение неисправностей
Для выявления и устранения неисправностей:
www.tp-linkru.com/support/faq
www.tp-link.ua/support/faq
Как восстановить заводские настройки
Почему индикатор питания (PWR) не горит, как
Что делать, если я не могу зайти на
маршрутизатора?
должен?
страницу веб-утилиты настройки?
Для загрузки последних прошивок, драйверов, утилит и руководств
пользователя:
www.tp-linkru.com/support/download
Не отключая питания маршрутизатора, с помощью булавки
Индикатор PWR должен гореть, если питание
Проверьте следующее:
www.tp-link.ua/support/download
нажмите кнопку RESET и удерживайте её нажатой 5 секунд,
маршрутизатора осуществляется должным образом. Если
пока индикатор SYS не загорится и не начнёт быстро мигать.
индикатор PWR горит не так, как должен, пожалуйста,
1) Проверьте индикаторы всех портов на
По другим вопросам технической поддержки, свяжитесь с нами,
Отпустите кнопку Reset, подождите, пока маршрутизатор
проверьте:
маршрутизаторе, убедитесь, что кабель подключен
используя следующую контактную информацию:
перезагрузится и восстановит заводские настройки.
как следует.
1) Убедитесь, что кабель питания как следует подключён в
Российская Федерация
соответствующий разъём на маршрутизаторе, а его вилка
2) Попробуйте подключить кабель к другому порту
Тел.: 8 (499) 754-55-60 (Москва)
хорошо вставлена в розетку.
на маршрутизаторе, убедитесь, что Вы используете
8 (800) 250-55-60 (звонок бесплатный из любого региона РФ)
E-mail: support.ru@tp-link.com
правильный и исправный кабель.
Форум: http://forum.tp-linkru.ru/
2) Убедитесь, что напряжение сети соответствует
Режим работы: с понедельника по субботу, с 9:00 до 21:00 (мск)
требованиям входного напряжения маршрутизатора.
3) Выключите питание и снова включите его через
*Кроме воскресений и праздничных дней в Российской Федерации.
некоторое время.
Украина
ООО «ТІПІ-ЛІНК ЮКРЕЙН»
Отдел поддержки: 0800 505 508
Почему страница веб-утилиты отображается
4) Убедитесь, что IP-адрес Вашего компьютера
указан в одной подсети с маршрутизатором.
Стоимость звонка: бесплатно для городской связи
Что делать, если я забыл имя пользователя и
не как должно?
Операторы мобильной связи: в зависимости от тарифов различных операторов
пароль для входа в маршрутизатор?
5) Если Вам так и не удалось войти в веб-утилиту
E-mail: support.ua@tp-link.com
Пожалуйста, сделайте следующее:
Время работы: с понедельника по пятницу, с 10:00 до 22:00
настройки, восстановите заводские настройки
Восстановите заводские настройки маршрутизатора.
маршрутизатора. Настройте параметры IP на
По всему миру
IP-адрес для входа в маршрутизатор: http://192.168.0.1, имя
1) Обновите Ваш веб-браузер или замените его на другой,
компьютере следующим образом: IP-адрес 192.168.0.x
Тел.: +86 755 2650 4400
пользователя/пароль по умолчанию: admin/admin. После
затем попробуйте снова зайти в веб-утилиту.
(где “x” любое число от 2 до 254), Маска подсети:
Стоимость звонка: в зависимости от тарифов различных операторов
сброса настроек все текущие настройки маршрутизатора
255.255.255.0.
международной связи, услуги IDD (прямой набор
международного номера).
будут утеряны, однако их можно импортировать, если Вы
2) Если всплывающее окно блокируется, измените уровень
E-mail: support@tp-link.com
создавали резервный файл с настройками.
защиты веб-браузера.
Время работы: круглосуточно без выходных
TP-LINK TECHNOLOGIES CO., LTD.
www.tp-linkru.com
Перед Вами Руководство пользователя устройства wi-fi, роутера TP-LINK TL-R600VPN V1. Вы можете ознакомиться и скачать данное руководство по эксплуатации бесплатно.
Инструкция по применению на русском языке, предложенная производителем, позволяет
правильно использовать Вашу бытовую технику и электронику.
-
 1
1
-
2
-
3
-
4
-
5
-
6


инструкцияTP-Link SafeStream TL-R600VPN

TL-R600VPN
Gigabit Broadband VPN Router
REV2.0.0
1910010932
Посмотреть инструкция для TP-Link SafeStream TL-R600VPN бесплатно. Руководство относится к категории маршрутизаторы (роутеры), 2 человек(а) дали ему среднюю оценку 8.9. Руководство доступно на следующих языках: английский. У вас есть вопрос о TP-Link SafeStream TL-R600VPN или вам нужна помощь? Задайте свой вопрос здесь
- Chapter 1. Introduction
- Chapter 2. Hardware Installation
- Chapter 3. Quick Installation Guide
- Chapter 4. Configuring the Router
- Appendix A: Specifications
- Appendix B: Preventing Lightning
- Appendix C: FAQ
- Appendix D: Glossary
Главная
| TP-Link | |
| SafeStream TL-R600VPN | TL-R600VPN V1 | |
| маршрутизатор (роутер) | |
| 0112039993281, 0132018350744, 0163120541218, 0172302830873, 0313480523861, 0320127552269, 0606121040057, 0731215290114, 0778890698408, 0801038410553, 0803983008281, 0806293536956, 0807030505587, 0807320172369, 0809185824674, 0809186281292, 0809385676127, 4055895290674, 5054484474302, 5054533474307, 5054629339497, 5425656036046, 6935364041168, 6935364041250, 7432307474438, 7432307772794, 8459730411754 | |
| английский | |
| Руководство пользователя (PDF) |
Сеть
| Подключение Ethernet | Да |
| Скорость передачи данных Ethernet LAN | 10,100,1000 Мбит/с |
| Свивка кабеля | 10/100/1000Base-T(X) |
| Стандарты сети | IEEE 802.3, IEEE 802.3ab, IEEE 802.3u |
| Тип Ethernet интерфейса | Гигабитный Ethernet |
| Поддержка VLAN | Да |
| Сопутствующие соединения | 20000 |
| Статический роутинг | Да |
Порты и интерфейсы
| Количество портов Ethernet LAN ( RJ-45) | 5 |
Протоколы
| Поддерживаемые сетевые протоколы | TCP/IP, DHCP, ICMP, NAT, PPPoE, SNTP, HTTP, DNS, IPsec, PPTP |
| DHCP клиент | Да |
| DHCP сервер | Да |
| Поддержка DMZ | Да |
Характеристики управления
| Управление через веб-интерфейс | — |
| Universal Plug and Play (UPnP) | Да |
| Обновляемое встроенное ПО | Да |
| Кнопка сброса установок | Да |
Безопасность
| Защита с помощью брандмауэра | Stateful packet inspection (SPI) firewall |
| Алгоритмы шифрования данных | — |
| описание фильтрации | Domain |
| Фильтрация MAC-адресов | Да |
| Количество туннелей VPN | 20 |
| Поддержка VPN (виртуальной частной сети) | Psec/PPTP |
| Фильтрация по IP адресу | Да |
| Фильтрация URL-адресов | Да |
| Брандмауэр | Да |
Свойства
| Флэш-память | 8 MB |
| Оперативная память | 64 MB |
| Сертификация | CE, FCC, RoHS |
| Поддерживаемые операционные системы Windows | Windows 2000, Windows 2000 Professional, Windows 7 Home Premium, Windows 7 Home Premium x64, Windows 7 Professional, Windows 7 Professional x64, Windows 7 Starter, Windows 7 Starter x64, Windows 7 Ultimate, Windows 7 Ultimate x64, Windows 98SE, Windows NT, Windows Vista Business, Windows Vista Business x64, Windows Vista Home Basic, Windows Vista Home Basic x64, Windows Vista Home Premium, Windows Vista Home Premium x64, Windows Vista Ultimate, Windows Vista Ultimate x64, Windows XP Home, Windows XP Home x64, Windows XP Professional, Windows XP Professional x64 |
| Поддерживаемые операционные системы Mac | Да |
| Поддерживаемые операционные системы Linux | Да |
| Тип внутренней памяти | DDR2 |
Энергопитание
| Входящее напряжение сети | 100 — 240 V |
| Частота входящего переменного тока | 50 — 60 Hz |
| Тип источника питания | Кабель переменного тока |
Условия эксплуатации
| Диапазон температур при эксплуатации | 0 — 40 °C |
| Диапазон температур при хранении | -40 — 70 °C |
| Диапазон относительной влажности при эксплуатации | 10 — 90 % |
| Диапазон относительной влажности при хранении | 5 — 90 % |
Вес и размеры
| Ширина | 209 mm |
| Глубина | 126 mm |
| Высота | 26 mm |
| Вес | — g |
Дизайн
| Монтаж в стойку | Нет |
| Светодиодные индикаторы | LAN, Power, WAN |
| Цвет товара | Черный |
Данные об упаковке
| Поставляемые кабели | AC, LAN (RJ-45) |
| Краткая инструкция пользователя | Да |
| Высота упаковки | 60 mm |
| Ширина упаковки | 254 mm |
| Масса брутто | 670 g |
| Глубина упаковки | 190 mm |
Характеристики беспроводной LAN
WAN подключение
| Ethernet WAN | Да |
| DSL WAN | Нет |
| Слот для SIM-карты | Нет |
| Совместимость с 3G / 4G USB модемом | Нет |
| Нет |
показать больше
Не можете найти ответ на свой вопрос в руководстве? Вы можете найти ответ на свой вопрос ниже, в разделе часто задаваемых вопросов о TP-Link SafeStream TL-R600VPN.
Не нашли свой вопрос? Задайте свой вопрос здесь
-
Инструкции по эксплуатации
1

TP-LINK TL-R600VPN V2 инструкция по эксплуатации
(148 страниц)
- Языки:Русский
-
Тип:
RAR -
Размер:
8.58 MB -
Описание:
SafeStream широкополосный гигабитный VPN-маршрутизатор
Просмотр
На NoDevice можно скачать инструкцию по эксплуатации для TP-LINK TL-R600VPN V2. Руководство пользователя необходимо для ознакомления с правилами установки и эксплуатации TP-LINK TL-R600VPN V2. Инструкции по использованию помогут правильно настроить TP-LINK TL-R600VPN V2, исправить ошибки и выявить неполадки.