
- Manuals
- Brands
- Traktor Manuals
- DJ Equipment
- Kontrol S4
- Setup manual
-
Contents
-
Table of Contents
-
Troubleshooting
-
Bookmarks
Quick Links
Related Manuals for Traktor Kontrol S4
Summary of Contents for Traktor Kontrol S4
-
Page 1
Setup Guide… -
Page 2
Disclaimer The information in this document is subject to change without notice and does not represent a commitment on the part of Native Instruments GmbH. The software described by this docu- ment is subject to a License Agreement and may not be copied to other media. No part of this publication may be copied, reproduced or otherwise transmitted or recorded, for any purpose, without prior written permission by Native Instruments GmbH, hereinafter referred to as Na- tive Instruments. -
Page 3
Contact Germany Native Instruments GmbH Schlesische Str. 29-30 D-10997 Berlin Germany www.native-instruments.de Native Instruments North America, Inc. 6725 Sunset Boulevard 5th Floor Los Angeles, CA 90028 www.native-instruments.com Japan Native Instruments KK YO Building 3F Jingumae 6-7-15, Shibuya-ku, Tokyo 150-0001 Japan www.native-instruments.co.jp ©… -
Page 4: Table Of Contents
Table of Contents Table of Contents Welcome to the TRAKTOR KONTROL S4 Setup Guide ………… 7 What Is Included in the Box? …………………. 7 Document Conventions ………………….. 8 Software Installation ………………..9 Read Before Installing …………………… 9 Installation on Mac OS X ………………….9 2.2.1…
-
Page 5
Connecting Headphones ………………….35 Connecting an Amplification System ………………36 Final Preparations ……………………37 Starting the TRAKTOR Software on Your Computer …………..38 Using the S4 with Your iOS Device …………….39 Connecting the S4 to Your iOS Device ………………40 Connecting the Power Supply ………………… -
Page 6
Table of Contents Support ……………………47 Knowledge Base / Online Support / Readme …………….47 Forum ……………………….48 Updates ……………………….48 Product Returns ………………….49 Traktor Kontrol S4 — Setup Guide — 6… -
Page 7: Welcome To The Traktor Kontrol S4 Setup Guide
▪ How to activate your TRAKTOR version using the Service Center application ▪ How to connect the devices and get your TRAKTOR KONTROL S4 system up and running ▪ How to make use of your iOS device with the TRAKTOR KONTROL S4 ▪…
-
Page 8: Document Conventions
Welcome to the TRAKTOR KONTROL S4 Setup Guide Document Conventions Document Conventions This document uses particular formatting to point out special facts and to warn you of poten- tial issues. The icons introducing the following notes let you see what kind of information can…
-
Page 9: Software Installation
Software Installation Read Before Installing Before starting the TRAKTOR software installer, here are some points to be aware of: ▪ Make sure you have downloaded the TRAKTOR software to your computer by following the in- structions on the registration page: http://www.native-instruments.com/go-s4 If you have already registered your device but need to download the installer again, you can find the relevant downloads in the «My Account»…
-
Page 10: Select The Components To Install
The components selection screen of the installation program. Basic Installation: This installs the TRAKTOR software along with its documentation. This com- ponent cannot be deselected. It also installs the Service Center application (required for acti- vation of your product) and the Controller Editor application, which allows you to configure the controllerʼs MIDI assignments for using the controller with other applications than TRAKTOR.
-
Page 11
Software Installation Installation on Mac OS X Traktor Kontrol S4: This installs the driver for the TRAKTOR KONTROL S4 controller. If you do not intend to use a TRAKTOR KONTROL S4 controller on your computer, you can deactivate the checkbox. -
Page 12: Enter Your Password
To proceed, enter your password and click OK. ► The selected components will be installed. → 2.2.4 Complete the Installation After the components have been installed, you need to restart your computer. Traktor Kontrol S4 — Setup Guide — 12…
-
Page 13: Installation On Windows
After your computer has restarted, continue reading in chapter ↑3, Product Activation ► with Service Center of this Setup Guide for information about product activation. Installation on Windows This section describes the process of installing the TRAKTOR software on Windows. Traktor Kontrol S4 — Setup Guide — 13…
-
Page 14: Locate And Start The Installation Program
After you have accepted the software license agreement, the installer window displays the fea- tures available for installation. The components selection screen of the installation program. Basic Installation: This installs the TRAKTOR software along with its documentation. This com- ponent cannot be deselected. Traktor Kontrol S4 — Setup Guide — 14…
-
Page 15: Confirm The Application Installation Path
Controller Editor: The Controller Editor application allows you to configure your controller for use as a MIDI controller with applications other than the TRAKTOR software. This component will automatically be installed unless a newer version of Controller Editor already exists on your computer.
-
Page 16: Select Your Hardware Drivers
Software Installation Installation on Windows It is strongly recommended to install the TRAKTOR software to the default location. If you still need to change the install location, click Change to open a Folder Selection dialog and select the desired destination folder.
-
Page 17: Complete The Software Installation
On the last screen of the installation program, click Finish to complete the installation ► and exit the installation program. Continue reading in chapter ↑3, Product Activation with Service Center of this Setup Guide for information about product activation. Traktor Kontrol S4 — Setup Guide — 17…
-
Page 18: Product Activation With Service Center
Within this folder, a subfolder labeled Service Center holds the correspond- ing application. Double-click the Service Center application to start the activation procedure. It is necessary to activate your Native Instruments product in order to use its full functionality. Traktor Kontrol S4 — Setup Guide — 18…
-
Page 19: Log In Into Your User Account
► If you do not have a Native Instruments account yet, click on Create new User Account. ► Fill in the address form. The password will be sent to you via e-mail. Traktor Kontrol S4 — Setup Guide — 19…
-
Page 20: Activate The Product
Activate the Product The product activation screen of Service Center. Enter the software serial number in the number field. The software serial number is locat- ed on the registration flyer, which you can find in your TRAKTOR KONTROL S4 product box. Click Activate to proceed.
-
Page 21: Finish The Online Activation
↑3.2, Updating Your Product. ▪ If no updates are available, the button in the bottom right corner of the screen reads Exit. You can click it to close Service Center. Traktor Kontrol S4 — Setup Guide — 21…
-
Page 22: Updating Your Product
Select the updates you want to download by checking the checkboxes on the left. We rec- ommend downloading all preselected updates. Click Download. The download will start. Traktor Kontrol S4 — Setup Guide — 22…
-
Page 23: Download The Updates
The product update in progress. Depending on the file size and the speed of your internet connection, downloading the files may take a while. We strongly recommend that you always install the latest updates. Traktor Kontrol S4 — Setup Guide — 23…
-
Page 24: Open Your Download Folder
After all files have been downloaded successfully, you will be asked to open the download fold- Click to open the download folder. ► After the download folder has opened, you can quit Service Center by clicking Exit. ► Traktor Kontrol S4 — Setup Guide — 24…
-
Page 25: Install The Updates
If the computer you want to use Native Instruments products on is permanently not connected to the internet, you can activate the products utilizing the Offline activation procedure. Note that you will need a second computer that is connected to the internet. Traktor Kontrol S4 — Setup Guide — 25…
-
Page 26: Start The Offline Activation
Start Service Center. If no internet connection is detected, you will be redirected to the Internet connection screen pictured above. In the Continue without connection to the internet area at the bottom of the screen, click Offline. You will be forwarded to the Activate screen. Traktor Kontrol S4 — Setup Guide — 26…
-
Page 27: Create The Activation Request File
Create the Activation Request File The offline activation screen of Service Center. On the Activate screen, click Create. The Activate screen will display fields in which to ► enter the serial number (see next step). Traktor Kontrol S4 — Setup Guide — 27…
-
Page 28: Enter The Serial Number
Enter the Serial Number The product activation screen of Service Center. Enter the software serial number in the number field. The software serial number is locat- ed on the registration flyer, which you can find in your TRAKTOR KONTROL S4 product box. Click Create to save the Activation Request File (ActivationRequestFile.html).
-
Page 29: Transfer The Activation Request File
Follow the instructions on the Service Center product activation web page. As a new Na- tive Instruments user you will need to create a new account before you can log in. Transfer the Activation Return file back to your audio computer. Traktor Kontrol S4 — Setup Guide — 29…
-
Page 30: Open The Activation Return File
On your audio computer, start Service Center again. In the Continue without connection to the internet area at the bottom of the screen, click Offline. Select the Activate tab and click Open to load the Activation Return file. Traktor Kontrol S4 — Setup Guide — 30…
-
Page 31: Finish The Offline Activation
Native Instruments user account information. Download all relevant up- dates from the Personal Update Manager to your internet computer, transfer them to your music computer utilizing portable storage media, and install them. Traktor Kontrol S4 — Setup Guide — 31…
-
Page 32: Further Information
Further Information Further Information For details on your registered products and their serial numbers as well as information on li- censes and NI user account settings, please see My Account: http://www.native-instru- ments.com/my-account/ Traktor Kontrol S4 — Setup Guide — 32…
-
Page 33: Using The S4 With Your Computer
Using the S4 with Your Computer If you are using the S4 with your computer, follow the instructions in this section. Before con- necting the devices, and setting up your TRAKTOR KONTROL S4, here are some points to be aware of: ▪…
-
Page 34: Turning On The Device
Connect the computer end (flat rectangle plug) of the USB cable to an available USB 2.0 port (or later) on your computer. Turning on the Device To turn your S4 device on: Traktor Kontrol S4 — Setup Guide — 34…
-
Page 35: Connecting Headphones
S4’s top panel) is set to minimum! Then, slowly increase the headphone volume while music is playing until it reaches the desired listening level To connect your headphones to the TRAKTOR KONTROL S4: Traktor Kontrol S4 — Setup Guide — 35…
-
Page 36: Connecting An Amplification System
S4 to minimum before you proceed. Then, slowly increase the volume while music is playing until it reaches the desired listening level To connect your power amplifier or active speakers to the TRAKTOR KONTROL S4: Traktor Kontrol S4 — Setup Guide — 36…
-
Page 37: Final Preparations
Turn on the amplification system (active speakers or power amplifier with passive speak- ers). Later on, when the software is running and you have loaded tracks to TRAKTOR’s Decks, grad- ually raise the volume controls while music is playing until a comfortable listening level is reached.
-
Page 38: Starting The Traktor Software On Your Computer
(for example on your desk- top). The TRAKTOR window with the Setup Wizard’s start screen in front of it will open. Con- → figure TRAKTOR following the steps in the Setup Wizard. For more information on TRAK- TOR’s Setup Wizard, please refer to the TRAKTOR Getting Started Guide.
-
Page 39: Using The S4 With Your Ios Device
Using the S4 with Your iOS Device The TRAKTOR KONTROL S4 is designed to work with the TRAKTOR DJ app on iOS devices. In this section we will describe the S4’s key functions when using it with the TRAKTOR DJ app.
-
Page 40: Connecting The S4 To Your Ios Device
Connecting the S4 to Your iOS Device Connecting the S4 to Your iOS Device To connect the TRAKTOR KONTROL S4 to your iOS device: Connect the device end (USB plug type B, device connector) of the included Native In- struments iOS cable to the USB socket on the rear panel of the S4.
-
Page 41
Connect the plug of the power cable to a power outlet. Connect the 15V male plug end of the power supply’s cable to the power supply input on the rear panel of your TRAKTOR KONTROL S4. Traktor Kontrol S4 — Setup Guide — 41… -
Page 42: Connecting Headphones
S4 to minimum before you proceed. Then, slowly increase the volume while music is playing until a desired listening level is reached. To connect your power amplifier or active speakers to the TRAKTOR KONTROL S4: Traktor Kontrol S4 — Setup Guide — 42…
-
Page 43: Final Preparations
Turn on the amplification system (active speakers or power amplifier with passive speak- ers). Later on, when the software is running and you have loaded tracks to TRAKTOR DJ’s Decks, gradually raise the volume controls while music is playing until a comfortable listening level is reached.
-
Page 44: Launching The Traktor Dj App
Launching the TRAKTOR DJ App Launching the TRAKTOR DJ App Launch the TRAKTOR DJ app on your iOS device by tapping its icon. TRAKTOR DJ will now acknowledge the connection of the S4. In the case of running TRAKTOR DJ on your iPad, the following dialog box will be displayed the first time the devices are connected.
-
Page 45: What’s Next
What’s Next? What’s Next? ▪ For information on how to operate the S4 and how to use it with the TRAKTOR software, please refer to the TRAKTOR KONTROL S4 Manual. You can access the TRAKTOR KON- TROL S4 Manual via the Open Manual… entry from the…
-
Page 46: Troubleshooting And Faq
If you hear clicks and/or drop-outs when a track is playing, you might need to increase the la- tency setting of your TRAKTOR KONTROL S4. To learn how to do this, please refer to the TRAKTOR KONTROL S4 Manual, which thoroughly describes the TRAKTOR KONTROL S4 Control Panel —…
-
Page 47: Support
When installing new software or software updates, a Readme file is included that contains late breaking news and new information that was not yet included in the documentation. Please open and read this Readme file before contacting Technical Support. Traktor Kontrol S4 — Setup Guide — 47…
-
Page 48: Forum
Native Instruments applications when showing the details for an applica- tion within the Overview tab of the Service Center. Updates are available on the Update tab in Service Center or on our website under: http://www.native-instruments.com/updates. Traktor Kontrol S4 — Setup Guide — 48…
-
Page 49: Product Returns
Please contact our Technical Support team prior to returning an item. If your product needs to be returned, they will assign you an RA (Return Authorization) number to expedite the process- ing of your return. Contact Native Instruments Technical Support http://www.native-instruments.com/support Traktor Kontrol S4 — Setup Guide — 49…
Посмотреть инструкция для Native Instruments Traktor Kontrol S4 бесплатно. Руководство относится к категории лицензии на программное обеспечение и дополнения, 1 человек(а) дали ему среднюю оценку 7.5. Руководство доступно на следующих языках: английский. У вас есть вопрос о Native Instruments Traktor Kontrol S4 или вам нужна помощь? Задайте свой вопрос здесь
- Title Page
- Disclaimer
- Contact
- Table of Contents
- 1 Welcome to the World of TRAKTOR KONTROL S4!
- 2 TRAKTOR KONTROL S4 Overview
- 3 Importing Your Music
- 4 Tutorials
- 5 Hardware Reference
- 6 Customizing TRAKTOR KONTROL S4
- 7 The S4 Audio Interface and Control Panel
- 8 Troubleshooting and Help
- 9 Appendix A – Common Setups
- 10 Appendix B – Technical Information
- 11 Appendix C – Quick References
- Index
Нужна помощь?
У вас есть вопрос о Native Instruments а ответа нет в руководстве? Задайте свой вопрос здесь Дай исчерпывающее описание проблемы и четко задайте свой вопрос. Чем детальнее описание проблемы или вопроса, тем легче будет другим пользователям Native Instruments предоставить вам исчерпывающий ответ.
Количество вопросов: 0

Главная
| Native Instruments | |
| Traktor Kontrol S4 | |
| лицензия на программное обеспечение и дополнения | |
| английский | |
| Руководство пользователя (PDF), Инструкция по установке (PDF) |
Не можете найти ответ на свой вопрос в руководстве? Вы можете найти ответ на свой вопрос ниже, в разделе часто задаваемых вопросов о Native Instruments Traktor Kontrol S4.
Инструкция Native Instruments Traktor Kontrol S4 доступно в русский?
Не нашли свой вопрос? Задайте свой вопрос здесь
Нет результатов

Native Instruments Traktor Kontrol Z2
инструкция90 страниц(ы)

Native Instruments Traktor Kontrol F1
инструкция146 страниц(ы)

Native Instruments Maschine MK2
инструкция1021 страниц(ы)

Panda Remote Control
инструкция36 страниц(ы)

Acronis Backup Advanced f/ Active Directory 11.7
инструкция445 страниц(ы)

Trend Micro Worry-Free Business Security 7
инструкция4 страниц(ы)

D-Link DWC-1000-AP6
инструкция2 страниц(ы)

Wyse R class WES2009
инструкция26 страниц(ы)

AMX IS-SPX-XPRESS-P
инструкция128 страниц(ы)

Dell Wyse WES7 conversion kit for Z class
инструкция20 страниц(ы)
Посмотреть все Native Instruments руководства Посмотреть все Native Instruments лицензия на программное обеспечение и дополнения руководства

Manual

Disclaimer
The information in this document is subject to change without notice and does not represent a commitment on the part of Native Instruments GmbH. The software described by this document is subject to a License Agreement and may not be copied to other media. No part of this publication may be copied, reproduced or otherwise transmitted or recorded, for any purpose, without prior written permission by Native Instruments GmbH, hereinafter referred to as Native Instruments.
“Native Instruments”, “NI” and associated logos are (registered) trademarks of Native Instruments GmbH.
Mac, Mac OS, GarageBand, Logic, iTunes and iPod are registered trademarks of Apple Inc., registered in the U.S. and other countries.
Windows, Windows Vista and DirectSound are registered trademarks of Microsoft Corporation in the United States and/or other countries.
All other trade marks are the property of their respective owners and use of them does not imply any affiliation with or endorsement by them.
Document authored by: Native Instruments GmbH
Software version: 2.5 (05/2012)
Special thanks to the Beta Test Team, who were invaluable not just in tracking down bugs, but in making this a better product.

Contact
Germany
Native Instruments GmbH
Schlesische Str. 29-30
D-10997 Berlin
Germany
www.native-instruments.de
USA
Native Instruments North America, Inc. 6725 Sunset Boulevard
5th Floor
Los Angeles, CA 90028 USA www.native-instruments.com
© Native Instruments GmbH, 2012. All rights reserved.

Table of Contents
Table of Contents
|
1 Welcome to the World of TRAKTOR KONTROL S4! ……………………………………………….. |
11 |
|||
|
1.1 |
What Is TRAKTOR KONTROL S4? …………………………………………………………………………………….. |
11 |
||
|
1.2 |
The TRAKTOR KONTROL S4 Documentation ……………………………………………………………………… |
11 |
||
|
1.2.1 |
Where To Start …………………………………………………………………………………………….. |
11 |
||
|
1.2.2 |
In This Manual …………………………………………………………………………………………….. |
14 |
||
|
1.2.3 |
Manual Conventions …………………………………………………………………………………….. |
15 |
||
|
1.3 |
System Requirements ………………………………………………………………………………………………….. |
16 |
||
|
2 TRAKTOR KONTROL S4 Overview …………………………………………………………………….. |
17 |
|||
|
3 |
Importing Your Music …………………………………………………………………………………… |
20 |
||
|
3.1 |
What Is the Track Collection? ……………………………………………………………………………………….. |
20 |
||
|
3.2 |
Importing Music Folders ………………………………………………………………………………………………. |
21 |
||
|
3.3 |
Tracks Managed by iTunes …………………………………………………………………………………………… |
22 |
||
|
3.3.1 |
Playing Tracks Managed by iTunes …………………………………………………………………. |
22 |
||
|
3.3.2 |
Importing a Selection of Tracks from iTunes …………………………………………………….. |
24 |
||
|
3.3.3 |
Importing iTunes Playlists …………………………………………………………………………….. |
24 |
||
|
4 |
Tutorials ……………………………………………………………………………………………………. |
25 |
||
|
4.1 |
Playing Your First Track ……………………………………………………………………………………………….. |
25 |
||
|
4.1.1 |
Quick Loading a Track ………………………………………………………………………………….. |
26 |
||
|
4.1.2 |
Playing the Track …………………………………………………………………………………………. |
28 |
||
|
4.1.3 |
If You Don’t Hear the Track ……………………………………………………………………………. |
29 |
||
|
4.2 |
Mixing In a Second Track ……………………………………………………………………………………………… |
31 |
||
|
4.2.1 |
Pre-listening a Second Track Directly from the Browser …………………………………….. |
32 |
||
|
4.2.2 |
Loading and Playing the Second Track ……………………………………………………………. |
33 |
||
|
4.2.3 |
Using Headphones to Prepare the Mix …………………………………………………………….. |
33 |
||
|
4.2.4 |
Synchronizing the Second Track …………………………………………………………………….. |
34 |
||
|
4.2.5 |
Setting a Cue Point as Starting Point ……………………………………………………………… |
35 |
TRAKTOR KONTROL S4 — Manual — 4

|
Table of Contents |
|||
|
4.2.6 |
Interlude: In Case the Left Track Is Over ………………………………………………………….. |
37 |
|
|
4.2.7 |
Mixing In the Track by Using the Channel EQ and Filter …………………………………….. |
37 |
|
|
4.2.8 |
Doing Everything by Hand ……………………………………………………………………………… |
38 |
|
|
4.3 |
Adjusting Levels …………………………………………………………………………………………………………. |
41 |
|
|
4.3.1 |
The Theory ………………………………………………………………………………………………….. |
41 |
|
|
4.3.2 |
The Practice ………………………………………………………………………………………………… |
42 |
|
|
4.4 |
Looping and Cueing …………………………………………………………………………………………………….. |
45 |
|
|
4.4.1 |
Playing with Loops ……………………………………………………………………………………….. |
45 |
|
|
4.4.2 |
Using Hotcues …………………………………………………………………………………………….. |
48 |
|
|
4.5 |
Using Samples in Your Mix …………………………………………………………………………………………… |
50 |
|
|
4.5.1 |
Loading a Sample from the Collection …………………………………………………………….. |
51 |
|
|
4.5.2 |
Triggering the Sample ………………………………………………………………………………….. |
52 |
|
|
4.5.3 |
Capturing a Sample From a Track Deck …………………………………………………………… |
54 |
|
|
4.5.4 |
Unloading a Sample …………………………………………………………………………………….. |
56 |
|
|
4.5.5 |
Getting More Controls Over the Samples …………………………………………………………. |
56 |
|
|
4.6 |
Adding FX |
………………………………………………………………………………………………………………….. |
57 |
|
4.6.1 |
Group Mode ………………………………………………………………………………………………… |
58 |
|
|
4.6.2 |
Getting the FX Unit Ready ……………………………………………………………………………… |
58 |
|
|
4.6.3 |
Assigning Decks to the FX Unit and Bringing In the FX ………………………………………. |
59 |
|
|
4.6.4 |
Controlling the FX Unit …………………………………………………………………………………. |
60 |
|
|
4.6.5 |
Single Mode ………………………………………………………………………………………………… |
61 |
|
|
4.6.6 |
Storing a Snapshot ………………………………………………………………………………………. |
61 |
|
|
4.7 |
Using the Loop Recorder ………………………………………………………………………………………………. |
62 |
|
|
4.7.1 |
Choosing a Source ……………………………………………………………………………………….. |
63 |
|
|
4.7.2 |
Recording a Loop …………………………………………………………………………………………. |
64 |
|
|
4.7.3 |
Overdubbing ……………………………………………………………………………………………….. |
66 |
|
|
4.7.4 |
Further Uses of the Recorded Loop …………………………………………………………………. |
66 |
|
|
4.8 |
Synchronization ………………………………………………………………………………………………………….. |
67 |
TRAKTOR KONTROL S4 — Manual — 5

|
Table of Contents |
|||
|
4.8.1 |
Introduction ………………………………………………………………………………………………… |
67 |
|
|
4.8.2 |
Who’s the Master? ……………………………………………………………………………………….. |
69 |
|
|
4.8.3 |
Other Useful Tools for Synching ……………………………………………………………………… |
72 |
|
|
4.8.4 |
In Conclusion ………………………………………………………………………………………………. |
73 |
|
|
5 Hardware Reference …………………………………………………………………………………….. |
74 |
||
|
5.1 |
Areas and Concepts …………………………………………………………………………………………………….. |
74 |
|
|
5.1.1 |
Decks …………………………………………………………………………………………………………. |
74 |
|
|
5.1.2 |
Mixer ………………………………………………………………………………………………………….. |
78 |
|
|
5.1.3 |
FX Units ……………………………………………………………………………………………………… |
79 |
|
|
5.1.4 |
Loop Recorder ……………………………………………………………………………………………… |
80 |
|
|
5.1.5 |
Front and Rear Panels ………………………………………………………………………………….. |
81 |
|
|
5.2 |
Types of Control Elements ……………………………………………………………………………………………. |
81 |
|
|
5.2.1 |
Buttons ………………………………………………………………………………………………………. |
81 |
|
|
5.2.2 |
Knobs ………………………………………………………………………………………………………… |
82 |
|
|
5.2.3 |
Encoders …………………………………………………………………………………………………….. |
83 |
|
|
5.2.4 |
Jog Wheels ………………………………………………………………………………………………….. |
83 |
|
|
5.2.5 |
Faders ……………………………………………………………………………………………………….. |
84 |
|
|
5.2.6 |
Displays, Meters and Indicators …………………………………………………………………….. |
84 |
|
|
5.2.7 |
Switches …………………………………………………………………………………………………….. |
85 |
|
|
5.2.8 |
Sockets ………………………………………………………………………………………………………. |
86 |
|
|
5.3 |
The Decks |
………………………………………………………………………………………………………………….. |
86 |
|
5.3.1 |
Deck Flavors and Structure ……………………………………………………………………………. |
86 |
|
|
5.3.2 |
SHIFT Buttons: Accessing Secondary Functions ………………………………………………… |
88 |
|
|
5.3.3 |
Deck Assign Buttons: Switching Deck Focus …………………………………………………….. |
88 |
|
|
5.3.4 |
Deck Display: Informed at a Glance ………………………………………………………………… |
89 |
|
|
5.3.5 |
LOAD Button ……………………………………………………………………………………………….. |
91 |
|
|
5.3.6 |
Jog Wheel ……………………………………………………………………………………………………. |
92 |
|
|
5.3.7 |
Tempo Fader and Tempo Offset Buttons ………………………………………………………….. |
93 |
TRAKTOR KONTROL S4 — Manual — 6

|
Table of Contents |
|||
|
5.3.8 |
Loop Section ……………………………………………………………………………………………….. |
96 |
|
|
5.3.9 |
Sample Play Buttons ……………………………………………………………………………………. |
99 |
|
|
5.3.10 |
Hotcue Buttons ……………………………………………………………………………………………. |
102 |
|
|
5.3.11 |
PLAY and CUE Buttons …………………………………………………………………………………. |
106 |
|
|
5.3.12 |
SYNC Button ……………………………………………………………………………………………….. |
107 |
|
|
5.3.13 |
SHIFT Button ……………………………………………………………………………………………….. |
108 |
|
|
5.4 |
The Mixer |
…………………………………………………………………………………………………………………… |
109 |
|
5.4.1 …………………………………………………………………………………………….. |
Mixer Overview |
110 |
|
|
5.4.2 …………………………………………………………………………………………. |
The Main Section |
110 |
|
|
5.4.3 …………………………………………………………………… |
The Channels and the Crossfader |
112 |
|
|
5.4.4 ………………………………………………………………………………………. |
The Master Display |
118 |
|
|
5.4.5 ……………………………………………………… |
The BROWSE Encoder and BROWSE Button |
121 |
|
|
5.5 |
The FX Units ………………………………………………………………………………………………………………. |
122 |
|
|
5.5.1 ………………………………………………………………………… |
Single Mode and Group Mode |
123 |
|
|
5.5.2 ………………………………………………………………………………………… |
FX Unit Reference |
123 |
|
|
5.6 |
The Loop ……………………………………………………………………………………………………….Recorder |
124 |
|
|
5.6.1 …………………………………………………………………………………………….. |
DRY/WET Knob |
125 |
|
|
5.6.2 ………………………………………………………………………………………………… |
SIZE Button |
125 |
|
|
5.6.3 …………………………………………………………………………………………………. |
REC Button |
126 |
|
|
5.6.4 ………………………………………………………………………………………………. |
UNDO Button |
126 |
|
|
5.6.5 ………………………………………………………………………………………………… |
PLAY Button |
127 |
|
|
5.6.6 …………………………………………………………… |
Copying and Saving the Recorded Loop |
127 |
|
|
5.7 |
Browsing, …………………………………………………………………………………….Loading and Copying |
127 |
|
|
5.7.1 ……………………………………………………………………….. |
Browsing Tracks and Samples |
128 |
|
|
5.7.2 ………………………………………………………………………………….. |
Copying across the S4 |
131 |
|
|
5.8 |
The Rear ……………………………………………………………………………………………………………Panel |
133 |
|
|
5.8.1 ………………………………………………………………………………………… |
MAIN OUT Section |
134 |
|
|
5.8.2 …………………………………………………………………………….. |
INPUT CHANNEL D Section |
134 |
TRAKTOR KONTROL S4 — Manual — 7

|
Table of Contents |
|||
|
5.8.3 |
INPUT CHANNEL C Section …………………………………………………………………………….. |
135 |
|
|
5.8.4 |
POWER Section ……………………………………………………………………………………………. |
136 |
|
|
5.9 |
The Front Panel …………………………………………………………………………………………………………… |
136 |
|
|
5.10 |
TRAKTOR KONTROL S4 Modes ……………………………………………………………………………………….. |
137 |
|
|
5.10.1 |
Native Traktor Mode ……………………………………………………………………………………… |
137 |
|
|
5.10.2 |
MIDI Mode …………………………………………………………………………………………………… |
137 |
|
|
6 Customizing TRAKTOR KONTROL S4 …………………………………………………………………. |
140 |
||
|
6.1 |
The Preferences Window ………………………………………………………………………………………………. |
140 |
|
|
6.2 |
Settings and Preferences for the S4 Control Elements ………………………………………………………. |
141 |
|
|
6.3 |
S4 Control Options ………………………………………………………………………………………………………. |
143 |
|
|
6.3.1 |
Restore Default ……………………………………………………………………………………………. |
148 |
|
|
6.3.2 |
Calibration …………………………………………………………………………………………………. |
149 |
|
|
6.4 |
Other Settings of Interest …………………………………………………………………………………………….. |
149 |
|
|
6.4.1 |
Switching the Deck Flavors ……………………………………………………………………………. |
150 |
|
|
6.4.2 |
Adjusting the Input Routing ………………………………………………………………………….. |
150 |
|
|
6.4.3 |
Using Four FX Units ……………………………………………………………………………………… |
153 |
|
|
6.5 |
The Setup Wizard ………………………………………………………………………………………………………… |
154 |
|
|
7 The S4 Audio Interface and Control Panel …………………………………………………………. |
161 |
||
|
7.1 |
Settings on Mac OS X ………………………………………………………………………………………………….. |
161 |
|
|
7.2 |
Settings on Windows: The Control Panel …………………………………………………………………………. |
162 |
|
|
7.2.1 |
Opening the Control Panel …………………………………………………………………………….. |
162 |
|
|
7.2.2 |
Audio Settings Page …………………………………………………………………………………….. |
163 |
|
|
7.2.3 |
Diagnostics Page …………………………………………………………………………………………. |
166 |
|
|
7.3 |
Using the S4 Audio Interface with Other Music Applications ……………………………………………… |
167 |
|
|
7.4 |
Using the S4 as your Default Audio Interface ………………………………………………………………….. |
168 |
|
|
7.4.1 |
Windows XP ………………………………………………………………………………………………… |
168 |
|
|
7.4.2 |
Windows Vista and 7 ……………………………………………………………………………………. |
168 |
|
|
7.4.3 |
Mac OS X ……………………………………………………………………………………………………. |
168 |
TRAKTOR KONTROL S4 — Manual — 8

|
Table of Contents |
||||
|
8 |
Troubleshooting and Help ……………………………………………………………………………… |
170 |
||
|
8.1 |
TRAKTOR Won’t Start …………………………………………………………………………………………………… |
170 |
||
|
8.2 |
Hardware-related Problems ………………………………………………………………………………………….. |
170 |
||
|
8.2.1 |
Basics ……………………………………………………………………………………………………….. |
170 |
||
|
8.2.2 |
USB and Driver Issues ………………………………………………………………………………….. |
171 |
||
|
8.2.3 |
Update the Driver ………………………………………………………………………………………… |
172 |
||
|
8.2.4 |
USB — related Power Issues ……………………………………………………………………………… |
172 |
||
|
8.2.5 |
Using the TRAKTOR KONTROL S4 with a Laptop ………………………………………………… |
173 |
||
|
8.3 |
Loose Jog Wheel Top Plate ……………………………………………………………………………………………. |
173 |
||
|
8.4 |
TRAKTOR Crashes ……………………………………………………………………………………………………….. |
174 |
||
|
8.5 |
Getting Help ………………………………………………………………………………………………………………. |
174 |
||
|
8.5.1 |
Knowledge Base / Readme / Online Support …………………………………………………….. |
174 |
||
|
8.5.2 |
Forum ………………………………………………………………………………………………………… |
175 |
||
|
8.6 |
Updates |
…………………………………………………………………………………………………………………….. |
175 |
|
|
9 |
Appendix A – Common Setups ………………………………………………………………………… |
176 |
||
|
9.1 |
TRAKTOR ………………………………………………………………………………..KONTROL S4 Basic Setup |
176 |
||
|
9.2 |
Adding a ……………………………………………………………………………………………………Microphone |
186 |
||
|
9.3 |
Using a ……………………………………………………………………………………………………Master Mixer |
189 |
||
|
9.4 |
TRAKTOR ………………………………………………………….KONTROL S4 with Turntables or CD Decks |
189 |
||
|
9.5 |
TRAKTOR …………………………………………………………………………..KONTROL S4 with Slave Mixer |
193 |
||
|
10 |
Appendix B – Technical …………………………………………………………………Information |
195 |
||
|
10.1 |
Technical ……………………………………………………………………………………………….Specifications |
195 |
||
|
10.2 |
Block Diagram ……………………………………………………………………………………………………………. |
199 |
||
|
11 |
Appendix C – Quick ……………………………………………………………………….References |
200 |
||
|
11.1 |
Track Deck …………………………………………………………………………………………..Quick Reference |
200 |
||
|
11.2 |
Remix Deck ………………………………………………………………………………………….Quick Reference |
203 |
||
|
11.3 |
Mixer Quick ………………………………………………………………………………………………….Reference |
207 |
||
|
11.3.1 ……………………………………………………………………….. |
Main Section Quick Reference |
207 |
TRAKTOR KONTROL S4 — Manual — 9

|
Table of Contents |
|||
|
11.3.2 |
Channel and Crossfader Quick Reference ………………………………………………………… |
208 |
|
|
11.3.3 |
Master Display Quick Reference …………………………………………………………………….. |
209 |
|
|
11.4 |
FX Unit Quick Reference ………………………………………………………………………………………………. |
209 |
|
|
11.5 |
Loop Recorder Quick Reference ……………………………………………………………………………………… |
210 |
|
|
11.6 |
Browsing, Loading and Copying Quick Reference …………………………………………………………….. |
211 |
|
|
Index |
………………………………………………………………………………………………………… |
212 |
TRAKTOR KONTROL S4 — Manual — 10
![]()
Welcome to the World of TRAKTOR KONTROL S4!
What Is TRAKTOR KONTROL S4?
1Welcome to the World of TRAKTOR KONTROL S4!
We are delighted that you have chosen TRAKTOR KONTROL S4!
1.1What Is TRAKTOR KONTROL S4?
TRAKTOR KONTROL S4 is the first fully integrated hardware and software DJ performance system created by the makers of TRAKTOR. TRAKTOR KONTROL S4 fuses the full-featured TRAKTOR KONTROL S4 hardware controller with the state-of-the-art TRAKTOR software.
The all-in-one TRAKTOR KONTROL S4 controller offers you an ergonomic DJ mixer, a built-in 24-bit/96 kHz audio interface, and a high-resolution control surface perfectly tailored for TRAKTOR. All controls needed for live performances now are at your fingertips!
—The TRAKTOR team at Native Instruments.
1.2The TRAKTOR KONTROL S4 Documentation
1.2.1Where To Start
TRAKTOR KONTROL S4 provides you with many information sources. The main sources are meant to be read in the following sequence:
▪Setup Guide
▪TRAKTOR KONTROL S4 Manual (this document) and video tutorials
▪TRAKTOR 2 Getting Started Guide
Additionally, an overview poster and keyboard shortcut overview card will help you in your everyday work with TRAKTOR KONTROL S4. Finally, the Controller Editor Reference Manual deals specifically with the Controller Editor (see below).
Hereafter is a quick description of each of these documentation sources.
TRAKTOR KONTROL S4 — Manual — 11
Welcome to the World of TRAKTOR KONTROL S4!
The TRAKTOR KONTROL S4 Documentation
Some of these documents (Setup Guide, Overview Poster and Keyboard Shortcut Overview Card) are available in printed form in the product box. The whole documentation is also available in PDF format and located within the TRAKTOR KONTROL S4 installation folder on your hard drive. You can also access these documents from the application’s Help menu.
Your First Stop: the Setup Guide
A printed Setup Guide is included in the product box. It will guide you through the software and hardware installation of your TRAKTOR KONTROL S4 system, from the very beginning to the first sound coming through your speakers. This should be your first stop in learning TRAKTOR KONTROL S4.
First read the Setup Guide. Then proceed with this TRAKTOR KONTROL S4 Manual to get more familiar with TRAKTOR KONTROL S4!
TRAKTOR KONTROL S4 Manual
After having read the Setup Guide and followed its instructions, your TRAKTOR KONTROL S4 system should be up and running. The next step is to read this TRAKTOR KONTROL S4 Manual. The TRAKTOR KONTROL S4 Manual first gives you a practical approach to TRAKTOR KONTROL S4. Then, it provides you with a detailed reference of your TRAKTOR KONTROL S4 hardware controller along with extra information (solving common issues, specifications, etc.). The next section will give you an overview of the manual content.
Video Tutorials
The Native Instruments website provides you with a bunch of video tutorials that give you a hands-on approach to many sides of the TRAKTOR KONTROL S4 workflow. To see them, point your favorite browser to following URL:
http://www.native-instruments.com/s4tutorials.
TRAKTOR 2 Getting Started Guide
The Getting Started guide gives you a practical approach to the TRAKTOR software. Here you will learn about additional features of TRAKTOR that extend beyond the TRAKTOR KONTROL S4 controller.
TRAKTOR KONTROL S4 — Manual — 12

Welcome to the World of TRAKTOR KONTROL S4!
The TRAKTOR KONTROL S4 Documentation
TRAKTOR 2 Manual
For in-depth information on all features provided by the TRAKTOR software, please refer to the TRAKTOR 2 Manual. It is available as a PDF file in the Documentation subfolder of the TRAKTOR 2 installation folder.
Overview Poster
In the product box, you will also find a double-sided overview poster depicting the top panel of your TRAKTOR KONTROL S4 hardware controller: on one side, you will find an overview of the main areas and their functionality; on the other side, you will find a description of every control element to be found on the Decks, the FX Units, the Loop Recorder and the rear and front panels of your controller. This poster can be used as a quick reference when using your TRAKTOR KONTROL S4, saving you from opening the manual each time you feel uncertain about a particular control element.
Keyboard Shortcut Overview Card
A keyboard shortcut overview card is included in the product box. It gives you the dedicated keyboard mappings for the TRAKTOR software.
Controller Editor Reference Manual
Beside of using your TRAKTOR KONTROL S4 hardware controller together with the TRAKTOR software, you can also use it as a powerful and highly versatile MIDI controller to pilot any other MIDI-capable application or device. This is made possible by the Controller Editor software, a little application that allows you to precisely define all MIDI assignments for your TRAKTOR KONTROL S4 controller. The Controller Editor should have been installed during the TRAKTOR KONTROL S4 installation procedure. For more info on this, please refer to the Controller Editor Reference Manual available as a PDF file in the Documentation subfolder of the Controller Editor installation folder on your hard disk.
The Jog Wheel Calibration Guide
The jog wheels of the S4 where designed to recalibrate themselves dynamically during the use of the controller; however, there is one situation in which manual recalibration of the jog wheels can be necessary. If you accidentally turn the controller upside-down while it is connected to your computer, the jog wheel sensors might lose track of the position of the jog wheels’ top plates. As a result, the jog wheels may not respond as expected when you turn it back to
TRAKTOR KONTROL S4 — Manual — 13

Welcome to the World of TRAKTOR KONTROL S4!
The TRAKTOR KONTROL S4 Documentation
the normal position. If this occurs, the easiest way to resolve this is to switch the unit off and on again. Alternatively you can recalibrate the jog wheels manually in TRAKTOR. Please refer to the separate Jog Wheel Calibration Guide in the Documentation subfolder of the TRAKTOR 2 program folder.
1.2.2In This Manual
What you are reading now is the TRAKTOR KONTROL S4 Manual. This manual is structured as follows:
▪The first part is this introduction.
▪Chapter ↑2, TRAKTOR KONTROL S4 Overview quickly introduces you to the TRAKTOR KONTROL S4 user interface and its main areas, both on the hardware side and software side.
▪Chapter ↑3, Importing Your Music shows you how to import your own music into the powerful Track Collection of TRAKTOR, so that you can use all TRAKTOR KONTROL S4 features with your own tracks.
▪Chapter ↑4, Tutorials is a selection of tutorials focused on your controller. They will let you progressively discover how to use the various tools provided by TRAKTOR KONTROL S4. These practical examples will simplify the learning process and get you quickly started with computer-based DJing.
▪Chapter ↑5, Hardware Reference is an extensive reference of all hardware control elements to be found on your TRAKTOR KONTROL S4 hardware controller. Whenever you are unsure about the functionality of a particular control element, you will find here all the necessary information.
▪Chapter ↑6, Customizing TRAKTOR KONTROL S4 shows you how to customize TRAKTOR KONTROL S4 in order to make it fit your particular needs.
▪Chapter ↑7, The S4 Audio Interface and Control Panel describes the on-board audio interface of the TRAKTOR KONTROL S4 hardware controller.
▪Chapter ↑8, Troubleshooting and Help provides you with a list of most common problems and their solutions, along with info on how to get help.
▪Finally, three appendixes provide you with useful additional information:
TRAKTOR KONTROL S4 — Manual — 14

Welcome to the World of TRAKTOR KONTROL S4!
The TRAKTOR KONTROL S4 Documentation
◦Appendix A shows you how to integrate TRAKTOR KONTROL S4 to your studio or live setup in various configurations.
◦Appendix B gives you the technical specifications of the TRAKTOR KONTROL S4 controller.
◦Appendix C provides you with Quick Reference tables for all control elements on your controller. Should you have any doubt about a particular control element, you will find here a useful reminder!
1.2.3Manual Conventions
This section introduces you to the signage and text highlighting used in this manual. This manual uses particular formatting to point out special facts and to warn you of potential issues. The icons introducing these notes let you see what kind of information is to be expected:
Whenever this exclamation mark icon appears, you should read the corresponding note carefully and follow the instructions and hints given there if applicable.
This light bulb icon indicates that a note contains useful extra information. This information may often help you to solve a task more efficiently, but does not necessarily apply to the setup or operating system you are using; however, it’s always worth a look.
Furthermore, the following formatting is used:
▪Text appearing in (drop-down) menus (such as Open…, Save as… etc.) and paths to locations on your hard drive or other storage devices is printed in italics.
▪Text appearing elsewhere (labels of buttons, controls, text next to checkboxes etc.) is printed in blue. Whenever you see this formatting applied, you will find the same text appearing somewhere on the screen.
▪Important names and concepts are printed in bold.
►Single instructions are introduced by this play button type arrow.
→Results of actions are introduced by this smaller arrow.
TRAKTOR KONTROL S4 — Manual — 15

Welcome to the World of TRAKTOR KONTROL S4!
System Requirements
Pet Names for Software and Hardware
Throughout the documentation, we will refer to the TRAKTOR KONTROL S4 hardware controller either as “TRAKTOR KONTROL S4” or simply “S4.”
Likewise, the TRAKTOR software will often be referred as “TRAKTOR PRO” or simply “TRAKTOR.”
Hence, a sentence like “TRAKTOR KONTROL S4 is a highly integrated DJ system allowing you to control TRAKTOR from your S4” shouldn’t sound weird to you.
1.3System Requirements
For the minimum system requirements your computer needs to meet, see the TRAKTOR specifications section of the Native Instruments website:
http://www.native-instruments.com/#/en/products/dj/traktor-pro-2/specifications/?page=2050
To check the compatibility with several operating systems, please have a look at: http:// www.native-instruments.com/compatibility
TRAKTOR KONTROL S4 — Manual — 16

TRAKTOR KONTROL S4 Overview
2TRAKTOR KONTROL S4 Overview
This mini-chapter will quickly introduce you to TRAKTOR KONTROL S4’s main areas and concepts, both on your TRAKTOR KONTROL S4 hardware controller and in the TRAKTOR software.
Take the time to read these few pages, as they will familiarize you with the way TRAKTOR KONTROL S4 works and let you catch sight of the power of its design. If you’re familiar with importing music files in TRAKTOR, you can skip ↑3, Importing Your Music and start right away with the tutorials in chapter ↑4, Tutorials after having read this chapter.
TRAKTOR KONTROL S4 — Manual — 17
TRAKTOR KONTROL S4 Overview
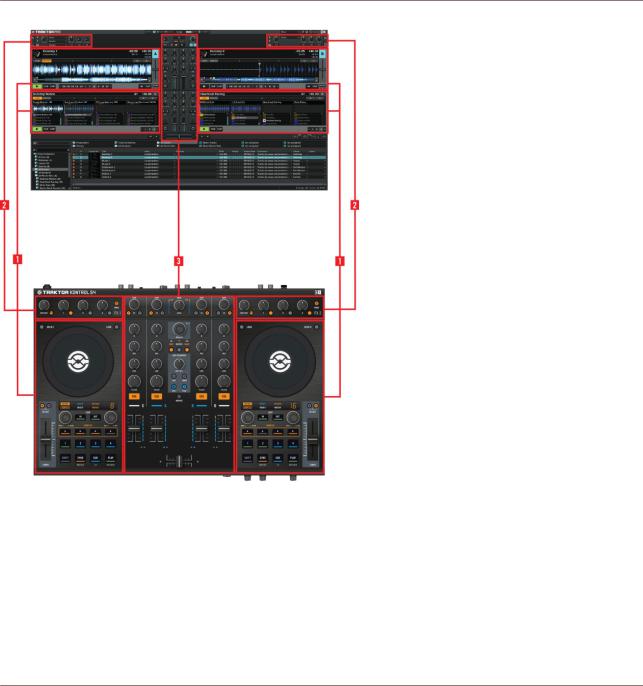
Hardware controller and software side by side
▪(1) Decks: TRAKTOR KONTROL S4 provides you with four virtual Decks. The Decks are the place where tracks, Samples and live input are played back. The Decks can be seen as the virtual equivalent to the good old vinyl or CD decks—just with a bunch of powerful additional features and the flexibility of a computer-based system. The two Decks on your S4 hardware controller allow you to control the four software Decks (labeled A, B, C and
D)available in TRAKTOR: The left Deck on your S4 can control Decks A and C in the software. The right Deck on your S4 can control Decks B and D in the software.
TRAKTOR KONTROL S4 — Manual — 18

TRAKTOR KONTROL S4 Overview
▪(2) FX Units: The signals coming from the Decks can be further processed by two FX Units located at the top of your hardware and software interface. You can even activate two additional FX Units in the software, allowing you to process each Deck individually. The FX Units give you access to the whole collection of high-quality FX included in TRAKTOR: The left FX Unit on your S4 can control the left FX Unit(s) in the software. The right FX Unit on your S4 can control the right FX Unit(s) in the software.
▪(3) Mixer: Sitting in the middle of your TRAKTOR KONTROL S4 controller and of TRAKTOR’s window, the Mixer receives on its four channels the audio signals coming from the four Decks described above. There is one channel for each Deck. As any DJ mixer, the Mixer’s purpose basically is to adjust the relative level of each channel, to control the channels’ frequency content, possibly feeding them into the FX Units before sending the overall result to the Main section at its top — and in the end, to generate the mix that is sent to your audience.
You will find a more detailed presentation at the beginning of chapter ↑5, Hardware Reference, followed by a thorough description of each control element to be found on your TRAKTOR KONTROL S4 controller. For an in-depth explanation of each and every functionality provided by the TRAKTOR software, please refer to the separate TRAKTOR 2 Manual. It is available as a PDF file in the Documentation subfolder of the TRAKTOR 2 installation folder.
TRAKTOR KONTROL S4 — Manual — 19
Importing Your Music
What Is the Track Collection?
3Importing Your Music
Most likely you already have a collection of music files on your computer. For those of you who can’t wait for mixing their own tracks, this chapter is for you! You will learn here how to quickly import your music into the powerful Track Collection of TRAKTOR.
If you prefer to start learning how to use TRAKTOR KONTROL S4 right away, skip this chapter and go on with the tutorials in chapter ↑4, Tutorials, which make use of the demo tracks provided with TRAKTOR KONTROL S4. You can always come back here at a later point.
3.1What Is the Track Collection?
The Track Collection (or simply “Collection”) represents the whole music that you have used, that you are using or that you plan to use in TRAKTOR.
Based on the music files on your computer, the Track Collection is just another way to display them. The Collection makes it easy to organize, tag, and prepare your tracks for being integrated into your mix.
Worth to note is that the Track Collection doesn’t care about the actual file structure on your hard disk, nor will it alter this structure in any way (as long as you don’t delete your files from within TRAKTOR).
The Track Collection is:
▪A database storing numerous information about your music files.
▪A convenient way to represent and search your music files, according to many of their characteristics (tags) like title, artist name, BPM, genre, length, etc.
▪The place where TRAKTOR-specific information about your tracks is stored.
▪The basis on which you can create your Playlists.
The Track Collection is not:
▪Moving, copying nor converting any audio file to some secret location.
▪Modifying in any way the hierarchic structure of your files on your hard disk.
TRAKTOR KONTROL S4 — Manual — 20
![]()
Importing Your Music
Importing Music Folders
To make use of the Track Collection, you have to populate it by importing your music files.
3.2Importing Music Folders
TRAKTOR offers an easy import function for tracks stored on your hard drive:
►Right-click (Windows) or [Ctrl]+click (Mac OS X) on the Track Collection entry in the Browser Tree and choose Import Music Folders from the menu.
The contextual menu for the Track Collection, with the Import Music Folders entry selected.
By default this process imports all music files contained in the My Music folder of your operating system.
TRAKTOR analyzes music for certain characteristics (BPM, etc.) when importing tracks for the first time. This function takes some time to process. Be sure to prepare the tracks you want to use in a DJ set beforehand if you want to use features such as synching or Auto Looping with them.
If you have stored tracks in other folders or on external storage devices, you can add these folders to the list of TRAKTOR Music Folders as follows:
1.Open Preferences > File Management.
TRAKTOR KONTROL S4 — Manual — 21
Importing Your Music
Tracks Managed by iTunes
2.Click Add… at the bottom of the Music Folders section.
3.Navigate to a folder you want to add.
4.Confirm with OK.
Repeat to add all of your Music Folders.
Subfolders are automatically included in the scan. Hence, you don’t need to add them to this list.
3.3Tracks Managed by iTunes
If you have organized your music collection with iTunes, TRAKTOR KONTROL S4 offers direct access to your iTunes Library and your iTunes playlists.
3.3.1Playing Tracks Managed by iTunes
You can browse your iTunes Library and playlists directly from your TRAKTOR KONTROL S4. By the way, this will be the opportunity to introduce you to browsing and loading from your hardware controller. For this, we will use following control elements:
▪ Any of the jog wheels:
TRAKTOR KONTROL S4 — Manual — 22
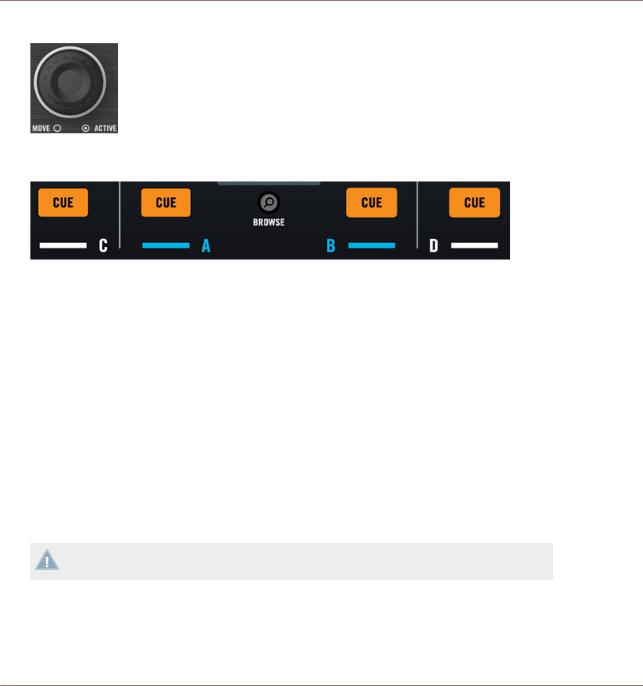
Importing Your Music
Tracks Managed by iTunes
▪Any of the LOOP MOVE encoders, located below each jog wheel:
▪The CUE buttons, located on each channel of the Mixer, and the BROWSE button in <between:
Please do the following:
1.Push the BROWSE button to enter Browse mode. On your computer screen, the Browser fills up the whole TRAKTOR window.
2.Turn the LOOP MOVE encoders to scroll through the Browser Tree until the iTunes icon gets selected, then push the encoder to open that node.
3.Browse through the iTunes Library and playlists in the same manner: turn the LOOP MOVE encoder to scroll within the iTunes node and push the encoder to expand/collapse the selected node.
4.Once the desired playlist is selected in the Browser Tree, select a track from the list by spinning the jog wheel.
5.To load the selected track on to the left or right Deck, press the flashing CUE button on the corresponding channel of the Mixer (A or B).
6.Repeat steps 3-5 to load a track on the other Deck.
7.When you are done, press the BROWSE button again to leave the Browse mode.
The iTunes tree node represents a read-only view on your iTunes Library and playlists. Editing functions are not available in this view.
Software Equivalent
Of course, you can do all this from the TRAKTOR user interface too:
TRAKTOR KONTROL S4 — Manual — 23

Importing Your Music
Tracks Managed by iTunes
1.Click the iTunes icon in the Browser Tree to open that node.
2.Browse through the Library and playlists as you would do in iTunes.
3.Load a track into a Deck as you would do from a normal TRAKTOR Playlist—for example by dragging the track onto that Deck.
3.3.2Importing a Selection of Tracks from iTunes
You can import a selection of tracks from your iTunes Library into the Track Collection via the TRAKTOR user interface:
1.Click the iTunes icon in the Browser Tree to open that node.
2.Select the tracks to import into the Track Collection.
3.Drag the selection onto the Track Collection icon in the Browser Tree.
4.Alternatively right-click (Windows) or [Ctrl]-click (Mac OS X) on the selection and choose Import to Collection in the contextual menu.
3.3.3Importing iTunes Playlists
You can directly import iTunes playlists as TRAKTOR Playlists via the TRAKTOR user interface:
1.Click the iTunes icon in the Browser Tree to open that node.
2.Select the playlist to be imported.
3.Drag the playlist onto the Playlists icon.
4.Alternatively right-click (Windows) or [Ctrl]-click (Mac OS X) on the playlist and choose Import to Playlists in the contextual menu.
TRAKTOR KONTROL S4 — Manual — 24
Tutorials
Playing Your First Track
4Tutorials
This chapter will guide you through the most common tasks that you will encounter during your work with TRAKTOR KONTROL S4.
The tutorials are workflow-oriented. They start with the simplest tasks and progressively lead you to more complex operation, helping you to get more and more familiar with your TRAKTOR KONTROL S4 system. After reading this, you should have the basic know-how allowing you to mix with TRAKTOR KONTROL S4.
The tutorials presented here and in the following chapter make use of the included demo tracks, which were copied to your hard disk during the TRAKTOR KONTROL S4 installation procedure. Thus, you can follow these tutorials even if you haven’t imported your own music yet into the Track Collection. For more info on how to import your music into the Collection, please refer to chapter ↑3, Importing Your Music above.
4.1Playing Your First Track
This first tutorial will show you how to load and play a track, how to check the needed audio outputs and how to quickly troubleshoot your system if no music can be heard.
Prerequisites
We assume here that your TRAKTOR KONTROL S4 system is already up and running. If it’s not the case, please follow first the instructions in the separate Setup Guide and come back here when you’re done!
In case you already changed some settings in TRAKTOR KONTROL S4 before you start with these tutorials, we strongly recommend you to reset your TRAKTOR KONTROL S4 system to the factory settings by doing the following:
1.In the TRAKTOR software, click the Help menu in the menu bar at the top of your screen (on Mac OS X) or at the top of the window (on Windows), and select Help > Start Setup Wizard.
2.In the window that opens, just click Finish at the bottom right corner without touching anything else.
TRAKTOR KONTROL S4 — Manual — 25
Tutorials
Playing Your First Track
→Your TRAKTOR KONTROL S4 is now reset to the factory settings.
The tutorials presented here assume that TRAKTOR KONTROL S4 is in its default factory state. If it’s not the case, we cannot guarantee that you will experience what we describe here, and you might miss important things to know!
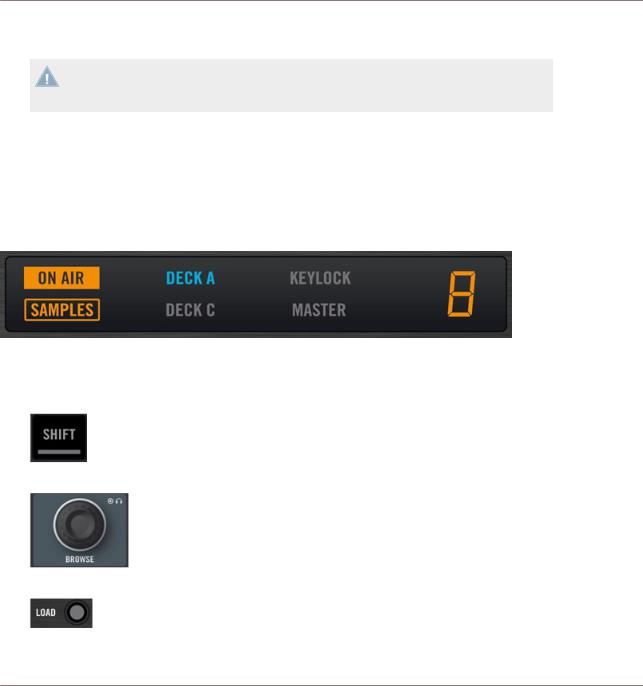
4.1.1Quick Loading a Track
Let’s load the track “Techno 1” from the included demo tracks on to Deck A.
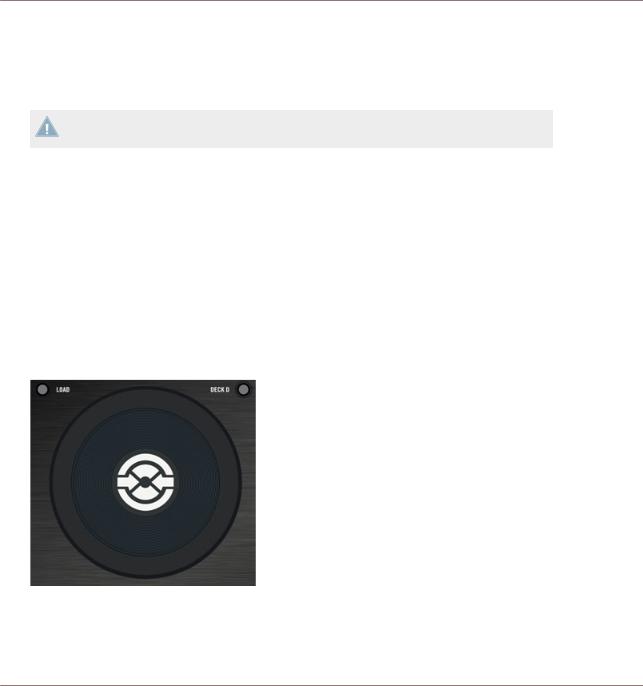
Since Deck A is sitting in the left part of the TRAKTOR window, we will use the left Deck on your S4. You can check this by looking at the left Deck’s display: you should see a lit blue indicator reading “DECK A”:
The Deck Display with a lit DECK A indicator
To select and load the track, we will use three control elements on your S4:
▪Any of the two SHIFT buttons (one at the bottom of each Deck):
▪The BROWSE encoder (in the top center of the Mixer):
▪The left Deck’s LOAD button (above the jog wheel):
TRAKTOR KONTROL S4 — Manual — 26
Tutorials
Playing Your First Track
While looking at the TRAKTOR window, do the following:
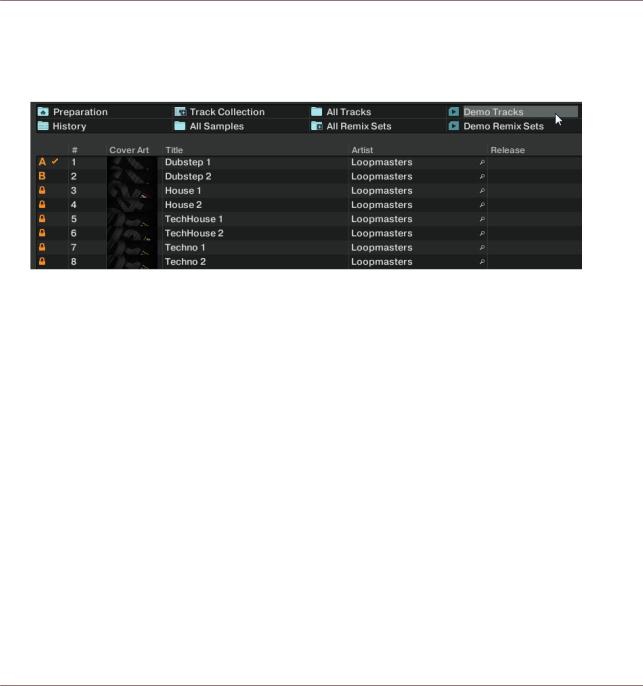
1.Hold SHIFT and turn the BROWSE encoder to select the Demo Tracks Favorite (Favorites are customizable shortcuts sitting at the top of the Browser in TRAKTOR’s window).
The tracks of the “Demo Tracks” Playlist appear below:
Release SHIFT and turn the BROWSE encoder to scroll through the Playlist and navigate to the track Techno 1.
2.Once the track is highlighted, press the LOAD button on the left Deck to load that track on to Deck A.
TRAKTOR KONTROL S4 — Manual — 27
Tutorials
Playing Your First Track
→The track is loaded. In TRAKTOR, its waveform and info appear on Deck A:
The LOAD button on the right Deck of your S4 would have loaded the track on to Deck B in
TRAKTOR.
In addition to using the S4 to load a track, you can also drag and drop tracks from the
Browser or from a folder on your computer directly into one of TRAKTOR’s Decks.
4.1.2Playing the Track
►Once the track is loaded, simply press the PLAY button at the bottom of the left Deck:
→The track starts playing. The PLAY button lights up and the waveform starts moving in TRAKTOR.
TRAKTOR KONTROL S4 — Manual — 28
Tutorials
Playing Your First Track
Again, pressing the PLAY button on the right Deck would have started the playback on
Deck B.
To Each Deck Its Own Channel
The audio playing on each Deck can be further shaped by the controls on the corresponding channel of the Mixer. Since the track is loaded on Deck A, you can control its sound on channel A (showing a lit blue “A” letter):
The Channel A
At this point you will probably hear some audio coming through your speakers or PA. If not, please check the following section.
4.1.3If You Don’t Hear the Track
If the track is playing on the Deck but the audio coming through your amplification system sounds too low, or if there is no sound at all, check the following:
TRAKTOR KONTROL S4 — Manual — 29
Tutorials
Playing Your First Track
▪At the bottom of your S4, verify that the crossfader is moved all the way to the left:
▪Above, the channel fader should be raised on channel A:
▪The channel meter (the vertical bar of LEDs along the channel fader, see picture above) should show some activity. If not, check that the HI, MID, LOW and FILTER knobs higher up on that channel are set to center position; at the top of the channel, push the GAIN encoder once to reset the channel’s input gain to 0 dB.
TRAKTOR KONTROL S4 — Manual — 30
![]()
Tutorials
Mixing In a Second Track
▪At the top center of the Mixer, the MAIN LEVEL knob should be turned at least part of the way to the right. You should see the MAIN LEVEL meters going up and down:
If not, at the top center of the TRAKTOR window, check that the MAIN knob is raised:
If you see some activity on the MAIN LEVEL meters of your S4 but don’t hear any sound, then double-check the connection starting with the cable going from the S4’s Main Outputs to your PA.
4.2Mixing In a Second Track
Now that you have learned how to quickly load and play tracks using the TRAKTOR KONTROL S4 (see the previous tutorial), let’s see how to mix in a second track. On the way, you will learn a few basic mixing tasks that every digital DJ needs to know: how to pre-listen tracks, synchronize tracks, start the playback at the right position, and mix the tracks together using the crossfader.
Prerequisites
We assume here that you already followed the instructions in the previous tutorial (see ↑4.1, Playing Your First Track). TRAKTOR KONTROL S4 now is in the following state:
▪ The track “Techno 1” is loaded on Deck A. The track is playing and audible.
TRAKTOR KONTROL S4 — Manual — 31

Tutorials
Mixing In a Second Track
▪ The crossfader is all the way to the left.
4.2.1Pre-listening a Second Track Directly from the Browser
Before we load another track, we will use TRAKTOR KONTROL S4’s Preview Player to pre-lis- ten the track in the headphones directly from the Browser.
The PHONES socket and headphones controls on the front panel
1.If it’s not already done, plug in a pair of headphones to the PHONES socket on the front panel of your S4.
2.On the right of the PHONES socket, turn the CUE VOL knob fully down and put on your headphones.
3.Next to the PHONES socket, Turn the CUE MIX knob fully counter-clockwise.
4.On the top panel of your S4, turn the BROWSE encoder to select any track in the Playlist.
5.Now press the BROWSE encoder.
The selected track is loaded into the Preview Player, as indicated by the Preview Play (headphones) indicator in the top right corner of the Master Display in the middle of your S4:
6.On the front panel, turn up the CUE VOL knob to a suitable level. You should hear the track playing in the Preview Player.
7.By turning the BROWSE encoder, you can seek through the track and pre-listen other parts of the track.
8.To unload the track from the Preview Player, press the BROWSE encoder again.
TRAKTOR KONTROL S4 — Manual — 32

Tutorials
Mixing In a Second Track
→You get back to the list browsing. You can select another track for pre-listening or load the desired track on a Deck.
4.2.2Loading and Playing the Second Track
We will choose the track “Techno 2” and load it on Deck B, as we did on Deck A in the previous tutorial:
1.Turn the BROWSE encoder to select the track Techno 2 in the Playlist.
2.Press the LOAD button on the right Deck to load the track on to Deck B. In the TRAKTOR window, the track info and waveform appear on Deck B.
3.Press the PLAY button on the right Deck to start the playback.
→The track starts playing. The PLAY button lights up and the waveform starts moving on TRAKTOR’s Deck.
We don’t hear anything from Deck B through the speakers yet because we have set the crossfader on the S4 all the way to the left—our plan is to slowly mix in the track on Deck B.
You can already give it a try: by slowly moving the crossfader to the right, you should hear the track on Deck B fade in, whereas the track on Deck A progressively fades out as you move the crossfader further to the right. Obviously, our mix is not satisfying at all yet: before mixing in the second track, we first have to beat-match it to the track playing on Deck A. So for now, pull the crossfader all the way back to the left.
If you don’t hear any sound coming from Deck B even with the crossfader all the way to the right, check the few troubleshooting guidelines in section ↑4.1.3, If You Don’t Hear the Track above.
4.2.3Using Headphones to Prepare the Mix
From now on, let’s get used to preparing our mix with headphones until the next track (here on Deck B) is ready to be mixed in.
TRAKTOR KONTROL S4 — Manual — 33

Tutorials
Mixing In a Second Track
The CUE button on channel B
►On your S4, press the CUE button on the channel B.
→The button lights up, indicating that Deck B is now sent to the Cue channel, which you will hear in your headphones.
At any time, use the CUE MIX knob nearby to adjust the balance between the cued track (Deck B) and the main mix (Deck A) in your headphones: turn it counter-clockwise when you want to concentrate on the cued track; turn it clockwise when you want to hear more of the main mix.
You are now ready to work on the track playing on Deck B without interfering with the main mix sent to your audience. Regardless of the mix that you’re hearing in your headphones, the main mix is still controlled by the crossfader and channel faders.
4.2.4Synchronizing the Second Track
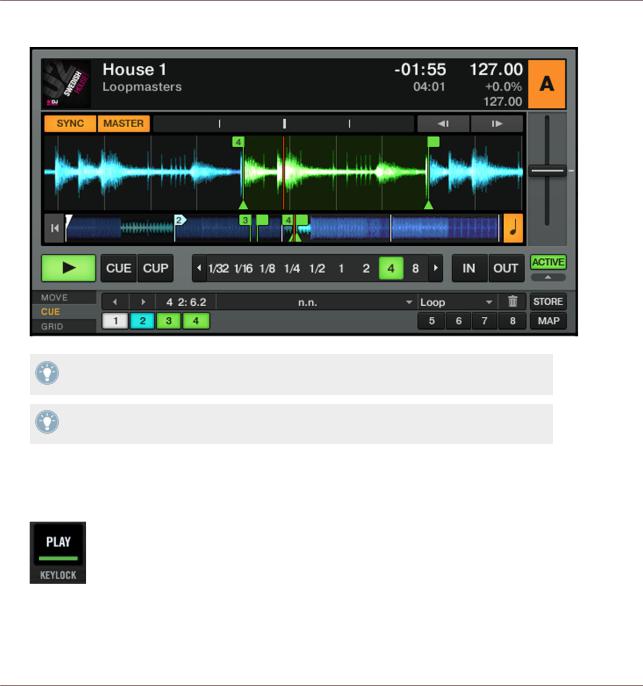
Before mixing in the track playing on Deck B, we will use TRAKTOR’s automatic Sync feature to adjust its tempo to that of Deck A. This is done in just one step via the SYNC button:
The SYNC button on the right Deck
TRAKTOR KONTROL S4 — Manual — 34

Tutorials
Mixing In a Second Track
►Press the SYNC button on the right Deck to synchronize its tempo and phase with those of Deck A.
→The SYNC button lights up. Now the two tracks are in perfect sync.
By slowly turning the CUE MIX knob on the front panel, you will hear the second track come into the mix in sync with Deck A.
Note that you should always adjust the tempo of the track that is not audible to the audience!
4.2.5Setting a Cue Point as Starting Point
You will probably want to have more control over which particular part of the track you mix in. For example, most of the time, not only the tempos but also the downbeats of both tracks should match. Using a particular point in a track (for mixing in, triggering, etc.) is called “cueing.”
TRAKTOR KONTROL S4 lets you mark points for cueing—we call them Cue Points. This notably allows you to re-use these points at a later stage, or in a later session.
The four unlit Hotcue buttons
►On the right Deck, whether or not the track is playing, simply press one of the unlit Hotcue buttons on a downbeat—let’s say the Hotcue button 1.
→The Hotcue button lights up in blue: you’ve just stored a Cue Point that you can return to simply by pressing the same Hotcue button again.
The first Hotcue button is now lit in blue.
TRAKTOR KONTROL S4 — Manual — 35

Tutorials
Mixing In a Second Track
Snapping to the Beats
You don’t have to worry about dropping a Hotcue directly on a beat: by default, TRAKTOR will make sure this happens automatically. This is because the so-called Snap mode is on, as you can see by the lit SNAP indicator on the Master Display, located in the middle of the Mixer:
The SNAP button and indicator on the Master Display
With Snap mode on, any point you set in the track will snap to the closest beat, thus ensuring that you get directly to that beat next time that you jump to that point.
Aligning the Tracks
Aligning both tracks is straightforward:
1.Make sure that Deck B is playing (its PLAY button must be lit).
2.When you hear a downbeat in the other track, press the Hotcue button you just used to store the downbeat position.
→The playback position on Deck B jumps to the stored Cue Point (as you can see in the TRAKTOR window), and the playback continues from there. Both tracks now are perfectly aligned, ready to be mixed.
Sticking to the Beats
Again, you don’t have to worry about pressing the lit Hotcue button exactly on the beat: by default, TRAKTOR will make sure that the beats of both tracks stick together and that the jump doesn’t ruin the beat matching. This is because the so-called Quantize mode is on, as you can see by the lit QUANT indicator on the Master Display (see picture above).
With Quantize mode on, whenever you jump through the track (e.g. by pressing a Hotcue button), the playback jumps to the nearest position that preserves the beat matching, thus ensuring that the current sync doesn’t get lost when you jump through the track.
TRAKTOR KONTROL S4 — Manual — 36

Tutorials
Mixing In a Second Track
4.2.6Interlude: In Case the Left Track Is Over
The track “Techno 1” on Deck A has been playing since we started with the tutorials, and it might happen that the playback reaches the end of the track. In this case, just do the following:
► On the left Deck, press SHIFT + CUE to skip back to the beginning of the track. You can then resume from where you left off.
4.2.7Mixing In the Track by Using the Channel EQ and Filter
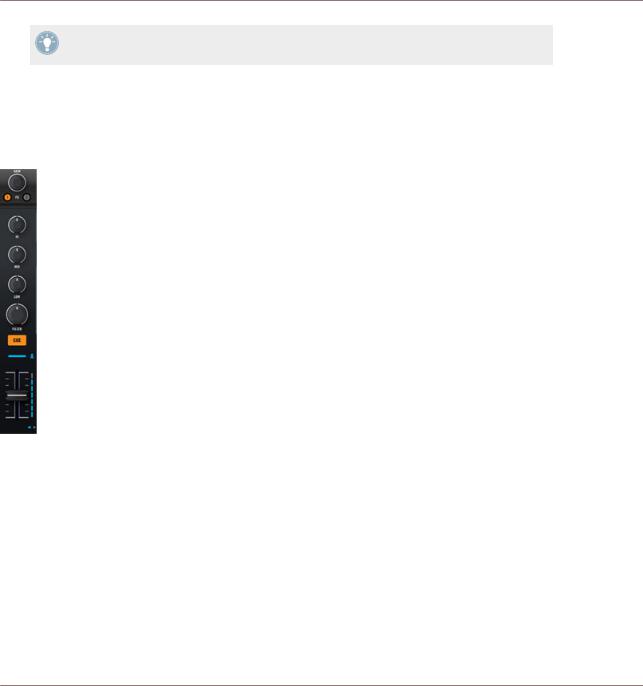
Now would be a great time to audition some of TRAKTOR KONTROL S4’s EQs and filters:
The EQ and FILTER knobs on channel B
►Turn any of the EQ or FILTER knob on channel B to hear the effect on the cued track.
TRAKTOR KONTROL S4 — Manual — 37

Tutorials
Mixing In a Second Track
The EQs and filters are excellent tools for making adjustments to tracks before mixing them in so that you get the smoothest transition possible. The most common technique is to filter the bassline out of the incoming track—having 2 basslines running rarely sounds good. Do the following:
We will now carry out a first version of the mix “for real”. Thus, turn the CUE MIX knob fully clockwise to hear the main mix in your headphones (or put off your phones and listen to your mix coming through your amplification system).
→You just did your first mix with TRAKTOR KONTROL S4!
4.2.8Doing Everything by Hand
You can also do your mix manually instead of using TRAKTOR’s sync and cueing facilities.
Most probably, you won’t do everything by hand in your everyday DJ work. Nevertheless, it is a good idea to get familiar with the “handcrafted” way:
▪It can be necessary when synching to a playing vinyl record or to the previous DJ.
▪You can combine it with TRAKTOR’s advanced features, thus further developing your own mixing style.
To show this, let’s mix a new track on Deck A with the one we just mixed in on Deck B.
From now on, the track on Deck B is “on air,” i.e. it is heard by your audience. Hence, we will now exclusively work on the left Deck, which controls Deck A in the software.
First Steps
1.First check that the crossfader is at full right.
2.With the track on Deck B still playing, load the track “House 1” onto Deck A (reminder: turn the BROWSE encoder to select the track in the list, then push LOAD on the left Deck).
At first, it may help to select a track with a similar BPM.
3.Press PLAY on the left Deck to start the playback of the new track.
4.On the same Deck, make sure the SYNC button is off.
TRAKTOR KONTROL S4 — Manual — 38

Tutorials
Mixing In a Second Track
5.On the Mixer, deactivate the CUE button above channel B’s fader and activate that of channel A to hear the new track in the headphone mix (you might need to adjust the CUE MIX knob accordingly).
Adjusting the Tempo
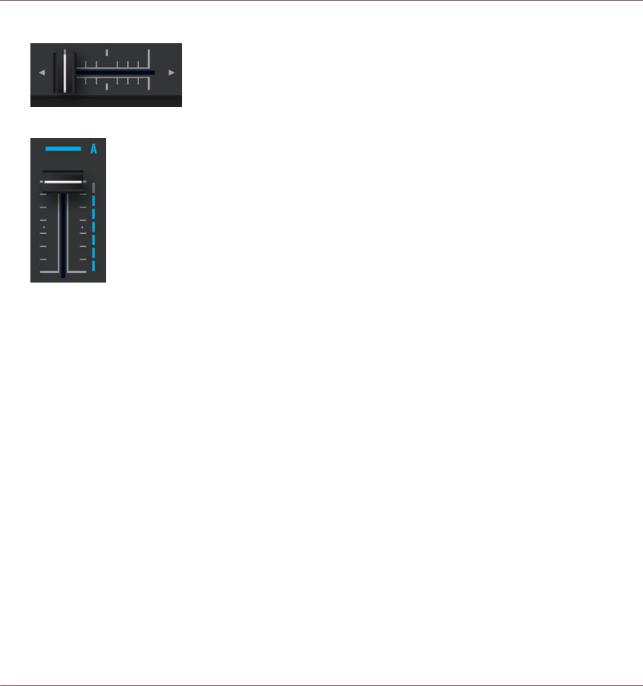
The tempo for each Deck can be manually controlled via the TEMPO fader:
Use the TEMPO fader to adjust the Deck’s tempo.
►Adjust the TEMPO fader on the left Deck until the track’s BPM either “sounds right,” or directly matches the value of the other track’s BPM, which is displayed at the top of Deck B in TRAKTOR.
Manually Cueing with the Jog Wheel
You can use the jog wheel to manually seek through the track and find a nice bring-in point:
TRAKTOR KONTROL S4 — Manual — 39

Tutorials
Mixing In a Second Track
Use the jog wheel to manually seek through the track.
1.On the left Deck, press and spin the jog wheel’s top plate to seek through the track. (You can also fast seek through the track by holding the SHIFT button at the bottom of the Deck while spinning the jog wheel.)
2.Once you have found an interesting point for cueing (let’s say a downbeat), keep pressing the top plate and release it when a downbeat arrives in the other track.
Deck A starts playing from that point.
Note that you could also stop the playback (by pressing the PLAY button) before you seek an interesting point with the jog wheel. Once you have found the point, you can release the jog wheel—since the Deck is not playing, you won’t lose the point. When a downbeat arrives in the other track, press PLAY again on the left Deck.
Aligning the Beats
In case you still hear a slight offset between both tracks, you can use the outer rim of the jog wheel to adjust the track’s phase and cancel the offset:
►On the left Deck, move the jog wheel’s outer rim in the desired direction to temporarily bend the tempo and adjust the phase in order to cancel any minor offset.
→Your tracks now perfectly match.
TRAKTOR KONTROL S4 — Manual — 40
![]()
Tutorials
Adjusting Levels
Note that this can also be useful when using TRAKTOR’s Sync feature. Indeed, in some situations, the automatic beat detection might need a slight correction: for example, in tracks with unusual low frequency content, the beat “feeling” might occur slightly after the beat as detected by TRAKTOR. If you couldn’t make it to manually correct the Beatgrid of your track before you go on stage, you can cancel the offset on the fly with the jog wheel’s outer rim.
Mixing In the New Track
►When you’re ready, you can bring the crossfader over from Deck B and slowly mix in the track in Deck A.
→You just did your first handmade mix with TRAKTOR KONTROL S4!
Don’t expect to be capable of manually matching beats right away, though—this requires intensive training and can’t be fully explained here in detail. Practice makes perfect!
4.3Adjusting Levels
Before going any further, we would like you to be aware of how important it is to have your mix at the right level. We provide you here with a few simple hints in order to get the best sound out of your mix.
Even if this section might look a bit technical, please take the time to read these few pages, as they can save you a lot of trouble, especially in a live situation!
4.3.1The Theory
By mixing, you blend together signals coming from different sources (and possibly process them on the way).
The basic rule is: you need to ensure that no signal is clipping, while simultaneously trying to use the full dynamic range available. Just to keep it short, there are two reasons behind this:
▪By using the full dynamic range available, you keep the noise level low relative to your mix. As a result, all the details of your music are better rendered.
TRAKTOR KONTROL S4 — Manual — 41

Tutorials
Adjusting Levels
▪When a signal is clipping, it is not getting louder, just worse. The loud parts (typically the beats) are cut, which both reduces the dynamic range and introduces distortion in your mix. The speakers will suffer from this—and so will your audience! (Be also prepared for some angered sound technician or club owner coming down on you.)
Hence, you should always make sure that your signals stay at levels that satisfy these two requirements.
4.3.2The Practice
To assist you in adjusting levels, the Mixer of your S4 is equipped with various level meters and controls. Each level meter consists of a bar of blue LEDs indicating the signal level, along with an orange LED at the top indicating the clipping.
A channel meter
The rule mentioned above can thus be translated as follows:
►Best practices when adjusting levels: Ensure that the displayed levels go high enough in the blue areas but don’t reach the orange LEDs, or only rarely.
Letting your levels go “in the red” (or orange in this case) and using signal clipping to let your mix sound dirtier is definitely not recommended: to do this, make use of the great FX selection of TRAKTOR KONTROL S4 instead!
Checking the Level on Each Channel
Each channel on the Mixer provides you with a vertical channel meter next to the fader. This meter shows you the pre-fader level of the signal on that channel, i.e. the level of the signal before it is adjusted by the channel fader. To adjust this level, use the GAIN encoder at the very top of the channel:
TRAKTOR KONTROL S4 — Manual — 42

Tutorials
Adjusting Levels
A GAIN encoder sits at the top of each channel
►Adjust the channel’s GAIN encoder so that the level displayed on the channel meter stays in the upper part of the blue area without reaching the orange clipping LED.
Note that the channel’s EQ and filter settings also affect the signal level, as well as the possible FX Unit(s) it is assigned to. Hence, when modifying any of these, you might need to readjust the GAIN encoder accordingly.
Of course, the artistic side of your tracks should not be overlooked: for tracks with a variable average level over time (e.g. a track starting with a soft intro), you should consider the loudest parts of the track when adjusting the channel level.
Matching Levels Between Channels
Moreover, in order to avoid any level jump when crossfading between two channels, the average channel levels should match:
►Before mixing in a cued channel, adjust its GAIN encoder so that its channel meter activity roughly matches that of the channel currently on air.
TRAKTOR already does this for you by automatically setting the level for each newly loaded track to a satisfying value. This so-called “Autogain” feature relies on the gain values extracted from your tracks. Nevertheless, depending on the particular EQ, filter and FX applied to the cued track, you might have to double-check the level consistency before you mix in the track. Moreover, what is important here is the average level of the specific part of the track that you’re about to mix in.
Checking the Main Level
The signals coming from all channels are mixed together according to the relative levels set by the channel faders and by the crossfader. This mix is then sent from TRAKTOR’s main output to the Main section:
TRAKTOR KONTROL S4 — Manual — 43

Tutorials
Adjusting Levels
The Main section on your S4
In this section, the MAIN LEVEL meters show you the (left and right) overall level of your mix before it is adjusted by the MAIN LEVEL knob. These meters actually mirror the MAIN meter in the Header of TRAKTOR. To adjust this level, use the MAIN knob right below in TRAKTOR’s Master panel:
The MAIN meter and knob in TRAKTOR
►Adjust the MAIN knob in TRAKTOR’s Master panel so that the values on your S4’s MAIN LEVEL meters stay in the upper part of the blue areas without reaching the orange clipping LEDs.
By default, a limiter is enabled on TRAKTOR’s main output. With this limiter enabled, the MAIN LEVEL meters’ clipping LEDs don’t indicate clipping anymore, but instead they indicate when the limiter kicks in. While the limiter virtually cancels any distortion that might occur, the resulting contraction of the dynamic range, though, cannot be undone. Therefore, even with the limiter enabled, ensure that the clipping LEDs don’t light up too often!
When the orange clipping LEDs light up, turning down the MAIN LEVEL knob on your S4 is of no use: indeed, changing the level of the already distorted or shrinked signal coming from TRAKTOR won’t repair it!
Should the level stay low on the MAIN LEVEL meters, check also the channel faders—they are probably set too low as well!
TRAKTOR KONTROL S4 — Manual — 44

Tutorials
Looping and Cueing
4.4Looping and Cueing
Now that you have learned the basic mixing tasks, we will focus on one of TRAKTOR KONTROL S4’s great features: its looping facilities.
Prerequisites
As always, we assume here that you already followed the instructions in the previous tutorials. TRAKTOR KONTROL S4 now is in the following state:
▪The track “House 1” is loaded on Deck A. The track is playing and audible.
▪The crossfader is all the way to the left.
4.4.1Playing with Loops
On your S4, each Deck is equipped with dedicated loop controls, located in the Loop section, right under the Deck Display:
The Loop section, from left to right: LOOP MOVE encoder, LOOP IN and LOOP OUT buttons, and LOOP SIZE encoder.
Setting a Loop with a Predefined Size
Let’s add a Loop to the track on Deck A.
The LOOP SIZE encoder
►To engage a loop on a playing track, just push down the LOOP SIZE encoder.
TRAKTOR KONTROL S4 — Manual — 45

Tutorials
Looping and Cueing
→This will automatically add a loop at that position in the track.
The loop size will correspond to the number on the Deck Display just above the LOOP SIZE encoder:
The Loop Size Display
►To change the size of the Loop, just turn the same LOOP SIZE encoder until the display reads the number of beats you’d like the Loop to be.
Note that you can adjust the loop size either before or after you’ve set the Loop! When doing it beforehand, it will affect the next Loops you set.
Setting a Loop Manually
You can also manually set loop start and loop end points. To do this, use the LOOP IN and LOOP OUT buttons in the Loop section:
The LOOP IN and LOOP OUT buttons
1.Press the LOOP IN button to set the Loop In Point.
2.Press the LOOP OUT button to set the Loop Out Point.
As soon as you hit the LOOP OUT button, a Loop is set and the track will start looping.
We already introduced the Snap mode in the previous tutorial (see ↑4.2.5, Setting a Cue Point as Starting Point). This mode also affects the Loop In and Loop Out Points, so that they will automatically be positioned directly on the beat.
Of course, you can also change the size of manually set Loops via the LOOP SIZE encoder as described above.
TRAKTOR KONTROL S4 — Manual — 46

Tutorials
Looping and Cueing
When setting a Loop manually, the Loop Size Display (above the LOOP SIZE encoder) might not always match the actual loop size.
Moving a Loop
You can also quickly move the active Loop across your track by using the LOOP MOVE encoder, at the left of the Loop section:
The LOOP MOVE encoder
►To move the Loop, turn the LOOP MOVE encoder.
The size of the move also corresponds to the loop size that is currently set, as displayed above the LOOP SIZE encoder.
Turning the LOOP MOVE encoder when there is no Loop currently active lets you jump backward/forward through the track by the same loop size. See section ↑5.3.8, Loop Section for more info.
Storing a Loop
In the previous tutorial, we looked at how to store Cue Points. This is as simple as pressing an unlit Hotcue button.
An unlit Hotcue button
Storing Loops works similar:
►To store the active Loop, press an unlit Hotcue button.
TRAKTOR KONTROL S4 — Manual — 47

Tutorials
Looping and Cueing
→The Hotcue button lights up, this time in green: you’ve just stored a Loop that you can return to simply by pressing the same Hotcue button again.
The same Hotcue button lit in green
Deactivating Looping
If you want to deactivate the current Loop, do the following:
►To deactivate looping, push either of the LOOP MOVE or LOOP SIZE encoder.
→The playback continues after the Loop.
By pushing the LOOP MOVE encoder when there is no Loop currently active, you activate looping: the next Loop in the track will be activated.
4.4.2Using Hotcues
In this tutorial and in the previous one, we already used Hotcues to store Cue Points and Loops. We want to show you here a few more details on their use.
Hotcue buttons with various assignments
As already explained, when pressing an unlit Hotcue button, if there is no Loop active you store a Cue Point at the current playback position (the Hotcue button turns blue), and if there is a Loop active you store this Loop (the Hotcue button turns green).
On the waveform of the software Deck, you can see that a line with the same color appears in the track at the corresponding position. Moreover, a little number at the top reminds you which button you should use to jump to that Cue Point or Loop:
TRAKTOR KONTROL S4 — Manual — 48

Tutorials
Looping and Cueing
A waveform with a Cue Point stored as Hotcue 2 and a Loop stored as Hotcue 3.
If you make a mistake, or just decide you no longer want a particular Hotcue, you can quickly clear it:
►To clear a Hotcue, hold down the SHIFT button and press the corresponding Hotcue button.
→You can see that the button is no longer lit.
Creative Uses of Hotcues
Hotcues aren’t just bookmarks to particular sections of a track—they can also be used for creative techniques such as remixing parts of a song, beat juggling effects, etc.
As an example, we will show you here how you can quickly make use of a Loop stored in a Hotcue slot to introduce the track you’re about to mix in. By the way, this will allow us to sum up what we’ve learned until now.
Provided that you carefully followed the instructions in the previous tutorials, the track “Techno 2” is still loaded on Deck B. Let’s say that the track on Deck A is on air (crossfader at full left) and you want to prepare the track on Deck B for mixing in:
1.Start the playback of the next track and send it to your headphones by activating the CUE button on the corresponding channel.
2.Find an interesting Loop near the beginning of the track by using the controls in the Loop section of the right Deck.
3.Once you have a nice Loop running, store it by pressing an unlit Hotcue button and leave it playing.
4.Now start to bring this Loop in your mix, for example by implementing the lowcut we explained in the previous tutorial (see ↑4.2.7, Mixing In the Track by Using the Channel EQ and Filter).
TRAKTOR KONTROL S4 — Manual — 49

Tutorials
Using Samples in Your Mix
5.When you’re about to fade out the previous track completely, release the Loop on the new track, and you’re done.
4.5Using Samples in Your Mix
The Remix Decks are a great way to add Samples to your set, or capture Samples from Track Decks for on-the-fly remixing.
The Remix Deck C with a Sample loaded in the upper Sample Cell of the first Sample Slot.
You can also use the Remix Decks to build new tracks on the fly, layering One-shot Samples and Loops on top of each other. Now let’s find out how to control the Remix Decks with your S4.
In case you were using Sample Decks in an earlier TRAKTOR version, don’t panic! All former Sample Slot functionality stays preserved.
Prerequisites
As always, we assume here that you already followed the instructions in the previous tutorials. TRAKTOR KONTROL S4 now is in the following state:
TRAKTOR KONTROL S4 — Manual — 50
 Loading…
1. Disclaimer …………………………………………………………………………………………………… 1
2.1. Document Conventions …………………………………………………………………………. 2
2.3. In this Document …………………………………………………………………………………. 3
3. Concepts ……………………………………………………………………………………………………. 4
3.2. Haptic Drive Modes ……………………………………………………………………………… 5
3.3. Pad Modes …………………………………………………………………………………………. 5
3.4.1. Beatgrid ……………………………………………………………………………………. 6
4.4. Connecting Headphones ……………………………………………………………………… 10
4.6. Final Preparation ………………………………………………………………………………… 11
5.1. Decks ……………………………………………………………………………………………… 16
5.1.1. Browse Controls ……………………………………………………………………….. 18
5.1.2. Pad Section …………………………………………………………………………….. 18
5.2. Mixer ………………………………………………………………………………………………. 21
5.2.1. Mixer Channel ………………………………………………………………………….. 23
5.3. FX Unit ……………………………………………………………………………………………. 24
5.4. Front Panel View ……………………………………………………………………………….. 25
5.5. Rear Panel ……………………………………………………………………………………….. 25
6. Mixing Your First Tracks ……………………………………………………………………………….. 27
6.1. Prerequisites …………………………………………………………………………………….. 27
Table of Contents
1. Disclaimer …………………………………………………………………………………………………… 1
2. Welcome to TRAKTOR KONTROL S4 ………………………………………………………………. 2
2.1. Document Conventions …………………………………………………………………………. 2
2.2. Documentation Resources …………………………………………………………………….. 3
2.3. In this Document …………………………………………………………………………………. 3
3. Concepts ……………………………………………………………………………………………………. 4
3.1. S4 and TRAKTOR Control Concept …………………………………………………………. 4
3.2. Haptic Drive Modes ……………………………………………………………………………… 5
3.3. Pad Modes …………………………………………………………………………………………. 5
3.4. Automatic Track Synchronization …………………………………………………………….. 6
3.4.1. Beatgrid ……………………………………………………………………………………. 6
3.4.2. Tempo Master and Master Clock ……………………………………………………. 6
3.4.3. Automatic Tempo Master Assignment ……………………………………………… 6
3.5. About the Track Collection …………………………………………………………………….. 6
3.6. Snap Mode and Quantize Mode ……………………………………………………………… 7
4. Setting up TRAKTOR KONTROL S4 …………………………………………………………………. 8
4.1. Connecting to the Computer …………………………………………………………………… 8
4.2. Connecting an Amplification System ………………………………………………………… 9
4.3. Connecting Monitors for DJ Booth …………………………………………………………… 9
4.4. Connecting Headphones ……………………………………………………………………… 10
4.5. Connecting to the Power Supply ……………………………………………………………. 10
4.6. Final Preparation ………………………………………………………………………………… 11
4.7. Importing Music to the Track Collection …………………………………………………… 13
5. TRAKTOR KONTROL S4 Overview ………………………………………………………………… 14
5.1. Decks ……………………………………………………………………………………………… 16
5.1.1. Browse Controls ……………………………………………………………………….. 18
5.1.2. Pad Section …………………………………………………………………………….. 18
5.1.3. Display Elements for Tracks and STEM Files ………………………………….. 20
5.1.4. Display Elements on a Remix Deck ………………………………………………. 20
5.2. Mixer ………………………………………………………………………………………………. 21
5.2.1. Mixer Channel ………………………………………………………………………….. 23
5.3. FX Unit ……………………………………………………………………………………………. 24
5.4. Front Panel View ……………………………………………………………………………….. 25
5.5. Rear Panel ……………………………………………………………………………………….. 25
6. Mixing Your First Tracks ……………………………………………………………………………….. 27
6.1. Prerequisites …………………………………………………………………………………….. 27
6.2. Loading the First Track into Deck A ……………………………………………………….. 28
6.3. Starting Playback of Deck A …………………………………………………………………. 29
6.4. Loading the Second Track into Deck B ……………………………………………………. 29
6.5. Syncing the Track Tempos …………………………………………………………………… 31
6.6. Starting Playback of the Second Track ……………………………………………………. 31
6.7. Mixing in the Audio Signal ……………………………………………………………………. 31
7. Tutorials ……………………………………………………………………………………………………. 33
7.1. Browsing and Loading ………………………………………………………………………… 34
7.2. Controlling Playback …………………………………………………………………………… 35
7.2.1. Using Transport Controls ……………………………………………………………. 36
7.2.2. Using Jog Wheels in JOG Mode …………………………………………………… 36
7.2.3. Using Jog Wheels in Turntable Mode …………………………………………….. 40
7.3. Assigning Mixer Channels to the Crossfader ……………………………………………. 43
7.3.1. Setting the Crossfader Curve ………………………………………………………. 44
7.4. Adjusting Levels ………………………………………………………………………………… 45
7.5. Using the Equalizer …………………………………………………………………………….. 47
7.6. Using CUE Channel ……………………………………………………………………………. 48
7.7. Adjusting Tempo ………………………………………………………………………………… 49
7.8. Locking the Key of Tracks ……………………………………………………………………. 52
7.9. Playing with Cue Points ………………………………………………………………………. 54
7.10. Playing with Loops ……………………………………………………………………………. 56
7.11. Playing with Flux Mode and Reverse Mode ……………………………………………. 58
7.12. Playing with MIXER Effects ………………………………………………………………… 60
7.13. Playing with FX Units ………………………………………………………………………… 61
7.14. Adding Tracks to the Preparation List ……………………………………………………. 62
7.15. Previewing Tracks in the Browser ………………………………………………………… 63
7.16. Switching Deck Focus ……………………………………………………………………….. 63
7.17. Playing with Remix Decks ………………………………………………………………….. 64
7.17.1. Using Pattern Recorder …………………………………………………………….. 70
7.18. Playing with STEM Decks ………………………………………………………………….. 70
7.19. Correcting Beatgrids of Tracks …………………………………………………………….. 75
8. Preferences ……………………………………………………………………………………………….. 77
9. Integrating External Devices ………………………………………………………………………….. 79
9.1. Integrating Microphone ……………………………………………………………………….. 79
9.2. Integrating Turntable …………………………………………………………………………… 80
9.3. Integrating CD Players ………………………………………………………………………… 81
9.4. Enabling Scratch Function in TRAKTOR …………………………………………………. 81
10. Setting the TRAKTOR KONTROL S4 as Your Default Audio Interface …………………… 83
Disclaimer
1. DISCLAIMER
The information in this document is subject to change without notice and does not represent a commitment on the part of Native Instruments GmbH. The software described by this document is subject to a License Agreement and may not be copied to other media. No part of this publication may be copied, reproduced or otherwise transmitted or recorded, for any purpose, without prior written permission by Native Instruments GmbH, hereinafter referred to as Native Instruments.
“Native Instruments”, “NI” and associated logos are (registered) trademarks of Native Instruments
GmbH.
Mac, macOS, GarageBand, Logic and iTunes are registered trademarks of Apple Inc., registered in the U.S. and other countries.
Windows and DirectSound are registered trademarks of Microsoft Corporation in the United States and/or other countries.
All other trademarks are the property of their respective owners and use of them does not imply any affiliation with or endorsement by them.
Document authored by: Native Instruments GmbH
Software version: 3.0.2 (12/2018)
Hardware version: TRAKTOR KONTROL S4 MK3
Special thanks to the Beta Test Team, who were invaluable not just in tracking down bugs, but in making this a better product.
1
Welcome to TRAKTOR KONTROL S4
2. WELCOME TO TRAKTOR KONTROL S4
Thank you for choosing TRAKTOR KONTROL S4, it is because of customers like you that we can continue developing groundbreaking music software and hardware. TRAKTOR KONTROL S4 is a fully integrated hardware and software DJ performance system. The all-in-one TRAKTOR KON-
TROL S4 controller offers you an ergonomic DJ mixer, a built-in 24-bit/96 kHz audio interface, and a high-resolution control surface, perfectly tailored for TRAKTOR PRO 3.
This documentation provides you with all the information you need to get started mixing, syncing and looping. If you are already familiar with TRAKTOR, this guide will also help you use the more advanced features of TRAKTOR KONTROL S4.
2.1. Document Conventions
This document uses particular formatting to point out special facts and to warn you of potential issues. The icons introducing the following notes let you see what kind of information can be expected:
The speech bubble icon indicates a useful tip that may help you to solve a task more efficiently.
The exclamation mark icon highlights important information that is essential for the given context.
The warning icon warns you of serious issues and potential risks that require your full attention.
Furthermore, the following formatting is used:
• Paths to locations on your hard disk or other storage devices are printed in
italics
.
• Important names and concepts are printed in
bold
.
• Square brackets are used to reference keys on a computer’s keyboard, e.g., Press [Shift] +
[Enter].
Pet Names for Software and Hardware
Throughout the documentation, we will refer to the TRAKTOR KONTROL S4 hardware controller as
TRAKTOR KONTROL S4
,
S4 controller
, or simply
S4
.
Likewise, the TRAKTOR software may be referred to as
TRAKTOR
.
2
Welcome to TRAKTOR KONTROL S4
2.2. Documentation Resources
Native Instruments provides many information sources regarding TRAKTOR KONTROL S4. The main resources to get you started are:
•
TRAKTOR KONTROL S4 Manual
: This manual guides you through the hardware and software setup process to get the TRAKTOR KONTROL S4 system up and running. Additionally, by providing task-based tutorials, it offers a practical approach to using your TRAKTOR KON-
TROL S4.
•
TRAKTOR PRO 3 Manual
: For in-depth information on all features provided by the TRAKTOR software, refer to the TRAKTOR PRO 3 Manual.
2.3. In this Document
What you are reading now is the TRAKTOR KONTROL S4 Manual. This manual is structured as follows:
•
Concepts quickly introduces you to the TRAKTOR KONTROL S4 user interface and its main
areas, both hardware and software.
•
Setting up TRAKTOR KONTROL S4
guides you through the process of setting up your TRAK-
TOR KONTROL S4 system and importing your music into TRAKTOR.
•
TRAKTOR KONTROL S4 Overview is an extensive reference of all hardware control elements
to be found on your TRAKTOR KONTROL S4 hardware controller. Whenever you are unsure about the functionality of a particular control element, you will find all the necessary information here.
•
Mixing Your First Tracks
is a quickstart tutorial introducing you to the main steps of mixing your first tracks using the SYNC function.
•
Tutorials contains a collection of short tutorials, showing you how to work with the individual
areas of the controller.
•
Preferences
explains how to open the Preferences in TRAKTOR and introduces the options to customize the TRAKTOR KONTROL S4 for specific needs.
•
Integrating External Devices
shows you how to integrate TRAKTOR KONTROL S4 with your studio or live setup, in various configurations.
•
Setting the TRAKTOR KONTROL S4 as Your Default Audio Interface
describes how to use the audio interface of the TRAKTOR KONTROL S4 as the default audio device of your computer.
• Specification gives you the technical specifications of the TRAKTOR KONTROL S4 controller.
3
Concepts
3. CONCEPTS
In this section you are briefly introduced to the main concepts of the TRAKTOR KONTROL S4 and some basic concepts of the TRAKTOR software.
3.1. S4 and TRAKTOR Control Concept
This section quickly introduces the main areas and concepts of your TRAKTOR KONTROL S4 hardware controller with reference to the TRAKTOR PRO software.
S4 and TRAKTOR control concept.
(
1
)
Decks
: You can use the Decks to control tracks and Samples, similar to DJ turntables or CD players but with additional features. TRAKTOR controls four virtual Decks and each of them can be operated in several Deck Types: Track Deck, Remix Deck, STEM, Deck, and Live Input.
TRAKTOR provides you with four virtual Decks. The two Decks on your S4 hardware controller allow you to control the four software Decks
A
,
B
,
C
and
D
in TRAKTOR: the left Deck on your S4 controls Decks
A
and
C
in the software. The right Deck on your S4 controls Decks
B
and
D
in the software.
(
2
)
Mixer
: You can use the Mixer to mix the audio signals coming from the Decks. The Mixer sits in the middle of the TRAKTOR software as well as on your TRAKTOR KONTROL S4 controller. On the S4, the Mixer consists of the four Mixer channels
A
,
B
,
C
, and
D
which receive the individual audio signals from the corresponding Decks. Each Mixer channel contains controls to modulate the audio signal and to adjust the outgoing volume before the audio signal is send to the
MAS-
TER
output. Furthermore, the Mixer provides the crossfader to let you fade between the audio signals in the Mixer channels.
(
3
)
FX Units
: You can further process the signals in the Mixer channels by using the two FX Units located at the top-left and top-right on your S4 and in the software interface. The FX Units give you access to a collection of high-quality effects included in TRAKTOR. FX Unit 1 at the top-left on your S4 controls FX Unit 1 in the software. FX Unit 2 at the top-right on your S4 control FX Unit 2 in the software.
4
Concepts
3.2. Haptic Drive Modes
You can operate the Jog Wheels on the S4 in three different modes, called HAPTIC DRIVE
MODEs. Each HAPTIC DRIVE MODE provides you with different control functions for the Jog
Wheels.
•
JOG mode
: The
JOG
mode lets you control the playback of your tracks by spinning the Jog
Wheel. Depending on the playback state or if you touch the top plate or the outer rim, the behavior differs accordingly. In
JOG
mode you can use the Jog Wheel for tempo bending and nudging, to cue beats and scratch tracks, as well as seeking within tracks. Furthermore, you can adjust the tension for the Jog Wheel using the JOG button as well as in the Preferences.
Furthermore, you can enable a tick felt as haptic feedback in the Jog Wheel in the Preferences.
For more information, refer to
Using Jog Wheels in JOG Mode
.
•
TT mode
: As with the
JOG
mode, the
TT
mode (turntable mode) lets you control the playback of your tracks. The difference is, the Jog Wheels rotate during playback. This enables you to control your tracks as you would on conventional turntables. In
TT
mode you can use the Jog
Wheel for tempo bending and nudging, to cue beats and scratch tracks, as well as seeking within tracks. Furthermore, you can adjust the base rotation speed using 33.3 revolutions or 45 revolutions per minute. For more information, refer to
Using Jog Wheels in Turntable Mode
.
•
GRID mode
: The
GRID
mode lets you correct faulty Beatgrids for tracks directly on the S4 using the Jog Wheels and the CUE channel on the fly. For more information, refer to
Correcting
Beatgrids of Tracks
.
3.3. Pad Modes
You can operate the Pads on a Deck in three different Pad modes. Depending on selected Pad mode the functions differ accordingly:
•
HOTCUES mode
: In HOTCUES mode, the Pads let you store and trigger Cue Points and
Loops in tracks and STEM Files as Hotcues. On Decks
A
and
B
the
HOTCUES
button lights up blue whereas on Decks
C
and
D
the
HOTCUES
button lights up orange. The HOTCUES mode is the default mode for Track Decks and STEM Decks. For more Information on using
HOTCUES mode, refer to
Playing with Cue Points
, and
Playing with Loops .
HOTCUES mode is not available for Remix Decks. When a Remix Deck is focused, the
HOTCUE
button is disabled.
•
SAMPLES mode
: In SAMPLES mode, the Pads let you control the Samples on the Remix
Deck. The the upper row of Pads give you direct access to the first Samples in the Sample
Slots. When the Deck is focused on a Remix Deck, the SAMPLES mode is enabled by default.
You can enable the SAMPLES mode on a Track Deck and on a STEM Deck as well. This way you can control the Track Deck or STEM Deck together with the Remix Deck, without switching the Deck focus to the Remix Deck. For more Information, refer to
Playing with Remix Decks
.
•
STEMS mode
: In STEMS mode, the Pads let you control the individual STEM Parts in the
STEM File. With the Pads you can adjust the individual STEM Part volume levels, filters. The
5
Concepts
STEMS mode is available only for STEM Decks. On the S4 Decks
A
and
B
the
STEMS
button lights up blue whereas on the S4 Decks
C
and
D
the
STEMS
button lights up orange. For more
Information, refer to
Playing with STEM Decks
.
3.4. Automatic Track Synchronization
This section introduces the principles of the automatic synchronization features offered by TRAK-
TOR.
One of the key features of TRAKTOR is the automatic synchronization of tracks. After loading tracks into the Decks, you can synchronize the track tempos with the
SYNC
function. The tempo of the synced track then adjusts the tempo of the Tempo Master, for example, the track in the playing
Deck. For this to work, TRAKTOR uses the tempo and beat information from the Beatgrids of tracks. Samples and time-evolving effects sync to the current Tempo Master automatically.
3.4.1. Beatgrid
TRAKTOR analyzes the tracks by providing reliable tempo information for syncing. This analysis determines the tempo (BPM) as well as the position of the beats; the result is the Beatgrid. There is a specific Beatgrid for each of your tracks.
3.4.2. Tempo Master and Master Clock
The
Tempo Master
represents the reference tempo to which the Decks synchronize. When enabling the
SYNC
function on a Deck, TRAKTOR synchronizes the track to the Tempo Master. The
Tempo Master can either be a Deck or TRAKTOR’s
Master Clock
. When the Master Clock is the
Tempo Master, it then represents the global tempo reference to which all Decks can sync. The
Tempo Master does not have to be the same throughout your mix, but there can only be one Tempo Master.
3.4.3. Automatic Tempo Master Assignment
TRAKTOR assigns the new Tempo Master automatically using the
AUTO
mode in the Master Control panel. When mixing tracks using the SYNC function, the synced Deck automatically becomes the new Tempo Master, as soon as the track of the current Tempo Master Deck ends or is stopped manually. This continues as long as there is no other track synced to the Tempo Master. Then the
Master Clock automatically becomes the new Tempo Master as soon the current track stops playing. The MASTER button then lights up in the Master Control panel.
The
AUTO
mode is activated by default.
3.5. About the Track Collection
The Track Collection represents all the music you use in TRAKTOR. With the Track Collection you can organize, tag, and prepare your tracks for being played as part of your mix.
A benefit of the Track Collection is that reads the metadata of the tracks, like track title, artist name, tempo, genre, key etc. It also stores TRAKTOR-specific information about your tracks.
6
Concepts
3.6. Snap Mode and Quantize Mode
Snap mode and Quantize mode are important tools that can help you when working with Cue
Points and Loops, and for jumping in the track:
• The Snap mode ensures that any Loop or Cue Point you set in a track snaps to the closest beat.
• The Quantize mode ensures that you remain in sync to the quantize value, whenever you jump to a Loop, to a Cue Point, or to any position within the track.
Examples for using and not using Snap Mode
Depending on what you want to do, you can enable or disable Snap mode and Quantize mode at any time. Here are a few examples on different use cases:
• Enable Snap mode if you want to set a Loop starting directly on a beat.
• Disable Snap mode if you want to set a Cue Point at the beginning of vocals that do not necessarily start on the beat.
• Enable Quantize mode if want to mix in a synced track and want the downbeats of both tracks to perfectly match.
• Disable Quantize mode if you want to trigger tracks or Samples any time you press play or trigger Hotcues.
Enabling and Disabling Quantize Mode
When Quantize mode is enabled, the
QUANT
(
Snap
) button lights up brightly. When Quantize mode is disabled, the
QUANT
(
Snap
) button lights up dimly.
To enable or disable Quantize mode:
• Press the
QUANT
(
Snap
) button.
Enabling and Disabling Snap Mode
To enable or disable Snap mode:
1.
Press and hold
SHIFT
to access the secondary functions of your S4.
When Snap mode is disabled, the
QUANT
(
Snap
) button lights up dimly. When Snap mode is enabled, the
QUANT
(
Snap
) button lights up brightly.
2.
While holding
SHIFT
, press the
QUANT
(
Snap
) button to enable or disable Snap mode, respectively.
7
Setting up TRAKTOR KONTROL S4
4. SETTING UP TRAKTOR KONTROL S4
By this section, you should have already installed TRAKTOR PRO 3 software using NATIVE AC-
CESS, in order to configure the S4 for its first use. If this is not the case, follow the instructions under this link Registering and Installing a Native Instruments Product using NATIVE ACCESS .
This section describes how to set up the TRAKTOR KONTROL S4. When all devices are connected your setup will look like the following illustration:
TRAKTOR KONTROL S4 setup.
4.1. Connecting to the Computer
To connect the TRAKTOR KONTROL S4 to your computer:
1.
Connect the device end of the included USB cable to the USB socket on the rear panel of your S4.
2.
Connect the computer end of the USB cable to an available USB 2.0 port (or later) on your computer.
8
Setting up TRAKTOR KONTROL S4
4.2. Connecting an Amplification System
To connect your power amplifier system to the TRAKTOR KONTROL S4:
• Connect the
MAIN OUT
XLR or RCA outputs on the rear panel of the TRAKTOR KONTROL
S4 to the inputs of your amplification system using the appropriate cables.
4.3. Connecting Monitors for DJ Booth
To connect your monitor speakers or a second power amplifier for the DJ booth to the TRAKTOR
KONTROL S4:
9
Setting up TRAKTOR KONTROL S4
• Connect the
BOOTH OUT
outputs on the rear panel of the TRAKTOR KONTROL S4 to the inputs of your monitoring system using appropriate cables.
4.4. Connecting Headphones
To connect headphones to the TRAKTOR KONTROL S4:
• Connect your headphones to the
PHONES OUT
socket on the front panel of the TRAKTOR
KONTROL S4 using a 1/4″ or a 1/8″ connector.
4.5. Connecting to the Power Supply
To connect the Power supply to the TRAKTOR KONTROL S4:
1.
Connect the device end of the Power supply cable to the Power socket on the rear panel of your S4.
2.
Connect the Power Supply unit to a power outlet.
10
Setting up TRAKTOR KONTROL S4
4.6. Final Preparation
After successfully setting up the TRAKTOR KONTROL S4 system, you need to prepare final steps before you can start using you S4. At first you switch on your devices and then you configure
TRAKTOR to be used with you S4.
Switching on Devices and Starting TRAKTOR
You can now switch on the devices. We recommended that you follow the order in the instructions below:
1.
On your S4, turn down the volume controls to minimum position by using the
MASTER
knob, the
BOOTH
knob and the
VOL
knob.
2.
Switch on your amplification system.
3.
Switch on your computer.
4.
Switch on your S4.
5.
Start TRAKTOR by double-clicking the Traktor application icon on your desktop.
The TRAKTOR software opens.
Importing Data from Your Previous TRAKTOR Version
When you start TRAKTOR for the first time, TRAKTOR recognizes if a previous version of TRAK-
TOR is installed on you system. In this case TRAKTOR asks if you want to import your previous data from the existing user content into a new folder in your user folder. Your previous data will not be changed if you import it to the new default folder.
If you want to import data from your previous TRAKTOR installation:
• Click
Yes
to confirm.
The data is imported.
11
Setting up TRAKTOR KONTROL S4
Switching to TRAKTOR Default Settings
When you start TRAKTOR with the S4 for the first time, TRAKTOR asks if you want to switch Mixer FX selection and the Tempo fader range to default setting. This is necessary to get the intended user experience of your S4:
TRAKTOR alert for switching Mixer FX and TEMPO fader range to default settings.
• Click
Yes
.
The Mixer FX and the
TEMPO
fader range are set to default settings.
Configuring TRAKTOR using the Setup Wizard
The Setup Wizard dialog appears automatically when you start TRAKTOR for the first time after installation. The Setup Wizard helps you to configure the software to your needs only with a few clicks. To configure TRAKTOR to be controlled with your S4 controller, perform the following actions:
1.
On the
WELCOME
page click
Next
to proceed.
2.
On the
DECK LAYOUT
page select the Deck setup to control with your S4, for example,
2
Track Decks + 2 Remix Decks
.
3.
Click
Next
to proceed.
The
SUMMARY
page shows you the configuration of TRAKTOR.
4.
Click
Finish
to confirm your configuration.
The TRAKTOR window now appears in the Essential Layout.
12
Setting up TRAKTOR KONTROL S4
4.7. Importing Music to the Track Collection
The most convenient way to get your tracks into TRAKTOR’s Track Collection is using drag and drop:
• Drag the music files from the location on your computer and drop them in the
Track Collection
folder in TRAKTOR’s Browser Tree.
TRAKTOR now analyzes the metadata of the music files and stores the files in the Track
Collection.
13
TRAKTOR KONTROL S4 Overview
5. TRAKTOR KONTROL S4 OVERVIEW
This section introduces you to the TRAKTOR KONTROL S4 and all its control elements and connectors.
TRAKTOR KONTROL S4 Overview.
(
1
)
Decks
: You can use the Decks to control tracks and Samples, similar to DJ turntables or CD players but with additional features. TRAKTOR controls four virtual Decks and each of them can be operated in several Deck Types: Track Deck, Remix Deck, STEM, Deck, and Live Input.
TRAKTOR provides you with four virtual Decks. The two Decks on your S4 hardware controller allow you to control the four software Decks
A
,
B
,
C
and
D
in TRAKTOR: the left Deck on your S4 controls Decks
A
and
C
in the software. The right Deck on your S4 controls Decks
B
and
D
in the software. For more information on the Deck control elements, refer to
Decks
.
(
2
)
Mixer
: You can use the Mixer to mix the audio signals coming from the Decks. The Mixer consists of the two Mixer channels
A
and
B
which receive the individual audio signals from the
Decks
A
and
B
. Each Mixer channel contains controls to modulate the audio signal and to adjust the outgoing volume before the audio signal is send to the
MASTER
output. The
SAMPLE
knob in the middle of the Mixer controls the relative level of the combined channel for Deck
C
and
D
. Furthermore, the Mixer provides the crossfader to instantly fade between the audio signals in the Mixer channels
A
and
B
. For more information on the Mixer control elements, refer to Mixer .
14
TRAKTOR KONTROL S4 Overview
(
3
)
FX Units
: You can further process the signals in the Mixer channels by using the two FX Units located at the top-left and top-right on your S4 and in the software interface. The FX Units give you access to a collection of high-quality effects included in TRAKTOR. FX Unit 1 at the top-left on your S4 controls FX Unit 1 in the software. FX Unit 2 at the top-right on your S4 control FX Unit 2
in the software. For more information, refer to FX Unit
.
15
TRAKTOR KONTROL S4 Overview
5.1. Decks
TRAKTOR KONTROL S4 provides you with two physical Decks to control the TRAKTOR
Decks. Each Deck provides you with the following control elements:
S4 Deck.
(
1
)
Browse controls
: Allow you to scroll through the Track Collection to find and load tracks, as well as previewing tracks and preparing playlists. For more information, refer to
Browse Controls .
(
2
)
Jog Wheel
: The Jog Wheel provides advanced control over track transport. As with a conventional CD player or turntable, you can manually hold playback, nudge and bend, and start scratching by touching and turning the Jog Wheel and the outer rim. Furthermore, you can manually correct tracks’ Beatgrids. The outer LED ring around the Jog Wheel gives you visual feedback on the playback status. For more information, refer to
Using Jog Wheels in JOG Mode and
Using Jog
Wheels in Turntable Mode .
(
3
)
MASTER
(
Reset
) button: Assigns the Deck to Tempo Master. Using the
SHIFT
button, it resets the relative
TEMPO
fader position in the software. For more information, refer to
Adjusting Tempo
and Automatic Track Synchronization .
16
TRAKTOR KONTROL S4 Overview
(
4
)
SYNC
(
Lock
): Syncs the Deck to the Tempo Master. Using
SHIFT
and
SYNC
(
Lock
) locks the
TEMPO
fader for the Deck. For more information, refer to
Adjusting Tempo
and
Locking the Key of
Tracks
.
(
5
)
TEMPO fader
: Lets you manually adjust the track tempo on that Deck. The
TEMPO
fader can be operated in Absolute mode and in Relative mode. If the Deck is synced to the Tempo Master, the
TEMPO
Fader has no effect. When the Deck is playing at original track tempo, the LED lights up blue independently from the current
TEMPO
fader position. When the Deck tempo is faster or slower than the original tempo, the LED is unlit. When the tempo is locked for the Deck, the LED
lights up red. For more information, refer to Adjusting Tempo
.
(
6
)
Pad section
: You can use the Pads to store and trigger Cue Points and Loops, and to control
Samples and STEM Files. The individual function depends on the selected Pad mode and on the selected Deck Type. For more information, refer to
Pad Section
.
(
7
)
Play/Pause
: Lets you start or pause the track playback on that Deck. The button brightly lights
up green during playback. For more information, refer to Using Transport Controls
.
(
8
)
CUE
: Lets you start track playback from the Floating Cue Point when the Deck is stopped.
Moves the playback position back to the Cue Point during playback. For more information, refer to
Using Transport Controls .
(
9
)
SHIFT
: When you hold
SHIFT
, you are provided with the secondary functions of some of the control elements on the S4.
(
10
)
DECK SELECT buttons
: Allow you to switch between TRAKTOR Decks A and C on the left
Deck, and between TRAKTOR Decks B and C on the right Deck. For more information, refer to
Switching Deck Focus .
(
11
)
JOG button
: Enables
JOG
mode (Jog Wheel mode) for the Jog Wheel. For more information, refer to
Using Jog Wheels in JOG Mode
.
(
12
)
TT button
: Enables
TT
mode (turntable mode) for the Jog Wheel. For more information, refer to
Using Jog Wheels in Turntable Mode
.
(
13
)
GRID button
: Enables
GRID
mode to manually correct the Beatgrid for the current track using the Jog Wheel. For more information, refer to
Correcting Beatgrids of Tracks .
(
14
)
MOVE encoder
: Allows you to jump within the track. When Looping is enabled the
MOVE
encoder allows you to move the Loop forwards and backwards in the track. Furthermore, it adjusts volume parameters for Samples and STEM parts using
SHIFT
. For more information, refer to
Using Transport Controls and
Playing with Loops
.
(
15
)
Multicolor display
: The multicolor display gives visual feedback about playback times and the Loop settings, and also provides track details such as artist name and track name. For more information, refer to
Display Elements for Tracks and STEM Files and Display Elements on a Remix Deck .
(
16
)
LOOP encoder
: Allows you to enable/disable Looping as well as changing the Loop size. Furthermore, it adjusts Filter effect parameters for Samples and STEM parts using
SHIFT
.
For more information, refer to Playing with Loops
.
(
17
)
REV button
: Plays back the track in reverse when in Flux mode. When you press the
REV
button, this automatically enables Flux mode as long as the
REV
button is pressed. For more infor-
mation, refer to Playing with Flux Mode and Reverse Mode
.
(
18
)
FLX button
: Enables Flux Mode for that Deck. For more information, refer to
Playing with
Flux Mode and Reverse Mode .
17
TRAKTOR KONTROL S4 Overview
(
19
)
FX Unit
: The FX Units allow you to control the effect parameters in the FX Units in the TRAK-
TOR software. Each Deck features one FX Unit which can be assigned to any Mixer channel. FX
Unit 1 is located on the left Deck, and FX Unit 2 on the right Deck. For more information, refer to
FX Unit .
5.1.1. Browse Controls
The Browse controls let you browse the Track Collection to find and load tracks as well as preview tracks and prepare playlists.
Browse controls.
(
1
)
Browse encoder
: You select tracks in the Track List by turning the
Browse
encoder and you can load the selected track into the Deck by pressing the
Browse
encoder. You can also use the
Browse
encoder to seek within the track that is playing in the Preview Player. When in SAMPLES mode you can can select another Sample in the Sample Slot by turning the
Browse
encoder. For more information, refer to
Browsing and Loading
and Previewing Tracks in the Browser
.
(
2
)
VIEW button
: Maximizes or minimizes the Browser view in the TRAKTOR software. For more
information, refer to Browsing and Loading .
(
3
)
Preparation List button
: Assigns a track to the Preparation List. For more information, refer to
Adding Tracks to the Preparation List .
(
4
)
Star button
: When this button is held the Browse encoder then selects favorites. For more information, refer to
Browsing and Loading
.
(
5
)
Preview Player
: Loads a track into the Preview Player in TRAKTOR’s Browser and plays it
back. For more information, refer to Previewing Tracks in the Browser
.
5.1.2. Pad Section
The Pads can be used to store and trigger Cue Points and Loops, as well as to Samples, and to control STEM Files. The individual function depends on the selected Pad mode as well as on the selected Deck Type.
18
TRAKTOR KONTROL S4 Overview
Pad section.
(
1
)
HOTCUES button
: Enables
HOTCUES
mode. In this mode, you can store and trigger Cue
Points and Loops within tracks using the Pads. On Decks
A
and
B
the
HOTCUES
button lights up blue whereas on Decks
C
and
D
the
HOTCUES
button lights up orange. The
HOTCUES
mode is the default mode for Track Decks and STEM Decks. For more information, refer to
Playing with
Cue Points
and
Playing with Loops .
HOTCUE
mode is not available for Remix Decks. When a Remix Deck is focused, the
HOTCUE
button is disabled.
(
2
)
Record button
: Enables the Pattern Recorder on the Remix Deck. With the Pattern Recorder you can record sequences to be played by the Samples. For more information, refer to
Using Pattern Recorder .
(
3
)
SAMPLES button
: Enables SAMPLES mode. The SAMPLES mode can only be enabled when the underlying Deck is configured as Remix Deck. Otherwise the
SAMPLES
button remains un-
lit. For more information, refer to Playing with Remix Decks
.
(
4
)
Mute button
: Mutes or un-mutes Samples on a Remix Deck or STEM Parts on a STEM
Deck. For more information, refer to
Playing with Remix Decks
and
Playing with STEM Decks
.
(
5
)
STEMS button
: Enables STEMS mode on a STEM Deck. Using the Pads, you can adjust the volumes and mute the individual STEM Parts of the STEM File. The
STEMS
mode is only availa-
ble on STEM Decks. For more information, refer to Playing with STEM Decks .
(
6
)
Pads
: Depending on the current Pad mode, the eight Pads have individual functions:
• When in
HOTCUES
mode the Pads store and trigger Cue Points and Loops for Track Decks and STEM Decks.
• When in
SAMPLES
mode the Pads control the first four SAMPLE Slots of Remix Decks.
• When in
STEMS
mode the Pads control the volumes of the individual STEM Parts and also mute them.
19
TRAKTOR KONTROL S4 Overview
5.1.3. Display Elements for Tracks and STEM Files
When the HOTCUES mode or the STEMS mode is enabled, the display contains the following elements:
Display elements for tracks and STEM Files.
(
1
)
Track title
: Displays the title of the loaded track or STEM File.
(
2
)
Key value
: Displays the current key value of the track or STEM File.
(
3
)
Loop indicator
: Displays the selected Loop size. When a Loop is enabled the Loop indicator is highlighted in green.
(
4
)
Waveform
: Displays the Waveform of the track or the STEM File. It also shows stored Cue
Points as white and blue markers, and stored Loops in green markers. The moving red marker represents the current playhead position.
(
5
)
Remaining Track time
: Displays the time remaining until the track or the STEM File ends.
(
6
)
Current Track Tempo
: Displays the current tempo for the track or STEM File.
5.1.4. Display Elements on a Remix Deck
When the Deck is a Remix Deck or the SAMPLES mode is enabled, the display contains the following elements:
Display elements on a Remix Deck.
(
1
)
Remix Set title
: Displays the title of the loaded Remix Set.
(
2
)
Quantize value
: Displays the Quantize value of the Remix Deck. If Quantize mode is enabled the field is highlighted in blue.
(
3
)
Loop indicator
: Displays the selected Loop size. When a Loop is enabled the Loop indicator is highlighted in green.
(
4
)
Play Type indicator
: Indicates if the corresponding Sample in the Sample Cell is a Loop or a
One-shot Sample.
20
TRAKTOR KONTROL S4 Overview
(
5
)
Beat Counter
: Represents the current internal Beat Count position of the Remix Deck. Synchronization and Quantize functions are based on this value.
(
6
)
Remix Deck Tempo
: Displays the current tempo of the Remix Deck.
For more information, refer to Playing with Remix Decks .
5.2. Mixer
Sitting in the middle of the TRAKTOR KONTROL S4 controller, the Mixer receives the audio signals coming from Decks. There is one channel for each Deck. The Mixer’s purpose is to adjust the relative level of each channel, to control the mixer channels’ frequency content, possibly feeding them into the FX Units before sending the overall result to the Master output, and in the end, to generate the mix that is sent to your audience. The Mixer also provides you with a crossfader, which allows you to make seamless transitions between various channels.
Mixer.
(
1
)
Mixer Channel A
,
B
,
C
,
D
: The Mixer channels receive the individual audio signals from the
Decks. Each Mixer channel contains controls to adjust the audio signal’s frequency content and to adjust the outgoing volume before the audio signal is send to the
MASTER
output. Any Mixer
channel can be individually assigned to FX Units. For more information, refer to Mixer Channel
.
21
TRAKTOR KONTROL S4 Overview
(
2
)
MASTER knob
: Adjusts the MASTER signal level. For more information, refer to
Adjusting
Levels
.
(
3
)
QUANT
(
Snap
)
button
: Allows you to enable or disable Quantize mode and Snap mode. For more information, refer to
Snap Mode and Quantize Mode
.
(
4
)
Master Level Meter
: Gives you visual feedback on the current Master Output volume level.
The blue LEDs indicate if the signal is below Headroom area. The red LED indicates if the signal is clipping. The yellow LEDs indicate if the audio signal is currently within the Headroom area before the audio signal starts clipping.
(
5
)
BOOTH knob
: Adjusts the Volume of the Booth output signal for the DJ monitors. For more
information, refer to Adjusting Levels .
(
6
)
MIXER FX SELECT buttons
: Select the
MIXER FX
to be controlled by the individual
MIXER
FX
controls in the Mixer channels. For more information, refer to Playing with MIXER Effects .
(
7
)
MIX knob
: Adjusts the signal mix between MASTER signal and the CUE channel signal in the
headphones. For more information, refer to Using CUE Channel
.
(
8
)
VOL knob
: Adjusts the level for the CUE channel. For more information, refer to
Using CUE
Channel .
(
9
)
Crossfader
: Controls the mix between the Mixer channels’ signals that are assigned to the left crossfader side and the right crossfader side. At each crossfader’s end, the opposite signals are totally silent. Moving the crossfader gradually fades in and fades out the relevant audio signal in the master output. At the center position, both audio signals are fully audible. For more informa-
tion, refer to Assigning Mixer Channels to the Crossfader .
22
TRAKTOR KONTROL S4 Overview
5.2.1. Mixer Channel
The Mixer channels receive the individual audio signals from the Decks. Each Mixer channel contains controls to adjust the incoming and outgoing levels, and the audio signal’s frequency content. Any of the four Mixer channels can integrate different external sources. Whereas Mixer channels
A
and
B
are equipped with an additional
PHONO
pre-amplifier for connecting turntables, Mixer channels
C
and
D
integrate microphones instead. The Mixer channels provide you with the following control elements:
Mixer channel.
(
1
)
GAIN knob
: Adjusts the input level for the incoming signal of the corresponding Deck, before it
passes the channel fader. For more information, refer to Adjusting Levels .
(
2
)
FX Assign buttons
: These buttons individually assign the FX Units to the Mixer channel. For more information, refer to
Playing with FX Units
.
(
3
)
HI knob
: Emphasizes, attenuates, or removes the middle frequency band of the audio signal.
For more information, refer to Using the Equalizer
.
(
4
)
MID knob
: Emphasizes or attenuates the middle frequency band of the audio signal. For more
information, refer to Using the Equalizer
.
(
5
)
LOW knob
: Emphasizes, or attenuates, or removes the low frequency band of the audio signal. For more information, refer to
Using the Equalizer .
23
TRAKTOR KONTROL S4 Overview
(
6
)
MIXER FX Amount knob
: The
MIXER FX
Amount knob controls the amount of the
MIXER FX
to be applied to the audio signal. In center position the MIXER FX is disabled for the individual
Mixer channel. For more information, refer to
Playing with MIXER Effects
.
(
7
)
MIXER FX ON button
: Enables or disables the
MIXER FX
for the individual Mixer channel. For more information, refer to
Playing with MIXER Effects
.
(
8
)
CUE button
: Routes the audio signal of the Mixer channel into the CUE channel. For more information, refer to
Using CUE Channel .
(
9
)
Channel fader
: Adjusts the Mixer channel’s level before the audio signal is sent to the crossfader and
MASTER
volume knob. For more information, refer to
Adjusting Levels .
(
10
)
Channel Level Meter
: The Channel Level Meter gives you visual feedback on the current channel volume. The blue LEDs indicate if the audio signal is below Headroom area. The red LED indicates if the audio signal is clipping. The yellow LEDs indicate if the audio signal is currently in the Headroom area before the audio signal starts to clip.
(
11
)
MIC C
or
D
/
PHONO
LED: On Mixer channel
A
and
B
, the
PHONO
LED lights up if the external input for the Mixer channel is set to receive a phono level signal from a turntable. On Mixer channel
C
and
D
, the
MIC
LED lights up if the external input for the Mixer channel is set to receive a microphone signal. For more information, refer to
Integrating External Devices
.
(
12
)
EXT button
: Switches the Mixer channel to insert the audio signal coming from the external audio source. For more information, refer to
Integrating External Devices
.
(
13
)
LINE LED
: Indicates if the external input for the Mixer channel is set to receive a line level
signal, for example, from a CD player. For more information, refer to Integrating External Devices .
5.3. FX Unit
The FX Units 1 and 2 on your S4 allow you to control the effect parameters selected in the FX
Units in the TRAKTOR software. The FX Units can be assigned to any Mixer channel.
FX Unit 1 controls.
(
1
) — (
4
)
FX knob 1
—
4
: Adjusts the individual effect parameter that is selected in the FX Unit in the
TRAKTOR software.
(
5
) — (
8
)
FX ON button 1
—
4
: Enables or disables the individual effect parameter that is selected in the FX Unit in the TRAKTOR software.
For more information on using FX Units, refer to
Playing with FX Units .
24
TRAKTOR KONTROL S4 Overview
5.4. Front Panel View
The front panel hosts controls for assigning the Mixer channels to the crossfader, and sockets for connecting headphones and a microphone.
Front panel.
(
1
)
Crossfader Curve selector
: Selects the curve which lets the audio signals fade in and out when moving the crossfader from one side to the other. For more information, refer to
Assigning
Mixer Channels to the Crossfader
.
(
2
)
Crossfader Assignment selectors C
,
A
,
B
,
D
: Assigns the individual Mixer channels to either the left or right crossfader side. You can also unassigns the Mixer channels from the crossfader when the selectors are set to center position. For more information, refer to
Assigning Mixer Channels to the Crossfader .
(
3
)
MIC D
: Connects a microphone to Mixer channel
D
using an XLR connector. For more informa-
tion, refer to Integrating Microphone .
(
4
)
PHONES OUT 1/8″
and
1/4″
: Connect one or two pairs of headphones. When two pairs of headphones are connected, the maximum headphone volume level is decreased.
5.5. Rear Panel
The rear panel hosts all sockets for connecting the S4 to the computer, for powering it up, and for connecting external devices.
Rear panel.
(
1
)
MAIN OUT RCA R
/
L
: Connects the S4 to a power amplifier using unbalanced RCA cables.
(
2
)
MAIN OUT XLR R
/
L
: Connects the S4 to a power amplifier using balanced XLR cables.
(
3
)
BOOTH OUT 1/4″ R
/
L
: Connects the S4 to a power amplifier for the DJ booth using balanced
1/4″ cables.
(
4
)
LINE IN D RCA R
/
L
: Connects a line level audio source, for example, a CD player to Mixer channel
D
using RCA cables.
(
5
)
PHONO / LINE IN B RCA R
/
L
: Connects a phono level device, for example, a turntable, or a line level audio source, for example a CD player to Mixer channel
B
using RCA cables.
(
6
)
GND
: The
GND
(ground) screw connects the ground wire of turntables to prevent buzzing in the audio signal.
(
7
)
PHONO / LINE IN A RCA R
/
L
: Connects a phono level device, for example, a turntable, or a line level audio source, for example, a CD player to Mixer channel
A
using RCA cables.
25
TRAKTOR KONTROL S4 Overview
(
8
)
LINE IN C RCA R
/
L
: Connects a line level audio source, for example, a CD player to Mixer channel
C
using RCA cables.
(
9
)
MIC C
: Connects a microphone to Mixer channel
C
using a 1/4″ connector.
(
10
)
Kensington Lock slot
: Connects a Kensignton Lock to the S4 to help prevent against theft.
(
11
)
USB HUB
: Connects a USB device, for example, another TRAKTOR controller or a USB-Hub.
(
12
)
USB socket
: Connects your S4 to the computer using the supplied USB cable.
(
13
)
PSU socket
: Connects the supplied Native Instruments Power Supply to the S4.
(
14
)
Power switch
: Switches the S4 on or off.
26
Mixing Your First Tracks
6. MIXING YOUR FIRST TRACKS
In this section you will learn to mix your first two tracks, using Deck
A
and Deck
B
, with the
SYNC
function. For this method, you will not need to use the Jog Wheels or your headphones.
At first you will prepare the Mixer by adjusting the control elements for mixing tracks between Deck
A
to Deck
B
. Then you will load the first track into Deck
A
, and begin to perform step by step.
6.1. Prerequisites
1.
Set Crossfader Assignment selector
A
to the left to assign Mixer channel
A
to the left crossfader end.
2.
Set Crossfader Assignment selector
B
to the right to assign Mixer channel
B
to the right crossfader end.
3.
Set the crossfader to the left-most position.
4.
Set channel fader
A
and channel fader
B
to maximum position.
27
Mixing Your First Tracks
5.
Set the
MASTER
knob to center position.
6.
Set the
BOOTH
knob to center position.
7.
Set the volume of your audio system or active speakers to minimum level.
6.2. Loading the First Track into Deck A
To load the first track into Deck A:
1.
Press
DECK SELECT
button
A
to focus the left S4 Deck on Deck
A
.
The
DECK SELECT
button
A
and the Deck LEDs light up blue.
2.
Press the
VIEW
button to maximize the Browser view in the software.
3.
Turn the Browse encoder to select one of your tracks in the Track List, or a demo track, for example,
Berlin Hauptbahnhof
by Native Instruments.
4.
Press the Browse encoder to load the selected track into that Deck.
28
Mixing Your First Tracks
TRAKTOR now analyzes the track to determine its tempo, and to create the Beatgrid and the
Waveform.
5.
Press the
VIEW
button again to minimize the Browser view in the software.
6.3. Starting Playback of Deck A
To start playback on Deck
A
:
1.
Press the Play/Pause button on the left S4 Deck.
The Waveform starts moving and the Channel Level Meter LEDs in the left Mixer channel
A
illuminate.
2.
Slowly increase the volume of your audio system or active speakers to a moderate listening level.
You now hear the audio of the track in your speakers.
6.4. Loading the Second Track into Deck B
To load the second track into Deck
B
:
29
Mixing Your First Tracks
The next track you want to mix must have a similar tempo like the playing track.
1.
Press
DECK SELECT
button
B
to set the right S4 Deck’s focus to Deck
B
.
The
DECK SELECT
button
B
and the Deck LEDs light up blue.
2.
Press the
VIEW
button to maximize the Browse view in the software.
3.
Turn the Browse encoder to select one of your tracks in the Track List, or a demo track, for example,
Lisa
by Native Instruments.
4.
Press the Browse encoder to load the track into the Deck.
TRAKTOR now analyzes the track to determine its tempo, and to create the Beatgrid and the
Waveform.
30
Mixing Your First Tracks
5.
Press the
VIEW
button again to minimize the Browser view in the software.
6.5. Syncing the Track Tempos
In order to sync the tempos of both tracks:
• Press the
SYNC
(
Lock
) button on the right S4 Deck.
The tempo of the track in Deck B is now synced to the running track, indicated by the equal tempo value in the software’s Deck Header. The
SYNC
(
Lock
) button lights up on the right
S4 Deck.
6.6. Starting Playback of the Second Track
When the track in Deck
A
is almost over you can start the playback of the next track:
• Press the Play/Pause button on the right S4 Deck to start playback of the track in Deck
B
.
The Waveform starts moving and the Channel Volume Meter LEDs in Mixer channel
B
illuminate. The tracks in Deck
A
and Deck
B
play in sync.
6.7. Mixing in the Audio Signal
You can now mix the audio signal of Mixer channel
B
into the Master signal:
1.
Move the crossfader slowly towards center position and hold for a moment.
31
Mixing Your First Tracks
The audio signal of the track in Mixer channel
B
fades into the Master signal.
2.
While the track in Deck
A
reaches its end, slowly move the crossfader towards the right-most position.
The audio signal of Mixer channel
A
slowly fades out of the Master signal. Only Mixer channel
B
is now audible.
When the playback of Deck
A
ends, Deck
B
automatically becomes the Tempo Master and is ready to transition to the next track.
32
Tutorials
7. TUTORIALS
The tutorials in this section introduces you to the several functions and features of the S4. The following list provides you with an overview of the tutorials including the link to it:
•
Browsing and Loading Tracks
: By having your music imported in TRAKTOR, you can use the Browse controls on the S4 to find tracks for your mix. When loading a track into a Deck,
TRAKTOR starts to analyze the track, calculating its exact tempo and key information. From this analysis, TRAKTOR creates the Beatgrid and the Waveform. This information is then stor-
ed for the track in the Track Collection. For more information, refer to Browsing and Loading .
•
Controlling Track Playback
: The S4 lets you control the playback of your tracks using transport controls and the Jog Wheels which can be operated several modes. For more information, refer to
Controlling Playback ,
Using Jog Wheels in JOG Mode , and
Using Jog Wheels in Turntable Mode .
•
Adjusting the Crossfader
: You can determine which Mixer channel is to be routed to the crossfader and set the crossfader curve accordingly. For more information, refer to
Assigning
Mixer Channels to the Crossfader .
•
Switching Decks Focus
: Each S4 Deck controls two TRAKTOR Decks. The Deck Select buttons determine which of the Decks is in focus. For more information, refer to
Switching Deck
Focus
.
•
Adjusting Levels
and
Using the Equalizer
: The Mixer lets you adjust volumes of your tracks and tweak the frequency bands of the audio signals using the equalizer. For more information,
refer to Adjusting Levels
and
Using the Equalizer .
•
Adjusting Tempo
: You can use the
TEMPO
faders to adjust the tempo on each Deck manually. The
TEMPO
faders can be operated in two modes. For more information, refer to
Adjusting
Tempo .
•
Locking Key of Tracks
: When adjusting the track tempo, then the pitch changes accordingly.
Using Keylock you can adjust the track tempo without changing the pitch. For more information, refer to
Locking the Key of Tracks .
•
Working with MIXER FX
: You can modulate the sound of your tracks using
MIXER FX
and the
FX Units. For more information, refer to
Playing with MIXER Effects
, and
Playing with FX Units
.
•
Working with Cue Points and Loops
: By triggering stored Hotcues from the Pads, you are able to jump to specific sections within the track. For more information, refer to
Playing with
Cue Points
. To extend the playback of tracks or to loop a specific part in a track, you can make use of the S4’s looping functions. For more information, refer to
Playing with Loops .
•
Snap Mode and Quantize Mode
: In order to precisely place Cue Points, Loops and jumps within tracks without loosing the sync, use Snap mode and Quantize mode. For more information, refer to
Snap Mode and Quantize Mode .
•
Using Flux and Reverse mode
: Flux mode and Reverse mode allow you to create a parallel playhead when performing with Hotcues and Loops. The parallel playhead ensures you don’t lose the original track playhead position in the track. For more information, refer to
Playing with
Flux Mode and Reverse Mode
.
•
Previewing Tracks
: The Preview Player in the Browser lets you conveniently preview tracks without loading them into the Deck. The CUE channel and its controls on the Mixer also enable
33
Tutorials
you to preview your tracks and your sound adjustments before you transition to the next track.
For more information, refer Previewing Tracks in the Browser
, and
Using CUE Channel
.
•
Working with the Preparation List
: TRAKTOR’s Browser allows you to prepare for your next mix. The S4 has a dedicated control so you can easily add tracks to the Preparation List.For
more information, refer to Adding Tracks to the Preparation List
.
•
Working with Remix Decks
: The Remix Decks allow you to playback Samples and add them to your mix. Furthermore, you can enable the Pattern Recorder for recording sequences to be played by the Samples. For more information, refer to
Playing with Remix Decks
.
•
Working with STEM Decks
: The STEM Decks let you playback STEM Files which include four individual STEM Parts for musical elements. The STEM Deck gives you the control over the
STEM Parts. For more information, refer to
Playing with STEM Decks .
•
Correcting Beatgrids of Tracks
: If the SYNC function is enabled but the playing tracks are not synced, it is likely that the Beatgrids were miscalculated. The S4 allows you correct Beatgrids manually. For more information, refer to
Correcting Beatgrids of Tracks .
7.1. Browsing and Loading
The S4 lets you conveniently browse for your music in the Track Collection in TRAKTOR. Using the Browse controls on the Decks, you can quickly open the Browser view, navigate in the Track
List, and select Favorite folders and Playlists for loading your desired tracks.
Maximizing and Minimizing Browser View
Using the Browse controls you can instantly browse for your music in TRAKTOR. However, you can maximize Browser view in TRAKTOR for a better overview:
1.
Press the
VIEW
button.
The TRAKTOR Layout switches to Browser view.
2.
Press the
VIEW
button again to close the Browser view in TRAKTOR.
Finding a Track
On the Deck you want load a track:
1.
Turn the Browse encoder to scroll through the Track List for selecting a track.
34
Tutorials
2.
Press and hold the
Star
button + turn the Browse encoder to select another favorite folder.
The Track List shows the content according to the selected folder.
Loading the Track into the Deck
To load the selected track into the Deck:
• Press the Browse encoder.
The track is loaded into the Deck. Depending on the loaded track, the Deck Type switches accordingly.
If the track is loaded into the Deck for the first time, TRAKTOR starts to analyze the track to determine its tempo, and then calculate the Beatgrid and Waveform. The moment of the analysis can be switched to another context in the Preferences.
7.2. Controlling Playback
The Transport Controls and the Jog Wheels on the S4 let you control the playback of tracks. This section describes the several interactions you can perform to control the playing track, as well as previewing tracks in the CUE channel for the next transition.
35
7.2.1. Using Transport Controls
The Transport Controls let you start and pause playback as well as cue the track.
Starting/Pausing Playback
To start the playback of the loaded track:
• Press the Play/Pause button.
Tutorials
To pause the playback:
• Press the Play/Pause button again.
Cueing the Track using the Cue Button
The
CUE
button has several functions:
• When pressing and holding the
CUE
button, the playback continues from the position of the floating Cue Point as long as the
CUE
button remains depressed.
• When releasing the
CUE
button, playback stops immediately and the playback position jumps back to the Cue Point.
• When pressing and holding the
CUE
button and pressing the Play/Pause button, the playback continues as normal.
7.2.2. Using Jog Wheels in JOG Mode
In this section you are provided with the several interactions you can perform with the Jog Wheels when used in
JOG
mode. In JOG mode you can use the Jog Wheel to bend and nudge the tempo, to cue a beat and to perform a scratch, and to fast seek within the Track. Furthermore, you can disable the touch-sensitivity of the top plate and you can adjust the resistance for spinning the Jog
Wheel.
36
Tutorials
Enabling JOG Mode
To enable JOG mode:
• Press the
JOG
button on the Deck.
The
JOG
button brightly lights up in the color of the focused Deck.
Tempo Bending and Nudging
You can use the Jog Wheel to manually correct the sync of tracks by bending or nudging the Deck tempo.
To nudge the Deck tempo:
• Touch the Jog Wheel’s outer rim and spin it clockwise to temporarily raise the Deck tempo. When you stop spinning the rim, the Deck returns to its original tempo.
To bend the Deck tempo:
• Touch the Jog Wheel’s outer rim and spin it counterclockwise to temporarily lower the Deck tempo. When you stop spinning the rim, the Deck returns to its original tempo.
37
Tutorials
If you select the option
Ticks when Nudging
in the Preferences, you then feel ticks in the Jog Wheel when spinning it using its outer rim. This option applies only for
JOG
mode. For more information, refer to
Preferences .
Cueing and Scratching
You can hold the track playback with the Jog Wheel to cue a beat or to scratch:
1.
Touch and hold the top plate of the Jog Wheel.
The playback is held. When you release the top plate, the playback continues as normal.
2.
While holding the top plate, spin the Jog Wheel clockwise or counterclockwise to cue a beat.
38
Tutorials
3.
While holding the top plate, spin the Jog Wheel back and forth to perform a scratch.
If you select the option
Enable Haptic Hotcues
Preferences, you then feel haptic feedback in the Jog Wheel when cuing Cue Points and Loop markers while touching
the top plate. For more information, refer to Preferences
.
Fast Seeking
You can use the Jog Wheel to fast seek within the track:
1.
Press and hold
SHIFT
to access the secondary S4 functions.
2.
While holding
SHIFT
turn the Jog Wheel clockwise or counterclockwise to fast seek within the track.
39
Tutorials
Disabling the Top Plate’s Touch-Sensitivity
You can disable the touch-sensitivity of the top plate for the JOG mode. This enables you to also use the top plate to bend or nudge the track tempo.
To disable the touch-sensitivity:
• Press the
JOG
button.
The
JOG
button now illuminates red indicating the touch-sensitivity of that top plate is disabled. When you press the
JOG
button again, the touch-sensitivity is re-enabled.
When you disable the touch-sensitivity of the top plate, you cannot perform backspins. Also, the haptic feedback options in the Preferences do not apply.
Adjusting the Jog Wheel Spinning Tension
You can adjust the spinning tension for the Jog Wheel:
1.
Press and hold the
JOG
button and turn the Jog Wheel clockwise to raise the tension.
The Jog Wheel’s tension raises.
2.
Press and hold the
JOG
button and turn the Jog Wheel counterclockwise to loosen the tension.
The Jog Wheel’s tension gets loose.
3.
Release the
JOG
button at the desired Jog Wheel tension.
You can adjust the tension also in the Preferences.
7.2.3. Using Jog Wheels in Turntable Mode
This section introduces you the several interactions you can perform with the Jog Wheels when used in Turntable mode. In
TT
mode (Turntable mode) the Jog Wheels behave like the platters of conventional DJ turntables. When the
TT
mode is enabled, the Jog Wheel will rotate during track playback.
40
Tutorials
In the Preferences you can adjust the Base speed for the Jog wheels. For more information, refer to
Preferences .
Enabling Turntable Mode
To enable Turntable mode:
• Press the
TT
button on that Deck.
The
TT
button brightly lights up in the color of the focused Deck.
Tempo Bending and Nudging
During Deck playback you can use the Jog Wheel to temporarily bend or to nudge the Deck tempo. This is used when syncing tracks manually.
To nudge the Deck tempo:
• Touch the Jog Wheel’s outer rim and spin it clockwise to temporarily raise the Deck tempo. When you stop spinning the rim, the Jog Wheel and the Deck returns to original tempo.
To bend the Deck tempo:
• Slightly touch the Jog Wheel’s outer rim to temporarily lower the Jog Wheel rotation tempo and the Deck tempo. When you stop touching the rim, the Jog Wheel and the Deck return to original tempo.
41
Tutorials
Cueing, Seeking and Scratching
You can use the Jog Wheel to cue a beat or to scratch:
1.
Touch and hold the top plate of the Jog Wheel.
The Jog Wheel stops to rotate and and the playback is held.
2.
While holding the top plate, spin the Jog Wheel clockwise or counterclockwise to cue a beat or to seek in the track.
42
Tutorials
3.
While holding the top plate, quickly spin the Jog Wheel back and forth for scratching the track.
When you release the top plate, the Jog Wheel continues to rotate and the Deck playback continues.
By enabling the option
Enable Haptic Hotcues
in the Preferences, you then feel a haptic feedback in the Jog Wheel when cuing Cue Points and Loop markers using
the top plate. For more information, refer to Preferences
.
7.3. Assigning Mixer Channels to the Crossfader
You can use the crossfader to transition between the audio signals in the Mixer channels. You can assign any Mixer channel to either crossfader side. If you do not intend to use the crossfader, we recommend you to unassign the Mixer channels from the crossfader to prevent accidental usage in a live situation.
Furthermore, you can determine the fading behavior for the audio signals when moving the crossfader.
Assigning Mixer Channels
For any Mixer channel there is a crossfader assign selector on the front panel.
To assign a Mixer channel to the left crossfader side:
• Set the crossfader assign selector for the corresponding Mixer channel to the left.
43
To assign a Mixer channel to the right crossfader side:
• Set the crossfader assign selector for the corresponding Mixer channel to the right.
Tutorials
Unassigning Mixer Channels
To unassign a Mixer channel from the crossfader:
• Set the crossfader assign selector for the corresponding Mixer channel to the center position.
7.3.1. Setting the Crossfader Curve
You can determine the fading behavior of the crossfader with the crossfader curve selector on the front panel. You can set it to the positions constant, smooth, or sharp.
•
Constant
: With this setting, moving the crossfader allows the levels of the Mixer channel signals to be raised and lowered constantly.
•
Smooth
: With this setting, moving the crossfader enables the levels of the Mixer channel signals to be raised and lowered smoothly.
•
Sharp
: With this setting, moving the crossfader lets the level of the other Mixer channel signal immediately raise to full volume. Both signals are audible in full volume when the crossfader is placed at any position between the crossfader ends.
If you want the crossfader to use the constant curve:
• Set the crossfader curve selector to the left.
If you want the crossfader to use the smooth curve:
44
Tutorials
• Set the crossfader curve selector to the center position.
If you want the crossfader to use the sharp curve:
• Set the crossfader curve selector to the right.
7.4. Adjusting Levels
When you mix tracks you need to make sure that the levels of both tracks are at the same level for flawless transitions. But also, you need to make sure the signals are not to loud neither to silent to gain the best possible audio quality. For this, you can define the level for the incoming audio signals into the Mixer channel, and you can define the levels for the outgoing signals send to the
MASTER output.
Adjusting Levels for Incoming Audio Signals
With the
GAIN
knob in the Mixer channel you can determine the level for the incoming audio signal. When you adjust the incoming level the Channel Volume Meter visually indicates the current level.
To adjust the level for the incoming audio signal in the Mixer channel:
• Turn the individual
GAIN
knob clockwise or counterclockwise so that the incoming level does not exceed the Headroom area reflected by the yellow LEDs of the Channel Volume Meter.
Adjusting Outgoing Mixer Channel Levels
The channel fader in a Mixer channel limits the maximum level sent from the Mixer channel to the
MASTER output.
45
Tutorials
To adjust the outgoing level of a Mixer channel:
• Move the relevant channel fader up or down.
The outgoing level changes accordingly. When the channel fader is set to its maximum position, the outgoing signal level equals the level of the incoming signal.
You can also use the channel faders to transitions between audio signals without using the crossfader.
Adjusting the MASTER Output Level
The MASTER output stage receives the signals coming from the Mixer channels. You can determine the MASTER output level with the
MASTER
knob.
To adjust the MASTER output level:
• Turn the
MASTER
knob clockwise or counterclockwise.
The MASTER output level adjusts accordingly.
Adjusting the BOOTH Output Level
The Booth output stage receives the same signals coming from the Mixer channels like the
MAS-
TER
output stage. You can determine the BOOTH output level with the
BOOTH
knob:
• Turn the
BOOTH
knob clockwise or counterclockwise.
The outgoing BOOTH output level adjusts accordingly.
46
Tutorials
To avoid damaging your ears, always watch the listening level of the connected speakers or power amplifier, and set it to a comfortable listening level.
7.5. Using the Equalizer
You can use the equalizer to slightly adjust certain frequencies in the audio signal to highlight a specific part, like, attenuating vocals or a lead line. Another common technique is to take out the bass frequency of one track in order to let the bass of the other track dominate the mix.
The
EQ
knobs adjust the high, middle, or low frequencies in the audio signal.
Taking out Frequency Bands of the Audio Signal
To take out frequency bands of the audio signal:
• Turn the individual
EQ
knob counterclockwise to take out the corresponding frequency band.
When you turn the
EQ
knob entirely counterclockwise you entirely remove the individual frequency band from the audio signal.
Taking out frequencies can avoid clipping that can easily occur when two tracks play together with full level.
Attenuating Frequency Bands in the Audio Signal
To attenuate frequency bands of the audio signal:
• Turn the individual
EQ
knob clockwise to attenuate the corresponding frequency band.
47
Tutorials
7.6. Using CUE Channel
You can use the CUE channel on the Mixer to preview tracks in the headphones. Any Mixer channel is equipped with a
CUE
button to route the audio signal into the CUE channel. You can use the
MIX
and
VOL
knobs to determining the level for the
CUE
channel, as well as the ratio between the cued signal and the MASTER signal.
Routing Audio Signals into the Cue Channel
To route the audio signal from a Mixer channel into the CUE channel:
• Press the
CUE
button of that Mixer channel.
The audio signal is audible in the CUE channel.
You can route the audio signals of all Mixer channels into the CUE channel at once.
Adjusting the Ratio between the Cue-Mix Signal
In the CUE channel, you can use the
MIX
knob to determine the ratio between the cued signal and the MASTER signal.
1.
Turn the
MIX
knob clockwise to let the MASTER signal dominate.
When you turn the
MIX
knob entirely clockwise, then you will only hear the MASTER signal in the headphones.
2.
Turn the
MIX
knob counterclockwise to let the Mixer channel signal dominate.
When you turn the
MIX
knob entirely counterclockwise, you then only hear the Mixer channel signal in the headphones.
Adjusting the CUE Channel Level
To adjust the CUE channel level:
• Turn the
VOL
knob clockwise or counterclockwise to increase or to decrease the CUE channel level.
48
Tutorials
7.7. Adjusting Tempo
You can adjust the track tempo with the automatic Deck synchronization function SYNC and the
TEMPO
fader. When youusing the
TEMPO
fader the resulting effect depends on several factors:
• When the SYNC function is used, changing the Tempo by moving the
TEMPO
fader only works on the Deck assigned to Tempo Master. Moving the
TEMPO
fader on the synced Deck has no effect.
• When the
TEMPO
fader is locked on the Deck, moving the
TEMPO
fader has no effect.
• The
TEMPO
faders can operated in two different modes, in
Absolute mode
and in
Relative
mode. By default, the
TEMPO
faders operate in Relative mode.
•
Relative
: In this mode, each
TEMPO
fader on your S4 affects the
TEMPO
fader of the software Deck relatively to its current position, even if this position does not match the position of the
TEMPO
fader on your S4. This notably resolves possible conflicts between the Tempo fader and the Deck synchronization.
•
Absolute
: In this mode, whenever you move the
TEMPO
fader on your S4, its position is transmitted 1:1 to the
TEMPO
fader of the software Deck, no matter what the current position of the Tempo fader in the software is. In Absolute mode, the software Deck’s tempo always matches the
TEMPO
fader position on your S4, unless you have somehow changed the software Deck’s tempo.
You can select the
TEMPO
fader mode in the Preferences. For more information, refer to
Preferences
.
Adjusting Tempo
To change the tempo on a Deck:
• Move the
TEMPO
fader up or down.
49
Tutorials
The track tempo decreases or increases, respectively. The key of the track changes accordingly.
Locking TEMPO Fader
To prevent accidental tempo changes you can lock the
TEMPO
fader:
1.
On the Deck, press and hold
SHIFT
to access the secondary Deck controls.
2.
While holding
SHIFT
, press the
SYNC
(
Lock
) button.
The
TEMPO
fader is locked, indicated by the red
TEMPO
fader LED. Moving the
TEM-
PO
fader will have no effect.
3.
To unlock the
TEMPO
fader, repeat the aforementioned steps.
When you unlock a
TEMPO
fader that is operated in Absolute Mode, the tempo for that Deck will immediately change to the value reflected by the current
TEMPO
fader position.
50
Tutorials
Resetting Relative Tempo Fader Position
When the
TEMPO
fader position in the software Deck does not match the
TEMPO
fader position on the S4 Deck, then you can reset the relative
TEMPO
fader position on the S4:
1.
On the S4 Deck, press and hold
SHIFT
to access the secondary Deck controls.
2.
While holding
SHIFT
, press the
MASTER
(
Reset
) button.
The
TEMPO
fader position in the software now reflects the
TEMPO
fader position of the S4
Deck.
When you reset the
TEMPO
fader that is operated in Absolute Mode, the tempo for that Deck will immediately change to the value reflected by the current Tempo Fader position.
Syncing Deck Tempo to Tempo Master using Sync
You can sync the Deck tempo to the Tempo Master:
• Press the
SYNC
(
Lock
) button to sync the Deck.
The Deck tempo is now synced to the Tempo Master. The button brightly lights up blue.
51
Tutorials
7.8. Locking the Key of Tracks
When you sync tracks, you change their tempos and, consequently, their pitches (or keys). Slowing down a track’s tempo will cause the track’s pitch to drop while speeding up a track’s tempo will cause the track’s pitch to rise. This is not problematic for small tempo adjustments. But when the tempo is changed more drastically, the resulting pitch shift might sound unnatural, especially for vocals.
To avoid this, you can use the
KEYLOCK
function on the S2 Deck to lock the track’s current key value. When you then move the
TEMPO
fader up or down, you change the track tempo but the track’s key remains at the locked value:.
Enabling Keylock for the Track
To lock the key for a track:
1.
Load a track into a Deck.
2.
Set the
TEMPO
fader to the center position.
3.
Press and hold
SHIFT
to access the secondary Deck functions.
4.
While holding
SHIFT
, press the
LOOP
encoder on that Deck to enable Keylock for the track.
The enabled Keylock is indicated by the blue dot next to the key value.
5.
Move the
TEMPO
fader up or down to change the track tempo.
52
Tutorials
The track tempo changes but the key value remains at the locked value.
Adjusting the Key without Changing Tempo
To change the pitch without changing the track tempo:
1.
Move the
TEMPO
fader up or down to set the desired track tempo.
2.
Press and hold
SHIFT
to access the secondary Deck functions.
3.
While holding
SHIFT
, press the
LOOP
encoder on that Deck to enable Keylock for the track.
53
Tutorials
The enabled Keylock is indicated by the blue dot next to the key value.
4.
While holding
SHIFT
, turn the
LOOP
encoder clockwise to shift up the key value. Turn the
LOOP
encoder counterclockwise to shift down the key value.
The pitch changes accordingly but the tempo remains unchanged.
7.9. Playing with Cue Points
When mixing tracks a common technique is to mix in the next track from a particular position in that track instead from its start, for example, at a certain beat. Mixing in tracks from a particular position in that track is called “cueing”. The S4 enables you to set points for cueing and for directly jumping to these particular positions: Cue Points. You can store Cue Points as Hotcues using the
Pads on the Deck. This allows you to gain instant access to your Cue Points.
Enabling Hotcues Mode
In order to work with Cue Points you need to ensure you are in HOTCUES mode:
• Press the
HOTCUES
button to enable HOTCUES mode for the selected Deck.
54
Tutorials
Storing Cue Points as Hotcues Buttons
To store a Cue Point as Hotcue:
• At the desired position in the track, press a Pad.
The Cue Point is set at the current playback position in the track and stored as Hotcue on the
Pad. This Pad lights up blue.
Triggering Cue Points on a Deck During Playback
To trigger Cue Points on a Deck during playback:
• Press a Pad.
The playback position jumps to the stored Cue Point and playback continues.
Triggering Cue Points on a Stopped Deck
On a stopped Deck, triggering Cue Points result in a different playback behavior:
• When pressing and holding a blue lit Pad, the playback continues from the position of the stored Cue point as long as the Pad is kept depressed.
• When releasing the Pad, the playback position jumps back to the Cue Point and playback stops immediately.
• When pressing and holding a blue lit Pad and later pressing the Play/Pause button, the playback continues as normal.
Removing Cue Points
To remove a Cue Point from the track and so the Hotcue:
• Press
SHIFT
and press a blue lit Pad.
The Hotcue is removed and the Cue Point is deleted from the track. The Pad is now unlit.
55
Tutorials
7.10. Playing with Loops
Loops are used as tools for remixing parts of tracks and can be used to extend track transitions. In this section you learn to play with Loops on the S4. Besides enabling Loops, you can store Loops as Hotcues in the track using the Deck’s Pads. This allows you to gain instant access to your most important Loops.
Enabling Hotcues Mode
In order to store and work with Loops you need to ensure you are in HOTCUES mode:
• Press
HOTCUES
to enable HOTCUES mode for the Deck.
Enabling a Loop
To enable a Loop:
1.
Press the
LOOP
encoder.
The Loop is enabled. The playback is looping by the selected Loop size. The Loop appears as the green area in the Waveform. When the playhead position reaches the Loop out point, the playback position seamlessly jumps back to to Loop In point. Looping continues as long as as the Loop is enabled.
2.
To disable the Loop, press the
LOOP
encoder again.
The playback continues.
56
Tutorials
Changing the Loop Size
You can instantly change the size of an enabled or disabled Loop:
• Turn the
LOOP
encoder clockwise or counterYou can change the size of the enabled or disabled Loop:clockwise.
The Loop size for the enabled Loop instantly changes by the value displayed in the Loop
Control bar.
If there is no Loop enabled, turning the
LOOP
encoder only selects a Loop size.
Storing a Loop as Hotcue
To store a Loop as a Hotcue:
1.
Press the
LOOP
encoder to enable a Loop.
2.
Press an unlit Pad.
The Loop is stored as a Hotcue. The Pad lights up green.
Triggering a Stored Loop
To trigger a stored Loop:
• Press a green lit Pad.
The Loop is enabled. The playback position jumps to the stored Loop In point and playback loops by the selected Loop size.
Moving the Loop within the Track
You can move an enabled or disabled Loop forwards or backwards within the track:
• Turn the
MOVE
encoder clockwise or counterclockwise.
57
Tutorials
This instantly moves the Loop within the track by the selected Loop size.
Removing a Stored Loop
To remove a stored Loop from the Hotcue and from the track:
• Press
SHIFT
and press a green lit Pad.
The Loop is removed from the Hotcue and from the track. The Pad is now unlit.
7.11. Playing with Flux Mode and Reverse Mode
Flux mode lets you jump to Cue Points and Loops without loosing the phrasing of your tracks. It is a timeline-based transport technique that enables you to interact with TRAKTOR’s transport controls, and then immediately jump back to the position in the timeline where the track would have been if the transport action had not been used. In other words, it is as if a second, virtual playhead continues forwards in the track, while TRAKTOR loops or jumps to a Cue Point.
When you release the Loop or Cue Point, by releasing the relevant Pad with the Hotcue, playback resumes at this playhead position. The longer you loop, the further ahead the playhead position will move and therefore the further ahead playback will jump to when you release Pad. The virtual
Flux mode timeline is represented by a green playhead in the Waveform view.
An expansion to the Flux mode is the Reverse mode. When you enable Reverse mode while in
Flux mode, you can let the track playback reversely from the current playhead position. The second, virtual playhead continues forwards in the track.
Enabling Flux Mode
To enable Flux mode for the selected Deck:
1.
Press the
FLX
button on the selected Deck.
58
Tutorials
Flux mode is enabled. The second, virtual playhead continues forwards in the track.
2.
Press and hold a Pad with the Hotcue.
The playback continues from the stored Cue Point or Loop.
3.
Release the Pad.
The playback resumes at the playhead position created by Flux mode.
You can also use Flux mode in conjunction with the Jog Wheel in JOG mode. When you backspin and release the Jog Wheel, the playback resumes at the playhead position created by Flux mode.
Enabling Reverse Mode
To enable Reverse mode:
1.
Press and hold the
REV
mode button on the selected Deck.
The track begins to playback in reverse. The second, virtual playhead continues forwards in the track.
2.
While holding the
REV
button, press and hold a Pad with a stored Hotcue.
The playback reversely continues from the stored Cue Point or Loop.
3.
Release the
REV
button.
The playback resumes at the playhead position created by Flux mode.
Enabling Reverse mode also enables Flux mode.
59
Tutorials
7.12. Playing with MIXER Effects
A Mixer FX is a grouped effect that can be applied to the audio signal in the Mixer channel using the Mixer FX Amount knob. You can choose between the
FILTER
effect and one of four preselected
MIXER FX
with the
FX SELECT
buttons
1
to
4
.
The following effects can be selected using the
FX SELECT
buttons:
FX SELECT buttons.
•
FILTER
: Selects the
FILTER
effect.
•
FX SELECT 1
: Selects the Reverb effect.
•
FX SELECT 2
: Selects the Dual Delay effect.
•
FX SELECT 2
: Selects the Noise effect.
•
FX SELECT 4
: Selects the Time Gater effect.
Besides the Filter Effect, each Mixer FX consists of the individual Effect and a Filter Effect. Depending on the direction you turn the FX Amount knob, you either apply the Mixer FX in combination with a low-pass Filter, or with a high-pass Filter.
Selecting a MIXER Effect for all Mixer Channels
To select a
MIXER FX
to be applied to all Mixer channels:
• Press the
FX SELECT
button with the individual
MIXER FX
.
The
FX SELECT
button brightly lights up, indicating the MIXER FX is selected. The
MIXER
FX ON
buttons in the Mixer channels also light up in the corresponding color.
Selecting a MIXER FX for individual Mixer Channels
You can select an individual
MIXER FX
for any of the Mixer channels:
1.
Press and hold the
FX SELECT
button with the individual Mixer FX.
The
FX SELECT
button lights up brightly.
2.
While holding the
FX SELECT
button, press the
MIXER FX ON
button on the individual Mixer channel.
3.
Release the
FX SELECT
button.
The
MIXER FX ON
button in the Mixer channel now reflects the color of the corresponding
FX SELECT
button.
60
Applying MIXER FX to the Audio Signal
To apply the selected
MIXER FX
, in combination with a low-pass Filter, to the audio signal:
• Turn the
MIXER FX
Amount knob counterclockwise.
Tutorials
To apply the selected MIXER FX in combination with a high-pass Filter to the audio signal:
• Turn the
MIXER FX
Amount knob clockwise.
If the
FILTER
is selected, turning the
MIXER FX
Amount knob only applies a low-pass Filter or a high-pass Filter to the audio signal.
7.13. Playing with FX Units
In this section you learn how to assign FX Units to Mixer channels and how to control individual effect parameters.
In TRAKTOR you can use the FX Units in the Global section to modulate the audio signals in the
Mixer channels. You can directly control the parameters of FX Unit 1 and 2 in the software using the controls of the corresponding FX Unit 1 and 2 on the S4. In the software the FX Units are freely configurable, whereas on the S4 you can only control the effect parameters that are assigned in the software.
Assigning FX Units to Mixer Channels
To assign FX Units to the Mixer channels:
• Press the FX Unit Assign buttons for the corresponding FX Unit in the Mixer channel. The left
FX Unit Assign button assigns FX Unit 1, and the right FX Unit Assign button assigns FX Unit
2.
61
Tutorials
The FX Unit Assign button lights up brightly.
You can assign both FX Units to any Mixer channel at a time.
Controlling FX Units
On the S4 the FX Units reflect the current FX Unit configuration in TRAKTOR. To control the FX
Units:
1.
Turn the FX Unit knobs 1 — 4 clockwise or counterclockwise to change the corresponding Effect parameter.
The FX Unit knobs in the software change accordingly.
2.
Press the FX Unit
ON
buttons 1 — 4 to enable or disable the corresponding Effect parameter.
The FX Unit
ON
buttons brightly light up on the S4 and in the software.
If the FX Unit is operated in Group FX mode in the software, the FX Unit
ON
button 1 on the S4 has no effect. The FX Unit
ON
button remains dimmed.
Displaying FX Units in the TRAKTOR Software
You can control the FX Units in the software from the S4, with or without displaying the FX Units in the software. However, it can be helpful to display the FX Units in the software for getting instant feedback about the selected Effects and the individual parameters.
To display the FX Units in the TRAKTOR software:
1.
In TRAKTOR, select
Extended
from the Layout drop-down menu to display the Global section.
2.
In the Global section, click the
FX
buttons on the far left and far right to display the FX Units
1 and 2.
7.14. Adding Tracks to the Preparation List
In TRAKTOR’s Browser you can prepare for your next mix by adding tracks to it’s Preparation List.
In TRAKTOR you can do this by tagging the selected track in the Track List. The track is then added to the Preparation List. When you select the Preparation List in the Browser, you are then provided with all the tracks contained in the Preparation List. On your S4 you can add the selected track in the Track List to the Preparation List using the Preparation List buttons on the S4 Decks.
To add tracks to the Preparation List:
62
Tutorials
1.
Turn the Browse encoder to select a track in the Track List.
2.
Press the Preparation List button on that Deck.
The track is added to the Preparation List. A diamond icon appears in the first column in the
Track List in TRAKTOR indicating that the track is added to the Preparation List. Pressing the Preparation List button again removes the track from the Preparation List.
7.15. Previewing Tracks in the Browser
With the Browse controls you can conveniently preview tracks in the Browser view:
1.
Put on your headphones.
2.
Turn the Browse encoder to select a track in the Track List.
3.
Press and hold the Preview button to load the track into the Preview Player and to instantly start playback.
The track is now playing back and audible in the CUE channel.
4.
While holding the Preview button turn the Browse encoder to seek within the track.
5.
Release the preview button to stop preview.
The preview Player is unloaded.
7.16. Switching Deck Focus
Any of the S4 Decks control two Decks in TRAKTOR. The left S4 Deck controls Deck
A
and Deck
C
, the right S4 Deck controls Deck
B
and Deck
D
. However, the S4 Decks can focus only on one of the TRAKTOR Decks.
To switch the Deck Focus on the left S4 Deck:
• On the left S4 Deck press the
DECK SELECT
buttons
A
or
C
to switch the Deck focus to the corresponding Deck.
63
Tutorials
To switch the Deck Focus on the right S4 Deck:
• Press the
DECK SELECT
buttons
B
or
D
to switch the Deck focus to the corresponding
Deck.
When Decks
A
and Deck
B
are focused on the S4, the Deck LEDs light up blue. When Decks
C
and Deck
D
are focused on the S4, the Deck LEDs light up orange.
7.17. Playing with Remix Decks
Remix Decks enable you to load collections of Samples (Remix Sets) and trigger the individual
Samples in your mix. As with Track Decks and STEM Decks, the Remix Decks can be synchronized to the Tempo Master to ensure the Samples always play in sync with other tracks.
A Remix Set can contain up to 64 Samples organized in the Sample Grid. The Sample Grid consists of four columns containing 16 Sample Cells each. When a Remix Set is loaded into a Remix
Deck on the S4, the first of the 16 Samples is visible in each Sample Slot. You can trigger them individually and manipulate their volume and sound using the Pads and the
MOVE
and
LOOP
encoders. You can instantly select another Sample in the Sample Slots using the Browse encoder.
Loading Remix Sets
To load a Remix Set from your Track Collection and to switch the Deck Type to Remix Deck:
1.
Press the
VIEW
button.
64
Tutorials
The TRAKTOR Layout switches to Browser view.
2.
Press and hold the
Star
button and turn the Browse encoder to select the
All Remix Sets
favorite folder.
3.
Turn the Browse encoder to select a Remix Set in the Track List.
4.
Press the Browse encoder to load the Remix Set into that Deck.
The Deck Type switches to Remix Deck and enables the
SAMPLES
mode for that S4 Deck.
Triggering Samples
Once the Remix Set is loaded into the Deck you can trigger the Samples:
1.
Press Pad
1
—
4
to trigger the corresponding Samples.
The Deck and the Samples play back and the Pads brightly light up.
65
Tutorials
2.
To stop the playback of a Sample, press and hold
SHIFT
to access the Decks secondary functions.
The colors of the first row of Pads change to white.
3.
While holding
SHIFT
, press the Pad for the corresponding Sample you want to stop playback.
The Sample stops immediately and the Pad turns dim. The Deck playback continues.
Adjusting Sample Slot Volume
The volume level of any Sample Slot can be adjusted and muted individually:
To adjust the volume level of a Sample Slot:
1.
Press and hold the Pad below the Pad for the corresponding Sample to access the sound controls for the Sample Slot.
The display shows the current
Volume
and
Filter
parameter values.
2.
While holding the Pad, turn the
MOVE
encoder clockwise or counterclockwise to adjust the volume for the Sample Slot.
66
The
Volume
parameter value in the display changes accordingly.
Tutorials
Muting Sample Slots
You can mute a Sample Slot immediately:
1.
Press and hold the Mute button.
2.
While holding the Mute button, press the Pad corresponding to the Sample Slot.
The Sample Slot is muted.
3.
To unmute the Sample Slot, repeat the aforementioned steps.
Applying Filter Effect to Sample Slot
Any Sample Slot contains a Filter control for applying a high-pass or low-pass filter:
1.
Press and hold the Pad below the Pad for the corresponding Sample to access the sound controls for the Sample Slot.
The display shows the current
Volume
and
Filter
parameter values.
2.
While holding the Pad, turn the
LOOP
encoder clockwise or counterclockwise to apply a high-pass or low-pass Filter effect to the Sample Slot.
67
Tutorials
The
Filter
parameter value in the display changes accordingly.
Selecting another Sample in Sample Slot
You can instantly select another Sample in any Sample Slot, independent of the playback status of the Sample Slot. When the Sample Slot is playing
1.
Press and hold the Pad below the Pad for the corresponding Sample to access the sound controls for the Sample Slot.
The display shows the current
Volume
and
Filter
parameter values.
2.
While holding the Pad, turn the Browse encoder clockwise or counterclockwise to to scroll through the List of Samples contained in the Sample Slot.
68
Tutorials
3.
When the new Sample is highlighted, release the Pad.
The playback of the Sample starts immediately in sync with the Quantize value.
Enabling and Adjusting the Remix Deck’s Quantize Mode
The Remix Deck provides an internal Quantize mode to let the Samples trigger at the right beat in the internal timeline. You can adjust the Quantize value with the
LOOP
encoder.
To enable Quantize mode for the Remix Deck:
1.
Press and hold
SHIFT
to access the secondary Deck functions.
2.
While holding
SHIFT
, press the
LOOP
encoder to enable or disable Quantize mode for the
Remix Deck.
The enabled Quantize mode is indicated by the blue dot next to the Quantize value.
3.
To adjust the Quantize value, hold
SHIFT
and turn the
LOOP
encoder clockwise or counterclockwise.
69
Tutorials
The Quantize value changes accordingly.
7.17.1. Using Pattern Recorder
The Pattern Recorder allows you to program sequences to be played by the Samples in the Remix
Slots. When the Pattern Recorder is enabled, you can instantly play and record your sequences by tapping the Pads. Upon recording, the sequences will automatically be quantized and instantly play back in sync to the Deck tempo and repeat. You can program sequences up to 16 steps.
The Pattern Recorder is meant to be used with one-shot Samples such as kick drum, snare, hihat, sound FX, etc. The usage of Loops will also work, but may not bring the appropriate results.
Enabling Pattern Recorder
To enable Pattern Recorder:
1.
Load a Remix Set into a Deck.
The Deck Type switches to Remix Deck. Alternatively, you can load individual Samples into an empty Remix Deck.
2.
To enable Pattern Recorder, press the record button on the Deck.
The Pattern Recorder is enabled and the record button brightly lights up red.
Recording Sequences
Once the Pattern Recorder is enabled you can play and record your sequences:
• Play your sequences by tapping Pad
1
— Pad
4
, corresponding to the Samples.
The Pattern Recorder instantly records your sequences and repeat them.
Removing a Sequence
To remove a sequences:
• Press and hold
SHIFT
+ press the Pad corresponding to the sequence you want to remove.
The sequence is removed. You can now tap in a new sequence on that Pad.
7.18. Playing with STEM Decks
In this section you will learn how to load and play back a STEM File, how to adjust volumes and apply Filter FX on individual STEM parts in the STEM Decks.
70
Tutorials
STEM Files allow you to interact with four different musical elements of a track independently. You can modify these four STEM Parts individually to create spontaneous instrumentals, remixes, or mashups. You can create transitions between musical elements STEM Part by STEM Part, or apply effects and EQ to a specific STEM Part, rather than the entire track. Furthermore, you can mix musical elements across multiple STEM Decks, for example, taking the vocals from one STEM
File and mixing it with the beat from another.
Loading a STEM File
To load a STEM File into a Deck and switch the Deck Type to STEM Deck:
1.
Press the
VIEW
button.
The TRAKTOR Layout switches to Browser view.
2.
Press and hold the
Star
button + turn the Browse encoder to select the
All Stems
favorite folder.
3.
In the Track List, select the STEM File you want to load by turning the Browse encoder.
4.
Press the Browse encoder to load the STEM File into the Deck.
The Deck Type automatically switches to STEM Deck. The display shows the Waveform for the entire STEM File.
Playing Back the STEM File
In order to play back a STEM File:
71
Tutorials
• Press the Play/Pause button on the Deck.
The STEM Deck plays back the STEM File.
Adjusting STEM Part Volumes
In order to adjust the volumes for the individual STEM Parts:
1.
Press the
STEMS
button to access STEM Deck controls.
2.
Press and hold the Pad below the Pad for the corresponding STEM Part to access the sound controls for that STEM Part.
The display shows the current
Volume
and
Filter
parameter values.
3.
While holding the Pad, turn the
MOVE
encoder clockwise or counterclockwise to adjust the volume for the STEM Part.
The volume of the musical element in the STEM Part decreases or increases accordingly.
72
Tutorials
4.
To reset the STEM Part volume, press and hold the Pad below the Pad of the corresponding
STEM Part and press the
MOVE
encoder.
The STEM Part volume is reset to full level.
Muting STEM Parts
You can mute a STEM Part immediately:
1.
Press and hold the Mute button and press the Pad corresponding to the STEM Part.
The STEM Part is muted.
2.
To unmute the STEM Part, repeat the aforementioned steps.
Applying Filter FX to STEM Parts
In order to apply a Filter effect to key elements of the music:
1.
Press the
STEMS
button to access STEM Deck controls.
73
Tutorials
2.
Press and hold the Pad below the Pad corresponding to the STEM Part to access the sound controls for that STEM Part.
The display shows the current
Volume
and
Filter
effect parameter values.
3.
While holding the Pad, press the
LOOP
encoder to enable the Filter effect for that STEM
Part.
The
Filter
effect parameter in the display is highlighted accordingly.
4.
While still holding the Pad, turn the
LOOP
encoder clockwise or counterclockwise to apply a high-pass or low-pass Filter effect to the STEM Part.
The
Filter
effect parameter value in the display changes accordingly.
5.
To reset the Filter effect for the STEM Part, press and hold the Pad below the Pad for the corresponding STEM Part and press the
LOOP
encoder.
The
Filter
effect parameter set back to the center position.
74
Tutorials
7.19. Correcting Beatgrids of Tracks
When a track contains a complex rhythm or an uneven timing, it can happen that the Beatgrid calculated by TRAKTOR does not precisely match the beat of the track. It is then not possible to match the beats of that track when mixing it using the
SYNC
function. Miscalculated Beatgrids can be corrected using the GRID mode on the S4. The GRID mode allows you to check and correct the Beatgrid of tracks.
Checking Beatgrid
To check the Beatgrid for the selected track:
1.
Load the track into a Deck.
2.
Press Play/Pause to start playback of the track.
3.
Press the
CUE
button of the Mixer channel corresponding to that Deck.
4.
Press the
JOG
button to enable Jog Wheel mode.
5.
Press and hold the
GRID
button on that Deck to make the Beatgrid tick audible.
75
Tutorials
Besides the beat of the track, you now hear a second beat tick (like a metronome tick) representing the Beatgrid. If the beat tick does not match the beat of the track, the Beatgrid is set incorrectly.
Correcting Beatgrid
To correct the Beatgrid setting, proceed as follows:
1.
While holding the
GRID
button, slightly turn the Jog Wheel clockwise or counterclockwise to move the Beatgrid forward or backward, respectively.
By turning the Jog Wheel you are able to adjust the Beatgrid, so that the beat tick matches the beat of the track.
2.
Release the
GRID
button.
The track’s Beatgrid is corrected and saved with the track.
Disable Analysis Lock if Tick is not audible
Ensure the Analysis Lock is disabled for the track to make Beatgrid correction possible.
To disable the Analysis Lock you need to perform the following actions in the TRAKTOR software:
1.
Select the
Extended
Layout in the Layout drop-down menu in the Header.
The Decks provide you with more functions and controls.
2.
Click on the Advanced Panel button to open the Advanced Panel for that Deck.
3.
Click on
GRID
to open the
GRID
page.
4.
Disable the Analysis Lock by clicking the
Analysis Lock
button.
The Beatgrid for the track can now be corrected.
76
Preferences
8. PREFERENCES
When opening the Preferences dialog in TRAKTOR you will find an additional page for the S4 controller with configuration settings.
Accessing TRAKTOR Preferences
To open the Preferences in TRAKTOR:
1.
Click the Preferences button in TRAKTOR’s Header.
2.
Select the
Traktor S4 MK3
page.
TRAKTOR S4 MK3 Preferences Page
Traktor S4 MK3 Preferences Page.
77
Preferences
Transport
•
Tempo Faders
: Determines the TEMPO fader mode.
• In
Absolute
mode, the track tempo automatically adjusts according to the TEMPO fader position when loading the track.
• In
Relative
mode, the track tempo is always set to the original tempo independent of the current TEMPO fader position when loading the track.
Haptic Drive
•
Ticks when Nudging
: Determines the haptic feedback sensitivity when turning the Jog Wheel using the rim in
JOG
mode.
• When
None
is selected, you do not feel any feedback in the Jog Wheel by turning it.
• When
Coarse
is selected, you feel ticks in coarse increments in the Jog Wheel by turning it.
• When
Fine
is selected, you feel ticks in fine increments in the Jog Wheel by turning it.
•
Jogwheel Tension
Determines the resistance when turning the Jog Wheel. A lower value results in less resistance, a higher value results in more resistance. The range is between
0
and
255
.
•
Enable Haptic Hotcues
When this option is ticked, you feel Cue Points and Loop markers in the Jog Wheel as haptic feedback when cueing them by touching the top plate.
TT Mode
•
Base
Determines the Jog Wheel’s revolutions per minute when used in
TT
mode.
• When
33.3 RPM
is selected, the Jog Wheel rotates slower.
• When
45 RPM
is selected, the Jog Wheel rotates faster.
Restore to default
•
Restore
: Restores to default S4 settings.
78
Integrating External Devices
9. INTEGRATING EXTERNAL DEVICES
The S4 provides you with the possibility to integrate external audio devices. Besides integrating microphones, you can also connect devices like turntables and CD players. This enables you to mix in external audio from vinyl and CD. In conjunction with turntables and CD players you can enable TRAKTOR’s Scratch function to control the Decks with timecode vinyls or timecode CDs, which you can purchase separately.
In this section you learn how to integrate external audio devices and how to setup TRAKTOR for using the Scratch function:
• For integrating a microphone, refer to Integrating Microphone .
• For integrating turntables into your setup, refer to
Integrating Turntable .
• For integrating CD players into your setup, refer to Integrating CD Players
.
• For configuring your S4 system connected with turntables or CD players to be used with TRAK-
TOR’s Scratch function, refer to Enabling Scratch Function in TRAKTOR .
9.1. Integrating Microphone
The Mixer channels
C
and
D
on the S4 allow you to integrate a microphone. On the rear panel on the S4 you can connect a microphone using a 1.8″ connector to be inserted into Mixer channel
C
.
On the front panel you can connect a microphone using an XLR connector to be integrated into
Mixer channel
D
.
This section introduces you the workflow to integrate a microphone. At first you connect the microphone to the S4. Then you enable the microphone pre-amplifier stage for the Mixer channel. Finally, you switch the Deck to Live Input to insert the microphone signal.
Connecting Microphone
To connect a microphone to your S4 system:
1.
Switch off the S4.
2.
Connect the microphone to the input
MIC C
on the rear panel, or to the input
MIC D
on the front panel on the S4, corresponding to its connector.
Enabling the Microphone Pre-Amplifier for the Mixer Channel
To let the Mixer channel receive the microphone signal, you need to enable the microphone preamplifier stage for the Mixer channel:
1.
Switch on the S4.
2.
Press and hold
SHIFT
on the S4 Deck to access the secondary Deck functions.
3.
While holding
SHIFT
, press the
EXT
button on the corresponding Mixer channel.
The
MIC C
or
MIC D
LED lights up indicating the microphone pre-amplifier stage is enabled for the Mixer channel.
79
Integrating External Devices
Switching the Deck to Live Input
To switch the S4 Deck to Live Input
1.
Press the
EXT
button on the Mixer channel you want to insert the microphone signal from.
The Deck has switched to Live Input. You can now speak into the microphone.
2.
Set the incoming microphone signal to an adequate level by turning the
GAIN
knob on the
Mixer channel.
9.2. Integrating Turntable
The Mixer channels on the S4 allow you to connect up to two phono level audio devices and two line level devices simultaneously.
A turntable that requires a separate phono pre-amplifier stage has to be connected to Mixer channel
A
or
B
. A turntable that has an integrated phono pre-amplifier can be connected to any Mixer channel.
This section provides you with the steps of how to connect a turntable without an integrated phono-pre-amplifier stage. At first you connect the turntable to the S4. Then you enable the phono pre-amplifier stage for the Mixer channel. Finally, you switch the Deck to Live Input.
Connecting Turntable
To connect your turntable to the S4:
1.
Switch off the S4.
2.
Connect your turntable to the inputs
PHONO / LINE IN A
or
B
on the rear panel of the S4 using a stereo RCA cable.
3.
Attach the ground wire of your turntable to the ground post
GND
on the rear panel of the S4.
Enabling the Phono Pre-Amplifier for the Mixer Channel
To let the Mixer channel receive the phono signal, you need to enable the phono pre-amplifier stage for the Mixer channel:
1.
Switch on the S4.
2.
Press and hold
SHIFT
on the S4 Deck you want to integrate the turntable to access the secondary Deck functions.
3.
While holding
SHIFT
press the
EXT
button on the corresponding Mixer channel.
The
PHONO
LED lights up indicating the phono pre-amplifier is enabled for the Mixer channel.
Switching the Deck to Live Input
To switch the S4 Deck to Live input:
1.
Press the
EXT
button on the Mixer channel you want to insert the external audio from.
The Deck has switched to Live Input.
2.
Put a vinyl on your turntable and start playback.
The Mixer channel now inserts the audio signal from the turntable.
80
Integrating External Devices
9.3. Integrating CD Players
The Mixer channels on the S4 allow you to connect up four line level devices simultaneously. This section guides you through the steps for connecting a CD player. At first you connect the CD player to the S4. Then you enable the line level input for the Mixer channel. Finally, you switch the
Deck to Live Input.
Connecting CD Players
To connect a CD player to the S4:
1.
Switch off your S4.
2.
Connect your CD player to any of the inputs
PHONO / LINE IN A
or
B
or
LINE INC
or
D
respectively, on the rear panel of the S4 using a stereo RCA cable.
Enabling Inputs for Line Level Signals
You need to enable the Mixer channel to receive a line level audio signal. In this case the
LINE
LED has to light up. If this is not the case, you need to enable the line level input for the Mixer channel:
1.
Switch on the S4.
2.
Press and hold
SHIFT
on the S4 Deck you want to integrate the CD player to access the secondary Deck functions.
3.
While holding
SHIFT
press the
EXT
buttons on the Mixer channel corresponding to the connected CD player.
The
LINE
LED lights up indicating the Mixer channel receives the line level audio signal from the Deck used as Live Input.
Switching the Deck to Live Input
To switch the S4 Deck to Live input:
1.
Press the
EXT
button on the Mixer channel you want to insert the external audio from.
The Deck has switched to Live Input.
2.
Insert a CD into the CD player and start playback.
The Mixer channel now receives the line level audio signal from the CD player.
9.4. Enabling Scratch Function in TRAKTOR
The S4 enables you to use TRAKTOR’s Scratch function in conjunction with the connected turntable(s) or CD player(s). For this, you need the the timecode control vinyl or CD which you can purchase separately on the Native Instruments website. This section introduces you the workflow on how to enabling the Scratch function in TRAKTOR.
Enabling Scratch Function in TRAKTOR
To enable the Scratch function for a Deck in TRAKTOR:
1.
Start TRAKTOR.
81
Integrating External Devices
2.
Click the Deck letter of the Deck for which you want to enable the Scratch function.
The context menu opens.
3.
Select
Track Deck
.
The Deck switches to Track Deck.
4.
Click the Deck letter again to open the context menu.
5.
Select
Scratch Control
.
The Scratch function is enabled for the Track Deck. The
CUE
and
CUP
buttons of the Transport Controls are replaced by the Absolute mode button and Relative mode button.
6.
Repeat the aforementioned steps if you have another device for Scratch control connected.
Using Timecode Media
To control the Decks you need to use the timecode media corresponding to the devices you use:
1.
Load a track into the Deck.
2.
Put on the timecode vinyl(s) on your turntable(s) or insert the CD(s) into your CD player(s).
3.
Start playback on the device(s).
TRAKTOR now calibrates the incoming timecode signal.
4.
Click either the Absolute mode button or the Relative mode button in the Transport Controls.
The track playback in the Deck is now controlled by the timecode signal coming from the external device.
Displaying the Timecode Scopes in the Decks
To additionally monitor the timecode signal quality, you can display the timecode signal scopes on the individual Decks in TRAKTOR:
1.
Open the Preferences in TRAKTOR.
2.
Select the
Decks Layout
page.
3.
In the
Platter / Scope
option, select
Scope
from the individual drop-down menus.
The timecode scopes are now visible in the Decks.
82
Setting the TRAKTOR KONTROL S4 as Your Default Audio Interface
10. SETTING THE TRAKTOR KONTROL S4 AS
YOUR DEFAULT AUDIO INTERFACE
If you want to use the TRAKTOR KONTROL S4 for playback of all audio applications on your computer, you can set it as your default audio interface.
Windows
On Windows you can define the TRAKTOR KONTROL S4 as your default audio interface as follows:
1.
Open Start > Preferences > System.
2.
Select the Sound tab.
3.
In the device list, select TRAKTOR KONTROL S4 and click Set Default.
4.
On the Sound tab scroll down to Input.
5.
In the device list, select TRAKTOR KONTROL S4 and click Set Default.
6.
Close the dialog.
macOS
On macOS you can define the TRAKTOR KONTROL S4 as your default audio interface as follows:
1.
From the Apple menu, select System Preferences.
2.
In the panel that opens, click Sound.
3.
On the Sound Effects drop-down menu, select TRAKTOR KONTROL S4.
4.
Click the Output tab and select TRAKTOR KONTROL S4 from the Choose a device for sound output list.
5.
Click the Input tab, and select TRAKTOR KONTROL S4 from the Choose a device for sound input list.
6.
Close the window to confirm your changes.
83