- Manuals
- Brands
- Endurance Manuals
- Treadmill
- T150
- User manual
-
Contents
-
Table of Contents
-
Bookmarks
Quick Links
T150
v. 091709
Endurance
T150 Treadmill
®
User Manual
v. T150-043019
Related Manuals for Endurance T150
Summary of Contents for Endurance T150
-
Page 1
T150 v. 091709 Endurance T150 Treadmill ® User Manual v. T150-043019… -
Page 2: Table Of Contents
Table of Contents IMPORTANT SAFETY INSTRUCTIONS……SAFETY gUIdElINES…………ASSEMblY INSTRUCTIONS……….. HARdWARE PACK CHECK lIST……..PART lIST…………….10 — 11 ASSEMblY STEPS…………12 — 17 SETTINg UP YOUR TREAdMIll……..OPERATINg YOUR TREAdMIll……..OPERATINg THE CONSOlE……….20 — 23 PROgRAM FEATURES…………24 — 33 gENERAl MAINTENANCE……….
-
Page 3: Important Safety Instructions
The T150 is designed for your enjoyment. by following these precautions and using common sense, you will have many safe and pleasurable hours of healthful exercise with your Endurance T150.
-
Page 4: Safety Guidelines
Safety Guidelines Successful cardio training programs have one prominent feature in common…safety. Cardio training has some inherent dangers, as do all physical activities. The chance of injury can be greatly reduced or completely removed by using correct running techniques, proper breathing, maintaining equipment in good working condition, and by wearing the appropriate clothing.
-
Page 5
Important Electrical Information Safety Guidelines WARNING! NEVER use a RCD — Residual Current Device (U.S. ver.= GFCI) — wall outlet with this treadmill. As with any appliance with a large motor, the RCD/GFCI will trip often. Route the power mains cord away from any moving part of the treadmill including the elevation mechanism and eleCtriCal safety WARNINg! -
Page 6
Safety Guidelines This exercise equipment is designed and built for optimum safety for home use. However, certain precautions always apply whenever you operate any exercise equipment. be sure to read the entire manual before assembly and operation of this machine. Also, please note the following safety precautions. -
Page 7
Safety Guidelines IMPORTANT OPERATION INSTRUCTIONS ● NEVER operate this treadmill without reading and completely understanding the results of any operational change you request from the computer. ● Understand that changes in speed and incline do not occur immediately. Set your desired speed on the computer console and release the adjustment key. -
Page 8: Assembly Instructions
ASSEMBLY TIPS Read all “NoteS” on each page before beginning each step. While you may be able to assemble the T150 using the illustrations only, important safety notes and other tips are included in the text. Some pieces may have extra holes that you will not use. Use only those holes indicated in the instructions and illustrations.
-
Page 9: Hardware Pack Check List
Hardware Pack Check List M10x15mm Button Head Cap Screw, 8pcs M10x20mm Button Head Cap Screw, 4pcs M4x10mm Round Self-Tapping Screw, 4pcs M4x8mm Phillips Rounded Head Screw, 2pcs M10 Curved Washer, 8pcs M10 Flat Washer, 4pcs M6 Allen Wrench, 1pcs Screw Driver, 1pcs, 1pcs…
-
Page 10: Part List
Parts List…
-
Page 11: Part List
Parts List…
-
Page 12: Assembly Steps
Step 1 Be careful to assemble all components in the sequence they are presented. Note: Finger tighten all hardware in this step. DO NOT wrench tighten unless instructed Routing the lower Cable through the Upright (b) on the right using the steel wire provided.
-
Page 13
Step 1 Above shows STEP 1 assembled and completed. -
Page 14
Step 2 Be careful to assemble all components in the sequence they are presented. Note: Wrench tighten all hardware at the end of Step 2B Connect Console Cable to the lower Cable Note: Be careful not to damage the cables. Attach Console (C) to the Uprights using: 4 — (#1) m10x15mm button Head Cap screw 4 — (#5) m10 Curved Washer… -
Page 15
Step 2 Step 2 T70 .1 Step 2 T70 .1 STEP 3. STEP 3. Using tool(D1) to tighten console set(C) Using tool(D1) to tighten console set(C) with screw(A1) and radian washer(C1). with screw(A1) and radian washer(C1). Connecting cables. Connecting cables. NOTICE:CABLES CAN NOT BE CRUSHED. -
Page 16
Step 3 Be careful to assemble all components in the sequence they are presented. Connect Power Cord (g) to the Main Frame. Attach bracket (F) to the Main Frame using: 2 — (#4) M4x8mm Phillips Rounded Head Screw… -
Page 17
Step 3 Above shows STEP 3 assembled and completed. -
Page 18: Setting Up Your Treadmill
Setting up your Treadmill PLACEMENT IN YOUR HOME To make exercise a desirable daily activity for you, the treadmill should be placed in a comfortable and attractive setting. This treadmill is designed to use minimal floor space and to fit nicely in your home. do not place or operate the treadmill outdoors.
-
Page 19: Operating Your Treadmill
Operating your Treadmill TURN POWER ON The On/Off switch for the treadmill is located next to the power supply cord receptacle on the front of the treadmill. Insert the power supply cord into the receptacle and flip the switch to the “ON”…
-
Page 20: Operating The Console
Operating the Console CONSOLE LAYOUT OVERVIEW…
-
Page 21
Operating the Console DISPLAY OVERVIEW TIME: displays duration of the workout in minutes and seconds. PULSE: displays Heart Rate in beats per minute. DISTANCE: displays traveled during workout in miles or kilometer. COLORIES: displays Calories burned during workout. SPEED: displays current speed during workout in mph or kph INCLINE: displays current incline of your workout. -
Page 22
Operating the Console BUTTON OVERVIEW QUICK START : To start workout. ENTER : To confirm program/values you set. COOL DOWN : To stop workout slowly. STOP : To stop workout. WORKOUT LEVEL : To increase/decrease workout level. SPEED : To increase/decrease workout speed. INCLINE : To adjust workout incline level. -
Page 23
Operating the Console WALK : To adjust speed to 2.5MPH/4KPH. : To adjust speed to 3.5MPH/5.6KPH. : To adjust speed to 4.5MPH/7.2KPH. CLASSIC : There are three programs in this mode. P1 is CARdIO, P2 is FAT bURN, P3 is INTERVAl. H.R.C : Heart Rate Control Program. -
Page 24: Program Features
It will automatically reset and turnoff display after 5 minutes idling time. PROGRAMS T150 offers thirteen exercise programs (MANUAL, CARDIO, FAT BURN, INTERVAL, HRC, TIME, CAlORIES, dISTANCE, gERKIN, USb, CUSTOM 1, CUSTOM 2, CUSTOM 3) MANUAL: The user can make adjustment on speed and incline throughout the workout.
-
Page 25
DISTANCE: The user can set the distance he/she wishes to exercise during workout GERKIN: Firefighter training program to help you to improve cardiovascular endurance This program will gradually increase the training difficulty during the workout. USB: The user can set up his/her own workout profile in the USB program. For more details, please read page #28. -
Page 26
Program Features MANUAL MODE 1. Press & hold STOP button or pull & insert Safety Key to reset program. 2. Press WORKOUT lEVEl buttons to adjust the weight, then press ENTER button. 3. Press MANUAl button. 4. Press QUICK START button 5. -
Page 27
5. Press SElECT lEVEl buttons to set value, then press ENTER button. 6. Press QUICK START button to start workout. P1 (GERKIN): Firefighter training program to help you to improve cardiovascular endurance. This program will gradually increase the training difficulty during the workout. -
Page 28
Set speed and incline by clicking arrows or the graphs in each segment. a3. After speed and incline are set, press SAVE. the file will be save in the USB device of your choice. File name will be T150.CUS and it cannot be changed. Different name cannot be read by the treadmill. -
Page 29
Program Features b. Record Setup: b1. Open file in your USB drive. File name is T150_REC.CUS (file name cannot be changed or it cannot be read). b2. Records will be shown in “Record Time”. b3. In “Result” column, it shows workout time, calories and distance. b4. -
Page 30
Program Features HEART RATE CONTROL (H.R.C) MODE Heat rate chest strap is required to run this program. 1. Press & hold STOP button or pull & insert Safety Key to reset program. 2. Press WORKOUT lEVEl buttons to adjust the weight, then press ENTER button. 3. -
Page 31
Program Features Your Endurance ® T150 Treadmill has the capability to determine Heart Rate with the use of a Heart Rate Chest Strap. It is available as an optional accessory for use with your unit depending on the Endurance ® model purchased. In all Heart Rate Control programs, the console only accepts the heart rate signal from the chest strap transmitter while the pulse grip heart rate function is disabled. -
Page 32
Program Features Fitness saFety The Heart Rate chart indicates average rate zones for different ages. A variety of different factors (including medication, emotional state, temperature and other conditions) can affect the target heart rate zone that is best for you. Your physician or health care professional can help you determine the exercise intensity that is appropriate for your age and condition. -
Page 33: Program Features
Program Features ENGINEERING MODE MODE (A) a1. Turn power on, press and hold STOP button to set date and time. a2. Press SElECT lEVEl buttons to adjust the value. a3. Press ENTER button to confirm the value MODE (B) b1. Turn power on, press and hold STOP and buttons for three seconds.
-
Page 34
General Maintenace Belt and Bed — Your treadmill uses a very high-efficient low-friction bed. Performance is maximized when the bed is kept as clean as possible. Use a soft, damp cloth or paper towel to wipe the edge of the belt and the area between the belt edge and frame. Also reach as far as practical directly under the belt edge. -
Page 35: General Maintenance
General Maintenance T70 .1 RUNNING BELT TRACKING ADJUSTMENT: The performance of your treadmill is dependent on the frame running on a reasonably After assembly and before turning level surface. If the frame is not level, the front and back roller cannot run parallel, and power on, position the rear roller using constant belt adjustment may be necessary.
-
Page 36: General Maintenance
General Maintenance Belt Lubrication Procedure 1) Turn off the Power. 2) lift the running belt and check if there is any lubricant on the back of the running belt. If running belt needs to be lubricated, take a wiper to clean the running deck and rollers.
-
Page 37: Troubleshooting Guide
Troubleshooting Guide TROUBLESHOOTING Problem Possible cause Corrections action 1.Not plugged in 1.Plug cord into outlet 2.Safety key not inserted 2.Insert safety key Treadmill will not start 3.Switch on OFF 3.Turn switch to ON 4.treadmill circuit breaker tripped 4.lubricate treadmill belt and rest Running belt slips Running belt not tight enough…
-
Page 38
Serial Number is Located on the Frame T150 Model Name : _______________________________ Purchase Date : _______________________________ Serial Number : 015227-_______________________ Customer Tech Support Hotline Toll Free: 1-800-556-3113 Phone: 1-708-427-3555 Fax: 1-708-427-3556 Hours: M-F 8:30-5:00 CST E-Mail: service@bodysolid.com Copyright 2009. Body-Solid. All rights reserved. Body-Solid reserves the right to change design and specifications when we feel it will improve the product.
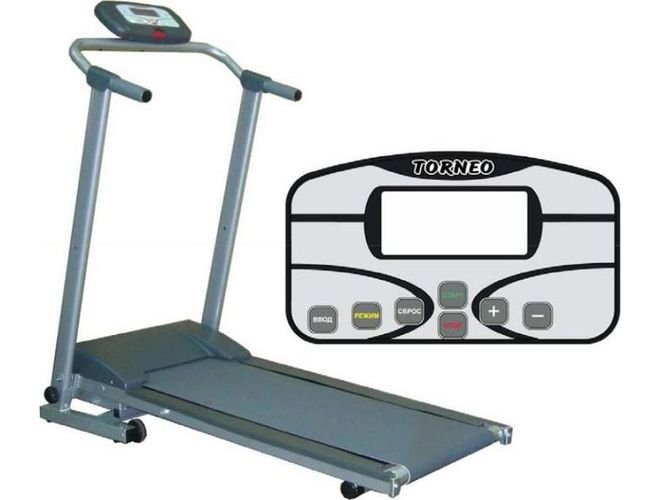
Беговая дорожка Torneo Inita – компактный электрический тренажер для домашнего использования. Популярность модели объясняется несколькими факторами, в том числе:
- высокой износостойкостью комплектующих;
- хорошим качеством сборки;
- функционалом, достаточным для эффективных тренировок;
- удобством хранения;
- демократичной стоимостью.
Содержание
- 1 Конструктивные особенности
- 2 Тренировочный компьютер
- 3 Технические характеристики беговой дорожки Torneo Inita T 150
- 4 Ключ безопасности
- 5 Функциональные возможности
- 6 Эксплуатационные особенности
- 7 Обслуживание
- 8 Отзывы
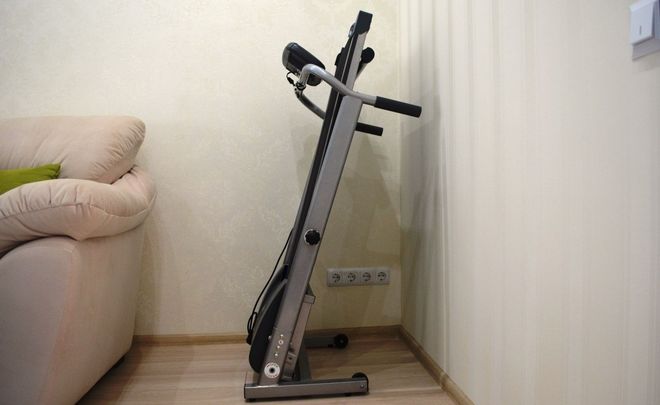
Конструктивные особенности
Беговая дорожка Torneo Inita t 150 состоит из:
- бегового полотна;
- центрального поручня;
- правой и левой рукояток;
- тренировочного компьютера.
Преимущество домашнего тренажера – складная конструкция. В горизонтальном положении его удерживают крепежные винты-барашки – они расположены в специальных отверстиях по бокам. Чтобы сложить дорожку, нужно открутить винты, затем поднять полотно и закрутить крепежи.
В многочисленных отзывах о беговой дорожке Torneo Inita пользователи отмечают качественный материал поручней – руки по нему не скользят, даже когда кожа влажная.
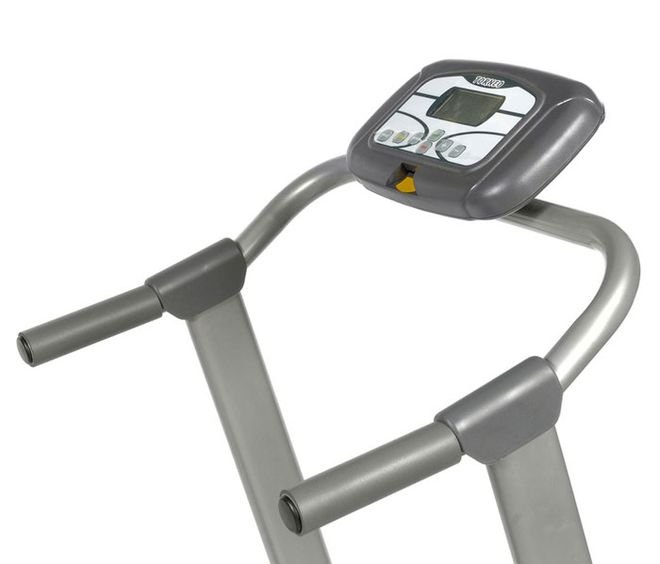
Рукоятки не регулируются, угол наклона бегового полотна фиксированный, изменить его невозможно.
В комплектации производитель предусмотрел транспортировочные ролики, с помощью которых спортивное оборудование проще переместить с одного места в другое.
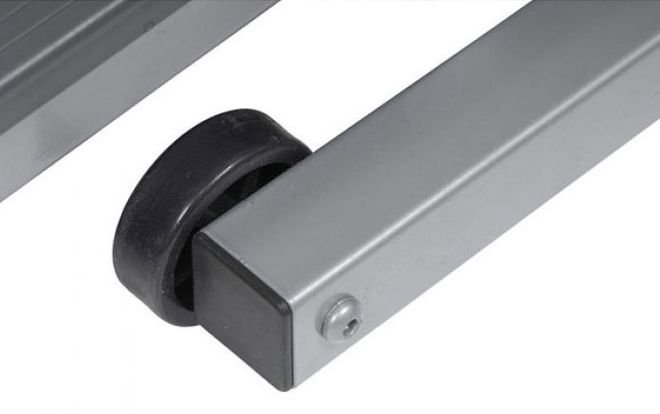
Устанавливать его производитель рекомендует на ровный пол – компенсаторы неровностей в данной модели не предусмотрены. Если есть неровности, придется регулировать беговое полотно – в комплекте с дорожкой поставляется специальный ключ. Полотно выравнивается регулировкой винтов, расположенных с обеих сторон.
Тренировочный компьютер
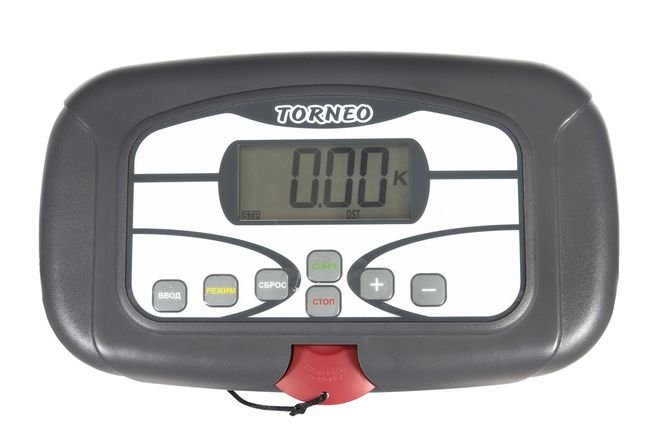
Электрическая Torneo Inita T 150 с дисплеем средней яркости – при дневном и искусственном освещении показатели на нем хорошо читаются. На экране отображаются следующие параметры:
- скорость движения;
- пройденное расстояние;
- время;
- сожженные калории.
Встроенного пульсометра нет, что не очень удобно, поэтому для контроля пульса придется покупать фитнес-браслет или смарт-часы.

Тренировочный компьютер в этой модели состоит из LCD-дисплея (без подсветки) и 7-ми кнопок:
- Ввод – нажатием на нее пользователь выбирает целевые параметры тренировки (время, расстояние). Параметры устанавливаются, когда тренажер находится в режиме ожидания. После перерыва в занятиях их можно продолжить – последние значения сохранятся.
- Режим – с помощью этой кнопки пользователь выбирает режим, в котором параметры будут выводиться на экран. Можно выбрать один показатель – количество израсходованных калорий, например. Второй вариант – сканирующий режим, когда все значения отображаются на дисплее поочередно.
- Сброс – с помощью этой клавиши обнуляются ранее установленные значения.
- Старт – кнопка запуска беговой дорожки.
- Стоп – кнопка для ее остановки.
- «+» — нажатием на ее занимающийся увеличивает скорость движения полотна. Одно кратковременное нажатие меняет значение на 0,1 км/ч. При длительном нажатии изменения происходят в ускоренном темпе.
- «-» — с помощью этой клавиши уменьшается скорость.
Технические характеристики беговой дорожки Torneo Inita T 150
- Тип – электрическая нерегулируемая.
- Источник питания – сеть 220 В.
- Мощность двигателя – 0,75 л.с.
- Предназначение – домашнее использование.
- Максимально допустимая нагрузка – 95 кг.
- Минимальная скорость – 1 км/ч.
- Максимальная скорость – 12 км/ч.
- Шаг – 0,1 км/ч.
- Размеры в рабочем состоянии – 1,3 х 0,6 х 1,25 м.
- Размеры в сложенном виде – 0,6 х 0,6 х 1,3 м.
- Размеры бегового полотна – 90 х 35 см.
- Вес тренажера – 35 кг.
Цена беговой дорожки Torneo Inita T 150 – 22000-24500 рублей. Она может незначительно меняться в разных регионах и городах.
Ключ безопасности
При включении в тренажере по умолчанию установлена минимальная скорость – 1 км/ч. Прежде чем настраивать параметры и начинать заниматься, необходимо установить ключ безопасности на консоль. В комплекте со спортивным оборудованием идет подробная инструкция – там показано, как это сделать.
Тренировочный компьютер оповестит об установке пользователя звуковым сигналом и автоматически переведет дорожку в режим готовности.
На ключе безопасности есть клипса, которая крепится на одежде. Крепить ее нужно так, чтобы шнур не провисал, но и не сильно натягивался – двигаться нужно с комфортом.
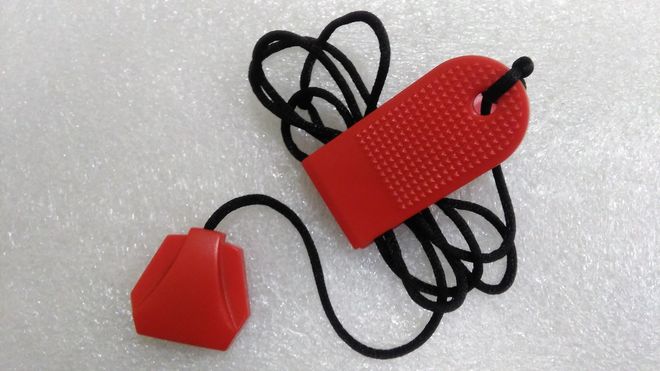
При возникновении нештатной ситуации, когда человек поскользнулся, пошатнулся, упал, магнитный ключ слетает. В этот момент тренажер останавливается.
Функциональные возможности
Производитель предусмотрел в бюджетной модели стандартный набор функций, необходимых для эффективных самостоятельных тренировок дома. Доступны 2 режима:
- ручной;
- целевые параметры.
В ручном режиме пользователь включает дорожку клавишей «Старт», начинает движение, плавно увеличивая скорость с помощью опции «+», а при интервальной тренировке периодически уменьшает ее, нажимая на кнопку «-».
Целевые параметры настраиваются с учетом задач, поставленных тренирующимся. Делается это в следующей последовательности:
- включение оборудования;
- выбор одного или нескольких целевых параметров с помощью кнопки «Режим»;
- установка заданных значений с помощью клавиши «Ввод».
Если в спортивном компьютере сохранились параметры предыдущих тренировок, их необходимо обнулить, нажав на кнопку «Сброс».
Занимающийся может задать один или несколько параметров – тренировка продолжится до того момента, пока все они не будут достигнуты. Тренажер оповестит о выполнении программы звуковым сигналом, после чего двигатель затормозит, и полотно остановится.
В этой модели также доступен режим ожидания – тренажер переходит в него после 4-х минут простоя. Для возврата в состояние готовности достаточно нажать любую клавишу на панели управления.
Посмотреть актуальную цену и купить беговую дорожку Torneo теперь можно прямо здесь с Яндекс Маркета:
Эксплуатационные особенности
Модель Torneo Inita рассчитана на эксплуатацию только в помещениях, где температура воздуха не опускается ниже +10 градусов и не поднимается выше +35 градусов. В неотапливаемых помещениях с высокой влажностью, большим скоплением пыли использование тренажера запрещено.
Устанавливать дорожку нужно так, чтобы со всех сторон оставалось по 50 см свободной площади, а вентиляционные отверстия в корпусе оставались открытыми.
Бег или быстрая ходьба по резиновому полотну разрешается только в спортивной обуви. Домашняя обувь может повредить поверхность полотна.
Запрещено увеличивать угол наклона дорожки, подкладывая под ножки посторонние предметы – это увеличивает риск падения и травматизма.
Обслуживание
Производитель рекомендует проверять прочность креплений раз в 3 месяца и при необходимости подтягивать их.
Очищать тренажер от пыли и загрязнений следует хлопчатобумажным полотенцем – его можно смочить в щадящем моющем растворе. Химические растворители и абразивы использовать нежелательно, так как они повредят поверхность.
Смазывать беговое полотно необходимо после каждых пройденных 300 км или 30 часов эксплуатации. Для этого используется специальная силиконовая смазка. Регулярное обслуживание обеспечит плавный ход полотна, продлит срок службы электродвигателя.

Отзывы
Анна, Екатеринбург
«Покупала беговую дорожку torneo inita t 150 для домашнего похудения. Понравилось, что она электрическая и очень компактная. Включила в сеть и беги – не нужно самой разгонять. Отзанималась, подняла – место в квартире освободилось.
Недостатки, к сожалению, тоже есть. Прежде всего, недостаточная длина и ширина полотна. При моем росте 177 см ноги так и норовят соскользнуть, что не очень удобно. Для невысоких людей – самое оно»
Екатерина, Белгород
«Незаменимая вещь для меня – бегаю утром в выходные и вечером после работы. Порадовали небольшие габариты, базовые режимы и возможность менять скорость. За 4 месяца занятий подтянулась, стала выносливее, ушла отечность с ног. Из недостатков отмечу шумную работу: чуть тише пылесоса. Нужно покупать резиновый коврик, чтобы соседи не жаловались. Ну и еще мне не хватает интервального режима бега – приходится менять параметры вручную»
Читайте также:
- Обзор беговых дорожек Torneo
- Беговая дорожка oxygen yukon — обзор, отзывы
- Беговая дорожка Xiaomi Walkingpad

T150 Endurance® v. 091709 T150 Treadmill User Manual v. T150-043019 Table of Contents IMPORTANT SAFETY INSTRUCTIONS.......................... 3 Safety guidelines...................................................... 4 Assembly Instructions........................................... 8 HARDWARE PACK CHECK LIST....................................... 9 PART LIST........................................................................... 10 - 11 Assembly steps............................................................ 12 - 17 Setting up your treadmill.................................... 18 OPERATING YOUR TREADMILL....................................... 19 OPERATING THE CONSOLE............................................. 20 - 23 PROGRAM FEATURES...................................................... 24 - 33 GENERAL MAINTENANCE................................................ 34 - 36 TROUBLESHOOTING GUIDE............................................ 37 2 Important Safety Instructions Before beginning any fitness program, you should obtain a complete physical examination from your physician. Il est conseille de subir un examen medical complet avant d’entreprendre tout programme d’exercise. Si vous avez des etourdissements ou des faiblesses, arretez les exercices immediatement. When using exercise equipment, you should always take basic precautions, including the following: Read all instructions before using the T150. These instructions are written to ensure your safety and to protect the unit. Do not allow children on or near the equipment. Use the equipment only for its intended purpose as described in this guide. Do not use accessory attachments that are not recommended by the manufacturer. Such attachments might cause injuries. Wear proper exercise clothing and shoes for your workout, no loose clothing. Use care when getting on or off the unit. Do not overexert yourself or work to exhaustion. If you feel any pain or abnormal symptoms, stop your workout immediately and consult your physician. Never operate the unit after it has been dropped or damaged. Return the equipment to a service center for examination and repair. Never drop or insert objects into any opening in the equipment. Always check the unit before each use. Make sure that all fasteners are secure and in good working condition. Do not use the equipment outdoors or near water. Personal Safety During Assembly It is strongly recommended that a qualified dealer assemble the equipment. Assistance is required. Before beginning assembly, please take the time to read the instructions thoroughly. Read each step in the assembly instructions and follow the steps in sequence. Do not skip ahead. If you skip ahead, you may learn later that you have to disassemble components and that you may have damaged the equipment. Assemble and operate the T150 on a solid, level surface. Locate the unit a few feet from the walls or furniture to provide easy access. The T150 is designed for your enjoyment. By following these precautions and using common sense, you will have many safe and pleasurable hours of healthful exercise with your Endurance T150. After assembly, you should check all functions to ensure correct operation. If you experience problems, first recheck the assembly instructions to locate any possible errors made during assembly. If you are unable to correct the problem, call the dealer from whom you purchased the machine or call 1-800-556-3113 for the dealer nearest you. 3 Safety Guidelines Successful cardio training programs have one prominent feature in common...safety. Cardio training has some inherent dangers, as do all physical activities. The chance of injury can be greatly reduced or completely removed by using correct running techniques, proper breathing, maintaining equipment in good working condition, and by wearing the appropriate clothing. It is highly recommended that you consult your physician before beginning any exercise program. This is especially important for individuals over the age of 35, or persons with pre-existing health problems. Always warm up before starting a workout. Try to do a total body warm up before you start. It is especially important to warm up the specific muscle groups you are going to be using. This can be as simple as performing a warm up set of high repetitions and light weight for each exercise. Always wear appropriate clothing and shoes when exercising. Wearing comfortable athletic shoes with good support and loose fitting, breathable clothing will reduce the risk of injury. Maintaining equipment in proper operating condition is of utmost importance for a safe cardio training program. Read and study all warning labels on this machine. It is absolutely necessary that you familiarize yourself and all others with the proper operation of this machine prior to use. Keep hands, limbs, loose clothing and long hair well out of the way of all moving parts. Inspect the machine daily for loose or worn parts. If a problem is found do not allow the machine to be used until all parts are tightened or worn or defective parts are repaired or replaced. To reduce the risk of burns, fire, electric shock, or injury to persons, install the treadmill on a flat level surface with access to a 110VAC, 20Amp, grounded outlet. Do not use an extension cord unless it is 12awg or larger, with only one outlet on the end. the treadmill should be the only appliance in the electrical circuit. do not attempt to disable the grounded plug by using improper adapters, or in any way modify the cord set. a serious shock or fire hazard may result along with computer malfunctions. 4 Important Electrical Information Safety Guidelines WARNING! NEVER use a RCD - Residual Current Device (U.S. ver.= GFCI) - wall outlet with this treadmill. As with any appliance with a large motor, the RCD/GFCI will trip often. Route the power mains cordELECTRICAL away from anySAFETY moving part of the treadmill including the elevation mechanism and transport wheels. WARNING! NEVER remove without first disconnecting ACGFCI) power.- wall If voltage varies ten percent (10%) NEVER use a any RCDcover - Residual Current Device (U.S. ver.= outlet with thisby treadmill. As with or more, the performance ofmotor, your treadmill may be are not any appliance with a large the RCD/GFCI willaffected. trip often.Such Routeconditions the power mains cordcovered away from under warranty. you suspect the voltage is low,mechanism contact your power company or a any your moving part of theIf treadmill including the elevation andlocal transport wheels. licensed electrician for proper testing. NEVER remove any cover without first disconnecting AC power. If voltage varies by ten percent (10%) NEVER expose this treadmilloftoyour raintreadmill or moisture. This productSuch is NOT designed outdoors, or more, the performance may be affected. conditions arefor notuse covered under near a pool or spa, or insuspect any other high humidity environment. The temperature your warranty. If you the voltage is low, contact your local power companyspecification or a licensed is 40 degrees c, and is 95%, non-condensing (no water drops forming on surfaces). electrician forhumidity proper testing. Circuit Breakers: Some circuittobreakers used in This homes are not rateddesigned for highfor inrush currents that NEVER expose this treadmill rain or moisture. product is NOT use outdoors, near pool or spa, aortreadmill in any other highturned humidity The temperature is 40 degreesthe canaoccur when is first on environment. or even during normal use. If specification your treadmill is tripping c, and humidity is 95%, non-condensing (nocurrent water drops surfaces). circuit breaker (even though it is the proper ratingforming and theontreadmill is the only appliance on Somebreaker circuit breakers used in homes are not currents that the Circuit circuit)Breakers: but the circuit on the treadmill itself does notrated trip, for youhigh will inrush need to replace thecan occurwith whena ahigh treadmill is type. first turned onnot or even during normal If your treadmill iswe tripping breaker inrush This is a warranty defect.use. This is a condition as a the circuit breaker (even though it is the current the treadmill is the onlyelectrical appliancesupply on the circuit) manufacture have no ability to proper control. This rating part isand available through most stores. but the circuit breaker on the treadmill itself does not trip, you will need to replace the breaker with a high inrush type. This is not a warranty defect. This is a condition we as a manufacture have no ability to control. This part is available through most electrical supply stores Grounding Instructions GROUNDING INSTRUCTION This product must be grounded. If the treadmill’s electrical system should malfunction or This product must beprovides grounded. If theoftreadmill’s electricalfor system should malfunction or the breakdown breakdown grounding a path least resistance electric current, reducing risk of grounding provides a path of least resistance for electric current, reducing the risk of electric shock. electric shock. This product is equipped with a cord having an equipment-grounding plug. The plug This product is equipped with a cord having an equipment-grounding plug. The plug must be plugged must intooutlet an appropriate outlet that isand properly installed and grounded accordance intobeanplugged appropriate that is properly installed grounded in accordance with all in local codes and withordinances. all local codes and ordinances. DANGER - Improper conductor can result a risk DANGER - Improperconnection connectionof ofthe the equipment-grounding equipment-grounding conductor can result in ainrisk of of electric shock. Check with a qualified electrician or serviceman if you are in doubt as to electric shock. Check with a qualified electrician or serviceman if you are in doubt as to whether whether the product is properly grounded. Do not the plug provided withifthe the product is properly grounded. Do not modify themodify plug provided with the product it will not product if it will not fit the outlet; have a proper outlet installed by a qualified electrician. fit the outlet; have a proper outlet installed by a qualified electrician. product is for useononaanominal nominal 120-volt 120-volt circuit, plug thatthat looks like like the plug ThisThis product is for use circuit,and andhas hasa agrounding grounding plug looks the illustrated below. A temporary adapter that looks like the adapter illustrated below may be used to plug illustrated below. A temporary adapter that looks like the adapter illustrated below may be connect this plug a 2-pole as shownasbelow if abelow properly is not outlet available. used to connect thistoplug to a receptacle 2-pole receptacle shown if agrounded properlyoutlet grounded is temporary should be used only until a properly outlet, (shown below) can(shown be not The available. Theadapter temporary adapter should be used only grounded until a properly grounded outlet, installed qualifiedby electrician. Theelectrician. green colored ear-lug, or the like,ear-lug, extending fromlike, the below) can by be ainstalled a qualified Therigid green colored rigid or the adapter, must be connected to a permanent ground such as a properly grounded outlet box extending from the adapter, must be connected to a permanent ground such as a properly cover. Whenever the box adapter is used, it must the be held in place by a metal screw. grounded outlet cover. Whenever adapter is used, it must be held in place by a metal screw. -3- 5 Safety Guidelines This exercise equipment is designed and built for optimum safety for home use. However, certain precautions always apply whenever you operate any exercise equipment. Be sure to read the entire manual before assembly and operation of this machine. Also, please note the following safety precautions. MECHANICAL SAFETY Inspect the equipment prior to exercising to ensure that all nuts and bolts are fully tightened before each use. Replace any defective components immediately and/or keep the equipment out of use until repair. Do not use attachments not recommended by the manufacturer. Never drop or insert an object into any opening. Only one person may use the treadmill at a time. Never activate the treadmill when someone is standing on the belt. APPROPRIATE ATTIRE Always wear appropriate clothing. Do not wear loose clothing that might catch on any part of this treadmill. Always wear non-slippery shoes while working with the treadmill. Do not wear shoes with heels or leather soles. Check the soles of your shoes and remove any dirt and embedded stones. CHILDREN AND PETS Most exercise equipment is not recommended for small children. Children should not use the equipment unless they are under strict adult supervision. To ensure safety, keep young children off the treadmill at all times. Exercise equipment has many moving parts. In the interest of safety, keep others (especially children and pets) at a safe distance while you exercise. FCC WARNING - POSSIBLE RADIO/TELEVISION INTERFERENCE NOTE: This equipment has been tested and found to comply with Part 15 of the FCC rules. These limits are designed to provide reasonable protection against harmful interference in a residential installation. Any changes or modifications not expressly approved by the party responsible for the compliance could void the user’s authority to operate the equipment. This equipment generates, uses and can radiate radio frequency energy and, if not installed and used in accordance with the instructions, may cause harmful interference to radio communications. However, there is no guarantee that the interference will not occur in a particular installation. If this equipment does cause harmful radio interference to radio or television reception, which can be determined by turning the equipment off and on, you are encouraged to try to correct the interference by one or more of the following measures: Class R (Residential): Private or non-commercial use • Reorient or relocate the receiving antenna • Increase space between the equipment • Plug the equipment into two electrical outlet located on separate circuits • Consult an exercise equipment dealer or an experienced radio/TV technician for help 6 Safety Guidelines IMPORTANT OPERATION INSTRUCTIONS NEVER operate this treadmill without reading and completely understanding the results of any operational change you request from the computer. ● Understand that changes in speed and incline do not occur immediately. Set your desired speed on the computer console and release the adjustment key. The computer will obey the command gradually. ● NEVER use your treadmill during an electrical storm. Surges may occur in your household power supply that could damage treadmill components. ● Use caution while participating in other activities while walking on your treadmill; such as watching television, reading, etc. These distractions may cause you to lose balance or stray from walking in the center of the belt; which may result in serious injury. ● NEVER mount or dismount the treadmill while the belt is moving. treadmills start with at a very low speed and it is unnecessary to straddle the belt during start up. Simply standing on the belt during slow acceleration is proper after you have learned to operate the unit.Always hold on to a handrail or hand bar while making control changes (incline, speed, etc.). Do not use excessive pressure on console control keys. They are precision set to function properly with little finger pressure. Pushing harder is not going to make the unit go faster or slower. If you feel the buttons are not functioning properly with normal pressure contact your dealer. ● SAFETY TETHER CORD A safety tether cord is provided with this unit. It is a simple magnetic design that should be used at all times. It is for your safety should you fall or move too far back on the tread-belt. Pulling this safety tether cord will stop tread-belt movement. To Use: 1. Place the magnet into position on the console control head. Your treadmill will not start and operate without this. 2. Fasten the plastic clip onto your clothing securely to assure good holding power. Note: The magnet has strong enough power to minimize accidental, unexpected stopping. The clip should be attached securely to make certain it does not come off. Be familiar with its function and limitations. The treadmill will stop, depending on speed, with a one to two step coast anytime the magnet is pulled off the console. Use the red Stop / Pause switch in normal operation. 7 Assembly Instructions Professional installers are highly recommended! However, if you acquire the appropriate tools, obtain assistance, and follow the assembly steps sequentially, the process will take time, but is fairly easy. Assembly Tips Read all “Notes” on each page before beginning each step. While you may be able to assemble the T150 using the illustrations only, important safety notes and other tips are included in the text. Some pieces may have extra holes that you will not use. Use only those holes indicated in the instructions and illustrations. NOTE: To find out the length of a particular bolt, measure its shank (the long, narrow part beneath the head). Refer to the following diagram: Do not fully tighten bolts until instructed to do so. NOTE: After assembly, you should check all functions to ensure correct operation. If you experience problems, first recheck the assembly instructions to locate any possible errors made during assembly. If you are unable to correct the problem, call the dealer from whom you purchased the machine or call 1-800-556-3113 for the dealer nearest you. 8 Hardware Pack Check List 1. 2. 3. 4. 5. 6. 7. 8. M10x15mm Button Head Cap Screw, 8pcs M10x20mm Button Head Cap Screw, 4pcs M4x10mm Round Self-Tapping Screw, 4pcs M4x8mm Phillips Rounded Head Screw, 2pcs M10 Curved Washer, 8pcs M10 Flat Washer, 4pcs M6 Allen Wrench, 1pcs Screw Driver, 1pcs, 1pcs 9 Parts List 10 Parts List 11 Step 1 Be careful to assemble all components in the sequence they are presented. Note: Finger tighten all hardware in this step. DO NOT wrench tighten unless instructed 1A. Routing the Lower Cable through the Upright (B) on the right using the steel wire provided. Note: Be careful not to damage the cables. 1B. Attach both Uprights (B) to Main Frame using 4 - (#1) M10x15mm Button Head Cap Screw 4 - (#2) M10x20mm Button Head Cap Screw 4 - (#5) M10 Curved Washer 4 - (#6) M10 Flat Washer 12 Step 1 Above shows STEP 1 assembled and completed. 13 Step 2 Be careful to assemble all components in the sequence they are presented. Note: Wrench tighten all hardware at the end of Step 2B 2A. Connect Console Cable to the Lower Cable Note: Be careful not to damage the cables. 2B. Attach Console (C) to the Uprights using: 4 - (#1) M10x15mm Button Head Cap Screw 4 - (#5) M10 Curved Washer 2C. Attach Plastic Covers (D & E) together using 4 - (#3) M4x10mm Round Self Tapping Screw 14 Step 2 StepStep 2 2 T70T70 .1 .1 3. STEP STEP 3. Using tool(D1) tighten set(C) console set(C) Using tool(D1) to tightentoconsole with screw(A1) andwasher(C1). radian washer(C1). with screw(A1) and radian Connecting Connecting cables. cables. NOTICE:CABLES CAN BE CRUSHED. NOTICE:CABLES CAN NOT BENOT CRUSHED. 4. STEP STEP 4. Using (D2) toside tighten side Using tool (D2)tool to tighten cover (D)cover (D) side (E) with(A3). screws (A3). and side and (E) with screws Above shows STEP 2 assembled and completed. C C E E A3 A3 d C1 A1 C1 d d C1 A1 A1 C1 A3 A3 d E A1 E 4 15 4 Step 3 Be careful to assemble all components in the sequence they are presented. 3A. Connect Power Cord (G) to the Main Frame. 3B. Attach Bracket (F) to the Main Frame using: 2 - (#4) M4x8mm Phillips Rounded Head Screw 16 Step 3 Above shows STEP 3 assembled and completed. 17 Setting up your Treadmill PLACEMENT IN YOUR HOME To make exercise a desirable daily activity for you, the treadmill should be placed in a comfortable and attractive setting. This treadmill is designed to use minimal floor space and to fit nicely in your home. Do not place or operate the treadmill outdoors. Do not place the treadmill near water or in a high moisture content environment. Make sure the power cord is not in the path of heavy traffic. It is highly recommended to place a dedicated treadmill mat beneath your treadmill. A dedicated mat provides superior stability and firmness for a proper workout. Locate the treadmill at least 4 feet from walls or furniture. Occasionally, after extended use, you will find a fine black dust below your treadmill. This is normal wear and DOES NOT mean there is anything wrong with your treadmill. This dust can be easily removed with a vacuum cleaner. If you wish to prevent this dust from getting on your floor or carpet, place a dedicated treadmill mat beneath your treadmill. LEVELING THE BASE It is important that you place the treadmill on a firm level surface. If the ground is uneven, you may level the treadmill with levelers located under the deck. Make sure the back of the deck is not higher than the front. If adjustments are to be made, check to see if the leverage feet, as shown below, touch the ground firmly. If there is a gap, turn the leverage foot counterclockwise to eliminate the gap. Make sure the running deck is level to the ground. If the deck is positioned so that you are running downhill, it will cause premature damage to the electronic system 18 Operating your Treadmill TURN POWER ON The On/Off switch for the treadmill is located next to the power supply cord receptacle on the front of the treadmill. Insert the power supply cord into the receptacle and flip the switch to the “ON” position. MOVING THE TREADMILL This treadmill is easy to move around safely. To move the treadmill: 1. Turn the power switch off. 2. Unplug the power cord. 3. Lift the rear of the treadmill to a comfortable angle. 4. Simply roll the treadmill on its front two wheels to the desired location. 5. Gently lower the rear of the treadmill to ground level. STORE YOUR TREADMILL Please follow these safety precautions, especially if you have children at home. We suggest to take the following precautions when storing your treadmill. 1. When you finish your workout, turn the power switch to the off position. 2. Remove the plug from the outlet. 3. Remove the safety key. It is imperative that the safety key is removed and kept away from children. 19 Operating the Console CONSOLE LAYOUT OVERVIEW 20 Operating the Console DISPLAY OVERVIEW TIME: Displays duration of the workout in minutes and seconds. PULSE: Displays Heart Rate in beats per minute. DISTANCE: Displays traveled during workout in miles or kilometer. COLORIES: Displays Calories burned during workout. SPEED: Displays current speed during workout in mph or kph INCLINE: Displays current incline of your workout. LEVEL: Displays current exercise level of your workout. PROGRAM: Displays current program of your workout. 21 Operating the Console BUTTON OVERVIEW QUICK START ENTER : To start workout. : To confirm program/values you set. COOL DOWN : To stop workout slowly. STOP : To stop workout. WORKOUT LEVEL SPEED INCLINE FAN LEVEL RISE ASCEND : To increase/decrease workout level. : To increase/decrease workout speed. : To adjust workout incline level. : There are three adjustments (High, Low & off) of the fan. : To adjust incline level to 0%. : To adjust incline level to 8% : To adjust incline level to 15%. 22 Operating the Console WALK : To adjust speed to 2.5MPH/4KPH. JOG : To adjust speed to 3.5MPH/5.6KPH. RUN : To adjust speed to 4.5MPH/7.2KPH. CLASSIC H.R.C MANUAL GOAL TRAINING : There are three programs in this mode. P1 is CARDIO, P2 is FAT BURN, P3 is INTERVAL. : Heart Rate Control Program. : Manual program. : There are three programs in this mode. P1 is TIME, P2 is CALORIES, P3 is DISTANCE. : There are five programs in this mode. P1 is GERKIN, P2 is USB, P3 is CUSTOM 1, P4 is CUSTOM 2, P5 is CUSTOM3. 23 Program Features When the display is off, press and hold QUICK START button to turn on the console display. When STOP button is pressed during workout, speed will decrease to zero, but incline level will not change. “STOP” will be shown on the display. If STOP button is pressed and hold for 3 seconds, it will exit the current program. After 5 minutes idling time, the program will automatically go to sleep mode and the display will be turned off. The user needs to press and hold QUICK START button for 3, the speaker will make a feedback noise and the display will turn on. When COOL DOWN button is pressed during workout, speed and incline will decrease to zero. It will automatically reset and turnoff display after 5 minutes idling time. PROGRAMS T150 offers thirteen exercise programs (MANUAL, CARDIO, FAT BURN, INTERVAL, HRC, TIME, CALORIES, DISTANCE, GERKIN, USB, CUSTOM 1, CUSTOM 2, CUSTOM 3) MANUAL: The user can make adjustment on speed and incline throughout the workout. CARDIO: The program is designed to strengthen the heart and cadiovascular system. Level, Speed and incline can be adjusted during the workout. FAT BURN: The program is designed with moderate changes in speed and incline to stimulate fat burn. Level, Speed and incline can be adjusted during the workout. INTERVAL: Walking and running speed intervals. Level, Speed and incline can be adjusted during the workout. HRC: Heart Rate Control allows the user to select a target heart rate that he/she would like to maintain throughout the workout. 24 Program Features TIME: The user can set the time he/she wishes to spend during workout CALORIES: The user can choose the number of calories he/she wishes to burn during workout. DISTANCE: The user can set the distance he/she wishes to exercise during workout GERKIN: Firefighter training program to help you to improve cardiovascular endurance This program will gradually increase the training difficulty during the workout. USB: The user can set up his/her own workout profile in the USB program. For more details, please read page #28. CUSTOM (1,2,3): The user can set up a customizable workout profile allows both speed and incline control up to 16 segments. 25 Program Features MANUAL MODE 1. Press & hold STOP button or pull & insert Safety Key to reset program. 2. Press WORKOUT LEVEL buttons to adjust the weight, then press ENTER Button. 3. Press MANUAL button. 4. Press QUICK START button 5. During workout, SPEED and INCLINE can be changed using INCLINE & SPEED buttons. CLASSIC MODE 1. Press & hold STOP button or pull & insert Safety Key to reset program. 2. Press WORKOUT LEVEL buttons to adjust the weight, then press ENTER Button. 3. Press CLASSIC button. 4. Press SELECT LEVEL Buttons to choose P1 (CARDIO), P2 (FAT BURN), P3 (INTERVAL) program, then press ENTER button. 5. Press SELECT LEVEL buttons to set time, then press ENTER button. 6. Press QUICK START button to start workout. During workout, you can change speed, incline and workout level by using INCLINE, SPEED & SELECT LEVEL buttons. GOAL MODE 1. Press & hold STOP button or pull & insert Safety Key to reset program. 2. Press WORKOUT LEVEL buttons to adjust the weight, then press ENTER Button. 3. Press GOAL button. 4. Press SELECT LEVEL Buttons to choose P1 (TIME), P2 (CALORIES), P3 (DISTANCE) program, then press ENTER button. 5. Press SELECT LEVEL buttons to set value, then press ENTER button. 6. Press QUICK START button to start workout. During workout, you can change speed, incline and workout level by using INCLINE and SPEED buttons. 26 Program Features TRAINING MODE 1. Press & hold STOP button or pull & insert Safety Key to reset program. 2. Press WORKOUT LEVEL buttons to adjust the weight, then press ENTER Button. 3. Press TRAINING button. 4. Press SELECT LEVEL Buttons to choose P1 (GERKIN), P2 (USB), P3 (CUSTOM 1), P4 (CUSTOM 2), P5 (CUSTOM 3) program, then press ENTER button. 5. Press SELECT LEVEL buttons to set value, then press ENTER button. 6. Press QUICK START button to start workout. P1 (GERKIN): Firefighter training program to help you to improve cardiovascular endurance. This program will gradually increase the training difficulty during the workout. 27 Program Features P2 (USB) PROGRAM a. Program Setup: download program at www.bodysolid.com undert T150 page. a1. Install USB program in the computer first a2. Set speed and incline by clicking arrows or the graphs in each segment. a3. After speed and incline are set, press SAVE. the file will be save in the USB device of your choice. File name will be T150.CUS and it cannot be changed. Different name cannot be read by the treadmill. a4. If there is no Data, the display will show “DAT ERR”. Program Edit Product Setting Speed Window Mode Setting Speed Setting Unit Setting Time Setting Incline Window Weight Setting Incline Setting USB Device Setting 28 Program Features b. Record Setup: b1. Open file in your USB drive. File name is T150_REC.CUS (file name cannot be changed or it cannot be read). b2. Records will be shown in “Record Time”. b3. In “Result” column, it shows workout time, calories and distance. b4. Data is recorded every 30 seconds. The longer you exercis, the more data will be recorded. Below the Heart Rate Graph window, there is scroll that the user can scroll left or right to see more data. Record Time Speed Graph Exercise Result Incline Graph Open Exercise Data File Heart Rate Graph 29 Program Features HEART RATE CONTROL (H.R.C) MODE Heat rate chest strap is required to run this program. 1. Press & hold STOP button or pull & insert Safety Key to reset program. 2. Press WORKOUT LEVEL buttons to adjust the weight, then press ENTER Button. 3. Press HEART RATE CONTROL button. 4. Press SELECT LEVEL Buttons to choose set user’s age then press ENTER button. 5. Press SELECT LEVEL buttons to set TARGET HEART RATE, then press ENTER button. 6. Press SELECT LEVEL buttons to set TIME then press ENTER button. 7. Press QUICK START button to start workout. During workout, user can change speed by SPEED buttons. Incline will be controlled by the program. If user’s heart rate is 10 bmp or more lower than the target heart rate, incline will increase 1% every 30 seconds. When inlcine is at the highest level, speed window will flash three times every 30 seconds to inform user to increase speed. If user’s heart rate is 10bmp or more higher than the target heart rate, incline will decrease 1% every 10 seconds. When incline is decreased to 0%, speed will be decreased 0.1 every 10 seconds automatically until the actual heart rate reaches back to the target heart rate range. If no heart rate is detected, program will stop in 30 seconds. 30 Program Features Your Endurance® T150 Treadmill has the capability to determine Heart Rate with the use of a Heart Rate Chest Strap. It is available as an optional accessory for use with your unit depending on the Endurance® model purchased. In all Heart Rate Control programs, the console only accepts the heart rate signal from the chest strap transmitter while the pulse grip heart rate function is disabled. The requirement to wear the chest strap is due to the superior accuracy of a chest strap transmitter compared to the pulse grip sensors. It is suggested for the Chest Strap Transmitter that you position the transmitter as close to your heart as possible, against the skin, 1-2 inches below the pectoral muscles. For best results, moisten the back of the transmitter for better contact. SAFETY PRECAUTIONS AND TIPS FOR CHEST STRAP 1. It is the owner’s responsibility to ensure that all users of this unit have read the Owner’s Manual and are familiar with warnings and safety precautions. 2. Do not place chest strap near devices that generate large magnetic fields. TV sets, electric motors, radios, and high voltage power lines can affect the transmitter’s performance. These items can interfere with the heart rate signal and possibly affect the heart rate readings on the console. 3. Handle the Chest Strap with care. Dropping the transmitter might cause damage that could void the warranty. 4. Do not use the chest strap if you have a cardiac pacemaker or if your are taking medications for a heart condition. Medication or electrical pulses from the pacemaker can interfere with accurate heart rate readings. 5. Do not bend the strips inside the chest strap. This can cause the chest strap to loose conductivity. 6. The chest strap has batteries that need to be replaced periodically. A faulty battery can cause inaccurate reading. 31 Program Features Fitness Safety The Heart Rate chart indicates average rate zones for different ages. A variety of different factors (including medication, emotional state, temperature and other conditions) can affect the target heart rate zone that is best for you. Your physician or health care professional can help you determine the exercise intensity that is appropriate for your age and condition. (MHR) = Maximum Heart Rate (THR) = Target Heart Rate 220 - Age = Maximum Heart Rate (MHZ) MHZ x .60 = 60% of your Maximum Heart Rate. MHZ x .75 = 75% of your Maximum Heart Rate. For example, if you are 30 years old, your calculations will be as follows: 220 - 30 = 190 190 x .60 = 114 (Low End or 60% of MHZ) 190 x .75 = 142 (High End or 75% of MHZ) 30 Year-Old (THR) Target Heart Rate would be 114-142 MaximumHeartRate(MHR)Calculation Heart Rate Training Zone Chart 32 Program Features ENGINEERING MODE MODE (A) a1. Turn power on, press and hold STOP button to set date and time. a2. Press SELECT LEVEL buttons to adjust the value. a3. Press ENTER button to confirm the value MODE (B) b1. Turn power on, press and hold STOP and buttons for three seconds. It shows show the Version of the Program. b2. Press ENTER button show the USB pragram information. b3. Press ENTER button to show roller diameter value (R-R), then press LEVEL buttons to adjust the value. Changing the value is not recommended. b4. Press ENTER button to set MPH or KPH, then press LEVEL buttons to choose between ML and KM. b5. Press ENTER button to set calendar, then press buttons to set the calendar on or off. b6. Press ENTER button to show total workout distance. b7. Press ENTER button to show total workout time by hour b8. Press ENTER button to go back to start screen. 33 LEVEL General Maintenace Belt and Bed - Your treadmill uses a very high-efficient low-friction bed. Performance is maximized when the bed is kept as clean as possible. Use a soft, damp cloth or paper towel to wipe the edge of the belt and the area between the belt edge and frame. Also reach as far as practical directly under the belt edge. This should be done once a month to extend belt and bed life. Use water only - no cleaners or abrasives. A mild soap and water solution along with a nylon scrub brush will clean the top of the textured belt. Allow the belt to dry before using. Belt Dust - This occurs during normal break-in or until the belt stabilizes. Wiping excess off with a damp cloth will minimize buildup. General Cleaning - Dirt, dust, and pet hair can block air inlets and accumulate on the running belt. On a monthly basis: vacuum underneath your treadmill to prevent buildup. Once a year, you should remove the black motor hood and vacuum out dirt that may accumulate. UNPLUG POWER CORD BEFORE THIS TASK. BELT ADJUSTMENTS: Running Belt Tension Adjustment - Adjustment must be made from the rear roller. The adjustment bolts are located at the end of the step rails in the end caps, as noted in diagram below. d before turning the rear roller using efer to the drawing if needed ) and wise to avoidTighten the belt slipping thefrom rear roller bolts only enough to prevent slippage at the front roller. Turn both tread-belt tension adjustment bolts in increments of 1/4 turn each and inspect for proper tension by walking on the belt at a low speed, making sure the belt does not slip. Keep tensioning the bolts until the belt stops slipping. • If you feel the belt is tight enough, but it still slips, the problem may be a loose Motor drive belt under the front cover. DO NOT OVERTIGHTEN – Over tightening will cause belt damage and premature bearing failure. the left side er bolt 1/4 turn clockwise(tighten) ller bolt 1/4 turn counterclockwise(loosen) 34 Maintenance T70 General .1 RUNNING BELT TRACKING ADJUSTMENT: The performance of your treadmill is dependent on the frame running on a reasonably After assembly and before turning level surface. If the frame is not level, the front and back roller cannot run parallel, and power on, position roller using constant the beltrear adjustment may be necessary. the ' T ' wrench ( refer to the drawing if needed ) and make 3 turns todesigned avoid thetobelt from Theclockwise treadmill is keep the slipping tread-belt reasonably centered while in use. It is normal for some belts to drift near one side while the belt is running with no one on it. After After assembly and before turning a few minutes of use, the tread-belt should have a tendency to center itself. If, during use, power on,the position the rear roller using belt continues to move toward one side, adjustments are necessary. the ' T ' wrench ( refer to the drawing if needed ) and make 3 turns clockwise to avoid theTRACKING: belt from slipping TO SET RUNNING BELT “T” wrench is provided to adjust the rear roller. Set belt speed at approximately 3 to 5 kph. Remember, a small adjustment can make a dramatic difference! To move the belt to the Right: 1) Turn the Left Roller Bolt 1/4 turn Clockwise (Tighten) If belt is too far to the left side 2) Turn the Righ Roller Bolt 1/4 turn 1) turn the left roller bolt 1/4 turn clockwise(tighten) Counterclockwise (Loosen) 2) turn the right roller bolt 1/4 turn counterclockwise(loosen) If belt is too far to the left side 1) turn the left roller bolt 1/4 turn clockwise(tighten) 2) turn the right roller bolt 1/4 turn counterclockwise(loosen) To move the belt to the Left: 1) Turn the Left Roller Bolt 1/4 turn Counterclockwise (Loosen) 2) Turn the Righ Roller Bolt 1/4 turn clockwise (Tighten) If belt is too far to the right side 1) turn the right roller bolt 1/4 turn clockwise(tighten) ATTENTION: 2) turn the DAMAGE left roller TO boltTHE 1/4 turn counterclockwise(loosen) RUNNING BELT RESULTING FROM IMPROPER TRACKING / TENSION ADJUSTMENTS IS NOT COVERED UNDER THE WARRANTY. If belt is too far to the right side 1) turn the right roller bolt 1/4 turn clockwise(tighten) 2) turn the left roller bolt 1/4 turn counterclockwise(loosen) 35 6 6 General Maintenance Belt Lubrication Procedure 1) Turn off the Power. 2) Lift the running belt and check if there is any lubricant on the back of the running belt. If running belt needs to be lubricated, take a wiper to clean the running deck and rollers. 3) Lift the running belt and spray lubricant as below photo shown. While spraying, pull the running belt and make it turn one revolution. Note: Please only spray in the center area, do not spray on the side area. 4) Turn on the power. 5) Press START button and increase the speed to 1.0 MPH (1.6KPH). Have a person to walk on the tradmill to help the running belt absorbs the lubricant. Note: DO NOT run the treadmill in high speed when lubricant is just sprayed on, lubricant may spread to drive motor and Control Board. 36 Troubleshooting Guide TROUBLESHOOTING Problem Treadmill will not start Possible cause Corrections action 1.Not plugged in 1.Plug cord into outlet 2.Safety key not inserted 2.Insert safety key 3.Switch on OFF 3.Turn switch to ON 4.treadmill circuit breaker tripped 4.lubricate treadmill belt and rest Running belt slips Running belt not tight enough Adjust running belt tension Running belt hesitates 1. Insufficient lubrication 1. Apply silicone lubricant when stepped on 2. Running belt worn out 2. Replace running belt Running belt not centered E1 Running belt tension not adjusted on Tighten the adjustment bolts on The left or right sides of the running board the left and right side of the rear roller The console is unable to detect motor operation signal 1. Check speed sensor connector 2.Check motor power cord dC-1(Under voltage) Input power voltage is lower than 1.Check input voltage standard 2.Restart the treadmill dC-4(Current protection) Current continuing exceed the standard lubricate treadmill belt and restart the treadmill dC-6 MCb is damaged Contact customer service for support E6/E7(Incline error) Incline unable to reach the set position and no signal feedback Check incline power cord and variable resistor connector UART error The console is unable to communicate with MCb 1.Check wire connections from the console to the MCb 2.Restart the treadmill 37 Serial Number is Located on the Frame T150 Model Name : _______________________________ Purchase Date: _______________________________ Serial Number: 015227-_______________________ Customer Tech Support Hotline Toll Free: 1-800-556-3113 Phone: 1-708-427-3555 Fax: 1-708-427-3556 Hours: M-F 8:30-5:00 CST E-Mail: [email protected] 2009. Body-Solid. All rights reserved. Body-Solid reserves the right to change design and specifications when we feel it will improve the product. c Copyright Body-Solid machines maintain several patented and patent pending features and designs. All rights reserved on all design patents and utility patents.