Welcome to ManualMachine
You have been successfully registered
We have sent a verification link to to complete your registration.
If you can’t find the email, check your Junk/Spam folder.


- Buy Points
- How it Works
- FAQ
- Contact Us
- Questions and Suggestions
- Users
![]()
 XVC205E
|
XVC205E |
||
|
Capacity |
5 GN 2/3 |
|
|
67 mm |
||
|
Pitch |
||
|
50 / 60 Hz |
||
|
Frequency |
||
|
Voltage |
230 V ~ 1N / 400 V ~ 3N |
|
|
Electrical power |
3,4 / 5,1 kW |
|
|
Dimensions |
574x773x708 |
|
|
Weight |
48 kg |

 Loading…
You can only view or download manuals with
Sign Up and get 5 for free
Upload your files to the site. You get 1 for each file you add
Get 1 for every time someone downloads your manual
Buy as many as you need
View and download manuals available only for
Register and get 5 for free
Upload manuals that we do not have and get 1 for each file
Get 1 for every download of your manual
Buy as much as you need
-
Contents
-
Table of Contents
-
Bookmarks
Related Manuals for Unox XVC
Summary of Contents for Unox XVC
-
Page 1
Instruction manual ENGLISH XVC-XBC BakerTop 596622 — 596632 — 596642 ChefTop 596505 — 596510 — 596511 — 596512 596522 — 596523 — 596523 — 596525 596532 — 596535 596542 — 596543 — 596548 Italiano… -
Page 2
INTRODUCTION ___________________________________3 FORWARD _______________________________________4 PICTOGRAM DESCRIPTION _________________________4 SAFETY REGULATIONS _____________________________5 INSTRUCTIONS FOR THE INSTALLER ________________8 INSTRUCTIONS FOR THE USER _____________________44 The company reserves the right to apply improvement modifications to appliances and accessories at any time without advance notice. English… -
Page 3: Introduction
We thank you for having purchased an oven / complementary accessory from the ChefTop™/BakerTop™ line. ChefTop™/BakerTop™ ovens are the climax of Unox research and guarantee minimum occupation of space with superlative performance while offering outstanding cooking management at any condition of use and load.
-
Page 4: Forward
Forward This manual shows the installation and use of the ChefTop™ e BakerTop™line of ovens. ChefTop™ ovens and their accessories allow complete COOKING SOLUTIONS using MAXI.Link technology dedicated to superb cuisine, such as: oven plus , oven plus SlowTop temperature maintainer and com- bination of two or more ovens.
-
Page 5: Safety Regulations
— that the type of gas available corresponds to the type indicated on the appliance; — that the gas pipe diameters meet the required measurements; — that components — not supplied by UNOX — used for installation comply with the regulations in force of the country of use;…
-
Page 6
( ) and contact a UNOX authorized customer assistance ser- ONLY FOR GAS OVENS vice. Do not attempt to independently repair the appliance. Request UNOX original spare parts for any repairs necessary. performed yearly by an authorised customer assistance service. -
Page 7
RISK OR ELECTRICAL SHOCK by UNOX. ONLY FOR GAS OVENS cated on the top portion of the oven. — kept free of any obstructions — risk of fire! -
Page 8: Table Of Contents
Appliance distances ________________________________________________________________________17 Positioning — COUNTERTOP OVENS _________________________________________________________18 Positioning: Floor or wheeled-bases _______________________________________________________18 Positioning: substructures ________________________________________________________________19 ________________________________________19 Anchoring to UNOX substructures ________________________________________________________19 __________________________________________________21 Positioning — FREE-STANDING OVENS WITH/WITHOUT TROLLEY _______________________________22 Levelling the appliance ___________________________________________________________________22 Adjustments _____________________________________________________________________________24 Door closure adjustment ___________________________________________________________________24…
-
Page 9: Unpacking
“Forward” at page 4 . Unpacking Check the package at reception for any visible damage. If damage is found, promptly contact UNOX and DO NOT install the appliance. Before transporting the appliance to its installa- People necessary for installation: tion point, make sure that: — it easily passes through doorways;…
-
Page 10
Follow the instructions in the figure and conserve several screws and plastic supports for the next installation; the screws that fasten the plastic supports to the wooden pallet can be dis- posed of. METAL METAL English… -
Page 11
UNOX has followed the NON-STEP Efforts philosophy for years to increase the environmental computability of its products to reduce energy consumption and wastes. UNOX wishes to protect the environment and invites the consumer to dispose of waste in recycling bins. NYLON… -
Page 12: Removing The Protective Film And Silicone Cap
Removing the protective film and silicone cap Slowly detach the protective films from the appliance: clean any glue residue with appropriate solvents with- out using tools, abrasive detergents or acids that could ruin the surfaces. The removed film, given its potential danger, must be kept out of reach of children and animals;…
-
Page 13
28-30 mbar 3B/P G30 /G31 37 mbar 3B/P G30 /G31 50 mbar Methane G20,G25,G25.1 Contact UNOX if any pieces are missing. Different auxiliary instruments are available as professional completion of the BakerTop™and ChefTop™ ranges: contact UNOX for additional information. English… -
Page 14: Getting Started
Getting started FREE-STANDING TROLLEY OVENS English…
-
Page 15: Positioning
869x1206x1857 XVC 105E 750x782x498 XVC 2005EP 860x1135x1217 XVC 105EP 750x782x498 XVC 1205EP 860x1135x897 XVC 205E 574x773x632 XVC 1005EP — EPL 866x972x1866 XVC 055E 574x762x498 XVC 905EP — EPL 866x972x1866 XVC 4015EG — GL 869X1206X2072 XVC 705E 750x773x1042 XVC 1215EG 860x1135x1105…
-
Page 16
with the regulations on system and work safety of the country of use. The figure gives indicative connection measurements: — electrical connection — plumbing 10 cm 10 cm 10 cm 10 cm 10 cm 10 cm 45 cm 45 cm English… -
Page 17: Appliance Distances
ChefTop BakerTop ™ ™ Appliance distances Position the appliance respecting the distances in the figure and so that the back wall is easily accessible for appliance connections and maintenance. Do not install the appliance near easily inflammable or heat sensitive materials, walls or furniture.
-
Page 18: Positioning — Countertop Ovens
DO NOT position the appliances on the floor directly but remove the plastic feet from the appliance and as- semble the steel support feet H.140 mm. UNOX. For detailed information on assembling the support feet Kit read the instructions on the kit packaging.
-
Page 19: Positioning: Substructures
™ Positioning: substructures Before anchoring on a UNOX substructure or on one of your own, always check that the substructure is perfectly flat using a spirit or digital level. If otherwise, the UNOX substructure can be levelled by acting on the feet, making sure to avoid completely unscrewing them.
-
Page 20
Anchoring on UNOX substructures (UNOX — high open stand) English… -
Page 21
™ ™ Positioning: appliance stacking (Maxi.LINK) Use UNOX’s oven stacking kit when stacking several units. It maintains the proper distance between appliances and simplifies electrical, plumbing and exhaust connections. Follow the instructions on the oven stacking kit for kit assembly. -
Page 22: Positioning — Free-Standing Ovens With/Without Trolley
Positioning — FREE-STANDING OVENS WITH/WITHOUT TROLLEY Ovens of this type must exclusively be set on floors that meet the following requirements: — be flame and heat resistant; — be perfectly level; — have a flat and even surface; — are able to support the appliance weight at full load without undergoing deformation or structural failure. Levelling the appliance Make sure that the length of the oven cavity diagonals are the same;…
-
Page 23
ChefTop BakerTop ™ ™ screws not supplied 12 1 only for free-standing trolley ovens If the floor is not perfectly flush, a loading ramp with a maximum incline of 4° may be used to simplify trolley loading. The maximum floor incline allowed is 2°. If floor incline exceeds this value, hot liquids may spill from the trays during loading/extrac- tion and cause burns. -
Page 24: Adjustments
Adjustments Door closure adjustment After positioning the oven, proceed as follows if the door handle fails to close in the correct upright position: check that the appliance is flush by using a spirit or digital level; if the appliance is level, adjust the closure latch as shown in the following figures. If the problem persists, repeat this procedure, loosening the latch fixing screws further.
-
Page 25
ChefTop BakerTop ™ ™ English… -
Page 26: Electrical Connection
UNOX. Failure to comply with these regulations may cause damage and inju- ries, invalidates the guarantee and relieves UNOX of all liabilities.
-
Page 27: Checks
Replacing the power supply cable The cable must be replaced by UNOX or by its technical assistance service, and in all cases by a person with similar qualification in order to avoid possible risks.
-
Page 28: Gas Connection
UNOX. Failure to comply with these regulations may cause damage and inju- ries, invalidates the guarantee and relieves UNOX of all liabilities.
-
Page 29
ChefTop BakerTop ™ ™ Table C Ø INIJECTOR BUSHING B DIS- MODELS [1/100 mm] TANCE column A column B column C G20, G25, G25.1 H = 39mm XBC615EG G30, G31 G20, G25, G25.1 XBC815EG H = 39mm G30, G31 G20, G25, G25.1 XVC315EG H = 39mm G30, G31… -
Page 30
CONTROL PANEL 5 sec. Enter the hidden menu by si- multaneously pressing the two buttons for 5 sec- onds. 10 sec Press the button until calling up the display: 12 — FrU Press the button until calling up «GAS» on the screen. Press the To save changes hold the button for 5 seconds until to hear acoustic signal confirmation… -
Page 31: Post-Connection Checks
ChefTop BakerTop ™ ™ Post-connection checks Check the items listed in the table after connecting the oven to the gas utility or after adjusting to a new type of gas. Check: Check result The air-tightness of the gas circuit using NON-CORROSIVE foam substances. Never use flames! mbar……
-
Page 32: Plumbing
A shut-off valve should be positioned between the water mains and the appliance; a pipe to supply detergent for cleaning the oven cavity; UNOX.Pure or UNOX.Pure-RO Follow instruction on the accessory package for connection. stacking kit. hose L= 1,5m…
-
Page 33: Water Supply: Specifications
Follow the instructions on the packaging of these parts for their assembly/disassembly. If the appliance cannot be permanently connected to the water mains, a water tank and pump kit for drawing water from the tank or from another external vessel is available from UNOX. Unox.PURE-RO Unox.PURE…
-
Page 34: Plumbing: Water Drainage
The pipes used for water drainage must be able to withstand high temperatures and not be made of metal. If it is necessary to lower the temperature of the waste water, UNOX recommends its waste water cooling kit. not supplied…
-
Page 35: Drainage Specifications
ChefTop BakerTop ™ ™ Drainage specifications The drainage system must: — be a siphon-type; — have a one meter maximum length; — have a minimum incline of 4%; — have a diameter that is NOT less than the drain pipe attachment; — be dedicated to each appliance;…
-
Page 36
Indicative example of plumbing in MAXI.Link columns HOOD OVEN 1 ø 8 ø10 OVEN 2 ø 8 ø 8 PROVER ø 8 Unox.PURE English… -
Page 37
ChefTop BakerTop ™ ™ Indicative example of plumbing in MAXI.Link columns HOOD OVEN 1 ø 8 ø10 OVEN 2 ø 8 ø 8 PROVER ø 8 Unox.PURE.RO English… -
Page 38: Smoke Exhaust — Electric Ovens
UNOX recommends its hoods, directly controlled by the oven’s self-diagnostic system. UNOX hood Follow the instructions on the UNOX hood packaging for their assembly. a pipe with no air suction or forced ventilation. ø 30 min The pipe must: — be INDEPENDENT for each appliance;…
-
Page 39: Smoke And Gas Exhaust — Gas Ovens
ChefTop BakerTop ™ ™ Smoke and gas exhaust Only for gas ovens) An exhaust pipe evacuates smoke and odours from the oven cavity as well as the exhaust gases. Evacuation may be done in various manners: select the method best suited to the nominal power of the appliances installed;…
-
Page 40: Connecting Appliance With Rj45 Cable
Setting ovens as “MASTER” or “CONTROLLED” When dealing with more than one UNOX oven, for MASTER sake or practicality it is best to set one oven as main All «CONTROLLED» ovens and connected add-ons “…
-
Page 41
ChefTop BakerTop ™ ™ Table E BakerTop™ Range ChefTop™ Range appliances Devices appliances Devices BakerTop™ Oven — MASTER ChefTop™ Oven — MASTER BakerTop™ Oven — CONTROLLED 1 ChefTop™ Oven — CONTROLLED 1 BakerTop™ Oven — CONTROLLED 2 ChefTop™ Oven — CONTROLLED 2 BakerTop™… -
Page 42: Connecting The External Usb Interface Kit And Safety Thermostat Reset
Connecting the external USB interface kit and safety ther- mostat reset button Consult the instructions on the external peripherals and accessories to mount and manage these. on the right hand side of the oven. “Unox.LINK USB” Kit: Includes: reset button grammes.
-
Page 43
ChefTop BakerTop ™ ™ Examples of correct and incorrect installation > 5 English… -
Page 44
INSTRUCTIONS FOR THE USER Contents General appliance operating instructions _______________________________________________________45 Cooking advice ___________________________________________________________________________45 Loading and using the trolleys ________________________________________________________________46 Using the core probe ______________________________________________________________________47 ______________________________48 _________________________________________49 Use ____________________________________________________________________________________50 Basic notions __________________________________________________________________________51 MANUAL operation ____________________________________________________________________52 PROGRAMMED operation _______________________________________________________________57 Oven-user interface _______________________________________________________________________67 Routine maintenance ______________________________________________________________________72 Inactivity ________________________________________________________________________________76 End of life disposal _________________________________________________________________________76… -
Page 45: General Appliance Operating Instructions
Before using the appliance: — make sure that you have a system conformity and use permit certificate that is issued by a UNOX authorised installer; — carefully read chapter “ Safety regulations“ at page 5 — read the chapter “Forward” at page 4 .
-
Page 46: Loading And Using The Trolleys
Trolley loading and use ( only free-standing trolley ovens) Use only UNOX trolleys, trays and grills. normal for the trolley to be pushed downward and lower in height, depending on how full the trays are. trolley guides. Lock the trays into place when moving the trolley as shown in the figure.
-
Page 47: Using The Core Probe
ChefTop BakerTop ™ ™ Core probe positioning During the cooking cycle, the probe detects the tem- perature at the «core» of the product: it reaches the tem- perature set by the user when the product is perfectly cooked both on its surface and innermost portion. The core probe must be poked deep into the food be- ing cooked;…
-
Page 48
“MASTER” ovens, “CONTROLLED” ovens and connected accessories If you own more than one UNOX appliance, we recom- MASTER mend that a specialised technician: — connect all appliance with an RJ45 cable; This makes it possible to manage the interconnected «MASTER» oven, the «CONTROLLED» ovens and all ing on the control panel of the «MASTER»… -
Page 49
ChefTop BakerTop ™ ™ COOKING SYSTEM Pollo (only for ChefTop™ ovens) The range of ChefTop™ ovens, thanks to ADAPTIVE.Cli- ma technology and an array of dedicated accessories, makes it possible to cook chicken/fowl with significant sav- ings in time, appliance cleaning and disposal of fats and oils. Rack Pollo Thanks to the Pollo, rack, the oven cavity space is optimised to allow larger loads: the rack’s design cooks… -
Page 50: Use
9 10 11 displays the STEP in use. ing cycle. The lit icon means that the oven is on. perature set. Delta «t». Controls the ovens and complemen- The active parameter is indicated by the blinking tary appliances connected to the ovens: the screen corresponding icon: shows the number of appliances in use.
-
Page 51: Basic Notions
UNOX for additional information. reset button RJ45 port If the oven’s sound signal is too low, UNOX recommends installing its Buzzer kit to increase the volume; the kit can be installed at any moment by a specialised technician. English…
-
Page 52: Manual Operation
MANUAL mode TIME CONFIGURATION TEMPERATURE CONFIG. DRY.Maxi STEAM.Maxi SELECT SELECT SELECT 2..9 TEMPERATURE CONFIG. STEP START/STOP STEP SELECT CORE PROBE CONFIGURATION DRY.Maxi STEAM.Maxi SELECT SELECT DELTA “t” CONFIGURATION SELECT Pressing the button moves from one STEP to the next; the current STEP is shown on the screen «1». STEP Pressing the button moves from one configuration parameter to the next;…
-
Page 53
ChefTop BakerTop ™ ™ SETTING COOKING DURATION Cooking duration can be set by establishing: — insert the probe into the smallest remaining prod- — cooking TIME uct; — the CORE TEMPERATURE measured by the probe — close the door and press the button: the oven will propose the same previous core temperature. -
Page 54
SETTING THE COOKING TEMPERATURE OF DELTA «T» Cooking temperature can be set by establishing: — an oven cavity TEMPERATURE — by using the The two values exclude each other: Delta «t» will be excluded if selecting the oven cavity parameter and vice-versa. 0°C 260°C Press the… -
Page 55
ChefTop BakerTop ™ ™ SETTING CLIMA LUX The oven cavity internal climate setting is indicated by the CLIMA LUX™ ellipse and is set using the buttons. The 10 BLUE LEDs indicate the percentage of target DRY.Maxi STEAM.Maxi The 10 RED LEDs indicate the drying percentage in- DRY.Maxi™… -
Page 56
The motor rotation speed and their work modes can be set by pressing the the button is first pressed, while repeated pressing sets the speed to 5, 4, 3, 2, 1 and P . The set speed appears on screen «6»: Pulsed mode The pulsed mode switches off the motor as well as the resistors when the set temperature has been reached. -
Page 57: Programmed Operation
ChefTop BakerTop ™ ™ PROGRAMMED Mode ChefUNOX — BakerUNOX LAST PROGRAM +3 REGEN — STEAM — GRILL APPEARS ONLY IF A MANUAL FAKIRO GRILL — PAN FRY PROGRAMME WAS ENGAGED MULTITIME — FAKIRO PIZZA POLLO — COMBI BAKE BAGUETTE — ROASTING RESTART CRISPY ROAST — NIGHT ROAST BRAISE…
-
Page 58
PURE The PURE function accesses a hidden menu from which When this warning is displayed: package is entered to activate litre count; litre countdown. Press the displays the message PURE. Use the buttons to write the PIN code The message «END» appears on screen. of the litre count. -
Page 59
ChefTop BakerTop ™ ™ Assigning a name to a programme P ress Use the buttons to input the 1st let- ter of the programme name. Press again and use the buttons to select the 2nd letter. Repeat the same operation for all suc- To end letter input, press the button and check the name entered:… -
Page 60
RECALLING AND STARTING A SAVED PROGRAM Press the button. press the buttons until the target program appears on screen «8». start it by pressing the button. START/STOP The oven beeps to signal cooking phase end. Press the button for 2/3 seconds to interrupt START/STOP the cooking cycle in advance. -
Page 61
ChefTop BakerTop ™ ™ ChefUnox — BakerUnox The oven comes with a library of preset automatic programmes for cooking specific foods Select the various programmes to cook an endless va- riety of foods: several programmes allow adjustment of different parameters to satisfy personal tastes. Press the button. -
Page 62
TEMPERATURE ADJUSTMENT — CLIMALUX — FAN SPEED Press the button until the temperature icon blinks. Set preheating temperature using the buttons. H Press the sage appears. using the buttons. If you want the adjustments to be: permanently saved into the selected programme ->press the button for 5 se performed only for this cycle of cooking ->… -
Page 63
ChefTop BakerTop ™ ™ Cooking/Baking PARAMETERS PROGRAMMES COOKING… NOTE ESSENTIAL ADJUSTABLE advised Regeneration Core probe temperature +3 REGEN from 3°C Steamed vegetables, Setting times on timers STEAM hard-boiled eggs, 1 to 9 steamed rice… Vegetables, meat and Setting times on timers GRILL fish from cold grill 1 to 9… -
Page 64
SAVING COOKING CYCLES This technology allows the oven to constantly control all manual cooking cycle, setting the most adequate parameters Therefore, the oven is able to recognise the amount for the products at issue. of food loaded into it and consequentially adjusts the Remember to insert the probe into the food’s core parameters of the programme selected in function of even if not required by parameters set;… -
Page 65
ChefTop BakerTop ™ ™ COOL The «COOL» function cools the oven cavity only by running the fans. The function can also be engaged while the door is open to speed cooling. The oven cavity temperature is displayed for the en- tire cooling duration. -
Page 66
WASHING and STEAM.Maxi functions i Prior to every use, the oven cavity MUST thoroughly UNOX spray cleaner inside the oven cavity. be washed several times to completely remove any Shut the door again. traces of residual detergent. The detergent com-… -
Page 67: Oven-User Interface
ChefTop BakerTop ™ ™ Oven-user interface The ovens show any alarm/warning messages regarding their display screens. WARNING tions that nevertheless allow the appliance and pe- ripherals to operate, though with a restricted set of functions. Pressing button clears the Warning list from THE SCREEN.
-
Page 68
Display Description Effect Troubleshooting WF — OVEN ALARM WF01 Warning: cavity 1 probe The oven continues to run using the cavity 2 probe, therefore temperature adjustments may be less accurate WF02 Warning: cavity 2 probe The oven continues to run using the cavity 1 probe, therefore temperature adjustments may be less accurate… -
Page 69
Effect Troubleshooting WD — VIDEO BOARD PE1705 WARNING WPURE Number of residual litres supplied The WPURE message appears by Unox.Pure filter at zero when the oven detects UNOX. PURE filter depletion Contact the Customer Assistance Service WD10 Error in EEPROM CRC for… -
Page 70
Display Description Effect Troubleshooting AL — PROVER ALARM AL01 Cavity probe alarm The prover stops any operating cycle and stops any successive AL02 Communications failure alarm Contact the Customer Assistance display screen settings Service AL10 Incorrect CRC alarm in EEPROM for essential parameters Display Description… -
Page 71
ChefTop BakerTop ™ ™ Display Description Effect Troubleshooting AO — REVERSE OSMOSIS ALARM AO01 Pressure gauge alarm: excessive Reverse osmosis stops all water pressure treatment cycles Contact the Customer Assistance AO02 Low pressure alarm Service AO03 Communications failure alarm Effect Display Description Effect… -
Page 72: Routine Maintenance
Use only a soft cleaning cloth dampened with a little soap and water. Rinse and dry completely. In alternative, only use detergents recommended by UNOX; other products may cause damage thereby in- validating the guarantee. Read the instructions provided by the detergent producer for their use.
-
Page 73
. P u both detergent and rinse aid in a single product, other- wise sold separately. The working principle of UNOX. Det&Rinse combines the degreasing action of deter- gents and the power of rinse aid to obtain the best re- sults during oven washing and rinsing. -
Page 74
WASHING BY HAND Follow the procedure below for cleaning the oven cavity: — switch on the oven and set the temperature to 55°C — run the oven for 10 minutes; — wait for the surfaces to cool off and clean with a soft cleaning cloth;… -
Page 75
ChefTop BakerTop ™ ™ If the appliance is not permanently connected to a drainage system, the conical plug that seals the drain pipe must be removed before starting any washing cycles. Replace the plug after this procedure. Inside and outside oven door window glass Wait for the windows to cool off. -
Page 76: Inactivity
only for gas ovens Appliances that evacuate exhaust gas through a flue must have qualified installer inspect it periodically in compliance with the laws in force in the country of installation. Request written documentation of the inspection. Inactivity Follow the precautions below during inactivity: — disconnect the power, water and gas supplies to the appliance ( ONLY FOR GAS OVENS — we recommend rubbing a soft cloth lightly doused with mineral oil on all stainless steel surfaces;…
-
Page 77: After-Sales Assistance
In case of any malfunctions, disconnect the appliance from its power and water supply. Consult the solutions proposed in the “ Table F” . If the solution is not listed in the table, contact a UNOX authorized technical customer service. Provide the fol- lowing information: — the date of purchase;…
-
Page 78: Certification
Also excluded is dam- age due to installation not conform to the technical specifications provided by Unox and linked to the environment of use, such as, for example, unclean and aggressive water supply, low quality gas supply, or electrical supply failing to respect nominal voltage and power ratings.
-
Page 80
OVENS PLANET ® International B.V. Groot Mijdrechtstraat 42 Postbus 32 3640 AA Mijdrecht Tel. +31 (0)297-282341 — Fax. +31(0)297-287405 www.emga.com info@emga.com www.unox.com…
This manual is also suitable for:
Xbc
137 762 ₽
Запросить
оптовые цены
4.6
оценок: 103
заказов: 666
Код товара: 159785
Продавец: barmagic
Хочу купить
Нужна
консультация
В корзину
Доставка
Выбрать город
Со склада продавца
В наличии
Срок доставки 1-3 дня,
уточним при оформлении заказа
Загрузка предложений…

Проверенный продавец «Barmagic» работающий на маркетплейсе Unox предлагает купить Пароконвектомат UNOX XVC 205 E
Похожие предложения
Продавец: trust-holod
145 475 ₽
Продавец: torgovets
132 492 ₽
Продавец: dgukvt
193 041 ₽
Смотрите также

361 821 ₽
899 000 ₽
82 586 ₽
122 723 ₽
86 080 ₽
209 816 ₽
255 976 ₽

32 340 ₽
40 102 ₽

326 822 ₽

213 398 ₽
287 361 ₽
307 476 ₽
172 580 ₽
188 112 ₽
233 914 ₽
276 019 ₽
299 000 ₽
373 750 ₽
150 000 ₽

22 110 ₽
24 542 ₽
55 017 ₽
69 321 ₽
Просмотренные товары
{{
cartProduct.title }}
{{ formatPrice(cartProduct.price) }}
пароконвектомат unox xvc
Показать ещё
Пароконвектомат UNOX XVC 205 E купить в других городах:
Пароконвектомат UNOX XVC 205 E в Абакане
Пароконвектомат UNOX XVC 205 E в Азове
Пароконвектомат UNOX XVC 205 E в Александрове
Пароконвектомат UNOX XVC 205 E в Алексине
Пароконвектомат UNOX XVC 205 E в Альметьевске
Пароконвектомат UNOX XVC 205 E в Анапе
Пароконвектомат UNOX XVC 205 E в Ангарске
Пароконвектомат UNOX XVC 205 E в Анжеро-Судженске
- Личный кабинет
- Сравнение товаров (0)
- Закладки (0)
![]() Loading…
Loading…
You can only view or download manuals with
Sign Up and get 5 for free
Upload your files to the site. You get 1 for each file you add
Get 1 for every time someone downloads your manual
Buy as many as you need
View and download manuals available only for
Register and get 5 for free
Upload manuals that we do not have and get 1 for each file
Get 1 for every download of your manual
Buy as much as you need
-
Contents
-
Table of Contents
-
Bookmarks
Related Manuals for Unox XVC
Summary of Contents for Unox XVC
-
Page 1
Instruction manual ENGLISH XVC-XBC BakerTop 596622 — 596632 — 596642 ChefTop 596505 — 596510 — 596511 — 596512 596522 — 596523 — 596523 — 596525 596532 — 596535 596542 — 596543 — 596548 Italiano… -
Page 2
INTRODUCTION ___________________________________3 FORWARD _______________________________________4 PICTOGRAM DESCRIPTION _________________________4 SAFETY REGULATIONS _____________________________5 INSTRUCTIONS FOR THE INSTALLER ________________8 INSTRUCTIONS FOR THE USER _____________________44 The company reserves the right to apply improvement modifications to appliances and accessories at any time without advance notice. English… -
Page 3: Introduction
We thank you for having purchased an oven / complementary accessory from the ChefTop™/BakerTop™ line. ChefTop™/BakerTop™ ovens are the climax of Unox research and guarantee minimum occupation of space with superlative performance while offering outstanding cooking management at any condition of use and load.
-
Page 4: Forward
Forward This manual shows the installation and use of the ChefTop™ e BakerTop™line of ovens. ChefTop™ ovens and their accessories allow complete COOKING SOLUTIONS using MAXI.Link technology dedicated to superb cuisine, such as: oven plus , oven plus SlowTop temperature maintainer and com- bination of two or more ovens.
-
Page 5: Safety Regulations
— that the type of gas available corresponds to the type indicated on the appliance; — that the gas pipe diameters meet the required measurements; — that components — not supplied by UNOX — used for installation comply with the regulations in force of the country of use;…
-
Page 6
( ) and contact a UNOX authorized customer assistance ser- ONLY FOR GAS OVENS vice. Do not attempt to independently repair the appliance. Request UNOX original spare parts for any repairs necessary. performed yearly by an authorised customer assistance service. -
Page 7
RISK OR ELECTRICAL SHOCK by UNOX. ONLY FOR GAS OVENS cated on the top portion of the oven. — kept free of any obstructions — risk of fire! -
Page 8: Table Of Contents
Appliance distances ________________________________________________________________________17 Positioning — COUNTERTOP OVENS _________________________________________________________18 Positioning: Floor or wheeled-bases _______________________________________________________18 Positioning: substructures ________________________________________________________________19 ________________________________________19 Anchoring to UNOX substructures ________________________________________________________19 __________________________________________________21 Positioning — FREE-STANDING OVENS WITH/WITHOUT TROLLEY _______________________________22 Levelling the appliance ___________________________________________________________________22 Adjustments _____________________________________________________________________________24 Door closure adjustment ___________________________________________________________________24…
-
Page 9: Unpacking
“Forward” at page 4 . Unpacking Check the package at reception for any visible damage. If damage is found, promptly contact UNOX and DO NOT install the appliance. Before transporting the appliance to its installa- People necessary for installation: tion point, make sure that: — it easily passes through doorways;…
-
Page 10
Follow the instructions in the figure and conserve several screws and plastic supports for the next installation; the screws that fasten the plastic supports to the wooden pallet can be dis- posed of. METAL METAL English… -
Page 11
UNOX has followed the NON-STEP Efforts philosophy for years to increase the environmental computability of its products to reduce energy consumption and wastes. UNOX wishes to protect the environment and invites the consumer to dispose of waste in recycling bins. NYLON… -
Page 12: Removing The Protective Film And Silicone Cap
Removing the protective film and silicone cap Slowly detach the protective films from the appliance: clean any glue residue with appropriate solvents with- out using tools, abrasive detergents or acids that could ruin the surfaces. The removed film, given its potential danger, must be kept out of reach of children and animals;…
-
Page 13
28-30 mbar 3B/P G30 /G31 37 mbar 3B/P G30 /G31 50 mbar Methane G20,G25,G25.1 Contact UNOX if any pieces are missing. Different auxiliary instruments are available as professional completion of the BakerTop™and ChefTop™ ranges: contact UNOX for additional information. English… -
Page 14: Getting Started
Getting started FREE-STANDING TROLLEY OVENS English…
-
Page 15: Positioning
869x1206x1857 XVC 105E 750x782x498 XVC 2005EP 860x1135x1217 XVC 105EP 750x782x498 XVC 1205EP 860x1135x897 XVC 205E 574x773x632 XVC 1005EP — EPL 866x972x1866 XVC 055E 574x762x498 XVC 905EP — EPL 866x972x1866 XVC 4015EG — GL 869X1206X2072 XVC 705E 750x773x1042 XVC 1215EG 860x1135x1105…
-
Page 16
with the regulations on system and work safety of the country of use. The figure gives indicative connection measurements: — electrical connection — plumbing 10 cm 10 cm 10 cm 10 cm 10 cm 10 cm 45 cm 45 cm English… -
Page 17: Appliance Distances
ChefTop BakerTop ™ ™ Appliance distances Position the appliance respecting the distances in the figure and so that the back wall is easily accessible for appliance connections and maintenance. Do not install the appliance near easily inflammable or heat sensitive materials, walls or furniture.
-
Page 18: Positioning — Countertop Ovens
DO NOT position the appliances on the floor directly but remove the plastic feet from the appliance and as- semble the steel support feet H.140 mm. UNOX. For detailed information on assembling the support feet Kit read the instructions on the kit packaging.
-
Page 19: Positioning: Substructures
™ Positioning: substructures Before anchoring on a UNOX substructure or on one of your own, always check that the substructure is perfectly flat using a spirit or digital level. If otherwise, the UNOX substructure can be levelled by acting on the feet, making sure to avoid completely unscrewing them.
-
Page 20
Anchoring on UNOX substructures (UNOX — high open stand) English… -
Page 21
™ ™ Positioning: appliance stacking (Maxi.LINK) Use UNOX’s oven stacking kit when stacking several units. It maintains the proper distance between appliances and simplifies electrical, plumbing and exhaust connections. Follow the instructions on the oven stacking kit for kit assembly. -
Page 22: Positioning — Free-Standing Ovens With/Without Trolley
Positioning — FREE-STANDING OVENS WITH/WITHOUT TROLLEY Ovens of this type must exclusively be set on floors that meet the following requirements: — be flame and heat resistant; — be perfectly level; — have a flat and even surface; — are able to support the appliance weight at full load without undergoing deformation or structural failure. Levelling the appliance Make sure that the length of the oven cavity diagonals are the same;…
-
Page 23
ChefTop BakerTop ™ ™ screws not supplied 12 1 only for free-standing trolley ovens If the floor is not perfectly flush, a loading ramp with a maximum incline of 4° may be used to simplify trolley loading. The maximum floor incline allowed is 2°. If floor incline exceeds this value, hot liquids may spill from the trays during loading/extrac- tion and cause burns. -
Page 24: Adjustments
Adjustments Door closure adjustment After positioning the oven, proceed as follows if the door handle fails to close in the correct upright position: check that the appliance is flush by using a spirit or digital level; if the appliance is level, adjust the closure latch as shown in the following figures. If the problem persists, repeat this procedure, loosening the latch fixing screws further.
-
Page 25
ChefTop BakerTop ™ ™ English… -
Page 26: Electrical Connection
UNOX. Failure to comply with these regulations may cause damage and inju- ries, invalidates the guarantee and relieves UNOX of all liabilities.
-
Page 27: Checks
Replacing the power supply cable The cable must be replaced by UNOX or by its technical assistance service, and in all cases by a person with similar qualification in order to avoid possible risks.
-
Page 28: Gas Connection
UNOX. Failure to comply with these regulations may cause damage and inju- ries, invalidates the guarantee and relieves UNOX of all liabilities.
-
Page 29
ChefTop BakerTop ™ ™ Table C Ø INIJECTOR BUSHING B DIS- MODELS [1/100 mm] TANCE column A column B column C G20, G25, G25.1 H = 39mm XBC615EG G30, G31 G20, G25, G25.1 XBC815EG H = 39mm G30, G31 G20, G25, G25.1 XVC315EG H = 39mm G30, G31… -
Page 30
CONTROL PANEL 5 sec. Enter the hidden menu by si- multaneously pressing the two buttons for 5 sec- onds. 10 sec Press the button until calling up the display: 12 — FrU Press the button until calling up «GAS» on the screen. Press the To save changes hold the button for 5 seconds until to hear acoustic signal confirmation… -
Page 31: Post-Connection Checks
ChefTop BakerTop ™ ™ Post-connection checks Check the items listed in the table after connecting the oven to the gas utility or after adjusting to a new type of gas. Check: Check result The air-tightness of the gas circuit using NON-CORROSIVE foam substances. Never use flames! mbar……
-
Page 32: Plumbing
A shut-off valve should be positioned between the water mains and the appliance; a pipe to supply detergent for cleaning the oven cavity; UNOX.Pure or UNOX.Pure-RO Follow instruction on the accessory package for connection. stacking kit. hose L= 1,5m…
-
Page 33: Water Supply: Specifications
Follow the instructions on the packaging of these parts for their assembly/disassembly. If the appliance cannot be permanently connected to the water mains, a water tank and pump kit for drawing water from the tank or from another external vessel is available from UNOX. Unox.PURE-RO Unox.PURE…
-
Page 34: Plumbing: Water Drainage
The pipes used for water drainage must be able to withstand high temperatures and not be made of metal. If it is necessary to lower the temperature of the waste water, UNOX recommends its waste water cooling kit. not supplied…
-
Page 35: Drainage Specifications
ChefTop BakerTop ™ ™ Drainage specifications The drainage system must: — be a siphon-type; — have a one meter maximum length; — have a minimum incline of 4%; — have a diameter that is NOT less than the drain pipe attachment; — be dedicated to each appliance;…
-
Page 36
Indicative example of plumbing in MAXI.Link columns HOOD OVEN 1 ø 8 ø10 OVEN 2 ø 8 ø 8 PROVER ø 8 Unox.PURE English… -
Page 37
ChefTop BakerTop ™ ™ Indicative example of plumbing in MAXI.Link columns HOOD OVEN 1 ø 8 ø10 OVEN 2 ø 8 ø 8 PROVER ø 8 Unox.PURE.RO English… -
Page 38: Smoke Exhaust — Electric Ovens
UNOX recommends its hoods, directly controlled by the oven’s self-diagnostic system. UNOX hood Follow the instructions on the UNOX hood packaging for their assembly. a pipe with no air suction or forced ventilation. ø 30 min The pipe must: — be INDEPENDENT for each appliance;…
-
Page 39: Smoke And Gas Exhaust — Gas Ovens
ChefTop BakerTop ™ ™ Smoke and gas exhaust Only for gas ovens) An exhaust pipe evacuates smoke and odours from the oven cavity as well as the exhaust gases. Evacuation may be done in various manners: select the method best suited to the nominal power of the appliances installed;…
-
Page 40: Connecting Appliance With Rj45 Cable
Setting ovens as “MASTER” or “CONTROLLED” When dealing with more than one UNOX oven, for MASTER sake or practicality it is best to set one oven as main All «CONTROLLED» ovens and connected add-ons “…
-
Page 41
ChefTop BakerTop ™ ™ Table E BakerTop™ Range ChefTop™ Range appliances Devices appliances Devices BakerTop™ Oven — MASTER ChefTop™ Oven — MASTER BakerTop™ Oven — CONTROLLED 1 ChefTop™ Oven — CONTROLLED 1 BakerTop™ Oven — CONTROLLED 2 ChefTop™ Oven — CONTROLLED 2 BakerTop™… -
Page 42: Connecting The External Usb Interface Kit And Safety Thermostat Reset
Connecting the external USB interface kit and safety ther- mostat reset button Consult the instructions on the external peripherals and accessories to mount and manage these. on the right hand side of the oven. “Unox.LINK USB” Kit: Includes: reset button grammes.
-
Page 43
ChefTop BakerTop ™ ™ Examples of correct and incorrect installation > 5 English… -
Page 44
INSTRUCTIONS FOR THE USER Contents General appliance operating instructions _______________________________________________________45 Cooking advice ___________________________________________________________________________45 Loading and using the trolleys ________________________________________________________________46 Using the core probe ______________________________________________________________________47 ______________________________48 _________________________________________49 Use ____________________________________________________________________________________50 Basic notions __________________________________________________________________________51 MANUAL operation ____________________________________________________________________52 PROGRAMMED operation _______________________________________________________________57 Oven-user interface _______________________________________________________________________67 Routine maintenance ______________________________________________________________________72 Inactivity ________________________________________________________________________________76 End of life disposal _________________________________________________________________________76… -
Page 45: General Appliance Operating Instructions
Before using the appliance: — make sure that you have a system conformity and use permit certificate that is issued by a UNOX authorised installer; — carefully read chapter “ Safety regulations“ at page 5 — read the chapter “Forward” at page 4 .
-
Page 46: Loading And Using The Trolleys
Trolley loading and use ( only free-standing trolley ovens) Use only UNOX trolleys, trays and grills. normal for the trolley to be pushed downward and lower in height, depending on how full the trays are. trolley guides. Lock the trays into place when moving the trolley as shown in the figure.
-
Page 47: Using The Core Probe
ChefTop BakerTop ™ ™ Core probe positioning During the cooking cycle, the probe detects the tem- perature at the «core» of the product: it reaches the tem- perature set by the user when the product is perfectly cooked both on its surface and innermost portion. The core probe must be poked deep into the food be- ing cooked;…
-
Page 48
“MASTER” ovens, “CONTROLLED” ovens and connected accessories If you own more than one UNOX appliance, we recom- MASTER mend that a specialised technician: — connect all appliance with an RJ45 cable; This makes it possible to manage the interconnected «MASTER» oven, the «CONTROLLED» ovens and all ing on the control panel of the «MASTER»… -
Page 49
ChefTop BakerTop ™ ™ COOKING SYSTEM Pollo (only for ChefTop™ ovens) The range of ChefTop™ ovens, thanks to ADAPTIVE.Cli- ma technology and an array of dedicated accessories, makes it possible to cook chicken/fowl with significant sav- ings in time, appliance cleaning and disposal of fats and oils. Rack Pollo Thanks to the Pollo, rack, the oven cavity space is optimised to allow larger loads: the rack’s design cooks… -
Page 50: Use
9 10 11 displays the STEP in use. ing cycle. The lit icon means that the oven is on. perature set. Delta «t». Controls the ovens and complemen- The active parameter is indicated by the blinking tary appliances connected to the ovens: the screen corresponding icon: shows the number of appliances in use.
-
Page 51: Basic Notions
UNOX for additional information. reset button RJ45 port If the oven’s sound signal is too low, UNOX recommends installing its Buzzer kit to increase the volume; the kit can be installed at any moment by a specialised technician. English…
-
Page 52: Manual Operation
MANUAL mode TIME CONFIGURATION TEMPERATURE CONFIG. DRY.Maxi STEAM.Maxi SELECT SELECT SELECT 2..9 TEMPERATURE CONFIG. STEP START/STOP STEP SELECT CORE PROBE CONFIGURATION DRY.Maxi STEAM.Maxi SELECT SELECT DELTA “t” CONFIGURATION SELECT Pressing the button moves from one STEP to the next; the current STEP is shown on the screen «1». STEP Pressing the button moves from one configuration parameter to the next;…
-
Page 53
ChefTop BakerTop ™ ™ SETTING COOKING DURATION Cooking duration can be set by establishing: — insert the probe into the smallest remaining prod- — cooking TIME uct; — the CORE TEMPERATURE measured by the probe — close the door and press the button: the oven will propose the same previous core temperature. -
Page 54
SETTING THE COOKING TEMPERATURE OF DELTA «T» Cooking temperature can be set by establishing: — an oven cavity TEMPERATURE — by using the The two values exclude each other: Delta «t» will be excluded if selecting the oven cavity parameter and vice-versa. 0°C 260°C Press the… -
Page 55
ChefTop BakerTop ™ ™ SETTING CLIMA LUX The oven cavity internal climate setting is indicated by the CLIMA LUX™ ellipse and is set using the buttons. The 10 BLUE LEDs indicate the percentage of target DRY.Maxi STEAM.Maxi The 10 RED LEDs indicate the drying percentage in- DRY.Maxi™… -
Page 56
The motor rotation speed and their work modes can be set by pressing the the button is first pressed, while repeated pressing sets the speed to 5, 4, 3, 2, 1 and P . The set speed appears on screen «6»: Pulsed mode The pulsed mode switches off the motor as well as the resistors when the set temperature has been reached. -
Page 57: Programmed Operation
ChefTop BakerTop ™ ™ PROGRAMMED Mode ChefUNOX — BakerUNOX LAST PROGRAM +3 REGEN — STEAM — GRILL APPEARS ONLY IF A MANUAL FAKIRO GRILL — PAN FRY PROGRAMME WAS ENGAGED MULTITIME — FAKIRO PIZZA POLLO — COMBI BAKE BAGUETTE — ROASTING RESTART CRISPY ROAST — NIGHT ROAST BRAISE…
-
Page 58
PURE The PURE function accesses a hidden menu from which When this warning is displayed: package is entered to activate litre count; litre countdown. Press the displays the message PURE. Use the buttons to write the PIN code The message «END» appears on screen. of the litre count. -
Page 59
ChefTop BakerTop ™ ™ Assigning a name to a programme P ress Use the buttons to input the 1st let- ter of the programme name. Press again and use the buttons to select the 2nd letter. Repeat the same operation for all suc- To end letter input, press the button and check the name entered:… -
Page 60
RECALLING AND STARTING A SAVED PROGRAM Press the button. press the buttons until the target program appears on screen «8». start it by pressing the button. START/STOP The oven beeps to signal cooking phase end. Press the button for 2/3 seconds to interrupt START/STOP the cooking cycle in advance. -
Page 61
ChefTop BakerTop ™ ™ ChefUnox — BakerUnox The oven comes with a library of preset automatic programmes for cooking specific foods Select the various programmes to cook an endless va- riety of foods: several programmes allow adjustment of different parameters to satisfy personal tastes. Press the button. -
Page 62
TEMPERATURE ADJUSTMENT — CLIMALUX — FAN SPEED Press the button until the temperature icon blinks. Set preheating temperature using the buttons. H Press the sage appears. using the buttons. If you want the adjustments to be: permanently saved into the selected programme ->press the button for 5 se performed only for this cycle of cooking ->… -
Page 63
ChefTop BakerTop ™ ™ Cooking/Baking PARAMETERS PROGRAMMES COOKING… NOTE ESSENTIAL ADJUSTABLE advised Regeneration Core probe temperature +3 REGEN from 3°C Steamed vegetables, Setting times on timers STEAM hard-boiled eggs, 1 to 9 steamed rice… Vegetables, meat and Setting times on timers GRILL fish from cold grill 1 to 9… -
Page 64
SAVING COOKING CYCLES This technology allows the oven to constantly control all manual cooking cycle, setting the most adequate parameters Therefore, the oven is able to recognise the amount for the products at issue. of food loaded into it and consequentially adjusts the Remember to insert the probe into the food’s core parameters of the programme selected in function of even if not required by parameters set;… -
Page 65
ChefTop BakerTop ™ ™ COOL The «COOL» function cools the oven cavity only by running the fans. The function can also be engaged while the door is open to speed cooling. The oven cavity temperature is displayed for the en- tire cooling duration. -
Page 66
WASHING and STEAM.Maxi functions i Prior to every use, the oven cavity MUST thoroughly UNOX spray cleaner inside the oven cavity. be washed several times to completely remove any Shut the door again. traces of residual detergent. The detergent com-… -
Page 67: Oven-User Interface
ChefTop BakerTop ™ ™ Oven-user interface The ovens show any alarm/warning messages regarding their display screens. WARNING tions that nevertheless allow the appliance and pe- ripherals to operate, though with a restricted set of functions. Pressing button clears the Warning list from THE SCREEN.
-
Page 68
Display Description Effect Troubleshooting WF — OVEN ALARM WF01 Warning: cavity 1 probe The oven continues to run using the cavity 2 probe, therefore temperature adjustments may be less accurate WF02 Warning: cavity 2 probe The oven continues to run using the cavity 1 probe, therefore temperature adjustments may be less accurate… -
Page 69
Effect Troubleshooting WD — VIDEO BOARD PE1705 WARNING WPURE Number of residual litres supplied The WPURE message appears by Unox.Pure filter at zero when the oven detects UNOX. PURE filter depletion Contact the Customer Assistance Service WD10 Error in EEPROM CRC for… -
Page 70
Display Description Effect Troubleshooting AL — PROVER ALARM AL01 Cavity probe alarm The prover stops any operating cycle and stops any successive AL02 Communications failure alarm Contact the Customer Assistance display screen settings Service AL10 Incorrect CRC alarm in EEPROM for essential parameters Display Description… -
Page 71
ChefTop BakerTop ™ ™ Display Description Effect Troubleshooting AO — REVERSE OSMOSIS ALARM AO01 Pressure gauge alarm: excessive Reverse osmosis stops all water pressure treatment cycles Contact the Customer Assistance AO02 Low pressure alarm Service AO03 Communications failure alarm Effect Display Description Effect… -
Page 72: Routine Maintenance
Use only a soft cleaning cloth dampened with a little soap and water. Rinse and dry completely. In alternative, only use detergents recommended by UNOX; other products may cause damage thereby in- validating the guarantee. Read the instructions provided by the detergent producer for their use.
-
Page 73
. P u both detergent and rinse aid in a single product, other- wise sold separately. The working principle of UNOX. Det&Rinse combines the degreasing action of deter- gents and the power of rinse aid to obtain the best re- sults during oven washing and rinsing. -
Page 74
WASHING BY HAND Follow the procedure below for cleaning the oven cavity: — switch on the oven and set the temperature to 55°C — run the oven for 10 minutes; — wait for the surfaces to cool off and clean with a soft cleaning cloth;… -
Page 75
ChefTop BakerTop ™ ™ If the appliance is not permanently connected to a drainage system, the conical plug that seals the drain pipe must be removed before starting any washing cycles. Replace the plug after this procedure. Inside and outside oven door window glass Wait for the windows to cool off. -
Page 76: Inactivity
only for gas ovens Appliances that evacuate exhaust gas through a flue must have qualified installer inspect it periodically in compliance with the laws in force in the country of installation. Request written documentation of the inspection. Inactivity Follow the precautions below during inactivity: — disconnect the power, water and gas supplies to the appliance ( ONLY FOR GAS OVENS — we recommend rubbing a soft cloth lightly doused with mineral oil on all stainless steel surfaces;…
-
Page 77: After-Sales Assistance
In case of any malfunctions, disconnect the appliance from its power and water supply. Consult the solutions proposed in the “ Table F” . If the solution is not listed in the table, contact a UNOX authorized technical customer service. Provide the fol- lowing information: — the date of purchase;…
-
Page 78: Certification
Also excluded is dam- age due to installation not conform to the technical specifications provided by Unox and linked to the environment of use, such as, for example, unclean and aggressive water supply, low quality gas supply, or electrical supply failing to respect nominal voltage and power ratings.
-
Page 80
OVENS PLANET ® International B.V. Groot Mijdrechtstraat 42 Postbus 32 3640 AA Mijdrecht Tel. +31 (0)297-282341 — Fax. +31(0)297-287405 www.emga.com info@emga.com www.unox.com…
This manual is also suitable for:
Xbc
137 762 ₽
Запросить
оптовые цены
4.6
оценок: 103
заказов: 666
Код товара: 159785
Продавец: barmagic
Хочу купить
Нужна
консультация
В корзину
Доставка
Выбрать город
Со склада продавца
В наличии
Срок доставки 1-3 дня,
уточним при оформлении заказа
Загрузка предложений…
Проверенный продавец «Barmagic» работающий на маркетплейсе Unox предлагает купить Пароконвектомат UNOX XVC 205 E
Похожие предложения
Продавец: trust-holod
145 475 ₽
Продавец: torgovets
132 492 ₽
Продавец: dgukvt
193 041 ₽
Смотрите также
361 821 ₽
899 000 ₽
82 586 ₽
122 723 ₽
86 080 ₽
209 816 ₽
255 976 ₽
32 340 ₽
40 102 ₽
326 822 ₽
213 398 ₽
287 361 ₽
307 476 ₽
172 580 ₽
188 112 ₽
233 914 ₽
276 019 ₽
299 000 ₽
373 750 ₽
150 000 ₽
22 110 ₽
24 542 ₽
55 017 ₽
69 321 ₽
Просмотренные товары
{{
cartProduct.title }}
{{ formatPrice(cartProduct.price) }}
пароконвектомат unox xvc
Показать ещё
Пароконвектомат UNOX XVC 205 E купить в других городах:
Пароконвектомат UNOX XVC 205 E в Абакане
Пароконвектомат UNOX XVC 205 E в Азове
Пароконвектомат UNOX XVC 205 E в Александрове
Пароконвектомат UNOX XVC 205 E в Алексине
Пароконвектомат UNOX XVC 205 E в Альметьевске
Пароконвектомат UNOX XVC 205 E в Анапе
Пароконвектомат UNOX XVC 205 E в Ангарске
Пароконвектомат UNOX XVC 205 E в Анжеро-Судженске
- Личный кабинет
- Сравнение товаров (0)
- Закладки (0)
![]()
Режим работы
с 10:00 до 18:00
-
Ваша корзина пуста!
-
Каталог товаров
- Тепловое оборудование +
- Аппараты Sous Vide
- Жарочная поверхность
- Казаны электрические
- Мультиварки
- Печи конвейерные
- Подогреватели блюд и посуды
- Столы и шкафы тепловые
- Сушилка овощей
- Чайники
- Пароконвектоматы
- Конвекционные печи
- Плиты электрические
- Газовая плита для ресторана
- Индукционная плита для ресторана
- Плиты инфракрасные стеклокерамика
- Шкафы жарочные
- Пекарские шкафы
- Расстоечные шкафы
- Хлебопекарные печи
- Электрические коптильные печи
- Газовые и электрические ротационные печи
- Печи на твердом топливе
- Пищеварочный котел
- Макароноварки
- Мармиты
- Сковороды опрокидывающиеся
- Тепловые линии
- Электрокипятильники
- Лампы подогрева
- Микроволновые печи
- Ошибори (подогреватели салфеток)
- Пароварки
- Подогреваемые поверхности
- Рисоварки
- Термосы — термоконтейнеры
- Технологическое оборудование +
- Бликсеры
- Взбивальные машины
- Гомогенизаторы
- Картофелечистки
- Клипсатор
- Колбасные шприцы
- Комбайны
- Куттеры
- Кухонные процессоры
- Лапшерезки
- Мукопросеиватель
- Мясорубки
- Мясорыхлители
- Овощерезки
- Овощечистки
- Пельменные аппараты
- Пилы для резки мяса
- Планетарные миксеры
- Ручные миксеры
- Слайсеры
- Стерилизаторы
- Сшиватели пакетов
- Сыротерки
- Тестоделители
- Тестозакаточные машины
- Тестомесы
- Тестораскаточные машины
- Универсальные кухон. Машины
- Фаршемешалки
- Хлеборезки
- Оборудование для столовой
- Оборудование для ресторана
- Оборудование для кафе
- Посудомоечные машины +
- Кассеты
- Котломоечные машины
- Подставки
- Посудомоечные машины конвеерного типа
- Стаканомоечные машины
- Столы для грязной посуды
- Столы для чистой посуды
- Фронтальная загрузка
- Купольные посудомоечные машины
- Холодильное оборудование +
- Аппараты для шокового охлаждения и заморозки
- Винные шкафы
- Витрины для мороженого
- Витрины кондитерские
- Ларь-бонета
- Льдогенераторы
- Моноблоки
- Морозильные лари
- Морозильные столы
- Морозильные шкафы для профессионального использования
- Сокоохладители
- Сокоохладители и граниторы
- Сплит-Системы
- Фризеры для производства мороженого
- Холодильники
- Холодильные витрины
- Холодильные витрины-прилавки всех видов
- Холодильные горки
- Холодильные камеры
- Холодильные столы
- Холодильные шкафы
- Шведские столы
- Оборудование для баров +
- Аппараты для приготовления шоколада, десертов
- Барная бакалея
- Блендеры
- Ведра для шампанского, формы для льда
- Весы порционные
- Декораторы для кофе
- Диспенсеры для мюсли
- Диспенсеры, емкости для сока
- Измельчители льда
- Коврики, подкладки барные
- Корзинки для хлеба
- Кофемашины
- Кофемолки
- Миксеры
- Миксеры для молочных коктейлей
- Миксеры ручные
- Направляющие для бокалов
- Поп-корн
- Сахарная вата
- Сифоны
- Соковыжимательные машины
- Трубочки, пики, зубочистки
- Френч-прессы, чайники заварочные, молочники
- Шейкеры, риммеры, джиггеры, мадлеры
- Штопоры и пробки
- Оборудование для Фаст-Фуда +
- Блинные аппараты
- Вафельницы
- Витрины тепловые
- Грили для кур
- Грили прижимные
- Грили решетка-лавовый
- Гриль Salamander
- Гриль роликовый
- Гриль-мангал
- Гриль-сковорода
- Оборудование для приготовления шаурмы
- Пончиковые аппараты
- Пресс для гамбургеров
- Тостеры
- Фритюрницы
- Хот-Дог
- Электрический контактный гриль
- Оборудование для пиццы +
- Печи для пиццы
- Пресс для пиццы
- Прилавки и витрины для пиццы
- Столы для пиццы
- Столы охлаждаемые для пиццы
- Тестомесы для пиццы
- Тестораскаточные машины для пиццы
- Упаковочное оборудование +
- Вакуумные машины
- Весовой упаковщик-этикетировщик
- Горизонтальные упаковочные машины
- Запайка лотков
- Паллетоупаковщики
- Сварщики ручные
- Термоусадочные упаковочные машины
- Упаковочные столы
- Нейтральное оборудование +
- Ванны моечные
- Вентоотсосы
- Весы
- Зонты вентиляционные
- Инсектицидные лампы
- Кассовые боксы
- Подставки и стенды
- Подтоварники
- Полки настенные (кухонные)
- Рабочая поверхность
- Разрубочные колоды
- Стеллажи
- Столы
- Столы-тумбы
- Тележки
- Шкафы кухонные
- Шкафы металлические
- Шпильки
- Мебель +
- Столы
- Стулья
- Оборудование для прачечных и химчисток +
- Пароманекены
- Гладильно-сушильные катки
- Комплектующие
- Оборудование для выведения пятен
- Разное
- Ротационные кабинеты
- Стирально-сушильные машины
- Упаковщики для белья
- Посуда для столовой +
- Валики, ножи, тесторезки
- Вилки
- Гастроемкости +
- Гастроемкости из поликарбоната
- Гастроемкости из полипропилена
- Гастроемкости перфорированные из нержавеющей стали
- Гастроемкости сплошные из нержавеющей стали
- Доски разделочные
- Инвентарь
- Кастрюли
- Кисточки
- Коврики, термозащита для рук
- Кондитерский инвентарь
- Ложки
- Лопаты для пиццы
- Мерная посуда
- Ножи
- Папки, карты вин, счета
- Подносы
- Подставки, крышки для торта
- Половники, шумовки, черпаки
- Противни
- Разрубочные колоды
- Ресторанный фарфор
- Салатники
- Сковороды
- Спецодежда
- Столовые приборы
- Таблички, ценники, дисплеи
- Термосы
- Фарфоровая посуда
- Формы для выпечки/выкладки
- Хлебные формы
- Чистки, терки, прессы
- Линии раздачи для столовой +
- Линии раздачи «Лира»
- Линии раздачи «Лира-профи»
- Линии раздачи «Аста»
- Линии раздачи «Дана»
- Линии раздачи «Патша»
- Линия раздачи «ВЕГА»
- Линия раздачи «Компактная»
- Линия раздачи «Мастер»
- Линия раздачи «Премьер»
- Линия раздачи «Школьник»
- Линия раздачи Stilag PRO
- Линия раздачи Stillag Optima
+
- Тепловое оборудование +
-
Производители
+
-
Доставка и оплата
+
-
Установка и сервис
+
-
Контакты
+
- Главная
- Тепловое оборудование
- Пароконвектоматы
- Пароконвектомат UNOX XVC 205 E
Пароконвектомат UNOX XVC 205 E

- Описание
- Характеристики
- Отзывов (0)
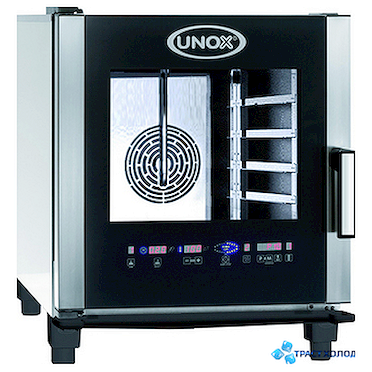
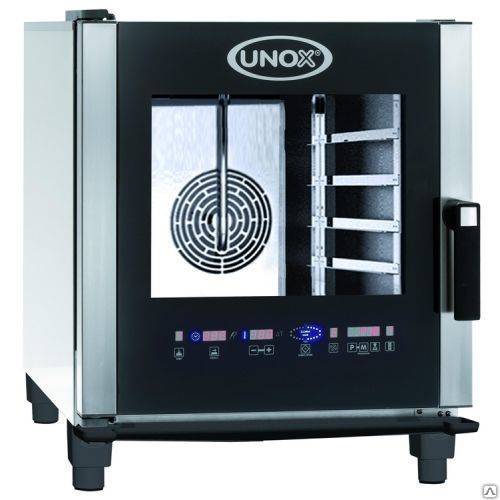
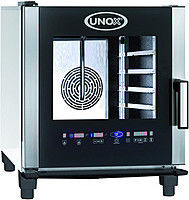
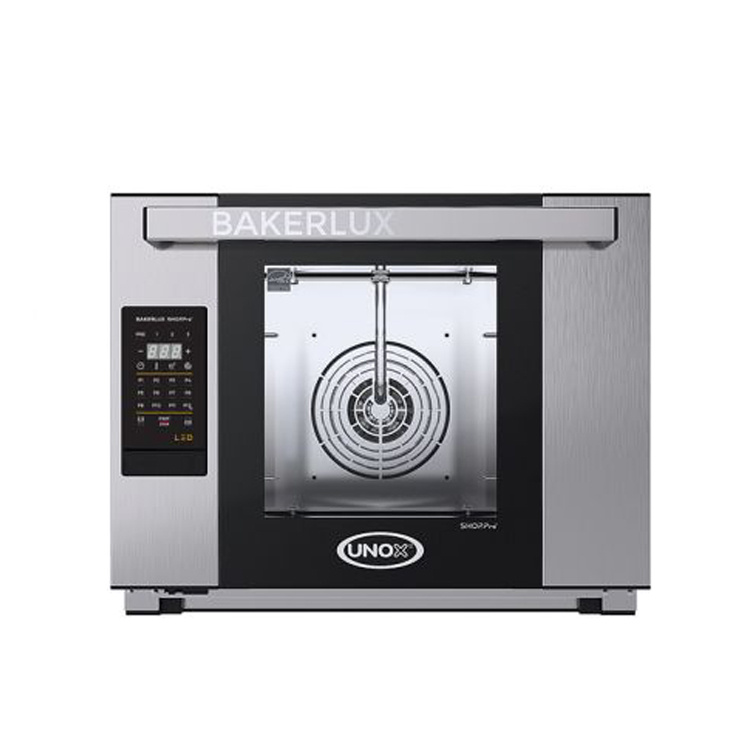
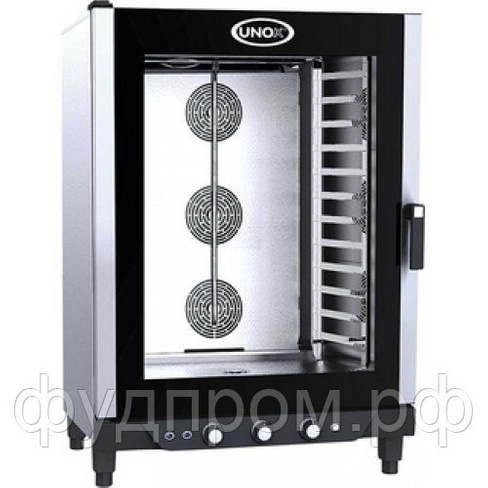
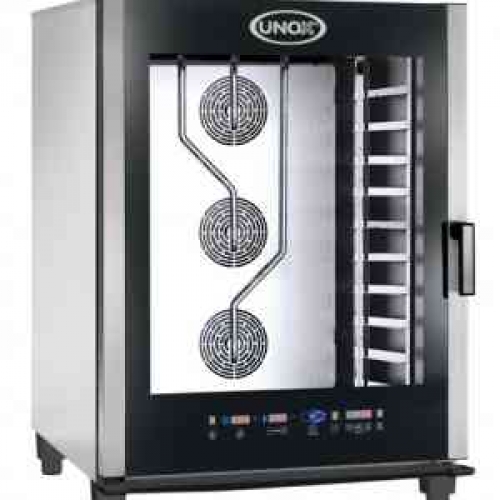
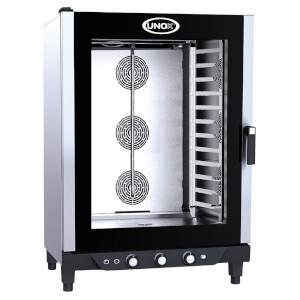
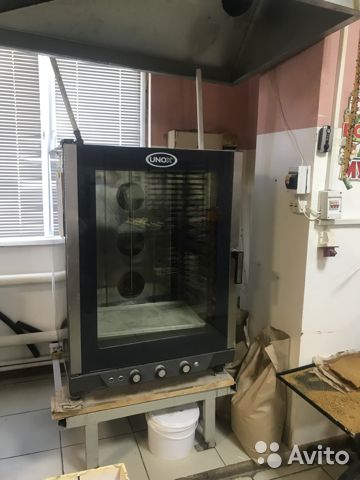
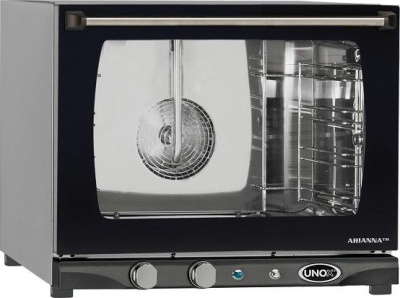
Пароконвектомат UNOX XVC 205 E серии ChefTop — инжекторная модель с сенсорным управлением.
Новая серия EVOLUTION с системой самоочистки. Новая система энергосбережения ECO.
| Технические характеристики | ||
| Подключение | 220, 380 | В |
| Количество уровней | 5 | |
| Расстояние между уровнями | 67 | мм |
| Тип гастроёмкости | GN 2/3 | |
| Размер гастроемкости (наруж./внутр.) | 352×325 / 329×300 | мм |
| Панель управления | электронная | |
| Способ образования пара | инжектор | |
| Температурный режим | от 30 до 260 | °С |
| Мощность | от 3.4 до 5.1 | кВт |
| Ширина | 574 | мм |
| Глубина | 773 | мм |
| Высота | 708 | мм |
| Вес (без упаковки) | 48 | кг |
| Вес (с упаковкой) | 58 | кг |
| Страна производитель | Италия | |
| Материал рабочей камеры | нержаеющая сталь | |
| Кол-во фаз | 3 |

Гарантия от производителя
12 месяцев
- Производитель: Unox
- Артикул: XVC 205 E
- Наличие: В наличии

- 166110 руб.
- С НДС: 166110 руб.
В закладки
В сравнение
| Технические характеристики | ||
| Подключение | 220, 380 | В |
| Количество уровней | 5 | |
| Расстояние между уровнями | 67 | мм |
| Тип гастроёмкости | GN 2/3 | |
| Размер гастроемкости (наруж./внутр.) | 352×325 / 329×300 | мм |
| Панель управления | электронная | |
| Способ образования пара | инжектор | |
| Температурный режим | от 30 до 260 | °С |
| Мощность | от 3.4 до 5.1 | кВт |
| Ширина | 574 | мм |
| Глубина | 773 | мм |
| Высота | 708 | мм |
| Вес (без упаковки) | 48 | кг |
| Вес (с упаковкой) | 58 | кг |
| Страна производитель | Италия | |
| Материал рабочей камеры | нержаеющая сталь | |
| Кол-во фаз | 3 |
Товар предназначен для использования в коммерческих целях.
Фирменные функции
— технология AIR.Maxi для оптимизации распределения воздушных потоков внутри рабочей камеры;
— технология STEAM.Maxi, позволяющая производить пар практически при любой температуре в камере (в комбинации с AIR.Maxi печь производит в три раза больше пара, чем обычная инжекторная модель);
— технология DRY.Maxi для максимально быстрого осушения камеры и подчеркивания вкуса;
— функция MULTI.Time, позволяющая закладывать в печь продукт в любой момент (перерасчет времени производится автоматически);
— система мониторинга влажности в камере ADAPTIVE.Clima, позволяющая из раза в раз готовить с одинаковым результатом;
— система оптимизации энергозатрат Protek.SAFE для гарантии максимально выгодной и безопасной эксплуатации;
— автоматическая система мойки Rotor.KLEAN.
Дополнительное описание
Наше предложение предназначено для тех, кто готовится открыть свой первый небольшой бизнес в сфере общественного питания. Ваш уютный ресторанчик или небольшую столовую полюбят посетители: влюбленные парочки и деловые люди, молодежные компании и семьи с детьми.
Кроме того, пароконвектомат Unox XVC 205 E будут обожать ваши повара за его неустанную заботу о вкусовых и питательных качествах приготовляемых блюд и избавление персонала от многих усилий по поддержанию чистоты на кухне. Он моет себя сам!
Вашим сотрудникам станет в прямом смысле слова легче дышать, если вы замените обычные плиты и духовки пароконвектоматом, который позволяет проверить степень готовности блюд при закрытой двери и почти не влияет на микроклимат в помещении благодаря отличной термоизоляции.
Вы всего лишь открываете точку по продаже фаст-фуда? В таком случае данная модель пароконвектомата будет тем более очень кстати! Вы в два счета обслужите массу людей, и каждый оценит вкус ваших пирожков и хот-догов!
Чтобы повар был доволен и посетитель рад, мы вам рекомендуем купить пароконвектомат!