Как запустить игры с USB носителей? — Все очень просто — читаем и радуемся!
Владельцы приводов D3-2 вздохните свободно! Самостоятельно записанные диски ваш привод не хочет читать, но запуск игр с USB — никто не отменял. Для тех у кого привод не D3-2 — поверьте, на много удобнее и быстрее скидывать игры на USB-HDD и играть. Не надо беспокоиться о том, куда положить все эти диски, исчезнут вопросы о сохранности дисков. И, наконец, ваш диск не окажется нечитабельным в самый разгар вечеринки!
Установка USB Loader GX:
1.Скачиваем:
Скачать
Скачать
2.Скидываем на SD-карту содержимое архива и соглашаемся на слияние папок. В итоге у вас должно быть так:
apps/USB Loader/USBLoaderGX_v3.0_IOS249.dol
wad/USBLoaderGX_v3.0_IOS249.wad
Проверяйте правильность пути, иначе ничего не получиться!
[ad1]
3.Вставляем SD — карту в Wii, и устанавливаем wad-файл при помощи:YAWMM или WiiMod
4. Выходим и запускаем USB Loader GX из главного меню Wii.
5.Как скидывать игры на USB носитель читаем ЗДЕСЬ
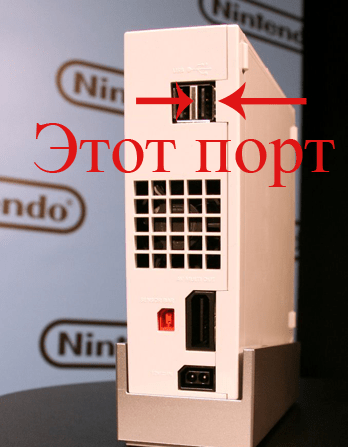
Вставлять USB-HDD для игр необходимо в левый(c лицевой) или в правый (сзади) USB порт:
P.S. Запускать игры с SD-карты ниже 10 класса не получится, лучше купите USB-HDD небольшой емкости специально для Wii.
Наиболее частые проблемы после установки лоадера:
Игры лоадер видит, но при запуске черный экран или выходит в главное меню:
Решение данной проблемы может заключаться в трех пунктах:
1.Не установлены все ios’ы — это четвертый пункт softmoda:
Этап IV:Установка необходимых cIOS и патчей System Menu IOS, просто повторите этот пункт, иногда программа устанавливает не все ios, либо установите их вручную.
2. Реже, но бывает — «битый» образ игры, т.е. просто скачайте другой образ или другую игру
3.Иногда проблема решается заменой USB накопителя, особенно если вы запускаете с USB флэшки
Это все проблемы, которые Вы сможете встретить.
Have a nice day;)
Если Вам помогла инструкция, вы можете отблагодарить автора:
Кошельки WebMoney:
R334537221223
Z101244944163
U409410162479
Yandex.Деньги:
410011738148518
Любая поддержка поможет проекту. Спасибо.
If you need help for anything regarding this tutorial, please join the RiiConnect24 Discord server (recommended) or e-mail us at [email protected].
This is a quick start guide on how to use USB Loader GX, a popular USB loader for the Wii that’s used to play games from a USB drive.
Despite its name, USB Loader GX is also capable of loading games from an SD Card.

What you need
- A Wii
- A USB drive or SD Card
- USB Loader GX
Make sure you have installed cIOS before following this!
We recommend you copy games over with Wii Backup Manager if you use Windows, Witgui if you use macOS, or Wii Backup Fusion for Windows, macOS, and Linux.
If you want to play games that are in NKit format, use this program to convert them to ISO first.
If you are not copying games using Wii Backup Manager, Witgui, or Wii Backup Fusion, make a folder on the root of the USB drive or SD card named “wbfs” and put the games in there.
To play games, we recommend using an external hard drive for your Wii. Flash drives are not recommended, and may vary in behavior even between the same product.
Make sure your USB drive is formatted as FAT32. Do not format it as other types such as exFAT or extFS.
You may format it as NTFS, but it won’t work with a majority of apps (eg. The Homebrew Channel, Nintendont)
Instructions
Downloading
- Extract USB Loader GX and put it in the
appsfolder on your USB drive or SD card. - Insert your USB drive, and SD card if you’re using one, into your Wii and launch USB Loader GX from the Homebrew Channel.
Getting Started
There is no “guide” to use the USB Loader GX app. This is intended to help you learn how to use it, by giving you a quick start. You should be able to figure out all the great features of USB Loader GX by using it.
- If USB Loader GX says “Waiting for HDD…” with a 20 seconds countdown, it’s likely that it can’t find the USB drive. Try to exit out of the app, and then relaunch it after you put the USB drive in the other port of the Wii.
- You can press the 1 Button on your Wii Remote to open up a dialog to download game covers and artwork from GameTDB. It might take a while to download the game covers and artwork, depending on how many games you have.
- There are WADs that can open up USB Loader GX if you load it from the Wii Menu. This is called a forwarder WAD. An official forwarder WAD can be found here, and a version for the vWii (Wii U) can be found here.
- GameCube or “custom” Wii games may or may not have a custom banner that USB Loader GX uses. To enable this, find or write
CustomBannersURL = http://banner.rc24.xyz/in config/GXGlobal.cfg on your USB drive. Then you can use the “Custom Banner” download by pressing the 1 Button on your Wii Remote.
User Interface
There are multiple buttons in the USB Loader GX interface.
Main Menu
These are the functions the buttons found on the top of the main menu do, from left to right:
- Star — Shows games that you have marked as “favorites”.
- Search — Lets you search for games by name.
- Sort — Cycles through sorting methods for games.
- Platform — Choose to sort games by platform.
- Category — Sorts games by category.
- List — Shows games in a list view.
- Multi-Cover View — Shows games in a multi-cover view.
- Cover Carousel View — Shows games in a carousel view.
- Wii Menu View — Shows games in a Wii Menu view.
- Parental Control — Locks USB Loader GX.
- Disc — Loads a game via disc.
Pressing any game will allow you to play the game by pressing “Start”.
There are also other buttons:
- (+) Icon — “Install” a game, i.e. loading it from disc and dumping it.
- Gears — Settings for USB Loader GX.
- SD card — Remount the SD card.
- Homebrew — Load homebrew apps.
- Wii — Open up the HOME Menu, which can also be accessed by pressing the HOME Button on the Wii Remote.
- Power Button — Turn off your Wii.
On the middle of the bottom of the screen, you can see how much space is free on your USB drive and how many games you have.
Continue to RiiTag
RiiTag is a customizable gamertag for your Wii that USB Loader GX can integrate with. This is optional to set up.
Continue to site navigation
We have many other tutorials that you might like.
![]() Загрузить PDF
Загрузить PDF
![]() Загрузить PDF
Загрузить PDF
Из этой статьи вы узнаете, как на консоли Wii играть в игру, которая записана на флеш-накопителе. Имейте в виду, что это можно сделать на классической Wii, но не на Wii U. Чтобы играть с флеш-накопителя, на Wii необходимо установить канал Homebrew, что приведет к аннулированию гарантии на Wii и нарушит условия использования Nintendo. Когда вы установите все необходимое, скопируйте игру с диска на флеш-накопитель, после чего можно играть с накопителя, а не с диска.
-

1
Убедитесь, что у вас есть все необходимое. Понадобится следующее:[1]
- SDHC-карта — карта емкостью до 8 ГБ необходима для установки Homebrew и выполнения других задач.
- Флеш-накопитель — на него будет записана игра.
- Пульт Wii — если у вас новая (черная) модель Wii, потребуется универсальный пульт Wii.
-
2
Отформатируйте флеш-накопитель в файловой системе FAT32. Для этого в окне «Форматирование» в меню «Файловая система» выберите «FAT32» (или «MS-DOS (FAT)» на компьютере Mac).
- Имейте в виду, что форматирование флеш-накопителя приведет к удалению всех файлов, которые находятся на нем, поэтому сначала создайте резервную копию важных данных и скопируйте ее компьютер или другой флеш-накопитель.
-
3
Извлеките диск с игрой из Wii (если необходимо).
-
4
-
5
Установите Homebrew на Wii. С помощью этого канала можно устанавливать пользовательские модификации, одна из которых позволит вам играть с флеш-накопителя.
-
6
Отформатируйте SD-карту. Когда вы установите Homebrew с SD-карты, отформатируйте ее, чтобы записать нужные файлы.
- Как и в случае с флеш-накопителем, в качестве файловой системы выберите «FAT32» (или «MS-DOS (FAT)» на компьютере Mac).
Реклама


-
1
Используйте компьютер с Windows. К сожалению, на компьютере Mac не получится создать флеш-накопитель для Wii. Если у вас нет доступа к компьютеру с Windows, попробуйте воспользоваться школьным компьютером или компьютером друга.
-
2
Определите разрядность Windows. Нужно выяснить, является ли Windows 64-разрядной или 32-разрядной, чтобы скачать соответствующий файл.
-
3
-
4
Щелкните по DOWNLOADS (Загрузки). Это опция в верхней части страницы.
-
5
Нажмите на ссылку для скачивания. Она зависит от разрядности системы:
- 64-разрядная — нажмите «WBFSManager 3.0 RTW x64» в разделе «OTHER AVAILABLE DOWNLOADS» (Другие доступные загрузки).
- 32-разрядная — нажмите «WBFSManager 3.0.1 RTW x86» в разделе «RECOMMENDED DOWNLOAD» (Рекомендуемая загрузка).
-
6
Откройте скачанный архив (ZIP-файл). Для этого дважды щелкните по нему.
-
7
Дважды щелкните по файлу setup. Вы найдете его в открытом архиве. Откроется окно установщика.
-
8
Установите программу. Для этого:
- Установите флажок у «I agree» (Согласиться) и нажмите «Next» (Далее).
- Дважды нажмите «Next» (Далее).
- Нажмите «Install» (Установить).
- Снимите флажок у «Show Readme» (Открыть файл Readme.txt).
- Нажмите «Finish» (Завершить).
-
9
Подключите флеш-накопитель к USB-порту компьютера.
-
10
Запустите WBFS Manager. Для этого дважды щелкните по значку в виде консоли Wii на синем фоне.
- Этот значок должен находиться на рабочем столе компьютера.
-
11
Нажмите OK, когда появится запрос. Откроется главное окно WBFS Manager.
-
12
Выберите свой флеш-накопитель. Откройте меню «Disk» (Диск) в верхнем левом углу окна, а затем щелкните по букве накопителя (обычно это буква «F:»).
- Если вы не знаете букву флеш-накопителя, откройте окно «Этот ПК» и найдите ее в разделе «Устройства и диски».
-
13
Отформатируйте флеш-накопитель. Нажмите Format (Форматирование) в верхней части окна, а затем нажмите «Yes» (Да) > «ОК», когда появятся запросы.
-
14
Извлеките флешку. Нажмите на значок в виде флеш-накопителя в правом нижнем углу экрана, в меню выберите «Извлечь» и отключите накопитель от компьютера.
- Возможно, вам придется нажать на «^», чтобы отобразить значок в виде флешки.
Реклама


-
1
Вставьте SD-карту в компьютер. Вставьте ее в слот для SD-карт так, чтобы наклейка смотрела вверх.
- Если на компьютере нет слота для SD-карт, купите USB-адаптер для SD-карты.
-
2
-
3
Нажмите Скачать. Это синяя кнопка посередине страницы. На компьютер скачается архив (ZIP-файл).
-
4
Извлеките файлы. На компьютере с Windows дважды щелкните по архиву, нажмите «Извлечь» в верхней части окна, щелкните по «Извлечь все» на панели инструментов, а затем нажмите «Извлечь», когда будет предложено. Файлы будут извлечены в обычную папку, которая откроется, когда процесс завершится.
- На компьютере Mac просто дважды щелкните по ZIP-файлу, чтобы открыть его.
-
5
Откройте папку Files. Для этого дважды щелкните по папке «USB Loader GX», а затем дважды щелкните по папке «Files».
-
6
Скопируйте файлы. Нажмите на любой файл в папке, нажмите Ctrl+A (Windows) или ⌘ Command+A (Mac), чтобы выбрать все файлы, а затем нажмите Ctrl+C (Windows) или ⌘ Command+C (Mac), чтобы скопировать файлы.
-
7
Нажмите на имя своей SD-карты. Вы найдете его на левой панели окна.
-
8
Вставьте файлы. Щелкните по пустому пространству в окне SD-карты, а затем нажмите Ctrl+V (Windows) или ⌘ Command+V (Mac). Файлы будут скопированы на SD-карту.
-
9
Извлеките карту. Сделайте это, когда копирование завершится:
- Windows — щелкните по вкладке «Управление» в верхней части окна SD-карты, а затем нажмите «Извлечь» на панели инструментов.
- Mac — нажмите на направленную вверх стрелку, которая расположена справа от имени SD-карты на левой панели.
Реклама


-
1
Вставьте SD-карту в Wii. Вставьте карту в слот на передней панели консоли.
-
2
Включите Wii. Нажмите кнопку питания на Wii или на пульте дистанционного управления.
- Пульт Wii должен быть включен и синхронизирован с консолью.
-
3
Нажмите A, когда появится запрос. Откроется главное меню.
-
4
Запустите канал Homebrew. В главном меню Wii выберите «the homebrew channel» (канал homebrew), а затем выберите «Start» (Запуск), когда появится запрос.
-
5
Выберите IOS263 Installer (Установщик IOS263). Это опция посередине меню. Раскроется меню.
-
6
Выберите Load (Загрузка), когда появится запрос. Вы найдете эту опцию внизу и в центре меню.
-
7
Нажмите кнопку 1. Будет выбрана опция «Install» (Установить).
- Если вы используете контроллер GameCube, вместо этого нажмите кнопку «Y».
-
8
Выберите <Download IOS from NUS> (Загрузить IOS с NUS). Это опция внизу страницы.
- Если вы не видите эту опцию, выделите текст в скобках внизу экрана и нажимайте «Right» (Вправо), пока не найдете ее.
-
9
Нажмите A, когда появится запрос. База IOS263 будет установлена на Wii. Этот процесс может занять до 20 минут.
-
10
Нажмите любую кнопку, когда появится запрос. Вы перейдете в меню Homebrew.
Реклама


-
1
Выберите cIOSX rev20b Installer (Установщик cIOSX rev20b). Это опция посередине меню Homebrew.
-
2
Выберите Load (Загрузка), когда появится запрос. Откроется меню установщика.
-
3
Прокрутите влево до опции «IOS236». Будет выбран файл IOS236, который вы установили ранее.
-
4
Нажмите A, чтобы подтвердить свой выбор.
-
5
Согласитесь с условиями использования. Для этого нажмите «A» на контроллере.
-
6
Выберите версию IOS. Нажимайте «Left» (Влево), пока не увидите «IOS56 v5661» в скобках, а затем нажмите «A».
-
7
Выберите пользовательский слот IOS. Нажимайте «Left» (Влево), пока не увидите «IOS249» в скобках, а затем нажмите «A».
-
8
Выберите установку по сети. Нажимайте «Left» (Влево), пока не увидите «Network installation» (Установка по сети) в скобках.
-
9
Запустите установку. Для этого нажмите «A».
-
10
Нажмите любую кнопку, когда появится запрос. Вы перейдете к следующему этапу установки.
-
11
Выберите другую версию IOS. Нажимайте «Left» (Влево), пока не увидите «IOS38 v4123» в скобками, а затем нажмите «A».
-
12
Выберите другой слот. Нажимайте «Left» (Влево), пока не увидите «IOS250» в скобках, а затем нажмите «A».
-
13
Используйте сетевой установщик. Выберите «Network installation» (Установка по сети) и нажмите «A», а затем дождитесь завершения установки.
-
14
Нажмите любую кнопку, когда появится запрос, а затем нажмите кнопку B. Wii перезагрузится.
Реклама


-
1
Перейдите на следующую страницу. Для этого нажмите направленную вправо стрелку на D-панели пульта Wii.
- Также можно нажать кнопку «+».
-
2
Выберите WAD Manager (WAD-менеджер). Это вторая опция на странице.
-
3
Выберите Load (Загрузка), когда появится запрос. Запустится установщик WAD Manager.
-
4
Нажмите A, чтобы принять условия использования.
-
5
Выберите «IOS249» для загрузки. Нажимайте «Left» (Влево), пока не увидите «IOS249» в скобках, а затем нажмите «A».
-
6
Отключите эмулятор. Выберите «Disable» (Отключить) в скобках и нажмите «A».
-
7
Выберите свою SD-карту. Выберите «Wii SD Slot» (Слот Wii SD) в скобках, а затем нажмите «A». Откроется список файлов, которые находятся на вставленной SD-карте.
-
8
Прокрутите вниз и выберите WAD. Это опция в нижней части экрана.
-
9
Выберите USB Loader GX. Прокрутите вниз, чтобы выбрать «USB Loader GX-UNEO_Forwarder.wad», а затем нажмите «A».
-
10
Установите WAD Manager. Нажмите «A», когда появится запрос.
-
11
Нажмите любую кнопку, когда появится запрос, а затем нажмите кнопку Home ⌂ (Домой). Wii перезагрузится, и вы вернетесь на вторую страницу канала Homebrew.
Реклама


-
1
Нажмите кнопку Home (Домой) еще раз. Вы найдете ее на пульте Wii. Откроется главное меню.
-
2
Выберите Shutdown (Выключить). Это опция внизу меню. Wii выключится.
- Подождите, пока Wii полностью выключится.
-
3
Вставьте флеш-накопитель в USB-порт на задней панели Wii.
-
4
Включите Wii. Для этого нажмите на кнопку питания.
-
5
Нажмите A, когда появится запрос. Откроется главное меню Wii, в котором найдите опцию «USB Loader GX» (справа от канала Homebrew).
-
6
Выберите USB Loader GX. Это опция справа на странице.
-
7
Выберите Start (Запуск). Запустится программа USB Loader GX.
- Этот процесс может занять несколько минут, особенно при первом запуске программы.
- Если отобразилось сообщение «Waiting for your slow USB» (Медленное USB-устройство), попробуйте подключить флеш-накопитель к другому USB-порту на задней панели Wii.
-
8
Вставьте в Wii диск с игрой, которую хотите скопировать на флеш-накопитель.
-
9
Выберите Install (Установить), когда появится запрос. Начнется чтение содержимого диска.
-
10
Выберите OK, когда появится запрос. Начнется копирование игры с диска на флеш-накопитель.
- Этот процесс займет довольно много времени, а индикатор прогресса может на некоторое время зависнуть. Не извлекайте флеш-накопитель и не перезагружайте Wii в процессе копирования.
-
11
Выберите OK, когда появится запрос. Процесс записи будет завершен.
- Сейчас диск с игрой можно извлечь из Wii.
-
12
Запустите игру. Нажмите на название игры, а затем нажмите на значок в виде вращающегося диска посередине окна.
Реклама


Советы
- Вместо флеш-накопителя можно использовать внешний жесткий диск.
- Размер одной игры для Wii, как правило, составляет около 2 гигабайт, поэтому купите флеш-накопитель достаточной емкости.
- Когда вы находитесь на главной странице программы USB Loader GX, нажмите кнопку «1», чтобы обновить обложку каждой игры на флеш-накопителе.
Реклама
Предупреждения
- Не отключайте Wii во время установки программного обеспечения, которое упомянуто в этой статье.
- Описанное копирование игр противоречит условиям использования Nintendo и законам в целом.
Реклама
Об этой статье
Эту страницу просматривали 55 097 раз.
Была ли эта статья полезной?
This guide will explain how to install USB Loader GX on your Nintendo Wii.
There are two different installation methods (automatic or manual), and two different installed channels which will be displayed on your Wii (Full channel or Forwarder). The differences will be detailed on this page.
- Requirements
- Installation
- After the installation
- Choosing a Hard Disk Drive
Requirements
To use USB Loader GX you need:
- A Soft-modded Nintendo Wii with the Homebrew Channel and the latest cIOS installed. (cIOS d2x is recommended)
- A USB 2.0 Hard Disk Drive or Flash Drive (see bellow for HDD format)
- A SD/SDHC Card (optional, you can use one if you have limited USB storage or if you find SD access on your computer easier than USB)
Additional informations you need to know:
-
If you don’t have the Homebrew Channel installed on your Wii or if you don’t know if your Wii has the necessary cIOS installed, you can follow one of these guides first (Choose one based on your knowledge and understanding, they are both identical):
- ModMii guide
- Modify any Wii 4.3 and bellow
-
Throughout this guide, you will see references to things like appsusbloader_gx_ or wad_. This is simply the location of the folder or file in question on your SD card or USB drive. For example:

See how my usb drive is _E:_. Well yours might be _D:_ or _G:_. We remove the drive letter path (E:) in this guide to avoid confusion.
- SD or USB? The Homebrew Channel can only recognize devices formatted as FAT32. If you choose to use a USB drive for the installation then you need a FAT32 partition. If you want to keep your USB drive only with NTFS partition(s) then choose a FAT32 SD/SDHC card for the installation.
Installation
Choosing an installation mode
USB Loader GX can either be installed as Homebrew Channel application (HBC) or as a Channel on the Wii.

USB Loader GX on The Homebrew Channel

USB Loader GX as a Channel on the Wii System Menu
The Homebrew Channel mode means that USB Loader GX is not physically installed on your Wii, it is only copied on your SD Card or your USB device and is launched from the Homebrew Channel. The advantage of this installation is that it is very easy to install and update the loader manually (place the executable on the SD card or USB device using your computer).
The Full Channel mode means that USB Loader GX executable is copied on the Wii internal memory. It appears as a channel directly on the Wii System Menu. You don’t need the executable on a SD card or USB device to launch the USB Loader GX, but you need a USB or SD to store the configuration files. To update the loader you can reinstall a new channel over the old one, or use the loader’s internal online update feature. Updating a Channel is not as simple as when updating from the HBC or forwarder.
The Forwarder mode is a mixed method from both previous modes. It installs a Channel on the Wii System Menu but it does not include the USB Loader GX executable. Instead, this Forwarder Channel launch the USB Loader GX executable located on your SD card or your USB Device.
The Forwarder is the preferred installation of many users, and it shares the advantage of both first modes: «Easy update» from the computer, and a «Channel» available on the Wii System Menu. You don’t need to go into the Homebrew Channel anymore to launch the loader and all the needed files are kept on your external device.
Automatic Installer
The installation can be done by a program on your computer (Windows only).
To install USB Loader GX on your SD or USB, you can use the USB Loader GX Installer v1.8. This is a multi-language Windows application which will download and copy the latest USB Loader GX release on your SD Card or USB device.
The installer has the following additional options:
— Allows you to pre-install language files (note: you can still do this easily in the loader),
— Download the latest Full Channel of USB Loader GX (note: you will need a WAD manager to be able to install on your Wii),
— Delete existing game covers
Note: The Automatic Installer does not install the Forwarder Channel.
Manual Installation
The installation can also be done manually and gives you more options, like different IOS versions and installation of the Forwarder Channel.
- Download the full package from the left menu on the main page. Select the __USBLoader_GX_Vx_x_ AllinOnePackage_IOS249.zip, download and save it on your computer.
- Open the downloaded package using winrar or 7zip.
The package contains two folders: apps and wad. - Extract and copy the apps and wad folder on your SD or USB. Your device should looks like this:
appsusbloader_gxboot.dol
appsusbloader_gxicon.png
appsusbloader_gxmeta.xml
wadUSBLoader_GX_Vx_x_UNLR_Channel_AHBPROT.wad
wadUSB Loader GX-UNEO_Forwarder_4_0_AHBPROT.wad
(The other files in the package are not needed)
- Installing the Full Channel or the Forwarder Channel:
You can stop here or delete the wad folder if you don’t want any channel on your Wii System Menu. USB Loader GX will work as a Homebrew Application and can be launched from the Homebrew Channel.
If you want to install a channel, you need another homebrew application: A WAD Manager.
— Download a WAD Manager (for example Wad Manager 1.7, or WAD Manager GUI 1.5v2, or any other).
— Extract and place the WAD manager’s boot.dol on your SD Card like for the USBLoader:
appswad managerboot.dol
appswad managericon.png(optional)
appswad managermeta.xml(optional)— Insert the SD or USB in your Wii
— Launch the Homebrew Channel
— Select and Launch the WAD Manager.
— If you are not already in the correct folder, browse the folders present on your storage device to wadIf you want the Full Channel: Select and install the UNLR_Channel_AHBPROT.wad file.
If you want the Forwarder Channel (Recommended!): Select and install the UNEO_Forwarder_4_0_AHBPROT.wad file.— Exit the WAD Manager and return to the Wii System Menu to see the channel you just installed. You can now launch USB Loader GX from this channel.
Note: If you selected the Forwarder Channel, remember that you NEED to keep the appsUSBLoader_gxboot.dol file on your SD or USB.
What is the difference between file’s version IOS222, IOS249 and IOS250?
There is no difference in how USB Loader GX is working. This is only an option used to speed the launch process.
Just use the file with IOS249 if you don’t know which version to choose.
Note: This IOS number is not the one used to specify which feature you will have access, it’s only the one used at the launch of the application in order to find the setting files. USB Loader GX will later allow you to specify a different IOS slot if you want to use different features (they will be detailed in other pages of this guides). The default IOS defined in the User’s Settings is 249.
If you want more explanations, read this:
USB Loader GX (and all games or homebrew running on the Wii) requires a IOS to access the Wii hardware, IOS which is defined at the very beginning of the application.
When you launch the loader it starts by loading a IOS capable or accessing hardwares (such as SD or USB). This IOS is usually located in slot 249.
Now that USB Loader GX is running and has access to SD card or USB device, it can load your User’s Settings to read your preferences and see which IOS you really want to use. If you want to use the IOS in slot 249 and you are already using USB Loader GX version «IOS249», then it’s fine and it continues the loading process.
If you want to use a different IOS than the one currently loaded, then USB Loader GX will need to change it and reload the one you specified in the User’s Settings before continuing the loading process. Reloading an IOS can takes up to 2 additional seconds.
By using a «IOS slot number» matching the IOS you defined in your User’s Settings, you prevent the 2 seconds reloading delay and it speeds the booting process.
It has no other purpose than speeding the launching delay of the loader.
If you don’t understand what it means, do not worry as they are ALL working the same way.
Advanced users: This option can be bypassed by editing the meta.xml arguments and specifying which IOS slot you want to load the first time. Specify the same IOS slot number than the one defined in your User’s Settings to prevent any IOS reloading.
After the installation
USB Loader GX uses the _appsusbloader_gx_ path on your SD or USB as the main place to store all your settings and downloads.
You need to keep that folder on SD or USB all the time.
Remember that The Homebrew Channel requires a FAT32 partition to recognize the SD or USB devices.
If you choose to launch USB Loader GX from the Homebrew Channel, then you need to keep a FAT32 partition to store the boot.dol file on it. If you have multiple partitions on your USB drive, it is recommended to format the first partition as FAT32 for homebrew compatibility reason.
If you choose to always launch USB Loader GX from the Channel or the Forwarder, then you don’t need a FAT32 partition, and you can move the _appsusbloader_gx_ folder either on:
- SD/SDHC card as FAT or FAT32 partition format,
- USB on a FAT32 partition,
- USB on a NTFS or ext2/3/4 partition.
USB Loader GX is looking in all partitions of your USB drive until it finds the installation folder (up to 8 partitions are supported).
The SD card is the first device accessed, it will load faster if you place the installation folder on your SD/SDHC card.
Note: Keeping a FAT32 partition on your SD and/or USB is a good idea if you want to exploit all features of USB Loader GX, and to have access to a larger choice of homebrew.
Updating USB Loader GX
If you have internet access on your Wii, you can update USB Loader GX directly from the loader. Go to the Update menu in the Settings.
If you don’t have Internet access or want to update USB Loader GX manually:
— If you are using the Homebrew Application mode or Forwarder Channel mode: Download the latest package and replace the file appsusbloader_gxboot.dol present on your SD card by the one from the package.
— If you are using the Full Channel mode: Download the latest package, extract the UNLR_Channel_AHBPROT.wad file and place it into your _wad_ folder. Use a Wad Manager to install the new version. It will overwrite the previous version.
Choosing a Hard Disk Drive
A lot of Hard Drives are compatible with the Wii, but you might want to check the USB Devices Compatibility List first.
The Wii can be used with self-powered Hard Drives, but if your drive is big (>500GB) you should prefer external powered drives as the Wii USB port might not provides enough power.
HDD Format
USB Loader GX supports a lot of partition format: WBFS, FAT32, NTFS, Ext 2/3/4
- WBFS: Old and deprecated Wii Backup File System format. Not compatible natively with computers, you need a dedicated program to manage the content of this partition and you can store only Wii games on it. The partition needs to be primary and active. This partition format is limited to 500 games.
- FAT32: Compatible with the Wii and all computers. Partition size limited to 2.2TB, maximum file size limited to 4GB (Wii games are automatically split in multiple parts when needed).
- NTFS: No size limit. Not supported by a lot of Wii Homebrew.
- Ext2/3/4: No size limit. Not compatible with other Wii Homebrew.
The Wii Homebrew Applications (such as The Homebrew Channel, Emulators, Games, Media players, etc.), USB Loader GX‘s NAND emulation feature and DIOS MIOS (Lite) require a FAT32 partition format. You can use a FAT32 SD/SDHC card for that purpose and set your USB hard drive as NTFS or Ext partition format.
You can of course create multiple partitions format on your HDD if you want to separate partitions for Wii Homebrew, Wii games or your computer’s data.
USB Loader GX supports up to 8 partitions.
If you want more informations between each format, you can read this.
Guide for USB Loader GX, Copyright © 2012. Created by Shano56 and Cyan. All rights reserved.
![]()
Description
USB Loader GX allows you to play Wii and GameCube games from a USB storage device or an SD card, launch other homebrew apps, create backups, use cheats in games and a whole lot more.
Installation
- Extract the apps folder to the root of your SD card and replace any existing files.
- Install the d2x v11 cIOS.
- Optional: Download wiitdb.xml by selecting the update option within the loaders settings menu.
- Optional: Install the loaders forwarder channel (Wii or vWii) and then set the return to setting to
UNEO.
cIOS guide
The first configuration is the optimal one for the Wii, but the second configuration should improve compatibility.
For Wii
Slot 249 base 56
Slot 250 base 57
Slot 251 base 38
For vWii and Wii
Slot 248 base 38 (Wii only)
Slot 249 base 56
Slot 250 base 57
Slot 251 base 58