1. Overview
In this tutorial, we’ll walk you through one of the easiest ways to try out Ubuntu Desktop on a virtual machine. VirtualBox is a general purpose virtualiser that is available across Linux, Mac OS and Windows. It’s a great way to experience Ubuntu regardless of your current operating system.
VirtualBox 7 and above includes a new feature called Unattended Guest OS Install which significantly streamlines the setup experience for common operating systems like Ubuntu, making it easier than ever to get started.
Note: This tutorial will also work for other distributions, so try it out with some of the Ubuntu flavours as well!
What you’ll learn
- How to install and configure VirtualBox
- How to import an Ubuntu image
- How to run a virtual instance of Ubuntu Desktop
- Further configuration options
What you’ll need
- A PC with internet access!
Download an Ubuntu Image
Duration: 3:00
You can download an Ubuntu image here. Make sure to save it to a memorable location on your PC! For this tutorial, we will use the latest Ubuntu 22.10 release.

Download and install VirtualBox
Duration: 5:00
You can download VirtualBox from the downloads page here. This page includes instructions on how to install VirtualBox for your specific OS so we won’t repeat those here.
Once you have completed the installation, go ahead and run VirtualBox.

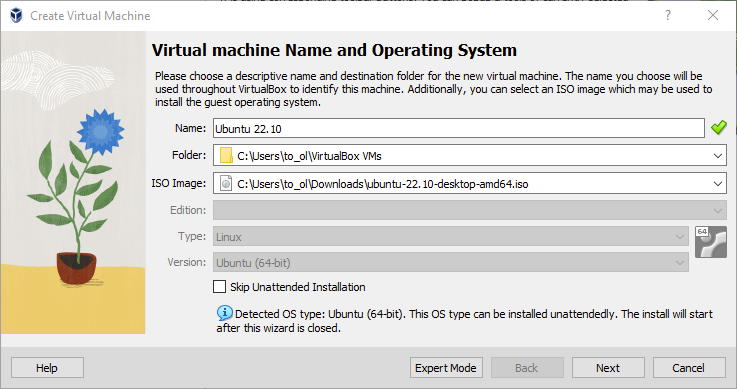
2. Create a new virtual machine
Click New to create a new virtual machine. Fill in the appropriate details:
- Name: If you include the word Ubuntu in your name the Type and Version will auto-update.
- Machine Folder: This is where your virtual machines will be stored so you can resume working on them whenever you like.
- ISO Image: Here you need to add a link to the ISO you downloaded from the Ubuntu website.
We want to install Ubuntu unattendedly so we can leave the checkbox to skip unchecked.
Create a user profile
To enable the automatic install we need to prepopulate our username and password here in addition to our machine name so that it can be configured automatically during first boot.
The default credentials are:
- Username: vboxuser
- Password: changeme
It is important to change these values since the defaults will create a user without sudo access.
Ensure your Hostname has no spaces to proceed!
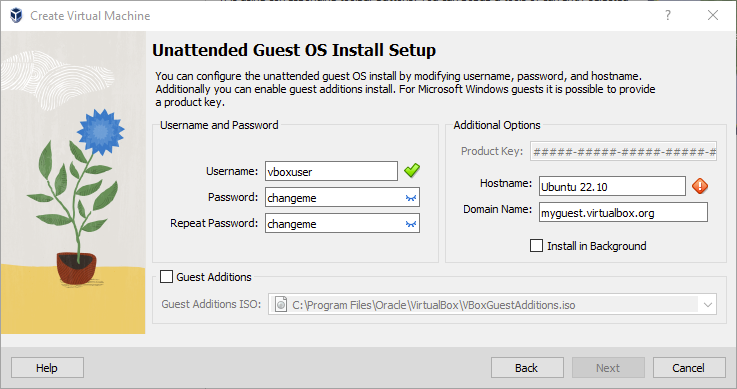
It is also recommended to check the Guest Additions box to install the default Guest Additions ISO that is downloaded as part of VirtualBox. Guest additions enables a number of quality of life features such as changing resolution and dynamic screen resizing so it is highly recommended!
Note: If you choose not to use unattended install then this step will be skipped and you will go straight to the following screen. Once your machine has been created you will be able to create a username and password by proceeding through the standard Ubuntu Desktop installation flow on first boot.
Define the Virtual Machine’s resources
In the next section we can specifiy how much of our host machine’s memory and processors the virtual machine can use. For good performance it’s recommended to provide your VM with around 8GB of RAM (althought 4GB will still be usable) and 4 CPUs. Try to remain in the green areas of each slider to prevent issues with your machine running both the VM and the host OS.

Then we need to specify the size of the hard disc for the virtual machine. For Ubuntu we recommend around 25 GB as a minimum. By default the hard disk will scale dynamically as more memory is required up to the defined limit. If you want to pre-allocate the full amount, check the ‘Pre-allocate Full Size’ check box. This will improve performance but may take up unnecessary space.
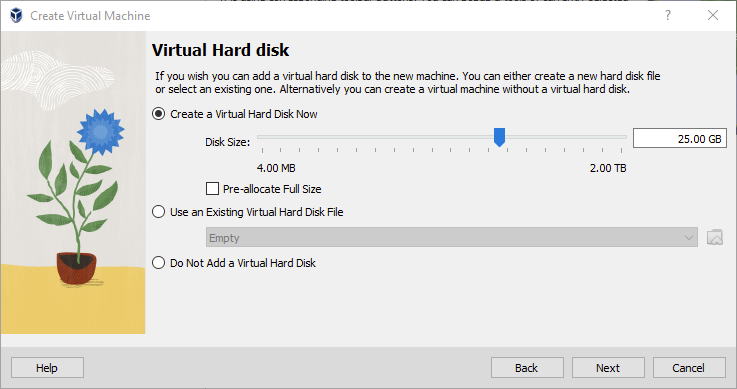
Click Next to continue and view a summary of your machine setting.

After this click Finish to initialize the machine!
3. Install your image
Click Start to launch the virtual machine.

You will see a message saying ‘Powering VM up …’ and your desktop window will appear.
On first boot the unattended installation will kick in so do not interact with the prompt to ‘Try and Install Ubuntu’ and let it progress automatically to the splash screen and into the installer.
Note: If you chose not to use unattended install then you will need to progress through the Ubuntu install manually. Check out our Ubuntu Desktop installation tutorial for more details.

You will notice at this stage that the resolution of the window is fixed at 800×600. This is because the Guest Additions features are not installed until after the Ubuntu installation has completed.

Once the installation completes, the machine will automatically reboot to complete the installation.

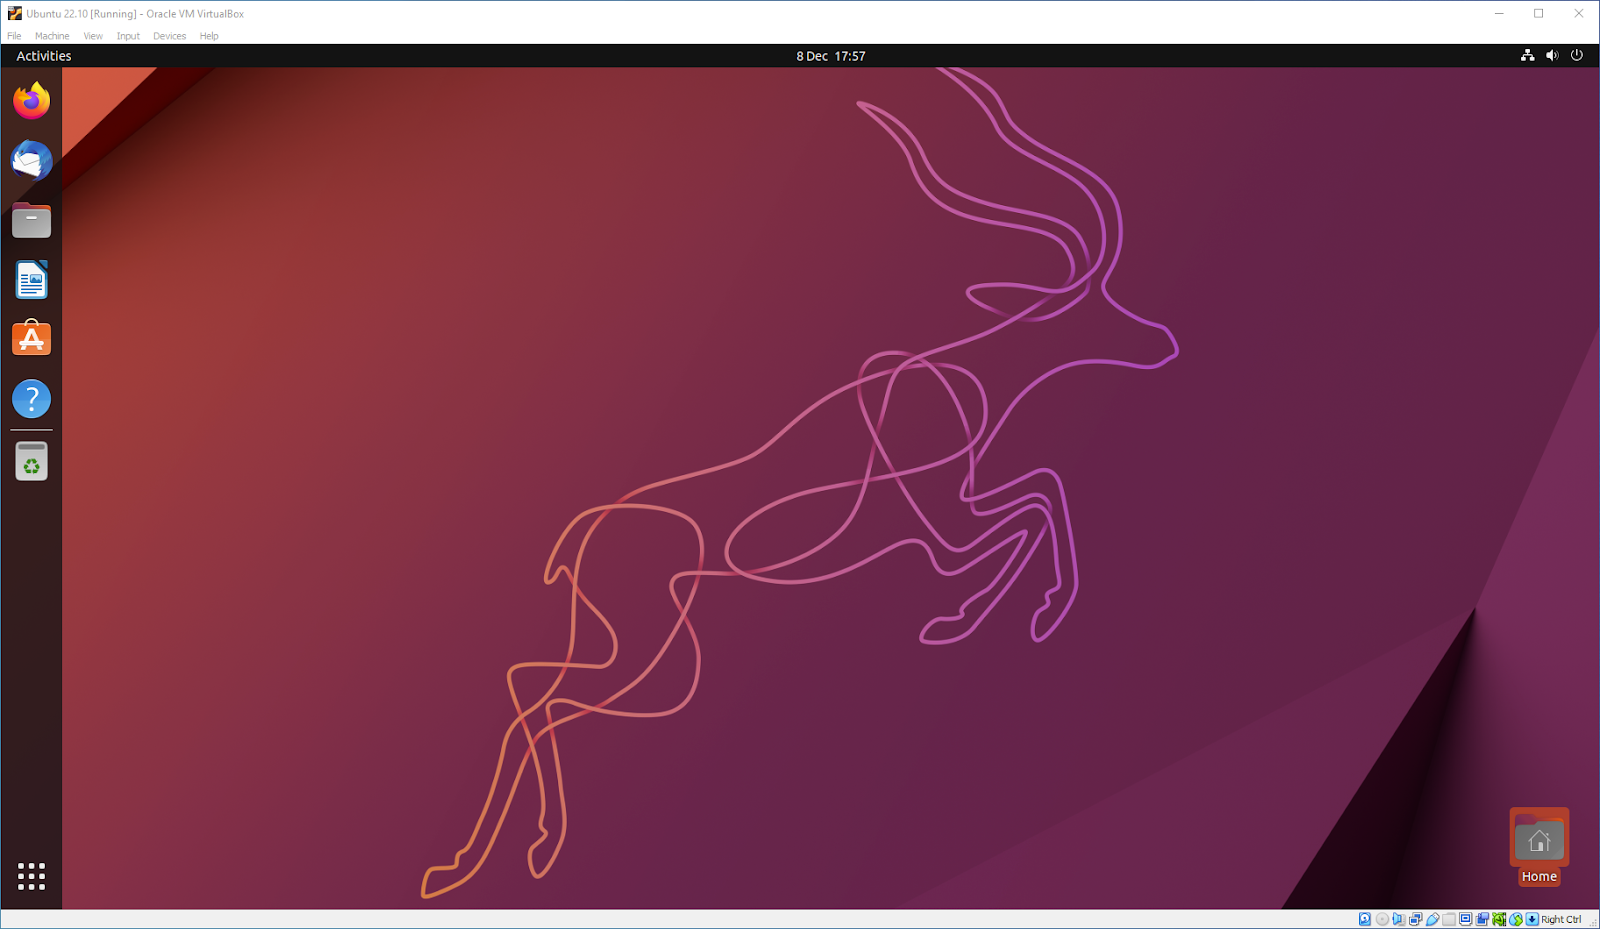
Finally you will be greeted with the Ubuntu log-in screen where you can enter your username and password defined during the initial setup (don’t forget that the default password is ‘changeme’ if you left everything as the default).

4. Explore Virtual Box
Enjoy your shiny new Ubuntu Desktop!
As always we recommend opening a terminal and running sudo apt update && sudo apt upgrade -y and then sudo snap refresh to get everything updated to the latest versions.
Once you’ve finished your session you can close your machine by clicking the X in the top right of the window and choosing whether to keep your machine frozen in its current state or shut it down completely.

As you can probably tell, there are tonnes of further configuration options available in VirtualBox and we’ve only scratched the surface.
VirtualBox allows you to create and configure multiple virtual machines, so don’t be afraid to create new instances of Ubuntu to try out different system and storage configurations to fine tune your performance.
Why not try following the tutorial above with one of the Ubuntu flavours!

Download and install VirtualBox
Duration: 5:00
You can download VirtualBox from the downloads page here. This page includes instructions on how to install VirtualBox for your specific OS so we won’t repeat those here.
Once you have completed the installation, go ahead and run VirtualBox.
2. Create a new virtual machine
Click New to create a new virtual machine. Fill in the appropriate details:
- Name: If you include the word Ubuntu in your name the Type and Version will auto-update.
- Machine Folder: This is where your virtual machines will be stored so you can resume working on them whenever you like.
- ISO Image: Here you need to add a link to the ISO you downloaded from the Ubuntu website.
We want to install Ubuntu unattendedly so we can leave the checkbox to skip unchecked.
Create a user profile
To enable the automatic install we need to prepopulate our username and password here in addition to our machine name so that it can be configured automatically during first boot.
The default credentials are:
- Username: vboxuser
- Password: changeme
It is important to change these values since the defaults will create a user without sudo access.
Ensure your Hostname has no spaces to proceed!
It is also recommended to check the Guest Additions box to install the default Guest Additions ISO that is downloaded as part of VirtualBox. Guest additions enables a number of quality of life features such as changing resolution and dynamic screen resizing so it is highly recommended!
Note: If you choose not to use unattended install then this step will be skipped and you will go straight to the following screen. Once your machine has been created you will be able to create a username and password by proceeding through the standard Ubuntu Desktop installation flow on first boot.
Define the Virtual Machine’s resources
In the next section we can specifiy how much of our host machine’s memory and processors the virtual machine can use. For good performance it’s recommended to provide your VM with around 8GB of RAM (althought 4GB will still be usable) and 4 CPUs. Try to remain in the green areas of each slider to prevent issues with your machine running both the VM and the host OS.
Then we need to specify the size of the hard disc for the virtual machine. For Ubuntu we recommend around 25 GB as a minimum. By default the hard disk will scale dynamically as more memory is required up to the defined limit. If you want to pre-allocate the full amount, check the ‘Pre-allocate Full Size’ check box. This will improve performance but may take up unnecessary space.
Click Next to continue and view a summary of your machine setting.
After this click Finish to initialize the machine!
3. Install your image
Click Start to launch the virtual machine.
You will see a message saying ‘Powering VM up …’ and your desktop window will appear.
On first boot the unattended installation will kick in so do not interact with the prompt to ‘Try and Install Ubuntu’ and let it progress automatically to the splash screen and into the installer.
Note: If you chose not to use unattended install then you will need to progress through the Ubuntu install manually. Check out our Ubuntu Desktop installation tutorial for more details.
You will notice at this stage that the resolution of the window is fixed at 800×600. This is because the Guest Additions features are not installed until after the Ubuntu installation has completed.
Once the installation completes, the machine will automatically reboot to complete the installation.
Finally you will be greeted with the Ubuntu log-in screen where you can enter your username and password defined during the initial setup (don’t forget that the default password is ‘changeme’ if you left everything as the default).
4. Explore Virtual Box
Enjoy your shiny new Ubuntu Desktop!
As always we recommend opening a terminal and running sudo apt update && sudo apt upgrade -y and then sudo snap refresh to get everything updated to the latest versions.
Once you’ve finished your session you can close your machine by clicking the X in the top right of the window and choosing whether to keep your machine frozen in its current state or shut it down completely.
As you can probably tell, there are tonnes of further configuration options available in VirtualBox and we’ve only scratched the surface.
VirtualBox allows you to create and configure multiple virtual machines, so don’t be afraid to create new instances of Ubuntu to try out different system and storage configurations to fine tune your performance.
Why not try following the tutorial above with one of the Ubuntu flavours!
5. Tell us your thoughts!
Thank you for following this tutorial, we’d love to hear how you got on.
Give us feedback in the Ubuntu Discourse if you have any issues.
To help us improve our tutorials, we’d love to hear more about you:
How will you use this tutorial?
Only read through it
Complete the exercise
What is your current level of experience?
Novice
Intermediate
Proficient
What operating system are you following this tutorial on?
Ubuntu
Other Linux OS
Windows
Mac OS
Was this tutorial useful?
Thank you for your feedback.
![]() Загрузить PDF
Загрузить PDF
![]() Загрузить PDF
Загрузить PDF
Из этой статьи вы узнаете, как на компьютере установить Ubuntu Linux в VirtualBox. VirtualBox — это программа, в которой можно установить дополнительную операционную систему, причем основная система компьютера не изменится.
-

1
Откройте веб-сайт Ubuntu. Перейдите на страницу https://www.ubuntu.com/download/desktop в веб-браузере компьютера. Здесь можно скачать образ диска (ISO-файл) Ubuntu.
-
2
Прокрутите вниз до последней версии Ubuntu. Вы найдете ее в нижней части страницы.
-
3
Щелкните по Download (Скачать). Это зеленая кнопка справа от выбранной вами версии Ubuntu. Откроется новая страница.
-
4
Прокрутите вниз и нажмите Not now, take me to the download (Не сейчас, начать загрузку). Эта ссылка находится в нижнем левом углу страницы.
-
5
Убедитесь, что началась загрузка ISO-файла. В противном случае щелкните по ссылке «Download now» (Скачать сейчас) в верхней части страницы. Пока ISO-файл будет скачиваться, создайте и настройте виртуальную машину в VirtualBox.
Реклама


-
1
Установите VirtualBox. Сделайте это, если на компьютере (с Windows или Mac OS X) нет этой программы.
-
2
Запустите VirtualBox. Дважды щелкните (или щелкните один раз на компьютере Mac) по значку программы VirtualBox.
-
3
Нажмите Создать. Это синий значок в верхнем левом углу окна VirtualBox. Откроется всплывающее меню.
-
4
Введите имя виртуальной машины. Введите любое имя (например, Ubuntu) в текстовом поле «Имя», которое находится в верхней части всплывающего меню.
-
5
Выберите «Linux» в меню «Тип». Откройте это меню и выберите «Linux».
-
6
Выберите «Ubuntu» в меню «Версия». В этом меню опция «Ubuntu» должна отобразится по умолчанию, когда вы выберете «Linux» в меню «Тип»; в противном случае откройте меню «Версия» и нажмите «Ubuntu (64-bit)».
-
7
Щелкните по Далее. Эта кнопка находится в нижней части меню.
-
8
Укажите размер оперативной памяти. Перетащите ползунок влево или вправо, чтобы уменьшить или увеличить объем оперативной памяти, который будет использоваться виртуальной машиной Ubuntu.
- По умолчанию будет выбран оптимальный объем оперативной памяти.
- Не перетаскивайте ползунок на красную область – сделайте так, чтобы выбранное значение находилось в пределах зеленой области.
-
9
Щелкните по Далее. Эта кнопка находится в нижней части меню.
-
10
Создайте виртуальный жесткий диск виртуальной машины. Виртуальный жесткий диск — это раздел на жестком диске компьютера, который будет использоваться для хранения файлов и программ виртуальной машины:
- нажмите «Создать»;
- нажмите «Далее»;
- нажмите «Далее»;
- укажите емкость виртуально жесткого диска;
- нажмите «Создать».
-
11
Проверьте, скачался ли образ Ubuntu. Если да, установите эту систему в VirtualBox.
Реклама


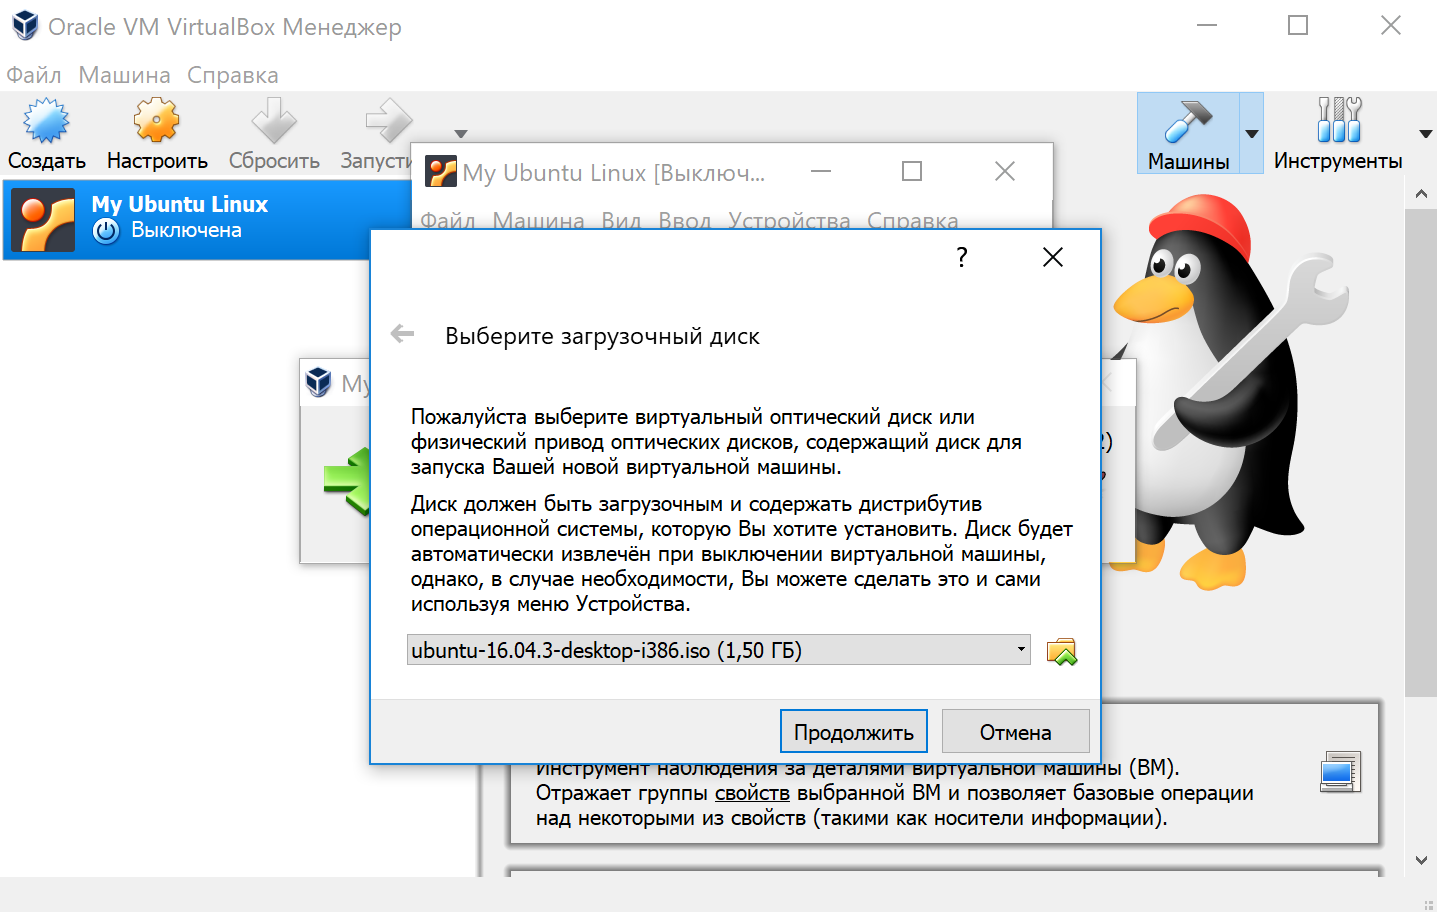
-
1
Дважды щелкните по имени созданной виртуальной машины. Оно находится в левой части окна VirtualBox. Откроется меню.
-
2
Щелкните по значку в виде папки. Он находится в нижней правой части меню. Откроется новое окно, в котором можно выбрать скачанный ISO-файл.
-
3
Выберите ISO-файл. Перейдите в папку со скачанным файлом и щелкните по нему.
-
4
Нажмите Открыть. Эта кнопка находится в нижнем правом углу окна. ISO-файл откроется в VirtualBox.
-
5
Нажмите Запустить. Эта опция находится в нижней части меню. Запустится установщик Ubuntu.
-
6
Щелкните по Установить Ubuntu. Эта опция находится справа в окне VirtualBox.
-
7
Установите флажки у обеих опций в окне «Подготовка к установке Ubuntu». Так вы установите полную версию Ubuntu.
-
8
Щелкните по Продолжить. Эта кнопка находится в нижнем правом углу страницы.
-
9
Установите флажок у опции «Стереть диск и установить Ubuntu». Не волнуйтесь — информация, которая хранится на жестком диске компьютера, не пострадает.
-
10
Нажмите Установить. Эта опция находится в нижнем правом углу страницы.
-
11
Щелкните по Продолжить, когда появится запрос. Так вы подтвердите, что виртуальный диск будет очищен (в любом случае на нем ничего нет); запустится процесс установки Ubuntu.
Реклама


-
1
Выберите часовой пояс. На карте щелкните по часовому поясу, в котором вы находитесь.
-
2
Нажмите Продолжить. Эта кнопка находится в нижнем правом углу страницы.
-
3
Активируйте экранную клавиатуру. Щелкните по значку в виде человека в верхней правой части окна, а затем нажмите на переключатель «Экранная клавиатура», чтобы открыть ее. Чтобы пользоваться физической клавиатурой, нужны драйверы, поэтому вы не сможете работать с ней, пока не настроите Ubuntu.
-
4
Введите свое имя. Сделайте это в текстовом поле «Имя» в верхней части окна.
- Когда вы введете имя, автоматически будет создано имя компьютера в виртуальной машине; если вы хотите изменить имя компьютера, введите его в поле «Имя компьютера».
-
5
Введите имя пользователя. Сделайте это в текстовом поле «Имя пользователя».
-
6
Создайте пароль. Введите пароль в текстовом поле «Пароль», а затем еще раз введите его в текстовом поле «Подтвердить пароль».
-
7
Щелкните по Продолжить. Эта кнопка находится в нижней части страницы.
- Если нужно, измените параметры входа в систему под текстовым полем «Подтвердить пароль».
-
8
Дождитесь, когда установка Ubuntu будет завершена. На это уйдет от нескольких минут до получаса в зависимости от быстродействия компьютера.
- Весь процесс пройдет в автоматическом режиме, то есть ваше участие не требуется.
-
9
Перезапустите виртуальную машину. Когда на экране появится кнопка «Перезапустить сейчас», сделайте следующее: нажмите «Выход» в верхнем правом (Windows) или в верхнем левом (Мас) углу окна, установите флажок у «Выключить машину», нажмите «ОК», а затем дважды щелкните по имени виртуальной машины.
-
10
Войдите в виртуальную систему. Когда виртуальная машина запустится, выберите свое имя, введите пароль и нажмите «Войти». Ubuntu запустится в виртуальной машине, но с этой системой можно работать как с обычной (не виртуальной) системой.
Реклама


Советы
- В виртуальной системе можно устанавливать программы, но не забывайте, что емкость виртуального жесткого диска ограничена.
Реклама
Предупреждения
- Виртуальная система будет работать не очень быстро, но это нормально, потому что на самом деле на одном компьютере вы запустите две операционные системы.
- Убедитесь, что на физическом жестком диске достаточно места, чтобы создать виртуальный жесткий диск. Например, если VirtualBox предлагает создать виртуальный жесткий диск емкостью 8 ГБ, убедитесь, что свободное пространство физического жесткого диска превышает 8 ГБ.
Реклама
Об этой статье
Эту страницу просматривали 174 790 раз.
Была ли эта статья полезной?
Если вы работаете на Windows версии ниже 10 или хотите получить изолированную операционную систему Linux, да ещё и с графическим окружением, то можно воспользоваться сторонним бесплатным программным продуктом под названием VirtualBox.
Общая информация о технологии виртуализации
Вам потребуется:
-
Инсталлятор Oracle VM VirtualBox для Windows Hosts
Ссылка на скачивание: Download Oracle VM VirtualBox -
Образ операционной системы Ubuntu Linux в формате ISO
Ссылка на скачивание: Download Ubuntu Desktop
Для начала необходимо установить и запустить приложение VirtualBox.

Нажимаем кнопку «Создать», выбираем из списка тип операционной системы «Linux», если нет своих предпочтений по дистрибутиву, то выбираем версию «Ubuntu» 32 или 64 битной архитектуры, а название можно ввести любое.

Указываем объём оперативной памяти выделенной под виртуальную систему. Рекомендованный объём составляет 1024 MB.

Указываем объём дискового пространства выделенного под виртуальную систему. Рекомендованный объём составляет 10 GB.
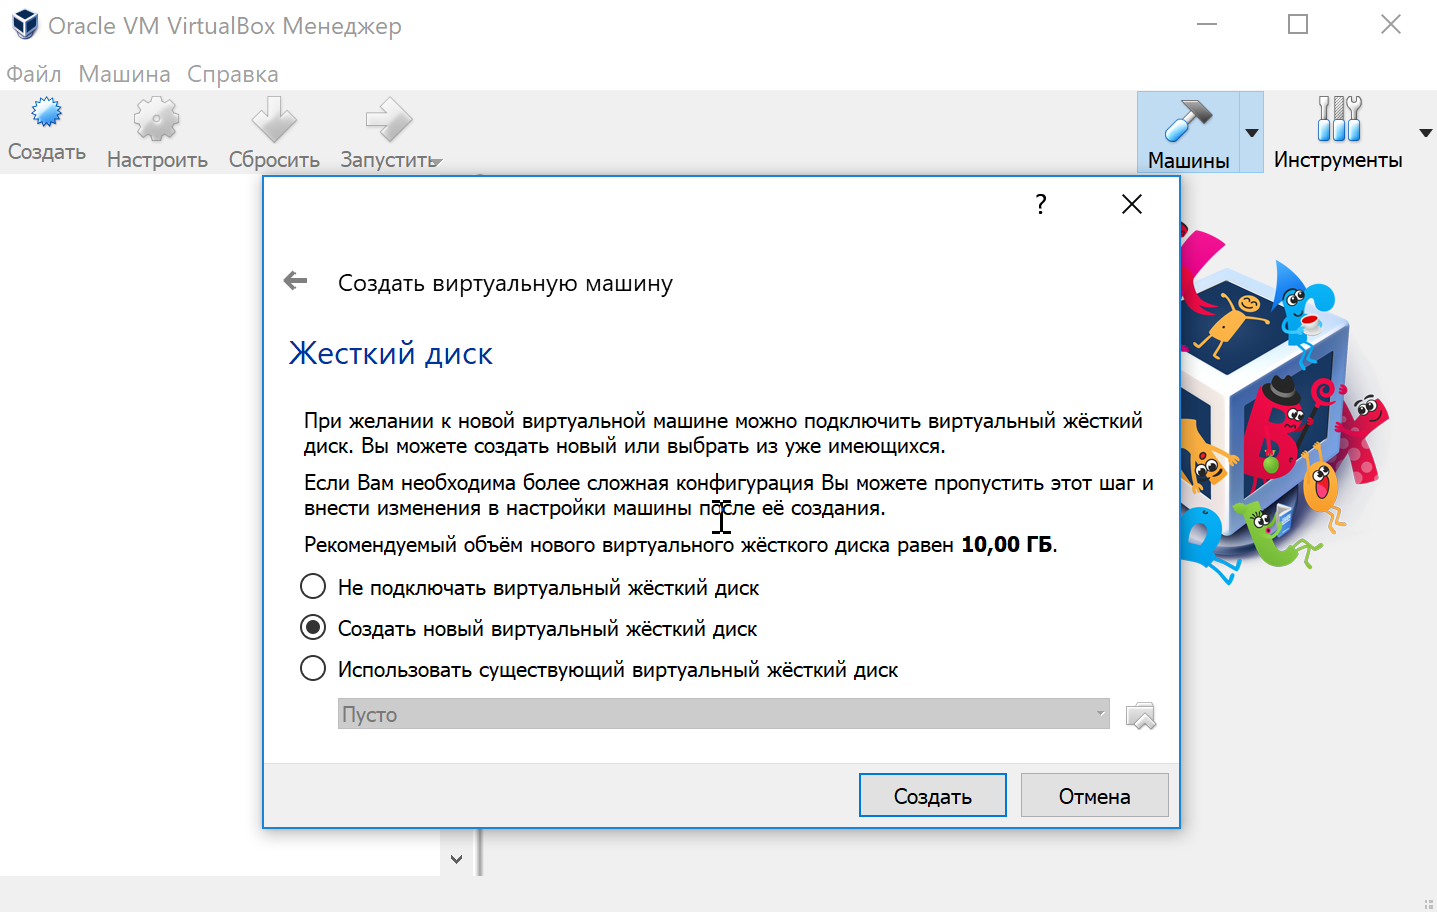
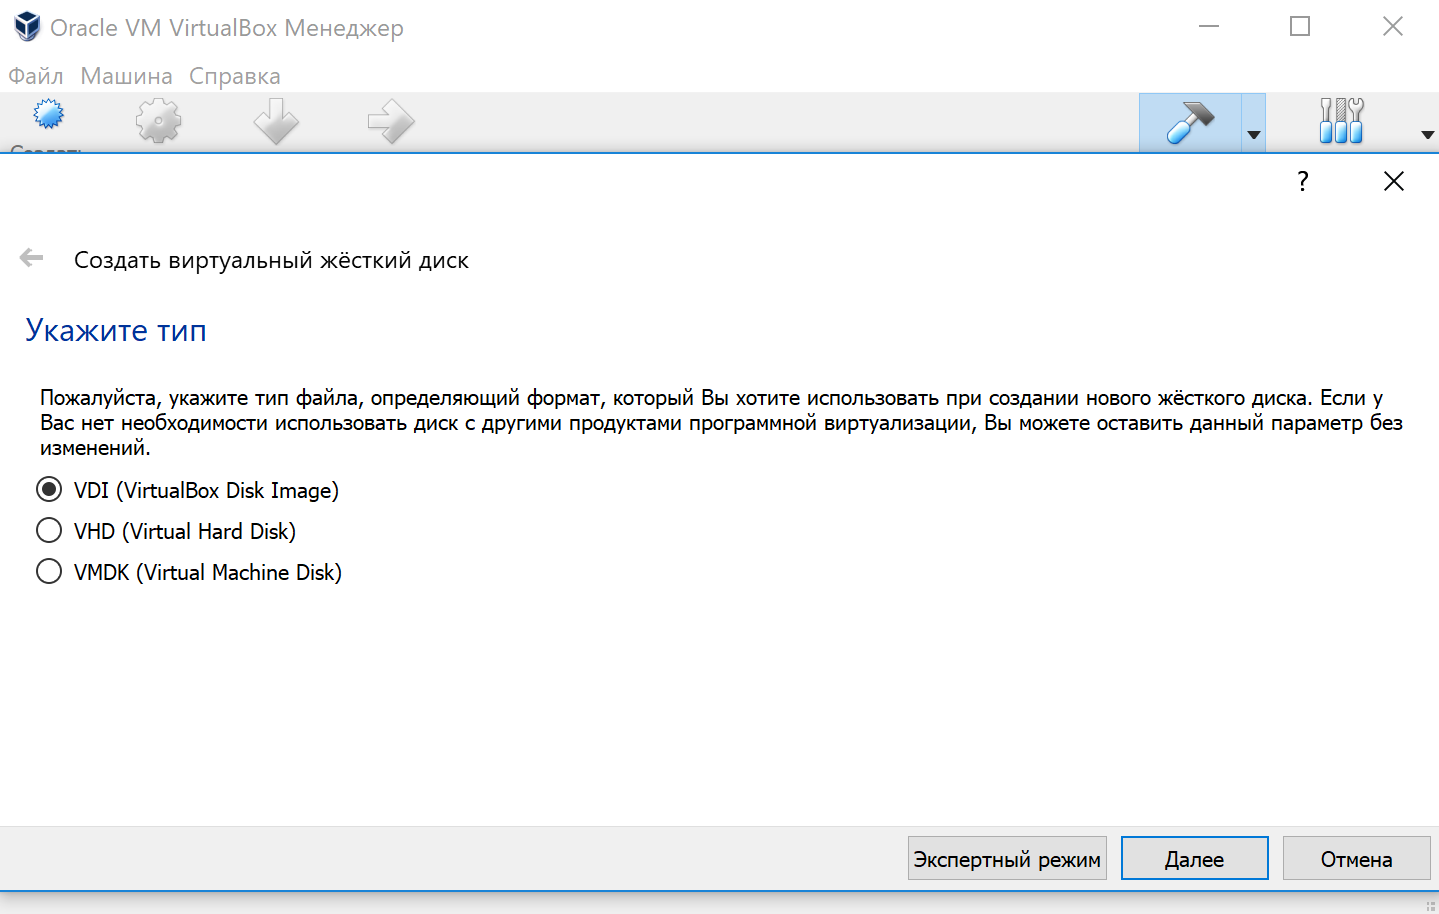
Тип виртуального жёсткого диска можно оставить как есть — VDI (VirtualBox Disk Image).
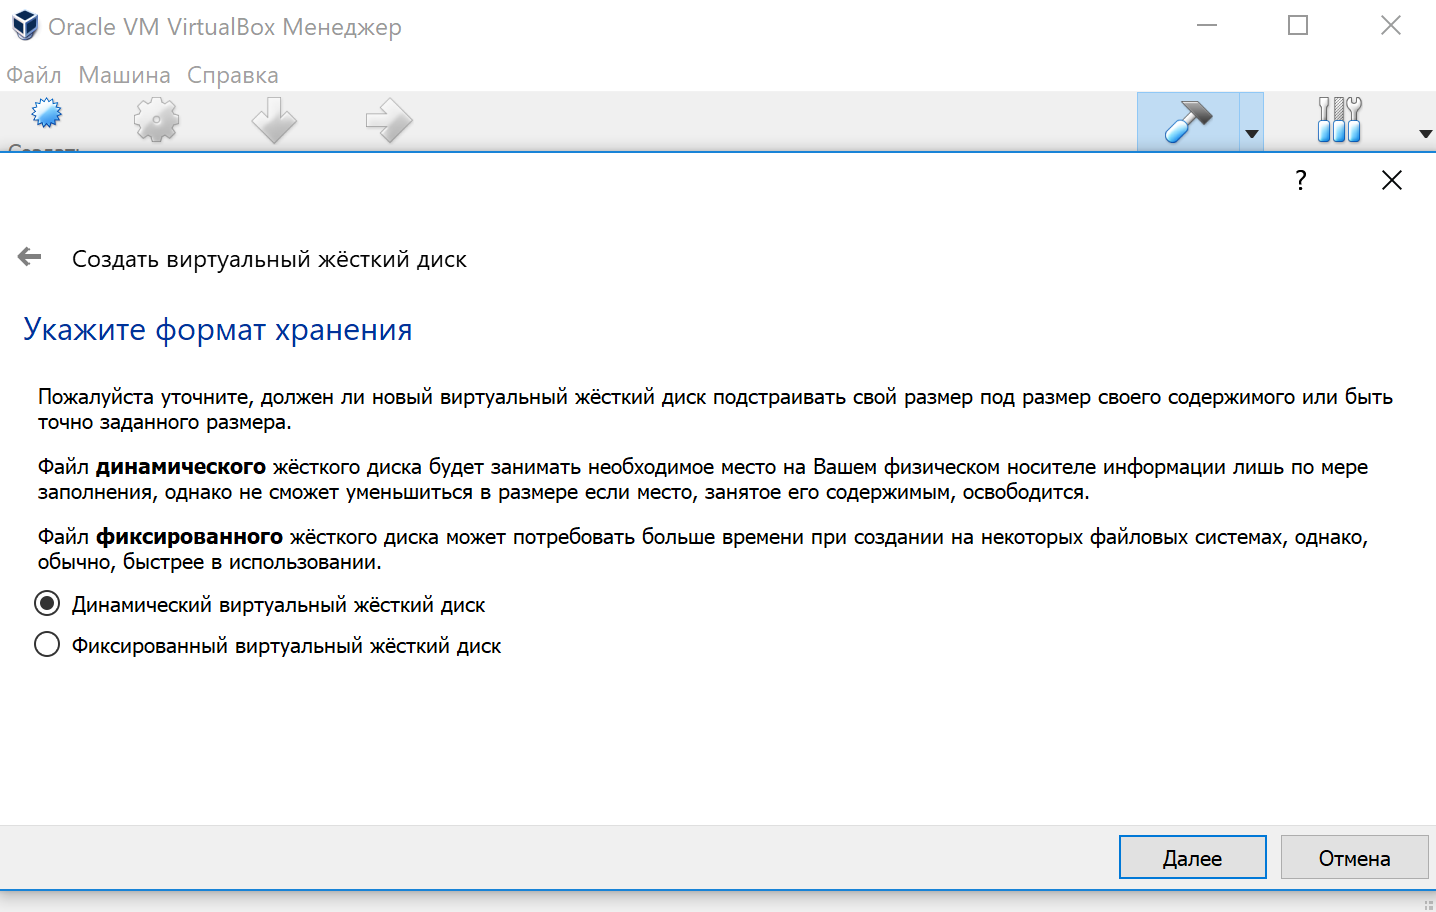
Формат хранения данных выберите исходя из личных предпочтений. Динамический виртуальный жёсткий диск растёт по мере заполнения, а фиксированный создаётся сразу того размера, который был указан на предыдущем шаге.
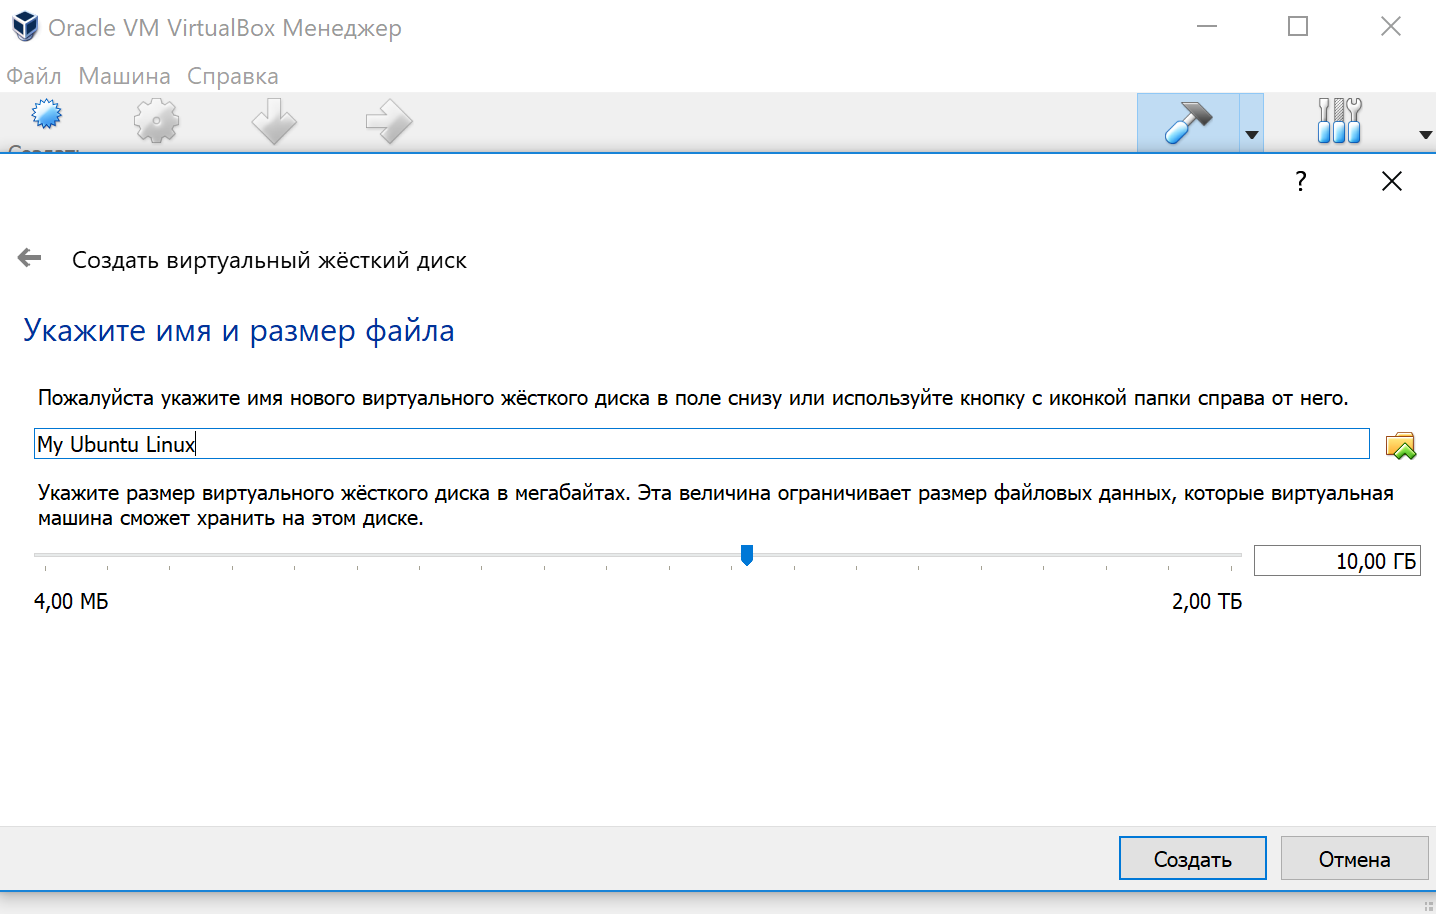
Имя и размер файла можно оставить без изменений и сразу нажать на кнопку «Создать».
По завершению у вас будет создана виртуальная машина, но она пока без операционной системы. Для того чтобы её установить, нужно скачать Ubuntu Linux (32-bit или 64-bit, в зависимости от того, что было выбрано на шаге, где мы указывали тип ОС).
Нажатие на кнопку «Запустить» должно привести к появлению диалогового окна с предложением указать путь до скаченного ISO образа. Сделайте этого и нажмите кнопку «Продолжить»
Виртуальная машина автоматически будет выполнять часть процессов, но в некоторых операциях всё же потребуется участие пользователя.
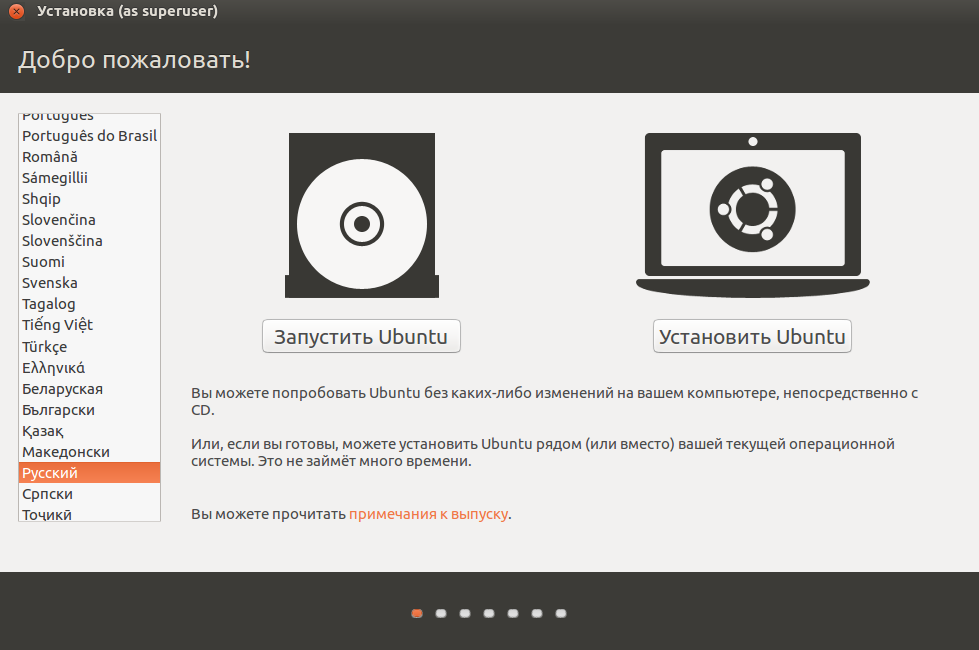
Выберите языковую поддержку в списке слева и нажмите «Установить Ubuntu».
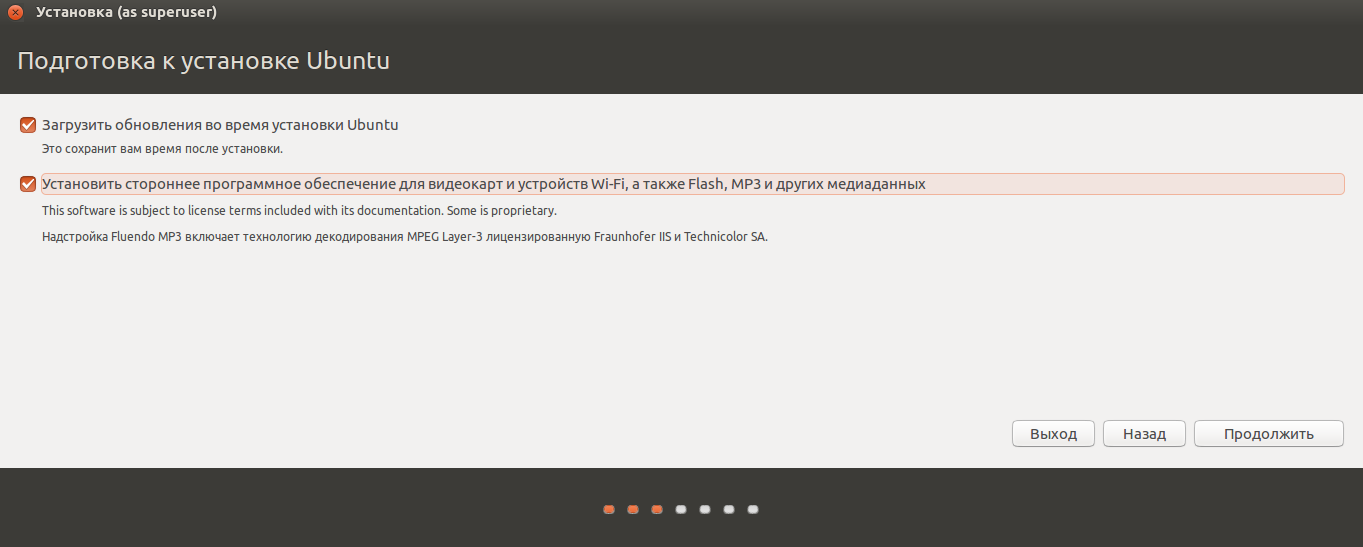
Можно загрузить обновления сразу на этапе установки.
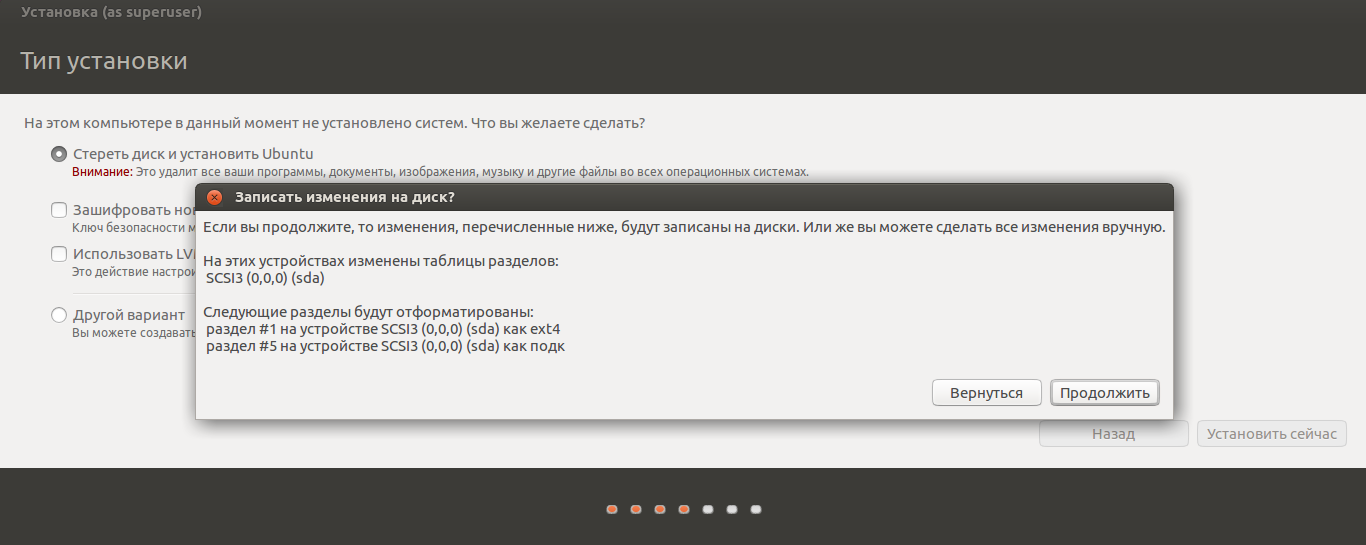
Без особых опасений выбираем пункт «Стереть диск и установить Ubuntu» и двигаемся дальше.
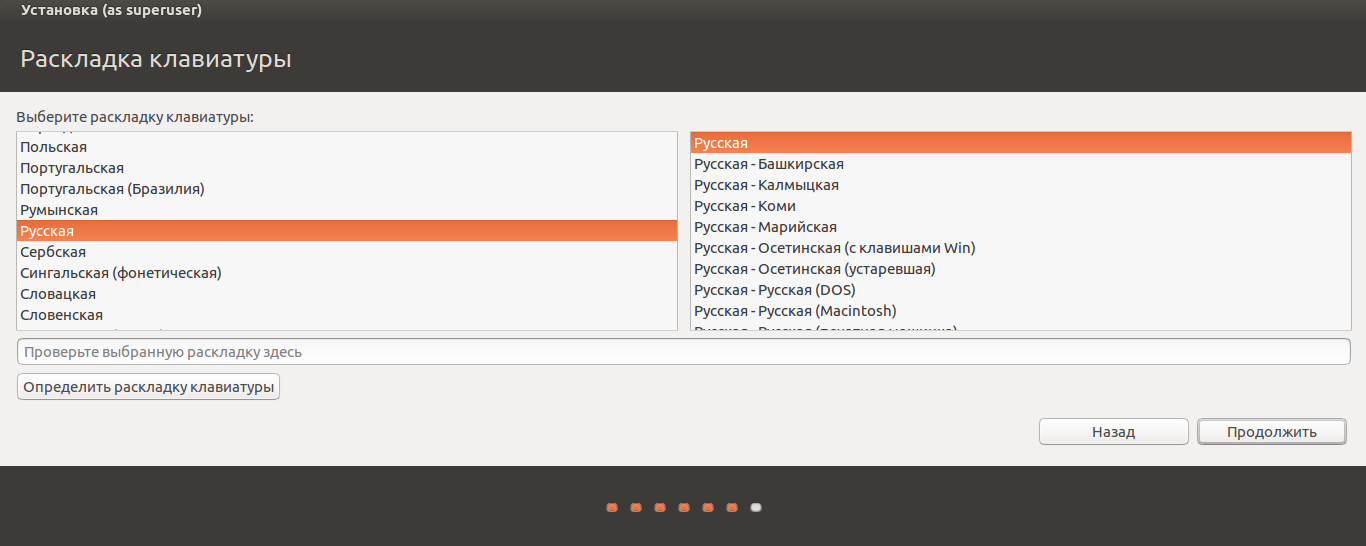
Если вы выбрали русский язык на первом этапе установки, то вам предложат русскую раскладку клавиатуры в качестве дополнительной.
Заполните поля и выберите режим входа в систему.
Далее начнётся процедура разметки диска, переноса файлов, установка обновлений и другие процессы, которые не потребуют прямого участия пользователя.
По завершению виртуальный компьютер перезагрузится и вы попадёте в уже установленную среду Ubuntu Linux.
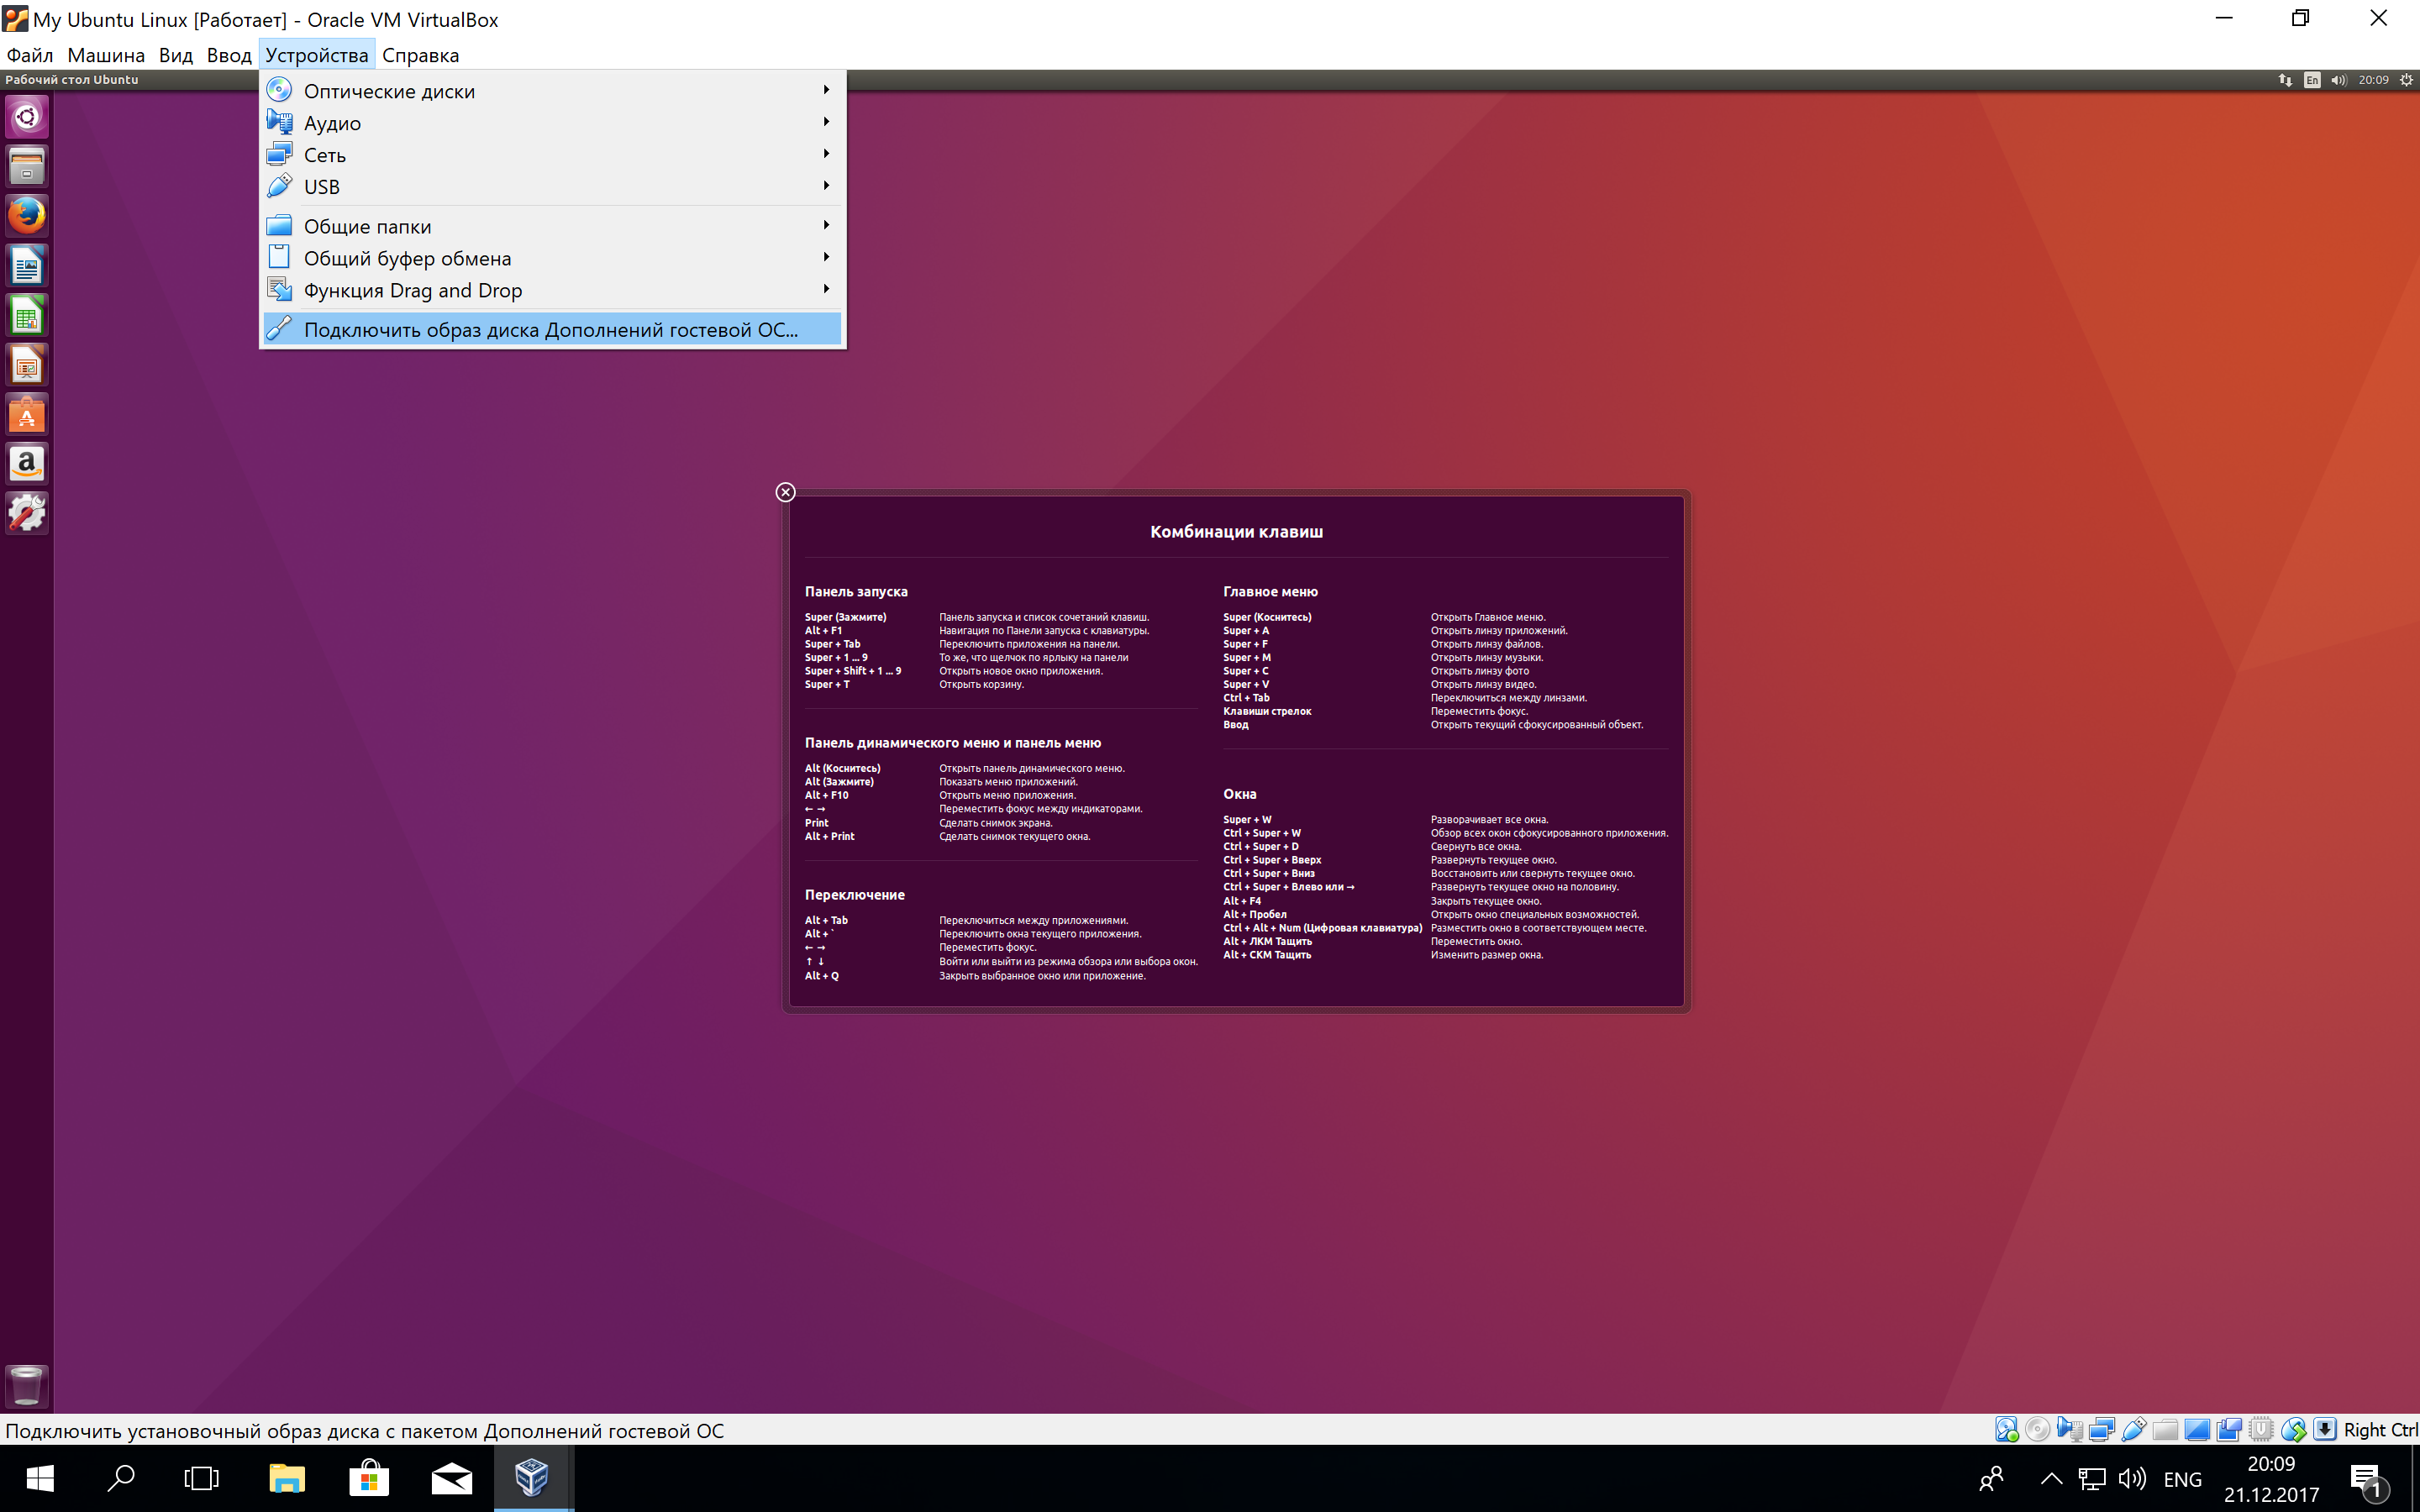
Но это ещё не всё. Весьма желательно установить так называемые «Дополнения гостевой ОС». Они содержат драйверы и прочие системные файлы, необходимые для наилучшей производительности и обеспечения дополнительных функциональных возможностей между виртуальной и гостевой операционными системами.
Выберите пункт меню «Устройства» программы VirtualBox, подпункт «Подключить образ диска Дополнений гостевой ОС…» и дождитесь предложение запустить приложение для автоматического запуска с виртуального привода.
Виртуальная ОС Ubuntu Linux установлена и готова к работе.
Ссылка на официальную документацию: Oracle VM VirtualBox User Manual
ОС Linux очень красивая система, имеет большое количество настроек для полного удовлетворения, полностью бесплатная, безопасная и к тому же потребляет меньше ресурсов чем Windows. Этого достаточно, чтоб установить Linux и попробовать им попользоваться перед тем, как принять решение, нужен он вам или нет!
P.S. Пишу после того, как написал этот пост! Запись вышла большая, но не стоит пугаться, все на самом деле очень просто. Следуйте пошагово и у вас все выйдет.
Для того, чтоб не удалять вашу основную систему я покажу вам как установить Linux на VirtualBox. В качестве примера будем устанавливать дистрибутив «Ubuntu», все остальные дистрибутивы (Linux Mint и т.д.) устанавливаются точно так же, поэтому порядок действий тот же!
Первым делом вам необходимо установить «Виртуал бокс» и установить в него плагины, после чего можем приступать к установке Линукс. Подробно не буду расписывать этот пункт, так как в прошлой записи я обо всем этом рассказывал, показывал и даже записал видео:
VM VirtualBox – Установка и настройка виртуальной машины
Где скачать Linux
Рекомендую выполнять загрузку операционных систем только с официальных сайтов. Забудьте про торренты, это не тот софт, который нужно качать таким образом. Ниже я оставлю ссылки на загрузку с официальных сайтов, где Вы можете скачать бесплатно ISO образ нужного вам дистрибутива:
- Ubuntu — https://ubuntu.com/download/desktop
- Linux Mint — https://linuxmint.com/download.php
- Manjaro — https://manjaro.org/download/
- Linux Lite — https://www.linuxliteos.com/download.php
Я оставил ссылки на эти дистрибутивы, потому что считаю их лучшими для новичков. Есть еще много интересных систем, но этого достаточно для того, чтоб начать изучать Linux и виртуальные машины с VirtualBox.
Создание виртуальной машины
После того как Вы установили Виртуал бокс и загрузили необходимый вам образ ISO, можно приступить к установке виртуальной машины:
- Откройте VirtualBox, нажмите «Создать», выберите тип системы и введите имя:
- Выделите ОЗУ для виртуальной машины, при этом не забывайте, что нужно оставить память для вашей основной ОС:
- Выберите «Создать новый виртуальный жесткий диск» и нажмите Далее.
- Выберите VHD (Virtual Hard Disk) и нажмите Далее.
- Выберите «Динамический виртуальный жесткий диск» и нажмите Далее.
- Укажите размер виртуального диска для вашей системы: 20 ГБ достаточно, но лучше поставьте 40 ГБ, чтоб у вас была возможность устанавливать разные программы:
Практически готово. Еще несколько настроек и можно приступать к установке ОС
- Выберите вашу систему и нажмите «Настроить»:
- Раздел «Система», вкладка «Процессор» выделите количество ядер вашего процессора (если у вас всего 2 ядра, выделите 1 ядро, если всего 4 ядра, выделите 2 и т.д.):
- Раздел «Дисплей»: включите 3D-ускорение и перетяните «Видеопамять» на максимум:
- Раздел «Носители»: Внизу нажмите «Добавить новый контроллер» и выберите «PIIX4 (Default IDE)»:
- Добавьте привод оптических дисков на созданном вами контроллере и нажмите «Оставить пустым»:
- Нажмите на привод «Пусто», затем «Оптический привод» нужно установить «Вторичный мастер IDE»:
- Нажмите на «Диск», выберите «Выбрать/Создать виртуальный оптический диск»:
- Нажмите «Добавить» и выберите ваш ISO образ с операционной системой:
- Выберите ваш ISO и нажмите «Выбрать»:
- Нажмите «ОК». У нас все готово к запуску!
Установка Ubuntu
Мы полностью установили и настроили виртуальную машину, осталось только запустить её и установить операционную систему. Для тех, кто ранее уже устанавливал Linux знает, что установка системы — это очень просто! Запускаем нашу машину:
Поздравляю! Если Вы сделали все правильно, у вас пошла установка Linux. Если Вы так же, как и я устанавливаете Ubuntu, после загрузки вам нужно выбрать язык и нажать «Установка Ubuntu»:
Поставьте везде галки и нажмите «Продолжить». Рекомендую выбрать «Обычная установка», также «Загрузить обновления во время установки…» и «Установить стороннее ПО»:
Следующим этапом будет «Тип установки»: Рекомендую выбрать первое (Стереть диск и установить Ubuntu), выберите и нажмите «Установить», после чего подтвердите свои действия нажав «Продолжить».
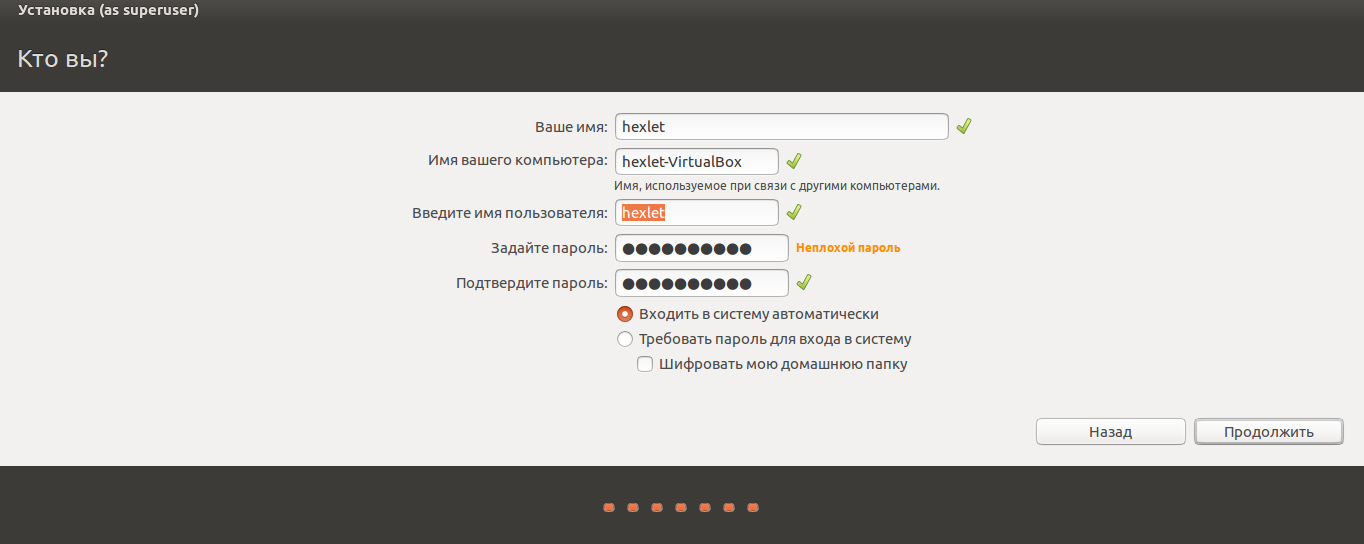
Кто Вы? На этой странице нужно ввести ваш логин и придумать пароль. Так же, Вы можете установить настройки входа в систему с паролем или без него. Нажмите «Продолжить»:
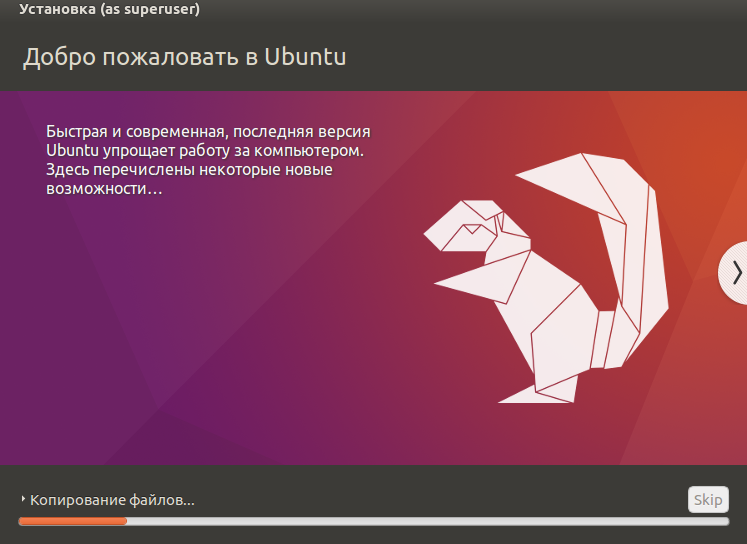
Практически все готово! Пока идет копирование файлов, Вы можете ознакомится с Ubuntu в познавательном слайдшоу. По завершению копирования Вы увидите «Установка Завершена», нажмите «Перезагрузить»:
Все готово! Можете приступить к знакомству с Ubuntu, но первым делом рекомендую поменять разрешение экрана. Для этого, нажмите на рабочем столе правой кнопкой мыши и выберите «Настройки дисплея», затем выберите нужное вам разрешение и нажмите «Применить»:
Видео
Если у вас остались какие-то вопросы – Welcome в комментарии!
Танки скачать World of Tanks стало невозможным из-за санкций, но сейчас РФ перекупила бизнес и можно и скачать и играть онлайн, переходи по ссылке там подробней
![]() Download Article
Download Article
![]() Download Article
Download Article
This wikiHow teaches you how to install Ubuntu Linux on a computer by using VirtualBox. VirtualBox is a program which allows you to install an operating system without changing your computer’s main operating system.
-
1
Open the Ubuntu website. Go to https://www.ubuntu.com/download/desktop in your computer’s web browser. You can download the Ubuntu disk image (also known as an ISO file) here.
-
2
Scroll down to the latest version of Ubuntu. You’ll find it near the bottom of the page.
Advertisement
-
3
Click Download. It’s a green button to the right of your selected version of Ubuntu. Doing so takes you to the support page.
-
4
Scroll down and click Download Now. This link is in the bottom-left corner of the page.
-
5
Make sure that Ubuntu begins downloading. The Ubuntu ISO should begin downloading immediately, but if it doesn’t, you can click the download now link at the top of the page. While the Ubuntu ISO downloads, you’ll have plenty of time to set up your virtual machine in VirtualBox.


Advertisement
-
1
Install VirtualBox if you haven’t yet done so. If you don’t already have VirtualBox installed on your Windows or Mac computer, you’ll need to install it before proceeding.
-
2
Open VirtualBox. Double-click (or click once on a Mac) the VirtualBox app icon.
-
3
Click New. It’s a blue badge in the upper-left corner of the VirtualBox window. Doing so opens a pop-up menu.
-
4
Enter a name for your virtual machine. Type whatever you want to name your virtual machine (e.g., Ubuntu) into the «Name» text field that’s near the top of the pop-up menu.
-
5
Select Linux as the «Type» value. Click the «Type» drop-down box, then click Linux in the resulting drop-down menu.
-
6
Select Ubuntu as the «Version» value. Ubuntu should be selected by default after you set the «Type» value to Linux, but if it isn’t, click the «Version» drop-down box and click Ubuntu (64-bit) before proceeding.
-
7
Click Next. It’s at the bottom of the menu.
-
8
Select an amount of RAM to use. Click and drag the slider left or right to decrease or increase the amount of RAM that VirtualBox will have available for your Ubuntu virtual machine.
- The ideal amount of RAM will automatically be selected when you get to this page.
- Make sure not to increase the RAM into the red section of the slider; try to keep the slider in the green.
-
9
Click Next. It’s at the bottom of the menu.
-
10
Create your virtual machine’s virtual hard drive. The virtual hard drive is a section of your computer’s hard drive space which will be used to store your virtual machine’s files and programs:
- Click Create
- Click Next
- Click Next
- Select an amount of space to use.
- Click Create
-
11
Make sure that your Ubuntu file is done downloading. Once the Ubuntu ISO finishes downloading, you can proceed with installing it to VirtualBox.


Advertisement
-
1
Double-click your virtual machine’s name. It’s on the left side of the VirtualBox window. Doing so will open a menu.
-
2
Click the folder-shaped icon. This icon is in the lower-right side of the menu. A new window in which you can select the Ubuntu ISO will open.
-
3
Select your Ubuntu ISO. Go to the folder into which the Ubuntu ISO file downloaded (e.g., Desktop), then click the ISO file to select it.
-
4
Click Open. It’s in the bottom-right corner of the window. Doing so opens the Ubuntu ISO file in VirtualBox.
-
5
Click Start. This option is at the bottom of the menu. Ubuntu will begin running.
-
6
Click Install Ubuntu. It’s on the right side of the VirtualBox window.
-
7
Check both boxes on the «Preparing to install Ubuntu» page. This will ensure that everything Ubuntu needs to run will be installed.
-
8
Click Continue. It’s in the bottom-right corner of the page.
-
9
Check the «Erase disk and install Ubuntu» box. This may sound scary, but don’t worry—nothing on your computer will be erased.
-
10
Click Install Now. It’s in the bottom-right corner of the page.
-
11
Click Continue when prompted. This confirms that you understand that the virtual machine’s virtual drive will be «erased» (there’s nothing on it anyway) and begins the Ubuntu installation process.


Advertisement
-
1
Select a time zone. Click a section that correlates with your position on the map.
-
2
Click Continue. It’s in the bottom-right corner of the page.
-
3
Enable the on-screen keyboard. Click the person-shaped icon in the upper-right side of the window, then click the «Screen Keyboard» switch to place a keyboard on the screen. Since Ubuntu will need to install drivers to work with your keyboard, you won’t be able to use your keyboard until it’s fully installed.
-
4
Enter your name. Do so in the «Your name» text box at the top of the window.
- Entering a name will also create a computer name for your virtual machine, but you can create your own computer name as well by typing it into the «Your computer’s name» box.
-
5
Enter a username. In the «Pick a username» text box, type in the username that you want to use.
-
6
Create a password. Type your preferred password into the «Choose a password» text box, then re-type it into the «Confirm your password» text box.
-
7
Click Continue. It’s at the bottom of the page.
- You can first select login options below the «Confirm your password» text field if need be.
-
8
Wait for Ubuntu to finish installing. This process may take anywhere from a couple of minutes to half an hour depending on the speed of your computer.
- You won’t need to do anything during the installation process.
-
9
Restart the virtual machine. Once you see the Restart Now button, do the following: click the Exit button in the upper-right corner of the window (Windows) or the upper-left corner of the window (Mac), check the «Power off the machine» box, click OK, and then double-click the virtual machine’s name.
-
10
Log into your computer. Once your Ubuntu virtual machine is back on, select your name, then enter your password and click Sign In. Ubuntu will load your desktop as though you were using a separate computer.


Advertisement
Add New Question
-
Question
Will choosing the erase disk option while installing Ubuntu remove my original Windows operating system?

When you’re asked this question inside the VirtualBox, it’s talking about the virtual disk, not your physical disk. And since the virtual disk is «brand new», there is nothing there that you should worry about. There is no risk to your Windows system.
-
Question
If I install Ubuntu from VirtualBox, will it erase all content on my C drive?
I was worried about this too. Ubuntu will format/erase only the virtual disk space you allocated for the Virtual Machine, not your whole C: drive.
-
Question
How do I get the 64-bit option on Virtualbox? I only have the 32-bit option.
To use 64-bit guests on VirtualBox, you need to have a CPU that supports Virtualization. Then, make sure that feature is turned on in the BIOS.
See more answers
Ask a Question
200 characters left
Include your email address to get a message when this question is answered.
Submit
Advertisement
-
You can install programs and apps on your virtual machine, though you’ll need to make sure that doing so doesn’t cause your virtual machine to exceed the amount of space in its virtual hard drive.
Thanks for submitting a tip for review!
Advertisement
-
Make sure your hard disk has enough space to create the virtual hard disk. For example, if VirtualBox suggests you need an 8 GB virtual hard disk, make sure you have more than 8 GB of free space on your computer.
-
It’s normal for VirtualBox operating systems to run sluggishly since you’re essentially operating two different systems on one computer’s worth of hardware.
Advertisement
About This Article
Article SummaryX
1. Download the latest version of Ubuntu.
2. Open VirtualBox and click New.
3. Enter a name and select Linux as the type.
4. Select Ubuntu 64 as the version.
5. Choose an amount of RAM to allocate.
6. Click Create a virtual hard disk now.
7. Double-click the virtual machine and select the Ubuntu ISO.
8. Click Install Ubuntu.
9. Click Erase disk and install Ubuntu.
For more tips, including how to navigate the setup for your new Ubuntu machine, read on!
Did this summary help you?
Thanks to all authors for creating a page that has been read 1,581,732 times.