-
Contents
-
Table of Contents
-
Troubleshooting
-
Bookmarks
Quick Links
GB
IE
MT
DETAILED
INSTRUCTIONS
FOR USE OF GLASS
CERAMIC BUILT-IN
INDUCTION COOKING
HOB
www.gorenje.com
Related Manuals for Gorenje Simplicity IT643SYW
Summary of Contents for Gorenje Simplicity IT643SYW
-
Page 1
DETAILED INSTRUCTIONS FOR USE OF GLASS CERAMIC BUILT-IN INDUCTION COOKING www.gorenje.com… -
Page 2
The telephone number can be found on the invoice or on the delivery note. Instructions for use are also available at our website: www.gorenje.com / < http://www. gorenje.com /> Important information Tip, note… -
Page 3: Table Of Contents
CONTENTS INTRODUCTION IMPORTANT SAFETY INSTRUCTIONS BUILT-IN GLASS CERAMIC INDUCTION COOKING HOB Technical specifications PREPARING THE APPLIANCE FOR BEFORE USING THE APPLIANCE FOR THE FIRST TIME THE FIRST USE COOKING HOB 10 INDUCTION COOKING SURFACE OPERATION 10 Glass ceramic cooking surface Power saving tips Pan recognition 12 Induction cooking zone operating principle…
-
Page 4: Important Safety Instructions
IMPORTANT SAFETY INSTRUCTIONS CAREFULLY READ THE INSTRUCTIONS AND SAVE THEM FOR FUTURE REFERENCE. This appliance can be used by children aged from 8 years and above and persons with reduced physical, sensory or mental capabilities or lack of experience and knowledge if they have been given supervision or instruction concerning use of the appliance in a safe way and understand the hazards involved.
-
Page 5
CAUTION: The cooking process has to be supervised. A short term cooking process has to be supervised continuously. WARNING: Unattended cooking on a hob with fat or oil can be dangerous and may result in fire. NEVER try to extinguish a fire with water, but switch off the appliance and then cover flame e.g. -
Page 6
The appliance is intended for household Using the glass ceramic hob as a storage use. Do not use it for any other purpose, area may result in scratches or other e.g. for room heating. damage to it. Never heat food in aluminium foil or in plastic containers on the cooking The appliance may only be connected to hob. -
Page 7: Built-In Glass Ceramic Induction Cooking Hob
BUILT-IN GLASS CERAMIC INDUCTION COOKING HOB (DESCRIPTION OF EQUIPMENT AND FUNCTIONS – DEPENDING ON THE MODEL) Since the appliances for which these instructions were drawn up may have different equipment, some functions or equipment may be described in the manual that may not be present in your appliances.
-
Page 8: Technical Specifications
TECHNICAL SPECIFICATIONS (DEPENDING ON THE MODEL) A Serial number B Code/ID C Type D Brand E Model F Technical data G Compliance symbols The rating plate with basic information on the appliance is located on the bottom side of the cooking hob. Information on appliance type and model can be found on the warranty sheet.
-
Page 9: Before Using The Appliance For The First Time
BEFORE USING THE APPLIANCE FOR THE FIRST TIME If your hob has a glass ceramic surface, clean it with a damp cloth and some washing- up liquid. Do not use aggressive cleaners, such as abrasive cleaners that could cause scratches, abrasive dishwashing sponges, or stain removers. During initial use, characteristic «new appliance smell»…
-
Page 10: Induction Cooking Surface
INDUCTION COOKING SURFACE GLASS CERAMIC COOKING SURFACE — The hob is resistant to temperature changes. — The hob is also impact-resistant. — Using the glass ceramic hob as a storage area may result in scratches or other damage to it. — Do not use the glass ceramic hob if it is cracked or broken.
-
Page 11: Power Saving Tips
POWER SAVING TIPS — When purchasing cookware, note that the diameter indicated on the pan usually pertains to the upper edge or the lid, which is normally larger than the diameter of the pan bottom. — If a dish takes a long time to cook, use a pressure cooker. Make sure there is always sufficient liquid in the pressure cooker.
-
Page 12: Induction Cooking Zone Operating Principle
INDUCTION COOKING ZONE OPERATING PRINCIPLE — The cooking hob is fitted with highly efficient induction cooking zones. The heat is generated directly in the bottom of the pan where it is needed the most. This avoids any losses through the glass ceramic surface.
-
Page 13: Induction Cookware
INDUCTION COOKWARE COOKWARE SUITABLE FOR AN INDUCTION HOB — The induction will work correctly if you use suitable cookware. — Make sure the pot or pan is in the middle of the cooking zone. — Suitable cookware: cookware made of steel, enamel-coated steel pans, or cast iron pans.
-
Page 14: Operating The Cooking Hob
OPERATING THE COOKING HOB CONTROL UNIT (depending on the model) C1C2 Settings sensor keys: Hob on/off key A1 On/off/child lock indicator light Lock/child lock key Defrosting/reheating key C1 Defrosting indicator light C2 Reheating indicator light C3 Pan position recognition with automatic bridging of cooking zones Cooking zone controls Timer functions Stop/go/memory function…
-
Page 15: Switching On The Hob
SWITCHING ON THE HOB Place the cookware onto the cooking hob. Touch the on/off key (A) to switch on the hob. «0» will appear on all cooking zone displays. A brief acoustic signal will be emitted and an indicator light will light up above the (A1) key.
-
Page 16: Automatic Rapid Heating
AUTOMATIC RAPID HEATING All cooking zones are fitted with a special mechanism that sets the cooking power to maximum at the start of the cooking process, regardless of the actual power setting. Automatic rapid heating function temporarily increases the operating power to quickly heat up the pan bottom (9).
-
Page 17: Bridged Cooking Zone (Depending On The Model)
BRIDGED COOKING ZONE (depending on the model) • Some models allow combining two cooking zones into a single large connected cooking zone. Thus, a large oval pan or a griddle can be placed on the combined cooking field. The pan has to be large enough to cover the centres of the upper and lower cooking zone.
-
Page 18
PAN POSITION RECOGNITION WITH AUTOMATIC BRIDGING OF COOKING ZONES (Only with some models.) Pan position recognition is activated automatically 10 seconds after the appliance is switched on. If there is a pan on the hob, the pan recognition function will recognize its position and automatically bridge the cooking zones depending on the size of the pan. -
Page 19: Power Zone With The Power Boost Option
POWER ZONE WITH THE POWER BOOST OPTION In some models, a power boost can be activated on all cooking zones indicated with «P» or «»». Power boost is not active for all cooking zones simultaneously. This allows faster heating of both the cookware and the food. The function allows temporary cooking at maximum power for up to 5 minutes.
-
Page 20: Child Lock
CHILD LOCK Child lock may be activated on the hob to prevent the appliance from being easily switched on. Locking the cooking hob controls The hob must be switched off. Touch the on/off key and hold it for 3 seconds. «L» will appear on the cooking zone power displays.
-
Page 21: Defrosting/Reheating
DEFROSTING/REHEATING Press the (C) key to activate the defrosting/reheating function. When defrosting, a temperature of 42 °C is maintained. At reheating, food temperature is maintained at 70 °C. Activating the defrosting function Press the (A) key to switch on the hob. Place a suitable pan on the selected cooking zone.
-
Page 22: Timer Functions
TIMER FUNCTIONS Cooking time can be set from 1 to 99 minutes. This function allows two operating modes: L L1 L L1 L1 M F1 L1 M F1 A MINUTE MINDER Touch the timer/minute minder key (K) to activate the timer. «00» will appear on the timer display (O).
-
Page 23: Pausing The Cooking Process With Stop & Go
Changing the cooking time — Remaining cooking time can be changed at any time during cooking. — Touch the power-off timer key (K) to select the timer display for the desired cooking zone. The relevant indicator light (L1) will flash. — Touch the (L) or (M) key to set a new desired cooking time.
-
Page 24: Memory Function
MEMORY FUNCTION The memory function allows restoring the most recently selected settings in 5 seconds after the hob is switched off. This is convenient when, for example, you accidentally press the on/off key and switch off the entire hob, or if the cooking hob is switched off automatically due to some spilt liquid.
-
Page 25: Switching Off A Cooking Zone
SWITCHING OFF A COOKING ZONE To switch off a cooking zone, use the relevant (H) key to set the value to «»0″». To quickly switch off the cooking zone, touch the relevant (H) and (I) keys simultaneously. You will hear a short beep, and «»0″»…
-
Page 26: Switching Off The Entire Cooking Hob
MAXIMUM COOKING TIME For safety, the cooking time for each cooking zone is restricted to a maximum duration. Maximum cooking time depends on the most recently set power level. If the power level is not changed, the cooking zone will be switched off automatically after the maximum cooking duration is reached.
-
Page 27: User Settings
USER SETTINGS SETTING THE ACOUSTIC SIGNAL AND LOCK PARAMETERS You can adjust the volume of the acoustic signal, duration of acoustic alarm, total maximum appliance power, and automatic lock settings. To activate the parameter settings menu, press the pause key (F) when the appliance is switched off, and hold it for 3 seconds.
-
Page 28
Acoustic alarm duration «So» The following values can be set: 05 on the display = 5 seconds 1,0 on the display = 1 minute 2,0 on the display = 2 minutes (default) Child safety lock «Lo» If the automatic lock function is activated in the user settings mode, the cooking hob will be automatically locked every time it is switched off. -
Page 29: Maintenance & Cleaning
MAINTENANCE & CLEANING Be sure to unplug the appliance from the power supply and wait for the appliance to cool down. Children should not clean the appliance or perform maintenance tasks without proper supervision. After each use, wait for the glass ceramic surface to cool down and clean it. Otherwise, all remaining impurities will burn onto the hot surface the next time you use the hob.
-
Page 30
Hold the scraper at the correct angle (45° to 60°). Gently press the scraper against the glass and slide it over the signage to remove the dirt. Make sure the plastic handle of the scraper (in some models) does not come into contact with a hot cooking zone. -
Page 31: Troubleshooting Table
TROUBLESHOOTING TABLE NOISE AND ITS CAUSES DURING INDUCTION COOKING Noises and sounds Cause Solution Induction- Induction technology is based on This is normal and it is not a generated the properties of some metals under result of any malfunction. operating noise electromagnetic effect.
-
Page 32
SAFETY FUNCTIONS AND ERROR DISPLAY The cooking hob is fitted with overheating sensors. These sensors can automatically switch off any cooking zone or the entire hob temporarily. Error, possible cause, solution • Continuous beep and flashing on the display. — Water spilt over sensor surface, or an object placed over the sensors. Wipe the sensor surface. -
Page 33: Installing A Built-In Hob
INSTALLING A BUILT-IN HOB — Use of solid wood corner trims on worktops behind the cooking zone is only allowed if the clearance between the trim and the cooking hob is no smaller than indicated on the installation plans. min 20 min 40 490-492 min 600…
-
Page 34
595-600 520-525 min 20 min 40 490-492 min 600 min 50 560-562 60cm 795-800 520-525 min 20 min 40 490-492 min 600 min 50 750-752 80cm 520-525 min 20 min 40 490-492 min 600 min 50 860-862 90cm… -
Page 35
AIR VENTS IN THE LOWER KITCHEN CABINET — Normal operation of the induction cooking hob electronic components requires sufficient air circulation. A Lower cabinet with a drawer — There must be an opening with a height of no less than 140 mm along the entire width of the cabinet in the cabinet rear wall. -
Page 36
B Lower cabinet with an oven — Installing an oven under the induction hob is possible for oven types EVP4.., EVP2.., EVP3.. with a cooling fan. Before installing the oven, the kitchen cabinet rear wall has to be removed in the area of the opening for installation. In addition, there should be an opening of at least 6 mm in the front side, along the entire width of the cabinet. -
Page 37
FLUSH-MOUNT INSTALLATION INTO THE WORKTOP Appliances without faceted edges or decorative frames are suitable for flush mounting. brushed edge faceted edge decorative frame 1. Installing the appliance The appliance may only be installed into a temperature- and water-resistant countertop, such as a countertop made of (natural) stone (marble, granite), or solid wood (the edges along the cut-out have to be sealed). -
Page 38
1. Silicone sealant, 2. Sealing tape Pay particular attention to built-in dimensions with (natural) stone countertops. When choosing the silicone sealant, observe the countertop material and consult the countertop manufacturer. Use of inappropriate silicone sealants can result in permanent discolouration of some parts. 2. -
Page 39
Ceramic, wooden, or glass countertop 1 — Countertop 2 — Appliance 3 — Slot 4 — Wooden frame, thickness 16 mm. Given the margin of error (tolerance) for the glass ceramic plate of the appliance, and the cut-out in the countertop, the slot is adjustable (min. 2mm). Install the wooden frame 5.5mm below the upper edge of the countertop (see figure). -
Page 40
FLUSH-MOUNT INSTALLATION INTO THE WORKTOP — FLUSH MOUNT (depending on the model) min 40 524-525 x min 600 490-492 min 50 283-285 304-305 30cm min 40 524-525 min 600 490-492 min 50 560-562 599-600 60cm min 40 524-525 490-492 min 600 min 50 750-752 799-800… -
Page 41
min 40 524-525 490-492 min 600 min 50 860-862 904-905 90 cm If the oven is installed under a flush-mounted cooking hob, then the worktop thickness should be at least 40 mm. -
Page 42
FITTING THE FOAM GASKET Some appliances come with the gasket already fitted! Before installing the appliance into a kitchen worktop, attach the foam gasket supplied with the appliance to the bottom side of the glass ceramic hob. — Remove the protective film from the gasket. — Attach the gasket to the bottom side of the glass (2–3 mm away from the edge). -
Page 43: Connecting The Cooking Hob To The Power Mains
CONNECTING THE COOKING HOB TO THE POWER MAINS — Power mains protection must conform to the relevant regulations. — Before connecting the appliance, make sure the voltage indicated on the rating plate conforms to the voltage in your power mains. — There should be a switching device in the electrical installation that can disconnect all poles of the appliance form the power mains, with a minimum clearance of 3 mm between the contacts when open.
-
Page 44
CONNECTION DIAGRAM: Jumpers (connecting bridges) are placed in the dedicated slot on the clamp. POWER CORD The following may be used for connection: • PVC insulated connection cables type H05 VV-F or H05V2V2-F with yellow-and-green protective conductor, or other equivalent or superior cables. -
Page 45: Disposal
DISPOSAL Packaging is made of environmentally friendly materials that can be recycled, disposed of, or destroyed without any hazard to the environment. To this end, packaging materials are labelled appropriately. The symbol on the product or its packaging indicates that the product should not be treated as normal household waste.
-
Page 48
BI4_TI_SY2.1 en (05-21)
21
782122
Чтобы выключить варочную панель, нажмите
на сенсор ВКЛ./ВЫКЛ. (А). Раздастся звуковой
сигнал, все индикаторы и дисплеи погаснут,
кроме дисплеев конфорок, которые еще остаются
горячие. На этих дисплеях будет гореть символ Н.
ВЫКЛЮЧЕНИЕ ВАРОЧНОЙ ПАНЕЛИ
A
A1
1
АВТОМАТИЧЕСКОЕ ОТКЛЮЧЕНИЕ
Если на сенсоры производится длительное воздействие (на панели управления разлилась жидкость или
лежит предмет), через 10 секунд все конфорки выключатся. На дисплее мигает символ
.
Если в течение 2 минут не убрать предмет или жидкость, варочная панель автоматически выключится.
Последние настройки можно восстановить с помощью функции паузы StopGo.
ПОЛЬЗОВАТЕЛЬСКИЕ НАСТРОЙКИ ЗВУКОВОГО
СИГНАЛА И АВТОБЛОКИРОВКИ
Вы можете поменять громкость и длительность звукового сигнала и настройку автоблокировки в
пользовательских настройках.
В меню пользовательских настроек можно войти в течение двух минут после подключения прибора
к электросети, и прибор должен быть выключен. Нажмите и удерживайте 3 секунды сенсор функции
паузы StopGo. На дисплее времени отобразится первый параметр — Uo, означающий громкость
звукового сигнала. Выбор параметров производится сенсором таймера (M,N).
Uo Громкость звукового сигнала
So Длительность звукового сигнала при оповещении
Lo Автоблокировка
-
Инструкции
-
Варочные панели
- Gorenje

Инструкция к Gorenje EC642CLI
PDF, 2.1 Мб
Схема встраивания
JPG, 257.45 Кб
Информация о приборе
PDF, 203.97 Кб

Инструкция к Gorenje EC642CLB
PDF, 2.1 Мб
Схема встраивания
JPG, 257.45 Кб
Информация о приборе
PDF, 201.76 Кб

Инструкция к Gorenje ECT648ORAW
PDF, 2.69 Мб
Схема встраивания
JPG, 256.25 Кб
Информация о приборе
PDF, 188.2 Кб

Инструкция к Gorenje ECT322ORAW
PDF, 2.69 Мб
Схема встраивания
JPG, 277.87 Кб
Информация о приборе
PDF, 187.72 Кб

Инструкция к Gorenje ECT648ORAB
PDF, 2.69 Мб
Схема встраивания
JPG, 256.25 Кб
Информация о приборе
PDF, 190.21 Кб

Инструкция к Gorenje IT640BSC
PDF, 2.38 Мб
Руководство по установке
PDF, 138.74 Кб
Схема с размерами для Gorenje IT640BSC
JPEG, 33.56 Кб

Инструкция к Gorenje ECT641BSC
PDF, 2.7 Мб
Схема встраивания с размерами
JPEG, 290.22 Кб

Инструкция к Gorenje IT321BCSC
PDF, 2.83 Мб
Схема встраивания с размерами
JPEG, 32.8 Кб

Инструкция к Gorenje GC321B
PDF, 5.88 Мб
Схема встраивания с размерами
JPEG, 35.52 Кб

Инструкция к Gorenje GT642SYW
PDF, 2.05 Мб

Инструкция к Gorenje IK640CLB
PDF, 1 Мб
Схема встраивания с размерами
JPEG, 36.82 Кб

Инструкция к Gorenje GCE691BSC
PDF, 3.74 Мб
Схема встраивания с размерами
JPEG, 43.26 Кб

Инструкция к Gorenje GT642SYB
PDF, 2.05 Мб

Инструкция к Gorenje IS646BG
PDF, 3.38 Мб
Схема встраивания с размерами
JPEG, 32.53 Кб

Инструкция к Gorenje IT645BCSC
PDF, 2.83 Мб
Схема встраивания с размерами
JPEG, 35.48 Кб

Инструкция к Gorenje IT640WSC
PDF, 2.38 Мб
Руководство по установке
PDF, 138.74 Кб
Схема встраивания с размерами
JPEG, 34.19 Кб
(скачивание инструкции бесплатно)
Формат файла: PDF
Доступность: Бесплатно как и все руководства на сайте. Без регистрации и SMS.
Дополнительно: Чтение инструкции онлайн

15
Страница:
(1 из 14)
навигация

1

2

3

4

5

6

7

8

9

10

11

12

13

14
Оглавление инструкции
- Страница 1 из 15
15 - Страница 2 из 15
Уважаемый покупатель! Данная газовая варочная панель предназначена для использования в домашнем хозяйстве. Упаковка изготовлена из экологически чистых материалов, которые можно без ущерба для окружающей среды подвергать переработке, складировать на специальных полигонах для хранения отходов и - Страница 3 из 15
ТЕХНИЧЕСКИЕ УКАЗАНИЯ И МОНТАЖ Важные предостережения • Встраивать прибор в элемент кухонной мебели, производить подключение к электросети и источнику газа может только квалифицированный специалист. • Во время работы прибора в помещении увеличивается образование тепла и влаги. При длительном - Страница 4 из 15
УСТАНОВКА Важные предостережения A (mm) B (mm) C (mm) D (mm) E (mm) F (mm) G (mm) G6SY2W G6SY2B GT6SY2B GT6SY2W 600 510 560 480 45 3 50 585 510 560 480 40 9 50 • Встраивать прибор в элемент кухонной мебели, производить подключение к электросети и источнику газа может только квалифицированный - Страница 5 из 15
Наклейка вспененного уплотнителя Перед встраиванием прибора в столешницу с нижней стороны стеклокерамической или стеклянной варочной панели необходимо приклеить уплотнитель, который прилагается в комплекте (см. рис.). Встраивание прибора без уплотнителя запрещено! Чтобы наклеить уплотнитель: – - Страница 6 из 15
• При подключении варочной панели к электросети необходимо предусмотреть размыкающее устройство с разомкнутыми контактами на всех полюсах. Уровень защитного устройства будет не ниже, чем уровень перенапряжения категории III. • Варочная панель может быть встроена между элементами кухонной мебели, - Страница 7 из 15
Процесс подключения • Подключение к источнику газа производится в соответствии действующими предписаниями и условиями подключения местного газоснабжающего предприятия. • С нижней стороны прибора расположена трубка газопровода для подключения к источнику газа с внешней резьбой ISO7-1 R1/2. • В - Страница 8 из 15
новых настроек. Проверьте функциональность и герметичность прибора. Элементы настройки на другой вид газа • Снимите с варочной поверхности решетки и горелки вместе с крышками. • Форсунка горелки двойной горелки находится под защитной пластинкой форсунки. • Снимите переключатели вместе с - Страница 9 из 15
Плита с форсунками Горелка Номинальная тепловая мощность(кВт) Ø ИНЖЕКТОР (мм) G30/G31 28..30/30-37mbar G20 20mbar G20 13mbar Ø БАЙПАСС (мм) G30/G31 28..30/30-37mbar G20 20mbar G20 13mbar Важные предостережения A 1.00 SR 1.75 MW 3.30 0.50 0.72 — X 0.84 0.65 0.97 — Z 1.03 0.85 1.28 — T 1.45 0.27 REG. - Страница 10 из 15
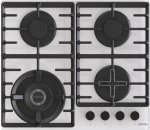
ИНСТРУКЦИЯ ПО ЭКСПЛУАТАЦИИ И ОБСЛУЖИВАНИЮ ОПИСАНИЕ ПРИБОРА 1. Газовая варочная зона передняя левая 2. Газовая варочная зона задняя левая 3. Газовая варочная зона задняя правая 4. Газовая варочная зона передняя правая 7. Панель управления плитой Элементы управления для газовых варочных зон Газовый - Страница 11 из 15
Для наиболее эффективного использования горелок используйте посуду с плоским дном с диаметром, соответствующим используемой горелке. Для кастрюль и сковородок меньшего диаметра (чайники для кофе и чая, и т.д.) мощность используемой горелки должна регулироваться, чтобы обеспечить, что пламя не - Страница 12 из 15
ОЧИСТКА И УХОД Для очистки варочной панели не используйте очистители высокого давления и пароструйные очистители, так как это может вызвать короткое замыкание и привести к удару электрическим током. • Очищайте прибор регулярно, желательно после каждого использования, предварительно охладив его. • - Страница 13 из 15
Стеклокерамические поверхности Рис.1 Рис.2 Рис.3 Рис.4 Рис.5 Очищайте варочную поверхность каждый раз после ее использования(дождитесь, пока она остынет!), иначе даже малейшие загрязнения при следующем использовании будут пригорать к нагретой поверхности. Для регулярного ухода за стеклокерамической - Страница 14 из 15
Специальные предостережения и оповещения о неисправностях Важная информация ▪ ▪ ▪ ▪ В течение гарантийного периода ремонт прибора может производить только специалист авторизованного сервисного центра! Перед ремонтом отключите прибор от электросети, выкрутив предохранитель или выключив главный - Страница 15 из 15
Инструкции и руководства похожие на GORENJE Simplicity G 6 SY2B
Другие инструкции и руководства из категории встраиваемая газовая варочная панель
© 2023 manuals-help.ru, Все права защищены
|
Код: 113621 Извините, товара сейчас нет в наличии
Бесплатная доставка
Извините, товара сейчас нет в наличии Сравнить Новости интернет-магазина «Лаукар»:28.03.2023 22.02.2023 13.02.2023 Дополнительная информация в категории Варочная панель газовая:Встраиваемые варочные панели — словарь терминов Таблица Авторизованных сервисных центров по брендам. Описание Инструкция Отзывы (0) В интернет-магазине бытовой техники «Лаукар» Вы можете скачать инструкцию к товару Варочная панель газовая Gorenje Simplicity GTW 641 SYW совершенно бесплатно. Все инструкции, представленные на сайте интернет-магазина бытовой техники «Лаукар», предоставляются производителем товара. Для того чтобы скачать инструкцию, Вам необходимо нажать на ссылку «скачать инструкцию», расположенную ниже, а в случае, если ссылки нет, Скачать инструкцию Смотреть инструкцию
Фирма-производитель оставляет за собой право на внесение изменений в конструкцию, дизайн и комплектацию товара: Варочная панель газовая Gorenje Simplicity GTW 641 SYW. Пожалуйста, сверяйте информацию о товаре с информацией на |