
CC-MC200W
RU
1
Перед эксплуатацией велокомпьютера полностью
прочтите настоящее руководство и сохраните его
для дальнейшего использования.
На нашем веб-сайте можно ознакомиться с под-
робными инструкциями и учебными видеоматери-
алами, а также загрузить руководство пользовате-
ля.
Предупреждение / Внимание!
• Не концентрируйте внимание на компьютере во время поездки. Со-
блюдайте правила безопасности!
• Надежно закрепите магнит, датчик и крепеж. Периодически прове-
ряйте надежность их крепления.
• Если ребенок проглотит батарею, незамедлительно обратитесь за
медицинской помощью к врачу.
• Не оставляйте велокомпьютер на солнце в течение длительного
периода времени.
• Не разбирайте велокомпьютер.
• Не допускайте падений велокомпьютера во избежание поломки.
• Если компьютер установлен на велосипеде, и есть необходимость
изменить режим и запустить или остановить таймер, нажмите
кнопку (четыере точки) внизу дисплея или одновременно SSE. Не
надавливайте сильно на эту область: это может привести к некор-
ректной работе компьютера и даже поломке.
• Отрегулируйте дисковый регулятор крепежа FlexTight™ вручную.
Будьте внимательны: при сильной затяжке возможно повреждение
резбы на крепеже.
• Для очистки компьютера, крепежа или датчика не пользуйтесь рас-
творителями и средствами, содержащими спирт и бензол.
• Утилизируйте использованные батареи в соответствии с местным
законодательством.
• Изображение на ЖК-экране может искажаться при просмотре че-
рез поляризованные солнцезащитные линзы.
Беспроводной датчик
Датчик предназначен для получения сигнала на расстоянии до 70 см
(большее расстояние повышает вероятность помех и ошибок). При ре-
гулировке положения датчика обратите внимание на следующее:
• Если расстояние между датчиком и компьютером слишком боль-
шое, то компьютер не сможет принимать сигналы. Эффективность
передачи сигнала может сократиться из-за понижения температу-
ры окружающей среды или из-за разряженных батарей.
• Сигнал может приниматься только в том случае, если задняя па-
нель компьютера обращена к датчику.
Следующие обстоятельства могут стать причиной помех и ошибок в
получении данных:
• Близость телевизора, ПК, радиоприемников, двигателей; нахожде-
ние в автомобиле или поезде.
• Близость железнодорожных путей и переездов, телевизионных
станций и радиолокационных баз.
• Близость других беспроводных устройств.
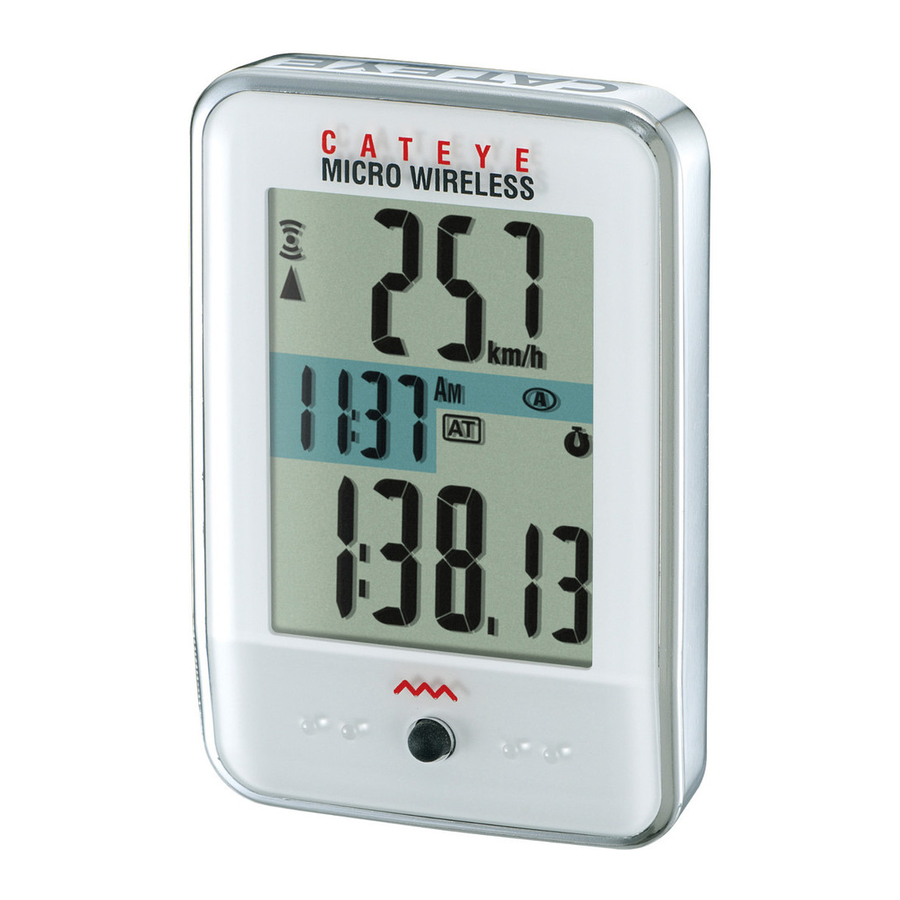
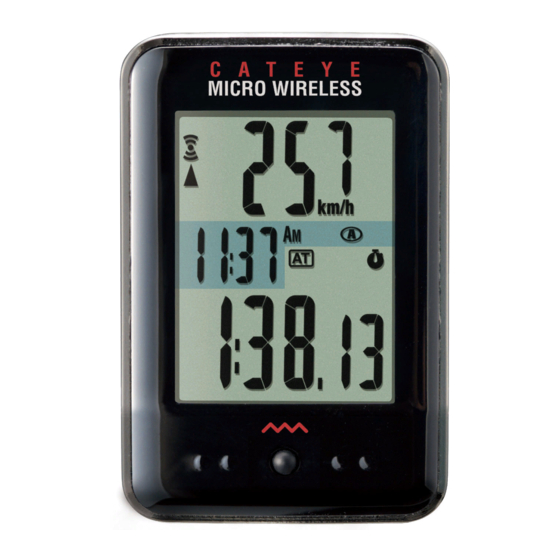
CATEYE
MICRO Wireless
CYCLOCOMPUTER
CC-MC200W
Cateye MICRO Wireless CC-MC200W — Cyclocomputer Manual
Before using the computer, please thoroughly read this manual and keep it for future reference.
Please visit our website, where detailed instructions with movies are available and the instruction manual can be downloaded.
- Do not concentrate on the computer while riding. Ride safely!
- Install the magnet, sensor, and bracket securely. Check these periodically.
- If a child swallows a battery, consult a doctor immediately.
- Do not leave the computer in direct sunlight for a long period of time.
- Do not disassemble the computer.
- Do not drop the computer to avoid malfunction or damage.
- When using the computer installed on the bracket, change the MODE by pressing on the four dots below the screen, or by pressing on the SSE simultaneously, to start or stop the timer. Pressing hard on other areas may result in malfunction or damage to the computer.
- Be sure to tighten the dial of the FlexTight™ bracket by hand. Tightening it strongly using a tool, etc. may damage the screw thread.
- When cleaning the computer, bracket and sensor, do not use thinners, benzene, or alcohol.
- Dispose of used batteries according to local regulations.
- LCD screen may be distorted when viewed through polarized sunglass lenses.
Wireless Sensor
The sensor was designed to receive signals within a maximum range of 70 cm, to reduce chance of interference. When adjusting the wireless sensor, note the following:
- Signals cannot be received if the distance between the sensor and the computer is too large. The receiving distance may be shortened due to low temperature and exhausted batteries.
- Signals can be received only when the back of the computer is facing the sensor.
Interference may occur, resulting in incorrect data, if the computer is:
- Near a TV, PC, radio, motor, or in a car or train.
- Close to a railroad crossing, railway tracks, TV stations and/or radar base.
- Using with other wireless devices in close proximity.
Preparing the computer
Perform the clear all data operation as shown below, when you use the unit for the first time or restore the unit to the condition checked at the factory.
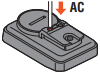
- Clear all data (initialization)
Press the AC button on the back of the computer.
- Select the speed units
Select «km/h» or «mph«.
- Enter the tire circumference
Enter the front wheel tire circumference of your bicycle in mm.
* Use «Tire circumference reference table» as a guide. - Set the clock
Pressing and holding the MODE button switches the display to «Displayed time», «Hour», and «Minute» in order. - Press the MENU button to complete setting


Operation test
After installed, check that the computer displays the speed by turning the front wheel. When it is not displayed, check the installation conditions A, B and C again (see previous section).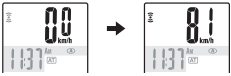
Tire circumference
You can find the tire circumference (L) of your tire size in the chart below, or actually measure the tire circumference (L) of your bicycle.
Operating the computer [Measuring screen]
![Operating the computer [Measuring screen]](https://static-data2.manualslib.com/pdf7/306/30529/3052829-cateye/images/cateye-micro-wireless-operating-the-computer-measuring-8cd5e.png "Cateye - MICRO Wireless - Operating the computer [Measuring screen]")
Switching computer function
Pressing the MODE button switches the measurement data at the bottom in the order shown in the following figure.
*1 When Tm about 10 hours, or Dst exceeds 999.99 km, .E will appear. Reset the data.
*2 It appears only in the auto mode.
MODE operation when the computer is mounted on the bracket
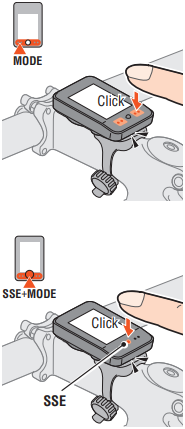
Starting / Stopping measurement
There are two measurement methods; manual mode and auto mode.
Setting method See «Changing the computer settings: Selecting the auto mode».
The speed unit (km/h or mph) flashes during measurement.
* The maximum speed and total distance are updated regardless of start/stop of the measurement.
Resetting data
Pressing and holding SSE together with the unit on the measurement screen resets any measurement data, except the total distance (Odo), trip distance-2 (Dst2), and stopwatch ( ).
).
* The total distance (ODO) is not reset.
Operating the computer [Various functions]
Backlight (Night mode)
![]()
With the night mode turned on, pressing the MODE button turns on the backlight (for 5 seconds). Pressing any button while the backlight is still on extends the illumination for another 5 seconds.")
Setting method Pressing and holding the MODE button proceeds to setting the night mode. Pressing and holding the button again turns on the night mode, and returns to the measurement screen.
* The night mode is automatically turned off without any signal received for 10 minutes.
* You can switch ON/OFF also from the menu screen. See «Changing the computer settings: Setting the night mode».
* When ![]() (battery icon) is turned on, the backlight is not turned on even if the night mode is on.
(battery icon) is turned on, the backlight is not turned on even if the night mode is on.
Setting the function to display
Displaying only selected data can be done.
Setting method See «Changing the computer settings: Setting the function».
* The current speed (Spd), and the elapsed time (Tm) cannot be hidden.
* When you hide the function assigned to the top display, the upper display returns to the current speed (Spd).
* The unit keeps recording hidden data on background and each measurement data is updated when displayed (except for the stop watch).
Stop watch
![]()
The time can be measured regardless of start/stop of the measurement. It can be used when the auto mode is on (![]() illuminated).
illuminated).
Upper display selection
Any data can be selected for the top display, and constantly be displayed.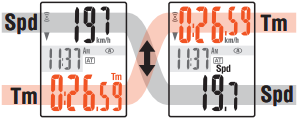
Setting method See «Changing the computer settings: Setting the upper display».
* The stopwatch cannot be set when the auto-mode is off.
Power-saving function
If the computer has not received a signal for 10 minutes, power-saving screen will activate and only the clock will be displayed. When you press MODE, or the computer receives a sensor signal, the measuring screen reappears.
* If another 12 hours of inactivity elapses in the power-saving screen, only the speed unit is displayed on the screen. With such a screen, pressing the MODE button returns to the measurement screen.
Pressing MENU on the measurement screen changes to the menu screen. Various settings can be changed on the menu screen.
* After changes are made, be sure to register the setting(s) by pressing the MENU button.
* Leaving the menu screen without any operation for 1 minutes returns to the measurement screen, and changes are not saved.


In use
Maintenance
To clean the computer or accessories, use diluted neutral detergent on a soft cloth, and wipe it off with a dry cloth.
Replacing the battery
Computer
When ![]() (battery icon) is turned on, replace the battery. Install a new lithium battery(CR2032) with the (+) side facing upward.
(battery icon) is turned on, replace the battery. Install a new lithium battery(CR2032) with the (+) side facing upward.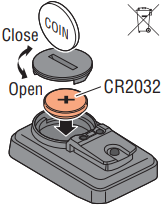
* After replacing the computer battery, follow the procedure described in «Preparing the computer».
Sensor
When the speed is not displayed even after adjusting correctly, replace the battery.
Insert new lithium batteries (CR2032) with the (+) sign upward, and close the battery cover firmly.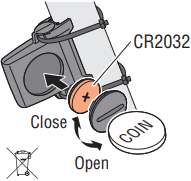
* After replacement, check the positions of the sensor and magnet.
Troubleshooting
The sensor signal icon does not flash (the speed is not displayed).
(Move the computer near the sensor, and turn the front wheel. If the sensor signal icon flashes, this trouble may be a matter of transmission distance due to battery drain, but not any malfunction.)
- Check that the clearance between the sensor and magnet is not too large. (Clearance: within 5 mm)
- Check that the magnet passes through the sensor zone correctly.
- Adjust the positions of the magnet and sensor.
- Is the computer installed at the correct angle?
- Back of computer must face toward the sensor.
- Check that the distance between the computer and sensor is correct. (Distance: within 20 to 70 cm)
- Install the sensor within the specified range.
- Is the computer or sensor battery weak?
In winter, battery performance diminishes.- Replace with new batteries according to the procedure specified in the section «Replacing the battery».
Nothing is displayed by pressing the button.
- Replace the computer battery according to the procedure specified in the section «Replacing the battery».
Incorrect data appear.
- Clear all according to the procedure described in «Preparing the computer».
The backlight is not turned on.
- Check if
 (battery icon) is turned on.
- Replace the computer battery according to the procedure specified in the section «Replacing the battery».
Specification
| Battery / Battery life | Computer: | Lithium battery (CR2032) x 1 / Approx. 1 years (If the computer is used for 1 hour/day; the battery life will vary depending on the conditions of use.) |
| Sensor: | Lithium battery (CR2032) x 1 / Unit Total Distance reaches about 10000 km (6250 mile) | |
| * It may be shortened significantly when backlight is used frequently. * This is the average figure of being used under 20°C temperature and the distance between the computer and the sensor is 65 cm. * The factory-loaded battery life might be shorter than the above-mentioned specification. |
||
| Controller | 4 bit, 1-chip microcomputer (Crystal controlled oscillator) | |
| Display | Liquid crystal display | |
| Sensor | No contact magnetic sensor | |
| Transmission distance | Between 20 and 70 cm | |
| Tire circumference range | 0100 mm — 3999 mm (Initial value: A = 2096 mm, B = 2050 mm) |
|
| Working temperature | 0°F — 104°F (0°C — 40°C) (This product will not display appropriately when exceeding the Working Temperature range. Slow response or black LCD at lower or higher temperature may happen respectively.) | |
| Dimensions/weight | Computer: | 2-7/64″ x 1-27/64″ x 11/16″ (53.5 x 36 x 17.5 mm) / 0.92 oz (26 g) |
| Sensor: | 1-41/64″ x 1-27/64″ x 19/32″ (41.5 x 36 x 15 mm) / 0.53 oz (15 g) |
* The specifications and design are subject to change without notice.
Limited warranty
2-Year Computer/Sensor only
(Accessories and Battery Consumption excluded)
CatEye cycle computers are warranted to be free of defects from materials and workmanship for a period of two years from original purchase. If the product fails to work due to normal use, CatEye will repair or replace the defect at no charge. Service must be performed by CatEye or an authorized retailer. To return the product, pack it carefully and enclose the warranty certificate (proof of purchase) with instruction for repair. Please write or type your name and address clearly on the warranty certificate. Insurance, handling and transportation charges to CatEye shall be borne by person desiring service.
For UK and REPUBLIC OF IRELAND consumers, please return to the place of purchase. This does not affect your statutory rights.
CAT EYE CO., LTD.
2-8-25, Kuwazu, Higashi Sumiyoshi-ku, Osaka 546-0041 Japan
Attn: CATEYE Customer Service Section
Phone: (06)6719-6863
Fax: (06)6719-6033
E-mail: support@cateye.co.jp
URL: http://www.cateye.com
[For US Customers]
CATEYE AMERICA, INC.
2825 Wilderness Place Suite 1200, Boulder CO80301-5494 USA
Phone: 303.443.4595
Toll Free: 800.5CATEYE
Fax: 303.473.0006
E-mail: service@cateye.com
Spare accessories
Standard accessories

Optional accessories


Documents / Resources
References
CATEYE
Download manual
Here you can download full pdf version of manual, it may contain additional safety instructions, warranty information, FCC rules, etc.
Download Cateye MICRO Wireless CC-MC200W — Cyclocomputer Manual
Посмотреть инструкция для Cateye Micro Wireless CC-MC200W бесплатно. Руководство относится к категории велокомпьютеры, 6 человек(а) дали ему среднюю оценку 8.7. Руководство доступно на следующих языках: английский. У вас есть вопрос о Cateye Micro Wireless CC-MC200W или вам нужна помощь? Задайте свой вопрос здесь
Не можете найти ответ на свой вопрос в руководстве? Вы можете найти ответ на свой вопрос ниже, в разделе часто задаваемых вопросов о Cateye Micro Wireless CC-MC200W.
Аккумулятор в моем устройстве велокомпьютер начал ржаветь. Безопасно ли пользоваться устройством?
Что означает аббревиатура GPS?
Необходим ли интернет для GPS?
Инструкция Cateye Micro Wireless CC-MC200W доступно в русский?
Не нашли свой вопрос? Задайте свой вопрос здесь
-
Contents
-
Table of Contents
-
Bookmarks
Quick Links
START
Click the button and follow the in-
structions.
CATEYE MICRO Wireless
CC-MC200W
Quick Start
Related Manuals for Cateye Micro wireless CC-MC200W
Summary of Contents for Cateye Micro wireless CC-MC200W
-
Page 1
START Click the button and follow the in- structions. CATEYE MICRO Wireless CC-MC200W Quick Start… -
Page 2
Thank you for purchasing our cyclocomputer CATEYE MICRO Wireless. This Quick Start Manual explains how to set up the computer and how to install the unit on your bicycle. Please set up the unit according to the specified procedure, then it will be ready for use as a cyclocomputer. -
Page 3
This PDF contains a movie file. When you click on the movie screen, a message regarding security appears. Click the “Trust in the text” or “Play” button to close the message. Click the screen again to play the movie. Next… -
Page 4
CATEYE MICRO Wireless Return to a Cover Quick Start Manual Contents Click the item you wish to view. Setting up the computer How to install the bracket (movie) How to install the speed sensor (movie) Various functions… -
Page 5
Operation of buttons Set up the computer by operating the buttons as follows. Check the button position before you start setting up. Back MENU MODE Press the MENU button and the MODE button on the back of the computer. Next… -
Page 6
CATEYE MICRO Wireless Return to Contents Quick Start Manual Setting up the computer Clear all data (initialization) Clear all data (initialization) Press the AC button on the back of the computer. After full lighting of the screen, the computer switch- Setting the speed unit es to the speed unit setting screen to start setup. -
Page 7
CATEYE MICRO Wireless Return to Contents Quick Start Manual Setting up the computer Setting the speed unit Clear all data (initialization) When the MODE button is pressed, either “km/h” or “mph” is selected for the speed unit display. Select the display of Setting the speed unit your choice. -
Page 8
CATEYE MICRO Wireless Return to Contents Quick Start Manual Setting up the computer Entering the tire circumference Clear all data (initialization) Enter the tire circumference (mm) of your bicycle with 4 digits using the tire circumference reference table. Setting the speed unit… -
Page 9
CATEYE MICRO Wireless Return to Contents Quick Start Manual Setting up the computer Setting the clock display Clear all data (initialization) When the MODE button is pressed, either “12h” or “24h” is selected for the clock display. Select the display of your Setting the speed unit choice. -
Page 10
CATEYE MICRO Wireless Return to Contents Quick Start Manual Setting up the computer Setting the AM/PM display Clear all data (initialization) When the MODE button is pressed, either “AM” or “PM” lights up. Select the display of your choice. Setting the speed unit Press and hold the MODE button to proceed to the next step “Setting the hour”. -
Page 11
CATEYE MICRO Wireless Return to Contents Quick Start Manual Setting up the computer Setting the hour Clear all data (initialization) Pressing the MODE button increases the value flashing (“Hour” of the clock). Enter any value. Setting the speed unit After entering, press and hold the MODE button to pro- ceed to the next step “Setting the minute”. -
Page 12
CATEYE MICRO Wireless Return to Contents Quick Start Manual Setting up the computer Setting the minute Clear all data (initialization) Clear all data (initialization) Pressing the MODE button increases the value flashing (“Minute” of the clock). Enter any value (Pressing and… -
Page 13
CATEYE MICRO Wireless Return to Contents Quick Start Manual Setting up the computer Now, setup of the computer is completed. Clear all data (initialization) If the bracket and speed sensor are not installed on your Setting the speed unit bicycle, return to Contents, click the movies of how to… -
Page 14
CATEYE MICRO Wireless Return to Contents Quick Start Manual Setting up the computer Setting the hour Clear all data (initialization) Pressing the MODE button increases the value flashing (“Hour” of the clock). Enter any value. Setting the speed unit After entering, press and hold the MODE button to pro- ceed to the next step “Setting the minute”. -
Page 15
CATEYE MICRO Wireless Return to Contents Quick Start Manual Setting up the computer Setting the minute Clear all data (initialization) Pressing the MODE button increases the value flashing (“Minute” of the clock). Enter any value (Pressing and Setting the speed unit holding MODE rapidly increases the value). -
Page 16
CATEYE MICRO Wireless Return to Contents Quick Start Manual Setting up the computer Now, setup of the computer is completed. Clear all data (initialization) Clear all data (initialization) If the bracket and speed sensor are not installed on your Setting the speed unit… -
Page 17
CATEYE MICRO Wireless Return to Contents Quick Start Manual How to install the bracket How to install the bracket… -
Page 18
CATEYE MICRO Wireless Return to Contents Quick Start Manual How to install the speed sensor… -
Page 19
CATEYE MICRO Wireless Return to Contents Quick Start Manual Setting up the computer Tire circumference reference table Generally, the tire size or ETRTO is indicated on the side of the tire. ETRTO Tire size L (mm) ETRTO Tire size L (mm) -
Page 20
Operation of buttons The computer is operated by the following button operations. When removed from the bracket When installed on the bracket The MODE or MENU The SSE and MODE Operating the Operating the SSE and button operation buttons operation MODE button MODE buttons MENU… -
Page 21
CATEYE MICRO Wireless Return to Contents Quick Start Manual Various functions Click the item you wish to view. Stop watch You can use the stopwatch independently of measurement. Backlight (Night mode) You can use the MODE button to turn on the backlight. -
Page 22
CATEYE MICRO Wireless Return to Various functions Quick Start Manual Stop watch How to use How to use Use 1 Use 2 You can use the stopwatch independently of measurement. Stop watch Starting/Stopping the stopwatch Pressing the SSE button together with the MODE button starts and stops counting. -
Page 23
CATEYE MICRO Wireless Return to Various functions Quick Start Manual Stop watch How to use Use 1 Use 1 Use 2 How to know the total time to the destination You can count the total time from departure to the destination. -
Page 24
CATEYE MICRO Wireless Return to Various functions Quick Start Manual Stop watch How to use Use 1 Use 2 Use 2 How to know the elapsed time in a given interval Measurement image START STOP… -
Page 25
CATEYE MICRO Wireless Return to Various functions Quick Start Manual Backlight (Night mode) How to use How to use How to set Night mode Night mode With the night mode turned on ( ON), press- ing the MODE button turns on the backlight for 5 seconds. -
Page 26
CATEYE MICRO Wireless Return to Various functions Quick Start Manual Backlight (Night mode) How to use How to set How to set How to set the night mode From the measuring screen, pressing and holding the MODE button repeatedly 2 times turns on the night mode. -
Page 27
CATEYE MICRO Wireless Return to Various functions Quick Start Manual Upper display selection How to use How to use How to set Setting the upper display When the elapsed time (Tm) is Any data can be selected to be displayed on top displayed in the upper display constantly. -
Page 28
CATEYE MICRO Wireless Return to Various functions Quick Start Manual Upper display selection How to use How to set (1/3) How to set (1/3) How to set the upper display (1/3) From the measuring screen, press the MENU button to switch to the Menu screen. -
Page 29
CATEYE MICRO Wireless Return to Various functions Quick Start Manual Upper display selection How to use How to set (2/3) How to set (2/3) How to set the upper display (2/3) Pressing the MODE button switches the icon to select the data for the up- per display. -
Page 30
CATEYE MICRO Wireless Return to Various functions Quick Start Manual Upper display selection How to use How to set (3/3) How to set (3/3) How to set the upper display (3/3) Pressing the MENU button 2 times registers the changed settings, and returns to the measuring screen. -
Page 31
CATEYE MICRO Wireless Return to Various functions Quick Start Manual Setting the function to display How to use How to use How to set Setting the function to display You can switch the screen quickly, by skipping the data less frequently used. -
Page 32
CATEYE MICRO Wireless Return to Various functions Quick Start Manual Setting the function to display How to use How to set (1/3) How to set (1/3) Setting the function to display (1/3) From the measuring screen, press the MENU button to switch to the Menu screen. -
Page 33
CATEYE MICRO Wireless Return to Various functions Quick Start Manual Setting the function to display How to use How to set (2/3) How to set (2/3) Setting the function to display (2/3) Pressing and holding the MODE button switches the flashing icon. -
Page 34
CATEYE MICRO Wireless Return to Various functions Quick Start Manual Setting the function to display How to use How to set (3/3) How to set (3/3) Setting the function to display (3/3) Pressing the MENU button 2 times registers the changed settings, and returns to the measuring screen.

Select «km/h» or «mph«.

Enter the front wheel tire circumference of your bicycle in mm.
* Use «Tire circumference reference table» as a guide.

Pressing and holding the MODE button switches the display to «Displayed time», «Hour», and «Minute» in order.

Operation test
After installed, check that the computer displays the speed by turning the front wheel. When it is not displayed, check the installation conditions A, B and C again (see previous section).
Tire circumference
You can find the tire circumference (L) of your tire size in the chart below, or actually measure the tire circumference (L) of your bicycle.
Operating the computer [Measuring screen]
Switching computer function
Pressing the MODE button switches the measurement data at the bottom in the order shown in the following figure.
*1 When Tm about 10 hours, or Dst exceeds 999.99 km, .E will appear. Reset the data.
*2 It appears only in the auto mode.
MODE operation when the computer is mounted on the bracket
Starting / Stopping measurement
There are two measurement methods; manual mode and auto mode.
Setting method See «Changing the computer settings: Selecting the auto mode».
The speed unit (km/h or mph) flashes during measurement.
* The maximum speed and total distance are updated regardless of start/stop of the measurement.
Resetting data
Pressing and holding SSE together with the unit on the measurement screen resets any measurement data, except the total distance (Odo), trip distance-2 (Dst2), and stopwatch ().
* The total distance (ODO) is not reset.
Operating the computer [Various functions]
Backlight (Night mode)
![]()
With the night mode turned on, pressing the MODE button turns on the backlight (for 5 seconds). Pressing any button while the backlight is still on extends the illumination for another 5 seconds.
Setting method Pressing and holding the MODE button proceeds to setting the night mode. Pressing and holding the button again turns on the night mode, and returns to the measurement screen.
* The night mode is automatically turned off without any signal received for 10 minutes.
* You can switch ON/OFF also from the menu screen. See «Changing the computer settings: Setting the night mode».
* When ![]() (battery icon) is turned on, the backlight is not turned on even if the night mode is on.
(battery icon) is turned on, the backlight is not turned on even if the night mode is on.
Setting the function to display
Displaying only selected data can be done.
Setting method See «Changing the computer settings: Setting the function».
* The current speed (Spd), and the elapsed time (Tm) cannot be hidden.
* When you hide the function assigned to the top display, the upper display returns to the current speed (Spd).
* The unit keeps recording hidden data on background and each measurement data is updated when displayed (except for the stop watch).
Stop watch
![]()
The time can be measured regardless of start/stop of the measurement. It can be used when the auto mode is on (![]() illuminated).
illuminated).
Upper display selection
Any data can be selected for the top display, and constantly be displayed.
Setting method See «Changing the computer settings: Setting the upper display».
* The stopwatch cannot be set when the auto-mode is off.
Power-saving function
If the computer has not received a signal for 10 minutes, power-saving screen will activate and only the clock will be displayed. When you press MODE, or the computer receives a sensor signal, the measuring screen reappears.
* If another 12 hours of inactivity elapses in the power-saving screen, only the speed unit is displayed on the screen. With such a screen, pressing the MODE button returns to the measurement screen.
Pressing MENU on the measurement screen changes to the menu screen. Various settings can be changed on the menu screen.
* After changes are made, be sure to register the setting(s) by pressing the MENU button.
* Leaving the menu screen without any operation for 1 minutes returns to the measurement screen, and changes are not saved.
In use
Maintenance
To clean the computer or accessories, use diluted neutral detergent on a soft cloth, and wipe it off with a dry cloth.
Replacing the battery
Computer
When ![]() (battery icon) is turned on, replace the battery. Install a new lithium battery(CR2032) with the (+) side facing upward.
(battery icon) is turned on, replace the battery. Install a new lithium battery(CR2032) with the (+) side facing upward.
* After replacing the computer battery, follow the procedure described in «Preparing the computer».
Sensor
When the speed is not displayed even after adjusting correctly, replace the battery.
Insert new lithium batteries (CR2032) with the (+) sign upward, and close the battery cover firmly.
* After replacement, check the positions of the sensor and magnet.
Troubleshooting
The sensor signal icon does not flash (the speed is not displayed).
(Move the computer near the sensor, and turn the front wheel. If the sensor signal icon flashes, this trouble may be a matter of transmission distance due to battery drain, but not any malfunction.)
- Check that the clearance between the sensor and magnet is not too large. (Clearance: within 5 mm)
- Check that the magnet passes through the sensor zone correctly.
- Adjust the positions of the magnet and sensor.
- Is the computer installed at the correct angle?
- Back of computer must face toward the sensor.
- Check that the distance between the computer and sensor is correct. (Distance: within 20 to 70 cm)
- Install the sensor within the specified range.
- Is the computer or sensor battery weak?
In winter, battery performance diminishes.- Replace with new batteries according to the procedure specified in the section «Replacing the battery».
Nothing is displayed by pressing the button.
- Replace the computer battery according to the procedure specified in the section «Replacing the battery».
Incorrect data appear.
- Clear all according to the procedure described in «Preparing the computer».
The backlight is not turned on.
- Check if (battery icon) is turned on.
- Replace the computer battery according to the procedure specified in the section «Replacing the battery».
Specification
| Battery / Battery life | Computer: | Lithium battery (CR2032) x 1 / Approx. 1 years (If the computer is used for 1 hour/day; the battery life will vary depending on the conditions of use.) |
| Sensor: | Lithium battery (CR2032) x 1 / Unit Total Distance reaches about 10000 km (6250 mile) | |
| * It may be shortened significantly when backlight is used frequently. * This is the average figure of being used under 20°C temperature and the distance between the computer and the sensor is 65 cm. * The factory-loaded battery life might be shorter than the above-mentioned specification. |
||
| Controller | 4 bit, 1-chip microcomputer (Crystal controlled oscillator) | |
| Display | Liquid crystal display | |
| Sensor | No contact magnetic sensor | |
| Transmission distance | Between 20 and 70 cm | |
| Tire circumference range | 0100 mm — 3999 mm (Initial value: A = 2096 mm, B = 2050 mm) |
|
| Working temperature | 0°F — 104°F (0°C — 40°C) (This product will not display appropriately when exceeding the Working Temperature range. Slow response or black LCD at lower or higher temperature may happen respectively.) | |
| Dimensions/weight | Computer: | 2-7/64″ x 1-27/64″ x 11/16″ (53.5 x 36 x 17.5 mm) / 0.92 oz (26 g) |
| Sensor: | 1-41/64″ x 1-27/64″ x 19/32″ (41.5 x 36 x 15 mm) / 0.53 oz (15 g) |
* The specifications and design are subject to change without notice.
Limited warranty
2-Year Computer/Sensor only
(Accessories and Battery Consumption excluded)
CatEye cycle computers are warranted to be free of defects from materials and workmanship for a period of two years from original purchase. If the product fails to work due to normal use, CatEye will repair or replace the defect at no charge. Service must be performed by CatEye or an authorized retailer. To return the product, pack it carefully and enclose the warranty certificate (proof of purchase) with instruction for repair. Please write or type your name and address clearly on the warranty certificate. Insurance, handling and transportation charges to CatEye shall be borne by person desiring service.
For UK and REPUBLIC OF IRELAND consumers, please return to the place of purchase. This does not affect your statutory rights.
CAT EYE CO., LTD.
2-8-25, Kuwazu, Higashi Sumiyoshi-ku, Osaka 546-0041 Japan
Attn: CATEYE Customer Service Section
Phone: (06)6719-6863
Fax: (06)6719-6033
E-mail: support@cateye.co.jp
URL: http://www.cateye.com
[For US Customers]
CATEYE AMERICA, INC.
2825 Wilderness Place Suite 1200, Boulder CO80301-5494 USA
Phone: 303.443.4595
Toll Free: 800.5CATEYE
Fax: 303.473.0006
E-mail: service@cateye.com
Spare accessories
Standard accessories
Optional accessories
Documents / Resources
References
CATEYE
Download manual
Here you can download full pdf version of manual, it may contain additional safety instructions, warranty information, FCC rules, etc.
Download Cateye MICRO Wireless CC-MC200W — Cyclocomputer Manual