В представленном списке руководства для конкретной модели Bluetooth-гарнитура — Velton B1. Вы можете скачать инструкции к себе на компьютер или просмотреть онлайн на страницах сайта бесплатно или распечатать.
В случае если инструкция на русском не полная или нужна дополнительная информация по этому устройству, если вам нужны
дополнительные файлы: драйвера, дополнительное руководство пользователя (производители зачастую для каждого
продукта делают несколько различных документов технической помощи и руководств), свежая версия прошивки, то
вы можете задать вопрос администраторам или всем пользователям сайта, все постараются оперативно отреагировать
на ваш запрос и как можно быстрее помочь. Ваше устройство имеет характеристики:Версия Bluetooth: 2.1, Тип: стерео, Вид наушников гарнитуры: накладные, Профиль: Handsfree, Headset, A2DP, AVRCP, Дальность действия: 10 м, Размеры (ШхВхТ): 155x157x38 мм, полные характеристики смотрите в следующей вкладке.
Для многих товаров, для работы с Velton B1 могут понадобиться различные дополнительные файлы: драйвера, патчи, обновления, программы установки. Вы можете скачать онлайн эти файлы для конкретнй модели Velton B1 или добавить свои для бесплатного скачивания другим посетителями.
Если вы не нашли файлов и документов для этой модели то можете посмотреть интсрукции для похожих товаров и моделей, так как они зачастую отличаются небольшим изменениями и взаимодополняемы.
Обязательно напишите несколько слов о преобретенном вами товаре, чтобы каждый мог ознакомиться с вашим отзывом или вопросом. Проявляйте активность что как можно бльше людей смогли узнать мнение настоящих людей которые уже пользовались Velton B1.

Россия
2017-12-08 17:02:04
Россия
Vadim
2018-04-02 12:36:29
Класс!
Vadim
2018-04-02 12:36:30
Класс!
Наталья
2018-08-19 03:11:10
Всё Супер!
Konstantin
2018-10-21 14:20:02
Нормально
Класс
Прежде чем начнется скачивание инструкции к Velton B1 напишите свой отзыв о опыте использования устройства
Класс
Прежде чем начнется скачивание инструкции к Velton B1 напишите свой отзыв о опыте использования устройства
Сергей
2020-03-06 20:59:56
отличные наушники
диана
2020-04-03 14:02:13
подарили несколько лет назад, сейчас хочу оживить наушники, пытаюсь подключить к телефону
Евгений
2020-04-13 14:03:29
Не могу подключиться
khgjm
2020-08-29 13:46:17
всп ипрьор пбгларпларнг ларгльанглен вн е енр н
прнро
2020-08-29 13:53:46
асот jmnv ews knkn у кшршьыамм лцсриц лг т клг увкиавт
Алексей
2020-11-07 23:44:20
супер
Ромгм
2020-12-18 07:24:10
Дммпши
Основные и самые важные характеристики модели собраны из надежных источников и по характеристикам можно найти похожие модели.
| Общие характеристики | |
| Версия Bluetooth | 2.1 |
| Тип | стерео |
| Вид наушников гарнитуры | накладные |
| Профиль | Handsfree, Headset, A2DP, AVRCP |
| Дальность действия | 10 м |
| Размеры (ШхВхТ) | 155x157x38 мм |
| Вес | 145 г |
| Питание | |
| Время работы в режиме разговора / ожидания | 10 / 245 ч |
| Функции | |
| Ответить/закончить разговор | есть |
| Ожидание/удержание вызова | есть |
| Голосовой набор | есть |
| Повтор последнего номера | есть |
| Дополнительные возможности | |
| Дисплей | нет |
| Сменные панели | нет |
Здесь представлен список самых частых и распространенных поломок и неисправностей у Bluetooth-гарнитур. Если у вас такая поломка то вам повезло, это типовая неисправность для Velton B1 и вы можете задать вопрос о том как ее устранить и вам быстро ответят или же прочитайте в вопросах и ответах ниже.
| Название поломки | Описание поломки | Действие |
|---|---|---|
| Не Подключаются | ||
| Нет Звука | ||
| Хрипит Звук | ||
| Пластиковая Дуга (Изголовье) | Лопнула Пластиковая Дуга (Изголовье) У Самой Чашки. На Qumo Trio Techno Точно Такая Же Беда. | |
| Не Заряжается Аккумулятор | ||
| Нельзя Отрегулировать Баланс | Один Динамик Стал Работать Тише Второго, А Как Отрегулировать Баланс В Инструкции Не Описано | |
| Плохо Работает Положение Нажатием «Плей-Пауза» | Порой Приходиться Нажимать Несколько Раз Или Искать Положение Кнопки Для Нажатия,Смещая Чуть На Бок От Оси Нажатия. Не Знаю Какой Принцип Работы Кнопки,Но Похоже Стёрты Дорожки На Платке Кнопки. | |
| Стали Тише Играть | В Один Момент Стали Тише Играть | |
| Не Работает Один Динамик | ||
| Отлетело 1 Ухо | Висит На 2Х Проводках Чёрном И Красном. | |
| Не Работает Один Динамик |
В нашей базе сейчас зарегестрированно 18 353 сервиса в 513 города России, Беларусии, Казахстана и Украины.
- Manuals
- Brands
- Cyclamatic Manuals
- Bicycle
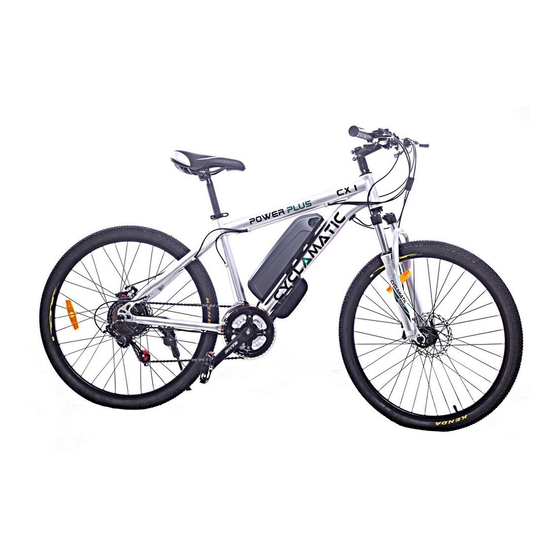
- Power Plus CX1
- Operating manual
-
Contents
-
Table of Contents
-
Troubleshooting
-
Bookmarks
Quick Links
CYCLAMATIC
Power Plus CX1
Operating Manual
1
Summary of Contents for Cyclamatic Power Plus CX1
-
Page 1
CYCLAMATIC Power Plus CX1 Operating Manual… -
Page 2
Important Safeguards: Electrical Safety: Personal Safety: • This eBike is intended for use as a commuter and • Only use batteries and chargers supplied. leisure bicycle. Using the eBike for any other purpose • Don’t modify the charger in any way. may result in serious injury. -
Page 3
eBike Safety Battery Safety: You must be over 14 to ride an eBike. • This appliance includes Li-Ion batteries; do not incinerate batteries or expose to high temperatures, • The drive assist system is limited to a maximum as they may explode. continuous power rating of 0.25kW (250W) and a maximum speed of 25Km/h, (15.5 mph). -
Page 4: Table Of Contents
Table of Contents Preparation Unpacking Front Wheel Assembly Installing the Handlebars Adjusting Saddle Height Pedal instillation Installing/ Removing Battery Operation Charging the Battery Turning on your eBike Brake and Derailleur Controls Check List Before Riding Maintenance Troubleshooting Technical Specification…
-
Page 5: Unpacking
Unpacking Packaging – Remove packaging materials and dispose of in a responsible manner. Remove all materials and set parts aside for assembly. Should your model be a foldable or non-foldable, minimal assembly is required for your bicycle. However, please follow the guidelines below for correct assembly.
-
Page 6: Front Wheel Assembly
Front Wheel Assembly 1. Remove the plastic bar at the 2.Mount the Front Wheel into the bottom of the fork. groove of the fork. 3.Take the Quick Release Pin and unscrew the end. Note the 4.Put the quick Release pin through direction of the springs, one goes the center of the wheel.
-
Page 7: Installing The Handlebars
Installing the Handlebars 1.Remove the four bolts that hold the handlebar clamp to the bike. 2. Slightly loosen the bolts starting with A and work your way down. Insert the handlebar and ensure the brake and shifter lines are properly routed to Rotate the handle bar clockwise and prevent interference when the handlebars position at 90°…
-
Page 8: Adjusting Saddle Height
Adjusting Saddle Height 1. Sit on the bike saddle 2. Try to reach the pedal with your heel when it is in the bottom position. Your knee should be stragiht 4. Close the quick release, firmly 3. To adjust, pull back the quick release pushing down so the lever lies flat leave and adjust the saddle to the against the frame.
-
Page 9: Installing/Removing Battery
Installing/Removing Battery 1. Unlock the battery by inserting 2. Slide the battery up towards the top the key on the left side and turn tube. Then pull the battery away from counter clockwise. the frame. 3. The battery is installed in the reverse, ensure the tabs on the battery line up with the notches on the frame to properly secure and lock the battery by…
-
Page 10: Charging The Battery
Charging the Battery 1. Safely remove the battery from 2. Plug the charger into the mains the eBike and gently remove the outlet, the LED light on the charger rubber cover from the right side of will turn green. the battery to access charging port. 4.Once fully charged the LED on 3.Connect the charger to the the charger switches back to green.
-
Page 11: Turning On Your Ebike
Turning on your eBike 1. Ensure the battery is securely 2. Press the red power button and locked into the frame by turning the battery gauge will light up and the key clockwise. Riding with the indicate the approximate charge key in the lock is not advised.
-
Page 12
Brake Controls The Left brake level activates front brakes The Right brake lever activates Rear brake Always use both brakes together The left derailleur shifts the front chainring (1-3), the right shifts the rear freewheel (1-7). To shift, you must be pedaling. The lower thumb switch will click when it shifts down, the top trigger shifts up. Checklist before you start riding 1. -
Page 13: Maintenance
Maintenance Wipe the bike with a dry cloth or a neutral detergent. Check the pressure and profile of the tires. Check the brakes for wear and adjust or replace them if necessary. Check the wheels for buckles or damaged spokes and have them repaired immediately by a qualified bike repair specialist.
-
Page 14: Troubleshooting
Troubleshooting Problem Check Action Battery Power. Charging. Tire Pressure. Inflate the tire. Low Speed. Is tire flat? Repair the tire. Load. Do not overload. The motor is not working. Ensure every plug is connected. If the Every Plug. situation does not improve, please Power indicator light does not shine.
-
Page 15: Technical Specification
Technical Specification eBike Model Battery Model Battery Charging Period Battery Charger Output Weight Frame Motor Range Modes Drive Train Brakes Wheels Tires…
-
Page 16
UK & Europe Phone 01527 941150 Email help@thesportshq.com Address Unit 2, Enfield Industrial Estate, Redditch, Worcs B97 6BG Phone 1-800-603-0004 Email help@shop247.com Address 16 Sunset Way, Suite 110 Henderson, Nevada 89014…
инструкцияMiele Blizzard CX1 Parquet PowerLine

de Gebrauchsanweisung Bodenstaubsauger
en Vacuum cleaner operating instructions
fr Mode d’emploi aspirateur traîneau
it Istruzioni d’uso aspirapolvere a traino
nl Gebruiksaanwijzing stofzuigers
M.-Nr. 11 288 822
HS16
Посмотреть инструкция для Miele Blizzard CX1 Parquet PowerLine бесплатно. Руководство относится к категории пылесосы, 3 человек(а) дали ему среднюю оценку 8.5. Руководство доступно на следующих языках: английский. У вас есть вопрос о Miele Blizzard CX1 Parquet PowerLine или вам нужна помощь? Задайте свой вопрос здесь
- Titelseite
- Inhalt
Главная
| Miele | |
| Blizzard CX1 Parquet PowerLine | 10512000 | |
| пылесос | |
| 4002515767351 | |
| английский | |
| Руководство пользователя (PDF) |
Дизайн
| Цвет товара | Белый |
| Тип пылесборника | Мешок для пыли |
| Тип | Цилиндрический пылесос |
| Беспроводной | Нет |
| Тип очистки | Cухой |
| Объём пылесборника | 2 L |
| Гибкий шланг | Да |
| Тип трубки | Телескопический |
| Тип фиксирования трубки | Защелкивающийся |
Энергопитание
| Годовое потребление энергии | 39.8 кВт·ч |
| Максимальная входная мощность | 1200 W |
| Регулируемая мощность | Да |
| Входящее напряжение сети | 230-240 V |
| Частота входящего переменного тока | 50 Hz |
Производительность
| Уровень шума | 76 dB |
| Поверхности, которые можно чистить | Carpet, Hard floor |
| Назначение | Дома |
| B | |
| A | |
| A | |
| Радиус работы | 10 m |
| Пылесос с воздушной фильтрацией | HEPA, Miele AirClean |
| Класс HEPA | HEPA 13 |
| Метод отделения грязи | Фильтрация |
Эргономика
| Длина шнура | 6.5 m |
| Тип управления | Вращающийся |
| Автоматический перематыватель шнура | Да |
| Хранение шнура | Да |
| Вкл/Выкл переключатель | Да |
Вес и размеры
Прочие свойства
Содержимое упаковки
| Щелевая насадка | Да |
| Насадка для чистки обивки входит в комплектацию | Да |
показать больше
Не можете найти ответ на свой вопрос в руководстве? Вы можете найти ответ на свой вопрос ниже, в разделе часто задаваемых вопросов о Miele Blizzard CX1 Parquet PowerLine.
Мой пылесос Miele не всасывает как раньше. В чем может быть проблема?
Как часто следует проверять фильтр?
Что делать при появлении от пылесоса неприятного запаха?
С какой частотой необходимо пылесосить помещения?
Какой вес Miele Blizzard CX1 Parquet PowerLine?
Инструкция Miele Blizzard CX1 Parquet PowerLine доступно в русский?
Не нашли свой вопрос? Задайте свой вопрос здесь
View a manual of the Miele Blizzard CX1 below. All manuals on ManualsCat.com can be viewed completely free of charge. By using the ‘Select a language’ button, you can choose the language of the manual you want to view.

MANUALSCAT | EN
Question & answers
Have a question about the Miele Blizzard CX1 but cannot find the answer in the user manual? Perhaps the users of ManualsCat.com can help you answer your question. By filling in the form below, your question will appear below the manual of the Miele Blizzard CX1. Please make sure that you describe your difficulty with the Miele Blizzard CX1 as precisely as you can. The more precies your question is, the higher the chances of quickly receiving an answer from another user. You will automatically be sent an e-mail to inform you when someone has reacted to your question.
Comfort light coming on and Hoover stops working.?
Jacinta2018-03-10
How do you remove the filter frame?
Robert2018-11-19
Won’t switch on from handle or Machian
Mîss poole 2018-02-26
I cannot download a manual for my Vac Cleaner.
I have lost it and would like another. How can I obtain one. I did find one on this site but it is in German and I only speak English. Can you help me? Thank you …Elsa
Elsa2019-04-16
How do I take the inside apart to clean it all?
claire2020-12-16
Ask a question about the Miele Blizzard CX1
Page: 1
en — Contents
28
Warning and Safety instructions……………………………………………………………. 30
Caring for the environment …………………………………………………………………… 39
Guide to the appliance………………………………………………………………………….. 40
Notes on the European Regulation (EU) No. 666/2013 ……………………………. 42
Illustrations ………………………………………………………………………………………….. 42
Connection…………………………………………………………………………………………… 42
Using the supplied accessories ……………………………………………………………. 43
Use………………………………………………………………………………………………………. 43
Setting down, transportation and storage……………………………………………… 46
Park system for pauses during vacuuming ……………………………………………….. 46
Park system for storage …………………………………………………………………………. 46
Maintenance ………………………………………………………………………………………… 47
Emptying the dust container …………………………………………………………………… 47
Cleaning the dust container …………………………………………………………………….. 47
Cleaning the filter frame …………………………………………………………………………. 47
Cleaning the fine dust filter………………………………………………………………………. 48
Starting the ComfortClean self-cleaning function manually …………………………. 48
Changing the battery in the radio-control handle ……………………………………….. 48
Replacing the thread lifters …………………………………………………………………….. 49
Cleaning and care ………………………………………………………………………………… 50
Problem solving guide ………………………………………………………………………….. 51
Fault resolution…………………………………………………………………………………….. 53
Cleaning the pre-filter …………………………………………………………………………….. 53
Cleaning the fine dust filter manually ……………………………………………………….. 53
Service…………………………………………………………………………………………………. 54
Contact in case of malfunction ………………………………………………………………… 54
Warranty ……………………………………………………………………………………………….. 54
Warranty in the UAE ……………………………………………………………………………….. 54
Optional accessories ……………………………………………………………………………. 54
Purchasing accessories ………………………………………………………………………….. 54
Electrical connection for the UK……………………………………………………………. 56
Electrical connection AU, NZ ………………………………………………………………… 56
Page: 2
en — Contents
29
Technical data………………………………………………………………………………………. 57
EU Conformity declaration ……………………………………………………………………. 57
UK Conformity declaration……………………………………………………………………. 57
Page: 3
en — Warning and Safety instructions
30
WARNING AU/NZ! Keep batteries out of reach
of children.
Coin or button batteries containing lithium can cause
severe or fatal injuries within 2 hours of being swallowed
or placed inside any part of the body. Non-lithium batter-
ies can also cause serious injuries if swallowed or placed
inside any part of the body. Even flat batteries can still be
dangerous. If you suspect a child has swallowed a bat-
tery or placed a battery inside any part of their body,
seek medical advice immediately (Australia: Poisons In-
formation Centre, Tel. 13 11 26; NZ: National Poisons
Centre, Tel. 0800 764 766). Examine devices and make
sure the battery compartment is correctly secured, e.g.
that the screw or other mechanical fastener is tightened.
Do not use if compartment is not secure. Used batteries
must be kept away from children while awaiting disposal
and must be disposed of in a safe manner.
Page: 4
en — Warning and Safety instructions
31
This vacuum cleaner conforms to current safety require-
ments. Inappropriate use can lead to personal injury and
damage to property.
Please read the operating instructions before using the
vacuum cleaner for the first time. They contain important
information on the safety, use and maintenance of the
vacuum cleaner. This will prevent both personal injury
and damage to the appliance.
In accordance with standard IEC 60335-1, Miele ex-
pressly and strongly advises that you read and follow the
instructions in the “Connection” chapter as well as the
safety instructions and warnings.
Miele cannot be held liable for injury or damage caused
by non-compliance with these instructions.
Keep these operating instructions in a safe place and
pass them on to any future owner.
Always disconnect the vacuum cleaner from the power
supply when you have finished using it, before changing
any accessories, as well as for maintenance work, clean-
ing and troubleshooting. Switch off at the wall socket
and unplug it.
Page: 5
en — Warning and Safety instructions
32
Correct application
This vacuum cleaner is intended for cleaning flooring in
domestic households and similar residential environments.
This vacuum cleaner is not suitable for use on construction
sites.
This vacuum cleaner is not intended for outdoor use.
This vacuum cleaner is intended for use at altitudes of
up to 4000 m above sea level.
This vacuum cleaner can be used for all normal cleaning
of carpets, rugs and robust hard flooring.
The vacuum cleaner must only be used to vacuum dry
floor surfaces. Do not vacuum people or animals. Any
other types of use, modifications or alterations are not per-
mitted.
The vacuum cleaner can only be used by people (includ-
ing children) with reduced physical, sensory, or mental
capabilities, or lack of experience or knowledge, if they are
supervised whilst using it or have been shown how to use
it in a safe way and understand and recognise the con-
sequences of incorrect operation.
Safety with children
Danger of suffocation. Packaging, e.g. plastic wrap-
pings, must be kept out of the reach of babies and chil-
dren. Whilst playing, children could become entangled in
packaging or pull it over their head and suffocate.
Children under 8 years of age must be kept away from
the vacuum cleaner unless they are constantly supervised.
Page: 6
en — Warning and Safety instructions
33
Children aged 8 and older may only use the vacuum
cleaner without supervision if they have been shown how
to use it in a safe manner. Children must be able to under-
stand and recognise the possible dangers caused by in-
correct operation.
Children must not be allowed to clean or maintain the
vacuum cleaner unsupervised.
Please supervise children in the vicinity of the vacuum
cleaner and do not let them play with it.
Models with radio controls on the handle: Keep batteries
out of the reach of children.
Technical safety
Before using the vacuum cleaner and its accessories,
check for any visible signs of damage. Do not use a dam-
aged appliance.
Compare the connection data on the data plate of the
vacuum cleaner (mains voltage and frequency) with that of
the mains electricity supply. This data must match exactly.
Without modifications, the vacuum cleaner is suitable for
50 Hz or 60 Hz.
The mains electrical plug must be fitted with an appro-
priate fuse.
AU/NZ: The mains electrical outlet must be fitted with an
appropriate circuit breaker.
Page: 7
en — Warning and Safety instructions
34
Temporary or permanent operation on an autonomous
power supply system or a power supply system that is not
synchronised with the mains power supply (e.g. island net-
works, back-up systems) is possible. A prerequisite for op-
eration is that the power supply system complies with the
specifications of EN 50160 or an equivalent standard.
The function and operation of the protective measures
provided in the domestic electrical installation and in this
Miele product must also be maintained in isolated opera-
tion or in operation that is not synchronised with the mains
power supply, or these measures must be replaced by
equivalent measures in the installation. As described, for
example, in the current version of BS OHSAS 18001–2 ISO
45001.
AU/NZ: Temporary or permanent operation with a self-
sufficient or non-mains synchronous energy supply system
(e.g. isolated networks, back-up systems) is possible. A re-
quirement for the operation is that the energy supply sys-
tem complies with all current local and national require-
ments that apply to stand-alone, solar and/or battery sys-
tems.
The protective measures provided in the domestic installa-
tion and in this Miele product must also be assured in their
function and operation in isolated operation or in non-
mains synchronous operation, or replaced with equivalent
measures in the installation.
Page: 8
en — Warning and Safety instructions
35
Do not pull or carry the vacuum cleaner by the cable,
and be careful not to damage the cable when withdrawing
the plug from the socket. Keep the cable away from sharp
edges and do not let it get squashed, for example, under a
door. Avoid running the vacuum cleaner over the cable.
This could damage the cable, plug or socket. The appli-
ance must not be used if any of these have suffered dam-
age.
Do not use the vacuum cleaner if the cable is damaged.
If the cable is damaged it must be replaced together with a
complete cable rewind. For safety reasons this must only
be done by Miele Service or a Miele authorised service
technician.
While the vacuum cleaner is under warranty, repairs
should only be undertaken by a Miele authorised service
technician. Otherwise the warranty will be invalidated.
Repairs should only be carried out by a Miele authorised
service technician. Repairs and other work by unqualified
persons can cause considerable danger to users.
Miele can only guarantee the safety of the appliance
when genuine Miele replacement parts are used. Faulty
components must only be replaced with genuine Miele re-
placement parts.
The packaging material protects the vacuum cleaner
from transport damage. We recommend you keep the
packaging for transport purposes.
Page: 9
en — Warning and Safety instructions
36
Cleaning
Do not immerse the vacuum cleaner or any accessories
supplied with it in water.
Clean the vacuum cleaner and accessories only with a
dry cloth or slightly damp cloth. Exception:
— Dust container / fine dust container: clean only with wa-
ter and a little mild washing-up liquid, then dry thor-
oughly.
— Fine dust filter: do not clean the inside of the fine dust
filter. Rinse the outside under running cold water. Do not
use washing-up liquid. Do not use any sharp or pointed
objects and do not brush the fine dust filter. After clean-
ing, leave the fine dust filter to dry for a minimum of
24 hours before placing it back in the fine dust con-
tainer.
— Pre-filter / filter frame: rinse under running cold water.
Do not use washing-up liquid. Do not use any sharp or
pointed objects. Dry thoroughly after cleaning.
Page: 10
en — Warning and Safety instructions
37
Correct use
Do not use the vacuum cleaner without the dust con-
tainer, pre-filter, fine dust container and fine dust filter fit-
ted.
Do not vacuum up anything which has been burning or
is still glowing e.g. cigarettes, ashes or coal, whether glow-
ing or apparently extinguished.
Do not use the vacuum cleaner to vacuum up any water,
liquid or damp dirt. Wait until any freshly cleaned or sham-
pooed rugs or carpets are completely dry before attempt-
ing to vacuum.
Do not use the vacuum cleaner to vacuum toner dust.
Toner, such as that used in printers and photocopiers, can
conduct electricity.
Do not vacuum up any inflammable or combustible li-
quids or gases and do not vacuum in areas where such
substances are stored.
Do not vacuum at head height and do not let the suction
get anywhere near a person’s head.
Important information on the handling of batteries (for
models with radio controls on the handle):
— Do not short-circuit or recharge the battery, or throw it
into a fire.
— Disposing of the battery: Remove the battery from the
radio-control handle and dispose of it in a municipal re-
cycling facility. Do not dispose of the battery with normal
household waste.
Page: 11
en — Warning and Safety instructions
38
Accessories
To avoid the risk of injury when vacuuming with a Miele
Turbobrush, do not touch the rotating roller brush.
It is not advisable to vacuum directly with the handle, i.e.
without an accessory attached as the rim could get dam-
aged and you could hurt yourself on sharp edges.
Only use genuine accessories with the “ORIGINAL
Miele” logo on the packaging. The manufacturer cannot
otherwise guarantee the safety of the product.
Page: 12
en — Caring for the environment
39
Disposing of sales packaging
The packaging material protects the va-
cuum cleaner from transport damage.
The packaging materials used are se-
lected from materials which are environ-
mentally friendly for disposal and can
therefore be recycled.
Recycling the packaging material re-
duces the use of raw materials in the
manufacturing process and also re-
duces the amount of waste in landfill
sites. Ensure that any plastic wrap-
pings, bags, etc. are disposed of safely
and kept out of the reach of babies and
young children. Danger of suffocation.
Disposing of your old appli-
ance
Before disposing of your old appliance,
remove the fine dust filter and dispose
of it with your household waste.
Electrical and electronic appliances of-
ten contain valuable materials. They
also contain specific materials, com-
pounds and components, which were
essential for their correct function and
safety. These could be hazardous to hu-
man health and to the environment if
disposed of with your domestic waste
or if handled incorrectly. Please do not,
therefore, dispose of your old appliance
with your household waste.
Please dispose of it at your local com-
munity waste collection / recycling
centre for electrical and electronic ap-
pliances, or contact your dealer or
Miele for advice. You are also respons-
ible (by law, depending on country) for
deleting any personal data that may be
stored on the appliance being disposed
of. Please ensure that your old appli-
ance poses no risk to children while be-
ing stored prior to disposal.
Disposing of old batteries
In many cases, electrical and electronic
appliances contain batteries which
must not be disposed of with house-
hold waste after use. You are legally ob-
liged (depending on country) to remove
any old batteries which are not securely
enclosed by the vacuum cleaner and to
take them to a suitable collection point
(e.g. retailer) where they can be handed
in free of charge. Insulate the metal
contacts with adhesive tape to prevent
short circuits. Batteries may contain
substances which can be hazardous to
human health and the environment.
Used batteries must be kept away from
children while awaiting disposal and
must be disposed of in a safe manner.
The labelling on the battery will provide
further information. The bin symbol with
a cross through it means that the bat-
teries must not be disposed of in
household waste. A bin with a cross
through it which also has one or more
chemical symbols on it indicates that
the battery contains lead (Pb), cadmium
(Cd) and/or mercury (Hg).
3E&G+J
Old batteries contain valuable raw ma-
terials which can be recycled. Dispos-
ing of batteries separately makes them
easier to handle and recycle.
Page: 13
en — Guide to the appliance
40
Page: 14
en — Guide to the appliance
41
a Suction hose
b Vacuum cleaner carrying handle
c Foot switch for cable rewind
d ComfortClean button
e Connection cable
f Upholstery nozzle
g Fine dust container with fine dust filter
h Rollers*
i Crevice nozzle
j Park system for pauses during vacuuming
k Rotary selector (or display, for models with radio control handles)
l On/Off footswitch
m Dust container carrying handle
n Filter frame
o Dust container
p Pre-filter
q Pre-filter handle
r Dust container release catch
s Floorhead*
t Release catches
u Comfort telescopic suction tube
v Release catch for Comfort telescopic suction tube
w LED*
x Standby button for short pauses in vacuuming*
y Suction power selector buttons +/-*
z Handle (some models have an air inlet valve in the handle)*
Underneath – park system for storage (not illustrated)
* These special features depend on the model and may vary or may not be avail-
able on your vacuum cleaner.
Page: 15
en
42
Notes on the European Regu-
lation (EU) No. 666/2013
This vacuum cleaner is a domestic va-
cuum cleaner and is classified as a uni-
versal vacuum cleaner in accordance
with the above-mentioned regulation.
These operating instructions and addi-
tional information are available to down-
load from the Miele website at
www.miele.com.
The annual energy consumption stated
in the regulation describes the indicat-
ive annual energy consumption (kWh
per year), based on 50 cleaning cycles.
Actual energy consumption depends on
how the vacuum cleaner is used.
All tests and calculations were carried
out according to the following harmon-
ised standards applicable at the time in
due consideration of the published reg-
ulation guidelines of the European
Commission from September 2014:
a) EN 60312-1 Vacuum cleaners for
household use – Part 1: Dry vacuum
cleaners – Methods for measuring the
performance.
b) EN 60704-2-1 Household and similar
electrical appliances – Test code for the
determination of airborne acoustical
noise – Part 2-1: Particular requirements
for vacuum cleaners.
c) EN 60335-2-2 Household and similar
electrical appliances – Safety – Part 2-2:
Particular requirements for vacuum
cleaner and water suction appliances.
Not all floorheads and accessories sup-
plied with the vacuum cleaner are inten-
ded for intensive cleaning of carpets or
hard floors as described in the regula-
tion. The following floorhead and setting
were used to determine the values:
For energy consumption and cleaning
class on carpet and hard floors and
sound power level on carpet, the ad-
justable floorhead was used with the
brush retracted (press the foot-
switch).
The data given in the regulation refers
exclusively to the combinations and
settings of the floorhead on the different
floor surfaces described here.
Illustrations
The illustrations referred to in the text
are shown on the fold-out pages at
the end of these operating instruc-
tions.
Connection
Attaching the suction hose
(Fig. 01 + 02)
Insert the hose connector into the
suction opening on the vacuum
cleaner until it clicks into position. To
do this, line up the guides on the two
pieces.
If you want to separate the pieces
again, press the release catches at
the side of the hose connector, and
pull the suction hose out of the suc-
tion opening.
Connecting the suction hose to the
handle (Fig. 03)
Insert the suction hose into the
handle until it clicks into position.
Page: 16
en
43
Connecting the handle to the suction
tube (Fig. 04)
Insert the handle into the suction tube
until it clicks into position. To do this,
line up the guides on the two pieces.
To detach the handle from the suction
tube, press the release catch and pull
the handle out of the suction tube,
twisting it slightly as you do so.
Connecting the telescopic tube to
the floorhead (Fig. 05)
Push the telescopic tube into the
floorhead and turn it clockwise or
anti-clockwise until it clicks into posi-
tion.
To detach the floorhead from the suc-
tion tube press the release button
and pull the suction tube away from
the floorhead, twisting it slightly as
you do so.
Using the supplied accessories
(Fig. 06)
Crevice nozzle
For cleaning in folds, crevices or
corners.
Upholstery nozzle
For cleaning upholstery, mat-
tresses, cushions, curtains, etc.
Dusting brush, supplied loose
(depending on model)
For cleaning skirting boards, or-
nate and carved objects.
The head can be swivelled to ad-
just the angle.
The crevice nozzle and the upholstery
nozzle are located in holders at the rear
of the vacuum cleaner.
Certain models are supplied as stand-
ard with a turbobrush which is not illus-
trated. The turbobrush is supplied with
its own set of operating instructions.
Use
Adjusting the dusting brush integ-
rated in the Eco Comfort handle
(Fig. 07)
Some models are equipped with an Eco
Comfort handle.
The dusting brush is suitable for vacu-
uming scratch-resistant surfaces, e.g.
keyboards or vacuuming up crumbs.
Press the release button on the dust-
ing brush and push the brush out un-
til it clearly engages in position.
When you have finished dusting
press the release button and push the
brush back into its original position
until it clicks into place.
Adjusting the telescopic suction
tube (Fig. 08)
One part of the telescopic suction tube
is packed inside the other, and it can be
adjusted to suit your height for comfort-
able vacuuming.
Grasp the release mechanism and
adjust the telescopic suction tube to
the required length.
Adjusting the floorhead
(Fig. 09, 10 + 11)
Depending on the model, your vacuum
cleaner will be fitted as standard with
one of the floorheads illustrated.
Page: 17
en
44
This vacuum cleaner can be used for
daily cleaning of carpets, rugs and ro-
bust hard floors.
Miele offers a range of other floorheads,
brushes and accessories for other types
of flooring and special applications (see
“Optional accessories”).
Please observe the flooring manu-
facturer’s cleaning and care instruc-
tions.
Clean even hard floors which are not
susceptible to scratching, as well as
flooring with gaps or deep crevices in it
with the brush protruding:
Press the footswitch.
Vacuum carpets and rugs with the
brush retracted:
Press the footswitch.
If the suction power of the adjustable
floorhead seems too high, reduce the
suction until the floorhead is easier
to manoeuvre (see “Use” – “Regulat-
ing the suction power”).
Adjustable floorhead (Fig. 12)
The adjustable floorhead can also be
used for vacuuming the stairs.
Risk of injury caused by falling
vacuum cleaner.
You may be injured if the vacuum
cleaner should fall from the stairs.
When vacuuming stairs, it is best to
start at the bottom of the stairs and
move upwards.
Unwinding the mains cable (Fig. 13)
Pull the mains cable out to the re-
quired length.
Insert the plug into the socket.
Risk of damage due to overheat-
ing.
The mains cable may overheat after
a long period of use.
If vacuuming for longer than
30 minutes, the cable must be pulled
out all the way.
Rewinding the cable (Fig. 14)
Switch off at the wall socket and un-
plug it.
Step briefly on the cable rewind foot-
switch.
The cable will then retract itself fully into
the vacuum cleaner.
If you do not want the cable to retract
completely into the vacuum cleaner
you can stop it before it does. To do
this, take hold of the cable whilst re-
tracting it and give it a short pull when
you want the rewinding to end.
Switching on and off (Fig. 15)
Press the On/Off footswitch .
To regulate the suction power
The suction power can be regulated to
suit the type of flooring being cleaned.
Reducing the suction power reduces
the amount of effort required to man-
oeuvre the floorhead.
The vacuum cleaner has symbols on
the controls which indicate the type of
use the settings are suitable for.
Page: 18
en
45
Curtains, fabric
Cut pile carpets, rugs and runners
Loop pile carpet and rugs
Hard flooring and heavily soiled
carpets and rugs (also for clean-
ing upholstery and mattresses
with the upholstery nozzle)
When using the adjustable floorhead,
if the suction seems too high, reduce
the suction power until the floorhead
is easier to manoeuvre.
Depending on the model, your vacuum
cleaner will be fitted as standard with
one of the following suction power se-
lectors:
— Rotary selector
— Radio-control handle
Rotary selector (Fig. 16)
Turn the rotary selector to the suction
power setting you require.
Radio-control handle (Fig. 17)
When the vacuum cleaner is switched
on with the On/Off foot control , the
suction power setting will flash in
the vacuum cleaner display.
Press the Standby button on the
handle.
The suction power setting will light
up in the vacuum cleaner display.
The first time the vacuum cleaner is
switched on, the highest setting will be
selected automatically.
After that, the vacuum cleaner will
switch on at the setting which was used
previously. This will flash.
Press the + button on the handle to
select a higher suction power setting.
Press the — button on the handle to
select a lower suction power setting.
To open the air inlet valve
(Fig. 18 + 19)
(not on models with radio-controls on
the handle or on Eco Comfort handles)
It is easy to reduce the suction power
for a short time, e.g. to prevent rugs or
other objects being sucked into the va-
cuum cleaner.
Open the air inlet valve on the handle
far enough to reduce the suction
power.
The floorhead will be easier to man-
oeuvre.
During vacuuming
When vacuuming, pull the cleaner be-
hind you on its wheels. You can stand
it upright for vacuuming stairs and
curtains etc.
If you vacuum a large amount of dust in
one go, you should start the Comfort-
Clean self-cleaning function manually
either during a vacuuming pause or im-
mediately afterwards. This enables the
vacuum cleaner to achieve the very
best cleaning performance again
straight away (see “Maintenance” –
“Starting the ComfortClean self-clean-
ing function manually”).
Page: 19
en
46
Interrupting operation (Fig. 17)
(for models with radio controls on the
handle)
The vacuum cleaner can be paused for
short breaks whilst vacuuming.
Press the Standby button on the
handle.
The Standby button is designed
to pause the vacuum cleaner for
short periods of time whilst vacuum-
ing. Do not leave the vacuum cleaner
in Standby mode for long periods.
This can cause overheating and
damage.
An LED will indicate each time a button
is pressed on the handle.
At the end of the pause you can do one
of the following:
Press the Standby button again to
switch the vacuum cleaner back on at
the setting you were using before
pausing it.
Press the + button to switch the va-
cuum cleaner back on using the
highest power setting.
Press the — button to switch the va-
cuum cleaner back on using the low-
est power setting.
Setting down, transportation
and storage
Park system for pauses during vacu-
uming (Fig. 20)
The Park system allows you to conveni-
ently park the suction tube and floor-
head during pauses.
Slot the floorhead or floorbrush into
the parking attachment on the va-
cuum cleaner.
If your vacuum cleaner is on a slop-
ing surface, e.g. a ramp, retract the
telescopic tube fully.
Park system for storage (Fig. 21)
Risk of electric shock from mains
voltage.
The mains voltage is applied to the
appliance even if it is switched off.
After use, switch the appliance off at
the wall socket and unplug it.
Stand the vacuum cleaner upright.
Retract the telescopic tube fully.
Slot the floorhead downwards into
the parking attachment on the va-
cuum cleaner.
This makes the vacuum cleaner easier
to carry or store.
Do not lift the vacuum cleaner by the
dust container carrying handle.
Always use the vacuum cleaner car-
rying handle.
Page: 20
en
47
Maintenance
Risk of electric shock from mains
voltage.
The mains voltage is applied to the
appliance even if it is switched off.
Before carrying out any maintenance
work, switch the appliance off at the
wall socket and unplug it.
Emptying the dust container
(Fig. 22–27)
Empty the dust container before the
dust has reached the max marking
on the dust container.
Pull the dust container handle up-
wards.
Lift the dust container upwards to re-
move it.
The contents of the container can be
disposed of with normal domestic
waste, providing they consist of gen-
eral household dust only.
Hold the dust container close to the
bin to prevent dust from billowing out.
Press the yellow release catch on the
bottom of the dust container.
The cover will open and the dust will fall
out.
Close the cover making sure it clicks
into place.
Insert the dust container into the va-
cuum cleaner from above so that it
audibly clicks into place.
Push the handle down.
Cleaning the dust container
Clean the dust container as required.
Clean the dust container using water
and mild washing-up liquid.
Dry the dust container thoroughly.
Cleaning the filter frame (Fig. 28 + 29)
A removable filter frame is located in the
dust container. This should be cleaned
if it is obviously dirty.
Place the emptied and open dust
container on its front.
Release the filter frame and remove it.
Empty the filter frame and rinse it un-
der cold running water.
Risk of damage caused by incor-
rect cleaning.
The filter frame can become dam-
aged and be less effective as a res-
ult.
Do not use washing-up liquid or any
pointed or sharp-edged objects to
clean the filter. Dry the filter frame
carefully after cleaning.
Replace the dry filter frame in the
dust container so that it audibly clicks
into place.
Page: 21
en
48
Cleaning the fine dust filter
The fine dust filter is equipped with a
self-cleaning function. When a specified
degree of soiling is reached, the va-
cuum cleaner switches off automatically
for approx. 20 seconds and carries out
a cleaning process. You will hear this
process running.
The ComfortClean button on the va-
cuum cleaner lights up yellow.
Starting the ComfortClean self-clean-
ing function manually (Fig. 30)
If you vacuum a large amount of dust in
one go, you should start the Comfort-
Clean self-cleaning function manually
either during a vacuuming pause or im-
mediately afterwards. This enables the
vacuum cleaner to achieve the very
best cleaning performance again
straight away.
With the vacuum cleaner switched
on, press the ComfortClean button
for at least 2 seconds.
The vacuum cleaner is switched off
automatically for approx. 20 seconds
and a cleaning process is carried out
which results in operational noise.
The ComfortClean button on the va-
cuum cleaner lights up yellow.
The vacuum cleaner will then switch
back on automatically and will operate
with the previously selected power
level.
We also recommend emptying and
cleaning the fine dust container once or
twice a year (see “Fault resolution” –
“Cleaning the fine dust filter manually”).
Changing the battery in the radio-
control handle (Fig. 31)
Change the battery approximately every
18 months. One 3 V battery (CR 2032)
is required.
The vacuum cleaner can still be used
when the battery has run out or if
there is no battery fitted.
Switch the vacuum cleaner on using
the On/Off footswitch .
The suction power setting will flash
in the vacuum cleaner display.
Press the ComfortClean button on
the vacuum cleaner for at least four
seconds (Fig. 30).
The vacuum cleaner can continue to be
used in this way, but only at maximum
power.
Undo the screw on the battery com-
partment cover using a cross-tip
screwdriver and then remove the
cover.
Replace the battery with a new one,
making sure the polarity is correct.
Replace the cover and tighten the
screw back up again.
Dispose of the old battery in a muni-
cipal recycling facility.
Page: 22
en
49
WARNING! Keep batteries
out of reach of children.
Coin or button batteries containing
lithium can cause severe or fatal in-
juries within 2 hours of being swal-
lowed or placed inside any part of
the body. Non-lithium batteries can
also cause serious injuries if swal-
lowed or placed inside any part of
the body. Even flat batteries can still
be dangerous. If you suspect a child
has swallowed a battery or placed a
battery inside any part of their body,
seek medical advice immediately
(Australia: Poisons Information
Centre, Tel. 13 11 26; NZ: National
Poisons Centre, Tel. 0800 764 766).
Examine devices and make sure the
battery compartment is correctly se-
cured, e.g. that the screw or other
mechanical fastener is tightened. Do
not use if compartment is not secure.
Used batteries must be kept away
from children while awaiting disposal
and must be disposed of in a safe
manner.
Replacing the thread lifters
(Fig. 32 + 33)
(not possible on EcoTeQ Plus floor-
heads)
The thread lifters on the suction inlet to
the floorhead can be replaced. Replace
the thread lifters if the pile has worn
down.
Lever the thread lifters from the slots.
To do so use a suitable tool, e.g. a flat
blade screwdriver.
Fit new thread lifters.
Replacement parts are available from
your Miele dealer or from the Miele
Spare Parts Dept.
Page: 23
en
50
Cleaning and care
Risk of electric shock from mains
voltage.
The mains voltage is applied to the
appliance even if it is switched off.
Before cleaning, switch the appli-
ance off at the wall socket and un-
plug it.
Vacuum cleaner and accessories
Risk of electric shock from mains
voltage.
If moisture gets into the vacuum
cleaner, there is a risk of electric
shock.
Do not let the vacuum cleaner get
wet.
Follow the special cleaning instruc-
tions for the dust container and filter
frame in “Maintenance” and for the
fine dust filter, the pre-filter and the
fine dust container in “Fault resolu-
tion”.
The vacuum cleaner and all plastic ac-
cessories can be cleaned with a propri-
etary cleaner suitable for plastic.
Damage due to unsuitable clean-
ing agents.
All surfaces are susceptible to
scratching. Contact with unsuitable
cleaning agents can alter or discol-
our the external surfaces.
Do not use abrasive cleaning agents,
glass cleaning agents, all-purpose
cleaners or oil-based conditioning
agents.
Page: 24
en
51
Problem solving guide
Many malfunctions and faults that can occur in daily operation can be easily
remedied. Time and money will be saved because a service call will not be
needed.
The following guide may help you to find the reason for a malfunction or a fault,
and to correct it.
Risk of electric shock from mains voltage.
The mains voltage is applied to the appliance even if it is switched off.
Before dealing with any problems, switch the appliance off at the wall socket
and unplug it.
Problem Cause and remedy
The vacuum cleaner
switches off automatic-
ally.
A temperature limiter switches the vacuum cleaner
off automatically if it gets too hot. This can occur
when the airways are blocked by bulky objects.
Switch the vacuum cleaner off immediately using
the On/Off footswitch . Switch off at the wall
socket and unplug it.
After removing the cause, wait for approximately 20–
30 minutes to allow the vacuum cleaner to cool
down. It can then be switched on again.
The ComfortClean but-
ton is lit up yellow.
The vacuum cleaner is running an automatic cleaning
process which you can hear running.
Wait for approx. 20 seconds until this cleaning
process has finished.
The ComfortClean but-
ton lights up red.
The vacuum cleaner
has switched to the
lowest power level.
The dust container is full.
Empty the dust container.
The pre-filter is dirty.
Clean the pre-filter (see “Fault resolution” –
“Cleaning the pre-filter”).
The fine dust filter is dirty.
Clean the fine dust filter at the next available op-
portunity (see “Fault resolution” – “Cleaning the
fine dust filter manually”).
Page: 25
en
52
Problem Cause and remedy
Cleaning performance
is reduced.
The pre-filter is dirty.
Clean the pre-filter (see “Fault resolution” –
“Cleaning the pre-filter”).
The fine dust container is full.
Empty and clean the fine dust container at the
next available opportunity (see “Fault resolution” –
“Cleaning the fine dust filter manually”).
Page: 26
en
53
Fault resolution
Risk of electric shock from mains
voltage.
The mains voltage is applied to the
appliance even if it is switched off.
Before carrying out any
troubleshooting, switch the appli-
ance off at the wall socket and un-
plug it.
Cleaning the pre-filter (Fig. 34 + 35)
The pre-filter is located at the rear of the
dust container.
This should be cleaned if it is obviously
dirty.
Remove the dust container.
Release the handle of the pre-filter
and remove the pre-filter.
Rinse the pre-filter under cold running
water.
Risk of damage caused by incor-
rect cleaning.
The pre-filter can become damaged
and be less effective as a result.
Do not use washing-up liquid or any
pointed or sharp-edged objects to
clean the filter. Dry the pre-filter care-
fully after cleaning.
Replace the dry pre-filter in the dust
container and lock the handle.
Replace the dust container in the va-
cuum cleaner.
Cleaning the fine dust filter
manually (Fig. 36–41)
Allow a drying time of 24 hours.
Remove the dust container.
Release the fine dust container from
the vacuum cleaner in the direction of
the arrow and remove it.
Run a little water into the opening at
the top of the fine dust container.
Gently shake the fine dust container
back and forth.
This will rinse out the dust.
Shake to empty the water out.
Turn the upper part in the direction of
the arrow so that the marking is
pointing to the symbol.
This releases the upper part.
Carefully lift the fine dust filter up-
wards and out of the fine dust con-
tainer.
Rinse the outside of the fine dust filter
under cold running water.
Risk of damage caused by incor-
rect cleaning.
The fine dust filter can become dam-
aged and be less effective as a res-
ult.
Do not clean the inside of the fine
dust filter. Do not use washing-up li-
quid or any pointed or sharp-edged
objects to clean the filter. Do not
brush the fine dust filter. After clean-
ing, allow the fine dust filter to dry for
a minimum of 24 hours.
Clean the fine dust filter container
with water and mild washing-up li-
quid.
Dry the fine dust filter container thor-
oughly.
Page: 27
en
54
Insert the dry fine dust filter into the
dry fine dust container so that the
marking is pointing to the symbol.
Turn the upper part in the direction of
the arrow so that the marking is
pointing to the symbol.
The upper part is locked.
Replace the fine dust container in the
vacuum cleaner and lock it into place.
Replace the dust container in the va-
cuum cleaner.
Service
Contact in case of malfunction
In the event of any faults which you
cannot remedy yourself, please contact
your Miele Dealer or Miele Service.
Contact information for Miele Service
can be found at the end of this docu-
ment.
Please note that telephone calls may be
monitored and recorded for training
purposes and that a call-out charge will
be applied to service visits where the
problem could have been resolved as
described in this booklet.
Warranty
For information on the appliance war-
ranty specific to your country, please
contact Miele. See end of this docu-
ment for address.
In the UK, your appliance warranty is
valid for 2 years from the date of pur-
chase. However, you must activate your
cover by calling 0330 160 6640 or re-
gistering online at www.miele.co.uk.
Warranty in the UAE
The appliance warranty is valid for 2
years from date of purchase.
For more information on country spe-
cific warranty terms and conditions,
please contact Miele Customer Service.
See end of this document for contact
details.
Optional accessories
Follow the flooring manufacturer’s
cleaning and care instructions.
We recommend using only genuine
Miele accessories bearing the “ORI-
GINAL Miele” logo on the packaging.
Only these will guarantee the optimum
performance of your vacuum cleaner
and the best possible cleaning results.
Please note that faults and damage
caused by use of accessories which
do not bear the “ORIGINAL Miele”
logo on the packaging are not covered
by the vacuum cleaner warranty.
Purchasing accessories
Original Miele accessories are available
from the Miele webshop, the Miele Cus-
tomer Service Department and from
your Miele dealer.
Original Miele accessories are identified
by the “ORIGINAL Miele” logo on the
packaging.
Page: 28
en
55
With 3D4U, Miele also offers free ac-
cessories to download for your 3D
printer (www.miele.com, Service,
3D4U).
Certain models are supplied with one or
more of the following accessories as
standard.
Floorheads / brushes
(only available in selected countries)
TurboTeQ Turbobrush (STB 305-3)
This brush is ideal for cleaning cut pile
carpet.
Hard floorbrush (SBB 235-3)
This brush is designed for use on hard
flooring such as tiled or stone floors.
Parquet Twister floorbrush with
swivel action (SBB 300-3)
With natural bristles for vacuuming
smooth hard floors and small gaps.
Parquet Twister XL floorbrush with
swivel action (SBB 400-3)
With natural bristles for quickly vacu-
uming smooth hard floors and small
gaps.
Other accessories
(only available in selected countries)
Turbo Mini hand turbobrush
(STB 101)
For vacuuming upholstery, mattresses
or car seats, etc.
Universal brush (SUB 20)
For dusting books, shelves, etc.
Radiator brush (SHB 30)
For dusting radiators, narrow shelves
and crevices.
Mattress nozzle (SMD 10)
For vacuuming upholstery, mattresses,
cushions, curtains, covers etc.
Crevice nozzle, 300 mm (SFD 10)
Extra long crevice nozzle for cleaning in
folds, crevices and corners.
Crevice nozzle, 560 mm (SFD 20)
Flexible crevice nozzle for vacuuming
hard to reach places.
XL upholstery nozzle (SPD 20)
Wide upholstery nozzle for cleaning up-
holstery, mattresses and cushions.
Page: 29
en
56
Electrical connection for
the UK
All electrical work should be carried out
by a suitably qualified and competent
person in strict accordance with current
national and local safety regulations (BS
7671 in the UK). The voltage and fre-
quency are given on the data plate loc-
ated underneath the vacuum cleaner.
Please ensure that these match the
household mains supply. The fuse rat-
ing is quoted on the plug. The appli-
ance is supplied with a cable and moul-
ded plug ready for connection to a
230-240 V/50 Hz a.c. single phase sup-
ply.
Electrical connection AU,
NZ
All work should be carried out by a suit-
ably qualified and competent person in
strict accordance with national and
local safety regulations. The voltage
and rated load are given on the data
plate located underneath the vacuum
cleaner. Please ensure that these match
the household mains supply. The appli-
ance is supplied with a cable and moul-
ded plug ready for connection to a
230V/50Hz AC single phase supply.
Test Marks Electrical safety
RCM Mark
Electrically sup-
pressed
according to
AS/NZS CISPR
14.1
Page: 30
en
57
Technical data
(for models with radio controlled handle)
Frequency band 433.05 MHz – 434.79 MHz
Maximum transmitting power < 10 µW
EU Conformity declaration
Miele hereby declares that this vacuum cleaner complies with Directive 2014/53/
EU.
The complete text of the EU declaration of conformity is available from one of the
following internet addresses:
— Products, Download from www.miele.ie
— For service, information, operating instructions etc: go to www.miele.ie/do-
mestic/customer-information-385.htm and enter the name of the product or the
serial number
UK Conformity declaration
Miele hereby declares that this vacuum cleaner complies with UK Radio Equip-
ment Regulations 2017, as amended.
The complete text of the UK declaration of conformity is available from one of the
following internet addresses:
— Products, Download from www.miele.co.uk
— For service, information, operating instructions etc: go to www.miele.co.uk and
enter the name of the product or the serial number
Page: 31
United Kingdom
Miele Co. Ltd., Fairacres, Marcham Road, Abingdon, Oxon, OX14 1TW
Tel: 0330 160 6600, Internet: www.miele.co.uk/service, E-mail: info@miele.co.uk
Australia
Miele Australia Pty. Ltd.
ACN 005 635 398
ABN 96 005 635 398
Level 4, 141 Camberwell Road
Hawthorn East, VIC 3123
Tel: 1300 464 353
Internet: www.miele.com.au
Miele Electrical Appliances Co., Ltd.
1-3 Floor, No. 82 Shi Men Yi Road
Jing’ an District
200040 Shanghai, PRC
Tel: +86 21 6157 3500
Fax: +86 21 6157 3511
E-mail: info@miele.cn,
Internet: www.miele.cn
China Mainland
Miele (Hong Kong) Ltd.
41/F — 4101, Manhattan Place
23 Wang Tai Road
Kowloon Bay, Hong Kong
Tel: (852) 2610 1025
Fax: (852) 3579 1404
Email:
customerservices@miele.com.hk
Website: www.miele.hk
Hong Kong, China
Miele India Pvt. Ltd.
1st Floor, Copia Corporate Suites,
Commercial Plot 9,
Mathura Road, Jasola,
New Delhi — 110025
E-mail: customercare@miele.in
Website: www.miele.in
India
Miele Ireland Ltd.
2024 Bianconi Avenue
Citywest Business Campus
Dublin 24
Tel: (01) 461 07 10
Fax: (01) 461 07 97
E-Mail: info@miele.ie
Internet: www.miele.ie
Ireland
Malaysia
Miele Sdn Bhd
Suite 12-2, Level 12
Menara Sapura Kencana
Petroleum
Solaris Dutamas No. 1
Jalan Dutamas 1
50480 Kuala Lumpur, Malaysia
Phone: +603-6209-0288
Fax: +603-6205-3768
Miele New Zealand Limited
IRD 98 463 631
8 College Hill
Freemans Bay, Auckland 1011
New Zealand
Tel: 0800 464 353
Internet: www.miele.co.nz
New Zealand
Miele Pte. Ltd.
29 Media Circle
#11-04 ALICE@Mediapolis
Singapore 138565
sTel: +65 6735 1191
Fax: +65 6735 1161
E-Mail: info@miele.com.sg
Internet: www.miele.sg
Singapore
Miele (Pty) Ltd.
63 Peter Place
Bryanston 2194
P.O. Box 69434
Bryanston 2021
Tel: (011) 875 9000
Fax: (011) 875 9035
E-mail: info@miele.co.za
Internet: www.miele.co.za
South Africa
Miele Appliances Ltd.
Showroom 1
Eiffel 1 Building
P.O. Box 114782 — Dubai
Tel. +971 4 3044 999
Fax. +971 4 3418 852
800-MIELE (64353)
E-Mail: info@miele.ae
Website: www.miele.ae
United Arab Emirates
Manufacturer: Miele & Cie. KG, Carl-Miele-Straße 29, 33332 Gütersloh, Germany
Thailand
Miele Appliances Ltd.
BHIRAJ TOWER at EmQuartier
43rd Floor Unit 4301-4303
689 Sukhumvit Road
North Klongton Sub-District
Vadhana District
Bangkok 10110, Thailand
Sheikh Zayed Road, Umm Al Sheif

SKCR Blizzard CX1 от Miele — это серия безмешковых пылесосов. Все модели имеют низкий уровень шума и моноциклонную технологию очистки воздуха — она обеспечивает высокую скорость всасывания. Система фильтрации разделяет пыль на мелко- и крупнодисперсную, что позволяет уловить до 99,99% частиц.
В модельном ряде представлены три пылесоса Blizzard SKCR3 CX1:
- Excellence PowerLine — универсальный;
- Parquet PowerLine — с щеткой для твердого пола, паркета в комплекте;
- Cat & Dog PowerLine — с турбощеткой, подходит для владельцев домашних животных, эффективно убирает шерсть с твердых напольных покрытий и ковров.
Как пользоваться Miele SKCR3 Blizzard CX1
На корпусе пылесосов Miele Blizzard CX1 SKCR3 расположены основные элементы управления:
- ножные клавиши — включить / выключить прибор и смотки кабеля в корпус;
- кнопка функции ComfortClean — автоматическая очистка фильтра НЕРА;
- переключатель режимов мощности.
Чтобы собрать пылесос и начать уборку:
- присоедините гибкий шланг к входному отверстию;
- состыкуйте гибкий шланг и рукоятку;
- соедините рукоятку с телескопической трубкой;
- отрегулируйте длину телескопической трубки.
Подберите необходимую насадку и присоедините к трубке. В зависимости от модели прибора, это может быть:
- Стандартная насадка для пола. Имеет кнопку, которая выдвигает / убирает искусственную щетину. Твердые напольные покрытия пылесосьте с выдвинутой щетиной, ковры — без нее.
- Одна из трех насадок, которые хранятся в корпусе прибора — для мебели, щадящей уборки и щелевая;
- Паркетная насадка SBB 300-3 «Twister» — в комплекте с пылесосом Parquet PowerLine;
- Турбощетка модели STB 305-3 — в комплекте с пылесосом Cat & Dog PowerLine.
Чтобы обеспечить эффективность уборки, регулярно очищайте у модели Miele Blizzard CX1 SKCR3 контейнер для пыли и его составляющие. Для этого:
- при максимальной заполненности контейнера — освободите его от пыли;
- при заметных загрязнениях контейнера — промойте его водой и моющим средством, просушите;
- очищайте съемную обойму фильтра — ее можно промывать под холодной проточной водой.
Характеристики
Все три пылесоса модельного ряда Miele Blizzard CX1 SKCR3 имеют схожие основные технические характеристики:
- тип пылесоса — напольный, безмешковой, с циклонной технологией;
- объем контейнера для сбора пыли — 2 литра;
- мощность двигателя — 1100 Вт;
- комплект фильтров — предварительный, мелкодисперсной пыли, выходящего воздуха;
- комплект из пяти насадок;
- длина сетевого кабеля — 7,5 метров;
- уровень шума при работе на максимальной мощности — 76 Дб;
- вес — 8,5 кг.
Основные функции
Пылесосы Miele Blizzard CX1 SKCR3 предназначены для сухой уборки помещений. Имеют четыре режима мощности:
- Минимальный. Для гардин, текстильных изделий.
- Для высококачественных ковровых покрытий, которые требуют бережного ухода.
- Для ковров с петлевым ворсом.
- Максимальный. Для твердых напольных покрытий.
Пылесосы применяют моноциклонную технологию Vortex — она обеспечивает всасывающую скорость воздуха свыше 100 км/час и разделяет крупные и мелкие частицы пыли. Пылесосы имеет следующие функции:
- Фильтрация выходящего воздуха. Не требующий замены, гипоаллергенный фильтр НЕРА LifeTime улавливает более 99% мелкодисперсных частиц пыли.
- Парковка. Автоматически выключает прибор — необходимо вставить трубку пылесоса в парковочный паз. Это позволяет компактно хранить прибор и делать перерывы в работе.
- Шумоподавление. Мотор PowerLine имеет низкий уровень шума при работе.
- ComfortClean. Автоматическая очистка фильтра для мелкодисперсной пыли.
- Click2Open. Позволяет легко открыть контейнер для сбора пыли — это необходимо при его очистке.
Подробное руководство (PDF) для Miele SKCR3 Blizzard CX1
Полная инструкция по эксплуатации на русском языке для пылесосов серии Miele SKCR3 Blizzard CX1 на официальном сайте производителя:
![]() Инструкция по Miele SKCR3 Blizzard CX1
Инструкция по Miele SKCR3 Blizzard CX1
Каталог современных моделей пылесосов Miele находится здесь.