Specifications:1586/1586998-dvc340.pdf file (29 Jan 2023) |
Accompanying Data:
Rekam DVC-340 Camcorder PDF Operation & User’s Manual (Updated: Sunday 29th of January 2023 01:23:47 PM)
Rating: 4.2 (rated by 10 users)
Compatible devices: HDR-TD30V, HD1000P, VMH-620A — Camcorder, DynaView SSC-DC573, All-World Cam, H8, DCR-DVD200 — Dvd Handycam Camcorder, Xacti VPC-HD2.
Recommended Documentation:
Text Version of Operation & User’s Manual
(Ocr-Read Summary of Contents of some pages of the Rekam DVC-340 Document (Main Content), UPD: 29 January 2023)
-
81, Rekam DVC-340 81 6.5 ПОДКЛЮЧЕНИЕ ЦИФРОВОЙ ВИДЕОКАМЕРЫ ККОМПЬЮТЕРУ СПОМОЩЬЮ USB КАБЕЛЯ (ВХОДИТ ВКОМПЛЕКТ) 1. Подключите цифровую видеокамеру кUSB-порту ком- пьютера при помощи USB-ка�…
-
34, Rekam DVC-340 34 Menu item Function Rotate: Use this function to rotate the images. [90 o ]: Rotate the image 90 degrees in clockwise. [180 o ]: Rotate the image 180 degrees in clockwise. [270 o ]: Rotate the image 270 degrees in clockwise. [Cancel]: No rotate the image. Crop Image: Use this function to crop the images. [Crop]…
-
21, 21 3.5 HOW TO USE THE SELF-TIMER Use the self-timer to set a delay from the time the shutter button is pressed to the time the image is shot. 1. Turn the power on, and set the digital video camera to the Capture mode. 2. Press the MENU button to display the capture menu, and then press the LEFT or RIGHT b…
-
19, 19 Display Title Description Capture mode For taking still photos. Video mode For recording movie clips. Audio mode For recording audio les. Playback mode For previewing record les. Please Note: Press the playback button to enter playback mode. 3.3 HOW TO RECORD A VIDEO CLIP 1. Turn on the digital…
-
29, 29 Menu item Function Image Setting: Effect: Set the color effect to add a color tone to the picture. [Normal]/[B&W]/[Sepia]/[Red]/[Green]/[Blue]/ [Sunset]/[Warm]/[Cool]/[Over Exposure] /[IR]/ [Binary]/[Vivid]/[Undertone]/[Dog Eye]/ [Aibao]/[Gothic]/[Japan Style]/[LOMO]/ [Negative]/[Cancel]. Satura…
-
40, Photo Effect: [Normal]/[B&W]/[Sepia]/[Red]/[Green]/[Blue]/ [Sunset]/[Warm]/[Cool]/[Over Exposure]/ [IR]/[Binary]/[Vivid]/[Undertone]/[Dog Eye]/ [Aibao]/[Gothic]/[Japan Style]/ [LOMO]/ [Negative] Self-timer: 2/5/10 sec. Storage: External memory: SD / MMC TV System: NTSC / PAL Digital Zoom: 8X Power Suppl…
-
43, 43 Пожалуйста, прочтите данное руководство пользователя, чтобы использовать цифровую видеокамеру правильно. Сохраните инструкцию после прочтения, чтобы вы �…
-
32, Rekam DVC-340 32 3. Zooming: Press the ZOOM IN or ZOOM OUT buttons to zoom in or zoom out the image. When the picture is enlarged you can use the LEFT/RIGHT/UP/DOWN buttons to browse the details of the image. 4. Press the ZOOM OUT button to resume the normal mode. 5.3 HOW TO PLAYBACK AUDIO FILES 1. Press the PLAYBAC…
-
Rekam DVC-340 User Manual
-
Rekam DVC-340 User Guide
-
Rekam DVC-340 PDF Manual
-
Rekam DVC-340 Owner’s Manuals
Recommended: L710, APS-25-CL, VisionX Series


-
Sony CCD-TRV138 — Handycam Camcorder — 320 KP
SECTION 6ADJUSTMENTSCCD-TRV138/TRV238E/TRV338/TRV438ERMT-833ADJRevision HistoryRevision HistoryVer 1.0 2004. 11LinkLinkAdjusting Items when Replacing Main Parts and BoardsBefore Starting AdjustmentsAdjusting Items when Replacing Main Parts and BoardsBefore Starting AdjustmentsLCD SYSTEM ADJUSTMENTSCAMERA …
CCD-TRV138 — Handycam Camcorder — 320 KP 49
-
Canon 2.2
1234IntroductionContents at a GlanceDownloading ImagesCamera SettingsRemote ShootingReferencePreferencesIndexEOS DIGITAL Camera SoftwareEOS UtilityVer. 2.2Instruction Manual1Ds Mk III1D Mk III40DO Content of this Instruction ManualO EU is used for EOS Utility.O Camera model is displayed as an icon.Exam …
2.2 54
-
GoPro HERO Camera
Consultezgopro.compourunetraductiondesinstructions.frn~~tLt..:~1&~r!llltl:gopro.comiJ’GAl- 1:~ItoObersetzteAnweisungensinduntergopro.comzufinden.Visitagopro.comparalasinstruccionestraducidas.PerIeistruzionitradotteinaltreIinguevisitareilsitegopro.com.HDHEROINSTRUCTIONSVisitegopro.comparaatradu~aodasinstru~oes. …
HERO Camera 12
-
Sony MHS-CM1
Mobile HD SnapCameraFor details on the advanced operations, please access»‘Mobile HD Snap Camera Handbook» contained onthe supplied CD-ROM via a computer.Instruction ManualBeR)re operating tile unit, please read this manual thoroughly, and retain it [or [[lltlre reference.MHS-CM1/CM3© 2009 Sony Corporat …
MHS-CM1 36
Additional Information:
Operating Impressions, Questions and Answers:
Инструкцию для Rekam DVC-340 на русском языке, в формате pdf можно скачать с нашего сайта. Наш каталог предоставляем Вам инструкцию производителя фирмы Rekam, которая была взята из открытых источников. Ознакомившись с руководством по эксплуатации от Rekam, Вы на все 100% и правильно сможете воспользоваться всеми функциями устройства.
Для сохранения инструкции «Видеокамера Full HD Rekam DVC-340» на русском языке на вашем компьютере либо телефоне, нажмите кнопку «Скачать инструкцию». Если активна кнопка «Инструкция онлайн», то Вы можете просмотреть документ (manual), в своём браузере онлайн.
Если у Вас нет возможности скачать инструкцию по эксплуатации либо просмотреть её, Вы можете поделиться ссылкой на эту страницу в социальных сетях и при удобном моменте скачать инструкцию. Либо добавьте эту страницу в закладки Вашего браузера, нажав кнопку «Добавить страницу в закладки браузера».
![]()
DIGITAL CAMCORDER
DVC-340
USER MANUAL
|
CONTENTS |
||
|
1. PARTS OF THE DIGITAL VIDEO CAMERA . . . . . . . . . . . . . . . . . . . . . . . . . . . . . . . . . . . . . . . . . . . . . . . . . |
. 4 |
|
|
2. SETUP GUIDE .. .. .. .. .. .. .. .. .. .. .. .. .. .. .. .. .. .. .. .. .. .. .. .. .. .. .. .. .. .. .. .. .. .. .. .. .. .. .. .. .. .. .. .. .. .. .. .. .. .. .. .. .. .. .. .. .. .. .. .. .. .. .. .. .. .. .. .. .. .. .. .. .. .. |
.. 5 |
|
|
2..1 |
HOW TO INSTALL THE BATTERY . . . . . . . . . . . . . . . . . . . . . . . . . . . . . . . . . . . . . . . . . . . . . . . . . . . . . . . . . . . . . . . . . |
. 5 |
|
2..2 HOW TO CHARGE THE BATTERY . . . . . . . . . . . . . . . . . . . . . . . . . . . . . . . . . . . . . . . . . . . . . . . . . . . . . . . . . . . . . . . . . |
. 6 |
|
|
2..3 HOW TO INSERT THE MEMORY CARD . . . . . . . . . . . . . . . . . . . . . . . . . . . . . . . . . . . . . . . . . . . . . . . . . . . . . . . . . . . . |
. .7 |
|
|
2..4 HOW TO FORMAT THE MEMORY CARD . . . . . . . . . . . . . . . . . . . . . . . . . . . . . . . . . . . . . . . . . . . . . . . . . . . . . . . . . . . |
. 8 |
|
|
2..5 |
HOW TO SELECT A LANGUAGE . . . . . . . . . . . . . . . . . . . . . . . . . . . . . . . . . . . . . . . . . . . . . . . . . . . |
. .9. . . . . . |
|
2..6 HOW TO SET THE DATE AND TIME . . . . . . . . . . . . . . . . . . . . . . . . . . . . . . . . . . . . . . . . . . . . . . . . . . . . . . . . . . . . . . . |
10 |
|
|
2..7 EXPLANATION OF THE MONITOR SCREEN DISPLAY . . . . . . . . . . . . . . . . . . . . . . . . . . . . . . . . . . . . . . . . . . . . |
.11 |
|
|
3. HOW TO USE THE DIGITAL VIDEO CAMERA . . . . . . . . . . . . . . . . . . . . . . . . . . . . . . . . . . . . . . . . . . . . . . |
18 |
|
|
3..1 HOW TO TURN THE DIGITAL VIDEO CAMERA ON AND OFF .. .. .. .. .. .. .. .. .. .. .. .. .. .. .. .. .. .. .. .. .. .. .. .. .. .. .. .. .. .. .. .. .. .. .. .. .. .. .. |
18 |
|
|
3..2 HOW TO CHANGE THE RECORD MODE . . . . . . . . . . . . . . . . . . . . . . . . . . . . . . . . . . . . . . . . . . |
18. . . . . . . |
|
|
3..3 HOW TO RECORD A VIDEO CLIP .. .. .. .. .. .. .. .. .. .. .. .. .. .. .. .. .. .. .. .. .. .. .. .. .. .. .. .. .. .. .. .. .. .. .. .. .. .. .. .. .. .. .. .. .. .. .. .. .. .. .. .. .. .. .. .. .. .. .. .. .. .. .. .. .. |
19 |
|
|
3..4 |
HOW TO TAKE STILL IMAGES . . . . . . . . . . . . . . . . . . . . . . . . . . . . . . . . . . . . . . . . . . . . . . . . . . . . . . . . . . . . . . . . . . . . |
20 |
|
3..5 HOW TO USE THE SELF-TIMER .. .. .. .. .. .. .. .. .. .. .. .. .. .. .. .. .. .. .. .. .. .. .. .. .. .. .. .. .. .. .. .. .. .. .. .. .. .. .. .. .. .. .. .. .. .. .. .. .. .. .. .. .. .. .. .. .. .. .. .. .. .. .. .. .. .. |
21 |
|
|
3..6 |
HOW TO RECORD AUDIO . . . . . . . . . . . . . . . . . . . . . . . . . . . . . . . . . . . . . . . . . . . . . . . . . . . . . . . . . . . . . . . . . . . . . . . . |
22 |
|
4. HOW TO USE THE MENU IN RECORD MODE . . . . . . . . . . . . . . . . . . . . . . . . . . . . . . . . . . . . . |
22. . . . . . . |
|
|
4..1 MENU IN CAPTURE MODE . . . . . . . . . . . . . . . . . . . . . . . . . . . . . . . . . . . . . . . . . . . . . . . . . . . . |
22. . . . . . . |
|
|
4..2 |
CAPTURE MENU LIST . . . . . . . . . . . . . . . . . . . . . . . . . . . . . . . . . . . . . . . . . . . . . . . . . . . . . . . . . . . . . . . . . . . . . . . . . . . |
23 |
|
4..3 MENU IN VIDEO MODE . . . . . . . . . . . . . . . . . . . . . . . . . . . . . . . . . . . . . . . . . . . . . . . . . . . . |
27. . . . . . . |
|
|
4..4 |
SETUP MENU . . . . . . . . . . . . . . . . . . . . . . . . . . . . . . . . . . . . . . . . . . . . . . . . . . . . . . . . . . . . . . . . . . . . . . . . . . . . . . . . . . . |
29 |
|
5. PLAYBACK . . . . . . . . . . . . . . . . . . . . . . . . . . . . . . . . . . . . . . . . . . . . . . . . . . . . . . . . . . . . . . . . . . . . . . . . . . . . . |
31 |
|
|
5..1 HOW TO PLAYBACK MOVIE CLIPS . . . . . . . . . . . . . . . . . . . . . . . . . . . . . . . . . . . . . . . . . . . . . . . . . . . . . . . . . . . . . |
31. . |
|
|
5..2 |
HOW TO PLAYBACK STILL IMAGES . . . . . . . . . . . . . . . . . . . . . . . . . . . . . . . . . . . . . . . . . . . . . . . . . . . . . . . . . |
31. . . . . |
|
5..3 |
HOW TO PLAYBACK AUDIO FILES . . . . . . . . . . . . . . . . . . . . . . . . . . . . . . . . . . . . . . . . . . . . . . . . . . . . |
32. . . . . . . . |
|
5..4 HOW TO VIEW THUMBNAILS . . . . . . . . . . . . . . . . . . . . . . . . . . . . . . . . . . . . . . . . . . . . . . . . . . . . . . . . . . . . . . . . . . . . |
32 |
|
|
5..5 MENU IN PLAYBACK MODE . . . . . . . . . . . . . . . . . . . . . . . . . . . . . . . . . . . . . . . . . . . . . . . . . . . . . . |
.33. . . . . . . |
6. HOW TO CONNECT THE DIGITAL VIDEO CAMERA TO A TV/HDTV/PC . . . . . . . . . . . . . . . . . . . . . . 35 6..1 HOW TO CONNECT THE DIGITAL VIDEO CAMERA TO A TV . . . . . . . . . . . . . . . . . . . . . . . . . . . . . . . . . . . . . . . .35 6..2 HOW TO CONNECT THE DIGITAL VIDEO CAMERA TO A HDTV . . . . . . . . . . . . . . . . . . . . . . . . . . . . . . . . . . . . . 36 6..3 HOW TO CONNECT THE DIGITAL VIDEO CAMERA TO A PC .. .. .. .. .. .. .. .. .. .. .. .. .. .. .. .. .. .. .. .. .. .. .. .. .. .. .. .. .. .. .. .. .. .. .. .. .. .. .. .. 37 6..4 HOW TO USE THE CARD READER . . . . . . . . . . . . . . . . . . . . . . . . . . . . . . . . . . . . . . . . . . . . . . . . . . . . . . . . . . . . . . . . 37 6..5 HOW TO CONNECT THE DIGITAL VIDEO CAMERA TO A PC WITH A USB CABLE . . . . . . . . . . . . . . . .38. . . .
7. TECHNICAL SPECIFICATIONS . . . . . . . . . . . . . . . . . . . . . . . . . . . . . . . . . . . . . . . . . . . . . . . . . . . . . . . . . . . 39
Please read these operating instructions carefully in order to use the digital video camera correctly.. Keep the instructions in a safe place after reading so that you can refer to them later.. Precautions:
Before using the digital video camera, please ensure that you read and understand the safety precautions described below..
•Should the digital video camera malfunction in any way, do not attempt to repair it yourself.. Maintenance and repairs should only be carried out by authorized service providers..
•Keep the digital video camera away from water and other liquids.. Do not use the camcorder with wet hands.. Never use the camcorder in the rain or snow.. Moisture creates the risk of electric shock..
•Use only the recommended power accessories.. Use of power sources not expressly recommended for this unit may lead to overheating, distortion of the equipment, fire, electrical shock or other hazards..
3

1.PARTS OF THE DIGITAL VIDEO CAMERA
1.Playback Button..
2.Menu Button..
3.Delete..
4.Power Button..
5.Mode Button..
6.Up Button..
7.Zoom In Button..
8.Zoom Out Button..
9.HDMI Jack..
10.Power/Charging Indicator Light..
11.Shutter Button..
12.SD Card Slot..
13.USB Jack..
14.AV Out Jack..
15.Right/LED On/Off Button..
16.Down Button..
4

17. OK Button..
18.Left/Display
Button..
19.Speaker..
20.LCD Screen..
21.Self-timer LED..
22.Lens..
23.LED Light..
24.Microphone..
25.Tripod Socket..
26.Battery Cover.. 27. Wrist Strap..
2.SETUP GUIDE
2.1HOW TO INSTALL THE BATTERY
1.Slide the battery cover and open it..
5
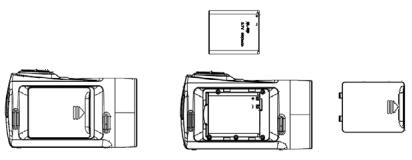
2.Place the accessory li-ion battery into the compartment.. Please note: The metallic contacts must be aligned with the contacts in the compartment..
3.After the battery is properly installed, close the battery cover..
2.2HOW TO CHARGE THE BATTERY
Charge the battery for at least eight hours prior to first use.
a.Power OFF and connect the USB cable to the digital video camera and the computer for battery charging..
b.Charging starts when charging LED turns BLUE.. The charge indicator
6
light turns OFF when charging is completed.. c. Disconnect the camcorder..
2.3 HOW TO INSERT THE MEMORY CARD
This digital video camera has no internal memory, it can’t record pictures or movie clips.. If you want record you have to use a SD or MMC card (The MAX..SD/MMC card that this digital video camera could support is up to 32GB)..Turn off the digital video camera before inserting or removing the memory card.. Be sure to align and position the card correctly when inserting it.. Never try to force the memory card into the slot if you feel resistance.. The memory card has a write protect switch which used to protect data from accidental deletion.. Therefore,whenever you want to record,format or delete files in the
SD card, disable the write protection beforehand..
7
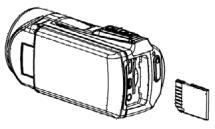
1.Turn off the camcorder..
2.Find the rubber cover at the side of digital video camera and then you will see the SD card slot..
3.Insert the memory card as illustrated..
4.Close the rubber cover..
5.To release the memory card, press the edge of the card gently..
2.4HOW TO FORMAT THE MEMORY CARD
It is important to format the memory card the first time you use this digital video camera.. All data will be deleted including protected files.Be sure to download the important files to your computer before formatting..
8
1.Turn the power on, and set the digital video camera to the Setup Menu..
2.Press the UP or DOWN buttons to select [Format], then press OK button to launch the submenu..
3.Press the UP or DOWN buttons to select the item [YES] and then press the OK button to erase all data..
2.5HOW TO SELECT A LANGUAGE
Be sure to choose a language and set the date & time before first time
using the digital video camera..
1.Turn the power on, and set the digital video camera to the Setup Menu..
2.Press the UP or DOWN buttons to select [Language] then press OK button to launch the submenu..
3.Press the UP or DOWN buttons to select the desired language and then press the OK button to confirm the setting and exit the menu..
9

2.6HOW TO SET THE DATE AND TIME
1.Turn the power on, press the MENU button to display the menu, and then press the RIGHT button twice to select [Setup] Menu..
2.Press the UP or DOWN buttons to select [Set Date] then press the OK button to launch the submenu..
3.Press the UP or DOWN buttons to change the highlighted value.. Press the LEFT or RIGHT buttons to move the cursor between settings..
4.Press the OK button to confirm the setting and close the menu..
10
![]()
2.7 EXPLANATION OF THE MONITOR SCREEN DISPLAY
5
6
7
15 14 13 12 11 10 9 8
|
Capture Mode:[ |
] |
||
|
1.. Camera Mode |
|||
|
Still Image Capture |
|||
11
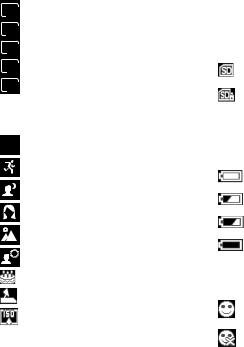
2.. Image Size..
21M 5616×3744
12M 4000×3000
8M 3264×2448
5M 2592×1944
3M 2048×1536
3.. Scene Mode..
P Auto
Sport
Night
Portrait
Landscape
Backlight
Party
Beach
High Sensitivity
4..Number of pictures available in SD Card..
5..SD Card inserted..
No protect status
Protect status
6..Zoom Value Level..
7..Battery Power Level..
Full
Medium
Low
None
8.. Smile Capture..
On
Off
12
|
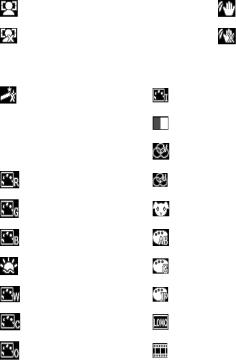
9.. Face Detect.. |
10.. Anti-Shake.. |
|
On |
On |
|
Off |
Off |
|
11.. Effect.. |
|
|
Normal |
IR |
|
B & W |
Binary |
|
Sepia |
Vivid |
|
Red |
Undertone |
|
Green |
Dog Eye |
|
Blue |
Aibao |
|
Sunset |
Gothic |
|
Warm |
Japan Style |
|
Cool |
LOMO |
|
Over Exposure |
Negative |
13
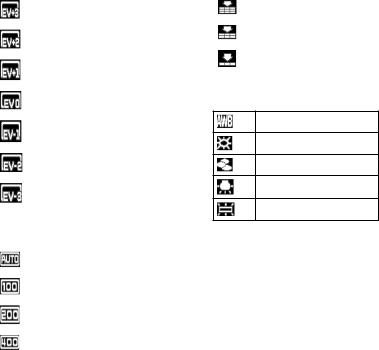
12.. Exposure..
+3
+2
+1
0
-1
-2
-3
13.. ISO..
Auto
100
200
400
14.. Image Quality..
Super Fine
Fine
Normal
15.. White Balance..
Auto
Daylight
Cloudy
Tungsten
Fluorescent
16.. Date Imprint..
14
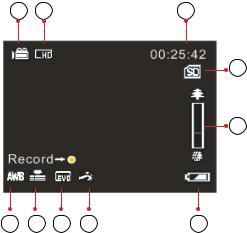
Video Record Mode: [  ]
]
4
5
|
10 |
9 |
8 |
7 |
6 |
1..Video recording icon..
2..Video size..
3..Recording time available..
4..SD Card inserted..
5..Zoom value level..
6..Battery power level..
15

7..Effect..
8..Exposure..
9..Video Quality..
10..White Balance..
Audio Mode:[  ]
]
3
4
1..Audio recording icon..
2..Audio recording time available..
3..SD Card inserted..
4..Battery power level..
16

Playback Mode: [  ]
]
4
7
6 5
|
1.. |
Playback still image icon.. |
Playback movie clips icon..
Playback audio recording icon..
2..Image/Video size..
3..File catalogue on SD card / Current Image Number#/Video#..
4..Video recording time..
17
5..Battery Power Level..
6..Date Imprint..
7.Press the shutter button to playback video file.
3.HOW TO USE THE DIGITAL VIDEO CAMERA
3.1HOW TO TURN THE DIGITAL VIDEO CAMERA ON AND OFF
1.Open the LCD panel to power on the digital video camera and close the LCD panel to turn off the digital video camera..
2.You can also press the POWER button to turn on the digital video camera and press it again for 3 second to turn it off..
To save battery power, you can change the power-off time by setting the function [Power Save] in the Setup menu..
3.2 HOW TO CHANGE THE RECORD MODE
There are four modes in this digital video camera.. Press the MODE button to change the mode, each time the MODE button is press the mode is changed..
18

|
Display |
Title |
Description |
|
Capture mode |
For taking still photos.. |
|
|
Video mode |
For recording movie clips.. |
|
|
Audio mode |
For recording audio files. |
|
|
Playback mode |
For previewing record files. |
Please Note: Press the playback button to enter playback mode.
3.3HOW TO RECORD A VIDEO CLIP
1.Turn on the digital video camera and set it to video record mode ( )..
)..
2.Zooming: Press the UP or DOWN buttons to zoom in or zoom out the subject. The value of magnification level appears on the LCD monitor..
3.Press the SHUTTER button to start recording..
4.Press the OK button to pause and press it again to continue to recording..
19
5.Press the SHUTTER button again to end the recording.. If the memory is full the video camera will stop recording automatically..
•On the upper of the LCD monitor displays the recorded time..
•When the light is insufficient press the RIGHT/LED ON/OFF button to turn on the compensating lamp and when the light is enough press the RIGHT/LED ON/OFF button again to turn off..
3.4HOW TO TAKE STILL IMAGES
1.Set the digital video camerar to capture mode, the icon appears on the LCD screen.. 
2.Zooming: Press the ZOOM IN or ZOOM OUT buttons to zoominorzoomoutthescreen.Thevalueofmagnification level appears on the LCD monitor..
3.Hold the camcorder steady and then press the SHUTTER
button down to take a picture..
• When the light is insufficient press the RIGHT/LED ON/OFF button to turn on the compensating lamp and when the light is enough press the RIGHT/LED ON/OFF button again to turn off..
20
![]()
3.5 HOW TO USE THE SELF-TIMER
Use the self-timer to set a delay from the time the shutter button is pressed to the time the image is shot..
1.Turn the power on, and set the digital video camera to the Capture mode..
2.Press the MENU button to display the capture menu, and then press the LEFT or RIGHT buttons select [Shooting] Menu..
3.Press the UP or DOWN buttons to select the items [Self Timer] or [Multi-Snapshot].. And press the OK button to launch the submenu:
Off: Don’t use self-timer without delay..
Self-timer 2S: The shutter release will delay for 2 seconds..
Self-timer 5S: The shutter release will delay for 5 seconds..
Self-timer 10S: The shutter release will delay for 10 seconds..
Multi-Snapshot: Press the shutter button once to take three pictures continuously..
21

4.Press the UP or DOWN buttons to select the desired item, and then press OK button to confirm the setting and close the menu..
5.Press the SHUTTER button to take picture..
3.6HOW TO RECORD AUDIO
1.Turn on the digital video camera and set it to audio record
mode ( )..
2.Press the SHUTTER button to start recording..
3.Press the SHUTTER button again to end the recording.. If the memory is full the video camera will stop recording automatically..
4.HOW TO USE THE MENU IN RECORD MODE
When a menu is displayed, the UP, DOWN and OK buttons is used to make the desired setting..
4.1MENU IN CAPTURE MODE
1.Turn on the digital video camera and set it to capture mode..
22

2.Press the MENU button to display the menu, and press the LEFT or RIGHT buttons to select the desired menu..
3.Press the UP or DOWN buttons to select an item..
4.Press the OK button to enter the submenu..
5.Use the UP or DOWN buttons to select the desired item..
6.Press the OK button to confirm the setting and close the menu..
4.2CAPTURE MENU LIST
|
Menu item |
Function |
|
|
You can select the scene mode according to the image |
||
|
Mode Set: |
your wish to capture.. There are 10 available modes.. |
|
|
[Auto]/[Sport]/[Night]/[Portrait]/[Landscape]/[Backlight]/ |
||
|
[Party]/[Beach]/[High Sensitivity]/[Cancel].. |
||
|
There are six options for choice: |
||
|
Size: |
[21M]: 5616×3744; [12M]: 4000×3000; [8M]: 3264×2448; |
|
|
[5M]: 2592×1944; [3M]: 2048×1536; |
||
|
[Cancel].. |
||
|
Face Detect: |
Use this function to detect our faces when taking pictures.. |
|
|
There are three options for choice.. [On]/[Off]/[Cancel].. |
||
|
Sets smile capture is on, Face Detect will be automatically |
||
|
Smile Capture: |
opened.. Once it detects smile, the digital video camera will |
|
|
automatically take a picture.. [On]/[Off]/[Cancel].. |
23

|
Menu item |
Function |
||
|
Use this function to take 3 pictures |
|||
|
continuously.. |
|||
|
[Single]: Press the shutter button once to |
|||
|
Multi-Snapshot: |
take one picture.. |
||
|
[Continuous]: Press the shutter button |
|||
|
once to take three pictures continuously.. |
|||
|
[Cancel]: Cancel this operation.. |
|||
|
Use the function to shoot an entire |
|||
|
surrounding area.. Shooting the |
|||
|
Panorama: |
directional position at 180 degrees |
||
|
Shooting: |
horizontally and 90 degrees vertically.. |
||
|
[Off]/[Up]/[Right]/[Cancel].. |
|||
|
Use the function to overlap two scene im- |
|||
|
Multi-Exposure: |
ages into a image for the special effect.. |
||
|
[Off]/[Double Exposure]/ |
|||
|
[Long Exposure]/[3D Capture]/[Cancel] |
|||
|
Use the self-timer to set a delay from the |
|||
|
Self-Timer: |
time the shutter button is pressed to the |
||
|
time the image is shot.. |
|||
|
[Off]/[2 Sec..]/[5 Sec..]/[10 Sec..]/[Cancel].. |
|||
|
Cancel: |
Cancel this operation.. |
||
|
The ISO menu allows you to set the level |
|||
|
Capture Setting: |
ISO: |
of sensitivity that your camera has to light |
|
|
in the surrounding environment.. |
|||
|
[Auto]/[100]/[200]/[400]/[Cancel].. |
24

|
Menu item |
Function |
||
|
Use the function to aviod our hands |
|||
|
Anti-Shake: |
shaking when taking pictures..There are |
||
|
three options for choice.. |
|||
|
[On]/[Off]/[Cancel].. |
|||
|
Best Shutter |
It is used to anti-shake for shooting |
||
|
images.. There are three options |
|||
|
Selector: |
|||
|
for choice..[On]/[Off]/[Cancel].. |
|||
|
This function can be used to add a date |
|||
|
Capture Setting: |
or time to your pictures as you take them.. |
||
|
There are four items for option: |
|||
|
[Off]: Do not add the recording date & |
|||
|
Imprint: |
time to printed images.. |
||
|
[Date]: Only add the recording date to |
|||
|
printed images.. |
|||
|
[Date & Time]: Add the recording date & |
|||
|
time to printed images.. |
|||
|
[Cancel]: Cancel this operation.. |
|||
|
Cancel: |
Cancel this operation.. |
||
|
Adjust the white balance to suit different |
|||
|
Image Setting: |
White Balance: |
light sources.. There are six items for |
|
|
option:[Auto]/[Daylight]/[Cloudy]/ |
|||
|
[Tungsten]/[Fluorescent]/[Cancel].. |
|||
25

|
Menu item |
Function |
|
|
Set the exposure value manually to |
||
|
compensate for unusual lighting |
||
|
Exposure: |
conditions such as indirect indoor |
|
|
lighting, dark backgrounds, and strong |
||
|
backlighting.. The exposure value range |
||
|
is –3 to +3.. |
||
|
Light Frequency should be set to either |
||
|
Light Frequency: |
60Hz or 50Hz depending on your region.. |
|
|
[50HZ]/[60HZ]/[Canel].. |
||
|
Image Setting: |
||
|
Select a lower image quality to decrease |
||
|
Quality: |
the image size in order to capture more |
|
|
images.. There are four options for choice: |
||
|
[Super Fine]/[Fine]/[Normal]/[Cancel].. |
||
|
You can set the level of sharpness in |
||
|
the images taken with your camera.. The |
||
|
Sharpness: |
sharpness level dictates if the edges of |
|
|
objects in the image are more or less |
||
|
distinct.. |
||
|
[Soft]/[Normal]/[Vivid]/[Cancel].. |
||
26
 Loading…
Видеокамера Rekam DVC-340 черный

5 Мпикс, 2.7″, 1920×1080, Full HD, CMOS, 800 мАч
подробнее

12
Код товара: 1109197
Table of Contents for Rekam DVC-340:
-
64 4.2 СПИСОК ЭЛЕМЕНТОВ ВМЕНЮ Элемент меню Функция Выбор режима: Вы можете выбрать подходящий режим съемки. Всего доступно 10 режимов. [Авто] / [Спорт] / [Ночной] / [Портрет] / [Пейзаж] / [Встречный свет] /[Вечеринка] / [Пляж] / [Высокая чувствительность]. Размер: Вы мо
-
17 Playback Mode: [ ] 1 2 3 4 5 6 7 1. Playback still image icon. Playback movie clips icon. Playback audio recording icon. 2. Image/Video size. 3. File catalogue on SD card / Current Image Number#/Video#. 4. Video recording time.
-
24 Menu item Function Shooting: Multi-Snapshot: Use this function to take 3 pictures continuously. [Single]: Press the shutter button once to take one picture. [Continuous]: Press the shutter button once to take three pictures continuously. [Cancel]: Cancel this operation. Panorama: Use the function to shoot an entire surrounding area. Shooting the directional position at 180 degrees horizontally and 90 degrees vertically. [Off
-
78 2. Включите телевизор ицифровую видеокамеру, азатем установите телевизор врежим «AV». 3. Когда цифровая видеокамера находится врежиме за- писи, вы можете просматривать на экране телевизора объекты съемки, которые вы хотите записать. 4. Когда цифровая видеокамера уст�
-
5 17. OK Button. 18. Left/Display Button. 19. Speaker. 20. LCD Screen. 21. Self-timer LED. 22. Lens. 23. LED Light. 24. Microphone. 25. Tripod Socket. 26. Battery Cover. 27. Wrist Strap. 2. SETUP GUIDE 2.1 HOW TO INSTALL THE BATTERY 1. Slide the battery cover and open it.
-
57 Режим воспроизведения: [ ] 1 2 3 4 5 6 7 1. Пиктограмма режима воспроизведения изображений.. Пиктограмма режима воспроизведения видео. Пиктограмма режима воспроизведения аудио 2. Размер Фото/Видео. 3. Каталог файлов на SD карте/ Номер текущего изобра- жения/Видео.
-
76 Элемент меню Функция Слайдшоу: Автоматическая демонстрация изображений через определенный интервал. [3 сек.]/[5 сек.]/[10 сек.]. Повернуть: Используйте эту функцию для поворота изображений. [90 o ]: Повернуть изображение на 90 градусов по часов�
-
55 Режим видеозаписи [ ] 1 2 3 4 5 6 7 8 9 10 1. Пиктограмма режима съемки. 2. Разрешение файла видеозаписи. 3. Доступное для видеозаписи время. 4. SD карта установлена. 5. Уровень масштабирования. 6. Уровень заряда батареи. 7. Эффект.
-
16 7. Effect. 8. Exposure. 9. Video Quality. 10. White Balance. Audio Mode:[ ] 1 2 3 4 1. Audio recording icon. 2. Audio recording time available. 3. SD Card inserted. 4. Battery power level.
-
81 6.5 ПОДКЛЮЧЕНИЕ ЦИФРОВОЙ ВИДЕОКАМЕРЫ ККОМПЬЮТЕРУ СПОМОЩЬЮ USB КАБЕЛЯ (ВХОДИТ ВКОМПЛЕКТ) 1. Подключите цифровую видеокамеру кUSB-порту ком- пьютера при помощи USB-кабеля. Включите камеру. На экране появится значок «Накопитель», если подключе- ние ккомпьютеру был успешно выполн
-
62 3. При помощи кнопок «Вверх» и«Вниз», выберете пункт [Авто-спуск] или [Серия снимков]. И нажмите кнопку OK, чтобы запустить подменю: Выкл: Не использовать таймер. Таймер 2сек: Съемка сзадержкой 2 секунды. Таймер 5сек: Съемка сзадержкой 5 секунд. Таймер 10сек: Съемка сзадержкой 10 секунд. Серия: При нажа�
-
DIGITAL CAMCORDER DVC-340 USER MANUAL
Questions, Opinions and Exploitation Impressions:
You can ask a question, express your opinion or share our experience of Rekam DVC-340 device using right now.