
PDF инструкция · 296 страниц(ы) русский
инструкцияSony DCR-HC94E

2-659-814-63(1)
© 2006 Sony Corporation
Digital Video Camera Recorder
Bruksanvisning SE
Руководство по эксплуатации RU
DCR-HC36E/HC44E/HC46E/
HC94E/HC96E
Посмотреть инструкция для Sony DCR-HC94E бесплатно. Руководство относится к категории видеокамеры, 1 человек(а) дали ему среднюю оценку 9.3. Руководство доступно на следующих языках: русский. У вас есть вопрос о Sony DCR-HC94E или вам нужна помощь? Задайте свой вопрос здесь
- SE
- RU

Главная
| Sony | |
| DCR-HC94E | DCR-HC94E | |
| видеокамера | |
| 4905524332926, 4905524333008 | |
| русский | |
| Руководство пользователя (PDF) |
Объектив
| Цифровой зум | 120 x |
| Оптическое увеличение | 10 x |
| Фокусное расстояние | 5.1 — 51 mm |
| Размер фильтра | 30 mm |
Датчик изображения
| Всего мегапикселей | 3.3 MP |
| Размер оптического сенсора | 1/3 « |
| Тип сенсора | CCD |
Прочие свойства
| Система линз | Carl Zeiss Vario-Sonnar T |
| Порты ввода/вывода | Audio Out, nUSB, nVideo Out.n |
| Разрешение | 640 x 480 пикселей |
| Фокус | Руководство |
| Функция смягчения голоса | Black, White, Mosaic, Overlap, Wipe, Monotone, Random Dot |
| Тип кабеля | Stereo AV, USB |
Экран
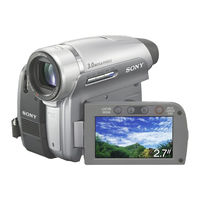
| Разрешение экрана | 123200 пикселей |
| Дисплей | ЖК |
| Диагональ экрана | 2.7 « |
Содержимое упаковки
| Поставляемое ПО | Picture Packagen |
Вес и размеры
| Вес | 460 g |
| Ширина | 72 mm |
| Глубина | 120 mm |
| Высота | 91 mm |
Затвор
| Скорость действия затвора | 1/2-1/3500 s |
Аудио
| Встроенный микрофон | Да |
| Встроенные колонки | Да |
Камера
| Масштабирование при воспроизведении (макс) | Да x |
| Минимальное освещение | 5 lx |
Видео
| Поддерживаемый видеоформат | DV |
Порты и интерфейсы
| DV порт | — |
| Вход S-Video | Нет |
| Выход S-Video | Да |
Устройства хранения данных
показать больше
Не можете найти ответ на свой вопрос в руководстве? Вы можете найти ответ на свой вопрос ниже, в разделе часто задаваемых вопросов о Sony DCR-HC94E.
Что означает аббревиатура MП?
Какой вес Sony DCR-HC94E?
Какой размер экрана Sony DCR-HC94E?
Какая высота Sony DCR-HC94E?
Какое разрешение экрана дисплея Sony DCR-HC94E?
Какая ширина Sony DCR-HC94E?
Какая толщина Sony DCR-HC94E?
Инструкция Sony DCR-HC94E доступно в русский?
Не нашли свой вопрос? Задайте свой вопрос здесь
- Manuals
- Brands
- SONY Manuals
- Camcorder
- Handycam DCR-HC94E
Manuals and User Guides for SONY Handycam DCR-HC94E. We have 2 SONY Handycam DCR-HC94E manuals available for free PDF download: Operating Manual, Service Manual
Sony Handycam DCR-HC94E Operating Manual (136 pages)
Sony Operating Guide Digital Video Camera Recorder
Brand: Sony
|
Category: Camcorder
|
Size: 3.55 MB
Table of Contents
-
Read this First
2
-
Table of Contents
5
-
Getting Started
8
-
Step 1: Checking Supplied Items
8
-
Step 2: Charging the Battery Pack
9
-
Playing Time
12
-
Step 3: Turning the Power on and Holding Your Camcorder Firmly
14
-
Step 4: Adjusting the LCD Panel and Viewfinder
16
-
Step 5: Using the Touch Panel
17
-
Changing the Language Setting
17
-
Checking the Screen Indicators (Display Guide)
17
-
-
Step 6: Setting the Date and Time
19
-
Step 7: Inserting a Tape or a «Memory Stick Duo
20
-
Memory Stick Duo
21
-
Step 8: Selecting the Aspect Ratio (16:9 or 4:3) of the Recording Picture (DCR-HC44E/HC46E/ HC94E/HC96E)
22
-
Recording/Playback
24
-
-
Easy Recording/Playback (Easy Handycam)
24
-
Recording
26
-
Playback
27
-
Functions Used for Recording/Playback, Etc
28
-
Recording
28
-
Playback
28
-
To Use the Flash (DCR-HC94E/HC96E)
28
-
To Use Zoom
28
-
-
-
Indicators Displayed During Recording/Playback
32
-
Viewing Movies
33
-
Viewing Still Images
33
-
-
Searching for the Starting Point
35
-
Searching for the Last Scene of the most Recent Recording
35
-
End Search
35
-
Reviewing the most Recently Recorded Scenes (Rec Review)
35
-
Searching Manually (EDIT SEARCH)
35
-
-
-
Remote Commander
36
-
Searching Quickly for a Desired Scene (Zero Set Memory)
36
-
Playback
36
-
Searching for a Scene by Date of Recording (Date Search)
37
-
Playback
37
-
-
Playing the Picture on a TV
38
-
-
Using the Menu
40
-
Using the Menu Items
40
-
Menu Items
42
-
CAMERA SET Menu
45
-
Settings to Adjust Your Camcorder to the Recording Conditions
45
-
Digital Zoom
50
-
-
MEMORY SET Menu
51
-
Settings for the «Memory Stick Duo
51
-
PICT.APPLI. Menu
55
-
Special Effects on Pictures or Additional Functions on Recording/Playback
55
-
EDIT/PLAY Menu
60
-
Settings for Editing or Playing Back in Various Modes
60
-
END SEARCH, Etc.)
61
-
Settings While Recording on a Tape or Other Basic Settings
61
-
STANDARD SET Menu
61
-
Audio MIX
62
-
Disp Output
64
-
(Clock Set/World Time/Language)
65
-
TIME/LANGU. Menu
65
-
-
-
Customizing Personal Menu
65
-
-
Dubbing/Editing
67
-
Dubbing to VCR/DVD Device, Etc
67
-
Recording Pictures from a TV or VCR Device, Etc
70
-
(Dcr-Hc36E/Hc46E/Hc96E)
71
-
Dubbing Pictures from a Tape to a «Memory Stick Duo
73
-
-
Dubbing Sound to a Recorded Tape
74
-
Recording Sound
75
-
Deleting Recorded Pictures from the «Memory Stick Duo
76
-
Marking Images on the «Memory Stick Duo» with Specific Information
77
-
(Print Mark/Image Protection)
77
-
Preventing Accidental Erasure
77
-
-
Printing Recorded Images (Pictbridge Compliant Printer)
78
-
Jacks to Connect External Devices
80
-
-
Using a Computer
82
-
Before Referring to the «First Step Guide» on Your Computer
82
-
System Requirements
83
-
For Macintosh Users
84
-
-
Installing the Software and «First Step Guide» on a Computer
85
-
Viewing «First Step Guide
89
-
Creating a DVD (Direct Access to «Click to DVD»)
90
-
Connecting an Analog VCR to the Computer Via Your Camcorder
93
-
(Signal Convert Function) (DCR-HC96E)
93
-
-
-
-
Troubleshooting
95
-
Cassette Tapes
98
-
Warning Indicators and Messages
113
-
Moisture Condensation
115
-
Pictbridge Compliant Printer
116
-
-
-
Additional Information
118
-
Using Your Camcorder Abroad
118
-
Usable Cassette Tapes
118
-
About the «Memory Stick
119
-
About the «Infolithium» Battery Pack
121
-
About I.link
123
-
Maintenance and Precautions
124
-
Specifications
127
-
Index
133
-
Advertisement
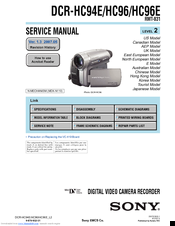
Sony Handycam DCR-HC94E Service Manual (12 pages)
Brand: Sony
|
Category: Camcorder
|
Size: 1.73 MB
Table of Contents
-
Exploded Views
2
-
Overall Assembly
2
-
Front Panel Block
3
-
Cabinet (R) Block
4
-
Main Block
5
-
Lens Block
6
-
Evf Block
7
-
Repair Parts List
8
-
Hardware List
8
-
Mechanism Deck Section
9
Advertisement
Related Products
-
SONY Handycam DCR-HC96E
-
Sony Handycam DCR-HC90E
-
Sony Handycam DCR-HC90
-
Sony Handycam DCR-HC96
-
Sony DCR-HC36 — MiniDV Digital Handycam Camcorder
-
Sony Handycam DCR-HC22E
-
Sony Handycam DCR-HC18E
-
Sony DCR-HC48 — 1MP MiniDV Handycam Camcorder
-
Sony Handycam DCR-HC53
-
Sony DCR-HC15
SONY Categories
![]()
Laptop
![]()
Camcorder
![]()
TV
![]()
CD Player
![]()
Digital Camera
More SONY Manuals
-
Драйверы
5
-
Руководства по ремонту
2
-
Инструкции по эксплуатации
8
Языки:

SONY DCR-HC94E инструкция по эксплуатации
(296 страниц)
- Языки:Русский, Шведский
-
Тип:
PDF -
Размер:
7.11 MB
Просмотр

SONY DCR-HC94E инструкция по эксплуатации
(136 страниц)
- Языки:Английский
-
Тип:
PDF -
Размер:
3.39 MB
Просмотр

SONY DCR-HC94E инструкция по эксплуатации
(152 страницы)
- Языки:Французский
-
Тип:
PDF -
Размер:
3.71 MB
Просмотр

SONY DCR-HC94E инструкция по эксплуатации
(292 страницы)
- Языки:Немецкий, Нидерландский
-
Тип:
PDF -
Размер:
6.58 MB
Просмотр

SONY DCR-HC94E инструкция по эксплуатации
(292 страницы)
- Языки:Испанский, Португальский
-
Тип:
PDF -
Размер:
6.52 MB
Просмотр

SONY DCR-HC94E инструкция по эксплуатации
(308 страниц)
- Языки:Греческий, Итальянский
-
Тип:
PDF -
Размер:
6.88 MB
Просмотр

SONY DCR-HC94E инструкция по эксплуатации
(276 страниц)
- Языки:Датский, Финский
-
Тип:
PDF -
Размер:
6.69 MB
Просмотр

SONY DCR-HC94E инструкция по эксплуатации
(300 страниц)
- Языки:Польский, Чешский
-
Тип:
PDF -
Размер:
6.93 MB
Просмотр
На NoDevice можно скачать инструкцию по эксплуатации для SONY DCR-HC94E. Руководство пользователя необходимо для ознакомления с правилами установки и эксплуатации SONY DCR-HC94E. Инструкции по использованию помогут правильно настроить SONY DCR-HC94E, исправить ошибки и выявить неполадки.
Характеристики, спецификации
Тип носителя:
кассета miniDV
Режим «Ночная съемка»:
есть
Режим широкоформатного видео:
есть
Физический размер матрицы:
1/3″
Фокусное расстояние объектива:
5.1 — 51 мм
Оптический/цифровой Zoom:
10x / 120x
Выдержка:
1/3500 — 1/2 сек
Стабилизатор изображения:
электронный
Жидко кристалический экран:
есть (2.7″, 123200 пикс.)
Видоискатель:
цветной, 123200 пикс.
Баланс белого:
авто, предустановки, ручная установка
Режимы съемки:
портретная, спортивная, восход и закат, пейзаж, пляж, прожектор, снег
Максимальное разрешение фотосъемки:
2116×1134 пикс
Широкоформатный режим фото:
есть
Интерфейсы:
AV-выход, S-Video выход, DV-выход, USB-интерфейс
Передача потоком через USB:
есть
Запись на карту памяти:
есть
Поддержка карт памяти:
MS, MS Duo
Минимальная освещенность:
5 люкс
Максимальное время работы от аккумулятора:
1.35 ч
Конструкция:
дистанционное управление
Размеры (ШхВхГ):
120x91x72 мм
Фейдеры:
черный, белый, наложение, стирание, один тон, случайная точка
Спецэффекты:
мозаика, передержка, один тон, сепия, негативное искусство, пастель, кинематографический эффект, замедленное движение, быстрое движение, ключ яркости, старое кино, медленный затвор, неподвижное, след
2-659-814-63(1)
Digital Video Camera Recorder
Bruksanvisning SE
Руководство по эксплуатации RU
DCR-HC36E/HC44E/HC46E/
HC94E/HC96E
© 2006 Sony Corporation
Läs detta först
Innan du använder enheten bör läsa igenom
Omhändertagande av
den här bruksanvisningen noga. Förvara
gamla elektriska och
den sedan så att du i framtiden kan använda
elektroniska produkter
den som referens.
(Användbar i den
Europeiska Unionen och
VARNING
andra Europeiska länder
Utsätt inte kameran för regn eller
med separata
fukt eftersom det kan medföra risk
insamlingssystem)
för brand eller elstötar.
Symbolen på produkten eller emballaget anger att
produkten inte får hanteras som hushållsavfall.
Den skall i stället lämnas in på uppsamlingsplats
VARNING!
för återvinning av el- och elektronikkomponenter.
Genom att säkerställa att produkten hanteras på
Byt bara ut batteriet mot ett batteri
rätt sätt bidrar du till att förebygga eventuella
av den angivna typen. Annars finns
negativa miljö- och hälsoeffekter som kan uppstå
om produkten kasseras som vanligt avfall.
det risk för brand eller
Återvinning av material hjälper till att bibehålla
personskador.
naturens resurser.
För ytterligare upplysningar om återvinning bör
du kontakta lokala myndigheter eller
FÖR KUNDER I EUROPA
sophämtningstjänst eller affären där du köpte
varan.
TÄNK PÅ ATT..!
Användbara tillbehör: Fjärrkontroll
De elektromagnetiska fälten för de aktuella
frekvenserna kan påverka bild och ljud på den här
digitala videokameran.
Att observera angående
användning
Den här produkten har testats och befunnits
överensstämma med de krav som EMC-direktiven
Din videokamera levereras med två
ställer upp för användning med kablar som är
olika bruksanvisningar.
kortare än 3 meter.
– ”Bruksanvisning” (Denna handbok du
Obs!
läser nu)
– ”First Step Guide (Förenklad guide)” för
Om statisk elektricitet eller elektromagnetism gör
att informationsöverföringen avbryts
anslutning av videokameran till en dator
(överföringen misslyckas) startar du om
och användning av medföljande
programmet eller kopplar bort anslutningskabeln
programvara (finns på medföljande CD-
(USB-kabel eller liknande) och sätter tillbaka den
ROM)
igen.
Olika typer av kassetter som kan
användas på din videokamera
Det går att använda mini-DVkassetter av
märket . Den här videokameran
hanterar inte kassetter med Cassette
Memory-funktionen (s. 120).
SE
2
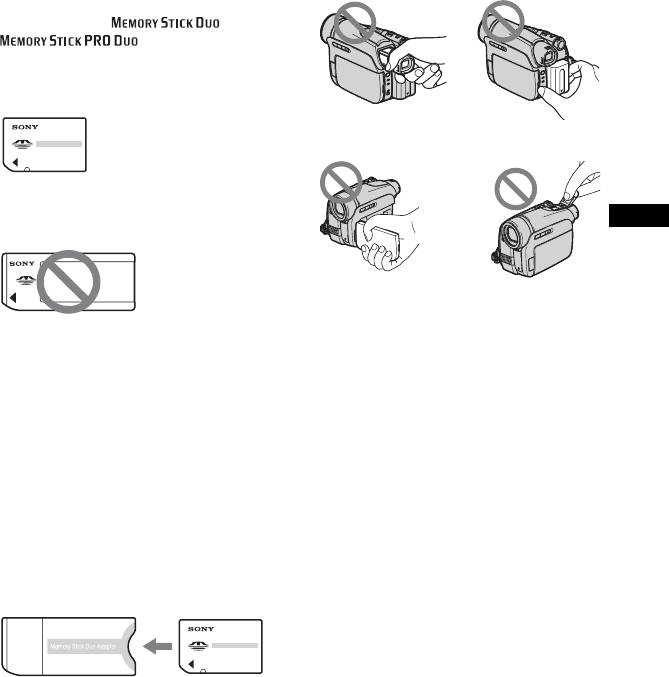
Olika typer av ”Memory Stick” som
Använda videokameran
kan användas på din videokamera
• Håll eller bär inte videokameran i följande
delar.
De finns två olika format av ”Memory
Stick”. Du kan använda ”Memory Stick
Duo” märkt med eller
(s. 121).
”Memory Stick Duo”
(Detta format kan användas med din
videokamera.)
Sökare Batteri
”Memory Stick”
(Det går inte att använda med din
SE
videokamera.)
LCD-panel Skydd över
tillbehörsskon
(DCR-HC94E/HC96E)
• Du kan inte använda andra typer av
• Videokameran är inte dammsäker,
minneskort förutom ”Memory Stick
droppsäker eller vattensäker.
Duo”.
Se ”Underhåll och försiktighetsåtgärder”
• ”Memory Stick PRO” och ”Memory Stick
(s. 125).
PRO Duo” kan endast användas
• Innan videokameran ansluts till en annan
tillsammans med utrustning som är
enhet via en USB- eller i.LINK-kabel, bör
kompatibel med ”Memory Stick PRO”.
du se till att anslutningskontakten
installerats på rätt sätt och utan tvång för
Använda ett ”Memory Stick Duo”
att undvika att terminalen skadas eller att
tillsammans med utrustning som är
funktionsstörning sker.
kompatibel med ”Memory Stick”
• För DCR-HC44E/HC46E/HC94E/
Se till att installera ”Memory Stick Duo” i
HC96E:
Memory Stick Duo-adaptern.
Koppla från nätkabeln från din Handycam
Station genom att hålla både din
Memory Stick Duo-adapter
Handycam Station och
likströmskontakten (DC).
• För DCR-HC44E/HC46E/HC94E/
HC96E:
Se till att POWER-omkopplaren är i läge
OFF (CHG) när du installerar
videokameran i din Handycam Station
eller när du tar bort videokameran från
den.
SE
Fortsättning ,
3
Läs detta först (fortsättning)
Om menyalternativen, LCD-panelen,
Inspelning
sökaren och linsen
• Innan du startar inspelningen bör du göra
en testinspelning för att kontrollera att
• Ett menyalternativ som är nedtonat är inte
bild och ljud spelas in utan problem.
tillgängligt under de aktuella inspelnings-
eller uppspelningsförhållandena.
• Du kan inte räkna med att få ersättning för
innehållet i en inspelning om du inte har
• LCD-skärm och sökare är tillverkade med
kunnat göra en inspelning eller
mycket hög precision; över 99,99% av
uppspelning på grund av att det var fel på
bildpunkterna är aktiva. Trots det kan det
videokameran, lagringsmediet eller
förekomma små svarta och/eller ljusa
liknande.
punkter (vita, röda, blå eller gröna), som
hela tiden syns på LCD-skärmen eller i
• Olika länder och regioner använder olika
sökaren. De här punkterna uppkommer
TV-färgsystem. Om du vill titta på
vid tillverkningen och går inte helt att
inspelningarna på en TV behöver du en
undvika. De påverkar inte inspelningen på
TV som använder PAL-systemet.
något sätt.
• TV-program, filmer, videoband och annat
material kan vara upphovsrättsskyddat.
Om du gör inspelningar som du inte har
rätt att göra kan det innebära att du bryter
mot upphovsrättslagarna.
Om denna bruksanvisning
• Bilderna av LCD-skärmen och sökaren
som används i den här bruksanvisningen
som illustrationer har tagits med en
digitalkamera och kan därför skilja sig
Svartpunkt
från hur du ser dem.
• Skärmmenyerna på respektive språk
Vit, röd, blå eller
används för att beskriva de olika
grön punkt
procedurerna. Om det behövs byter du
språk för skärmmenyerna innan du
• Om LCD-skärmen, sökaren eller linsen
använder videokameran (s. 66).
utsätts för direkt solljus under en längre
• Illustrationerna som används i denna
tid kan det leda till funktionsstörningar.
bruksanvisning syftar till modellen DCR-
• Rikta inte kameran direkt mot solen. Det
HC96E. Modellnamnet för din
kan leda till funktionsstörningar. Vill du
videokamera finns på kamerans
ta bilder av solen bör du bara göra det när
undersida.
ljuset inte är så intensivt, t.ex. när solen
• Design och specifikationer för
håller på att gå ned.
inspelningsenhet och tillbehör är föremål
för ändring utan förvarning.
SE
4

Om Carl Zeiss-linsen
• Den här videokameran är utrustad med en
Carl Zeiss-lins, en lins som utvecklats i
samarbete med Carl Zeiss i Tyskland och
av Sony Corporation. Carl Zeiss-linsen
ger oöverträffad bildkvalitet. Den
använder mätsystemet MTF för
videokameror och har samma kvalitet som
en typisk Carl Zeiss-lins.
MTF= Modulation Transfer Function.
Värdet visar hur mycket av ljuset från
motivet som kommer in genom linsen.
• För DCR-HC94E/HC96E:
Videokamerans lins har dessutom en T —
ytbehandling som tar bort störande
reflexer och bidrar till naturtrogen
färgåtergivning.
SE
5
Краткое содержание страницы № 1
2-659-814-12(1)
Digital Video Camera Recorder
Getting Started 8
Recording/
24
Playback
Operating Guide
Using the Menu 40
Dubbing/Editing 67
DCR-HC36E/HC44E/HC46E/
Using a Computer 82
HC94E/HC96E
Troubleshooting 95
Additional Information 118
© 2006 Sony Corporation
Краткое содержание страницы № 2
E:SONY26598141111GB01REG_E.fm Read this first using connection cables shorter than 3 meters (9.8 Before operating the unit, please read this feet). manual thoroughly, and retain it for future reference. Notice If static electricity or electromagnetism causes WARNING data transfer to discontinue midway (fail), restart the application or disconnect and connect the To reduce fire or shock hazard, do communication cable (USB, etc.) again. not expose the unit to rain or moisture. Disposa
Краткое содержание страницы № 3
Types of cassette you can use in your Using the camcorder camcorder � Do not hold the camcorder by the following parts. You can use mini DV cassettes marked with . Your camcorder is not compatible with the Cassette Memory function (p. 118). Types of “Memory Stick” you can use in your camcorder There are two sizes of “Memory Stick.” Viewfinder Battery pack You can use “Memory Stick Duo” marked with or (p. 119). “Memory Stick Duo” (This size can be used with your camcorder.) LCD panel
Краткое содержание страницы № 4
E:SONY26598141111GB01REG_E.fm Read this first (Continued) About menu items, LCD panel, to a malfunction of the camcorder, storage media, etc. viewfinder, and lens TV color systems differ depending on the A menu item that is grayed out is not countries/regions. To view your available under the current recording or recordings on a TV, you need a PAL playback conditions. system-based TV. The LCD screen and the viewfinder are Television programs, films, video tapes, manufactured
Краткое содержание страницы № 5
E:SONY26598141111GB00BOOKTOC.fm Table of Contents Read this first ……………………………………………………………………………….2 Getting Started Step 1: Checking supplied items ……………………………………………………..8 Step 2: Charging the battery pack ……………………………………………………9 Step 3: Turning the power on and holding your camcorder firmly ……….14 Step 4: Adjusting the LCD panel and viewfinder ……
Краткое содержание страницы № 6
Indicators displayed during recording/playback ………………………………. 32 Searching for the starting point …………………………………………………….. 35 Searching for the last scene of the most recent recording (END SEARCH) ………………………………………………………………………. 35 Searching manually (EDIT SEARCH) ………………………………………………….. 35 Reviewing the most recently recorded scenes (Rec review) ..
Краткое содержание страницы № 7
E:SONY26598141111GB00BOOKTOC.fm Printing recorded images (PictBridge compliant printer) ……………………78 Jacks to connect external devices ………………………………………………….80 Using a Computer Before referring to the “First Step Guide” on your computer ………………82 Installing the software and “First Step Guide” on a computer …………….85 Viewing “First Step Guide” ……………………………………………………………89 Creating
Краткое содержание страницы № 8
E:SONY26598141111GB02GET_E.fm Getting Started Step 1: Checking supplied items USB cable (1) (p. 78, 82) Make sure that you have following items supplied with your camcorder. The number in the parentheses indicates the number of that item supplied. The cassette tape and “Memory Stick Duo” are not supplied. See page 3, 118, 119, for Lens cap (1) compatible cassettes and “Memory Stick Duo” (DCR-HC36E/HC44E/HC46E) for your camcorder. (p. 14, 24, 26) AC Adaptor (1) (p. 9) To attach the
Краткое содержание страницы № 9
Getting Started E:SONY26598141111GB02GET_E.fm Step 2: Charging the battery pack You can charge the “InfoLITHIUM” 1 Align the terminals of the battery battery pack (P series) (p. 121) after pack and your camcorder (1), attaching it to your camcorder. then attach the battery pack and For DCR-HC44E/HC46E/HC94E/HC96E: click it into place (2). POWER switch 2 DC IN jack 1 Handycam DC plug Station 2 Slide the POWER switch in the direction of the arrow to OFF To the wall socket (CHG) (The def
Краткое содержание страницы № 10
E:SONY26598141111GB02GET_E.fm Step2: Charging the battery pack (Continued) For DCR-HC36E: The CHG (charge) lamp lights up and charging starts. When inserting the camcorder into the Handycam Station, close the DC IN jack cover. With the v mark For DCR-HC36E: facing to the LCD screen Connect the mains lead to the AC Adaptor and the wall socket. DC IN jack CHG (charge) lamp 4 For DCR-HC44E/HC46E/HC94E/ HC96E: Connect the mains lead to the AC Adaptor and the wall socket. Insert the cam
Краткое содержание страницы № 11
Getting Started E:SONY26598141111GB02GET_E.fm To remove the battery pack POWER switch 1 Slide the POWER switch to OFF (CHG). Hold down the V BATT (battery) release lever with one hand. With the v mark 2 Remove the battery in the direction of facing to the LCD the arrow with the other hand. screen POWER switch DC IN jack DC plug 1 To the wall socket 2 AC Adaptor Mains lead V BATT (battery) For DCR-HC44E/HC46E/HC94E/HC96E: release lever To remove your camcorder from the Handycam Station
Краткое содержание страницы № 12
E:SONY26598141111GB02GET_E.fm Step2: Charging the battery pack (Continued) DCR-HC36E * Typical recording time shows the time when you repeat recording start/stop, turning the Continuous Typical power on/off and zooming. Battery pack recording recording time time* DCR-HC94E/HC96E NP-FP30 (supplied) 85 40 Continuous Typical 105 50 Battery pack recording recording NP-FP50 120 60 time time* 150 75 NP-FP50 (supplied) 80 45 NP-FP70 255 125 90 50 310 155 95 50 NP-FP71 300 150 NP-FP70 175 95 3
Краткое содержание страницы № 13
Getting Started E:SONY26598141111GB02GET_E.fm DCR-HC44E/HC46E On the AC Adaptor Use the nearby wall socket when using the AC LCD panel LCD panel Battery pack Adaptor. Disconnect the AC Adaptor from the opened* closed wall socket immediately if any malfunction NP-FP50 (supplied) 120 150 occurs while using your camcorder. Do not use the AC Adaptor placed in a narrow NP-FP70 255 310 space, such as between a wall and furniture. NP-FP71 300 370 Do not short-circuit the DC plug of the A
Краткое содержание страницы № 14
E:SONY26598141111GB02GET_E.fm Step 3: Turning the power on and holding your camcorder firmly To record or play back, slide the POWER Lamps that light up switch repeatedly to turn on the respective CAMERA-TAPE: To record on a tape. lamp. CAMERA-MEMORY: To record on a When using it for the first time, the “Memory Stick Duo.” [CLOCK SET] screen appears (p. 19). PLAY/EDIT: To play or edit pictures. After you have set the date and time ([CLOCK SET], p. 19), the next time you turn on the po
Краткое содержание страницы № 15
Getting Started E:SONY26598141111GB02GET_E.fm To turn off the power Slide the POWER switch to OFF (CHG). For DCR-HC36E/HC44E/HC46E: Attach the lens cap after turning off the power. At the time of purchase, the power will be set to turn off automatically if you leave your camcorder without any operation attempted for approximately 5 minutes, to save battery power ([A.SHUT OFF], p. 64). If warning messages appear on the screen, follow the instructions (p. 114). 15 DCR-HC36E/HC44E/HC
Краткое содержание страницы № 16
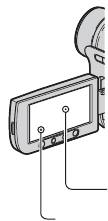
E:SONY26598141111GB02GET_E.fm Step 4: Adjusting the LCD panel and viewfinder The LCD panel The viewfinder Open the LCD panel 90 degrees to the You can view pictures using the viewfinder camcorder (1), then rotate it to the best to avoid wearing down the battery, or when angle to record or play (2). the picture seen on the LCD screen is poor. DISP/BATT INFO Viewfinder 180 degrees (max.) 2 1 90 degrees to Viewfinder lens adjustment 90 degrees the camcorder lever (max.) Move it until the p
Краткое содержание страницы № 17
Getting Started E:SONY26598141111GB02GET_E.fm Step 5: Using the touch panel You can play back recorded pictures Changing the language setting (p. 27), or change the settings (p. 40) using the touch panel. You can change the on-screen displays to show messages in a specified language. Select the screen language in Place your hand on the rear side of [LANGUAGE] on the (TIME/ the LCD panel to support it. Then, LANGU.) menu (p. 40, 65). touch the buttons displayed on the screen. Checkin
Краткое содержание страницы № 18
E:SONY26598141111GB02GET_E.fm Step 5: Using the touch panel (Continued) 3 Touch the area including the indicator that you want to check. DISP GUIDE END FOCUS: MANUAL 1/2 PROGRAM AE: SPOTLIGHT STEADYSHOT: OFF The meanings of the indicators in the area are listed on the screen. If you cannot find the indicator you want to check, touch / to toggle. When you touch , the screen returns to the area selecting display. To finish the operation Touch [END]. 18 DCR-HC36E/HC44E/HC4
Краткое содержание страницы № 19
Getting Started E:SONY26598141111GB02GET_E.fm Step 6: Setting the date and time Set the date and time when using this camcorder for the first time. If you do not 3 Select [CLOCK SET] with / , set the date and time, the [CLOCK SET] then touch . screen appears every time you turn on your –:––:–– camcorder or change the POWER switch CLOCK SET position. DATE If you do not use your camcorder for about 3 2006 Y 1M 1D 0: 00 months, the built-in rechargeable battery gets discharged and
Краткое содержание страницы № 20
E:SONY26598141111GB02GET_E.fm Step 7: Inserting a tape or a “Memory Stick Duo” Cassette tape 2 Insert a cassette with its window facing outwards, then press You can use mini DV cassettes only . (p. 118). The recordable time varies depending on Push the center of the back [ REC MODE] (p. 61). of the cassette lightly. Window 1 Slide and hold the OPEN/ EJECT lever in the direction of the arrow and open the lid. OPEN/EJECT lever Cassette compartment The cassette compartment automat