- Manuals
- Brands
- Vorwerk Manuals
- Food Processor
- Thermomix TM 31
- Instruction manual
-
Contents
-
Table of Contents
-
Troubleshooting
-
Bookmarks
Quick Links
Thermomix TM 31
Instruction Manual
Related Manuals for Vorwerk Thermomix 31
Summary of Contents for Vorwerk Thermomix 31
-
Page 1
Thermomix TM 31 Instruction Manual… -
Page 2: Table Of Contents
Instruction Manual Thermomix TM 31 Table of contents Notes for your safety Technical data Introduction/Customer service Your Thermomix TM 31 Accessories Before you start Initial test How to insert the mixing bowl correctly Cleaning How to insert the mixing blade Accessories Mixing bowl, mixing bowl base Mixing bowl lid, measuring cup…
-
Page 3
Instruction Manual Thermomix TM 31 Soft start Gentle stir setting, soft heating setting Varoma temperature level Speed selector Stirring Mixing/puree making Clockwise/counter-clockwise operation Turbo button Dough mode Things to remember Sleep mode Electronic motor protection Smells Cleaning Notes for your safety — VAROMA Technical data — VAROMA Your VAROMA, cleaning your VAROMA Possible combinations of VAROMA… -
Page 4: Notes For Your Safety
Instruction Manual Thermomix TM 31 Notes for your safety The Thermomix TM 31 complies with the most Always use the spatula provided with your advanced safety standards. For your own appliance together with its safety disk for safety, please read these operating instructions stirring.
-
Page 5
This also applies in the case of damage to the connecting cable which may only be replaced with a speci- fic cable by the Vorwerk after-sales-ser- vice. Improper repair works or inexpert handling may result in serious risks for the user. -
Page 6: Technical Data
Instruction Manual Thermomix TM 31 Technical Data Symbol of conformity/ Mark of conformity Motor Maintenance-free Vorwerk reluctance motor 500 W rated power Speed continuously adjustable from 100 to 10,200 revolutions per minute (Gentle stir 40 rpm) Special speed setting (alternating mode) for dough pre- paration.
-
Page 7: Introduction/Customer Service
Instruction Manual Thermomix TM 31 Introduction Customer service Operating instructions giving guidance how to If you have any questions or difficulties please make best use of the appliance! do not hesitate to contact: During a Thermomix TM 31 demonstration, you Your Thermomix TM 31 advisor: had the opportunity to have a closer look at what we call «the revolution in your kitchen», our…
-
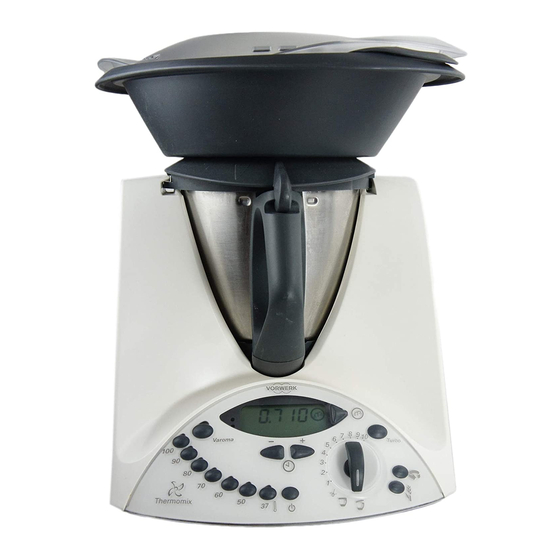
Page 8: Your Thermomix Tm 31
Instruction Manual Thermomix TM 31 Your Thermomix TM 31 After opening the packaging please check that all Thermomix TM 31 components are included. These are: — Thermomix TM 31 including mixing bowl and lid — Simmering basket — Stirring attachement (butterfly) — Measuring cup — Spatula — Recipe book…
-
Page 9: Accessories
Instruction Manual Thermomix TM 31 Accessories Mixing bowl Mixing bowl base Sealing ring for mixing blade unit Cutting/Mixing blade unit Simmering basket Spatula with safety disk Measuring cup Lid sealing ring Stirring attachment (butterfly)
-
Page 10: Before You Start
Instruction Manual Thermomix TM 31 Before you start Congratulations on having bought the Thermomix TM 31! Before using your Thermomix TM 31 for the first time you should attend a demonstration with a qualified Thermomix advisor. Before you start Keep your Thermomix TM 31 in a permanent position in your kitchen, so that you can opera- te it easily.
-
Page 11: Cleaning
Instruction Manual Thermomix TM 31 Cleaning As with all new appliances or tableware you should clean your Thermomix TM 31 — especi- ally the mixing blade, the lid, the mixing bowl and the simmering basket — thoroughly before using it for the first time. To remove the mixing blade: Turn the bot- tom of the mixing bowl anti-clockwise 30 degrees and pull it off downwards.
-
Page 12: How To Insert The Mixing Blade
Instruction Manual Thermomix TM 31 The main appliance can be wiped with a damp To clean the mixing blade always hold it under cloth. Use water sparingly to prevent moisture running water with the blade pointing upwards. from entering the appliance. In order to facilitate the cleaning use a brush.
-
Page 13
Instruction Manual Thermomix TM 31 Now re-fit the bottom of the mixing bowl from below onto the mixing blade. Turn clockwise 30 degrees to lock. Important: All components — except for the mixing blade — are dishwasher-proof. Put plastic parts, in particular the lid of the mixing bowl, into the top rack of the washer in order to avoid deformation resulting from exposure to higher temperatures. -
Page 14: Accessories
Instruction Manual Thermomix TM 31 Accessories Before you start using your Thermomix TM 31 Mixing bowl we would like to present its accessories in The mixing bowl has a capacity of 2 litres. Never more detail. exceed this maximum level because the food to They are proof of a well thought out design.
-
Page 15: Mixing Bowl Lid, Measuring Cup
Instruction Manual Thermomix TM 31 Mixing bowl lid The lid of the mixing bowl is used to close the mixing bowl. safety reasons your Thermomix TM 31 will not start working unless the lid has been positioned and locked correctly. Never try to force the lid open when the appli- ance is locked.
-
Page 16: Simmering Basket
Instruction Manual Thermomix TM 31 Simmering basket The simmering basket for the Thermomix TM 31 is made of high-quality plastic. Like the measuring cup, the basket is a multi-purpose item: Filtering of fruit and vegetable juices. Chop and make a puree in the Thermomix TM 31, then insert the simmering basket into the mixing bowl and use it as a filter when pouring the juice out.
-
Page 17: Spatula
Instruction Manual Thermomix TM 31 Spatula The spatula is another example for the intelli- gent design of the Thermomix. The spatula has a specially shaped safety disk to make sure that it does not roll off the work top. The Thermomix TM 31 spatula is the only instrument you may use to mix or stir the ingredients in the mixing bowl.
-
Page 18: Stirring Attachment (Butterfly)
Instruction Manual Thermomix TM 31 Stirring attachment (butterfly) This accessory will help you to achieve best results when whipping cream or bea- ting egg whites. It is also the perfect uten- sil for the preparation of creamy puddings or cream mixtures. When boiling milk or preparing puddings or sauces the butterfly allows a constant movement of ingredients.
-
Page 19: Working With The Thermomix Tm 31
Instruction Manual Thermomix TM 31 Working with the Thermomix TM 31 Before you start using your Thermomix TM 31 For your safety consider the following tips to make your work Before operating your Thermomix TM 31 easier: ensure that it is standing securely on an even working top, not too near to the edge and A safety device is provided which pre- observing a sufficient distance from hanging…
-
Page 20: Explanation Of Symbols
Instruction Manual Thermomix TM 31 Explanation of symbols Timer buttons Temperature buttons Gentle stir setting Button for dough mode Tare button for scales Button for clockwise /anti-clock- wise operation Important: Lid locked Take care not to obstruct the ventilation openings on the sides of the appliance. Lid unlocked This might cause overheating.
-
Page 21: Multi-Function Display
Instruction Manual Thermomix TM 31 Multi-function display Press tare button. The scales display will In the centre at the top of the control panel show: there is a digital display. This display provides the following information: Timer mode Weighing mode The symbols are displayed to indi- cate if the device is in weighing or timer mode.
-
Page 22: Other Important Information
Instruction Manual Thermomix TM 31 Other important information Always press the tare button first before weig- The tare function works from 5 g to 6.0 kg. hing or using the tare function. This will increa- When weighing and adding ingredients with the se the accuracy of the scales.
-
Page 23: Timer Buttons And Timer Display
Instruction Manual Thermomix TM 31 Timer buttons and timer display Observe the following sequence of steps if you wish to heat or cook food in your Thermomix TM 31: Before setting the temperature, select a time. Since the appliance only heats when the tempe- rature has been selected.
-
Page 24: Adjustment Of Pre-Set Time
Instruction Manual Thermomix TM 31 Adjustment of pre-set time function by pressing the button. This will The pre-set time can be changed at any time prevent unwanted heating of ingredients in the during preparation. Press the «-» button to redu- mixing bowl if a time has been pre-set.
-
Page 25: Soft Start
Instruction Manual Thermomix TM 31 Soft start (above 60°C/140°F) If the turbo button is pressed or the speed selector actuated while the temperature in the mixing bowl is above 60°C (140°F), the electro- nic system prevents the food from escaping by delaying the speed increase.
-
Page 26: Speed Selector
Instruction Manual Thermomix TM 31 Speed selector For your safety Press the speed selector to start the If you operate the appliance at medium and Thermomix TM 31. The following speeds are higher speed levels and press the turbo but- available.
-
Page 27: Turbo Button
Instruction Manual Thermomix TM 31 Turbo button For your safety Use the turbo button to operate the Thermomix Soft start only works if the food to be mixed TM 31 at maximum speed. The turbo function or cooked has been heated up in the only works as long as this button is pressed and Thermomix TM 31.
-
Page 28: Things To Remember
Instruction Manual Thermomix TM 31 Things to remember Sleep mode Smells If the Thermomix TM 31 is connected to mains When the appliance is used for the first time it supply but not used it will automatically switch may smell. If the motor is subjected to a high to standby (sleep mode) after approx.
-
Page 29: Notes For Your Safety — Varoma
In the event that any repairs are needed, When you use the appliance, ensure that they should only be performed by authori- there is sufficient clearance at the top Vorwerk service technicians. (suspended cupboards, shelving) and Unauthorised repairs or incorrect use can around the sides.
-
Page 30: Your Varoma, Cleaning Your Varoma
Instruction Manual Thermomix TM 31 Your VAROMA The VAROMA consists out of three parts: The actual VAROMA unit made of top- quality stainless steel An inner VAROMA tray and A lid, both made from top-quality, food- compatible plastic. Cleaning your VAROMA …
-
Page 31: Your Thermomix Tm
Instruction Manual Thermomix TM 31 How to combine your VAROMA parts You can use your VAROMA in either of the fol- lowing combinations: Combination 1: Stainless steel unit plus lid. This is the best combination for cooking large amounts of the same food, e.g. vegetables, potatoes or large pieces of meat or sausages.
-
Page 32: Inserting The Varoma Correctly
Instruction Manual Thermomix TM 31 Inserting the VAROMA correctly Step 1: The Thermomix TM 31 Your VAROMA is an accessory designed for the Fill the Thermomix TM 31 mixing bowl with at Thermomix TM 31. least 0.5 litres of water. Position the bowl as It can only be used with a Thermomix TM 31.
-
Page 33
Instruction Manual Thermomix TM 31 If necessary, you can use the inner tray and put food on top of that. Having filled your VAROMA, position it upright on your locked Thermomix TM 31 and put on the lid. All you have to do now is program the cooking time and select the VAROMA heat setting on your Thermomix TM 31. -
Page 34: Practical Work With The Varoma
Instruction Manual Thermomix TM 31 Practical work with the VAROMA The bottom of the stainless steel unit and the The description shows clearly how easy it is to inner tray are both designed with an even use the VAROMA. pattern of small slots to guarantee an even distribution of steam in the VAROMA.
-
Page 35: Notes For Your Own Recipes
Instruction Manual Thermomix TM 31 Notes for your own recipes Order of ingredients Heating times When preparing food according to your own Heating time is dependent on the following: recipes consider the order of the necessary starting temperature of the ingredients to steps.
-
Page 36: Troubleshooting
By pulling the mains plug: the display shows «E.r» followed by a two-digit E.r 23, 24, 28, 32, 38, 39, 70 figure please contact the responsible Vorwerk customer service indicating the error message By turning the speed selector to (e.g. E.r 53 = temperature sensor failure) if it is…
Посмотреть инструкция для Thermomix TM31 бесплатно. Руководство относится к категории кухонные комбайны, 21 человек(а) дали ему среднюю оценку 8.8. Руководство доступно на следующих языках: русский. У вас есть вопрос о Thermomix TM31 или вам нужна помощь? Задайте свой вопрос здесь
Не можете найти ответ на свой вопрос в руководстве? Вы можете найти ответ на свой вопрос ниже, в разделе часто задаваемых вопросов о Thermomix TM31.
В чем разница между кухонным комбайном и измельчителем продуктов?
Можно ли наливать теплые жидкости в кухонный комбайн?
При приготовлении теста не получается сформировать шар, что мне делать?
Может ли мыть Thermomix кухонный комбайн в посудомоечной машине?
Инструкция Thermomix TM31 доступно в русский?
Не нашли свой вопрос? Задайте свой вопрос здесь

- Manuals
- Brands
- Thermomix Manuals
- Kitchen Appliances
- TM 31
- Instruction manual
-
Contents
-
Table of Contents
-
Troubleshooting
-
Bookmarks
Available languages
-
EN
-
FR
Quick Links
Thermomix TM 31
Instruction Manual – Retain for future reference!
Guide d’utilisation – A conserver pour consultation ultérieure !
Related Manuals for Thermomix TM 31
Summary of Contents for Thermomix TM 31
-
Page 1
Thermomix TM 31 Instruction Manual – Retain for future reference! Guide d’utilisation – A conserver pour consultation ultérieure ! -
Page 3: Table Of Contents
Starting the Thermomix TM 31 ……..
-
Page 4
Table of contents Temperature buttons and illuminated temperature indicators ……30 Indicator for remaining heat ……….. 31 Soft start . -
Page 5: Notes For Your Safety
Thermomix TM 31 for • Do not immerse the Thermomix TM 31 in water or the first time and be sure to take particular note of use a lot of water when cleaning. No water must the following.
-
Page 6
• Hold measuring cup firmly while operating the lead to splashing of hot food or frothing up of Thermomix TM 31 at medium (3 – 6) and higher liquid. (7 – 10) speed levels or pressing turbo button to •… -
Page 7
Property damage Thermomix TM 31 can move • Place your Thermomix TM 31 on a clean, solid and even surface so that it cannot slip. Keep a sufficient distance from the edge of this surface to prevent Thermomix TM 31 from falling down. -
Page 8: Technical Data
Maximum power consumption 1,500 W. Pull-out connecting cable, 1 m long. Pull-out connecting cable, 1 m long. Dimensions and weight Dimensions and weight excl. Varoma Varoma Thermomix TM 31 excl. Varoma Thermomix TM 31 height height 30.0 cm 30.0 cm height 11.8 cm…
-
Page 9: Introduction/Customer Service
Thermomix TM 31! Thermomix TM 31! Your Thermomix TM 31 advisor: Your Thermomix TM 31 advisor: During a Thermomix TM 31 demonstration, you During a Thermomix TM 31 demonstration, you Name Name experienced and tested with your five senses the…
-
Page 10: Your Thermomix Tm 31
Your Thermomix TM 31 Your Thermomix TM 31 After opening the packaging please check that all Thermomix TM 31 components are included. These are: • Thermomix TM 31 including mixing bowl and lid • Simmering basket • Stirring attachement (butterfly) •…
-
Page 11
Your Thermomix TM 31 Main appliance Mixing bowl Mixing bowl base Mixing knife Sealing ring for mixing knife Simmering basket Spatula with safety disk Measuring cup Mixing bowl lid Sealing ring for mixing bowl lid Stirring attachment (butterfly) VAROMA VAROMA receptacle… -
Page 12: Before You Start
Thermomix advisor. Familiarize yourself with using your Thermomix TM 31. Before you start Make sure to place your Thermomix TM 31 on a clean, solid and even surface so that it cannot slip. Keep your Thermomix TM 31 in a permanent position in your kitchen, so that you can operate it easily.
-
Page 13: How To Remove The Mixing Knife
Before you start How to remove the mixing knife To remove the mixing knife: Hold the mixing knife on the upper part carefully with one hand and turn with your other hand the bottom of the mixing bowl anti-clockwise 30 degrees and pull it off downwards Remove the mixing knife together with its sealing ring CAUTION…
-
Page 14: How To Insert The Mixing Knife
Before you start How to insert the mixing knife To re-insert the mixing knife, follow the ‘removal’ steps in the reverse order. Put the mixing knife back into the mixing bowl by pushing it through the opening in the bottom of the bowl CAUTION Risk of damage by leaking out food Ensure sealing ring of mixing knife is fitted to…
-
Page 15: Accessories
Accessories Accessories Before you start using your Thermomix TM 31 we would like to present its accessories in more detail. They are proof of a well thought out design. Every part has been designed intelligently and serves several purposes. 2.0 litre Mixing bowl 1.5 litre…
-
Page 16
Mixing bowl lid The mixing bowl lid is used to close the mixing bowl. For safety reasons your Thermomix TM 31 will not start working unless the lid has been positioned and locked correctly. Never try to force the lid open when the appliance is locked. -
Page 17: Simmering Basket
• Filtering of fruit and vegetable juices. Chop and make a puree in the Thermomix TM 31, then insert the simmering basket into the mixing bowl and use it as a filter when pouring the juice out.
-
Page 18: Spatula
CAUTION Danger of injury by usage of not intended items • Use only the spatula with safety disk (provided with the Thermomix TM 31) for stirring food in mixing bowl. • Lock the mixing bowl lid before inserting the spatula through the opening in the mixing bowl lid.
-
Page 19: Stirring Attachment (Butterfly)
Accessories Stirring attachment (butterfly) • The butterfly (here positioned on mixing knife ) will help you to achieve best results when whipping cream or beating egg whites. It is also the perfect utensil for the preparation of creamy puddings or cream mixtures. •…
-
Page 20: Varoma
CAUTION • Always store the VAROMA with its lid closed • Use VAROMA only with Thermomix TM 31 (not suitable for microwave, oven or other appliances). How to combine the VAROMA parts You can use your VAROMA in either of the following…
-
Page 21: How To Use The Varoma Correctly
How to use the VAROMA correctly Your VAROMA is an accessory designed for the Thermomix TM 31 and can only be used with it. Before you can start steam cooking with the VAROMA you will need to set up your Thermomix TM 31 correctly.
-
Page 22
Mind hot steam escapes at the sides and from the top of VAROMA lid during operation. • Keep children away from Thermomix TM 31 when using VAROMA and warn them about the danger of hot steam and hot condensed water. -
Page 23
Water or water-based liquid in the mixing bowl heats up to over 100 °C, developing hot steam. The steam rises through the opening in the mixing bowl lid of the Thermomix TM 31 into the VAROMA. The food is cooked gently in the hot steam. -
Page 24: Practical Work With The Varoma
Accessories Practical work with the VAROMA • Do not thicken your sauces and soups until the This description explains clearly how easy it is to steam cooking process is finished. Thickeners use the VAROMA. Observe the following basic rules may stop steam from forming evenly in the for using the VAROMA: mixing bowl and slow down the overall cooking process.
-
Page 25: Working With The Thermomix Tm 31
Find a permanent place in your kitchen for your If the appliance has been transported in winter Thermomix TM 31 right from the start so that it is and the temperature falls below – 20 °C (– 4 °F) ready at hand whenever you need it.
-
Page 26: Explanation Of Symbols On Control Panel
Working with the Thermomix TM 31 Explanation of symbols on control panal Timer buttons Button for dough mode Closed lid Temperature buttons Tare button for scales Open lid Gentle stir setting Button for clockwise / On / Off button counter-clockwise operation…
-
Page 27: Multi-Function Display
Working with the Thermomix TM 31 Multi-function display Step 3: Put in the first ingredient (2.0 kg max.) and In the centre at the top of the control panel there is check the quantity on the display a digital display.
-
Page 28: Further Information About Weighing
Working with the Thermomix TM 31 Further information about weighing The tare function works from 5 g to 6.0 kg in steps of 3 times 2 kg. When weighing and adding ingre- dients with the help of the tare function always add…
-
Page 29: Timer Buttons And Timer Display
Working with the Thermomix TM 31 Timer buttons and timer display Step 3: Turn the speed selector (see page 32ff.) Observe the following sequence of steps if you wish to prepare or heat food in your After the speed selector has been turned, the…
-
Page 30: Adjustment Of Preset Time
90 °C (194 °F) is set the preparation. Press the – button to reduce the time, related light will start flashing. As the Thermomix press the + button to increase it. heats up the lights for 37 °C, 50 °C, 60 °C, 70 °C and If the speed selector gets turned to 80 °C (99, 122, 140, 158 and 176°F, respectively)
-
Page 31: Indicator For Remaining Heat
If using the Thermomix TM 31 to process food that has not been heated or cooked in the appliance (e.g. prepar- ing a gravy from hot meat juices) you should only increase the speed slowly and gradually.
-
Page 32: Varoma Temperature Setting
This will prevent the food to be chopped from Never heat up the mixing bowl when empty. escaping. Speed selector Turn the speed selector to start the Thermomix TM 31. The following speeds are available: Designation Speed level Revolution/min.
-
Page 33: Turbo Button
CAUTION Danger of injury by escaping food Hold measuring cup firmly while operating the Thermomix TM 31 at medium (3 – 6) and higher (7 – 10) speed levels or pressing turbo button to chop or to purée food. Turbo button…
-
Page 34: Clockwise/Counter-Clockwise Operation
Thermomix TM 31 can move reverse the rotating direction of the mixing knife Place your Thermomix TM 31 on a clean, solid from clockwise to counter-clockwise. Pressing and even surface so that it cannot slip. Keep a…
-
Page 35: Things To Remember
In sleep mode, power consumption of the Thermomix TM 31 is less than 1 W. If you do not use the Thermomix TM 31 for a prolonged period of time we recommend that you disconnect it from mains supply.
-
Page 36: Cleaning
Cleaning As with all kitchen appliances or tableware you Important: should clean all parts of your Thermomix TM 31 – Never use pointed or sharp objects for cleaning especially the mixing knife, the mixing bowl, the as this may damage functional parts or affect the mixing bowl lid and its sealing ring –…
-
Page 37: How To Clean The Mixing Knife
Cleaning How to clean the mixing knife Important: To clean the mixing knife hold it under running All components are dishwasher-proof. Place water with the mixing knife pointing upwards, as plastic parts, in particular the mixing bowl lid, shown on picture .
-
Page 38: How To Clean The Main Appliance
Disconnect the appliance from mains power supply before cleaning. • Do not immerse the Thermomix TM 31 in water or use a lot of water when cleaning. No water must be allowed to enter the housing. Wipe the main appliance with a damp soft cloth and a gentle cleansing agent .
-
Page 39: Notes For Your Own Recipes
Notes for your own recipes Notes for your own recipes Use similar recipes of the Thermomix TM 31 Example: Chopping vegetables cookbooks as a guide for adapting your own recipes. Settings: 7 sec. / speed 5 The easy to understand step by step design of our…
-
Page 40: Troubleshooting
Error display: Error messages of the appliance can be reset as follows: As a special feature the Thermomix TM 31 will By pulling the mains plug: show the cause for the error on the display. If the E.r 23, 28, 32, 38, 39, 70 display shows “E.r”…
-
Page 41: Legal Regulations
Legal regulations Legal regulations Copyright For customers living in EU-Member States: Copyright © Text, design, photography, illustrations by English Vorwerk International Mittelsten Scheid & Co., As owner of an electrical or electronic Switzerland. All rights reserved. product, you are not allowed by law This publication may not –…
-
Page 42: Warranty
For detailed information contact your Thermomix purchase contract. advisor, the sales company in your country, or refer to www.thermomix.com. The Thermomix TM 31 may only be repaired by the responsible Vorwerk customer service or an authorised Vorwerk repairer. Produced by Vorwerk Elektrowerke GmbH &…
-
Page 43
Informations détaillées sur le Thermomix TM 31 ……. . 10… -
Page 44
Table des Matières Boutons de température et indicateurs lumineux ……..30 Boutons de température et indicateurs lumineux . -
Page 45: Pour Votre Sécurité
Pour votre sécurité Pour votre sécurité Le Thermomix TM 31 est destiné à un usage dome- Danger d’électrocution stique. Il est conforme aux normes de sécurité les • Débranchez l’appareil de la prise secteur avant de plus avancées. Pour votre propre sécurité, lisez le nettoyer.
-
Page 46
Danger de blessure par projection d’aliments • Veillez à placer le Thermomix TM 31 sur une surface • Maintenez fermement le gobelet doseur en place propre, ferme et plane, en particulier quand vous pendant l’utilisation du Thermomix TM 31 aux… -
Page 47
Thermomix TM 31 d’une chute. Lors de la préparation d’une pâte ou d’un mixage, un déséquilibre peut se produire dans le bol de mixage qui, dans certaines circonstances, risque de provoquer un déplacement… -
Page 48: Données Techniques
Longueur maximale du câble d’alimentation : 1 mètre Longueur maximale du câble d’alimentation : 1 mètre Dimensions et poids Dimensions et poids sans Varoma Varoma Thermomix sans VAROMA Thermomix TM 31 Hauteur Hauteur 30,0 cm 30,0 cm Hauteur 11,8 cm…
-
Page 49
Le guide d’utilisation vous permet de vous familiari- www.thermomix.com www.thermomix.com ser pas à pas avec votre Thermomix. Nous vous conseillons de le lire attentivement. A chaque étape, vous verrez que notre priorité lors de l’élabo- ration de ce produit de haute qualité, a été de répondre à… -
Page 50: Informations Détaillées Sur Le Thermomix Tm 31
Informations détaillées sur le Thermomix TM 31 Informations détaillées sur le Thermomix TM 31 Après ouverture de votre colis vérifiez qu’il contient bien tous les éléments suivants : • Thermomix TM31 avec le bol de mixage et le couvercle •…
-
Page 51
Informations détaillées sur le Thermomix TM 31 Appareil principal Bol de mixage Socle du bol Ensemble couteaux Joint de l’ensemble couteaux Panier de cuisson Spatule avec disque de sécurité Gobelet doseur Couvercle de bol Joint du couvercle Fouet VAROMA VAROMA Plateau à… -
Page 52: Avant La Première Utilisation
Avant la première utilisation Avant la première utilisation Toutes nos félicitations pour avoir choisi le Thermomix TM 31. Vous avez attendu impatiemment votre Thermomix TM31 et vous êtes ravis de le voir arriver. Vous savez certainement depuis longtemps quelles recet- tes vous aimeriez tester en premier.
-
Page 53: Comment Enlever L’ensemble Couteaux
Avant la première utilisation Comment enlever l’ensemble couteaux Pour enlever l’ensemble couteaux: tenez soigneuse- ment la partie supérieure de l’ensemble couteaux d’une main et tournez avec l’autre, le socle du bol d’environ 30° dans le sens inverse des aiguilles d’une montre et tirez-le vers le bas .
-
Page 54: Comment Insérer L’ensemble Couteaux
Avant la première utilisation Comment insérer l’ensemble couteaux Vous savez comment ôter l’ensemble couteaux du bol. Pour le réinstaller suivez le même processus dans le sens inverse. Insérez l’ensemble couteaux à l’intérieur du bol en le poussant à travers l’ouverture au fond du bol ATTENTION Risque de détérioration par un écoulement de nourriture:…
-
Page 55: Accessoires
Le socle du bol Le socle du bol est utilisé pour fixer l’ensemble couteaux avec le bol. Le bol du Thermomix TM 31 peut être posé sur n’importe quel support sans qu’il soit nécessaire d’utiliser un dessous de plat. Important: Le socle du bol doit être tourné…
-
Page 56
Accessoires Couvercle de bol Le couvercle de bol est utilisé pour fermer votre bol. Pour des raisons de sécurité, votre Thermomix TM 31 ne fonctionnera pas si le couvercle n’est pas correc- tement positionné et verrouillé sur le bol. N’essayez jamais de forcer l’ouverture du couvercle quand votre appareil est en marche. -
Page 57: Panier De Cuisson
Accessoires Panier de cuisson Le panier de cuisson du Thermomix TM 31 est fait d’un plastique alimentaire de grande qualité. Comme le gobelet, il a plusieurs utilisations: • Filtrer le jus des fruits ou des légumes: Découpez et réduisez en purée vos fruits ou légumes dans le Thermomix TM 31, puis insérez le panier de…
-
Page 58: Spatule
ATTENTION Danger de blessure par utilisation d’accessoires non conçus pour l’appareil • Utilisez uniquement la spatule dotée d’un disque de sécurité (livrée avec le Thermomix TM 31) pour brasser les aliments dans le bol de mixage. • Verrouillez le couvercle du bol de mixage avant d’introduire la spatule dans l’ouverture du couvercle.
-
Page 59: Fouet
à la paroi. Il est très facile d’insérer et d’enlever le fouet : Adaptez-le simplement sur l’ensemble couteaux dans le bol du Thermomix TM 31 comme indiqué sur la photo . La partie supérieure en forme de boule permet de le retirer aisément.
-
Page 60: Varoma
Quelle que soit la combinaison choisie, utilisez toujours le couvercle • Utilisez le VAROMA seulement avec le Thermomix TM 31 (ne convient pas aux micro- ondes, fours ou autres appareils). Comment assembler votre VAROMA Vous pouvez utiliser votre VAROMA dans l’une ou l’autre des combinaisons suivantes.
-
Page 61: La Meilleure Façon D’utiliser Votre Varoma
Accessoires Le meilleure façon d’utiliser votre VAROMA Votre VAROMA est un accessoire conçu pour le Thermomix TM 31 et ne peut être utilisé qu’avec le Thermomix TM 31. Avant de commencer à cuisiner à la vapeur avec votre VAROMA, il faut installer votre Thermomix TM 31 correctement.
-
Page 62
Important: Ne laissez jamais le gobelet doseur sur ou à l’intérieur du couvercle du bol du Thermomix TM 31 lorsque vous utilisez le VAROMA. Il est très important que le VAROMA et son couvercle soient bien assemblés. Sinon, il n’y aura pas assez de vapeur à… -
Page 63
Le liquide dans le bol est chauffé à plus de 100 °C de manière à ce que la vapeur sortant par l’orifice du couvercle du Thermomix TM 31 puisse pénétrer dans le VAROMA. Les aliments sont cuits lentement Lorsque les aliments sont cuits ou si vous souhaitez dans la vapeur chaude. -
Page 64: Règles Pratiques Pour L’utilisation De Votre Varoma
Accessoires Règles pratiques pour l’utilisation de votre • Graissez le VAROMA et le plateau intérieur pour VAROMA s’assurer que les aliments tels que viande, pois- Le descriptif explique clairement qu’il est facile son ou pâtes n’accrochent pas. d’utiliser le VAROMA. Veillez à…
-
Page 65: Travailler Avec Le Thermomix Tm 31
Aménagez dès le début une place dans votre cuisine la balance sera parfaitement opérationnelle. pour y laisser votre Thermomix TM 31 de façon Si vous n’utilisez pas votre Thermomix TM 31 permanente. Vous l’aurez ainsi à portée de main dès pendant une longue période, débranchez-le comme…
-
Page 66: Explication Des Symboles Sur Le Panneau De Contrôle
Travailler avec le Thermomix TM 31 Explication des symboles sur le panneau de contrôle Boutons de minuterie Mode pétrin Couvercle verrouillé Boutons de température Bouton de tare de la balance Couvercle déverrouillé Vitesse mijotage Sens de rotation Interrupteur ATTENTION Risque de détérioration par un refroidissement insuffissant du Thermomix : Assurez-vous que les aérations de chaque côté…
-
Page 67: Affichage Multifonctions
Etape 3: Mettez le premier ingrédient (2 kg max.) et En haut et au centre du panneau de contrôle du regardez la quantité sur l’affichage Thermomix TM 31 se trouve un affichage digital. Cet affichage fournit les informations suivantes: Etape 4: Si vous voulez ajouter des ingrédients, pressez de nouveau le bouton de tare et insérez les…
-
Page 68: Autres Informations Importantes Concernant La Pesée
Après avoir pressé le bouton de tare du Thermomix TM 31, le mode pesée reste actif pendant une durée de 5 mn. Passé ce délai, le Thermomix TM 31 bascule en mode minuterie. Quand le bouton de tare est pressé une nouvelle fois, le mode pesée redevient actif pour une durée de 5 mn.
-
Page 69: Bouton D’horloge Et Affichage De La Minuterie
Travailler avec le Thermomix TM 31 Bouton d’horloge et affichage de la minuterie Quand le Thermomix TM 31 fonctionne à froid, il Observez les instructions suivantes pour cuire ou s’éteint automatiquement à l’expiration du temps mijoter dans votre Thermomix TM 31.
-
Page 70: Ajustement Du Minuteur
« + » pour l’augmenter. Si le de 90 °C, les voyants des températures précédentes Thermomix est arrêté avant que le temps sélection- (37 °C, 60°C …) clignoteront successivement jusqu’à né ne soit terminé (pour l’ajout d’un nouvel ingré- ce que le voyant correspondant au 90 °C clignote…
-
Page 71: Témoin De Chaleur
éclaboussures en augmentant progressivement la vitesse. Ce démarrage lent ne fonctionne que si la préparation a été préalablement chauffée ou cuite avec le Thermomix TM 31. Ainsi le capteur de température peut mesurer correctement la température résiduelle et contrôler en consé- quence le démarrage progressif.
-
Page 72: Température Varoma
éviter que la préparation ne jaillisse hors du bol. la vapeur. ATTENTION Ne jamais faire chauffer le bol à vide. Sélecteur de vitesse Tournez le sélecteur de vitesse pour mettre votre Thermomix TM 31 en marche. Les vitesses dispo- nibles sont les suivantes: Désignation Niveau/Vitesse Tour/min. Mijotage Brassage 1 –…
-
Page 73: Bouton Turbo
ATTENTION Danger de blessure par projection d’aliments Maintenez fermement le gobelet doseur en place pendant l’utilisation du Thermomix TM 31 aux vitesses moyennes (3 – 6) et rapides (7 – 10) ou quand vous appuyez sur le bouton Turbo pour hacher ou mixer les aliments.
-
Page 74: Sens De Rotation
Le Thermomix TM 31 peut bouger pour changer le sens de rotation des couteaux. Placez votre Thermomix TM 31 sur une surface Il est possible de sélectionner le mode à toutes propre, ferme et plane afin qu’il ne puisse pas les vitesses et en position glisser.
-
Page 75: Ce Que Vous Devez Savoir
Ce que vous devez savoir Mode veille • Si le message « LOAd » est toujours affiché à Si le Thermomix TM 31 est branché et se trouve sur l’issue du temps de refroidissement, contactez le la position mais inutilisé pendant une quinzaine Service Clients de Vorwerk France.
-
Page 76: Nettoyage
Nettoyage Nettoyage Comme pour tout appareil de cuisine, vous devez Vous pouvez maintenant nettoyer votre bol à l’inté- nettoyer soigneusement votre Thermomix TM 31, rieur et à l’extérieur (après avoir retiré l’ensemble plus particulièrement votre ensemble couteaux, couteaux) dans de l’eau de vaisselle chaude, à…
-
Page 77: Comment Nettoyer L’ensemble Couteaux
Nettoyage Comment nettoyer l’ensemble couteaux Important: Pour nettoyer l’ensemble couteaux, maintenez-le Tous les composants sont lavables en machine. sous l’eau courante, lames pointées vers le haut Toutefois, prenez soin de positionner les élé- comme indiqué sur la photo ments plastiques, notamment le couvercle de Afin de faciliter le nettoyage, utilisez une brosse ou bol, dans le bac supérieur de votre lave-vaisselle nettoyez-le au lave-vaisselle.
-
Page 78: Comment Nettoyer Le Bloc Moteur
• N’immergez pas le bloc moteur de votre Thermomix TM 31 dans l’eau. Faites toujours attention en le nettoyant qu’il n’y ait pas d’eau qui pénètre dans l’appareil. Nettoyez le bloc moteur avec une éponge humide et un détergent doux…
-
Page 79: Conseils Pour Vos Propres Recettes
Conseils pour vos propres recettes Conseils pour vos propres recettes Utilisez les livres de recettes du Thermomix TM 31 Exemple : Légumes hachés comme un guide. Préparation : 7 sec / vit 5 C’est la manière la plus facile d’apprendre à con- naître le fonctionnement de l’appareil.
-
Page 80: Anomalies De Fonctionnement
La balance est imprécise Vérifications: quand vous pressez le bouton de tare, veillez à ne pas frôler le Thermomix. Rien ne doit être appuyé contre le Thermomix ; aucune tension doit s’exercer sur le câble; les « pieds » du Thermomix doivent être propres;…
-
Page 81: Réglementation Légale
Réglementation légale Réglementation Copyright légale pour les clients qui résident dans un Copyright © pays membre de l’Union Européenne Textes, mise en page, photographies, illustrations : Vorwerk International Mittelsten Scheid & Co., « La législation (directive européenne Suisse.Tous droits réservés. Aucune section de cet 2002 / 96 / CE du 27 janvier 2003 relative ouvrage (partielle ou entière) ne peut être reproduite, aux déchets d’équipements électriques…
-
Page 82: Garantie
Thermomix en combinaison avec des accessoires ou équipements non fournis par Vorwerk Thermomix. • en cas d’utilisation d’accessoires autres que ceux fournis avec le Thermomix TM 31 (page 10 – 11), ou de pièces détachées non originales Vorwerk Thermomix •…
Instruction Manual
Thermomix TM 31
Retain for future reference!
Table of contents
3
Table of contents
Notes for your safety . . . . . . . . . . . . . . . . . . . . . . . . . . . . . . . . . . . . . . . . . . . . . . . . . . . . . . . 5
Technical data . . . . . . . . . . . . . . . . . . . . . . . . . . . . . . . . . . . . . . . . . . . . . . . . . . . . . . . . . . . . . 8
Introduction/Customer service . . . . . . . . . . . . . . . . . . . . . . . . . . . . . . . . . . . . . . . . . . . . . . . 9
Your Thermomix TM 31 . . . . . . . . . . . . . . . . . . . . . . . . . . . . . . . . . . . . . . . . . . . . . . . . . . . . . 10
Before you start
. . . . . . . . . . . . . . . . . . . . . . . . . . . . . . . . . . . . . . . . . . . . . . . . . . . . . . . . . 12
How to insert the mixing bowl correctly . . . . . . . . . . . . . . . . . . . . . . . . . . . . . . . . . . . . . . . . . . 12
How to remove the mixing knife . . . . . . . . . . . . . . . . . . . . . . . . . . . . . . . . . . . . . . . . . . . . . . . 13
How to insert the mixing knife . . . . . . . . . . . . . . . . . . . . . . . . . . . . . . . . . . . . . . . . . . . . . . . . . 14
Accessories
. . . . . . . . . . . . . . . . . . . . . . . . . . . . . . . . . . . . . . . . . . . . . . . . . . . . . . . . . . . . . 15
Mixing bowl, mixing bowl base . . . . . . . . . . . . . . . . . . . . . . . . . . . . . . . . . . . . . . . . . . . . . . . . 15
Mixing bowl lid, measuring cup . . . . . . . . . . . . . . . . . . . . . . . . . . . . . . . . . . . . . . . . . . . . . . . . 16
Simmering basket . . . . . . . . . . . . . . . . . . . . . . . . . . . . . . . . . . . . . . . . . . . . . . . . . . . . . . . . . . . 17
Spatula . . . . . . . . . . . . . . . . . . . . . . . . . . . . . . . . . . . . . . . . . . . . . . . . . . . . . . . . . . . . . . . . . . . . 18
Stirring attachment (butterfly) . . . . . . . . . . . . . . . . . . . . . . . . . . . . . . . . . . . . . . . . . . . . . . . . . . 19
VAROMA . . . . . . . . . . . . . . . . . . . . . . . . . . . . . . . . . . . . . . . . . . . . . . . . . . . . . . . . . . . . . . . . . . 20
How to combine the VAROMA parts . . . . . . . . . . . . . . . . . . . . . . . . . . . . . . . . . . . . . . . . . . . . 20
How to use the VAROMA correctly . . . . . . . . . . . . . . . . . . . . . . . . . . . . . . . . . . . . . . . . . . . . . 21
Practical work with the VAROMA . . . . . . . . . . . . . . . . . . . . . . . . . . . . . . . . . . . . . . . . . . . . . . . 24
Working with the Thermomix TM 31
. . . . . . . . . . . . . . . . . . . . . . . . . . . . . . . . . . . . 25
Starting the Thermomix TM 31 . . . . . . . . . . . . . . . . . . . . . . . . . . . . . . . . . . . . . . . . . . . . . . . . . 25
Explanation of symbols on control panel . . . . . . . . . . . . . . . . . . . . . . . . . . . . . . . . . . . . . . . . . 26
Multi-function display . . . . . . . . . . . . . . . . . . . . . . . . . . . . . . . . . . . . . . . . . . . . . . . . . . . . . . . . 27
Weighing and adding with the tare button . . . . . . . . . . . . . . . . . . . . . . . . . . . . . . . . . . . . . . . . 27
Further information about weighing . . . . . . . . . . . . . . . . . . . . . . . . . . . . . . . . . . . . . . . . . . . . . 28
Timer buttons and timer display . . . . . . . . . . . . . . . . . . . . . . . . . . . . . . . . . . . . . . . . . . . . . . . . 29
Adjustment of preset time . . . . . . . . . . . . . . . . . . . . . . . . . . . . . . . . . . . . . . . . . . . . . . . . . . . . 30
4
Table of contents
Temperature buttons and illuminated temperature indicators . . . . . . . . . . . . . . . . . . . . . . . . . 30
Indicator for remaining heat . . . . . . . . . . . . . . . . . . . . . . . . . . . . . . . . . . . . . . . . . . . . . . . . . . . 31
Soft start . . . . . . . . . . . . . . . . . . . . . . . . . . . . . . . . . . . . . . . . . . . . . . . . . . . . . . . . . . . . . . . . . . 31
Soft heating setting . . . . . . . . . . . . . . . . . . . . . . . . . . . . . . . . . . . . . . . . . . . . . . . . . . . . . . . . . . 31
VAROMA temperature setting . . . . . . . . . . . . . . . . . . . . . . . . . . . . . . . . . . . . . . . . . . . . . . . . . 32
Speed selector . . . . . . . . . . . . . . . . . . . . . . . . . . . . . . . . . . . . . . . . . . . . . . . . . . . . . . . . . . . . . 32
Gentle stir setting . . . . . . . . . . . . . . . . . . . . . . . . . . . . . . . . . . . . . . . . . . . . . . . . . . . . . . . . . . . 32
Stirring . . . . . . . . . . . . . . . . . . . . . . . . . . . . . . . . . . . . . . . . . . . . . . . . . . . . . . . . . . . . . . . . . . . . 32
Mixing/blending . . . . . . . . . . . . . . . . . . . . . . . . . . . . . . . . . . . . . . . . . . . . . . . . . . . . . . . . . . . . . 32
Turbo button . . . . . . . . . . . . . . . . . . . . . . . . . . . . . . . . . . . . . . . . . . . . . . . . . . . . . . . . . . . . . . . 33
Clockwise/counter-clockwise operation . . . . . . . . . . . . . . . . . . . . . . . . . . . . . . . . . . . . . . . . . . 34
Dough mode . . . . . . . . . . . . . . . . . . . . . . . . . . . . . . . . . . . . . . . . . . . . . . . . . . . . . . . . . . . . . . . 34
Things to remember
. . . . . . . . . . . . . . . . . . . . . . . . . . . . . . . . . . . . . . . . . . . . . . . . . . . . 35
Sleep mode . . . . . . . . . . . . . . . . . . . . . . . . . . . . . . . . . . . . . . . . . . . . . . . . . . . . . . . . . . . . . . . . 35
Electronic motor protection . . . . . . . . . . . . . . . . . . . . . . . . . . . . . . . . . . . . . . . . . . . . . . . . . . . . 35
Smells . . . . . . . . . . . . . . . . . . . . . . . . . . . . . . . . . . . . . . . . . . . . . . . . . . . . . . . . . . . . . . . . . . . . 35
Cleaning
. . . . . . . . . . . . . . . . . . . . . . . . . . . . . . . . . . . . . . . . . . . . . . . . . . . . . . . . . . . . . . . . 36
How to clean the mixing bowl and its lid . . . . . . . . . . . . . . . . . . . . . . . . . . . . . . . . . . . . . . . . . 36
How to clean the mixing knife . . . . . . . . . . . . . . . . . . . . . . . . . . . . . . . . . . . . . . . . . . . . . . . . . 37
How to clean the VAROMA . . . . . . . . . . . . . . . . . . . . . . . . . . . . . . . . . . . . . . . . . . . . . . . . . . . 37
How to clean the main appliance . . . . . . . . . . . . . . . . . . . . . . . . . . . . . . . . . . . . . . . . . . . . . . . 38
Additional information for cleaning . . . . . . . . . . . . . . . . . . . . . . . . . . . . . . . . . . . . . . . . . . . . . . 38
Notes for your own recipes . . . . . . . . . . . . . . . . . . . . . . . . . . . . . . . . . . . . . . . . . . . . . . . . . . 39
Troubleshooting . . . . . . . . . . . . . . . . . . . . . . . . . . . . . . . . . . . . . . . . . . . . . . . . . . . . . . . . . . . 40
Legal Regulations . . . . . . . . . . . . . . . . . . . . . . . . . . . . . . . . . . . . . . . . . . . . . . . . . . . . . . . . . . 41
Warranty . . . . . . . . . . . . . . . . . . . . . . . . . . . . . . . . . . . . . . . . . . . . . . . . . . . . . . . . . . . . . . . . . . 42
Customer Service . . . . . . . . . . . . . . . . . . . . . . . . . . . . . . . . . . . . . . . . . . . . . . . . . . . . . . . . . . 43
Notes for your safety
5
Notes for your safety
The Thermomix TM 31 is intended for domestic use.
It complies with the most advanced safety standards.
For your own safety, read this instruction manual carefully before using your Thermomix TM 31 for the first time and be sure to take particular note of the following.
Retain instruction manual for future reference. This instruction manual is part of the Thermomix TM 31.
Therefore always add this instruction manual to the appliance when a third person uses it.
The Thermomix TM 31 is not intended for use by persons (including children) with reduced physical, sensory or mental capabilities, or lack of experience and knowledge, unless they have been given supervision or instruction concerning use of the appliance by a person responsible for their safety. Children should be supervised to ensure that they do not play with the appliance.
Danger of electric shock
• Disconnect the appliance from mains power supply before cleaning.
• Do not immerse the Thermomix TM 31 in water or use a lot of water when cleaning. No water must be allowed to enter the housing.
• Inspect your appliance and its accessories including the mixing bowl regularly for possible damage.
Damaged parts can impair safety. If damage does occur, do not use the appliance and contact
Vorwerk customer service or an authorised
Vorwerk repairer.
• The Thermomix TM 31 may only be repaired by the responsible Vorwerk customer service or an authorised Vorwerk repairer. This also applies in the case of damage to the connecting cable which may only be replaced with a specific cable by the Vorwerk customer service or an authorised
Vorwerk repairer. Improper repair works or inexpert handling may result in serious risks for the user.
Danger of injury from sharp mixing knife
• Do not touch the blades of mixing knife. They are very sharp. Hold upper part of mixing knife when removing or re-inserting it.
Danger of scalding by splashing hot food
• Place a maximum filling quantity of 2 litres of food into mixing bowl.
• Observe the fill level marks of mixing bowl.
• Use Thermomix TM 31 only with correctly fitted sealing ring of mixing bowl lid.
• Never use the turbo button or abruptly increase the speed when processing food that has not been heated in the Thermomix TM 31.
• Mind single spots of hot food escaping from opening of mixing bowl lid.
6
Notes for your safety
• Use only low speed levels ( – 2) when selecting
VAROMA temperature. Higher speed levels can lead to splashing of hot food or frothing up of liquid.
• Be sure to place the Thermomix TM 31 on a clean, solid and even surface, particularly when
• using the VAROMA.
Be sure to position the VAROMA correctly onto mixing bowl and appliance.
Danger of scalding by hot steam and hot condensed water
• Mind hot steam escapes at the sides and from the top of VAROMA lid during operation.
• Touch only the handles at both sides of VAROMA.
• Never use VAROMA without VAROMA lid.
• Hold VAROMA lid in such a way that the rising steam or hot dripping liquid cannot come into contact with you when taking it off.
• Mind hot steam which will continue to rise up out of opening of mixing bowl lid when removing the entire VAROMA.
• Keep children away from Thermomix TM 31 when using VAROMA and warn them about the danger of hot steam and hot condensed water.
• Ensure that opening of mixing bowl lid and some slots of VAROMA receptacle and tray remain free, otherwise there can be uncontrolled escape of steam.
Danger of injury by escaping food
• Hold measuring cup firmly while operating the
Thermomix TM 31 at medium (3 – 6) and higher
(7 – 10) speed levels or pressing turbo button to chop or to purée food.
Danger of injury by usage of not intended items or equipment
• Use only parts provided with the Thermomix
TM 31 (page 10–11) or original spare part from
Vorwerk Thermomix.
• Never use the Thermomix TM 31 in combination with parts or equipment not provided by Vorwerk
Thermomix.
• Use only the measuring cup to close the opening in the mixing bowl lid.
• Use only the spatula with safety disk for stirring food in mixing bowl. Never use other items such as spoons, cooking spoons or any other tools for stirring. These might get caught by the rotating mixing knife, possibly resulting in injury.
• Lock the mixing bowl lid before inserting the spatula through the opening in the mixing bowl lid.
Danger of injury by contact with hot parts
• Keep the appliance always out of children’s reach and warn children that the mixing bowl and
VAROMA will heat up.
Property damage
Thermomix TM 31 can move
• Place your Thermomix TM 31 on a clean, solid and even surface so that it cannot slip. Keep a sufficient distance from the edge of this surface to prevent Thermomix TM 31 from falling down.
When preparing dough or chopping food, an imbalance can develop in the mixing bowl which, under certain circumstances, may cause the whole appliance to move. Do not, therefore, leave the appliance unattended while it is operating as it might fall from the work surface.
Risk of damage
• By hot steam: Ensure a sufficient distance over
Thermomix TM 31 and VAROMA (suspended cupboards, shelving) and around them to prevent damage of hot escaping steam.
• By external heat source: Keep a sufficient distance between the appliance and external heat sources such as radiators, hot plates etc.
• By leaking out food: Ensure sealing ring of mixing knife is fitted to the knife bearing. If there is no sealing ring the food to be mixed or cooked may leak out and damage the appliance.
•
By insufficient cooling of Thermomix TM 31:
Ensure ventilation openings on both sides of the appliance are always free from splashes of fat, food leftovers or suchlike and not covered.
Otherwise damage of the applicance may occur.
Notes for your safety
7
8
Technical data
Technical data
Symbol of conformity/
Mark of conformity
Motor
Heating system
Integrated scales
Housing
Mixing bowl
Connected load
Dimensions and weight
Thermomix TM 31 excl. Varoma
Varoma
Maintenance-free Vorwerk reluctance motor 500 W rated power.
Speed continuously adjustable from 100 to 10,200 revolutions per minute (Gentle stir 40 rpm).
Special speed setting (alternating mode) for dough preparation.
Electronic motor protection to prevent overload.
1,000 W power consumption.
Protected against overheating.
Measuring range from 5 to 100 g in 5 g increments;
100 to 2,000 g in 10 g increments (to max. 6 kg).
High-quality plastic material.
Stainless steel, with heating system and temperature sensor integrated.
Maximum capacity 2 litres.
Only for 220 … 240 V ~ alternating voltage.
Maximum power consumption 1,500 W.
Pull-out connecting cable, 1 m long.
height width depth weight height width depth weight
30.0 cm
28.5 cm
28.5 cm
6.3 kg
11.8 cm
38.5 cm
27.5 cm
0.8 kg
Introduction
Customer service
9
Customer service
Dear Customer,
Congratulation on having chosen the
Thermomix TM 31!
If you have any questions or difficulties please do not hesitate to contact:
Your Thermomix TM 31 advisor:
During a Thermomix TM 31 demonstration, you experienced and tested with your five senses the benefits of your new Thermomix. An experienced
Thermomix advisor helped you optimising the usage of all possible functions to your individual needs.
Name
Telephone
Fax
Mobile phone
Thermomix customer service: see page 43
Now you are ready to start taking advantage of your own Thermomix. Preparing tasty and healthy food becomes fast and easy.
Cooking with Thermomix saves you time for other activities.
Vorwerk International Mittelsten Scheid & Co.
Verenastrasse 39
8832 Wollerau
Switzerland
This instruction manual will familiarize you step by step with your new Thermomix. Please read it carefully. With each step you will experience that we have considered your interests and needs when we designed this high quality product.
www.thermomix.com
Version: 20071214 / 230
The easy to understand step by step design of our recipes will enable you to prepare your meals and dishes without expert knowledge.
We wish you, your family and your friends a lot of fun with your new Thermomix!
Vorwerk Thermomix
10
Your Thermomix TM 31
Your Thermomix TM 31
After opening the packaging please check that all Thermomix TM 31 components are included.
These are:
• Thermomix TM 31 including mixing bowl and lid
• Simmering basket
• Stirring attachement (butterfly)
• Measuring cup
• Spatula
• VAROMA
• Recipe book
• Instruction Manual
1
3
2
5
4
7
9
Your Thermomix TM 31
11
8
14
13
12
4
5
6
7
8
9
10
1
2
3
11
Main appliance
Mixing bowl
Mixing bowl base
Mixing knife
Sealing ring for mixing knife
Simmering basket
Spatula with safety disk
Measuring cup
Mixing bowl lid
Sealing ring for mixing bowl lid
Stirring attachment (butterfly)
12
13
14
VAROMA
VAROMA receptacle
VAROMA tray
VAROMA lid
11
10
6
12
Before you start
Before you start
Congratulations on purchasing the Thermomix TM 31!
Before using your Thermomix TM 31 for the first time attend a demonstration with a qualified
Thermomix advisor. Familiarize yourself with using your Thermomix TM 31.
Before you start
Make sure to place your Thermomix TM 31 on a clean, solid and even surface so that it cannot slip.
Keep your Thermomix TM 31 in a permanent position in your kitchen, so that you can operate it easily.
Clean your Thermomix TM 31 thoroughly before using it for the first time. Follow the instructions in the chapter on cleaning (page 36).
How to insert the mixing bowl correctly
Before inserting the mixing bowl please always ensure that the speed selector has been set to
1
. Insert the mixing bowl with the handle pointing to the front and push it gently into position
2
.
The mixing bowl has been inserted correctly if its handle is at the front, as shown in the picture
2
, and if the bowl itself is securely fixed in the appliance.
To close the mixing bowl correctly press the lid vertically onto the mixing bowl
3
. The marker must point to the handle. Then turn the lid in a clock-wise direction until you hear it “click” into
Important:
Turn the lid clockwise as far as it will go; otherwise, the Thermomix TM 31 cannot be switched on.
1
2
3
4
4
3
2
How to remove the mixing knife
To remove the mixing knife: Hold the mixing knife on the upper part carefully with one hand and turn with your other hand the bottom of the mixing bowl anti-clockwise 30 degrees and pull it off downwards
5
.
Remove the mixing knife together with its sealing
CAUTION
Danger of injury from sharp mixing knife
Do not touch the blades of mixing knife. They are very sharp. Hold upper part of mixing knife when removing or re-inserting it.
Important:
Take precautions to prevent the mixing knife from falling out accidentally.
5
6
Before you start
13
14
Before you start
How to insert the mixing knife
To re-insert the mixing knife, follow the
‘removal’ steps in the reverse order.
Put the mixing knife back into the mixing bowl
1
by pushing it through the opening in the bottom of the bowl
2
.
CAUTION
Risk of damage by leaking out food
Ensure sealing ring of mixing knife is fitted to the knife bearing. If there is no sealing ring the food to be mixed or cooked may leak out and damage the appliance.
Now re-fit the bottom of the mixing bowl from below onto the mixing knife. Turn clockwise 30 degrees to lock
3
.
1
2
3
Accessories
Before you start using your Thermomix TM 31 we would like to present its accessories in more detail.
They are proof of a well thought out design. Every part has been designed intelligently and serves several purposes.
Mixing bowl
On the inside and on the outside of the mixing bowl there are marks indicating the filling level
4
.
Each mark corresponds to 0.5 litre. The mixing bowl has a maximum capacity of 2 litres
5
.
CAUTION
Danger of scalding by splashing hot food
• Place a maximum filling quantity of 2 litres of food into mixing bowl.
• Observe the fill level marks of mixing bowl.
Mixing bowl base
The mixing bowl base
6
is used to fasten and loosen the mixing knife within the mixing bowl. The mixing bowl may be placed on any work surface.
There is no need to place a mat under the bowl.
Important:
The mixing bowl base must be turned as far as it will go and locked. Failure to fit the bottom correctly may result in damage to other parts of the Thermomix.
4
5
6
Accessories
15
2.0 litre
1.5 litre
1.0 litre
0.5 litre maximum capacity of mixing bowl
16
Accessories
1
Mixing bowl lid
The mixing bowl lid is used to close the mixing bowl.
For safety reasons your Thermomix TM 31 will not start working unless the lid has been positioned and locked correctly. Never try to force the lid open when the appliance is locked. The appliance reacts with error “OPEn” (see page 40).
2
Take care to insert the sealing ring for the lid correctly.
Put the lid upside down on your work surface and position the ring onto the lid by pushing it into the three hinges whereupon you can hear a “click”
1
.
The sealing ring prevents liquid or food to be cooked from escaping between the mixing bowl and the lid.
CAUTION
Danger of scalding by splashing hot food
Use Thermomix TM 31 only with correctly fitted sealing ring of mixing bowl lid.
The measuring cup can be used to measure ingredients. A measuring cup filled to the brim holds 100 ml, and a half-filled measuring cup
(middle notch) 50 ml.
Place the measuring cup into the opening in the lid with its opening showing upwards
2
.
When cleaning the lid it is advisable occasionally to clean the sealing ring separately.
Measuring cup
The measuring cup is a multi-purpose item: it is a closing cap for the opening in the lid to avoid heat loss and it prevents food to be mixed or cooked from escaping.
CAUTION
Danger of scalding by splashing hot food
Use only the measuring cup (provided with the
Thermomix TM 31) to close the opening in the mixing bowl lid.
Only when using the butterfly: position the measuring cup with the opening pointing downwards.
If you wish to add some liquid there is no need to remove the measuring cup. Simply pour the liquid onto the lid. It will gradually trickle into the mixing bowl.
To add ingredients through the opening in the lid lift the measuring cup and add them into the mixing bowl.
Simmering basket
The simmering basket for the Thermomix TM 31 is made of high-quality plastic. Like the measuring cup, the basket is a multi-purpose item:
• Filtering of fruit and vegetable juices. Chop and make a puree in the Thermomix TM 31, then insert the simmering basket into the mixing bowl and use it as a filter when pouring the juice out.
When pouring the juice use the spatula to hold the simmering basket
3
.
• Delicate food such as meatballs or fishballs that are not suited to be prepared in the mixing bowl as a whole should be put into the simmering basket. Here they can be stewed.
• For cooking side dishes (e.g. rice, potatoes).
Removing the simmering basket is effortless: place the hook of the spatula into the notch of the simmering basket
4
and lift the basket
5
.
The spatula can be removed at any time.
• The feet at the bottom of the simmering basket
6
allow juice to drip off the food in the basket.
• In case of reducing liquid in food (e.g. tomato sauce) put the simmering basket as cover onto the lid
7
instead of the measuring cup.
4
5
6
7
3
Accessories
17
18
Accessories
Spatula
The spatula
1
is another example for the intelligent design of the Thermomix.
• The Thermomix TM 31 spatula is the only instrument you may use to mix or stir the ingredients in the mixing bowl
2
. Push it from above into the bowl through the opening in the lid. The safety disk ensures that the spatula is not caught by the mixing knife. This means that you can use the spatula during chopping, cooking or simmering.
• The spatula should be used to scrape all ingredients from the mixing bowl. The tip of the spatula is shaped to fit exactly between the mixing knife assembly and the wall of the mixing bowl.
• The spatula has a specially shaped safety disk to make sure that it does not roll off the work top.
• When filtering fruit or vegetable juices use the spatula to hold the simmering basket in place.
• Removing the simmering basket is effortless with the spatula.
1
2
CAUTION
Danger of injury by usage of not intended items
• Use only the spatula with safety disk (provided with the Thermomix TM 31) for stirring food in mixing bowl.
• Lock the mixing bowl lid before inserting the spatula through the opening in the mixing bowl lid.
• Never use other items such as spoons, cooking spoons or any other tools for stirring. These might get caught by the rotating mixing knife, possibly resulting in injury.
Stirring attachment (butterfly)
• The butterfly
3
(here positioned on mixing knife
4
) will help you to achieve best results when whipping cream or beating egg whites.
It is also the perfect utensil for the preparation of creamy puddings or cream mixtures.
• When boiling milk or preparing puddings or sauces the butterfly allows a constant movement of ingredients. This will prevent the food from sticking.
It is easy to insert and remove the butterfly:
Insert the butterfly as shown in the picture
5
.
Its ball-shaped end ensures that it can be removed easily.
To remove the butterfly hold the ball-shaped end and pull it out with rotations in both directions.
CAUTION
• Only switch on speed after the butterfly has been positioned into place.
• Do not select a speed higher than level 4 when the butterfly is fitted.
• Never use the spatula when the butterfly is fitted.
• Do not add ingredients that might damage or block the butterfly when the mixing knife is in motion and the butterfly is fitted.
3
4
5
Accessories
19
20
Accessories
1
VAROMA
The VAROMA
1
consists out of three parts
2
:
• VAROMA receptacle (bottom)
• VAROMA tray (middle)
• VAROMA lid (top)
All parts are made of high-quality, food compatible plastic.
CAUTION
• Always store the VAROMA with its lid closed
1
.
• Use VAROMA only with Thermomix TM 31
(not suitable for microwave, oven or other appliances).
2
3
How to combine the VAROMA parts
You can use your VAROMA in either of the following two combinations:
Combination 1:
VAROMA receptacle plus VAROMA tray and lid
2
.
Use this combination for cooking different foods, e.g. vegetables with meat or fish, or a larger amount of the same food, e.g. yeast dumplings.
Combination 2:
VAROMA receptacle plus VAROMA lid
3
.
Use this combination for cooking large amounts of the same food, e.g. vegetables, potatoes or large pieces of meat or sausages.
CAUTION
Danger of scalding by hot steam and hot condensed water
Never use VAROMA without VAROMA lid.
Important:
If VAROMA lid is not positioned properly, the steam will escape and the food inside the
VAROMA will not cook properly.
Accessories
21
4
How to use the VAROMA correctly
Your VAROMA is an accessory designed for the
Thermomix TM 31 and can only be used with it.
Before you can start steam cooking with the VAROMA you will need to set up your Thermomix TM 31 correctly.
Step 1: Set up Thermomix TM 31
Place the mixing bowl into position. Pour at least
0.5 litre (500 g) of water into mixing bowl for
30 minutes steam cooking. If you steam cook with simmering basket, insert the simmering basket and fill it with ingredients, e.g. potatoes or rice. Close the mixing bowl with mixing bowl lid and lock it.
For a flavoursome variation you can use a vegetable broth or water-wine-mix instead of water.
Step 2: Filling the VAROMA
Place VAROMA lid upside down on your work surface
4
and position VAROMA receptacle on top – it fits precisely into the groove.
Now loosely fill VAROMA receptacle with food
5
.
Make sure that some slots remain open so that the steam can spread evenly. As you fill the VAROMA, put food requiring longer cooking at the bottom, and food requiring shorter cooking at the top.
VAROMA lid underneath VAROMA receptacle will stop the liquid from washed vegetables, ripe fruit, raw meat or fish from wetting your work surface.
5
CAUTION
Danger of scalding by hot steam and hot condensed water
• Ensure that opening of mixing bowl lid and some slots of VAROMA receptacle and tray remain free, otherwise there can be uncontrolled escape of steam.
• Be sure to position the VAROMA correctly onto mixing bowl and appliance.
22
Accessories
When using the VAROMA tray, insert it into the
VAROMA receptacle. Make sure VAROMA tray is positioned loosely and evenly. Then place food onto
Place Varoma upright into position onto locked mixing bowl lid (without the measuring cup) in such a way that it sits well
2
.
Place the VAROMA lid on top. It should be positioned loosely and evenly so that it seals the VAROMA well, allowing no steam to escape.
Important:
Never leave the measuring cup in the mixing bowl lid when using the VAROMA.
If VAROMA lid is not positioned properly, not enough steam will stay in the VAROMA. This will slow down the cooking process.
1
2
CAUTION
Danger of scalding by hot steam and hot condensed water
• Mind hot steam escapes at the sides and from the top of VAROMA lid during operation.
• Keep children away from Thermomix TM 31 when using VAROMA and warn them about the danger of hot steam and hot condensed water.
Danger of scalding by splashing hot food
• Use only low speed levels ( – 2) when selecting VAROMA temperature. Higher speed levels can lead to splashing hot food or liquid to froth up.
3
Accessories
23
Step 3: Steam cooking with VAROMA
3
All you need to do is select the time and VAROMA temperature on the control panal. Steam cooking process begins when you turn the speed selector to low speed settings to speed 2. The timer starts to run up.
Water or water-based liquid in the mixing bowl heats up to over 100 °C, developing hot steam.
The steam rises through the opening in the mixing bowl lid of the Thermomix TM 31 into the
VAROMA. The food is cooked gently in the hot steam.
CAUTION
Danger of scalding by hot steam and hot condensed water
• Touch only the handles at both sides of
VAROMA.
• Hold VAROMA lid in such a way that the rising steam or hot dripping liquid cannot come into contact with you when taking it off.
• Mind hot steam which will continue to rise up out of opening of mixing bowl lid when removing the entire VAROMA.
4
When the ingredients are cooked or if you want to check whether they are cooked, turn speed selector into closed or open lid position ( / ).
In order to open the VAROMA, slightly incline the
VAROMA lid carefully to the front so that the steam can escape on the back
4
. Take care to let the condensation water drip into the VAROMA receptacle and tray by holding the VAROMA lid above them.
Then carefully remove the VAROMA lid and place it upside down onto the work surface. Lift the
VAROMA receptacle and tray up, wait some seconds so that the condensed water drips onto mixing bowl lid. Then place VAROMA receptacle and tray onto VAROMA lid.
24
Accessories
Practical work with the VAROMA
This description explains clearly how easy it is to use the VAROMA. Observe the following basic rules for using the VAROMA:
• Place enough water in the mixing bowl.
Important:
30 minutes steam cooking requires 0.5 litre (500 g) of water, for every additional 15 minutes an additional 250 g.
• Do not thicken your sauces and soups until the steam cooking process is finished. Thickeners may stop steam from forming evenly in the mixing bowl and slow down the overall cooking process.
• You can also turn the VAROMA lid upside down and use it as a water collector for the Varoma receptacle and the Varoma tray
1
. It can also be used as a tray to serve food directly from the
VAROMA.
• The bottom of the VAROMA receptacle and tray are both designed with an even pattern of small slots to guarantee an even distribution of steam in the VAROMA. The food should always be positioned so that as many slots as possible remain “free”. Laying the food in “loosely” is usually enough to ensure this.
• You can cook foods of different consistency and hardness at the same time. Place food requiring longer cooking at the bottom and food requiring less cooking at the top, e.g. vegetables in the
VAROMA receptacle and fish on the VAROMA tray.
• The vegetables will be evenly cooked if you cut them into similar-sized pieces. The cooking times stated are approximate cooking time varies depending on quality, ripeness and size of the ingredients as well as your personal preferences.
• Grease the VAROMA receptacle and tray to make sure that ingredients such as meat, fish or dough do not stick.
1
Working with the
Thermomix TM 31
Working with the Thermomix TM 31
25
CAUTION
Thermomix TM 31 can move
Place your Thermomix TM 31 on a clean, solid and even surface so that it cannot slip. Keep a sufficient distance from the edge of this surface to prevent Thermomix TM 31 from falling down.
Please turn the appliance on by pushing the button. The display shows the timer mode
2
.
Before you start using your Thermomix TM 31 consider the following tips to make your work easier:
Risk of damage by hot steam
Ensure a sufficient distance over Thermomix
TM 31 and VAROMA (suspended cupboards, shelving) and around them to prevent damage of hot escaping steam.
A safety device is provided which prevents the
Thermomix TM 31 from operating if the mixing bowl has not been inserted properly and the lid has not been correctly locked (speed selector is blocked).
Likewise, a safety device prevents the lid from opening while the appliance is operating.
Find a permanent place in your kitchen for your
Thermomix TM 31 right from the start so that it is ready at hand whenever you need it.
Starting the Thermomix TM 31
Pull the electric cable lightly from the housing and connect it to the mains supply. You can choose whatever length of cable you need, up to 1 m. If you do not need the whole length of the cable the remaining length is kept inside the Thermomix TM 31 avoiding any tiresome “spaghetti” of cables! Please avoid removing or re-inserting the cable frequently as this may result in cable rupture. Make sure that there is no strain on the cable so that the scales work properly. Do not place the appliance on the cable. If you do, the appliance will not sit firmly on the surface and the scales will not weigh accurately.
Now the appliance is operable.
The electronic scales work within a temperature range between – 20 °C and + 50 °C (4 °F and +122 °F).
If the appliance has been transported in winter and the temperature falls below – 20 °C (– 4 °F) wait until the Thermomix TM 31 has reached room temperature again. In this way, the integrated scales will work perfectly. If you do not need your
Thermomix TM 31 for a prolonged period of time please disconnect it from mains supply as you do with most electric appliances (economizing on power consumption; see also: “Sleep mode”, page 35)
2
26
Working with the Thermomix TM 31
Explanation of symbols on control panal
00:00
3
4
2
Timer buttons
Temperature buttons
Gentle stir setting
1
Button for dough mode
Tare button for scales
Button for clockwise / counter-clockwise operation
Closed lid
Open lid
On / Off button
CAUTION
Risk of damage by insufficient cooling of
Thermomix TM 31:
Ensure ventilation openings on both sides of the appliance
1
are not covered. Otherwise overheating of the appliance may occur.
Working with the Thermomix TM 31
27
Multi-function display
In the centre at the top of the control panel there is a digital display.
This display provides the following information:
• Weighing mode
• Timer mode
• Counter-clockwise operation has been chosen
• Thermomix in dough mode
The symbols and are displayed to indicate if the appliance is in weighing or timer mode.
The latter two operating modes as well are indicated by their respective symbols ( or ).
Weighing and adding with the tare button
The integrated scales allow you to weigh all ingredients directly in the mixing bowl and in the
VAROMA. Please observe the following sequence of steps:
Step 1: Insert mixing bowl. The display will show the timer 00:00
2
.
Step 2: Press tare button. Wait for the tone “beep” and the display will show the scales 0.000
3
.
Step 3: Put in the first ingredient (2.0 kg max.) and check the quantity on the display
4
.
Step 4: If you wish to add more ingredients push the tare button again and add the next ingredient.
Repeat these steps as often as required to the maximum weight (6 kg). The variation for up to
2 kg is + / – 30 g.
2
3
Important:
When pressing the tara button do not touch the
Thermomix or lean anything against.
3
4
4
28
Working with the Thermomix TM 31
Further information about weighing
The tare function works from 5 g to 6.0 kg in steps of 3 times 2 kg. When weighing and adding ingredients with the help of the tare function always add ingredients slowly because two to three seconds are needed before the scales show the correct weight.
If you remove an ingredient from the mixing bowl after you have pressed the tare button, the information on picture
1
will appear on the display.
When adding ingredients with the help of the tare function do not add more than 2.0 kg at a time. If you add more than 2.0 kg at a time the display will start flashing, indicating an overload
2
.
Always press the tare button first before weighing or using the tare function. This will increase the accuracy of the scales. Please be careful not to move the appliance during the weighing process.
After pressing the tare button the Thermomix remains in the weighing mode for 5 minutes unless another button is pushed or the speed selector is turned. After these 5 minutes the Thermomix returns to the timer mode. When the tare button is pressed once more the 5 minutes start again.
The display provides you with valuable information when weighing or adding ingredients.
Remember to observe the maximum of 2.0 kg per adding process.
1
2
Working with the Thermomix TM 31
29
Timer buttons and timer display
Observe the following sequence of steps if you wish to prepare or heat food in your
Thermomix TM 31:
Step 1: Select a time
Therefore use the timer buttons to preset an operating time of up to 60 minutes
3
.
Press the + to increase time and the – button to reduce it. To change time gradually, press the button briefly. Press and hold the + button to increment the timer display rapidly, e.g.
4
.
Time selection:
0 – 1
minute in increments of
1 second
1 – 10
minutes in increments of 30 seconds
10 – 60
minutes in increments of
1 minute
When the display is in the zero setting you can preset the time directly to 1 minute by briefly actuating the – button; therefore you do not have to count up in increments of 1 second.
Then proceed as indicated above.
Press both buttons simultaneously to set the displayed time to 00:00
3
.
Step 2: Select a temperature (see page 30ff.)
Select the appropriate temperature if the food should be heated or cooked. If not proceed with step 3.
Step 3: Turn the speed selector (see page 32ff.)
After the speed selector has been turned, the preset time is counted backwards in steps of one second, until 00:00 is reached.
When the appliance is in cold mixing mode the mixing speed switches off after the preset time has expired. A buzzer will sound to indicate that the job has been completed.
When the appliance is in heating or cooking mode the mixing knife will continue to rotate in the gentle stir setting after the preset time has expired.
To switch off the buzzer turn the speed selector back to / .
Important:
Heating and cooking are only possible if a time period has been preset.
3
3
4
4
27:00
30
Working with the Thermomix TM 31
Adjustment of preset time
The preset time can be changed at any time during preparation. Press the – button to reduce the time, press the + button to increase it.
If the speed selector gets turned to / before the preset time has expired, for example in order to add another ingredient, the display will flash, indicating the current time, until the appliance is switched on again. Food preparation can thus be continued without difficulty. If you wish to stop the mixing procedure altogether before the preset time has expired, press both timer buttons simultaneously.
This will stop the display flashing and you may reset the time.
If no time has been preset and the speed selector is activated the appliance will automatically stop after a maximum time of 60 minutes.
After this time, a buzzer will sound.
has been reached during the heating process. For example, if a temperature of 90 °C (194 °F) is set the related light will start flashing. As the Thermomix heats up the lights for 37 °C, 50 °C, 60 °C, 70 °C and
80 °C (99, 122, 140, 158 and 176°F, respectively) light up one after the other until 90 °C (194 °F) is reached. At this point this light changes from flashing to continuous mode. The illuminated temperature indicators are approximate values.
Always ensure that none of the coloured indicator lights is flashing if you do not wish to heat or cook food. Otherwise, switch off the heating function by pressing the button. This will prevent unwanted heating of ingredients in the mixing bowl if a time has been preset.
Temperature buttons and illuminated temperature indicators
The temperature buttons can be used to set a temperature between 37 °C and 100 °C (99 °F and 212 °F).
Each button has a coloured indicator lamp
1
which will flash after the respective button has been pressed:
1
00:0
37 °C (99 °F) . . . . . . . . . . . . . . . . . . . . . . . . = green
50 °C and 60 °C (122 °F and 140 °F) . . . . . = yellow
70 °C and 80 °C (158 °F and 176 °F) . . . . . = orange
90 °C, 100 °C and
VAROMA (194 °F and 212 °F) . . . . . . . . . . . . = red
The illuminated temperature indicators are points of reference. When the preset temperature has been reached during cooking the indicator lamp stops flashing and changes to continuous mode. The illuminated indicators show the temperature that
Working with the Thermomix TM 31
31
Indicator for remaining heat
If the mixing bowl is re-inserted into the appliance while it is still warm the relevant light will show its remaining temperature (only 1 lamp in continous mode, e.g
2
remaining heat 60 °C). No temperature for warming up, cooking and steam-cooking can be set unless a time has been preset.
Therefore please always proceed as follows:
Always start by setting a time, then choose the temperature, followed by speed selection.
Soft start (above 60 °C / 140 °F)
If the turbo button is pressed or the speed selector actuated while the temperature in the mixing bowl is 60 °C (140 °F) or above
2
, the electronic system prevents the food from escaping by delaying the speed increase. This soft start only works if the food has been heated up or cooked in the
Thermomix TM 31. Then the temperature sensor can measure the actual temperature correctly and control soft start accordingly. If using the
Thermomix TM 31 to process food that has not been heated or cooked in the appliance (e.g. preparing a gravy from hot meat juices) you should only increase the speed slowly and gradually.
Soft heating setting
Speeds 2 and 3 are designed a soft heating setting.
When these speeds are selected the temperature rise slowier. This leads to a gently heating of the food being cooked.
CAUTION
Danger of scalding by splashing hot food
Never use the turbo button or abruptly increase the speed when processing food that has not been heated in the Thermomix TM 31.
2
00:00
4
3
2
32
Working with the Thermomix TM 31
VAROMA temperature setting
If the Varoma temperature setting
1
is selected temperatures of more than 100 °C (212 °F) may be reached depending on what ingredients you are using. During 15 minutes at Varoma temperature setting 250 g water or water-based liquids evaporate.
This temperature setting is used for steam cooking
(see page 21 ff.) and sautéing ingredients.
CAUTION
Never heat up the mixing bowl when empty.
Stirring
Use the lower speeds 1 – 3 for gentle mild stirring.
This lower speed range is ideally suited for delicious stews!
Mixing/blending
Use the speed range from 4 to 10
3
for coarse, fine and very fine chopping, mixing and blending.
Always be sure to put the speed selector slowly to its desired position with the measuring cup inserted.
This will prevent the food to be chopped from escaping.
Speed selector
Turn the speed selector to start the Thermomix
TM 31. The following speeds are available:
Designation Speed level
Gentle stir
Stirring
Mixing/ blending
Turbo mixing
1 – 3
4 – 10
Turbo
Revolution/min.
40
100 – 500
1,100 – 10,200
10,200
Gentle stir setting
The gentle stir setting
2
can be selected using the speed selector. At this setting, the food is stirred slowly in the same way as if you periodically stirred some food in a sauce-pan. If this setting is selected, the food is not chopped and large chunks remain.
1
2
4
3
2
Working with the Thermomix TM 31
33
CAUTION
Danger of injury by escaping food
Hold measuring cup firmly while operating the
Thermomix TM 31 at medium (3 – 6) and higher (7 – 10) speed levels or pressing turbo button to chop or to purée food.
3
Turbo button
Use the turbo button
4
to operate the Thermomix
TM 31 at maximum speed. The turbo function only works as long as this button is pressed and held.
It is also useful for an “alternating” mode. If, for example, you wish to coarsely chop a large quantity of food, press the turbo button 3 or 4 times (repeat as necessary). In this way, the food will be chopped evenly.
The turbo function is available when the speed selector is set to or to speed level 5 or above.
When the speed selector is set to the timer is activated. Turbo function is not available if the dough mode is activated.
CAUTION
Danger of scalding by splashing hot food
Never use the turbo button or abruptly increase the speed when processing food that has not been heated in the Thermomix TM 31.
4
3
4
2
34
Working with the Thermomix TM 31
Clockwise/counter-clockwise operation
Press the button on the control panel
1
to reverse the rotating direction of the mixing knife from clockwise to counter-clockwise. Pressing button is possible at any speed selection and .
Counter-clockwise operation is indicated by the symbol on the display. To switch of counter-clockwise operation just press the button again.
Counter-clockwise operation is intended for gently stirring delicate food which is not to be chopped.
Dough mode
Use dough mode
2
to make heavy yeast dough or bread dough. To activate the dough mode set the speed selector to and press the button on the control panel.
This will start the alternating operation to process the dough evenly in the mixing bowl. This is an imitation of a special kneading procedure used in the baking trade to achieve a high-quality dough.
Dough mode is only available if the mixing bowl has cooled down after cooking to a temperature below
60 °C (140 °F). If the temperature is higher, a buzzer will sound. To prevent accidental heating of bread dough the electronic system blocks the heating system when dough mode has been selected.
CAUTION
Thermomix TM 31 can move
Place your Thermomix TM 31 on a clean, solid and even surface so that it cannot slip. Keep a sufficient distance from the edge of this surface to prevent Thermomix TM 31 from falling down.
When preparing dough or chopping food, an imbalance can develop in the mixing bowl which, under certain circumstances, may cause the whole appliance to move. Do not, therefore, leave the appliance unattended while it is operating as it might fall from the work surface.
1
4
3
2
2
Things to remember
35
Things to remember
Sleep mode
If the Thermomix TM 31 is connected to mains supply but not used it will automatically switch to standby (sleep mode) after approx. 15 minutes. The display will be blank. To re-activate the appliance press any button on the control panel.
To switch the Thermomix TM 31 to sleep mode press and hold the button for approx. 2 seconds until “OFF” appears on the display. The appliance can now be re-activated only by a short press on the button. In sleep mode, power consumption of the Thermomix TM 31 is less than 1 W.
If you do not use the Thermomix TM 31 for a prolonged period of time we recommend that you disconnect it from mains supply.
Electronic motor protection
All recipes in the Thermomix TM 31 cookbook have been developed in such a way that the motor protection will not activate if all instructions are observed.
But even if quantities are exceeded, the motor is protected by an automatic switch-off function. In such cases, the display will show the error message “LOAd”. If the motor has turned off:
• put the speed selector to
• remove the mixing bowl from the appliance,
• reduce the quantity contained in the bowl and/or add some liquid,
• wait for approx. 5 minutes (cooling down time),
• re-insert the mixing bowl,
• re-start the Thermomix TM 31 by means of the speed selector.
• If the error message “LOAd” is still displayed after the cooling time please call our customer service.
Smells
When the appliance is used for the first time it may smell. If the motor is subjected to a high load during food preparation, the motor may overheat and start smelling, in addition to the possibility of an automatic switch-off of the appliance. This is completely harmless and after the cooling-down time indicated above, the appliance will again be in perfect working order.
36
Cleaning
Cleaning
As with all kitchen appliances or tableware you should clean all parts of your Thermomix TM 31 – especially the mixing knife, the mixing bowl, the mixing bowl lid and its sealing ring – thoroughly before using it for the first time and after every usage.
How to clean the mixing bowl and its lid
Dismantle the mixing bowl and mixing knife as well as mixing bowl lid and its sealing ring (refer to pages 13, 14, 16).
CAUTION
Danger of injury from sharp mixing knife
Do not touch the blades of mixing knife. They are very sharp. Hold upper part of mixing knife when removing or re-inserting it.
Important:
Never use pointed or sharp objects for cleaning as this may damage functional parts or affect the safety of the appliance.
Now, clean the inside and outside of the mixing bowl (without the mixing knife)
1
, either in hot water with cleansing agent and a soft cloth or in the dishwasher; the mixing knife, spatula, butterfly, simmering basket, measuring cup, mixing bowl lid and
VAROMA can be cleaned in the same way.
If food is sticking in the mixing bowl use a special cleansing agent for stainless steel.
Ensure that the contact pins at the bottom of the mixing bowl are always dry. If necessary wipe them off. We recommend that you dismantle the mixing bowl for cleaning, especially when you clean it in the dishwasher.
1
Cleaning
37
How to clean the mixing knife
To clean the mixing knife hold it under running water with the mixing knife pointing upwards, as shown on picture
2
. In order to facilitate the cleaning, use a brush or clean it in the dishwasher.
Important:
Do not leave the mixing knife in dish water for a long time as this may damage the gasket system of the knife bearing.
Carefully re-assemble the mixing bowl and mixing knife (incl. sealing ring).
How to clean the VAROMA
To clean the VAROMA wash receptacle, tray and lid carefully in warm, soapy water or in the dishwasher.
Use a soft, clean cloth and gentle cleansing agents for cleaning
3
. Avoid using sharp objects or metal scouring pads, as these will cause scratches.
2
Important:
All components are dishwasher-proof. Place plastic parts, in particular the mixing bowl lid, into the top rack of the dishwasher in order to avoid deformation resulting from exposure to higher temperatures.
Some foodstuffs such as curry, carrot juice, and those with citric acid content may cause staining. Wipe such substances off the mixing bowl lid, the spatula, the simmering basket and all VAROMA parts as quickly as possible.
Any residual staining will disappear in time.
3
38
Cleaning
How to clean the main appliance
Disconnect the appliance from mains power supply before cleaning.
WARNING
Danger of electric shock
• Disconnect the appliance from mains power supply before cleaning.
• Do not immerse the Thermomix TM 31 in water or use a lot of water when cleaning.
No water must be allowed to enter the housing.
Wipe the main appliance with a damp soft cloth and a gentle cleansing agent
1
. Use water sparingly to prevent moisture from entering the appliance.
Additional information for cleaning
Some of the plastic parts may become slightly discoloured.
If the mixing bowl with mixing knife, mixing bowl lid and measuring cup are only slightly soiled it is sufficient to perform a short mixing operation to clean them. Therefore place approx. 1 litre water and a few drops of cleansing agent into mixing bowl, select speed 5 or 6 and press several times the button. Follow this operation by thoroughly rinsing with water and if necessary use a soft cloth as well.
To improve ventilation during storage, do not close the mixing bowl with the measuring cup.
1
Notes for your own recipes
39
Notes for your own recipes
Use similar recipes of the Thermomix TM 31 cookbooks as a guide for adapting your own recipes.
The easy to understand step by step design of our recipes enables you to prepare your own recipes with your Thermomix TM 31.
Example: Chopping vegetables
Settings: 7 sec. / speed 5
1
2
set timer to 7 seconds turn speed selector to 5
Order of ingredients
When preparing food according to your own recipes consider the order of the steps, e.g. prepare dry ingredients first.
Example: Kneading dough
Settings: 2 min. / /
1
2
3
set timer to 2 minutes turn speed selector to press the
Weighing the ingredients
Before weighing each ingredient press the button and the scales will show 0.000.
Add your ingredient.
Attention: Never exceed the 2 litres maximum capacity of the mixing bowl!
Chopping and blending
When chopping ingredients or blending preset first a short time and check the result. If the result you want to achieve is not reached prolong the time.
Order of presetting
You will achieve best results by sticking to the suggested order in the following examples:
Presetting of time is necessary if you want to heat the food. If you stir delicate food use the counterclockwise mode .
Example: Cooking delicate food
Settings: 5 min. / 100 °C /
1
2
3
4
/ speed 1 set timer to 5 minutes press 100 °C temperature button press button turn speed selector to 1
Heating times
Heating time is dependent on the following:
a
starting temperature of the ingredients to be
b
heated quantity, weight and volume of ingredients
c
Attention: Never exceed the maximum capacity of the mixing bowl or VAROMA!
heating conductibility of the food to be
d e f
prepared heating level speed level use of accessories
(with / without simmering basket / VAROMA)
40
Troubleshooting
Troubleshooting
Error:
The appliance cannot be switched on
The appliance does not heat
The appliance stops during operation
Trouble with scales
Error display:
As a special feature the Thermomix TM 31 will show the cause for the error on the display. If the display shows “E.r” followed by a two-digit figure please contact the responsible Vorwerk customer service indicating the error message (e.g. E.r 53 = temperature sensor failure) if it is not possible to solve the problem by pulling the mains plug and re-starting the appliance.
With respect to “LOAd” please refer to the notes on page 35.
Action:
Check if the connecting cable has been properly plugged in and if the lid has been locked correctly.
Check if the appliance is still in “sleep mode”.
Check if a heating time and temperature have been preset.
See section entitled “Electronic motor protection” on page 35.
Check: while pressing tara button do not touch
Thermomix; nothing leans against Thermomix; no tension on the cable; Thermomix ”feet“ are clean; worktop is clean, solid, even and not vibrating; do not slide Thermomix over the worktop.
Error messages of the appliance can be reset as follows:
1
2
3
By pulling the mains plug:
E.r 23, 28, 32, 38, 39, 70
By turning the speed selector to and then to :
E.r 22, 24-27, 29-31, 34-37, 51-69, OPEn, LOAd
Only by Vorwerk customer service:
E.r 71, 72
WARNING
Danger of electric shock
Inspect your appliance and its accessories including the mixing bowl regularly for possible damage. Damaged parts can impair safety.
If damage does occur, do not use the appliance and contact Vorwerk customer service or an authorised Vorwerk repairer.
Legal regulations
Legal regulations
41
Copyright
For customers living in EU-Member States:
English
As owner of an electrical or electronic product, you are not allowed by law
(according to EU-Directive 2002 / 96 / EC of
27 January 2003 on waste electrical and electronic equipment and the particular national laws of the EU-Member States transforming this Directive) to dispose of this product or its electrical / electronic accessories as unsorted domestic waste.
You shall use the designated gratis possibilities for return instead.
Copyright ©
Text, design, photography, illustrations by
Vorwerk International Mittelsten Scheid & Co.,
Switzerland. All rights reserved.
This publication may not – in part or in whole – be reproduced, stored in a retrieval system, transmitted or distributed in any form or by any means, electronic, mechanical, photocopying, recording or otherwise, without the prior permission of Vorwerk
International Mittelsten Scheid & Co.
42
Warranty
Warranty
Warranty
For the warranty period, please refer to your purchase contract.
The Thermomix TM 31 may only be repaired by the responsible Vorwerk customer service or an authorised Vorwerk repairer.
Use only parts provided with the Thermomix TM 31
(page 10 –11) or original spare parts from Vorwerk
Thermomix.
Never use the Thermomix TM 31 in combination with parts or equipment not provided by Vorwerk
Thermomix.
Otherwise your warranty is rendered void.
Customer Service
43
Customer Service
Customer service
For detailed information contact your Thermomix advisor, the sales company in your country, or refer to www.thermomix.com.
Vorwerk Elektrowerke GmbH & Co.KG
Blombacher Bach 3
42270 Wuppertal www.vorwek-elektrowerke.de
44
45
46
47
48
49
50
51
Войти или зарегистрироваться
-
Файл недоступен
Получить доступ2,3 МБ .rar
![]()
Термомикс ТМ31. Руководство пользователя 2021-12-07
Руководство по эксплуатации Термомикс ТМ31
- руководство пользователя термомикс тм31
- Обзoр
- История версий
-

Файл в формате PDF

- Войти через Facebook
- Войти через Twitter
- Войти через Google
- Ваше имя или e-mail:
- У Вас уже есть учётная запись?
-
- Нет, зарегистрироваться сейчас.
- Да, мой пароль:
-
Забыли пароль?
-
Запомнить меня
Поиск
-
- Искать только в заголовках
- Сообщения пользователя:
-
Имена участников (разделяйте запятой).
- Новее чем:
-
-
Искать только в этой категории
- Искать только в описаниях ресурсов
-
Искать только в этой категории
-
Быстрый поиск
- Последние сообщения
Больше…
-
Этот сайт использует файлы cookie. Продолжая пользоваться данным сайтом, Вы соглашаетесь на использование нами Ваших файлов cookie.Accept
Узнать больше.Скрыть объявление