Всем привет!!!
В этот раз я расскажу как быстро и легко настроить VPN сервер на Synology NAS, что бы иметь доступ к своей домашней или офисной сети находясь за ее пределами.
Для чего нужен такой VPN сервер для дома? Причин может быть много. Это либо безопасность, что бы не открывать незащищенные порты наружу открывая только порты VPN сервера, либо просто что бы подключаться к домашним устройствам из вне, так как буд-то вы находитесь дома. Для офиса же или предприятия думаю такой вопрос излишний, любой администратор понимает суть VPN сервера.
И так у вас есть Synology NAS, вы заходите в центр пакетов и ставите VPN server
Открываете его и видите такую картину:
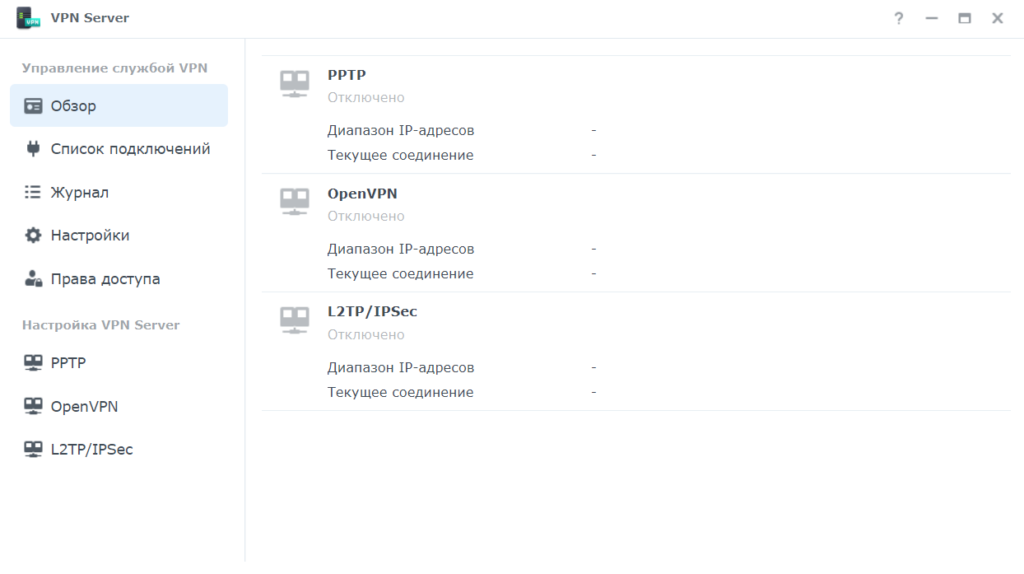
Synology VPN server поддерживает три протокола: PPTP, OpenVPN и L2TPIPsec. PPTP хороший протокол, но считается менее безопасным чем другие. OpenVPN это открытый протокол и он есть на большинстве устройств. А L2TPIPsec считается самым защищенным из представленных и он встроен почти во все ОС и устройства Windows, MAC OS, Android и IOS. Именно поэтому я и решил использовать последний, так как не нужно устанавливать дополнительное ПО.
Настройка L2TPIPsec выглядит очень просто:
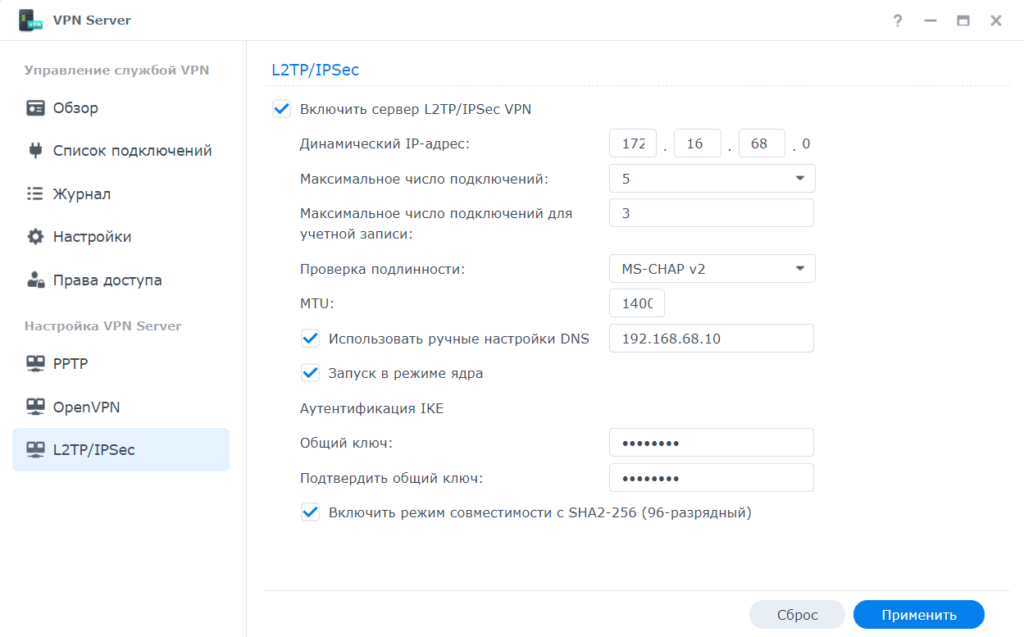
- Динамический IP-адрес, VPN Server присвоит VPN-клиентам IP-адреса, выбрав их из диапазона виртуальных IP-адресов. Например, если для динамического IP-адреса сервера VPN Server задано значение «172.16.68.0», то виртуальный IP-адрес VPN-клиента может быть в диапазоне от « 172.16.68.1» до « 172.16.68.[максимальное число подключений]» для PPTP и в диапазоне от « 172.16.68.2» до « 172.16.68.255» для OpenVPN.
Важно! Прежде чем указывать динамический IP-адрес сервера VPN, учтите следующее.
- Динамические IP-адреса, разрешенные для сервера VPN Server, должны быть в одном из следующих диапазонов:
- От «10.0.0.0» до «10.255.255.0»
- От «172.16.0.0» до «172.31.255.0»
- От «192.168.0.0» до «192.168.255.0»
- Указанные динамический IP-адрес сервера VPN Server и присвоенные клиентам VPN виртуальные IP-адреса не должны конфликтовать с IP-адресами, которые сейчас используются в вашей локальной сети.
Простыми словами сетка для VPN должна отличаться от вашей существующей реальной сети.
- С максимальным числом подключений думаю все понятно.
- В проверке подлинности два варианта, тот что PAP передает пароли в незашифрованном виде, это нас не устраивает, поэтому выбираем MS-CHAP v2
- MTU 1400 стоит по умолчанию, рекомендую так же оставить, так как оно должно быть меньше чем реальное MTU интернет подключения. Так как мы его не знаем, то ставим 1400. Этот параметр точно подойдет и особо не повлияет ни на что.
- Если вы хотите что бы через VPN подключение еще и ваш личный DNS работал, то укажите его IP адрес
- Запуск в режиме ядра ставим для максимальной производительности VPN сервера.
- Очень важно задать общий ключь достаточно сложный, это влияет на безопасность.
- Включать или не включать режим совместимости это на ваше усмотрения.
Для подключения MAC OS галочку совместимости нужно убрать !!!
На этом вся настройка Synology VPN сервера выполнена и он готов к подключению первых клиентов.
Так же хочу отметить, что если у вас на Synology настроен фаервол, то нужно разрешить в нем сетку для динамического IP настроенную первым этапом и открыть порты для внешних подключений

Порт 1723TCP нужен для PPTP, порт 1194UDP нужен для OpenVPN, а порты 1701UDP, 4500UDP и 500UDP нужны для L2TPIPsec.
Впрочем, когда вы все настроите и нажмете применить вам это сообщит система:

Windows 1011 клиент
Теперь, когда все настроено и порты открыты и проброшены на NAT, настало время подключиться к нашему VPN серверу, Начнем с Windows. А с ним и только с ним как раз есть небольшие трудности.
По умолчанию встроенный VPN клиент Windows не поддерживает подключение к L2TP/IPsec через NAT. Дело в том, что IPsec использует протокол ESP (Encapsulating Security Payload) для шифрования пакетов, а протокол ESP не поддерживает PAT (Port Address Translation). Если вы хотите использовать IPSec для коммуникации, Microsoft рекомендует использовать белые IP адреса на VPN сервере. Простыми словами Windows хочет что бы вы поднимали VPN сервер на роутере или на сервере, который подключен непосредственно к интернету без роутера и NAT. Это весьма дорого и не всегда выполнимо. Поэтому есть решение.
Можно использовать командлет PowerShell для внесения изменений в реестр:
Set-ItemProperty -Path "HKLM:SYSTEMCurrentControlSetServicesPolicyAgent" -Name "AssumeUDPEncapsulationContextOnSendRule" -Type DWORD -Value 2
Или отредактировать реестр вручную. Более подробно Как подключиться к VPN Server от Synology с помощью ПК Windows? – Центр знаний Synology
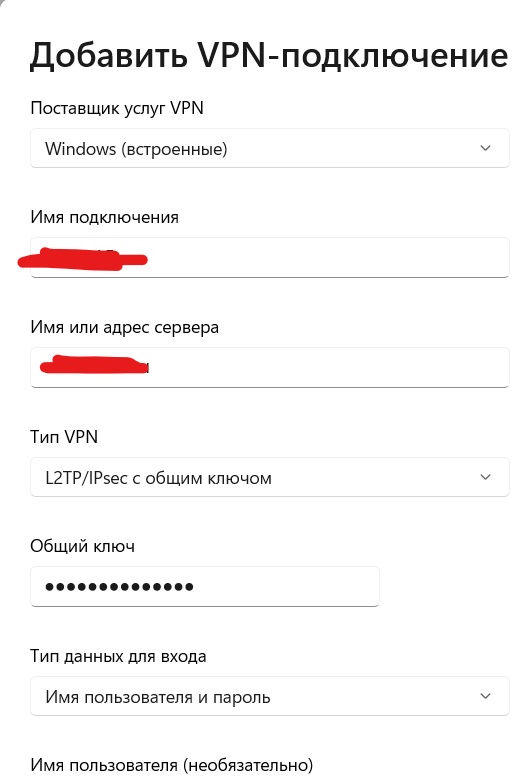
Затем создадим подключение VPN с такими параметрами:
На этом настройка подключения на Windows завершена и можно подключаться.
Если способ выше не помогает и ваш Windows ПК не подключается по L2TP то нужно сделать следующее:
Взято от сюда: Исправляем проблему подключения к L2TP/IPSec VPN серверу за NAT | Windows для системных администраторов (winitpro.ru)
- Ослабляет уровень шифрования, для L2TP/IPSec используются алгоритмы MD5 и DES:
reg add "HKEY_LOCAL_MACHINESystemCurrentControlSetServicesRasmanParameters" /v AllowL2TPWeakCrypto /t REG_DWORD /d 1 /f
- Включает шифрование IPsec, которое часто отключается некоторыми VPN клиентами или утилитами:
reg add "HKEY_LOCAL_MACHINESystemCurrentControlSetServicesRasmanParameters" /v ProhibitIpSec /t REG_DWORD /d 0 /fЕсли и это не поможет, то используйте вместо L2TP протокола PPTP на крайний случай.
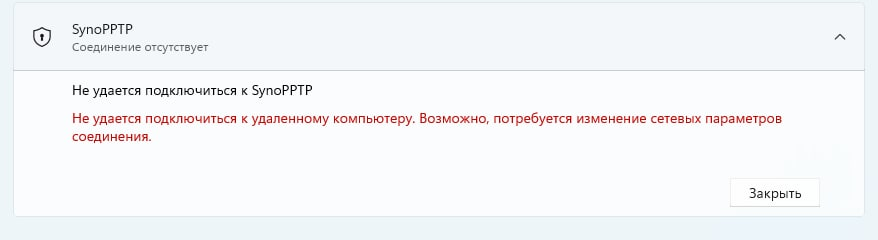
Так же на Windows ПК встречается такая проблема: Не удается подключиться к удаленному компьютеру. Возможно потребуется изменение сетевых параметров соединения
Нужно открыть Диспетчер устройств – Сетевые адаптеры и удалить все устройства WAN Miniport
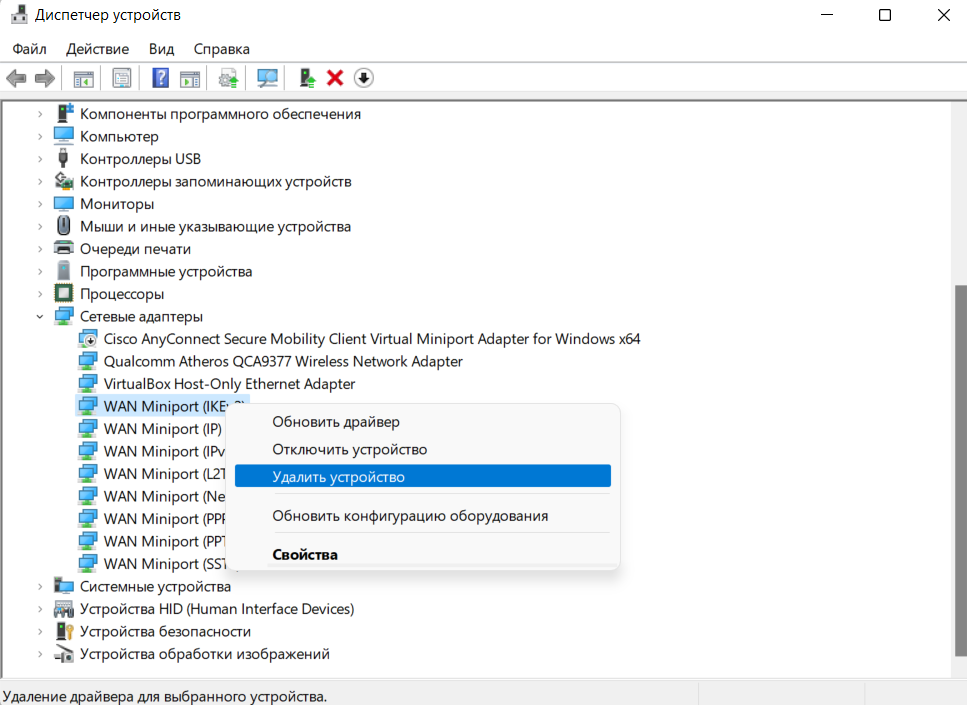
Затем щелкнуть в самый верх по названию вашего ПК и нажать кнопку “Обновить конфигурацию оборудования”
Устройства WAN miniport будут установлены заново и проблем с подключением не будет.
На телефоне подключение выглядит практически также, не вижу смысла это расписывать. Тут самое главное, то что это легко и все необходимое уже встроено в телефон. Настраивается в пару действий и работает просто превосходно.
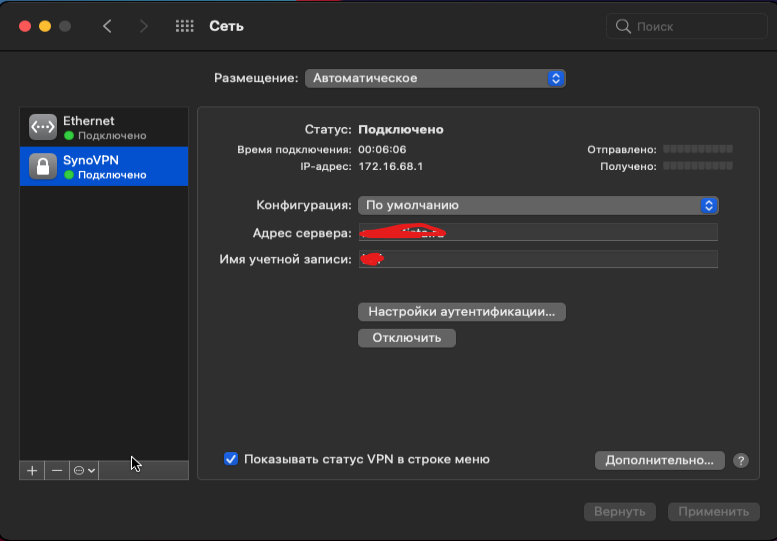
MAC OS клиент
На MAC OS тоже все просто, только выглядит по другому, а параметры все теже:
Linux клиент
Мой основной и самый любимый дистрибутив для декстопа это Ubuntu. Поэтому буду показывать на ее примере, но в других дистрибутивах будет оналогично.
Для начала установим требуемый пакет, которого почему-то нет по умолчанию
sudo apt install network-manager-l2tp network-manager-l2tp-gnomeПосле этого открываем настройки, сетевые подключения и жмем добавить VPN

В открывшемся окне указываем название, доменное имя вашего NAS или IP адрес, логин DSM и тут начинается интересное
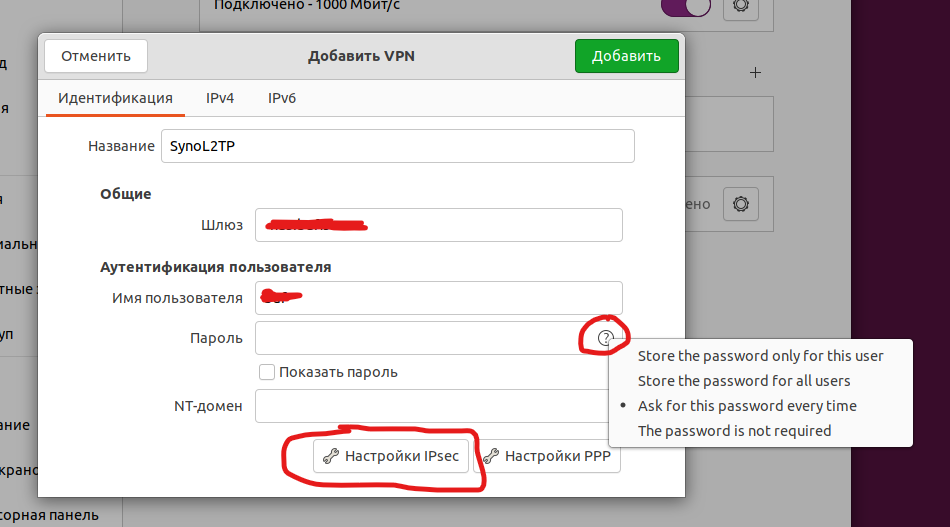
По умолчанию пароль вы не введете, нажимаем на вопрос и выбираем пункт 1 или 2 (сохранять пароль дя пользователя или всей ОС). Я выбрал первое. Затем жмете на кнопку Настройка Ipsec и вводите общий ключь сервера
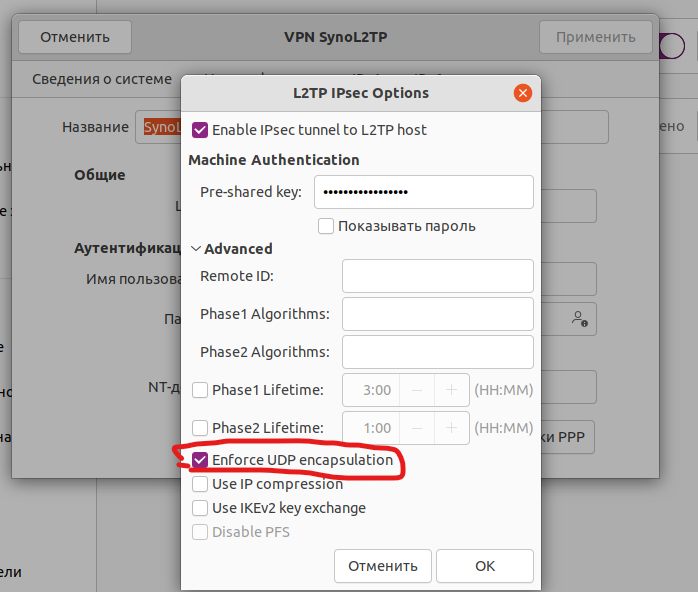
Так же обязательно открывайте дополнительные настройки и ставте галочку: Enforce UDP encapsulation
Сохряняем все настройки, и включаем VPN. Если все введено правильно, то в терминале можно увидеть VPN интерфейс ну и проверить, что все работает как надо.

На этом моя статья “Synology NAS поднимаем VPN сервер” завершена. Пользуйтесь Synology и желаю удачи!!!
Время на прочтение
3 мин
Количество просмотров 11K
Всем привет!
Знаю, что тем с настройками OpenVPN сделано множество. Однако, сам столкнулся с тем, что систематизированной информации по теме заголовка в принципе нет и решил поделиться опытом в первую очередь с теми, кто не является гуру в администрировании OpenVPN, но хотел бы добиться подключения удаленных подсетей по типу site-to-site на NAS Synology. Заодно и для себя заметку оставить на память.
Итак. Есть NAS Synology DS918+ с установленным пакетом VPN Server, настроенным OpenVPN и пользователями, которые могут коннектиться к VPN серверу. Не буду вдаваться в подробности настройки сервера в интерфейсе DSM (веб портал NAS сервера). Эта информация есть на сайте производителя.
Проблема в том, что интерфейс DSM (на дату публикации версия 6.2.3) имеет ограниченное количество настроек для управления OpenVPN сервером. В нашем случае требуется схема соединения по типу site-to-site, т.е. хосты подсети клиента VPN должны видеть хосты подсети VPN сервера и наоборот. Типовые настройки, доступные на NAS, позволяют настроить доступ только от хостов подсети клиента VPN до хостов подсети сервера VPN.
Для настройки доступа к подсетям клиентов VPN из подсети VPN сервера нам понадобится зайти на NAS через SSH и настроить файл конфигурации OpenVPN сервера вручную.
Для редактирования файлов на NAS по SSH мне удобнее пользоваться Midnight Commander. Для этого я в Центре пакетов подключил источник packages.synocommunity.com и установил пакет Midnight Commander.

Заходим по SSH на NAS под учетной записью с правами администратора.

Набираем sudo su и ещё раз указываем пароль администратора:

Набираем команду mc и запускаем Midnight Commander:

Далее переходим в каталог /var/packages/VPNCenter/etc/openvpn/ и находим файл openvpn.conf:

По задаче нам необходимо подключить 2 удаленные подсети. Для этого заводим через DSM 2 учетные записи на NAS с ограниченными правами на все службы NAS и выдаём доступ только на VPN подключение в настройках VPN Server. Для каждого клиента нам нужно настроить статичный IP выделяемый VPN сервером и роутинг через этот IP трафика с подсети VPN сервера на подсеть VPN клиента.
Исходные данные:
Подсеть VPN сервера: 192.168.1.0/24.
Пул адресов OpenVPN сервера 10.8.0.0/24. Сам OpenVPN сервер получает адрес 10.8.0.1.
Подсеть VPN клиента 1 (пользователь VPN): 192.168.10.0/24, должен получать на OpenVPN сервере статичный адрес 10.8.0.5
Подсеть VPN клиента 2 (пользователь VPN-GUST): 192.168.5.0/24, должен получать на OpenVPN сервере статичный адрес 10.8.0.4
В каталоге настроек создаем папку ccd и неё создаём файлы настроек с названиями, соответствующими логинам пользователей.

Для пользователя VPN в файле прописываем следующие настройки:

Для пользователя VPN-GUST в файле прописываем следующие:

Остаётся только поднастроить конфигурацию OpenVPN сервера — добавить параметр для чтения настроек клиентов и добавить роутинги на подсети клиентов:

В приведенном скриншоте первые 2 строчки конфига настраиваются с помощью интерфейса DSM (простановка галки на параметре «Разрешить клиентам осуществлять доступ к локальной сети сервера» в настройках OpenVPN сервера).
Строка client-config-dir ccd указывает, что настройки клиентов находятся в папке ccd.
Далее 2 строки настройки добавляют роуты на подсети клиентов через соответствующие шлюзы OpenVPN.
И наконец для правильной работы необходимо применить топологию subnet.
Все остальные настройки в файле не трогаем.
После прописывания настроек не забываем перезагрузить сервис VPN Server в менеджере пакетов. На хостах или шлюзе для хостов подсети сервера прописать роуты на подсети клиентов через NAS.
В моём случае шлюзом для всех хостов подсети, в которой находится NAS (его IP 192.168.1.3), выступал роутер (192.168.1.1). На этом роутере я добавил в статическую таблицу маршрутов записи маршрутизации для сетей 192.168.5.0/24 и 192.168.10.0/24 на шлюз 192.168.1.3 (NAS).
Не забываем, что при включенном брандмауэре на NAS необходимо будет настроить и его. Плюс на клиентской стороне может быть включен брандмауэр, который так же нужно будет настроить.
ПС. Я не являюсь профессионалом в сетевых технологиях и в частности в работе с OpenVPN, просто делюсь своим опытом и публикую настройки, которые я сделал, позволившие настроить связь между подсетями по типу site-to-site. Возможно есть и более простая и/или правильная настройка, буду только рад, если поделитесь опытом в комментариях.
Prologue
I use my Synology DS920+ mainly for the storage of family photos and videos and I have a ton of them. I also have documents, eBooks etc. stored on it. The NAS is not exposed to internet, and I usually access it through an L2TP VPN connection, which I’d configured on my Ubiquiti UniFi DreamMachine in the past, from outside of my home network. It’s usually documents that I’ve accessed from outside so far and never really accessed photos and videos.
Last week I went on a family weekend getaway trip where I needed to look for some old family photos and videos. I flipped the VPN switch on my iPhone and got connected almost immediately. But not for long. It was frequently disconnecting while watching videos. Usually the L2TP connection works fine for me but something happened that day. I really wished that I had OpenVPN set up as an alternative. And that’s exactly what I did first thing after returning home from the trip.
What we’re doing
This tutorial will be split into 3 parts. In the first part, which is this post, we’ll set up the OpenVPN server on our Synology NAS.
In the second part, we’ll connect to the VPN server from Windows 10 and iOS, without using client-side Certificate Authentication.
And in the last part, we’ll connect from Windows 10 and iOS using client-side Certificate Authentication.
The setup
It’s critical to mention the details of the hardware and software being used because in the world of tech, the way of doing things can often change with the changes in hardware or software. So, following are our setup:
NAS: Synology DS920+, DSM 7.1-42661 Update 4
OpenVPN server app: VPN Server package (1.4.7-2901) by Synology Inc.
Router: Ubiquiti UniFi DreamMachine
OpenVPN clients:
- OpenVPN Connect 3.3.6.2752 on Windows 10
- OpenVPN Connect 3.3.2.5086 on iOS 16.0.2
The OpenVPN Connect client is an official client developed and maintained by OpenVPN Inc. It can be downloaded from here:
https://openvpn.net/client-connect-vpn-for-windows/
There’s another client called OpenVPN GUI. This is a community project and can also be used on Windows. It can be downloaded from here:
https://openvpn.net/community-downloads/
We’ll use the official OpenVPN Connect client as the UX is pretty identical on both Windows and iOS.
DDNS
For OpenVPN to work, we need a static IP address for our server. Like most people, I have dynamic external IP address, so creating a DDNS (Dynamic Domain Name System) hostname is required so that even if the external IP address changes, the server can be reached using the DDNS hostname. DDNS allows connection to the Synology NAS over the internet by mapping a hostname to its IP address. I’ve already configured DDNS using the free synology.me DDNS provider. It’s beyond the scope of this post how to do it, but this doc from Synology may be followed: https://kb.synology.com/en-us/DSM/help/DSM/AdminCenter/connection_ddns?version=7
Let’s say our DDNS hostname is myhostname.synology.me.
Note: if we have a static external IP address, which never changes, then we can simply use that and we do not have to configure DDNS.
Also note that configuring DDNS using Synology provider will require us to get a certificate from Let’s Encrypt and set it as default. This certificate will be automatically used when we export the configuration to be used with the client in the second part.
Installing the VPN Server package
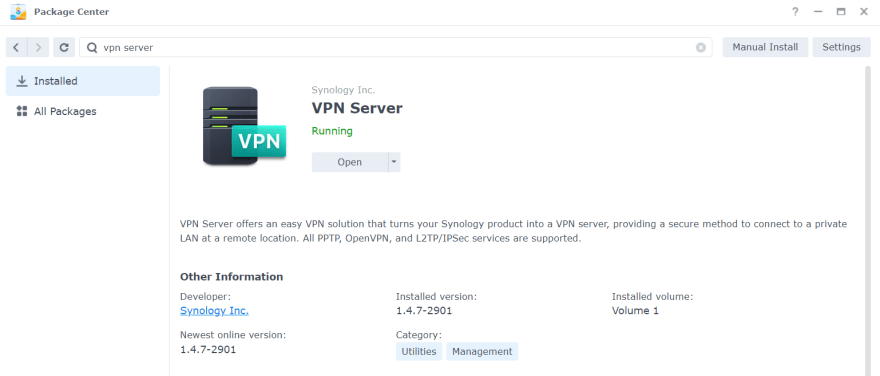
It’s probably the easiest task. We just search for it and install. That’s it.
Creating a user to use with OpenVPN server
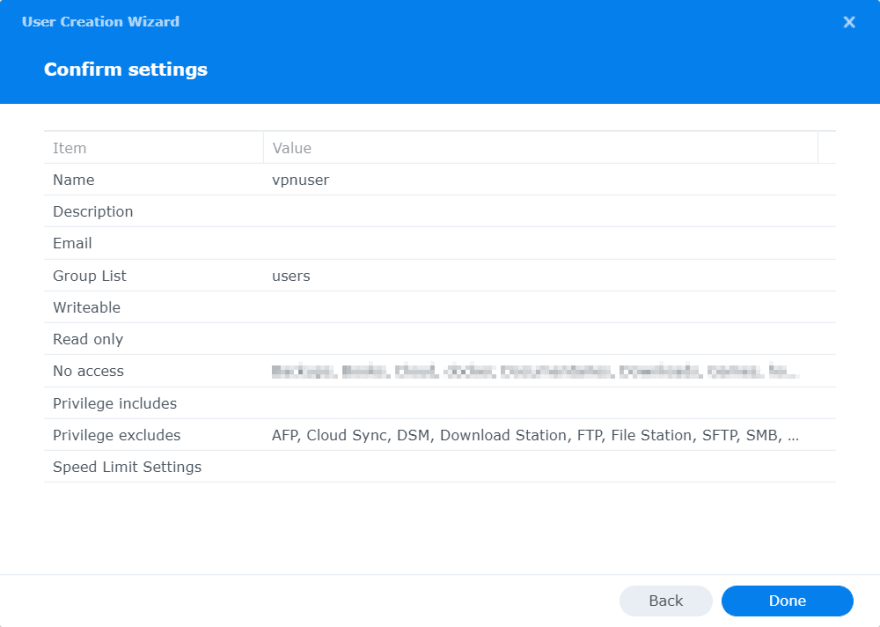
Any existing user we have on our NAS would work just fine. We only need to grant it the required privilege. But we should really create a separate user just for the purpose of connecting to the VPN server. In doing so, we can restrict the VPN user from pretty much everything else on the NAS. So, in case it gets compromised, it can’t be used to access other apps or shared folders.
Let’s open up Control Panel, select User & Group from the left-hand-side panel and hit the Create button.

The User Creation Wizard will pop up. On the first screen, we fill in the required details like Name and Password and hit Next.

On the next screen, we can add the user to any group we want. By default, the user is added to the System default group users. In case we want to create multiple VPN users for different members of the family, we may want to create a dedicated group, say ‘vpnusers’, with the required privileges or restrictions and assign all VPN users to that group. That way we wouldn’t have to restrict or grant the same privileges to individual users manually. For the purpose of this tutorial, we’ll leave this as-is and assign the restrictions/ privileges manually on the next screens.

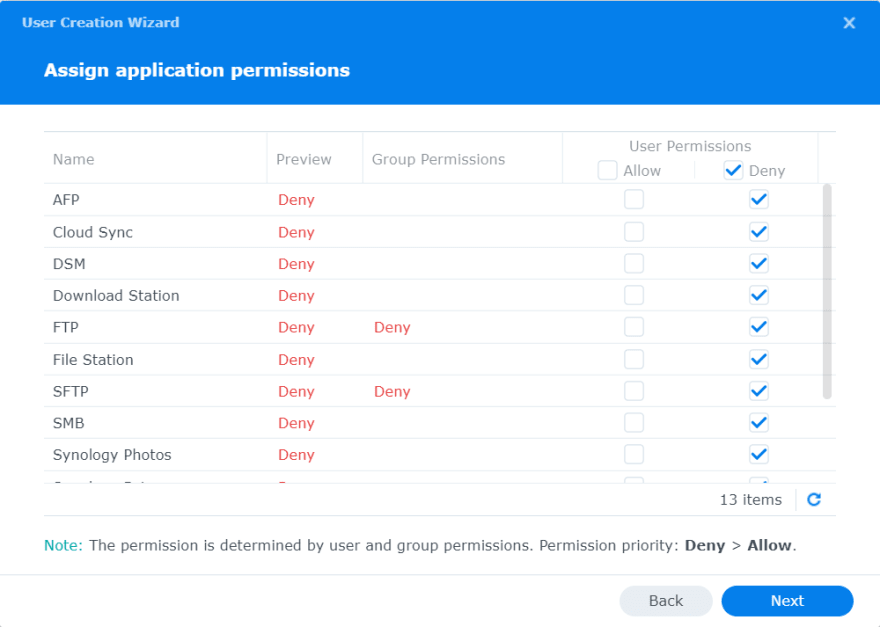
On the following screen, we can assign permission to access different shared folders. We don’t want to assign any. So let’s tick the No Access checkbox at the top to deny access to all shared folders.

We’ll leave the next step as-is.
Next screen is for assigning application permissions and we want to deny access to all.
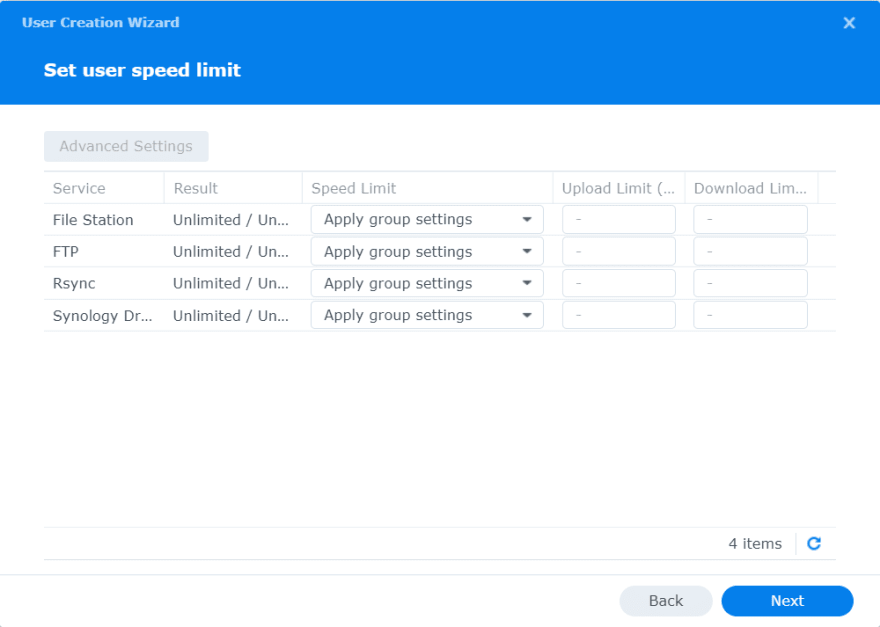
We’ll leave the next step as-is.
The last step is for reviewing the settings and confirm.
Configuring the OpenVPN server
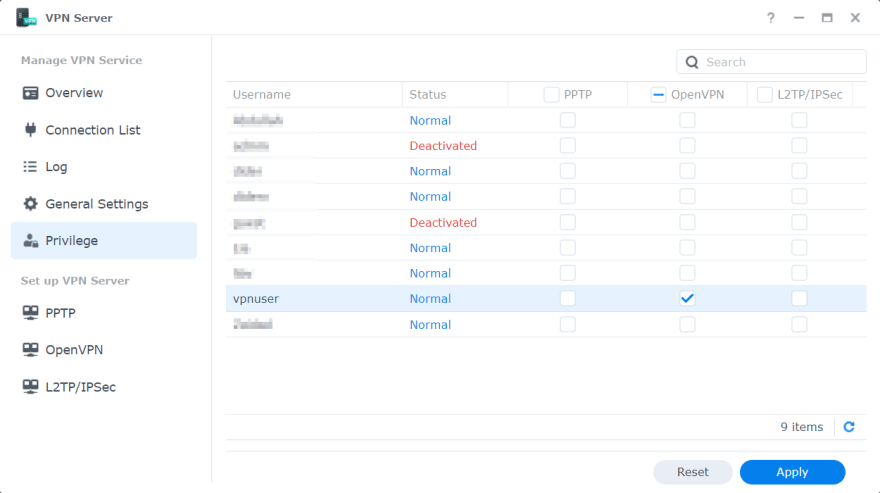
Let’s open up the VPN Server app and head straight to the Privilege screen. We’ll grant our newly created vpnuser the privilege to connect to the VPN Server.
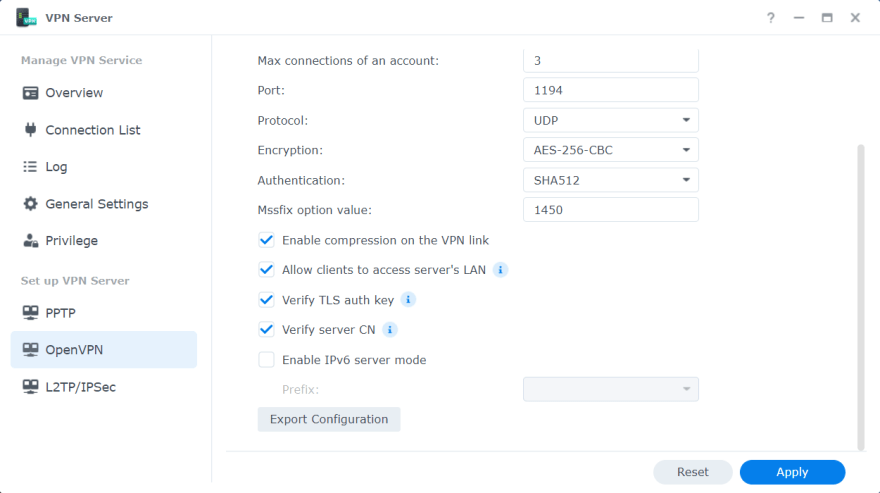
Next, we’ll go to the screen for configuring OpenVPN and tick Enable OpenVPN server checkbox. On this screen we can customize each of the settings. We’ll leave the dropdowns as-is, with the default values selected. Then we’ll check only the first 4 checkboxes.
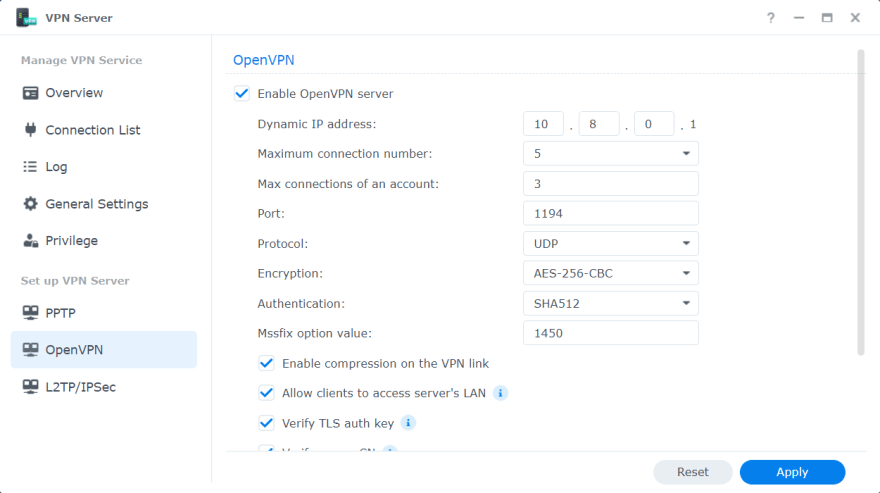
If we want to enable IPv6 server mode, we can check the last one too. But in order to enable OpenVPN server to send IPv6 addresses, we have to first get a prefix via 6in4/6to4/DHCP-PD in Control Panel > Network > Network Interface, then select the prefix on this screen.
If we don’t want the clients to be able to access the server’s LAN, we can untick the second checkbox Allow clients to access server's LAN.
Also, take note of the second-to-last checkbox Verify server CN. We can leave it unticked. But if we tick it, then it creates an issue for the OpenVPN Connect client, which we’ll see when we configure the client in the second part of this tutorial.
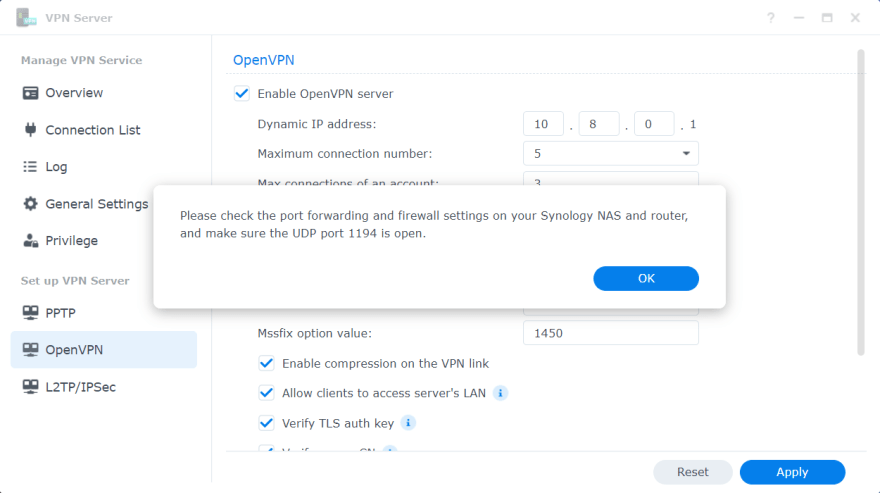
Now we have to click Apply for the changes to take effect first before we export the configuration. After clicking the Apply button, we are shown an information dialog which tells us to check port forwarding and firewall settings on both the NAS and the router. We’ll talk about those settings shortly.
Note that it’s a security best practice to not use any default configured port (like 1194 here) and instead use a different available port.
Enable port forwarding on the router
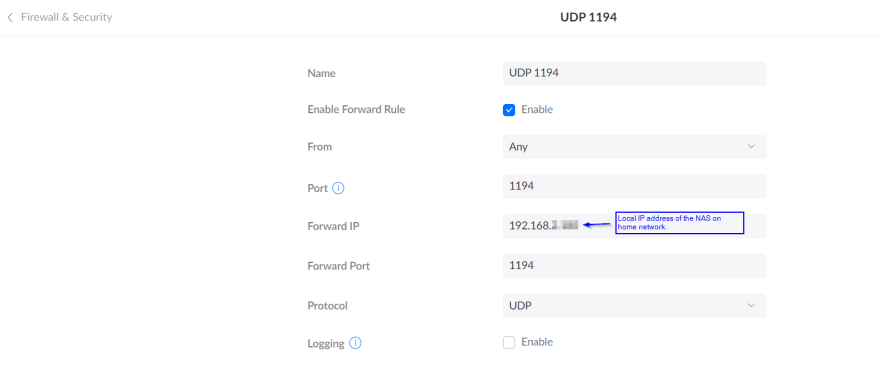
Before the VPN server connection request could reach the Synology NAS (where the VPN server runs), it reaches our router using the external IP address on port 1194. This is the default configured port, whcih we saw earlier. The router then forwards the request to the same port at the NAS’ local IP address. But this does not happen automatically. That’s why we need to enable port forwarding on the router. The process to do it is pretty much same on most routers and can easily be found online by searching with the router model name. Following is how it looks like on our Ubiquiti UniFi DreamMachine.
Check firewall settings on the router
Most of the time any connection attempt on port 1194 will be blocked by default on the routers. So we need to allow this by creating a firewall rule.
Luckily on our DreamMachine, a rule is automatically created once the port forwarding has been set up.

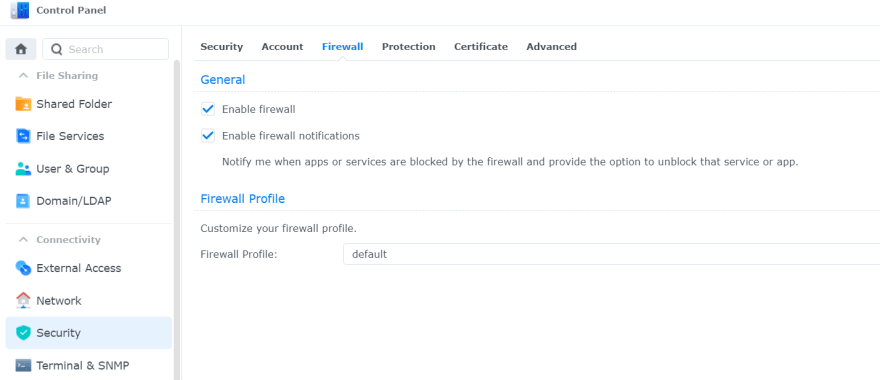
Check firewall settings on the NAS
We need to make sure that port 1194 is allowed to receive UDP connection requests in the Synology firewall. I already have firewall enabled with the default profile and found that the VPN connection can be established without having to add any additional rule. But if it’s not the case then we have to add a rule to enable port 1194 (or whatever port we’ve configured).
Summary
That’s basically it as far as configuring the OpenVPN server on Synology NAS is concerned. It’s not too difficult but we do need to take care to check the firewall settings on both the NAS and the router as most of the time VPN connection issues are caused by misconfigured firewalls.
In the next part, we’ll look at how to connect to the OpenVPN server we’ve just configured.
In this tutorial, we will look at the Synology NAS OpenVPN setup and configuration instructions.
After my recent Ultimate Synology NAS Setup & Configuration Guide tutorial, I received a ton of great feedback from users who were interested in safely and securely accessing their NAS from outside of their network.
I’ve been using OpenVPN on a Synology NAS using VPN Server for the past year and have had no issues at all. I can safely access my NAS anywhere in the world and more importantly, I control access.
I will quickly explain what a VPN server does and the different types of VPN server configurations, but if you already know, you can skip down to the OpenVPN Server instructions for the Synology NAS.
-
Synology NAS OpenVPN Setup & Configuration
-
1. What is a VPN Server?
- 1.1 VPN Connection Types for OpenVPN on a Synology NAS
- 2. How to Set Up OpenVPN on a Synology NAS
-
3. Synology NAS OpenVPN Firewall Configuration
- 4. Port Forwarding for OpenVPN on a Synology NAS
-
1. What is a VPN Server?
-
5. Configuration File Changes for OpenVPN on a Synology NAS
- 6. Synology NAS OpenVPN Client Configuration and Testing
- 7. Static Route Configuration – Synology NAS OpenVPN Setup
- Conclusion: OpenVPN on a Synology NAS
Before looking at how to set up OpenVPN on a Synology NAS, we’re going to look at exactly what a VPN server is and the different connection types.
1. What is a VPN Server?
A VPN is a Virtual Private Network that extends your private network to a public network. In layman’s terms, it allows you to securely connect back to your local network from an outside network. There are two types of VPN networks:
1.1 VPN Connection Types for OpenVPN on a Synology NAS
Split-Tunnel VPN: Traffic is only sent through your network if it is attempting to access an internal resource. Your IP address when navigating to a site outside of your network will be the IP address of the network that you are currently on.
Full-Tunnel VPN: All traffic is sent through your home network. Your IP address for internal and external requests will be your home networks.
I created a very basic image below that explains this, but we will look at how to configure both in later steps. It’s important to note that both connection types will allow you to access your local network. This only shows how traffic is routed differently to external networks.
NOTE: This is not the exact network flow. I am simplifying the process as much as I can.

2. How to Set Up OpenVPN on a Synology NAS
The screenshots below are from DSM 6, but work exactly the same way on DSM 7.
1. Open the Package Center and Install the VPN Server application.

2. Open the application and navigate to the OpenVPN section.
3. Enable OpenVPN Server. Change the Dynamic IP address range and maximum connection properties if you’d like. Since we are trying to access our Synology NAS outside of our network, we need to enable Allow clients to access server’s LAN. The rest can stay as default. Click Apply.

4. Navigate to the privilege section and ensure that the user account that you’d like to connect to the VPN with has permission for OpenVPN.

3. Synology NAS OpenVPN Firewall Configuration
Our VPN Server is now configured, but we need to ensure that our firewall allows access to UDP port 1194. If you aren’t sure how to configure Synology’s Firewall, you can learn how in our Ultimate Synology NAS Setup & Configuration Guide.
5. If you are using Synology’s firewall, open the Control Panel, Security, then navigate to the Firewall and Edit Rules.

6. Create an Allow rule for the VPN Server (OpenVPN) application, UDP port 1194.

7. When completed, the rule should be above the deny all rule.

4. Port Forwarding for OpenVPN on a Synology NAS
We just configured our Synology firewall to allow connections on UDP port 1194 so that we can connect to OpenVPN on a Synology NAS.
We now need to port forward UDP port 1194 on our router to our Synology NAS. Synology has UPnP functionality, which gives your NAS the ability to open ports on your router automatically. If you have a UPnP compatible router, it’s very easy to set this up.
However, there is a lot of debate on the security of UPnP, so I will not be going over it in this tutorial. If you’d like to do it this way, you can read Synology’s help article here.
Now, port forwarding will be completely different on every brand’s router settings page. This is a great guide that shows how to port forward on a few different brands of routers, but the best thing to do is try and google the name of your router and port forwarding. Example: Netgear port forwarding
This process requires you to have a static IP address setup. If you don’t currently have a static IP address setup, read how to set up a static IP address here.
8. Create a port forwarding rule for UDP port 1194 to your Synology NAS’s IP address. In the example below, 192.168.1.220 is the IP address of my Synology NAS.

Assuming that you were able to open UDP port 1194 and configure the Synology firewall rule successfully, the port configuration is now complete!
5. Configuration File Changes for OpenVPN on a Synology NAS
Now that we have configured OpenVPN on a Synology NAS, we need to modify our configuration file. Before we get into the steps, you need to ensure that you have DDNS configured.
Most people have dynamic external IP addresses, so creating a DDNS hostname is required because you need to ensure that you are always accessing your external IP address.
If you’d like to configure DDNS using a free synology.me hostname, you can follow Synology’s instructions here. If you’d like to use DuckDNS, I wrote up a tutorial on how you can do it here.
If you are absolutely positive that you have a static external IP address that never changes, you do not have to set up DDNS. Simply use your external IP address as YOUR_SERVER_IP.
It’s also important to note that the DDNS provider is irrelevant, you just need to ensure that you have a DDNS hostname configured!
9. Open the VPN Server application and select OpenVPN. Select Export configuration.

10. Extract the contents of the folder. We will only be editing the Synology NAS OpenVPN .ovpn file, so open that file with a text editor.
11. By default, you will receive a default Synology NAS OpenVPN configuration file with a unique certificate at the bottom. This document shouldn’t be shared with anyone other than users who you would like to authenticate with your VPN. We need to change the items below that are highlighted in red.
- YOUR_SERVER_IP: This should be the DDNS hostname that you configured.
- redirect-gateway def1: This is what determines if you are configuring a split-tunnel or full-tunnel VPN. If you aren’t sure which you’d like, reference the image above to see the differences. I create two separate configuration files (one for split-tunnel and one for full-tunnel) and depending on the situation, use one or the other. To enable full-tunnel, remove the “#” sign (this is the symbol for a comment). Just removing the comment symbol will enable the full-tunnel VPN.
- NOTE: If you are using an iPhone and have iOS 7 or above, you will need to add redirect-gateway ipv6 under redirect-gateway def1.
- dhcp-option: If you have a local DNS server that you’d like to use, you can add the IP address of your DNS server there. If you don’t have a local DNS server, leave this line commented out.
- NOTE: If you don’t have a local DNS server configured, OpenVPN will default to using Google’s public DNS records. This means that you won’t be able to access any of your local network resources by hostname, only IP address. If you’d like to configure a local DNS server, you can check out my tutorial on Pi-hole here.
- NOTE: This is a very basic example of how DNS can be used.
- client-cert-not-required: This option is not added by default but should be added if you will be using the new OpenVPN clients (most people will be). If you don’t add this option, you will receive an error message when you connect. While you can proceed through the error message, this will stop the error from occurring.
dev tun
tls-client
remote YOUR_SERVER_IP 1194
# The "float" tells OpenVPN to accept authenticated packets from any address,
# not only the address which was specified in the --remote option.
# This is useful when you are connecting to a peer which holds a dynamic address
# such as a dial-in user or DHCP client.
# (Please refer to the manual of OpenVPN for more information.)
#float
# If redirect-gateway is enabled, the client will redirect it's
# default network gateway through the VPN.
# It means the VPN connection will firstly connect to the VPN Server
# and then to the internet.
# (Please refer to the manual of OpenVPN for more information.)
#redirect-gateway def1
#redirect-gateway ipv6 #REQUIRED for iOS 7 and above.
# dhcp-option DNS: To set primary domain name server address.
# Repeat this option to set secondary DNS server addresses.
#dhcp-option DNS DNS_IP_ADDRESS
pull
# If you want to connect by Server's IPv6 address, you should use
# "proto udp6" in UDP mode or "proto tcp6-client" in TCP mode
proto udp
script-security 2
comp-lzo
reneg-sec 0
cipher AES-256-CBC
auth SHA512
auth-user-pass
client-cert-not-required
-----BEGIN CERTIFICATE-----
[YOUR CERTIFICATE WILL BE HERE. LEAVE THIS ALL AS DEFAULT]
-----END CERTIFICATE-----
12. Save the configuration file and add it to any devices that you’d like to test the VPN connection with. I normally test the connection with my cellphone, as you cannot be on the same network as your VPN server. You MUST be testing this from an external network (cell phone/hotspot is a great option).
6. Synology NAS OpenVPN Client Configuration and Testing
Now that we have configured everything, we need to test our connection. Download the OpenVPN client on your cell phone or on a PC that you can connect to a different network. Remember, you must be connected to a different network to test this.
13. Download the OpenVPN client software for your device here.
14. Select the add button at the bottom and then choose File. You should now be prompted to browse for the .ovpn file that we created earlier. Upload the file and then login with your DSM username and password.

15. You should be able to connect to your VPN now.

16. I am going to show two examples below. First, I am connected to my VPN Server using my split tunnel connection. You can see that my external IP address is my mobile network (as I am accessing an external webpage).

17. In this screenshot, I am connected to my VPN Server using my full-tunnel connection. My external IP address is my ISP’s, as all traffic is being routed through my home network.

Both, split tunnel and full tunnel VPN connections allow you to access your local resources, but full tunnel VPN connections should be used if you’re trying to secure your network traffic (like when you’re on public Wi-Fi).
7. Static Route Configuration – Synology NAS OpenVPN Setup
This step is not required unless you need to access VPN devices from your home network.
Your home network and VPN network will be on different subnets which means that your local devices will only be able to talk to the machines on its subnet (VPN network will see both).
In order to have your local network talk to your VPN network (in my case, 192.168.1.X and 10.5.0.X), a static route will need to be configured in your router. I cannot go over the setup steps for this as each router is different, but below is a screenshot of the static route that I configured.
The Gateway IP Address will be the IP address of your Synology NAS (since that’s where your VPN is running). The 10.5.0.0/24 subnet is where you will need to enter the IP range you are using (as defined in the OpenVPN settings).

Conclusion: OpenVPN on a Synology NAS
This tutorial looked at how to set up OpenVPN on a Synology NAS. Configuring Synology’s VPN Server allows you to securely connect to your home network to access your NAS and local resources.
It also completely bypasses the need for QuickConnect or exposing your NAS to the internet (which is a security risk). As an added benefit, the full tunnel VPN connection will also secure your connection when on public Wi-Fi devices!
There’s one thing that I want to mention in regard to the security of this VPN. Synology does a pretty poor job of letting the user configure this as securely as possible. With the way that this is configured, technically, you are exposed to a man-in-the-middle attack.
There’s a lot that has to happen in order for you to be exposed to that type of attack, but I want to mention that it is a valid concern. If complete security is your top concern, I would look into implementing OpenVPN on a Raspberry Pi or your router (if applicable).
The device running OpenVPN doesn’t really matter, it just needs to be able to easily configure the server/client certificates.
Thanks for checking out the tutorial on how to set up OpenVPN on a Synology NAS! If you have any questions on how to set up OpenVPN on a Synology NAS, please leave them in the comments!
by Elena Constantinescu
Elena started writing professionally in 2010 and hasn’t stopped exploring the tech world since. With a firm grasp of software reviewing and content editing, she is always trying… read more
Updated on February 25, 2021
by
Elena Constantinescu

Elena started writing professionally in 2010 and hasn’t stopped exploring the tech world since. With a firm grasp of software reviewing and content editing, she is always trying… read more
- If you have a Synology NAS device, you can turn it into a VPN server to allow other users to connect remotely and share files securely.
- It’s a time-consuming process, but it’s not difficult if you accurately follow our complete step-by-step guide.
- The biggest decision is choosing the VPN protocol for the Synology NAS server: PPTP, L2TP/IPsec, or OpenVPN.
- We’re showing you exactly how to configure Synology VPN settings and how to connect.
XINSTALL BY CLICKING THE DOWNLOAD FILE
Fortect is a tool that does not simply cleans up your PC, but has a repository with several millions of Windows System files stored in their initial version. When your PC encounters a problem, Fortect will fix it for you, by replacing bad files with fresh versions. To fix your current PC issue, here are the steps you need to take:
- Download Fortect and install it on your PC.
- Start the tool’s scanning process to look for corrupt files that are the source of your problem
- Right-click on Start Repair so the tool could start the fixing algorythm
- Fortect has been downloaded by 0 readers this month.
A NAS is a data storage server that you can connect to your home or office network.
You can use it to save all essential data in a single place, including photos and videos, without having to rely on cloud storage.
Anyone can access these files through the Internet using a web browser or mobile app: you, your family, or your team members.
If you have a Synology NAS, it means that you can turn it into a VPN server on your Windows 10 PC.
This way, users can remotely connect to the NAS device and perform file transfers, safe from hacker interceptions.
Check out our complete step-by-step guide below to find out how to easily set up and connect to Synology VPN on Windows 10.
Before getting started
When setting up the Synology VPN server, you have to choose a VPN protocol from PPTP, L2TP/IPsec, and OpenVPN.
Keep in mind that the VPN clients must apply identical configurations to their devices in order to establish a successful connection.
Furthermore, any modifications made to the VPN configuration must be also updated in the VPN clients.
That means you should take into account the devices and operating systems used by the VPN clients.
At the same time, you need to ensure anti-hacker VPN protection, so you can’t set the bar low for security.
Which VPN protocol should I use?

Most platforms and operating systems have native support for PPTP, so it’s really easy to set it up without installing additional software.
However, PPTP has weak security and is mostly considered obsolete because of this. Also, some old routers block the GRE protocol (IP protocol 47), which is required for VPN connections over PPTP.
L2TP/IPsec provides better security than PPTP and has good compatibility with most devices, including Windows, Mac, Linux, and mobile.
It requires DSM 4.3 or newer. If you make any changes to the L2TP/IPsec VPN server, this can be easily applied at the VPN clients, too.
OpenVPN offers the best security among the three, but it’s not built into operating systems. That means that VPN users must install an OpenVPN client (free to use).
On top of that, you need to export the OpenVPN configuration every time you make changes and share it with the VPN clients. Plus, OpenVPN server mode doesn’t support bridge mode for site-to-site connections.
We suggest using OpenVPN for best security or L2TP/IPsec for good security and native integration.
How do I set up a Synology NAS VPN server on Windows 10?
For PPTP
- Click VPN Server on your Synology NAS
- Select PPTP on the left side
- Check the Enable PPTP VPN server box
- Set the Dynamic IP address*
- At Maximum connection number, you can limit the number of simultaneous VPN client connections
- The Maximum number of connections with same account field is similar to the one before, but it refers to users logged in under the same VPN account
- Set Authentication to MS-CHAP v2 to encrypt the VPN client passwords
- Set Encryption to Require MPPE
- Leave MTU to default (1400)
- Leave Use manual DNS unchecked to push the Synology NAS DNS server to the VPN clients
- Click Apply
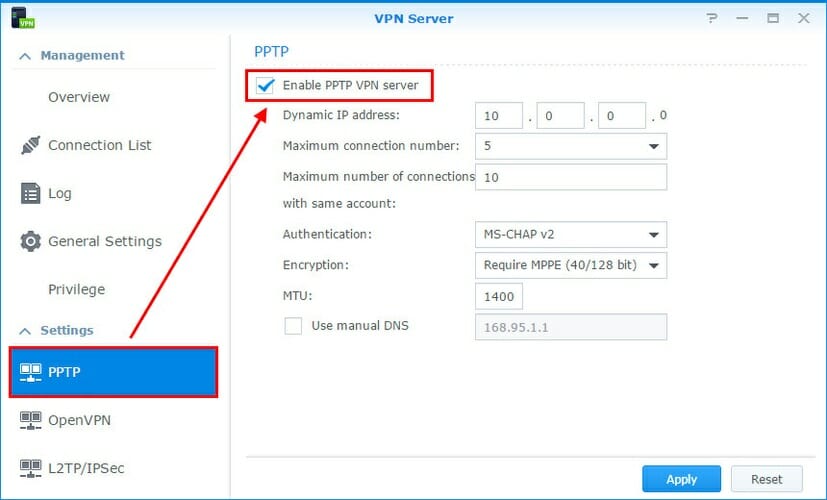
For L2TP/IPsec

- Open VPN Server and go to L2TP/IPsec on the left side
- Check the Enable L2TP/IPsec VPN server box
- Enter the Dynamic IP address*
- Set Maximum connection number to the total simultaneous VPN client connections you allow
- Set Authentication to MS-CHAP v2
- Leave MTU to default (1400)
- Leave Use manual DNS unchecked to push the Synology NAS DNS server to the VPN clients
- At IKE authentication, enter and confirm the pre-shared key.
- Click Apply
For OpenVPN
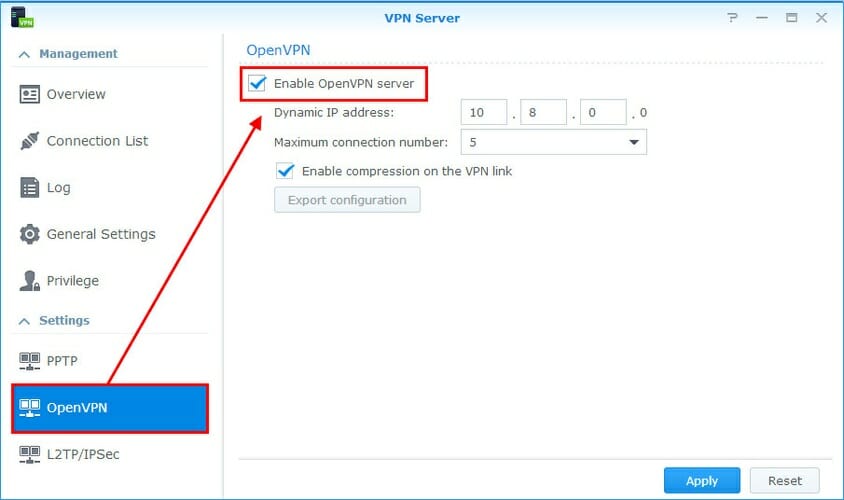
- Launch VPN Server and select OpenVPN on the left side
- Check the Enable OpenVPN server
- Set the Dynamic IP address*
- Limit the Maximum connection number
- At Enable compression on the VPN link
- Tick it if you want to apply data compression and speed up file transfers
- Leave it unchecked if you don’t want it to consume additional system resources (lower speed).
- Enable Allow clients to access server’s LAN
- Tick Enable IPv6 server mode only if you want VPN clients to connect using IPv6 instead of IPv4
- Click Apply
*The dynamic IP address is taken into account by the VPN server when it assigns the virtual IP addresses to all connected clients. It should not be identical to any local IP addresses used by your devices in LAN. You can use the arp -a command in CMD to view all local IP addresses.
Many routers have VPN server support for PPTP and L2TP/IPsec.
To avoid conflicts caused by occupied ports, make sure that the VPN server isn’t enabled on your router if you want to set up a Synology VPN server over PPTP or L2TP/IPsec.
Furthermore, you should use a router that allows VPN pass-through.
How do I connect to Synology VPN on Windows 10?
For PPTP
Here’s how to add a VPN connection, edit VPN properties, and connect to the Synology VPN when using the PPTP protocol.
For L2TP/IPsec
When it comes to the L2TP/IPsec protocol, start by making a minor registry tweak
Then, you can add your VPN connection, edit L2TP/IPsec settings, and connect to the Synology VPN.
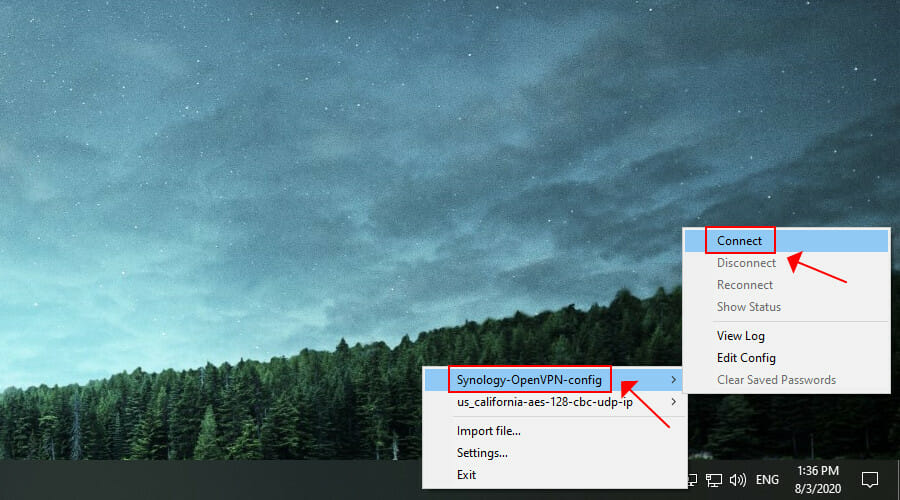
For OpenVPN
The OpenVPN option is the most complicated because you have to install an OpenVPN client (no operating system has native support for OpenVPN).
Before doing that, you have to get the OpenVPN configuration settings ready. Once everything is set up, you can connect to the Synology OpenVPN server.
- Prepare the OpenVPN configuration
- On the Synology VPN server, select OpenVPN from the left side
- Click Export configuration
- Copy the ZIP archive to the VPN client PC
- Unzip the archive and open the openvpn.ovpn file with any text editor
- Replace YOUR_SERVER_IP with the public IP address of the Synology NAS
- Set up the OpenVPN client
- Download OpenVPN GUI and install it on your PC
- Go to the config subfolder of the OpenVPN directory. The default location is:
C:Program FilesOpenVPNconfig - Copy the Synology OpenVPN configuration files (ca.crt and openvpn.ovpn) to this location
- Connect to the OpenVPN server

- Launch OpenVPN GUI as admin
- Right-click the OpenVPN GUI icon in the systray
- Select the Synology OpenVPN profile and click Connect
Synology VPN troubleshooting
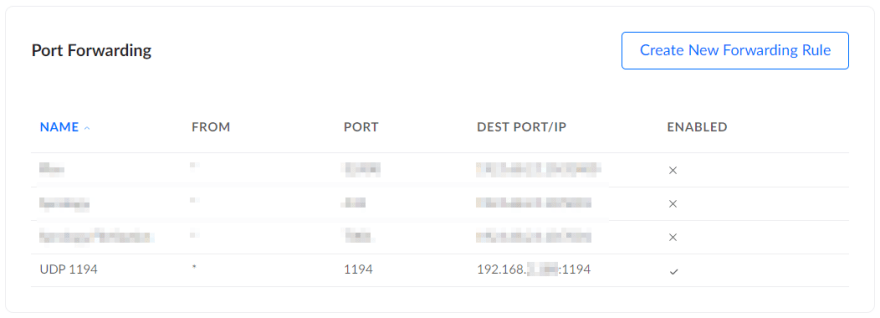
To avoid VPN connection issues, it’s a good idea to check port forwarding and if the required ports are opened in the firewall on the Synology NAS and router, for both the VPN server and clients.
- PPTP requires port 1723 over TCP
- L2TP/IPsec needs ports 1701, 500, and 4500 over UDP
- OpenVPN needs port 1194 over UDP
Conclusion
To sum up, you can turn your Synology NAS into a VPN server and then connect to it from any part of the world to access files.
It’s a time-consuming process, but it’s not difficult at all if you follow the instructions accurately.
You just need to set up the right VPN protocol for your home or office. No matter what you choose, you can change the VPN settings anytime to try something else.
Your connection is not secure — websites you visit can find out your details:

- Your IP Address:
loading

Companies can sell this information, alongside your location and internet provider name, and profit from it by serving targeted ads or monitoring your data usage.
We recommend Private Internet Access, a VPN with a no-log policy, open source code, ad blocking and much more; now 79% off.
![]()