-
Contents
-
Table of Contents
-
Troubleshooting
-
Bookmarks
Quick Links
WRE6505 v2
Wireless AC750 Range Extender
Version 1.00
Edition 1, 10/2016
Quick Start Guide
User’s Guide
Default Login Details
Web Address
http://DHCP-assigned IP
www.zyxel.com
Password
http://zyxelsetup
http://192.168.1.2
1234
Copyright © 2016 ZyXEL Communications Corporation
Related Manuals for ZyXEL Communications WRE6505 v2
Summary of Contents for ZyXEL Communications WRE6505 v2
-
Page 1
WRE6505 v2 Wireless AC750 Range Extender Version 1.00 Edition 1, 10/2016 Quick Start Guide User’s Guide Default Login Details Web Address http://zyxelsetup http://DHCP-assigned IP http://192.168.1.2 www.zyxel.com Password 1234 Copyright © 2016 ZyXEL Communications Corporation… -
Page 2
KEEP THIS GUIDE FOR FUTURE REFERENCE. Related Documentation • Quick Start Guide The Quick Start Guide shows how to connect the WRE6505 v2 and access the Web Configurator wizards. • More Information Go to support.zyxel.com to find other information on the WRE6505 v2. -
Page 3: Table Of Contents
Contents Overview Contents Overview User’s Guide ……………………….8 Introduction ………………………….9 The Web Configurator ……………………..13 WRE6505 v2 Modes ……………………..19 Repeater Mode ……………………….21 Access Point Mode ……………………..27 eaZy123 Wizard Setup ……………………..33 Tutorials …………………………38 Technical Reference ……………………..46 Monitor …………………………47 Wireless LAN ……………………….49 LAN ……………………………66 One Connect ……………………….68…
-
Page 4: Table Of Contents
Repeater Mode ……………………….21 4.1 Overview ……………………….21 4.2 What You Can Do ……………………..21 4.3 What You Need to Know ……………………21 4.3.1 Setting your WRE6505 v2 to Repeater Mode ……………..22 4.3.2 Configuring your WLAN, LAN and Maintenance Settings …………22 WRE6505 v2 User’s Guide…
-
Page 5
7.3.1 Push Button Configuration (PBC) ………………..39 7.3.2 PIN Configuration ……………………40 7.4 Connecting the WRE6505 v2 (in Repeater mode) to an AP ………….41 7.4.1 Selecting an AP from an Automatically Detected List ………….42 7.4.2 Selecting an AP by Manually Entering Security Information ………..43 Part II: Technical Reference……………. -
Page 6
12.6 Firmware Upgrade Screen ………………….73 12.7 Backup / Restore Screen ……………………75 12.7.1 Backup Configuration ………………….76 12.7.2 Restore Configuration ………………….76 12.7.3 Back to Factory Defaults …………………..77 12.8 Restart Screen ……………………..77 12.9 System Mode ……………………..78 12.9.1 System WPS Behavior ………………….79 WRE6505 v2 User’s Guide… -
Page 7
13.1 Power, Hardware Connections, and LEDs ………………83 13.2 WRE6505 v2 Access and Login ………………….84 13.3 Internet Access ……………………..85 13.4 Resetting the WRE6505 v2 to Its Factory Defaults ……………..86 13.5 Wireless Problems ……………………..86 Appendix A Customer Support ………………….88 Appendix B Setting Up Your Computer’s IP Address …………….94 Appendix C Legal Information ………………….122… -
Page 8: User’s Guide
User’s Guide…
-
Page 9: Introduction
WLAN Your can create the following connections using the WRE6505 v2: • LAN. You can connect network devices via the Ethernet port of the WRE6505 v2 so that they can communicate with each other and access the Internet. • WLAN. Wireless clients can connect to the WRE6505 v2 to access network resources.
-
Page 10: Securing The Wre6505 V2
If you forget your password, you will have to reset the WRE6505 v2 to its factory default settings. If you backed up an earlier configuration file, you would not have to totally re-configure the WRE6505 v2.
-
Page 11: Wps Button
LEDs are turned off using the WPS button. 1.4 WPS Button The WPS button can be used to begin Wi-Fi Protected Setup (WPS), reboot the WRE6505 v2 while keeping it’s configuration or reboot the WRE6505 v2 to factory default configuration. Table 2 WPS Button Functions…
-
Page 12: Wi-Fi Protected Setup
Section 2.4 on page 1.4.1 Wi-Fi Protected Setup Your WRE6505 v2 supports Wi-Fi Protected Setup (WPS), which is an easy way to set up a secure wireless network. WPS is an industry standard specification, defined by the Wi-Fi Alliance. WPS allows you to quickly set up a wireless network with strong security, without having to configure security settings manually.
-
Page 13: The Web Configurator
H A PT ER The Web Configurator 2.1 Overview This chapter describes how to access the WRE6505 v2 Web Configurator and provides an overview of its screens. The Web Configurator is an HTML-based management interface that allows easy setup and management of the WRE6505 v2 via Internet browser.
-
Page 14: Password Screen
71). The time is in 24-hour format, for example 15:00 is 3:00 PM. 2.2.2 Password Screen You should see a screen asking you to change your password (highly recommended) as shown next. Figure 4 Change Password Screen WRE6505 v2 User’s Guide…
-
Page 15: Home Screen
Type a new password. Retype to Confirm Retype the password for confirmation. Apply Click Apply to save your changes back to the WRE6505 v2. Ignore Click Ignore if you do not want to change the password this time. 2.2.3 Home Screen If you have previously logged into the Web Configurator but did not click Logout, you may be redirected to the Home screen.
-
Page 16: Navigating The Web Configurator
2.2.3.1 Time/Date Edit One timezone can cover more than one country. You can choose a particular country in which the WRE6505 v2 is located and have the WRE6505 v2 display and use the current time and date for its logs.
-
Page 17: Title Bar
The icons provide the following functions. Table 7 Title Bar: Web Configurator Icons LABEL DESCRIPTION Logout Click this at any time to exit the Web Configurator. Home Click this to open the home screen. See Section 2.2.3 on page WRE6505 v2 User’s Guide…
-
Page 18: Navigation Panel
Chapter 6 on page 2.3.2 Navigation Panel Use the menu items on the navigation panel to open screens to configure WRE6505 v2 features. The following table describes the icons shown in the navigation panel. Table 8 Navigation Panel Menu Icons…
-
Page 19: Wre6505 V2 Modes
Status screen in this mode. In this mode, you can also set the WRE6505 v2 to work as an AP only, a wireless bridge to establish wireless links with other APs (WDS bridge), or an AP and bridge simultaneously (WDS repeater).
-
Page 20
Speed boost mode. These behaviors are only available in Repeater mode through the Maintenance screen. 3.1.1.1 Changing Operating Mode The WRE6505 v2 is in repeater mode by default. To change its operating mode, access the web configurator and go to the Maintenance > System Mode screen. See Section 12.9 on page 78 detailed information. -
Page 21: Repeater Mode
Repeater Mode 4.1 Overview In repeater mode, your WRE6505 v2 can act as an access point and wireless client at the same time. The WRE6505 v2 can connect to an existing network through another access point and also lets wireless clients connect to the network through it. This helps you expand wireless coverage when you have an access point or wireless router already in your network.
-
Page 22: Setting Your Wre6505 V2 To Repeater Mode
WRE6505 v2 is already in Repeater mode. Note: If a client is connected to the WRE6505 v2 through the wired Ethernet connection, the client can only access the 2.4 GHz Wi-Fi. In the following figure, the LAN Client is only able to communicate with devices in the 2.4 GHz wireless network.
-
Page 23
Click this button to refresh the status screen statistics. Device Information Host Name This is the WRE6505 v2’s system name you configure in the Maintenance > General screen. Firmware Version This is the firmware version and the date created. -
Page 24
Table 9 Status Screen: Repeater Mode LABEL DESCRIPTION SSID This shows a descriptive name used to identify the WRE6505 v2 in the wireless LAN. Channel This shows the channel number which you select manually or the WRE6505 v2 automatically scans and selects. -
Page 25: Configuration Menus
WLAN network. 4.5 Configuration Menus Use the menu in the navigation panel to configure WRE6505 v2 features in Repeater mode. The following screen and table show the features you can configure in Repeater mode. Figure 13 Menus: Repeater Mode The following table describes the sub-menus.
-
Page 26
Use this screen to configure general wireless LAN and wireless security 2.4G settings. AP Select Use this screen to choose an access point that you want the WRE6505 v2 to connect to. MAC Filter Use this screen to configure the WRE6505 v2 to block access to devices or block the devices from accessing the WRE6505 v2. -
Page 27: Access Point Mode
Access Point Mode 5.1 Overview In Access Point (AP) mode your WRE6505 v2 bridges a wired network (LAN) and wireless LAN (WLAN) in the same subnet. See the figure below for an example. Figure 14 Wireless Internet Access in Access Point Mode…
-
Page 28: What You Need To Know
5.3.1 Setting your WRE6505 v2 to AP Mode By default, AP mode in the WRE6505 v2 is not configured with a static IP address. To set up your WRE6505 v2 in AP mode for the first time, the directly-connected router must have the DHCP server function enabled.
-
Page 29
MAC Address This shows the wireless adapter MAC Address of your device. SSID This shows a descriptive name used to identify the WRE6505 v2 in the wireless LAN. Channel This shows the channel number which you select manually or the WRE6505 v2 automatically scans and selects. -
Page 30
This displays what percentage of the WRE6505 v2’s processing ability is currently used. When this percentage is close to 100%, the WRE6505 v2 is running at full load, and the throughput is not going to improve anymore. If you want some applications to have more throughput, you should turn off other applications (for example, using bandwidth management. -
Page 31: Configuration Menus
Chapter 5 Access Point Mode 5.5 Configuration Menus Use the menu in the navigation panel to configure WRE6505 v2 features in Access Point mode. The following screen and table show the features you can configure in Access Point mode. Figure 16 Menu: Access Point Mode The following table describes the sub-menus.
-
Page 32
WRE6505 v2 to the factory defaults. Restart Restart Use this screen to reboot the WRE6505 v2 without turning the power off. System Mode System Mode Use this screen to select how you want to use your WRE6505 v2. WRE6505 v2 User’s Guide… -
Page 33: Eazy123 Wizard Setup
See Section 2.2 on page 13 for detailed information. Note: The wizard appears when the WRE6505 v2 is accessed for the first time or when you reset the WRE6505 v2 to its default factory settings. The wizard screen opens.
-
Page 34
Type the selected network’s Wi-Fi password (key) if wireless security is enabled. Click Continue. If you click Choose Network Manually, the following screen displays. Enter the SSID and security settings of your wireless router or AP. Click Continue. WRE6505 v2 User’s Guide… -
Page 35
The 5 GHz setup screen displays. Repeat previous steps to select and connect to a 5 GHz Wi-Fi network. Configure the wireless settings between the WRE6505 v2 and its wireless clients. The WRE6505 v2 automatically copies the SSID of the associated AP and appends “.speed” to the 5GHz SSID. Click Apply. -
Page 36: Ap Mode
Chapter 6 eaZy123 Wizard Setup The eaZy 123 setup wizard is complete. Verify the WRE6505 v2’s wireless network settings and click GO to log into the web configurator again. 6.3.2 AP Mode Configure the wireless settings between the WRE6505 v2 and its wireless clients. The WRE6505 v2 automatically copies the SSID of the associated AP and appends “.speed”…
-
Page 37
Chapter 6 eaZy123 Wizard Setup The eaZy 123 setup wizard is complete. Verify the WRE6505 v2’s wireless network settings and click GO to log into the web configurator again. WRE6505 v2 User’s Guide… -
Page 38: Tutorials
7.3 Connecting to a Wireless Network Using WPS This section gives you an example of how to set up wireless network using WPS. The following example uses the WRE6505 v2 as the AP and NWD-211AN as the wireless client which connects to a notebook.
-
Page 39: Push Button Configuration (Pbc)
Navigate to Network > Wireless LAN 2.4G or Wireless LAN 5G > WPS Device and press the WPS button. Note: Your WRE6505 v2 has a WPS button located on its panel, as well as a WPS button in its configuration utility. Both buttons have exactly the same function; you can use one or the other.
-
Page 40: Pin Configuration
On the WRE6505 v2, navigate to the Network > Wireless LAN 2.4G or Wireless LAN 5G > WPS screen. Obtain the PIN number for the WRE6505 v2 or press the Generate button to create a new PIN number. See Section 9.10 on page 62 Enter the WRE6505 v2 PIN number in the wireless station’s utility screen.
-
Page 41: Connecting The Wre6505 V2 (In Repeater Mode) To An Ap
Figure 19 Example WPS Process: PIN Method Wireless Client WITHIN 2 MINUTES Authentication by PIN SECURITY INFO COMMUNICATION 7.4 Connecting the WRE6505 v2 (in Repeater mode) to an Repeater mode allows you to extend the original AP coverage. WRE6505 v2 User’s Guide…
-
Page 42: Selecting An Ap From An Automatically Detected List
• Selecting an AP by Manually Entering Security Information — create a secure wireless network by manually entering the AP’s wireless security settings in the WRE6505 v2’s interface. Section 7.4.2 on page 43. This is useful when the AP is hidden.
-
Page 43: Selecting An Ap By Manually Entering Security Information
Apply to save settings and restart the WRE6505 v2. Figure 22 Tutorial: Configure WRE6505 v2’s WLAN You have successfully set up your WRE6505 v2 to connect to an AP. Click GO to go to the Status screen. Figure 23 Tutorial: Saving settings 7.4.2 Selecting an AP by Manually Entering Security Information…
-
Page 44
Apply to save settings and restart the WRE6505 v2. Figure 26 Tutorial: Configure WRE6505 v2’s WLAN You have successfully set up your WRE6505 v2 to connect to an AP. Click GO to go to the Status screen. WRE6505 v2 User’s Guide… -
Page 45
Chapter 7 Tutorials Figure 27 Tutorial: Saving settings WRE6505 v2 User’s Guide… -
Page 46: Technical Reference
Technical Reference…
-
Page 47: Monitor
H A PT ER Monitor 8.1 Overview This chapter discusses read-only information related to the device state of the WRE6505 v2. 8.2 What You Can Do • use the Packet Statistics screen (Section 8.3 on page 47) to view port status, packet specific statistics, the «system up time»…
-
Page 48
This displays the reception speed in kilobits per second on this port. System Up Time This is the total time the WRE6505 v2 has been on. Poll Interval(s) Select the time interval in seconds for refreshing statistics in this field. -
Page 49: Wireless Lan
(Section 9.4 on page 51). • Use the AP select screen to choose an access point that you want the WRE6505 v2 (in repeater mode) to connect to. You should know the security settings of the target AP (Section 9.6 on page 57).
-
Page 50: Wireless Security Overview
Some wireless devices, such as scanners, can detect wireless networks but cannot use wireless networks. These kinds of wireless devices might not have MAC addresses. Hexadecimal characters are 0, 1, 2, 3, 4, 5, 6, 7, 8, 9, A, B, C, D, E, and F. WRE6505 v2 User’s Guide…
-
Page 51: General Wireless Lan Screen
Use this screen to enable the Wireless LAN, enter the SSID and select the wireless security mode. Note: If you are configuring the WRE6505 v2 from a computer connected to the wireless LAN and you change the WRE6505 v2’s SSID, channel or security settings, you will lose your wireless connection when you press Apply to confirm.
-
Page 52
Select a channel from the drop-down list box. The options vary depending on the frequency band and the country you are in. This option is only available when the WRE6505 v2 is in AP mode and Auto Channel Selection is disabled. -
Page 53
Security Security Mode If the WRE6505 v2 is in repeater mode, select No Security or the available modes to match as provided by the source AP or wireless router. If the WRE6505 v2 is in AP mode, select WPA2-PSK, WPA-PSK or Static WEP to add security on this wireless network. -
Page 54: Wireless Security
Both the wireless stations and the access points must use the same WEP key. Your WRE6505 v2 allows you to configure up to four 64-bit or 128-bit WEP keys but only one key can be enabled at any one time.
-
Page 55
A passphrase functions like a password. In WEP security mode, it is further converted by the WRE6505 v2 into a complicated string that is referred to as the “key”. This key is requested from all devices wishing to connect to a wireless network. -
Page 56: Wpa-Psk/Wpa2-Psk
The preceding «0x», that identifies a hexadecimal key, is entered automatically. Key 1 to Key 4 The WEP keys are used to encrypt data. Both the WRE6505 v2 and the wireless stations must use the same WEP key for data transmission.
-
Page 57: Ap Select Screen
Use this screen (available in repeater mode only) to choose an access point that you want the WRE6505 v2 to connect to. You should know the security settings of the target AP. To open this screen, click Network > Wireless LAN 2.4G or Wireless LAN 5G > AP Select.
-
Page 58
The WRE6505 v2 automatically copies the SSID of the associated AP. You can set the SSID and Wi- Fi key of the WRE6505 v2’s WLAN to be the same as those on the AP to which the WRE6505 v2 wants to connect. Click Apply to save your settings. -
Page 59
Use this screen to manually enter the SSID, security mode and Wi-Fi key of the AP to which you want the WRE6505 v2 to connect. This is useful when the AP’s SSID is hidden. Click Continue to configure the wireless settings between the WRE6505 v2 and its wireless clients (see Set up the WRE6505 v2’s WLAN for clients on page… -
Page 60: Mac Filter
Chapter 9 Wireless LAN 9.7 MAC Filter The MAC Filter screen allows you to specify which devices are allowed to access the WRE6505 v2, while denying access to all unspecified devices. Every Ethernet device has a unique MAC (Media Access Control) address. The MAC address is assigned at the factory and consists of six pairs of hexadecimal characters, for example, 00:A0:C5:00:00:02.
-
Page 61: Wireless Lan Advanced Screen
Output Power Set the output power of the WRE6505 v2 in this field. If there is a high density of APs in an area, decrease the output power of the WRE6505 v2 to reduce interference with other APs.
-
Page 62: Quality Of Service (Qos) Screen
DESCRIPTION Enable WMM QoS Check this to have the WRE6505 v2 automatically give a service a priority level according to the ToS value in the IP header of packets it sends. WMM QoS (Wifi MultiMedia Quality of Service) gives high priority to voice and video, which makes them run more smoothly.
-
Page 63: Wps Device Screen
The current wireless and wireless security settings also appear in the screen. This displays Unconfigured if WPS is disabled and there are no wireless or wireless security changes on the WRE6505 v2 or click Release Configuration (AP mode only) to remove the configured wireless and wireless security settings. Release This button is only available when the WPS status displays Configured.
-
Page 64: Scheduling Screen
Wireless LAN scheduling is disabled by default. The wireless LAN can be scheduled to turn on or off on certain days and at certain times. To open this screen, click Network > Wireless LAN 2.4G or Wireless LAN 5G > Scheduling tab. WRE6505 v2 User’s Guide…
-
Page 65
If you have chosen Off earlier for the WLAN Status the Wireless LAN will turn off between the two times you enter in these fields. Apply Click Apply to save your changes back to the WRE6505 v2. Reset Click Reset to reload the previous configuration for this screen. -
Page 66: Lan
WRE6505 v2 sends to the DHCP clients. Click Network > LAN. Note: If you change the IP address of the WRE6505 v2 in the screen below, you will need to log into the WRE6505 v2 again using the new IP address.
-
Page 67
Enter the gateway of your WRE6505 v2 in dotted decimal notation. DNS Assignment First DNS Server Select From ISP if your ISP or router to which the WRE6505 v2 connects dynamically assigns DNS server information (and the WRE6505 v2’s IP address). The field to the Second DNS Server right displays the (read-only) DNS server IP address that the ISP assigns. -
Page 68: One Connect
One Connect is a ZyXEL-proprietary feature. It complies with the IEEE 1905.1 standard and allows auto-detection and auto-configuration. If your wireless router supports ZyXEL One Connect, WRE6505 v2 for example, you can download and install the ZyXEL One Connect App in your mobile device to check the connection status, do speed test, turn on or turn off the devices in your network, block or allow a device’s access and set…
-
Page 69
One Connect Auto-configuration Select Enable to allow the WRE6505 v2 to automatically update the wireless settings on the APs or wireless repeaters (which also support ZyXEL One Connect) in its network. Select Disable to turn this feature off if you want to have the APs or repeaters in the network use different wireless settings. -
Page 70: Maintenance
• Use the Restart screen to reboot the WRE6505 v2 without turning the power off (Section 12.8 on page 77). • Use the System Mode screen to select how you want to use your WRE6505 v2 (Section 12.9 on page 78).
-
Page 71: System Password Screen
Click Reset to reload the previous configuration for this screen. 12.5 Time Screen Use this screen to configure the WRE6505 v2’s time based on your local time zone. To change your WRE6505 v2’s time and date, click Maintenance > Time. The screen appears as shown.
-
Page 72
When you select Manual, enter the new date in this field and then click Apply. Get from Time Select this radio button to have the WRE6505 v2 get the time and date from the time Server server you specified below. -
Page 73: Firmware Upgrade Screen
(usually) uses the system model name with a “*.bin” extension, e.g., “WRE6505 v2.bin”. The upload process uses HTTP (Hypertext Transfer Protocol) and may take up to two minutes. After a successful upload, the system will reboot.
-
Page 74
This is the size of the firmware in bytes. 15073234 is about 15 MB. Do_Firmware_ Click this button to download and upgrade the new firmware to the WRE6505 v2. Upgrade Note: Do not turn off the WRE6505 v2 while firmware upload is in progress! After you see the Firmware Upgrading screen, wait until the upgrade process is complete. -
Page 75: Backup / Restore Screen
Chapter 12 Maintenance Figure 49 Firmware Upgrading The WRE6505 v2 automatically restarts in this time causing a temporary network disconnect. In some operating systems, you may see the following icon on your desktop. Figure 50 Network Temporarily Disconnected After the WRE6505 v2 restarts, the Upgrade Accomplished screen appears.
-
Page 76: Backup Configuration
Figure 52 Maintenance > Backup/Restore 12.7.1 Backup Configuration Backup configuration allows you to back up (save) the WRE6505 v2’s current configuration to a file on your computer. Once your WRE6505 v2 is configured and functioning properly, it is highly recommended that you back up your configuration file before making configuration changes. The backup configuration file will be useful in case you need to return to your previous settings.
-
Page 77: Back To Factory Defaults
If you uploaded the default configuration file you may need to change the IP address of your computer to be in the same subnet as that of the default WRE6505 v2 IP address (192.168.1.2). Refer to your operating system’s help files for details on how to set up your computer’s IP address.
-
Page 78: System Mode
Chapter 12 Maintenance 12.9 System Mode Use this screen to change the operating mode of the WRE6505 v2. For further information on system operating mode, see Section 3.1.1 on page Figure 56 Maintenance > System Mode The following table describes the labels in this menu.
-
Page 79: System Wps Behavior
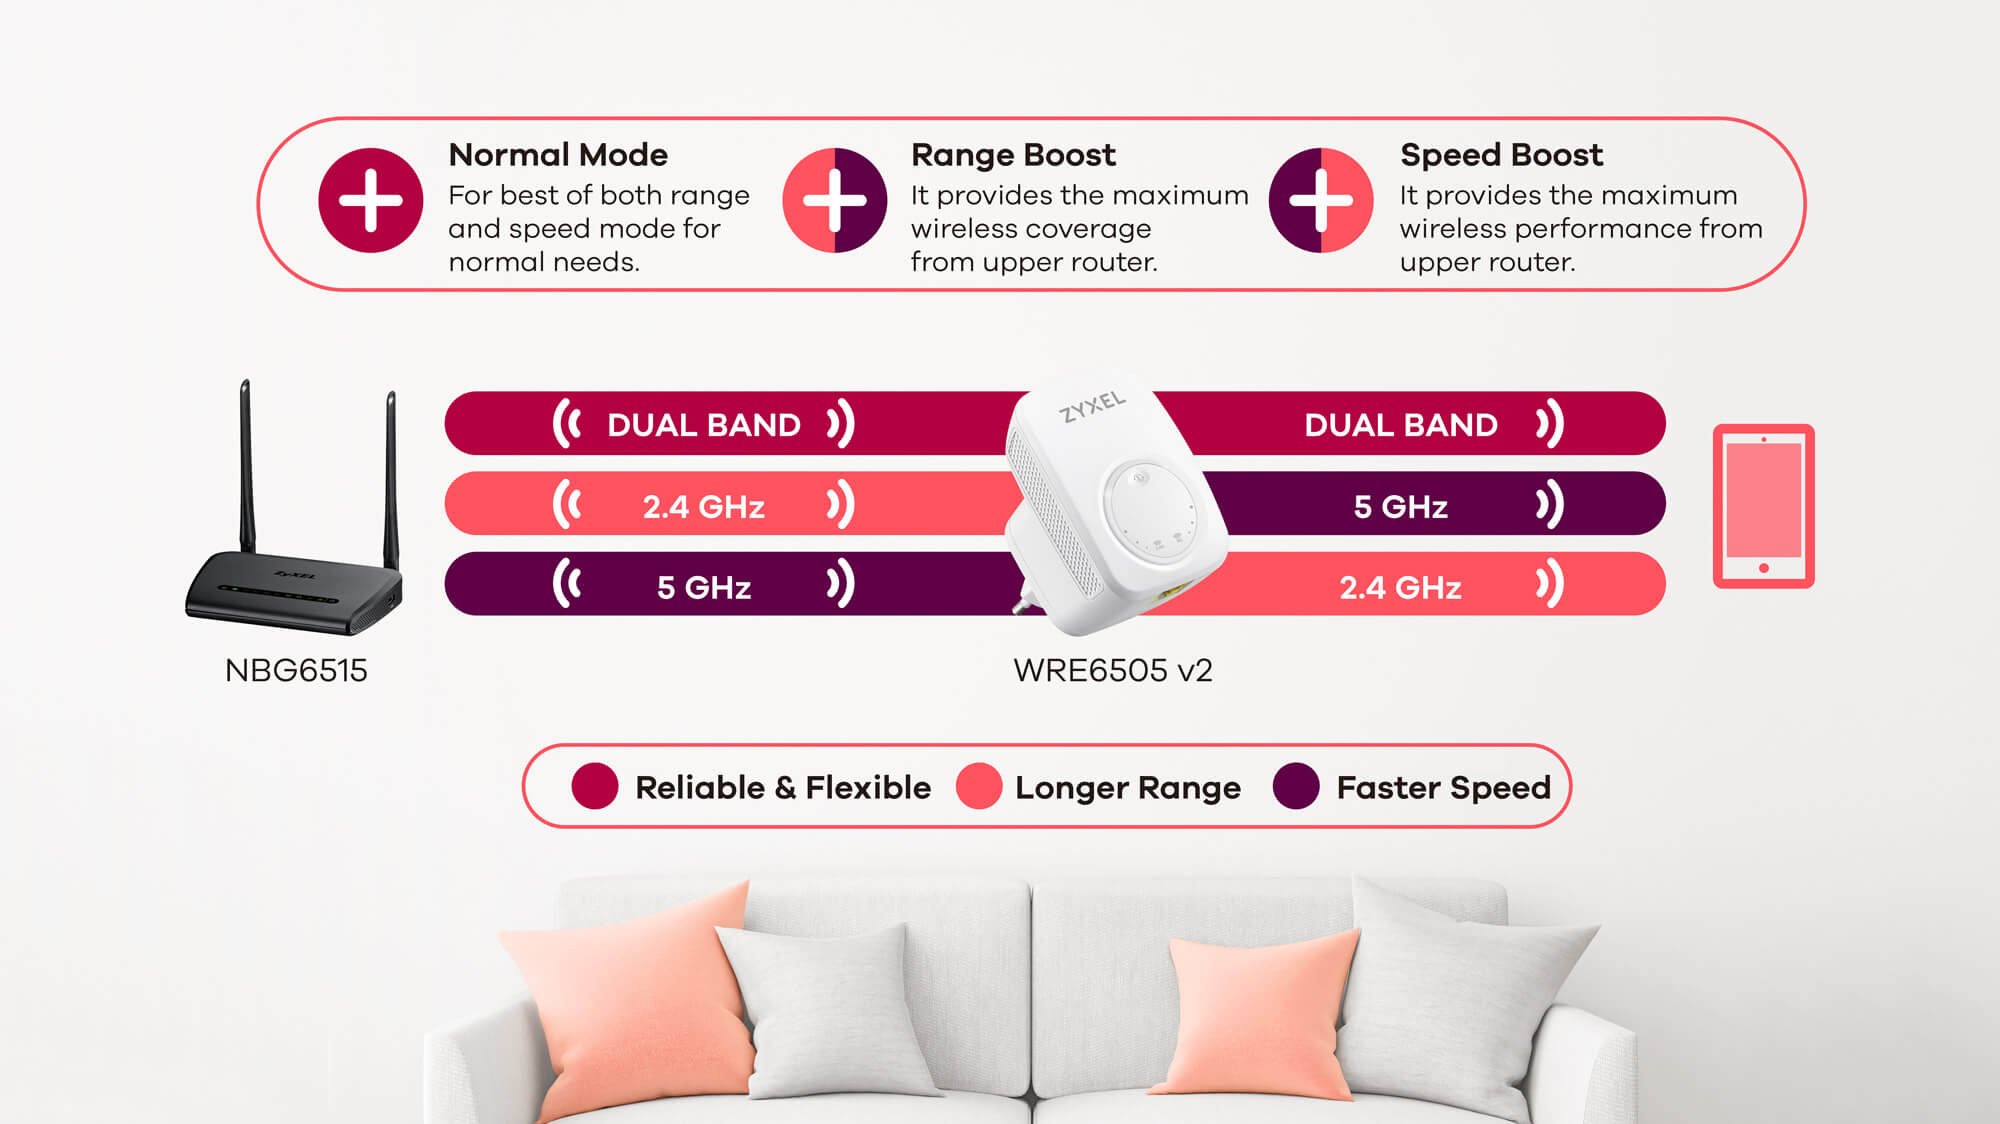
Table 33 Maintenance > System Mode (continued) LABEL DESCRIPTION Range boost Select this option to set the WRE6505 v2 to Range boost mode—the 2.4 GHz band is mode supported on the Up behavior, while the 5 GHz band is supported on the Down behavior. Speed boost…
-
Page 80
Home2_5GEXT Work2_5GEXT Work2_5GEXT Home2 Home2_5GEXT Work4 Work4_5GEXT 12.9.1.2 Range Boost Mode In range boost mode, the 2.4 GHz band is supported on the Down behavior, while the 5 GHz band is supported on the Up behavior. WRE6505 v2 User’s Guide… -
Page 81
In speed boost mode, the 5 GHz band is supported on the Down behavior, while the 2.4 GHz band is supported on the Up behavior. Figure 60 WPS Mode: Speed Boost Mode 5 GHz 2.4 GHz Universal Down Repeater Client WRE6505 v2 User’s Guide… -
Page 82
Home1 Home1_2.4GEXT Work1 Work4_2.4GEXT No profile Home2_2.4GEXT No profile Work4_2.4GEXT Home1 Home1_2.4GEXT Work1 Work3_2.4GEXT 5 GHz No profile No profile Work2 (Initial Setup) (Initial Setup) Home2 Home2_5GEXT Work4 Home2 Home2_5GEXT Work4 No profile No profile Work3 WRE6505 v2 User’s Guide… -
Page 83: Troubleshooting
13.1 Power, Hardware Connections, and LEDs The WRE6505 v2 does not turn on. None of the LEDs turn on. Make sure the WRE6505 v2 is plugged in to an appropriate power source. Make sure the power source is turned on.
-
Page 84: Wre6505 V2 Access And Login
Make sure your Internet browser does not block pop-up windows and has JavaScript and Java enabled. Reset the device to its factory defaults, and try to access the WRE6505 v2 with the default address. If the problem continues, contact the network administrator or vendor, or try one of the advanced suggestions.
-
Page 85: Internet Access
Internet, especially peer-to-peer applications. Check the signal strength. If the signal strength is low, try moving the WRE6505 v2 closer to the AP if possible, and look around to see if there are any devices that might be interfering with the wireless network (for example, microwaves, other wireless networks, and so on).
-
Page 86: Resetting The Wre6505 V2 To Its Factory Defaults
13.4 Resetting the WRE6505 v2 to Its Factory Defaults If you reset the WRE6505 v2, you lose all of the changes you have made. The WRE6505 v2 re-loads its default settings, and the password resets to 1234. You have to make all of your changes again.
-
Page 87
Chapter 13 Troubleshooting Check that both the WRE6505 v2 and your wireless station are using the same wireless and wireless security settings, and that both the WRE6505 v2 and the AP are using the same wireless and wireless security settings. -
Page 88: Appendix A Customer Support
• Brief description of the problem and the steps you took to solve it. Corporate Headquarters (Worldwide) Taiwan • ZyXEL Communications Corporation • http://www.zyxel.com Asia China • ZyXEL Communications (Shanghai) Corp. ZyXEL Communications (Beijing) Corp. ZyXEL Communications (Tianjin) Corp. • http://www.zyxel.cn India • ZyXEL Technology India Pvt Ltd • http://www.zyxel.in Kazakhstan •…
-
Page 89
• ZyXEL Singapore Pte Ltd. • http://www.zyxel.com.sg Taiwan • ZyXEL Communications Corporation • http://www.zyxel.com/tw/zh/ Thailand • ZyXEL Thailand Co., Ltd • http://www.zyxel.co.th Vietnam • ZyXEL Communications Corporation-Vietnam Office • http://www.zyxel.com/vn/vi Europe Austria • ZyXEL Deutschland GmbH • http://www.zyxel.de Belarus • ZyXEL BY • http://www.zyxel.by… -
Page 90
Appendix A Customer Support Belgium • ZyXEL Communications B.V. • http://www.zyxel.com/be/nl/ • http://www.zyxel.com/be/fr/ Bulgaria • ZyXEL България • http://www.zyxel.com/bg/bg/ Czech Republic • ZyXEL Communications Czech s.r.o • http://www.zyxel.cz Denmark • ZyXEL Communications A/S • http://www.zyxel.dk Estonia • ZyXEL Estonia • http://www.zyxel.com/ee/et/ Finland •… -
Page 91
• ZyXEL Communications Poland • http://www.zyxel.pl Romania • ZyXEL Romania • http://www.zyxel.com/ro/ro Russia • ZyXEL Russia • http://www.zyxel.ru Slovakia • ZyXEL Communications Czech s.r.o. organizacna zlozka • http://www.zyxel.sk Spain • ZyXEL Communications ES Ltd • http://www.zyxel.es Sweden • ZyXEL Communications • http://www.zyxel.se Switzerland •… -
Page 92
Appendix A Customer Support • http://www.zyxel.ch/ Turkey • ZyXEL Turkey A.S. • http://www.zyxel.com.tr • ZyXEL Communications UK Ltd. • http://www.zyxel.co.uk Ukraine • ZyXEL Ukraine • http://www.ua.zyxel.com Latin America Argentina • ZyXEL Communication Corporation • http://www.zyxel.com/ec/es/ Brazil • ZyXEL Communications Brasil Ltda. -
Page 93
Appendix A Customer Support North America • ZyXEL Communications, Inc. — North America Headquarters • http://www.zyxel.com/us/en/ Oceania Australia • ZyXEL Communications Corporation • http://www.zyxel.com/au/en/ Africa South Africa • Nology (Pty) Ltd. • http://www.zyxel.co.za WRE6505 v2 User’s Guide… -
Page 94: Appendix B Setting Up Your Computer’s Ip Address
PP EN D I X Setting Up Your Computer’s IP Address Note: Your specific WRE6505 v2 may not support all of the operating systems described in this appendix. See the product specifications for more information about which operating systems are supported.
-
Page 95
Appendix B Setting Up Your Computer’s IP Address In the Control Panel, click the Network Connections icon. Right-click Local Area Connection and then select Properties. On the General tab, select Internet Protocol (TCP/IP) and then click Properties. WRE6505 v2 User’s Guide… -
Page 96
Appendix B Setting Up Your Computer’s IP Address The Internet Protocol TCP/IP Properties window opens. WRE6505 v2 User’s Guide… -
Page 97
In the Command Prompt window, type «ipconfig» and then press [ENTER]. You can also go to Start > Control Panel > Network Connections, right-click a network connection, click Status and then click the Support tab to view your IP address and connection information. WRE6505 v2 User’s Guide… -
Page 98
Windows Vista This section shows screens from Windows Vista Professional. Click Start > Control Panel. In the Control Panel, click the Network and Internet icon. Click the Network and Sharing Center icon. Click Manage network connections. WRE6505 v2 User’s Guide… -
Page 99
Right-click Local Area Connection and then select Properties. Note: During this procedure, click Continue whenever Windows displays a screen saying that it needs your permission to continue. Select Internet Protocol Version 4 (TCP/IPv4) and then select Properties. WRE6505 v2 User’s Guide… -
Page 100
Appendix B Setting Up Your Computer’s IP Address The Internet Protocol Version 4 (TCP/IPv4) Properties window opens. WRE6505 v2 User’s Guide… -
Page 101
In the Command Prompt window, type «ipconfig» and then press [ENTER]. You can also go to Start > Control Panel > Network Connections, right-click a network connection, click Status and then click the Support tab to view your IP address and connection information. WRE6505 v2 User’s Guide… -
Page 102
This section shows screens from Windows 7 Enterprise. Click Start > Control Panel. In the Control Panel, click View network status and tasks under the Network and Internet category. Click Change adapter settings. Double click Local Area Connection and then select Properties. WRE6505 v2 User’s Guide… -
Page 103
Appendix B Setting Up Your Computer’s IP Address Note: During this procedure, click Continue whenever Windows displays a screen saying that it needs your permission to continue. Select Internet Protocol Version 4 (TCP/IPv4) and then select Properties. WRE6505 v2 User’s Guide… -
Page 104
Appendix B Setting Up Your Computer’s IP Address The Internet Protocol Version 4 (TCP/IPv4) Properties window opens. WRE6505 v2 User’s Guide… -
Page 105
Click OK to close the Local Area Connection Properties window. Verifying Settings Click Start > All Programs > Accessories > Command Prompt. In the Command Prompt window, type «ipconfig» and then press [ENTER]. The IP settings are displayed as follows. WRE6505 v2 User’s Guide… -
Page 106
Mac OS X: 10.3 and 10.4 The screens in this section are from Mac OS X 10.4 but can also apply to 10.3. Click Apple > System Preferences. In the System Preferences window, click the Network icon. WRE6505 v2 User’s Guide… -
Page 107
Appendix B Setting Up Your Computer’s IP Address When the Network preferences pane opens, select Built-in Ethernet from the network connection type list, and then click Configure. For dynamically assigned settings, select Using DHCP from the Configure IPv4 list in the TCP/IP tab. WRE6505 v2 User’s Guide… -
Page 108
• In the Router field, type the IP address of your device. Click Apply Now and close the window. Verifying Settings Check your TCP/IP properties by clicking Applications > Utilities > Network Utilities, and then selecting the appropriate Network Interface from the Info tab. WRE6505 v2 User’s Guide… -
Page 109
Figure 61 Mac OS X 10.4: Network Utility Mac OS X: 10.5 and 10.6 The screens in this section are from Mac OS X 10.5 but can also apply to 10.6. Click Apple > System Preferences. In System Preferences, click the Network icon. WRE6505 v2 User’s Guide… -
Page 110
From the Configure list, select Using DHCP for dynamically assigned settings. For statically assigned settings, do the following: • From the Configure list, select Manually. • In the IP Address field, enter your IP address. WRE6505 v2 User’s Guide… -
Page 111
Appendix B Setting Up Your Computer’s IP Address • In the Subnet Mask field, enter your subnet mask. • In the Router field, enter the IP address of your WRE6505 v2. Click Apply and close the window. Verifying Settings Check your TCP/IP properties by clicking Applications > Utilities > Network Utilities, and then selecting the appropriate Network interface from the Info tab. -
Page 112
When the Network Settings window opens, click Unlock to open the Authenticate window. (By default, the Unlock button is greyed out until clicked.) You cannot make changes to your configuration unless you first enter your admin password. WRE6505 v2 User’s Guide… -
Page 113
Appendix B Setting Up Your Computer’s IP Address In the Authenticate window, enter your admin account name and password then click the Authenticate button. In the Network Settings window, select the connection that you want to configure, then click Properties. WRE6505 v2 User’s Guide… -
Page 114
Click OK to save the changes and close the Properties dialog box and return to the Network Settings screen. If you know your DNS server IP address(es), click the DNS tab in the Network Settings window and then enter the DNS server information in the fields provided. WRE6505 v2 User’s Guide… -
Page 115
Verifying Settings Check your TCP/IP properties by clicking System > Administration > Network Tools, and then selecting the appropriate Network device from the Devices tab. The Interface Statistics column shows data if your connection is working properly. WRE6505 v2 User’s Guide… -
Page 116
The following screens use the default openSUSE 10.3 installation. Note: Make sure you are logged in as the root administrator. Follow the steps below to configure your computer IP address in the KDE: Click K Menu > Computer > Administrator Settings (YaST). WRE6505 v2 User’s Guide… -
Page 117
Appendix B Setting Up Your Computer’s IP Address When the Run as Root — KDE su dialog opens, enter the admin password and click OK. When the YaST Control Center window opens, select Network Devices and then click the Network Card icon. WRE6505 v2 User’s Guide… -
Page 118
Appendix B Setting Up Your Computer’s IP Address When the Network Settings window opens, click the Overview tab, select the appropriate connection Name from the list, and then click the Configure button. When the Network Card Setup window opens, click the Address tab WRE6505 v2 User’s Guide… -
Page 119
Click Next to save the changes and close the Network Card Setup window. If you know your DNS server IP address(es), click the Hostname/DNS tab in Network Settings and then enter the DNS server information in the fields provided. WRE6505 v2 User’s Guide… -
Page 120
Click the KNetwork Manager icon on the Task bar to check your TCP/IP properties. From the Options sub-menu, select Show Connection Information. Figure 65 openSUSE 10.3: KNetwork Manager When the Connection Status — KNetwork Manager window opens, click the Statistics tab to see if your connection is working properly. WRE6505 v2 User’s Guide… -
Page 121
Appendix B Setting Up Your Computer’s IP Address Figure 66 openSUSE: Connection Status — KNetwork Manager WRE6505 v2 User’s Guide… -
Page 122: Appendix C Legal Information
The contents of this publication may not be reproduced in any part or as a whole, transcribed, stored in a retrieval system, translated into any language, or transmitted in any form or by any means, electronic, mechanical, magnetic, optical, chemical, photocopying, manual, or otherwise, without the prior written permission of ZyXEL Communications Corporation. Published by ZyXEL Communications Corporation. All rights reserved.
-
Page 123: European Union
ZyXEL tímto prohlašuje, že tento zařízení je ve shodě se základními požadavky a dalšími příslušnými ustanoveními (Czech) směrnice 1999/5/EC. Dansk (Danish) Undertegnede ZyXEL erklærer herved, at følgende udstyr udstyr overholder de væsentlige krav og øvrige relevante krav i direktiv 1999/5/EF. WRE6505 v2 User’s Guide…
-
Page 124
Les liaisons sans fil pour une utilisation en extérieur d’une distance supérieure à 300 mètres doivent être notifiées à l’Institut Belge des services Postaux et des Télécommunications (IBPT). Visitez http://www.ibpt.be pour de plus amples détails. Denmark WRE6505 v2 User’s Guide… -
Page 125: Safety Warnings
For detailed information about recycling of this product, please contact your local city office, your household waste disposal service or the store where you purchased the product. WRE6505 v2 User’s Guide…
-
Page 126
återvinningsstation. Vid tiden för kasseringen bidrar du till en bättre miljö och mänsklig hälsa genom att göra dig av med den på ett återvinningsställe. WRE6505 v2 User’s Guide… -
Page 127
Appendix C Legal Information Environmental Product Declaration WRE6505 v2 User’s Guide… -
Page 128
Various symbols are used in this product to ensure correct usage, to prevent danger to the user and others, and to prevent property damage. The meaning of these symbols are described below. It is important that you read these descriptions thoroughly and fully understand the contents. WRE6505 v2 User’s Guide… -
Page 129
This product contains in part some free software distributed under GPL license terms and/or GPL like licenses. Open source licenses are provided with the firmware package. You can download the latest firmware at www.zyxel.com. To obtain the source code covered under those Licenses, please contact support@zyxel.com.tw to get it. WRE6505 v2 User’s Guide… -
Page 130: Index
HTTP viewing firmware version 23, 29 channel 24, 29, 30 configuration backup reset factory defaults restore general connection guide quick start contact information copyright CPU usage 24, 30 customer support Internet connection IP Address Daylight saving WRE6505 v2 User’s Guide…
-
Page 131
25, 31 wireless LAN normal mode security 38, 39 38, 40 service set identification operating service set identity. see SSID. mode speed boost mode operating mode SSID 24, 29, 30, 49, 58 changing subnet mask WRE6505 v2 User’s Guide… -
Page 132
WEP Encryption 53, 55, 57 WEP encryption WEP key wireless channel wireless LAN wireless network basic guidelines encryption security SSID wireless security overview troubleshooting type wireless tutorial wizard setup behavior screen WPS button 11, 18 WRE6505 v2 User’s Guide…
Перед вами файл pdf, где представлена инструкция (руководство) на русском для ZYXEL WRE6505 v2. Вы можете скачать ее либо изучить в онлайн режиме.
Подробные сведения об инструкции:
Устройство из раздела: маршрутизатор
Бренд-производитель: ZYXEL
Наименование модели: ZYXEL WRE6505 v2
Язык: Руководство на русском языке
Файл: pdf
Размер файла: 5,10 MB

Скачать инструкцию к HARPER HDT2-1110
ЗАГРУЗИТЬ
Просмотр инструкции онлайн

Ликвидация мертвых зон Wi-Fi с репитером Zyxel WRE6505v2
Видео
Компактный стильный дизайн, который хорошо впишется в интерьер вашего дома
Репитер беспроводной сети Zyxel WRE6505v2 прекрасно впишется в интерьер вашего дома. По размерам это устройство не больше чайной чашки, и его можно вставить в любую электрическую розетку. Если вас отвлекает мигание его светодиодов в темноте, то их можно отключить, три раза нажав кнопку WPS.

Высокоскоростная сеть Wi-Fi без мертвых зон
С помощью Zyxel WRE6505v2 вы сможете легко ликвидировать все мертвые зоны в вашем доме. Для этого нужно только вставить повторитель в электрическую розетку, нажать на нем кнопку WPS, потом нажать такую же кнопку на маршрутизаторе, после чего репитер скопирует все настройки вашей сети Wi-Fi и начнет передавать сигнал беспроводной сети на мобильные устройства, которые находятся вне зоны покрытия маршрутизатора.
Три режима расширения беспроводной сети
Используя WRE6505v2, вы сможете расширить свою сеть Wi-Fi так, как вам это удобно. Можно выбрать режим Normal для расширения покрытия как для 2.4 ГГц, так и для 5 ГГц, режим Range для расширения покрытия только в диапазоне 2.4 ГГц, либо режим Speed для расширения только в диапазоне 5 ГГц.
Индикация мощности сигнала помогает выбрать оптимальное место для репитера
Светодиодные индикаторы WRE6505v2 помогут выбрать место для установки репитера, где он обеспечивает наилучшее покрытие вашего дома. Они отображают мощность сигнала для каждого из двух частотных диапазонов по отдельности.

Возможность отключения светодиодов
Вам мешает мигание светодиодов? Тогда отключите их, трижды нажав кнопку WPS на репитере WRE6505v2.

Есть вопросы?
Мы всегда готовы помочь!
Контакты
инструкцияZyXEL WRE6505 v2

Quick Start Guide
www.zyxel.com
WRE6505 v2
Wireless AC750 Range Extender
Version 1.00
Edition 1, 10/2016
Copyright © 2016 ZyXEL Communications Corporation
User’s Guide
Default Login Details
Web Address
http://zyxelsetup
http://DHCP-assigned IP
http://192.168.1.2
Password 1234
Посмотреть инструкция для ZyXEL WRE6505 v2 бесплатно. Руководство относится к категории wi-fi ретрансляторы, 1 человек(а) дали ему среднюю оценку 8.5. Руководство доступно на следующих языках: английский. У вас есть вопрос о ZyXEL WRE6505 v2 или вам нужна помощь? Задайте свой вопрос здесь
- WRE6505 v2
- User’s Guide
- Technical Reference
Главная
| ZyXEL | |
| WRE6505 v2 | WRE6505V2-EU0101F | |
| wi-fi ретранслятор | |
| 4718937591619 | |
| английский | |
| Руководство пользователя (PDF), Краткое руководство пользователя (PDF), Техническая спецификация (PDF) |
Производительность
| Тип | Сетевой передатчик и приемник |
| Скорость передачи данных | 433 Мбит/с |
| Максимальное расстояние передачи | — m |
| WPS кнопки | Да |
| Обновляемое встроенное ПО | Да |
| Скорость передачи данных Ethernet LAN | 10, 100 Мбит/с |
Дизайн
| Цвет товара | Белый |
| Светодиодные индикаторы | Power, WPS |
| Сертификация | CE LVD, CE, FCC |
| Тип крепления | Стена |
Сеть
| Wi-Fi стандартов | 802.11a, Wi-Fi 5 (802.11ac), 802.11b, 802.11g, Wi-Fi 4 (802.11n) |
| Алгоритмы шифрования данных | WPS |
| Wi-Fi диапазоны | Двухдиапазонный (2,4Ггц/5Ггц) |
| Свивка кабеля | 10/100Base-T(X) |
| Wi-Fi | Да |
| Автоматический выбор канала | Да |
Порты и интерфейсы
| Количество портов Ethernet LAN ( RJ-45) | 1 |
Энергопитание
| Входящее напряжение сети | 100-240 V |
| Частота входящего переменного тока | 50 — 60 Hz |
Вес и размеры
| Вес | 88.6 g |
| Ширина | 54.8 mm |
| Глубина | 45.2 mm |
| Высота | 77.8 mm |
Данные об упаковке
| Ширина упаковки | 138 mm |
| Глубина упаковки | 122 mm |
| Высота упаковки | 95 mm |
| Масса брутто | 243 g |
Условия эксплуатации
| Диапазон температур при эксплуатации | 0 — 40 °C |
| Диапазон температур при хранении | -30 — 70 °C |
| Диапазон относительной влажности при эксплуатации | 10 — 90 % |
| Диапазон относительной влажности при хранении | 10 — 95 % |
Содержимое упаковки
| Краткая инструкция пользователя | Да |
| Поставляемые кабели | LAN (RJ-45) |
Логистические данные
| Код гармонизированной системы описания (HS) | 85176990 |
показать больше
Не можете найти ответ на свой вопрос в руководстве? Вы можете найти ответ на свой вопрос ниже, в разделе часто задаваемых вопросов о ZyXEL WRE6505 v2.
Какой вес ZyXEL WRE6505 v2?
В чем разница между роутером и модемом?
От чего зависит скорость загрузки в Интернете?
Вредно ли Wi-Fi-излучение?
Какие сертификаты ZyXEL WRE6505 v2 имеет?
Какая высота ZyXEL WRE6505 v2?
Какая ширина ZyXEL WRE6505 v2?
Какая толщина ZyXEL WRE6505 v2?
Инструкция ZyXEL WRE6505 v2 доступно в русский?
Не нашли свой вопрос? Задайте свой вопрос здесь
![]()
WRE6505 v2
Wireless AC750 Range Extender
Version 1.00
Edition 1, 10/2016
Quick Start Guide
User’s Guide
Default Login Details
|
Web Address |
http://zyxelsetup |
|
http://DHCP-assigned IP |
|
|
http://192.168.1.2 |
|
|
www.zyxel.com |
|
|
Password |
1234 |
Copyright © 2016 ZyXEL Communications Corporation

IMPORTANT!
READ CAREFULLY BEFORE USE.
KEEP THIS GUIDE FOR FUTURE REFERENCE.
Related Documentation
•Quick Start Guide
The Quick Start Guide shows how to connect the WRE6505 v2 and access the Web Configurator wizards.
•More Information
Go to support.zyxel.com to find other information on the WRE6505 v2.
WRE6505 v2 User’s Guide
2

|
Contents Overview |
|
|
Contents Overview |
|
|
User’s Guide ……………………………………………………………………………………………………………………….. |
8 |
|
Introduction …………………………………………………………………………………………………………………………….. |
9 |
|
The Web Configurator …………………………………………………………………………………………………………….. |
13 |
|
WRE6505 v2 Modes ………………………………………………………………………………………………………………. |
19 |
|
Repeater Mode ……………………………………………………………………………………………………………………… |
21 |
|
Access Point Mode ………………………………………………………………………………………………………………… |
27 |
|
eaZy123 Wizard Setup ……………………………………………………………………………………………………………. |
33 |
|
Tutorials ……………………………………………………………………………………………………………………………….. |
38 |
|
Technical Reference ………………………………………………………………………………………………………….. |
46 |
|
Monitor …………………………………………………………………………………………………………………………………. |
47 |
|
Wireless LAN ………………………………………………………………………………………………………………………… |
49 |
|
LAN ……………………………………………………………………………………………………………………………………… |
66 |
|
One Connect …………………………………………………………………………………………………………………………. |
68 |
|
Maintenance ………………………………………………………………………………………………………………………….. |
70 |
|
Troubleshooting …………………………………………………………………………………………………………………….. |
83 |
WRE6505 v2 User’s Guide
3

|
Table of Contents |
||
|
Table of Contents |
||
|
Contents Overview ……………………………………………………………………………………………………………… |
3 |
|
|
Table of Contents ………………………………………………………………………………………………………………… |
4 |
|
|
Part I: User’s Guide ………………………………………………………………………………. |
8 |
|
|
Chapter |
1 |
|
|
Introduction…………………………………………………………………………………………………………………………. |
9 |
|
|
1.1 |
Overview …………………………………………………………………………………………………………………………… |
9 |
|
1.2 |
Securing the WRE6505 v2 …………………………………………………………………………………………………. |
10 |
|
1.3 |
Front Panel ………………………………………………………………………………………………………………………. |
10 |
|
1.4 |
WPS Button ……………………………………………………………………………………………………………………… |
11 |
|
1.4.1 Wi-Fi Protected Setup ………………………………………………………………………………………………. |
12 |
|
|
Chapter |
2 |
|
|
The Web Configurator ………………………………………………………………………………………………………… |
13 |
|
|
2.1 |
Overview …………………………………………………………………………………………………………………………. |
13 |
|
2.2 |
Accessing the Web Configurator …………………………………………………………………………………………. |
13 |
|
2.2.1 Login Screen …………………………………………………………………………………………………………… |
13 |
|
|
2.2.2 Password Screen …………………………………………………………………………………………………….. |
14 |
|
|
2.2.3 Home Screen …………………………………………………………………………………………………………… |
15 |
|
|
2.3 |
Navigating the Web Configurator ………………………………………………………………………………………… |
16 |
|
2.3.1 Title Bar ………………………………………………………………………………………………………………….. |
17 |
|
|
2.3.2 Navigation Panel ……………………………………………………………………………………………………… |
18 |
|
|
2.4 |
Resetting the WRE6505 v2 ………………………………………………………………………………………………… |
18 |
|
Chapter |
3 |
|
|
WRE6505 v2 Modes ……………………………………………………………………………………………………………. |
19 |
|
|
3.1 |
Overview …………………………………………………………………………………………………………………………. |
19 |
|
3.1.1 Device Modes ………………………………………………………………………………………………………….. |
19 |
|
|
Chapter |
4 |
|
|
Repeater Mode …………………………………………………………………………………………………………………… |
21 |
|
|
4.1 |
Overview …………………………………………………………………………………………………………………………. |
21 |
|
4.2 What You Can Do …………………………………………………………………………………………………………….. |
21 |
|
|
4.3 |
What You Need to Know ……………………………………………………………………………………………………. |
21 |
|
4.3.1 Setting your WRE6505 v2 to Repeater Mode ………………………………………………………………. |
22 |
|
|
4.3.2 Configuring your WLAN, LAN and Maintenance Settings ………………………………………………. |
22 |
WRE6505 v2 User’s Guide
4

|
Table of Contents |
||
|
4.4 |
Repeater Mode Status Screen ……………………………………………………………………………………………. |
22 |
|
4.5 |
Configuration Menus …………………………………………………………………………………………………………. |
25 |
|
Chapter |
5 |
|
|
Access Point Mode…………………………………………………………………………………………………………….. |
27 |
|
|
5.1 |
Overview …………………………………………………………………………………………………………………………. |
27 |
|
5.2 What You Can Do …………………………………………………………………………………………………………….. |
27 |
|
|
5.3 |
What You Need to Know ……………………………………………………………………………………………………. |
28 |
|
5.3.1 Setting your WRE6505 v2 to AP Mode ……………………………………………………………………….. |
28 |
|
|
5.3.2 Configuring your WLAN, LAN and Maintenance Settings ………………………………………………. |
28 |
|
|
5.4 |
AP Mode Status Screen …………………………………………………………………………………………………….. |
28 |
|
5.5 |
Configuration Menus …………………………………………………………………………………………………………. |
31 |
|
Chapter |
6 |
|
|
eaZy123 Wizard Setup………………………………………………………………………………………………………… |
33 |
|
|
6.1 |
Overview …………………………………………………………………………………………………………………………. |
33 |
|
6.2 |
Accessing the Wizard ………………………………………………………………………………………………………… |
33 |
|
6.3 |
Using the Wizard ………………………………………………………………………………………………………………. |
33 |
|
6.3.1 Repeater Mode ………………………………………………………………………………………………………… |
33 |
|
|
6.3.2 AP Mode …………………………………………………………………………………………………………………. |
36 |
|
|
Chapter |
7 |
|
|
Tutorials…………………………………………………………………………………………………………………………….. |
38 |
|
|
7.1 |
Overview …………………………………………………………………………………………………………………………. |
38 |
|
7.2 |
Connecting to the Internet from an Access Point …………………………………………………………………… |
38 |
|
7.3 |
Connecting to a Wireless Network Using WPS ……………………………………………………………………… |
38 |
|
7.3.1 Push Button Configuration (PBC) ……………………………………………………………………………….. |
39 |
|
|
7.3.2 PIN Configuration …………………………………………………………………………………………………….. |
40 |
|
|
7.4 |
Connecting the WRE6505 v2 (in Repeater mode) to an AP ……………………………………………………. |
41 |
|
7.4.1 Selecting an AP from an Automatically Detected List ……………………………………………………. |
42 |
|
|
7.4.2 Selecting an AP by Manually Entering Security Information …………………………………………… |
43 |
|
Part II: Technical Reference…………………………………………………………………. |
46 |
|
Chapter 8 |
|
|
Monitor………………………………………………………………………………………………………………………………. |
47 |
|
8.1 Overview …………………………………………………………………………………………………………………………. |
47 |
|
8.2 What You Can Do …………………………………………………………………………………………………………….. |
47 |
|
8.3 Packet Statistics Screen ………………………………………………………………………………………………….. |
47 |
|
Chapter 9 |
|
|
Wireless LAN……………………………………………………………………………………………………………………… |
49 |
WRE6505 v2 User’s Guide
5

|
Table of Contents |
|||
|
9.1 Overview …………………………………………………………………………………………………………………………. |
49 |
||
|
9.2 What You Can Do …………………………………………………………………………………………………………….. |
49 |
||
|
9.3 What You Should Know …………………………………………………………………………………………………….. |
49 |
||
|
9.3.1 Wireless Security Overview ……………………………………………………………………………………….. |
50 |
||
|
9.4 General Wireless LAN Screen ……………………………………………………………………………………………. |
51 |
||
|
9.5 Wireless Security ……………………………………………………………………………………………………………… |
54 |
||
|
9.5.1 No Security ……………………………………………………………………………………………………………… |
54 |
||
|
9.5.2 WEP Encryption ………………………………………………………………………………………………………. |
54 |
||
|
9.5.3 WPA-PSK/WPA2-PSK ………………………………………………………………………………………………. |
56 |
||
|
9.6 AP Select Screen ……………………………………………………………………………………………………………… |
57 |
||
|
9.7 MAC Filter ……………………………………………………………………………………………………………………….. |
60 |
||
|
9.8 Wireless LAN Advanced Screen …………………………………………………………………………………………. |
61 |
||
|
9.9 Quality of Service (QoS) Screen …………………………………………………………………………………………. |
62 |
||
|
9.10 WPS Screen …………………………………………………………………………………………………………………… |
62 |
||
|
9.11 WPS Device Screen ………………………………………………………………………………………………………… |
63 |
||
|
9.12 |
Scheduling Screen ………………………………………………………………………………………………………….. |
64 |
|
|
Chapter |
10 |
||
|
LAN …………………………………………………………………………………………………………………………………… |
66 |
||
|
10.1 |
Overview ……………………………………………………………………………………………………………………….. |
66 |
|
|
10.2 |
LAN IP Screen ……………………………………………………………………………………………………………….. |
66 |
|
|
Chapter |
11 |
||
|
One Connect ……………………………………………………………………………………………………………………… |
68 |
||
|
11.1 Overview ……………………………………………………………………………………………………………………….. |
68 |
||
|
11.1.1 What You Can Do …………………………………………………………………………………………………… |
68 |
||
|
11.2 One Connect Screen ……………………………………………………………………………………………………….. |
68 |
||
|
Chapter |
12 |
||
|
Maintenance ………………………………………………………………………………………………………………………. |
70 |
||
|
12.1 |
Overview ……………………………………………………………………………………………………………………….. |
70 |
|
|
12.2 What You Can Do …………………………………………………………………………………………………………… |
70 |
||
|
12.3 |
General …………………………………………………………………………………………………………………………. |
70 |
|
|
12.4 |
System Password Screen ……………………………………………………………………………………………….. |
71 |
|
|
12.5 |
Time Screen …………………………………………………………………………………………………………………… |
71 |
|
|
12.6 |
Firmware Upgrade Screen ……………………………………………………………………………………………….. |
73 |
|
|
12.7 |
Backup / Restore Screen …………………………………………………………………………………………………. |
75 |
|
|
12.7.1 Backup Configuration ……………………………………………………………………………………………… |
76 |
||
|
12.7.2 Restore Configuration ……………………………………………………………………………………………… |
76 |
||
|
12.7.3 Back to Factory Defaults …………………………………………………………………………………………. |
77 |
||
|
12.8 |
Restart Screen ……………………………………………………………………………………………………………….. |
77 |
|
|
12.9 System Mode …………………………………………………………………………………………………………………. |
78 |
||
|
12.9.1 System WPS Behavior ……………………………………………………………………………………………. |
79 |
WRE6505 v2 User’s Guide
6

Table of Contents
|
Chapter 13 |
||
|
Troubleshooting…………………………………………………………………………………………………………………. |
83 |
|
|
13.1 |
Power, Hardware Connections, and LEDs ………………………………………………………………………….. |
83 |
|
13.2 |
WRE6505 v2 Access and Login ………………………………………………………………………………………… |
84 |
|
13.3 |
Internet Access ………………………………………………………………………………………………………………. |
85 |
|
13.4 |
Resetting the WRE6505 v2 to Its Factory Defaults ………………………………………………………………. |
86 |
|
13.5 |
Wireless Problems ………………………………………………………………………………………………………….. |
86 |
|
Appendix |
A |
Customer Support ……………………………………………………………………………………………. |
88 |
|
Appendix |
B |
Setting Up Your Computer’s IP Address ……………………………………………………………… |
94 |
|
Appendix |
C Legal Information …………………………………………………………………………………………… |
122 |
|
|
Index ……………………………………………………………………………………………………………………………….. |
130 |
WRE6505 v2 User’s Guide
7

8
1
Introduction
1.1 Overview
The WRE6505 v2 allows you to easily extend existing IEEE 802.11 b/g/n/ac wireless networks fast and easy. Simply plug the WRE6505 v2 directly into a power outlet and the LED signal strength indicator allows you to determine the ideal installation location. The one-click Wi-Fi Protected Setup (WPS Button on page 11) provides frustration-free wireless client setup and completes the instant network access setup.
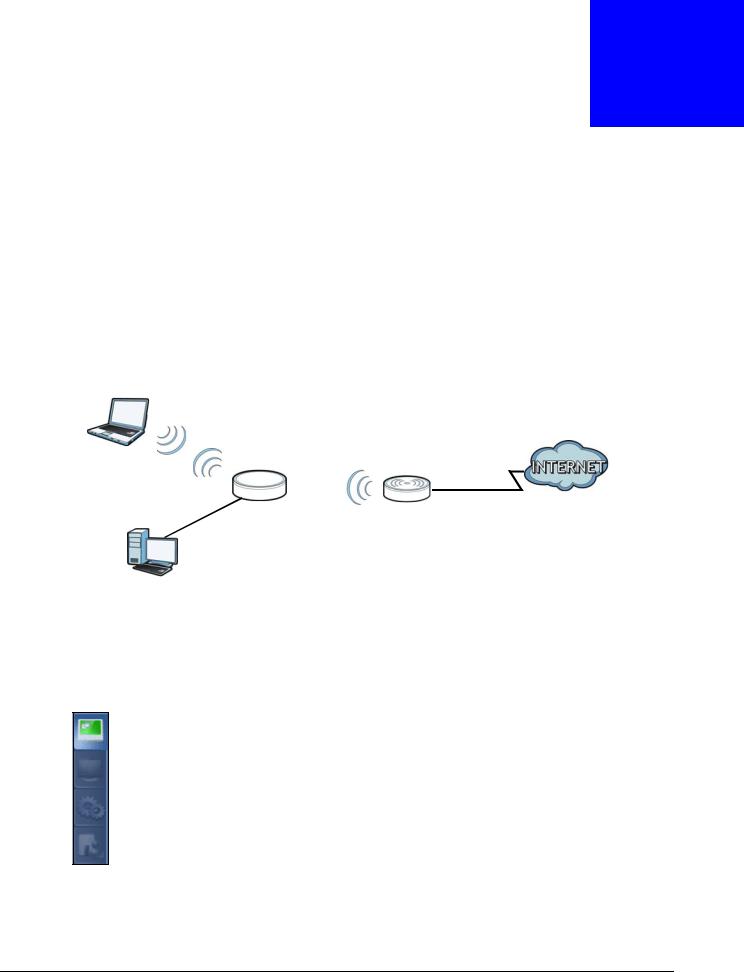
Figure 1 Universal Repeater
WLAN
AP
N
Your can create the following connections using the WRE6505 v2:
•LAN. You can connect network devices via the Ethernet port of the WRE6505 v2 so that they can communicate with each other and access the Internet.
•WLAN. Wireless clients can connect to the WRE6505 v2 to access network resources.
Use a (supported) web browser to manage the WRE6505 v2.
See Chapter 7 on page 38 for more information.
WRE6505 v2 User’s Guide
9
Chapter 1 Introduction
1.2 Securing the WRE6505 v2
Do the following things regularly to make the WRE6505 v2 more secure and to manage the WRE6505 v2 more effectively.
•Change the password. Use a password that’s not easy to guess and that consists of different types of characters, such as numbers and letters.
•Write down the password and put it in a safe place.
•Back up the configuration (and make sure you know how to restore it). Restoring an earlier working configuration may be useful if the device becomes unstable or even crashes. If you forget your password, you will have to reset the WRE6505 v2 to its factory default settings. If you backed up an earlier configuration file, you would not have to totally re-configure the WRE6505 v2. You could simply restore your last configuration.
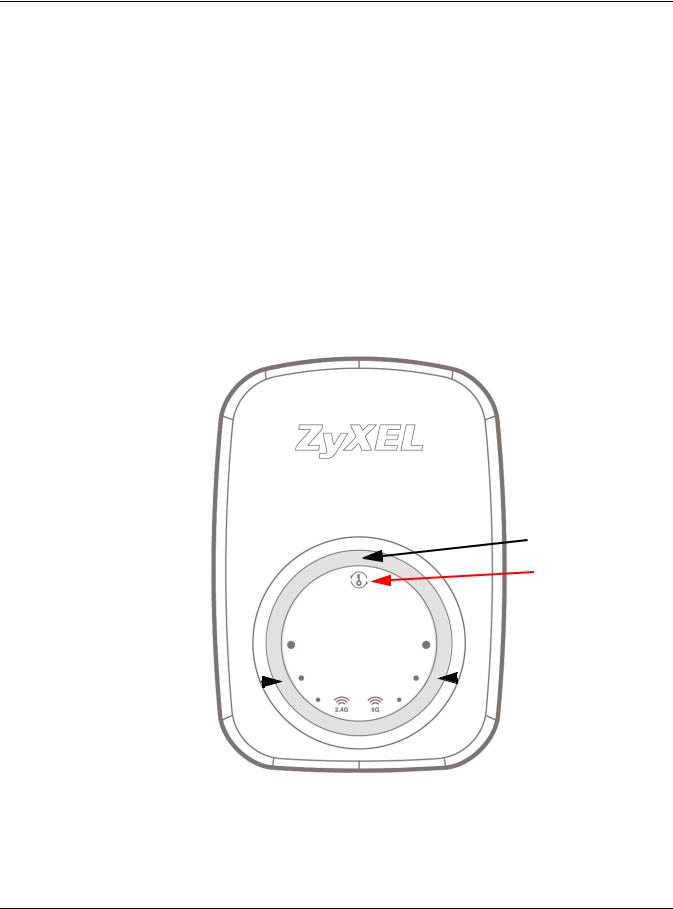
1.3Front Panel
Figure 2 Front Panel
 Power/WPS LED
 WPS Button
2.4 GHz Signal
Strength LEDs 
 5 GHz Signal
Strength LEDs
WRE6505 v2 User’s Guide
10
![]()
Chapter 1 Introduction
The following table describes the LEDs.
Table 1 Front Panel LEDs
|
LED |
COLOR |
STATUS |
DESCRIPTION |
|
Power/WPS |
Blue |
On |
The WRE6505 v2 is receiving power and functioning properly. |
|
Blinking |
The WRE6505 v2 is booting, resetting to factory defaults, the |
||
|
WRE6505 v2 is waiting for another WPS device to connect, or |
|||
|
firmware upgrade is in progress. |
|||
|
Off |
The WRE6505 v2 is not receiving power, or there is no WPS |
||
|
connection established. |
|||
|
2.4 GHz Signal |
White |
On |
The more the LEDs are on the better the Wi-Fi signal strength. |
|
Strength |
• Three LEDs: signifies a signal strength of 51% ~ 100% |
||
|
• Two LEDs: signifies a signal strength of 20% ~ 50% |
|||
|
• One LED: signifies a signal strength under 20% |
|||
|
Blinking |
Firmware upgrade is in progress. |
||
|
Off |
The 2.4 GHz wireless LAN is not enabled, there is no signal |
||
|
detected or the WRE6505 v2 (repeater mode) is not connected |
|||
|
to a wireless router/AP, or the LEDs are turned off using the |
|||
|
WPS button. |
|||
|
5 GHz Signal |
White |
On |
The more the LEDs are on the better the Wi-Fi signal strength. |
|
Strength |
• Three LEDs: signifies a signal strength of 51% ~ 100% |
||
|
• Two LEDs: signifies a signal strength of 20% ~ 50% |
|||
|
• One LED: signifies a signal strength under 20% |
|||
|
Blinking |
Firmware upgrade is in progress. |
||
|
Off |
The 5 GHz wireless LAN is not enabled, there is no signal |
||
|
detected or the WRE6505 v2 (repeater mode) is not connected |
|||
|
to a wireless router/AP, or the LEDs are turned off using the |
|||
|
WPS button. |
|||
1.4 WPS Button
The WPS button can be used to begin Wi-Fi Protected Setup (WPS), reboot the WRE6505 v2 while keeping it’s configuration or reboot the WRE6505 v2 to factory default configuration.
Table 2 WPS Button Functions
|
ACTION |
RESULT |
|
|
Press thress times within |
Turn off or turn on all LEDs. |
|
|
5 seconds |
||
|
AP Mode |
||
|
Push twice within 5 |
The WRE6505 v2 begins connecting to a wireless client via WPS. See Section 1.4.1 |
|
|
seconds |
on page 12. |
|
|
Hold for 5 to 10 seconds |
The WRE6505 v2 keeps its configuration and reboots. |
|
|
Hold for more than 10 |
The WRE6505 v2 resets its configuration to factory defaults and reboots. See |
|
|
seconds |
Section 2.4 on page 18. |
|
|
Repeater Mode |
||
|
Push twice within 5 |
The WRE6505 v2 begins connecting to a wireless client via WPS. See Section 1.4.1 |
|
|
seconds |
on page 12. |
|
|
WRE6505 v2 User’s Guide |
11

|
Chapter 1 Introduction |
||
|
Table 2 WPS Button Functions |
||
|
ACTION |
RESULT |
|
|
Hold for 5 to 10 seconds |
he WRE6505 v2 keeps its configuration and reboots. |
|
|
Hold for more than 10 |
TThe WRE6505 v2 resets its configuration to factory defaults and reboots. See |
|
|
seconds |
Section 2.4 on page 18. |
|
1.4.1 Wi-Fi Protected Setup
Your WRE6505 v2 supports Wi-Fi Protected Setup (WPS), which is an easy way to set up a secure wireless network. WPS is an industry standard specification, defined by the Wi-Fi Alliance.
WPS allows you to quickly set up a wireless network with strong security, without having to configure security settings manually. Each WPS connection works between two devices. Both devices must support WPS (check each device’s documentation to make sure).
Depending on the devices you have, you can either press a button (recommended) on the device itself, or in its configuration utility or enter a PIN (a unique Personal Identification Number that allows one device to authenticate the other) in each of the two devices. When WPS is activated on a device, it has two minutes to find another device that also has WPS activated. Then, the two devices connect and set up a secure network by themselves.
For more information on using WPS, see Section 7.3 on page 38.
WRE6505 v2 User’s Guide
12

2
The Web Configurator
2.1 Overview
This chapter describes how to access the WRE6505 v2 Web Configurator and provides an overview of its screens.
The Web Configurator is an HTML-based management interface that allows easy setup and management of the WRE6505 v2 via Internet browser. Use Internet Explorer 6.0 and later versions, Mozilla Firefox 3 and later versions, or Safari 2.0 and later versions. The recommended screen resolution is 1024 by 768 pixels.
In order to use the Web Configurator you need to allow:
•Web browser pop-up windows from your device.
•JavaScript (enabled by default).
•Java permissions (enabled by default).
Refer to Chapter 13 Troubleshooting to see how to make sure these functions are allowed in Internet Explorer.
2.2Accessing the Web Configurator
1Make sure your WRE6505 v2 hardware is properly connected and prepare your computer or computer network to connect to the WRE6505 v2 (refer to the Quick Start Guide).
2Launch your web browser.
3Open a web browser such as Internet Explorer and type “http://zyxelsetup” or “http://192.168.1.2” as the web address in your web browser.
2.2.1 Login Screen
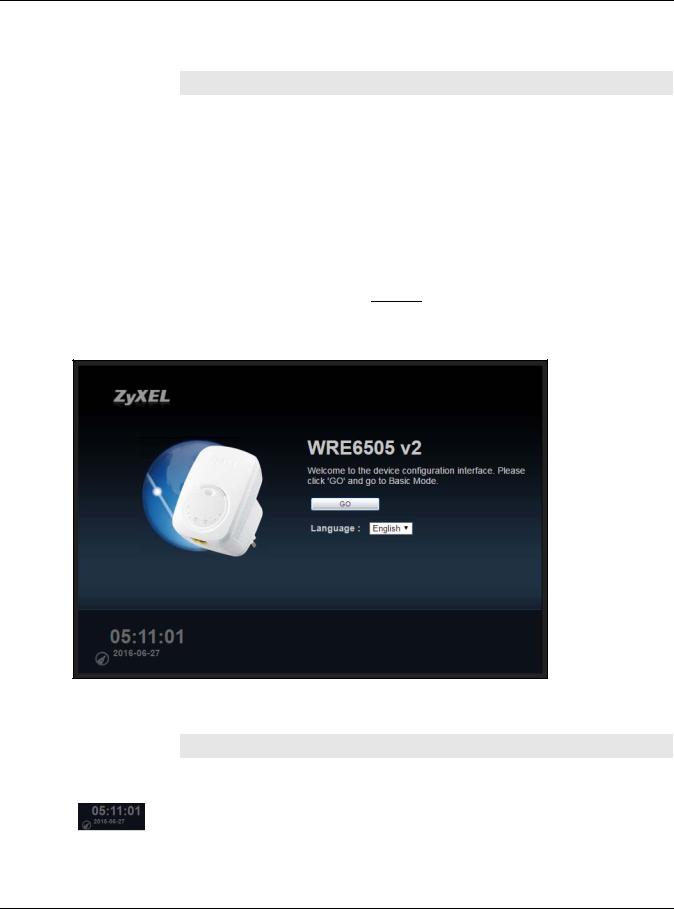
The Web Configurator initially displays the following login screen.
WRE6505 v2 User’s Guide
13

Chapter 2 The Web Configurator
Figure 3 Login Screen
The following table describes the labels in this screen.
Table 3 Login screen
|
LABEL |
DESCRIPTION |
|
Password |
Type «1234» (default) as the password. |
|
Language |
Select the language you want to use to configure the Web Configurator. Click Login. |
|
This shows the time (hh:mm) and date (yyyy:mm:dd) of the timezone you select in the |
|
|
Maintenance > Time screen (see Section 12.5 on page 71). The time is in 24-hour |
|
|
format, for example 15:00 is 3:00 PM. |
|
2.2.2 Password Screen
You should see a screen asking you to change your password (highly recommended) as shown next.
Figure 4 Change Password Screen
WRE6505 v2 User’s Guide
14
Chapter 2 The Web Configurator
The following table describes the labels in this screen.
Table 4 Change Password Screen
|
LABEL |
DESCRIPTION |
|
New Password |
Type a new password. |
|
Retype to Confirm |
Retype the password for confirmation. |
|
Apply |
Click Apply to save your changes back to the WRE6505 v2. |
|
Ignore |
Click Ignore if you do not want to change the password this time. |
2.2.3 Home Screen
If you have previously logged into the Web Configurator but did not click Logout, you may be redirected to the Home screen.
You can also open this screen by clicking Home (
 ) in the Web Configurator screens. The Home screen displays as follows.
Figure 5 Home Screen
The following table describes the labels in this screen.
Table 5 Home Screen
|
LABEL |
DESCRIPTION |
|
GO |
Click this to return to the previous screen. |
|
Language |
Select a language to go to the Web Configurator in that language and click GO. |
|
(This is just an example). This shows the time (hh:mm:ss) and date (yyyy:mm:dd) of the |
|
|
timezone you select in Section 2.2.3.1 on page 16 or Section 12.5 on page 71. |
|
WRE6505 v2 User’s Guide
15

Chapter 2 The Web Configurator
2.2.3.1 Time/Date Edit
One timezone can cover more than one country. You can choose a particular country in which the WRE6505 v2 is located and have the WRE6505 v2 display and use the current time and date for its logs.
Click the  icon to change the time and date display.
Figure 6 Change Time Zone
The following table describes the labels in this screen.
Table 6 Change Time Zone
|
LABEL |
DESCRIPTION |
|
Change time zone |
Select the specific country whose current time and date you want the WRE6505 v2 to |
|
display. |
|
|
Finish |
Click this to apply the settings and refresh the weather display. |
2.3 Navigating the Web Configurator
The following summarizes how to navigate the web configurator from the Status screen.
WRE6505 v2 User’s Guide
16

Chapter 2 The Web Configurator
Figure 7 The Web Configurator’s Main Screen
A
C
B
The Web Configurator’s main screen is divided into these parts:
•A — Title Bar
•B — Navigation Panel
•C — Main Window
2.3.1Title Bar
The title bar provides some useful links that always appear over the screens below, regardless of how deep into the Web Configurator you navigate.
Figure 8 Title Bar
The icons provide the following functions.
Table 7 Title Bar: Web Configurator Icons
|
LABEL |
DESCRIPTION |
|
Logout |
Click this at any time to exit the Web Configurator. |
|
Home |
Click this to open the home screen. See Section 2.2.3 on page 15. |
WRE6505 v2 User’s Guide
17
|
Chapter 2 The Web Configurator |
||
|
Table 7 Title Bar: Web Configurator Icons (continued) |
||
|
LABEL |
DESCRIPTION |
|
|
About |
Click this icon to view copyright and a link for related product information. |
|
|
eaZy123 |
Click this icon to open the wizard. See Chapter 6 on page 33. |
|
2.3.2 Navigation Panel
Use the menu items on the navigation panel to open screens to configure WRE6505 v2 features.
The following table describes the icons shown in the navigation panel.
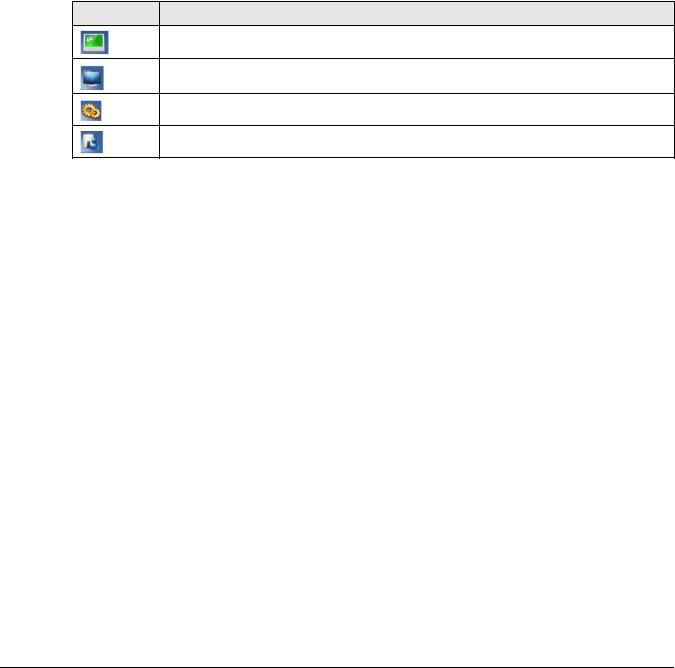
Table 8 Navigation Panel Menu Icons
ICON DESCRIPTION
Click this icon to see the Status page. The information in this screen depends on the device mode you select.
Click this icon to see the Monitor navigation menu.
Click this icon to see the Configuration navigation menu.
Click this icon to see the Maintenance navigation menu.
2.4 Resetting the WRE6505 v2
If you forget your password or IP address, or you cannot access the Web Configurator, press the WPS button for more than 10 seconds to reload the factory-default configuration file. This means that you will lose all configurations that you had previously saved, the password will be reset to
1234.
1Make sure the power LED is on.
2Press and hold the WPS button. After 10 seconds, the power LED begins flashing.
3Release the WPS button. The WRE6505 v2 reloads factory defaults and begins to reboot.
WRE6505 v2 User’s Guide
18

3
WRE6505 v2 Modes
3.1 Overview
This chapter introduces the different modes available on your WRE6505 v2.
•System mode. This is the operating mode of your WRE6505 v2, or simply how the WRE6505 v2 is being used in the network.
3.1.1Device Modes
This refers to the operating mode of the WRE6505 v2, which can act as a:
•Repeater: In this mode, the WRE6505 v2 can be an access point and a wireless client at the same time. Go to Section 4.4 on page 22 to view the Status screen in this mode. Use this mode if there is an existing wireless router or access point in your network and you also want to allow clients to connect to the WRE6505 v2 wirelessly.
•Access Point: Use this mode if you want to extend your network by allowing network devices to connect to the WRE6505 v2 wirelessly. Go to Section 5.4 on page 28 to view the Status screen in this mode.
In this mode, you can also set the WRE6505 v2 to work as an AP only, a wireless bridge to establish wireless links with other APs (WDS bridge), or an AP and bridge simultaneously (WDS repeater). See Section 5.2 on page 27 for more information.
The following figure is an illustration of the device configuration modes of the WRE6505 v2.
Figure 9 Device Mode Example
Note: Choose your device mode carefully to avoid having to change it later.
WRE6505 v2 User’s Guide
19

Chapter 3 WRE6505 v2 Modes
Under Repeater mode, the WRE6505 v2 supports three WPS behaviors: Normal mode, Range boost mode, and Speed boost mode. These behaviors are only available in Repeater mode through the
Maintenance screen.
3.1.1.1 Changing Operating Mode
The WRE6505 v2 is in repeater mode by default. To change its operating mode, access the web configurator and go to the Maintenance > System Mode screen. See Section 12.9 on page 78 for detailed information.
The WRE6505 v2 restarts automatically after you change operating modes.
WRE6505 v2 User’s Guide
20
![]()
4
Repeater Mode
4.1 Overview
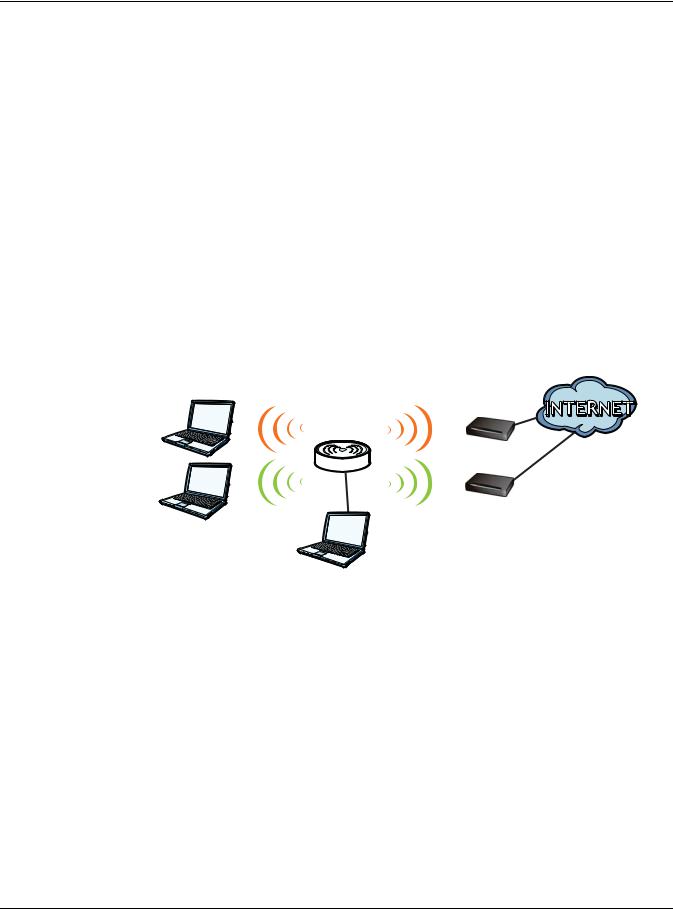
In repeater mode, your WRE6505 v2 can act as an access point and wireless client at the same time. The WRE6505 v2 can connect to an existing network through another access point and also lets wireless clients connect to the network through it. This helps you expand wireless coverage when you have an access point or wireless router already in your network.
In the example below, the WRE6505 v2 (A) is configured as a repeater. It has three clients that want to connect to the Internet. The WRE6505 v2 wirelessly connects to the available access point (B).
Figure 10 Repeater Mode
A B
After the WRE6505 v2 and the access point connect, the WRE6505 v2 acquires its IP address from the access point. The clients of the WRE6505 v2 can now surf the Internet.
4.2What You Can Do
•Use the Status screen (Section 7.1 on page 38) to view read-only information about your WRE6505 v2.
•Use the LAN screen (Chapter 10 on page 66) to set the IP address for your WRE6505 v2.
•Use the Wireless LAN > AP Select screen (Section 9.6 on page 57) to scan for available access points within transmission range and connect to an AP.
•Use other Wireless LAN screens (Section 9.4 on page 51) to configure the wireless settings and wireless security between the wireless clients and the WRE6505 v2.
4.3What You Need to Know
With the exception of the AP Select screen other configuration screens in Repeater mode are similar to the ones in Access Point Mode. See Chapter 3 on page 19 of this User’s Guide.
WRE6505 v2 User’s Guide
21
Chapter 4 Repeater Mode
4.3.1 Setting your WRE6505 v2 to Repeater Mode
1To use your WRE6505 v2 as a repeater, see Section 3.1.1.1 on page 20.
2Connect your computer to the LAN port of the WRE6505 v2.
3Open a web browser such as Internet Explorer and type “http://zyxelsetup” or “http://192.168.1.2” as the web address in your web browser.
4Enter “1234” (default) as the password and click Login.
5Type a new password and retype it to confirm, then click Apply. Otherwise, click Ignore.
Note: You have to log in to the Web Configurator again when you change modes. As soon as you do, your WRE6505 v2 is already in Repeater mode.
Note: If a client is connected to the WRE6505 v2 through the wired Ethernet connection, the client can only access the 2.4 GHz Wi-Fi. In the following figure, the LAN Client is only able to communicate with devices in the 2.4 GHz wireless network.
Figure 11 Repeater Mode Overview
|
5 GHz |
WRE |
|
2.4 GHz |
|
|
2.4 GHz |
2.4 GHz AP |
|
2.4 GHz |
|
|
LAN Client |
4.3.2Configuring your WLAN, LAN and Maintenance Settings
•See Chapter 9 on page 49 and Chapter 10 on page 66 for information on configuring your wireless network and LAN settings.
•See Chapter 12 on page 70 for information on configuring your Maintenance settings.
4.4 Repeater Mode Status Screen
Click  to open the Status screen.
WRE6505 v2 User’s Guide
22
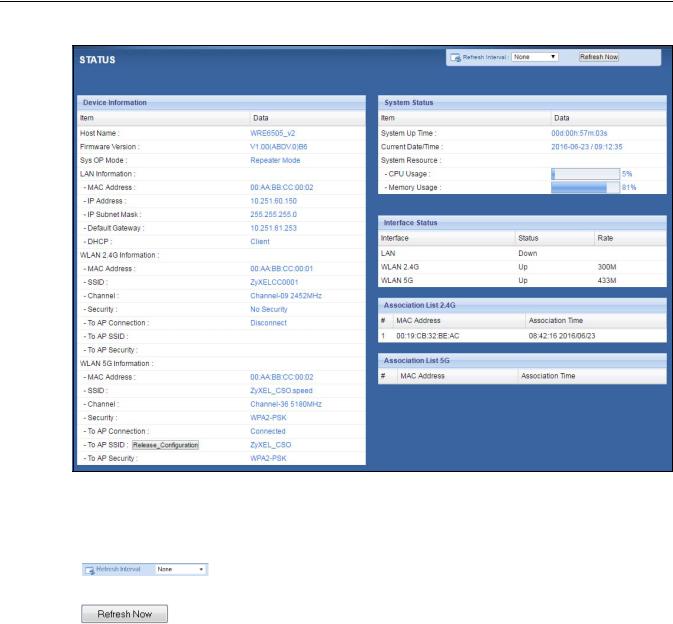
Chapter 4 Repeater Mode
Figure 12 Status: Repeater Mode
The following table describes the labels shown in the Status screen.
Table 9 Status Screen: Repeater Mode
|
LABEL |
DESCRIPTION |
|||
|
Select a number of seconds or None from the drop-down list box to refresh all |
||||
|
screen statistics automatically at the end of every time interval or to not |
||||
|
refresh the screen statistics. |
||||
|
Click this button to refresh the status screen statistics. |
||||
|
Device Information |
||||
|
Host Name |
This is the WRE6505 v2’s system name you configure in the Maintenance > |
|||
|
General screen. |
||||
|
Firmware Version |
This is the firmware version and the date created. |
|||
|
Sys OP Mode |
This is the device mode (Section 3.1.1 on page 19) to which the WRE6505 v2 |
|||
|
is set — Repeater Mode. |
||||
|
LAN Information |
||||
|
MAC Address |
This shows the LAN Ethernet adapter MAC Address of your device. |
|||
|
IP Address |
This shows the LAN port’s IP address. |
|||
|
IP Subnet Mask |
This shows the LAN port’s subnet mask. |
|||
|
Default Gateway |
This shows the LAN port’s gateway IP address. |
|||
|
DHCP |
This shows the LAN port’s DHCP role — Client or None. |
|||
|
WLAN 2.4G Information |
||||
|
MAC Address |
This shows the wireless adapter MAC Address of your WRE6505 v2. |
|||
|
WRE6505 v2 User’s Guide |
23
|
Chapter 4 Repeater Mode |
||
|
Table 9 Status Screen: Repeater Mode |
||
|
LABEL |
DESCRIPTION |
|
|
SSID |
This shows a descriptive name used to identify the WRE6505 v2 in the wireless |
|
|
LAN. |
||
|
Channel |
This shows the channel number which you select manually or the WRE6505 v2 |
|
|
automatically scans and selects. |
||
|
Security |
This shows the level of wireless security the WRE6505 v2 is using. |
|
|
To AP Connection |
This displays whether the WRE6505 v2 is connected to an AP or not. |
|
|
To AP SSID |
This displays the SSID of the connected AP. |
|
|
Click the Release_Configuration button to remove all configured wireless |
||
|
and wireless security settings for WPS connections on the WRE6505 v2. |
||
|
To AP Security |
This displays the type of established security protocol with the AP. |
|
|
WLAN 5G Information |
||
|
MAC Address |
This shows the wireless adapter MAC Address of your WRE6505 v2. |
|
|
SSID |
This shows a descriptive name used to identify the WRE6505 v2 in the wireless |
|
|
LAN. |
||
|
Channel |
This shows the channel number which you select manually or the WRE6505 v2 |
|
|
automatically scans and selects. |
||
|
Security |
This shows the level of wireless security the WRE6505 v2 is using. |
|
|
To AP Connection |
This displays whether the WRE6505 v2 is connected to an AP or not. |
|
|
To AP SSID |
This displays the SSID of the connected AP. |
|
|
Click the Release_Configuration button to remove all configured wireless |
||
|
and wireless security settings for WPS connections on the WRE6505 v2. |
||
|
To AP Security |
This displays the type of established security protocol with the WRE6505 v2. |
|
|
System Status |
||
|
Item |
This column shows the type of data the WRE6505 v2 is recording. |
|
|
Data |
This column shows the actual data recorded by the WRE6505 v2. |
|
|
System Up Time |
This is the total time the WRE6505 v2 has been on. |
|
|
Current Date/Time |
This field displays your WRE6505 v2’s present date and time. |
|
|
System Resource |
||
|
CPU Usage |
This displays what percentage of the WRE6505 v2’s processing ability is |
|
|
currently used. When this percentage is close to 100%, the WRE6505 v2 is |
||
|
running at full load, and the throughput is not going to improve anymore. If |
||
|
you want some applications to have more throughput, you should turn off |
||
|
other applications (for example, using bandwidth management. |
||
|
Memory Usage |
This shows what percentage of the heap memory the WRE6505 v2 is using. |
|
|
Interface Status |
||
|
Interface |
This displays the WRE6505 v2 port types. The port types are: LAN and WLAN. |
|
|
Status |
For the LAN port, this field displays Down (line is down) or Up (line is up or |
|
|
connected). |
||
|
For the WLAN, it displays Up when the WLAN is enabled or Down when the |
||
|
WLAN is disabled. |
||
|
Rate |
For the LAN ports, this displays the port speed and duplex setting or is left |
|
|
blank when the line is disconnected. |
||
|
For the WLAN, it displays the maximum transmission rate when the WLAN is |
||
|
enabled and is left blank when the WLAN is disabled. |
||
|
Association List 2.4G |
||
|
WRE6505 v2 User’s Guide |
24
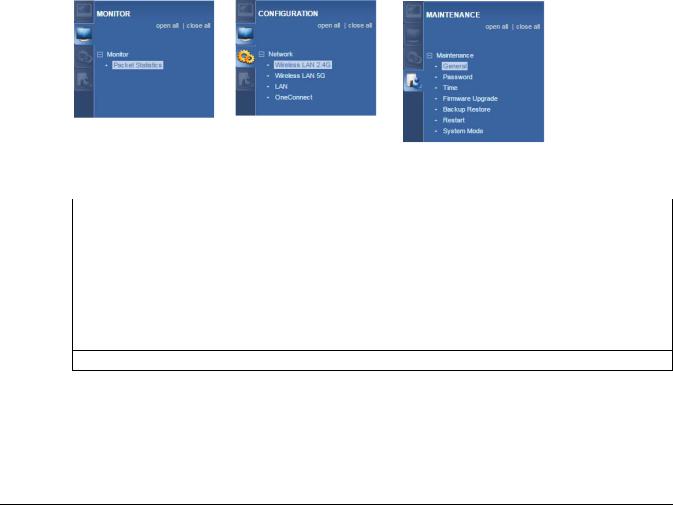
|
Chapter 4 Repeater Mode |
||
|
Table 9 Status Screen: Repeater Mode |
||
|
LABEL |
DESCRIPTION |
|
|
# |
This is the index number of an associated wireless station. |
|
|
MAC Address |
This field displays the MAC address of an associated wireless station. |
|
|
Association Time |
This field displays the time a wireless station first associated with the WRE6505 |
|
|
v2’s WLAN network. |
||
|
Association List 5G |
||
|
# |
This is the index number of an associated wireless station. |
|
|
MAC Address |
This field displays the MAC address of an associated wireless station. |
|
|
Association Time |
This field displays the time a wireless station first associated with the WRE6505 |
|
|
v2’s WLAN network. |
||
4.5 Configuration Menus
Use the menu in the navigation panel to configure WRE6505 v2 features in Repeater mode. The following screen and table show the features you can configure in Repeater mode.
Figure 13 Menus: Repeater Mode
The following table describes the sub-menus.
Table 10 Menus: Repeater Mode
|
LINK |
TAB |
FUNCTION |
|
Status |
Status |
This screen shows the WRE6505 v2’s general device, system and interface |
|
status information. |
||
|
MONITOR |
||
|
Monitor |
||
|
Packet |
Packet |
Use this screen to view port status, packet specific statistics, the «system |
|
Statistics |
Statistics |
up time» and so on. |
CONFIGURATION
Network
WRE6505 v2 User’s Guide
25

|
Chapter 4 Repeater Mode |
|||
|
Table 10 Menus: Repeater Mode |
|||
|
LINK |
TAB |
FUNCTION |
|
|
Wireless LAN |
General |
Use this screen to configure general wireless LAN and wireless security |
|
|
2.4G |
settings. |
||
|
AP Select |
Use this screen to choose an access point that you want the WRE6505 v2 |
||
|
to connect to. |
|||
|
MAC Filter |
Use this screen to configure the WRE6505 v2 to block access to devices or |
||
|
block the devices from accessing the WRE6505 v2. |
|||
|
Advanced |
Use this screen to configure advanced wireless settings. |
||
|
QoS |
Use this screen to enable Wi-Fi MultiMedia Quality of Service (WMMQoS). |
||
|
WPS |
Use this screen to enable WPS. |
||
|
WPS Device |
Use this screen to add a wireless station using WPS. |
||
|
Wireless LAN |
General |
Use this screen to configure general wireless LAN settings. |
|
|
5G |
|||
|
AP Select |
Use this screen to choose an access point that you want the WRE6505 v2 |
||
|
to connect to. |
|||
|
MAC Filter |
Use this screen to configure the WRE6505 v2 to block access to devices or |
||
|
block the devices from accessing the WRE6505 v2. |
|||
|
Advanced |
Use this screen to configure advanced wireless settings. |
||
|
QoS |
Use this screen to enable Wi-Fi MultiMedia Quality of Service (WMMQoS). |
||
|
WPS |
Use this screen to enable WPS. |
||
|
WPS Device |
Use this screen to add a wireless station using WPS. |
||
|
LAN |
IP |
Use this screen to configure LAN IP address and subnet mask. |
|
|
OneConnect |
OneConnect |
Use this screen to enable or disable Wi-Fi auto-configuration. |
|
|
MAINTENANCE |
|||
|
General |
General |
Use this screen to view and change administrative settings such as system |
|
|
and domain names. |
|||
|
Password |
Password |
Use this screen to change the password of your WRE6505 v2. |
|
|
Setup |
|||
|
Time |
Time Setting |
Use this screen to change your WRE6505 v2’s time and date. |
|
|
Firmware |
Firmware |
Use this screen to upload firmware to your WRE6505 v2. |
|
|
Upgrade |
Upgrade |
||
|
Backup |
Backup |
Use this screen to backup and restore the configuration or reset your |
|
|
Restore |
Restore |
WRE6505 v2 to the factory defaults. |
|
|
Restart |
Restart |
Use this screen to reboot the WRE6505 v2 without turning the power off. |
|
|
System Mode |
System Mode |
Use this screen to select how you want to use your WRE6505 v2. |
|
WRE6505 v2 User’s Guide
26

5
Access Point Mode
5.1 Overview
In Access Point (AP) mode your WRE6505 v2 bridges a wired network (LAN) and wireless LAN (WLAN) in the same subnet. See the figure below for an example.
Figure 14 Wireless Internet Access in Access Point Mode
Note: See Chapter 7 on page 38 for an example of setting up a wireless network in Access Point mode.
5.2What You Can Do
•Use the Status screen (Section 5.4 on page 28) to view read-only information about your WRE6505 v2.
•Use the LAN screen (Chapter 10 on page 66) to set the IP address for your WRE6505 v2 acting as an access point.
•Use the Wireless LAN screens (Section 9.10 on page 62) to configure the wireless settings and wireless security between the wireless clients and the WRE6505 v2.
WRE6505 v2 User’s Guide
27

Chapter 5 Access Point Mode
5.3 What You Need to Know
With the exception of the Scheduling screen other configuration screens in Access Point mode are similar to the ones in repeater mode. See Chapter 3 on page 19 of this User’s Guide.
5.3.1 Setting your WRE6505 v2 to AP Mode
By default, AP mode in the WRE6505 v2 is not configured with a static IP address. To set up your WRE6505 v2 in AP mode for the first time, the directly-connected router must have the DHCP server function enabled.
1To use your WRE6505 v2 as an access point, see Section 3.1.1.1 on page 20.
2Connect one end of an Ethernet cable to the Ethernet port on the WRE6505 v2 and the other end to your router.
3Connect your computer to your network, make sure both the WRE6505 v2 and computer are under the same subnet.
4Open a web browser window and type “http://zyxelsetup” in the web address. The login screen displays.
5Enter “1234” (default) as the password and click Login.
6Type a new password and retype it to confirm, then click Apply. Otherwise, click Ignore. The WRE6505 v2 Web Configurator displays, which allows you to configure the AP mode.
5.3.2Configuring your WLAN, LAN and Maintenance Settings
•See Chapter 9 on page 49 and Chapter 10 on page 66 for information on configuring your wireless network and LAN settings.
•See Chapter 12 on page 70 for information on configuring your Maintenance settings.
5.4 AP Mode Status Screen
Click  to open the Status screen.
WRE6505 v2 User’s Guide
28

Chapter 5 Access Point Mode
Figure 15 Status Screen: Access Point Mode
The following table describes the labels shown in the Status screen.
Table 11 Status Screen: Access Point Mode
|
LABEL |
DESCRIPTION |
|||
|
Select a number of seconds or None from the drop-down list box to refresh all |
||||
|
screen statistics automatically at the end of every time interval or to not refresh |
||||
|
the screen statistics. |
||||
|
Click this button to refresh the status screen statistics. |
||||
|
Device Information |
||||
|
Host Name |
This is the WRE6505 v2’s system name you configure in the Maintenance > |
|||
|
General screen. |
||||
|
Firmware Version |
This is the firmware version and the date created. |
|||
|
Sys OP Mode |
This is the device mode (Section 3.1.1 on page 19) to which the WRE6505 v2 is set |
|||
|
— AP Mode. |
||||
|
LAN Information |
||||
|
MAC Address |
This shows the LAN Ethernet adapter MAC Address of your device. |
|||
|
IP Address |
This shows the LAN port’s IP address. |
|||
|
IP Subnet Mask |
This shows the LAN port’s subnet mask. |
|||
|
Default Gateway |
This shows the LAN port’s gateway IP address. |
|||
|
DHCP |
This shows the LAN port’s DHCP role — Client or None. |
|||
|
WLAN 2.4G Information |
||||
|
MAC Address |
This shows the wireless adapter MAC Address of your device. |
|||
|
SSID |
This shows a descriptive name used to identify the WRE6505 v2 in the wireless |
|||
|
LAN. |
||||
|
Channel |
This shows the channel number which you select manually or the WRE6505 v2 |
|||
|
automatically scans and selects. |
||||
|
WRE6505 v2 User’s Guide |
29

|
Chapter 5 Access Point Mode |
||
|
Table 11 Status Screen: Access Point Mode (continued) |
||
|
LABEL |
DESCRIPTION |
|
|
Security |
This shows the level of wireless security the WRE6505 v2 is using. |
|
|
WLAN 5G Information |
||
|
MAC Address |
This shows the wireless adapter MAC Address of your device. |
|
|
SSID |
This shows a descriptive name used to identify the WRE6505 v2 in the wireless |
|
|
LAN. |
||
|
Channel |
This shows the channel number which you select manually or the WRE6505 v2 |
|
|
automatically scans and selects. |
||
|
Security |
This shows the level of wireless security the WRE6505 v2 is using. |
|
|
System Status |
||
|
Item |
This column shows the type of data the WRE6505 v2 is recording. |
|
|
Data |
This column shows the actual data recorded by the WRE6505 v2. |
|
|
System Up Time |
This is the total time the WRE6505 v2 has been on. |
|
|
Current Date/Time |
This field displays your WRE6505 v2’s present date and time. |
|
|
System Resource |
||
|
CPU Usage |
This displays what percentage of the WRE6505 v2’s processing ability is currently |
|
|
used. When this percentage is close to 100%, the WRE6505 v2 is running at full |
||
|
load, and the throughput is not going to improve anymore. If you want some |
||
|
applications to have more throughput, you should turn off other applications (for |
||
|
example, using bandwidth management. |
||
|
Memory Usage |
This shows what percentage of the heap memory the WRE6505 v2 is using. |
|
|
Interface Status |
||
|
Interface |
This displays the WRE6505 v2 port types. The port types are: LAN and WLAN. |
|
|
Status |
For the LAN port, this field displays Down (line is down) or Up (line is up or |
|
|
connected). |
||
|
For the WLAN, it displays Up when the WLAN is enabled or Down when the WLAN |
||
|
is disabled. |
||
|
Rate |
For the LAN ports, this displays the port speed and duplex setting or is left blank |
|
|
when the line is disconnected. |
||
|
For the WLAN, it displays the maximum transmission rate when the WLAN is |
||
|
enabled and is left blank when the WLAN is disabled . |
||
|
Association List 2.4G |
||
|
# |
This is the index number of an associated wireless client. |
|
|
MAC Address |
This field displays the MAC address of an associated wireless client. |
|
|
Association Time |
This field displays the time a wireless station first associated with the WRE6505 |
|
|
v2’s WLAN network. |
||
|
Association List 5G |
||
|
# |
This is the index number of an associated wireless client. |
|
|
MAC Address |
This field displays the MAC address of an associated wireless client. |
|
|
Association Time |
This field displays the time a wireless station first associated with the WRE6505 |
|
|
v2’s WLAN network. |
||
WRE6505 v2 User’s Guide
30
![]()
Chapter 5 Access Point Mode
5.5 Configuration Menus
Use the menu in the navigation panel to configure WRE6505 v2 features in Access Point mode. The following screen and table show the features you can configure in Access Point mode.
Figure 16 Menu: Access Point Mode
The following table describes the sub-menus.
Table 12 Navigation Panel: Access Point Mode
|
LINK |
TAB |
FUNCTION |
|
|
Status |
Status |
This screen shows the WRE6505 v2’s general device, system and interface |
|
|
status information. |
|||
|
MONITOR |
|||
|
Monitor |
|||
|
Packet |
Packet |
Use this screen to view port status, packet specific statistics, the «system |
|
|
Statistics |
Statistics |
up time» and so on. |
|
|
CONFIGURATION |
|||
|
Network |
|||
|
Wireless LAN |
General |
Use this screen to configure general wireless LAN and wireless security |
|
|
2.4G |
settings. |
||
|
MAC Filter |
Use this screen to configure the WRE6505 v2 to block access to devices or |
||
|
block the devices from accessing the WRE6505 v2. |
|||
|
Advanced |
Use this screen to configure advanced wireless settings. |
||
|
QoS |
Use this screen to enable Wi-Fi MultiMedia Quality of Service (WMMQoS). |
||
|
WPS |
Use this screen to enable and configure WPS. |
||
|
WPS Device |
Use this screen to add a wireless station using WPS. |
||
|
Scheduling |
Use this screen to schedule the times the Wireless LAN is enabled or |
||
|
disabled. |
|||
|
Wireless LAN |
General |
Use this screen to configure general wireless LAN settings. |
|
|
5G |
|||
|
MAC Filter |
Use this screen to configure the WRE6505 v2 to block access to devices or |
||
|
block the devices from accessing the WRE6505 v2. |
|||
|
Advanced |
Use this screen to configure advanced wireless settings. |
||
|
QoS |
Use this screen to enable Wi-Fi MultiMedia Quality of Service (WMMQoS). |
||
|
WPS |
Use this screen to enable and configure WPS. |
||
|
WPS Device |
Use this screen to add a wireless station using WPS. |
||
|
Scheduling |
Use this screen to schedule the times the Wireless LAN is enabled or |
||
|
disabled. |
|||
|
LAN |
IP |
Use this screen to configure LAN IP address and subnet mask. |
|
WRE6505 v2 User’s Guide
31

|
Chapter 5 Access Point Mode |
|||
|
Table 12 Navigation Panel: Access Point Mode |
|||
|
LINK |
TAB |
FUNCTION |
|
|
OneConnect |
OneConnect |
Use this screen to enable or disable Wi-Fi auto-configuration. |
|
|
MAINTENANCE |
|||
|
General |
General |
Use this screen to view and change administrative settings such as system |
|
|
and domain names. |
|||
|
Password |
Password |
Use this screen to change the password of your WRE6505 v2. |
|
|
Setup |
|||
|
Time |
Time Setting |
Use this screen to change your WRE6505 v2’s time and date. |
|
|
Firmware |
Firmware |
Use this screen to upload firmware to your WRE6505 v2. |
|
|
Upgrade |
Upgrade |
||
|
Backup |
Backup |
Use this screen to backup and restore the configuration or reset your |
|
|
Restore |
Restore |
WRE6505 v2 to the factory defaults. |
|
|
Restart |
Restart |
Use this screen to reboot the WRE6505 v2 without turning the power off. |
|
|
System Mode |
System Mode |
Use this screen to select how you want to use your WRE6505 v2. |
|
WRE6505 v2 User’s Guide
32

6
eaZy123 Wizard Setup
6.1 Overview
This chapter provides information on the wizard setup screens in the Web Configurator.
The Web Configurator’s wizard setup helps you configure your device.
6.2 Accessing the Wizard
Launch your web browser and type «http://zyxelsetup» or “http://192.168.1.2” as the website address. See Section 2.2 on page 13 for detailed information.
Note: The wizard appears when the WRE6505 v2 is accessed for the first time or when you reset the WRE6505 v2 to its default factory settings.
The wizard screen opens.
Note: If you have already configured the wizard screens and want to open it again, click the eaZy123 icon ( ) on the upper right corner of any Web Configurator screen.
6.3 Using the Wizard
The eaZy123 wizard for the WRE6505 v2 is available in both Repeater and AP mode.
6.3.1Repeater Mode
1The wizard scans for available Wi-Fi networks and displays the network list. Select a 2.4 GHz Wi-Fi network to which you want the WRE6505 v2 to connect to extend the network. Click Continue.
If the wireless router or AP you want to connect to is not listed, click Choose Network Manually and go to step 3 to configure the SSID and security settings manually.
If you don’t want to associate with a 2.4 GHz network, click Skip 2.4 GHz.
WRE6505 v2 User’s Guide
33

Chapter 6 eaZy123 Wizard Setup
2 Type the selected network’s Wi-Fi password (key) if wireless security is enabled. Click Continue.
3If you click Choose Network Manually, the following screen displays. Enter the SSID and security settings of your wireless router or AP. Click Continue.
WRE6505 v2 User’s Guide
34

Chapter 6 eaZy123 Wizard Setup
4The 5 GHz setup screen displays. Repeat previous steps to select and connect to a 5 GHz Wi-Fi network.
5Configure the wireless settings between the WRE6505 v2 and its wireless clients. The WRE6505 v2 automatically copies the SSID of the associated AP and appends “.speed” to the 5GHz SSID. Click
Apply.
WRE6505 v2 User’s Guide
35

Chapter 6 eaZy123 Wizard Setup
6The eaZy 123 setup wizard is complete. Verify the WRE6505 v2’s wireless network settings and click GO to log into the web configurator again.
6.3.2AP Mode
1Configure the wireless settings between the WRE6505 v2 and its wireless clients. The WRE6505 v2 automatically copies the SSID of the associated AP and appends “.speed” to the 5GHz SSID. Click
Apply.
WRE6505 v2 User’s Guide
36

Chapter 6 eaZy123 Wizard Setup
2The eaZy 123 setup wizard is complete. Verify the WRE6505 v2’s wireless network settings and click GO to log into the web configurator again.
WRE6505 v2 User’s Guide
37

7
Tutorials
7.1 Overview
This chapter provides tutorials for your WRE6505 v2 (in access point or repeater mode) as follows:
•Connecting to the Internet from an Access Point
•Connecting to a Wireless Network Using WPS
•Connecting the WRE6505 v2 (in Repeater mode) to an AP
7.2Connecting to the Internet from an Access Point
This section gives you an example of how to set up an access point (AP) and wireless client (a notebook (B), in this example) for wireless communication. B can access the Internet through the access point (A) wirelessly.
Figure 17 Wireless Access Point Connection to the Internet
7.3 Connecting to a Wireless Network Using WPS
This section gives you an example of how to set up wireless network using WPS. The following example uses the WRE6505 v2 as the AP and NWD-211AN as the wireless client which connects to a notebook.
Note: The wireless client must be a WPS-aware device (for example, a WPS USB adapter or PCI card).
The following WPS methods for creating a secure connection are described in the tutorial.
•Push Button Configuration (PBC) — create a secure wireless network simply by pressing a button. See Section 7.3.1 on page 39.This is the easier method.
•PIN Configuration — create a secure wireless network simply by entering a wireless client’s PIN (Personal Identification Number) in the WRE6505 v2’s interface. See Section 7.3.2 on page 40. This is the more secure method, since one device can authenticate the other.
WRE6505 v2 User’s Guide
38

Chapter 7 Tutorials
7.3.1 Push Button Configuration (PBC)
The push button configuration function found in the interface is only available in AP mode. The WPS button, see Section 1.3 on page 10, can also be used for PBC configurations in either AP or Repeater mode.
1Make sure that your WRE6505 v2 is turned on and that it is connected to your network.
2Launch your wireless client’s configuration utility.
3In the wireless client utility, find the WPS settings. Enable WPS and press the WPS button (Start or WPS button).
4Log into WRE6505 v2’s Web Configurator. Make sure WPS is enabled in the Network > Wireless LAN > WPS screen.
5Navigate to Network > Wireless LAN 2.4G or Wireless LAN 5G > WPS Device and press the
WPS button.
Note: Your WRE6505 v2 has a WPS button located on its panel, as well as a WPS button in its configuration utility. Both buttons have exactly the same function; you can use one or the other.
Note: It doesn’t matter which button is pressed first. You must press the second button within two minutes of pressing the first one.
The WRE6505 v2 sends the proper configuration settings to the wireless client. This may take up to two minutes. Then the wireless client is able to communicate with the WRE6505 v2 securely.
The following figure shows you how to set up wireless network and security by pressing a button on both WRE6505 v2 and wireless client (the NWD-211AN in this example).
WRE6505 v2 User’s Guide
39

Chapter 7 Tutorials
Figure 18 Example WPS Process: PBC Method
AP
Wireless Client
WITHIN 2 MINUTES
SECURITY INFO
COMMUNICATION
7.3.2 PIN Configuration
When you use the PIN configuration method, you need to use both WRE6505 v2’s configuration interface and the client’s utilities.
The push button configuration function is only available in AP mode.
1Launch your wireless client’s configuration utility. Go to the WPS Station settings and select the PIN method to get a PIN number.
2On the WRE6505 v2, navigate to the Network > Wireless LAN 2.4G or Wireless LAN 5G >
WPS screen.
3Obtain the PIN number for the WRE6505 v2 or press the Generate button to create a new PIN number. See Section 9.10 on page 62
4Enter the WRE6505 v2 PIN number in the wireless station’s utility screen.
The WRE6505 v2 authenticates the wireless client and sends the proper configuration settings to the wireless client. This may take up to two minutes. Then the wireless client is able to communicate with the WRE6505 v2 securely.
WRE6505 v2 User’s Guide
40
 Loading…