
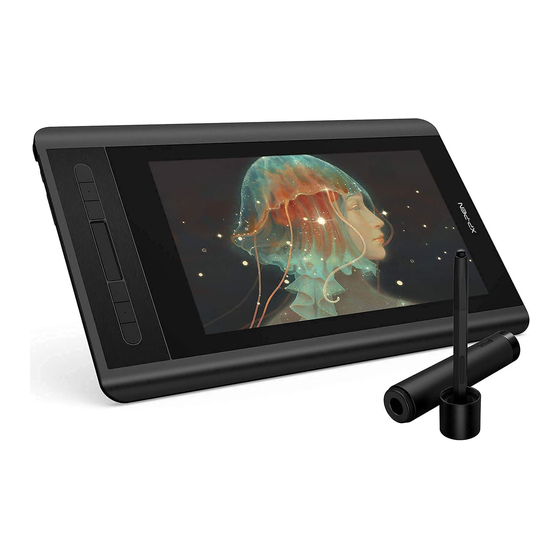
Artist 12
Скачать руководство пользователя
XP-PEN New UI Driver Manual V1.2(Russian)
Dec 04,2020 PM 12:19
Artist 12 User Manual(Russian)
Jun 22,2020 PM 16:54
программное обеспечение и драйверы
XPPenMac_3.4.6_230607
Jun 08,2023 PM 17:39
XPPenMac_3.4.0_230104
Jan 09,2023 PM 18:24
XPPenWin_3.4.7.230608
Jun 16,2023 PM 14:44
XPPenWin_3.4.0.230109
Jan 11,2023 PM 18:38
Ubuntu、Centos、Fedora、Red Hat、Manjaro、Arch、Debian、OpenSUSE、elementary OS、Mint、ezgo Linux、Pop!_OS、Mageia
XPPen-pentablet-3.2.3.230215-1.x86_64.tar.gz
Mar 21,2023 AM 10:22
Ubuntu、Debian、elementary OS、Mint、ezgo Linux、Pop!_OS
XPPen-pentablet-3.2.3.230215-1.x86_64.deb
Mar 21,2023 AM 10:22
Centos、Fedora、Red Hat、OpenSUSE、Mageia
XPPen-pentablet-3.2.3.230215-1.x86_64.rpm
Mar 21,2023 AM 10:22
Contents
Introduction
Product Overview
Included with your product
Connection
Compatibility
FAQS
Introduction

Thank you for choosing XPPen Artist 2nd drawing display. This user manual is specially designed to detail the product’s functions and features. Please read this manual before using the product to ensure safe and proper use.
Due to the latest product improvements, content may differ from the final product and is subject to change without prior notice.
Note: The pictures in the User Manual are for reference only. The User Manual supplied with the device may vary depending on the model.
Product Overview

1. Lanyard hole
2. Shortcut key
3. Display/Work area
4. Power key
5. Indicator light
a. Press the power key to turn on the device. The indicator light will remain blue when the device is on. Press the power key again to turn off the device.
b. The indicator light will turn and stay orange when the device is in standby mode.
c. To switch to drawing tablet mode, press the power key and hold for 3 seconds. The indicator light will blink blue and orange. Press the power key again to return to normal mode.
6. +/‒ key
7. Full-featured USB-C port
8. 3-in-1 USB-C port
* Image is for illustrative purposes only. The positions and number of shortcut keys may vary from model to model.
Included with your product
Drawing Display
Stylus
Pen Clip
Pen Nibs
Power Adapter
3-in-1 USB Cable
Power Extension Cord
Cleaning Cloth
Anti-slip Gloves
Quick Guide
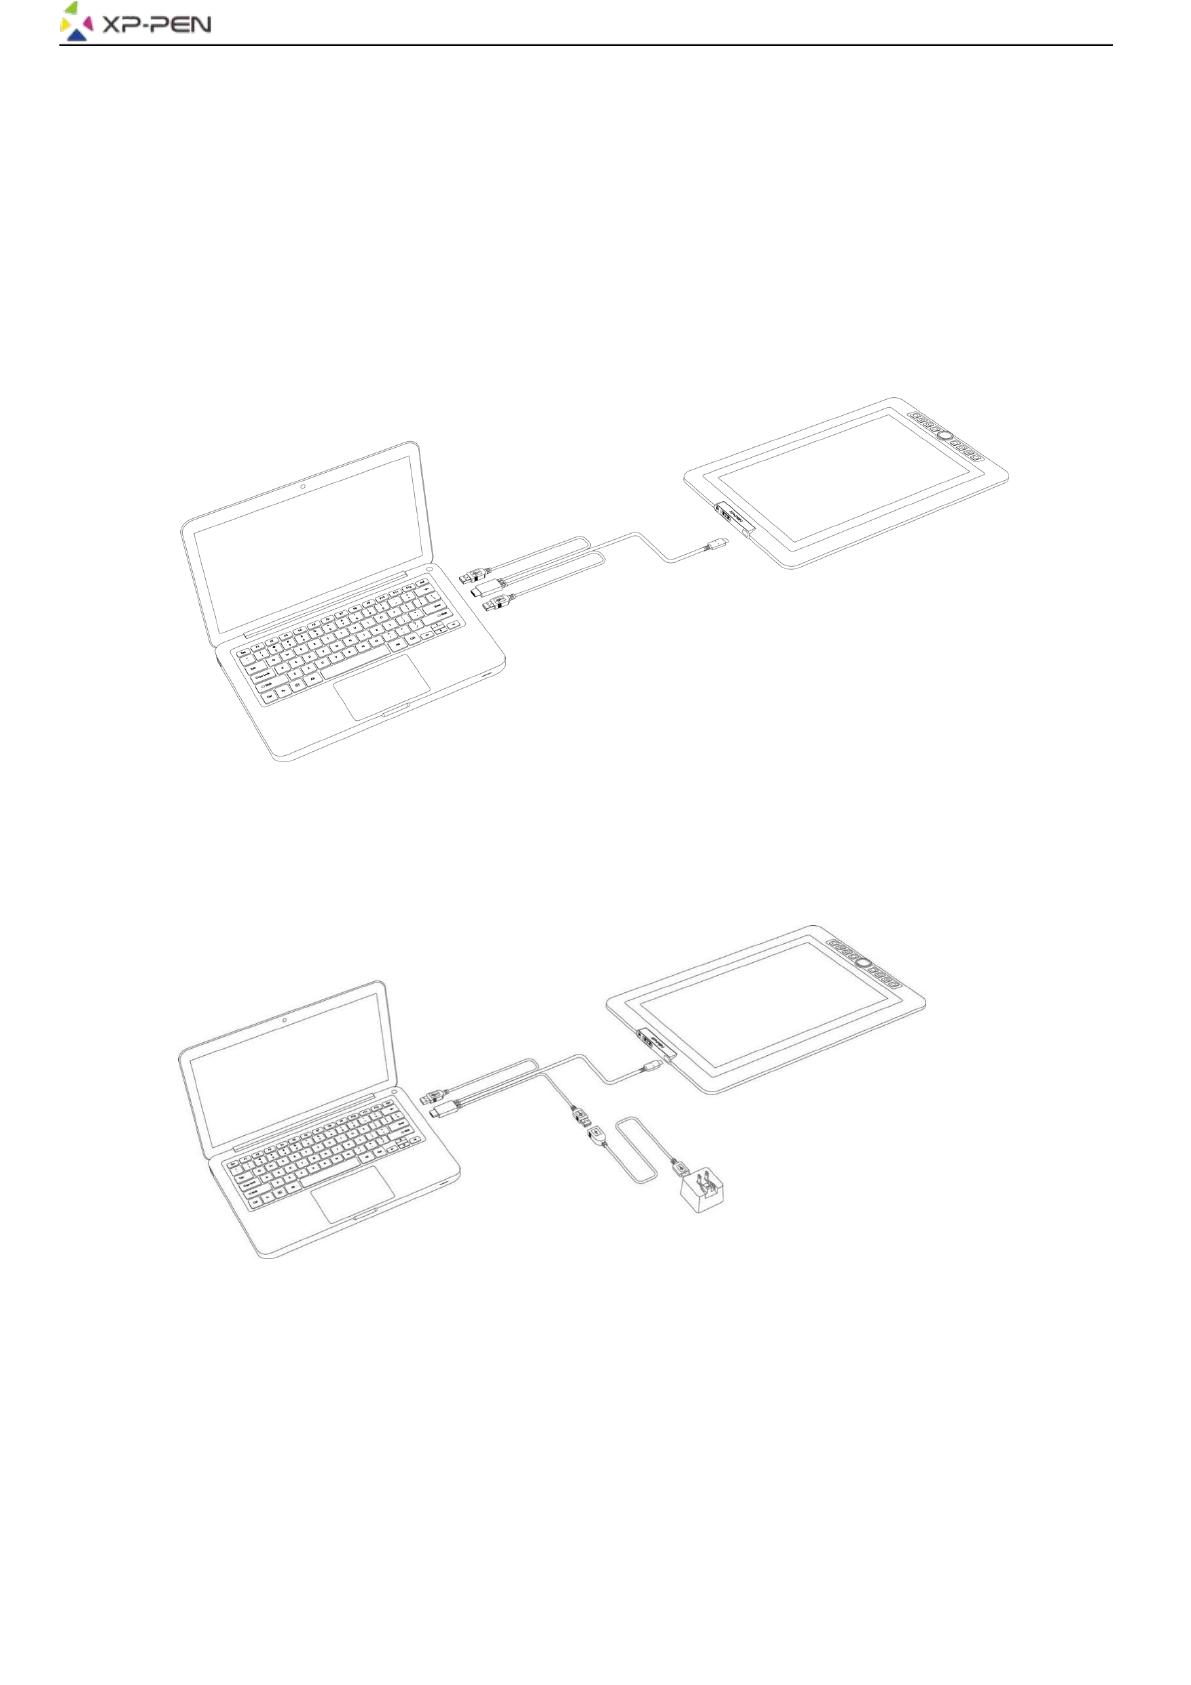
Connection
You can connect the device to your computer via the following methods.
Connect the USB-A end to your computer to supply power to the device (A). If the power supply is insufficient, the screen of the drawing display will blink. At this moment, connect the red USB-A end to another USB port of your computer, or to power adapter and power supply (B).

*Power adapters for some models are sold separately. Please purchase them if necessary or use other adapters
Connect via USB-C Cable

*USB-C cable is sold separately. Please purchase it if necessary.
Connect to Android phone or tablet: To check compatible phone models, please visit our website

* Power adapters and USB-C cables for some models are sold separately. Please purchase them if necessary or use other power adapters
Note:
* HDMI, the HDMI logo, and the term High Definition Multimedia Interface are trademarks or registered trademarks of HDMI Licensing LLC.
Compatibility
Windows 7 or later,
macOS 10.10 or later,
Android (USB3.1 DP1.2),
Chrome OS 88 or later,
Linux.
Product Settings
Driver Installation
To ensure the device works properly, please install the driver before using it.
Please download the driver suitable for your product model from XPPen website (https://www.xp-pen.com).
Notes:
1. Before installing the driver, please turn off all antivirus software and graphics software.
2. Uninstall drivers (if any) for other drawing displays/tablets before the installation.
3. Restart your computer after the installation is completed.
4. For the best performance for your device, we recommend you to install the latest driver.
Windows:
Unzip file. Run the «exe» file as administrator, and follow the prompts to complete the installation.
Mac:
Unzip file. Run the «dmg» file and follow the prompts to complete the installation. Go to System Preference -> Security & Privacy -> Accessibility settings and click the lock icon in the lower left corner to unlock the settings. Tick the checkbox on the left of the PenTable_Driver application to enable accessibility. Then click the lock icon to lock the settings.


If there is no PenTablet_Driver on the list, go to Library -> Application Support -> PenDriver to add the driver manually.

Linux:
Deb: Enter command sudo dpkg -i. Drag the installation file to the window and execute the command;
Rpm: Enter command sudo rpm -i. Drag the installation file to the window and execute the command;
Tag.gz: Unzip file. Enter command sudo. Drag install.sh to the window and execute command.
Introduction to Driver
The driver will run automatically after being installed. If it does not run automatically, go to the driver folder to run it manually.
Windows: Start -> Pentablet
Mac: Application -> XP-PenPenTabletPro -> PenTablet
If the device is not connected or the connection fails, you can see the following prompt. In this case, try to restart your computer or the driver, or contact our service staff for support.

If the device is connected to your computer successfully, the device image and name will be displayed in the upper left corner of the driver.

You can connect up to 3 devices via the driver at the same time. Customize a specific device’s settings after switching to that device, and all changes made will only apply to that device.
Configuration saving:
After changing the configuration, click the «Store» button in the lower left corner of the driver interface, otherwise, the modified configuration is valid only for the time it is currently in use.
Device Settings

You can set the drawing display functions, including:
1. Work Area
2. Pen Settings
3. Shortcut Keys
* Functions may vary depending on the model.
Work Area
Go to Work area and define the mapping between the device’s work area and the screen display area.
Screen

You can set the mapping between the display area of the current screen and the device.
If multiple monitors are used in duplicate mode, the work area of the device will be mapped to all monitors. When the pen moves in the work area, the cursor on all monitors will move at the same time.
If multiple monitors are used in extend mode, go to the monitor tabs to select one of the monitors that the work area of the device will be mapped to. XPPen drawing display is selected by default.
There are two available options to set the screen mapping area:
1. Set full screen: After you select it, the device will be mapped to the whole area of the selected monitor.
2. Customize screen area: There are three ways to customize the screen area:

a. Drag to select an area: Drag the cursor from one point to another on the screen.
b. Use the cursor to select an area: Select «Click to set screen area», then click the upper left corner position and lower right corner position to select on the screen.
c. Coordinates: Manually enter coordinates in the corresponding input boxes for X, Y, W and H.
3. Identify: Identify all connected monitors. The numeric identifier will be displayed in the lower left corner of each monitor.
4. Calibration: Hold the stylus in the usual way and click the tip of the stylus instead of the cursor in the center of the red cross on the display to calibrate the offset between the stylus and cursor.
Pen Display
You can set the work area of current device here. The driver enables three ways to set the work area of the device.

1. Full area: The whole work area of the device is available.
2. Customize active area: There are three ways to customize the work area.

a. Drag to select an area: Drag the cursor from one point to another on the device.
b. Use the pen to select an area: Select «Click to set active area», then use stylus to click the upper left corner position and lower right corner position on your device.
c. Coordinates: Manually enter coordinates in the corresponding input boxes for X, Y, W and H.
3. Proportion: Scale your device’s work area and selected display area proportionately. For example: After selecting proportion, if you draw a circle on the device, a circle will appear on the screen, but some part of the work area may not be used. But if you don’t choose the proportion and draw a circle, then the circle may change into an ellipse on the screen.
Rotation:
You can set the device to 0°, 90°, 180° and 270° clockwise for use.
Left-handed mode: Rotate 180°.
Display Settings (for Windows Only):


Color temperature: The driver enables five modes, i.e., low blue light, 6500K (default), 7500K, 9300K, and USER. In the USER mode, color temperature can be customized by adjusting the R, G and B values.
Brightness, Contrast: Slide the corresponding slider to adjust the brightness and contrast.
Pen Settings
When the stylus is within the Work area, the device will recognize the stylus and add it to the driver. The stylus used should be compatible with the device.
Application
The driver allows you to set pen keys, shortcut keys in a specified application.

Select an application from the list of applications at the top of the driver, tick the application, and then customize its pen keys, shortcut keys.
1. Click the + icon on the top right of the application bar to open the application list.
2. Select an application to be added from the running applications or click Browse to add from the installed applications.
3. Click «OK» to add the selected application.
4. Select an added application and click the — icon on the top right of the application bar to delete the application.
If you select all other applications, it will apply to other non-customized applications.

Pen settings

Click «Customize» in the drop-down menu to go to shortcut key settings and customize pen key functions.
Before setting shortcut key functions, tick to select any of the options under Keyboard, Mouse Control, Others, and Run Application.
Keyboard:
You can set keyboard shortcut, for example, set it as “Alt+A” in 3D MAX, so the alignment tool can be used.

You can set a combination of multiple keys such as Ctrl+C and Ctrl+V. When you press the combination key, the set shortcut keys will all run once.
Windows (Command): You can add a combination key containing system key, for example: to enter Win(Cmd)+Shift+3, you can press Shift+3 and the driver will bring the system key automatically.
Mouse control:
You can set mouse control and keyboard combination key. For example, if you select Shift and Left Click, shortcut actions are enabled in the software that supports this combination key.

Other:
Precision mode: It limits the work area to a small area. This function allows you to draw more precisely in the area.
Run application:
Run the selected application.
Customized name:
You can customize the name of the current key settings.
Pressure settings:
The sensitivity of pressure can be adjusted by adjusting the Output and Pen Pressure curve or moving the slider on the progress bar.
Current pressure can evaluate your current pen pressure.

Mouse mode:
When you move your pen out of the work area, the cursor will stay where you leave, which is like operating a mouse. Select the mode and you can adjust the speed of the cursor on your device. If you do not select the mode, the pen mode applies by default.
Windows Ink (for Windows only):
Windows supports the handwriting function. If you need to use this function in Microsoft Office/Whiteboard or other software, do not turn it off.
Shortcut Keys
The number of keys varies from model to model. Please refer to the actual product.

Customize:
Click «Customize» in the drop-down menu to customize key functions. The setting steps are the same as pen key settings (see Pen settings).
Driver Settings

Disable shortcut Keys:
Disable the functions and prompts of all keys of the device.
Disable message:
When you press a key, no key message will be displayed at the bottom of the screen.
Disable pressure:
You will not feel the pressure of the stylus when using the stylus.
Disable tilt:
This will disable the tilt effect of the stylus.
Import & Export config:
You can import/export configurations to save and load their settings. (When you need to import or export the changed functions, click the «Store» button on the left side of the driver interface first to save the current configuration. This function is available for only the same operating system.)
Diagnostic tool:
You can use the diagnostic tool in case of any problems while using the driver.
Feedback:
If you have any questions or suggestions during the use of the driver, you can give us feedback through this page.
Driver Uninstallation
Windows:
Go to Start -> Settings -> Apps -> Apps & Features, find «Pentablet» and then left click «Uninstall» as per prompts.
Mac:
Go to -> Applications, find XP-PenPentabletPro, click «UninstallPenTablet» as per prompts.
Linux:
Deb: Enter command sudo dpkg -r xp-pen-pentablet and execute the command;
Rpm: Enter command sudo rpm -e xp-pen-pentablet and execute the command;
Tag.gz: Unzip file. Enter command sudo. Drag uninstall.sh to the window and execute the command.
FAQs
1. No display or black screen on a drawing display.
a. Check if the device is connected to power supply properly;
b. Check if the cable is connected properly;
c. Check if the power indicator is blue. If not, check the cable and restart the device;
d. If the signal is unstable, check if the cable port is stable.
2. Computer fails to recognize the device.
a. Check if your computer’s USB port used works normally. If not, use another USB port.
3. Stylus does not work.
a. Make sure you are using the stylus that originally came with your device;
b. Make sure you installed the driver correctly, and check if the pen settings of the driver are normal.
4. The drawing software cannot sense the pen pressure while the cursor can move.
a. Check if the drawing software supports pen pressure;
b. Download the latest driver installation files from XPPen website and check if the pen pressure is normal in the driver.
c. Before installing the driver, turn off your antivirus software and graphics software;
d. Uninstall drivers for other drawing displays before installation;
e. Restart your computer after the installation is completed;
f. If the pen pressure is normal in the driver (Windows: ensure Windows Ink is enabled in the pen settings of the driver), run the drawing software and test it again.
5. Cursor offsets.
a. Calibrate the pen with the driver.
6. Line latency during drawing with the software.
a. Check if the computer configuration (CPU&GPU) meets the recommended configuration requirements for the drawing software installed, and optimize related functions via settings according to the FAQs posted on the official website of the drawing software.
This Class B digital apparatus complies with Canadian ICES-003.
Cet appareil numérique de la classe B est conforme à la norme NMB-003 du Canada.
If you need any further assistance, please contact us at:
Website: www.xp-pen.com
Email: service@xp-pen.com
-
Contents
-
Table of Contents
-
Bookmarks
Quick Links
Graphic Pen Display
Artist 12 Manual
Windows 10, 8, 7 and Mac 10.8 or above
www. xp-pen. com
Related Manuals for XP-PEN Artist 12
Summary of Contents for XP-PEN Artist 12
-
Page 1
Graphic Pen Display Artist 12 Manual Windows 10, 8, 7 and Mac 10.8 or above www. xp-pen. com… -
Page 2
Safety Precautions This manual uses the following symbols to ensure that the XP-PEN Tablet is used correctly and safely. Be sure to read and observe the Safety Precautions. Do not use this product in a control system area that requires a high degree of safety and reliability. -
Page 3: Table Of Contents
Contents I. Product Overview Overview Working area II. Connecting the Artist 12 III. Driver Installation Windows IV. Driver Settings UI Windows V. Driver Uninstall Windows VI. FAQ…
-
Page 4: Product Overview
Thank you for purchasing the XP-Pen tablet. Our product user manual currently supports English, Russian, Japanese, German, Korean, Chinese, Italian, Spanish, Portuguese, and French. We apologize if your preferred language is not supported. { I. Product Overview } Overview Image 1-1: Overview (1).
-
Page 5: Connecting The Artist
If your tablet displays a “No Signal” error message: (a). Unplug the Artist 12’s HDMI and USB cords, then plug them back in. If possible test out different USB or HDMI ports. Ensure that each cord is connected well. Reboot your computer, then turn the Artist 12 off and back on.
-
Page 6: Mac
Monitor 2, then apply and exit. Image 3-1: Current Screen Note: To use Paint Tool Sai (SAI) with the Artist 12, please open your computer’s Display settings and set “Size to text, apps, etc” to 100%. Image 3-2: Display setting (1).
-
Page 7
Image 3-3: Mac driver (4). If you run into the error message below, please complete the following steps. Image 3-4: Unidentified developer a. Open “System Preferences,” then “Security & Privacy”. Image 3-5: Security & Privacy b. Click “Open Anyway” button. Image 3-6: Open Anyway… -
Page 8
(7.1) Open [Finder] > [Applications] > [Touch Tablet] > [Pen Tablet Setting]. (7.2) In the Monitor tab, set Monitor Mapping to Artist 12. (8). With Mirror Displays disabled, set your Artist 12’s resolution to 1920×1080. (8.1) Open [Finder] > [Applications] > [Touch Tablet] > [Pen Tablet Setting]. -
Page 9: Driver Settings Ui
{ IV. Driver Settings UI } Notes: (a). The Artist 12’s shortcut keys are designed to work with US English keyboards. Keys may not function correctly with the other keyboard languages. (b). By default, the Artist 12 express keys are mapped to standard Photoshop keyboard shortcuts. Keys can be customized to function efficiently in other software.
-
Page 10
Current Pen Pressure shows the current pressure level being exerted on your tablet and can be used to test pen pressure. Image 4-4: Click Sensitivity & Current Pen Pressure 1.3. Current Screen The Artist 12 may be configured for use with single or dual monitors. Generally, this should be set to “Monitor1” or Monitor 2.” Image 4-5: Current Screen 1.4. -
Page 11
Image 4-6: Mouse Mode 1.5. Import & Export Profiles You can use the Import & Export Profile function to save/load your barrel buttons and shortcut keys setting. Note: When you complete setting up your barrel buttons and shortcut keys, click the OK button to save and exit the tablet settings menu first. -
Page 12
1.7. Express Keys Setting In this tab, you may edit the functions of the Artsit 12’s shortcut keys. Use the “Definition” option to program custom keystrokes. Disable express keys: When you enable it, all of the express keys function will be disabled. Hide hints: When you enable it and press any express key, the message will not popup on the bottom of your screen. -
Page 13
Image 4-12: Touch bar Note: You can set each shortcut key for different software. a. Click the “+” button to go to Select Program tab. Image 4-13: Select Program b. You can choose Default or use Browse to select your choice of software. -
Page 14
1.9. Display Setting a. Color Temperature: Use to adjust the Artist 12’s color balance. b. User: Use to adjust red, green and blue color levels on the Artist 12’s display. Brightness and contrast can also be adjusted here. c. Rotate: You may rotate the Artist 12’s display in this tab. -
Page 15: Mac
Image 4-17: XP-Pen logo Notes: (a). The Artist 12’s shortcut keys are designed to work with US English keyboards. Keys may not function correctly with the other keyboard languages. (b). By default, the Artist 12 express keys are mapped to standard Photoshop keyboard shortcuts. Keys can be customized to function efficiently in other software.
-
Page 16
You can use the Import & Export Profile function to save/load your barrel buttons and shortcut keys setting. Image 4-20: Export configuration file Image 4-21: Import configuration file 1.3. Monitor The “Monitor” tab allows you to configure your tablet for use Main monitor (monitor1) or Artist 12 (monitor2). Image 4-22: Monitor… -
Page 17
1.4. Express Keys In the Express Keys tab, you may choose your preferred functions for the Artist 12’s shortcut keys. Use the “Reset Customer Defined” option to program custom keystrokes. Image 4-23: Express Keys Image 4-24: Action Setting 1.5. Calibration The Calibration tab allows you to calibrate your tablet or rotate your display. -
Page 18: Driver Uninstall
Open [Finder]→ [Application]→ [Pen Tablet], then click “Uninstall Pen Tablet” and follow the on-screen instructions. Image 5-1: Mac uninstall NOTE: When attempting to reinstall the Artist 12 driver, be sure to reboot your computer after the uninstall is complete. { VI. FAQ } 1. Where can I download the latest Artist 12 driver? a.
-
Page 19
If you can’t test the pen pressure, please uninstall the driver and reboot. Make sure your computer login account has Administrator authority. e. The Artist 12 supports plug and play, please test your stylus pens function before reinstalling the driver. If you have control, please disable your antivirus then go to the XP-Pen website to download the latest driver.

Благодарим Вас за покупку XP-Pen Artist 12 Pro, 13.3 Pro и 15.6 Pro. В настоящее время
руководство пользователя нашего продукта поддерживает английский, русский, японский,
немецкий, корейский, китайский, итальянский, испанский и французский языки. Мы приносим
свои извинения, если ваш язык не поддерживается.
{ I. Обзор продукта}
Обзор
(1). Дисплей/Рабочая зона
(2). Горячие клавиши
(3). Колесо управленич
(4). Порт USB
(5). Увеличение яркости
(6). Уменьшение яркости
(7). Световой индикатор:
а. Синий: Artist 12 Pro, 13.3 Pro и 15.6 Pro подключены к вашему компьютеру и включены.
б. Световой индикатор не активен: Artist 12 Pro, 13.3 Pro и 15.6 Pro выключены.
{ II.Подключение Artist 12 Pro,
13.3 Pro и 15.6 Pro }
1.Подключитесь к интернету.
2.Закройте все открытые приложения.
3.Подключите Artist 12 Pro, 13.3 Pro и 15.6 Pro к вашему компьютеру, используя один
из следующих двух способов:
a.сначала подключите USB кабель к Artist 12 Pro, 13.3 Pro и 15.6 Pro, а затем подключите кабель HDMI и
USB-кабели (черный и красный) к компьютеру;
Рис. 2.1. Подключение, способ А
б. сначала подключите USB кабель к Artist 12 Pro, 13.3 Pro и 15.6 Pro, затем подключите кабель HDMI и
черный USB-кабель к компьютеру. Подключите красный USB кабель к удлинителю, USB-адаптеру и
розетке.
Рис. 2.2. Подключение, способ Б
Примечания:
а. Не используйте USB кабель Type-C на Type-C для подключения к Artist 12 Pro, 13.3 Pro и 15.6 Pro.
б. Если ваш компьютер – настольный (стационарный) компьютер, подключите HDMI кабель Artist 12 Pro,
13.3 Pro и 15.6 Pro к той же видеокарте, что и обычный монитор.
{ III. Установка драйвера }
Поддерживаемые операционные системы:
ПРИМЕЧАНИЯ:
(1). Отключите любое антивирусное или программы комплексной сетевой защиты и закройте все
второстепенные фоновые программы перед началом установки. Некоторые программы, такие как
OneDrive и Dropbox, могут монополизировать важные файлы и воспрепятствовать успешной
установке. На компьютерах с системой Windows проверьте панель задач в правом нижнем углу
экрана и закройте все программное обеспечение, не связанное с аппаратным обеспечением
вашего компьютера.
(2). Прежде, чем устанавливать драйвер Artist 12 Pro, 13.3 Pro и 15,6 Pro, удалите все существующее
драйверы графических планшетов и интерактивных дисплеев. Другие драйверы графических
планшетов/интерактивных дисплеев могут конфликтовать с драйвером для Artist 12 Pro, 13.3 Pro и
15.6 Pro, или полностью помешать установке.
(3). Посетите официальный сайт XP-Pen, а затем загрузите и установите последнюю версию драйвера
для вашего устройства. После завершения загрузки обязательно извлеките содержимое файла
«.zip» перед запуском «.exe» или «.pkg»
(4). Artist 12 Pro, 13.3 Pro и 15.6 Pro имеет максимальное разрешение 1920x1080
Windows
1. Подключите Artist 12 Pro, 13.3 Pro или 15.6 Pro к вашему компьютеру, как показано на схеме на стр. 4
2. Посетите сайт XP-Pen — https://www.xp-pen.com/download/index/id/65.html и загрузите самую
последнюю версию драйвера, подходящей для вашей модели интерактивного дисплея.
3. После того, как zip-файл загрузился, откройте папку Загрузки и найдите zip файл.
4. Откройте эту папку zip — внутри вы увидите папку с тем же именем, что и zip-файл.
5. Извлеките эту папку из zip папки на рабочий стол, щелкнув левой кнопкой мыши и переместив ее из
zip папки на рабочий стол. Очень важно, чтобы файл распаковывался на рабочий стол, иначе
программа не будет установлена правильно.
6. Откройте извлеченную папку, дважды щелкнув правой кнопкой мыши на файл .exe, найденном
внутри, и выберите «Запуск от имени администратора». Когда система предложит вам, хотите ли вы,
чтобы этот файл внес изменения, выберите «Да»
7. Следуйте подсказкам программы установки, чтобы установить драйвер.
8. Когда драйвер завершит установку, перезагрузите ваш компьютер
9. После успешной установки иконка драйвера( ) появится на панели задач вашего ПК. Если иконка
отсутствует, удалите драйвер, перезагрузите компьютер и повторите шаг 2. Щелкните правой
кнопкой мыши по рабочему столу и выберите «Параметры дисплея». Отрегулируйте монитор
«Размер текста, приложений и т. д.» до 100%.
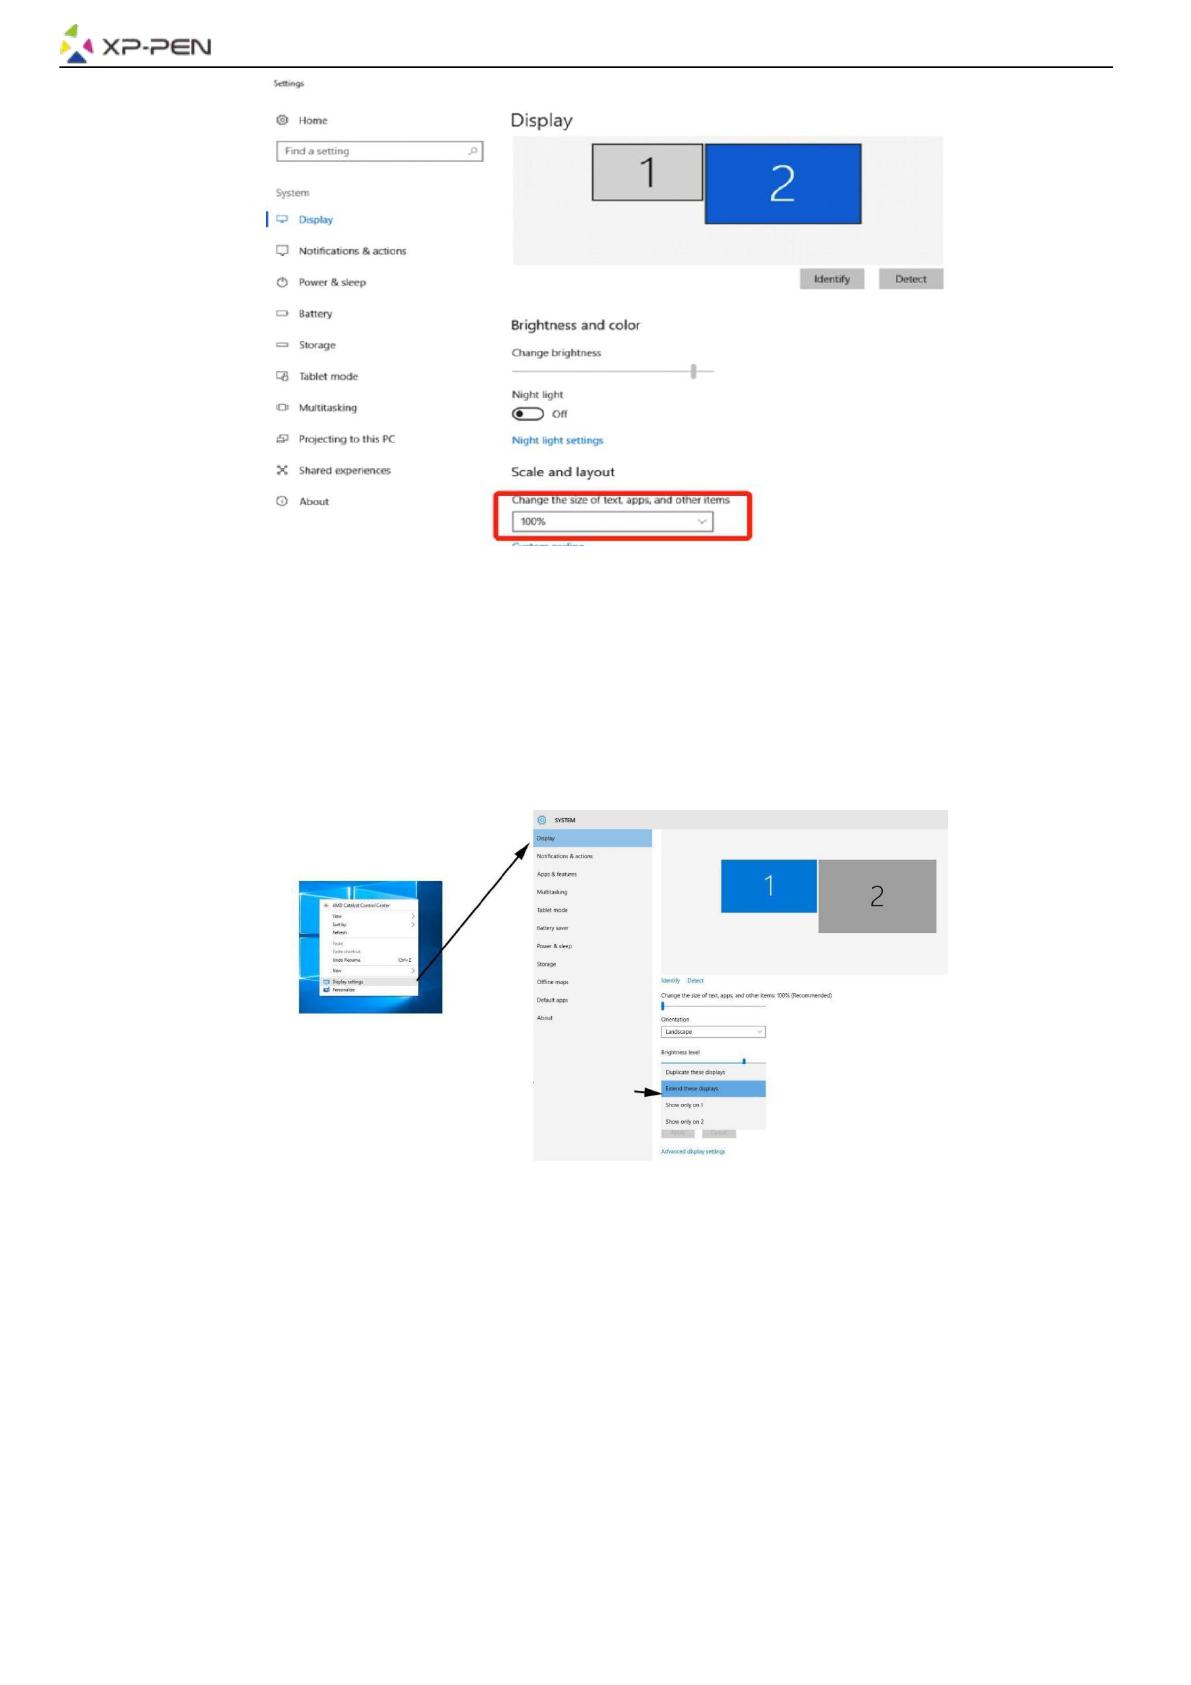
Рис. 3.1. Регулировка параметров текста, приложений и т. д.
1. В настройках дисплея вы можете установить значения для монитора «Расширить эти дисплеи» или
«Дублировать эти дисплеи».
2.В расширенном режиме установите Artist 12 Pro, 13.3 Pro и 15.6 Pro на монитор 2 и выберите
разрешение 1920×1080.
3.В режиме дублирования установите одно и тоже разрешение на оба монитора.
Рис. 3.2. Настройки дисплея
4. Нажмите “ОК” для выхода.
5. Для того, чтобы открыть настройки интерактивного дисплея, щелкните дважды на иконку на панели
задач в драйвере интерактивного дисплея. Установите “Текущий экран” вашего Artist 12 Pro, 13.3 Pro
или 15.6 Pro на монитор 2, затем «применить» и «выйти».
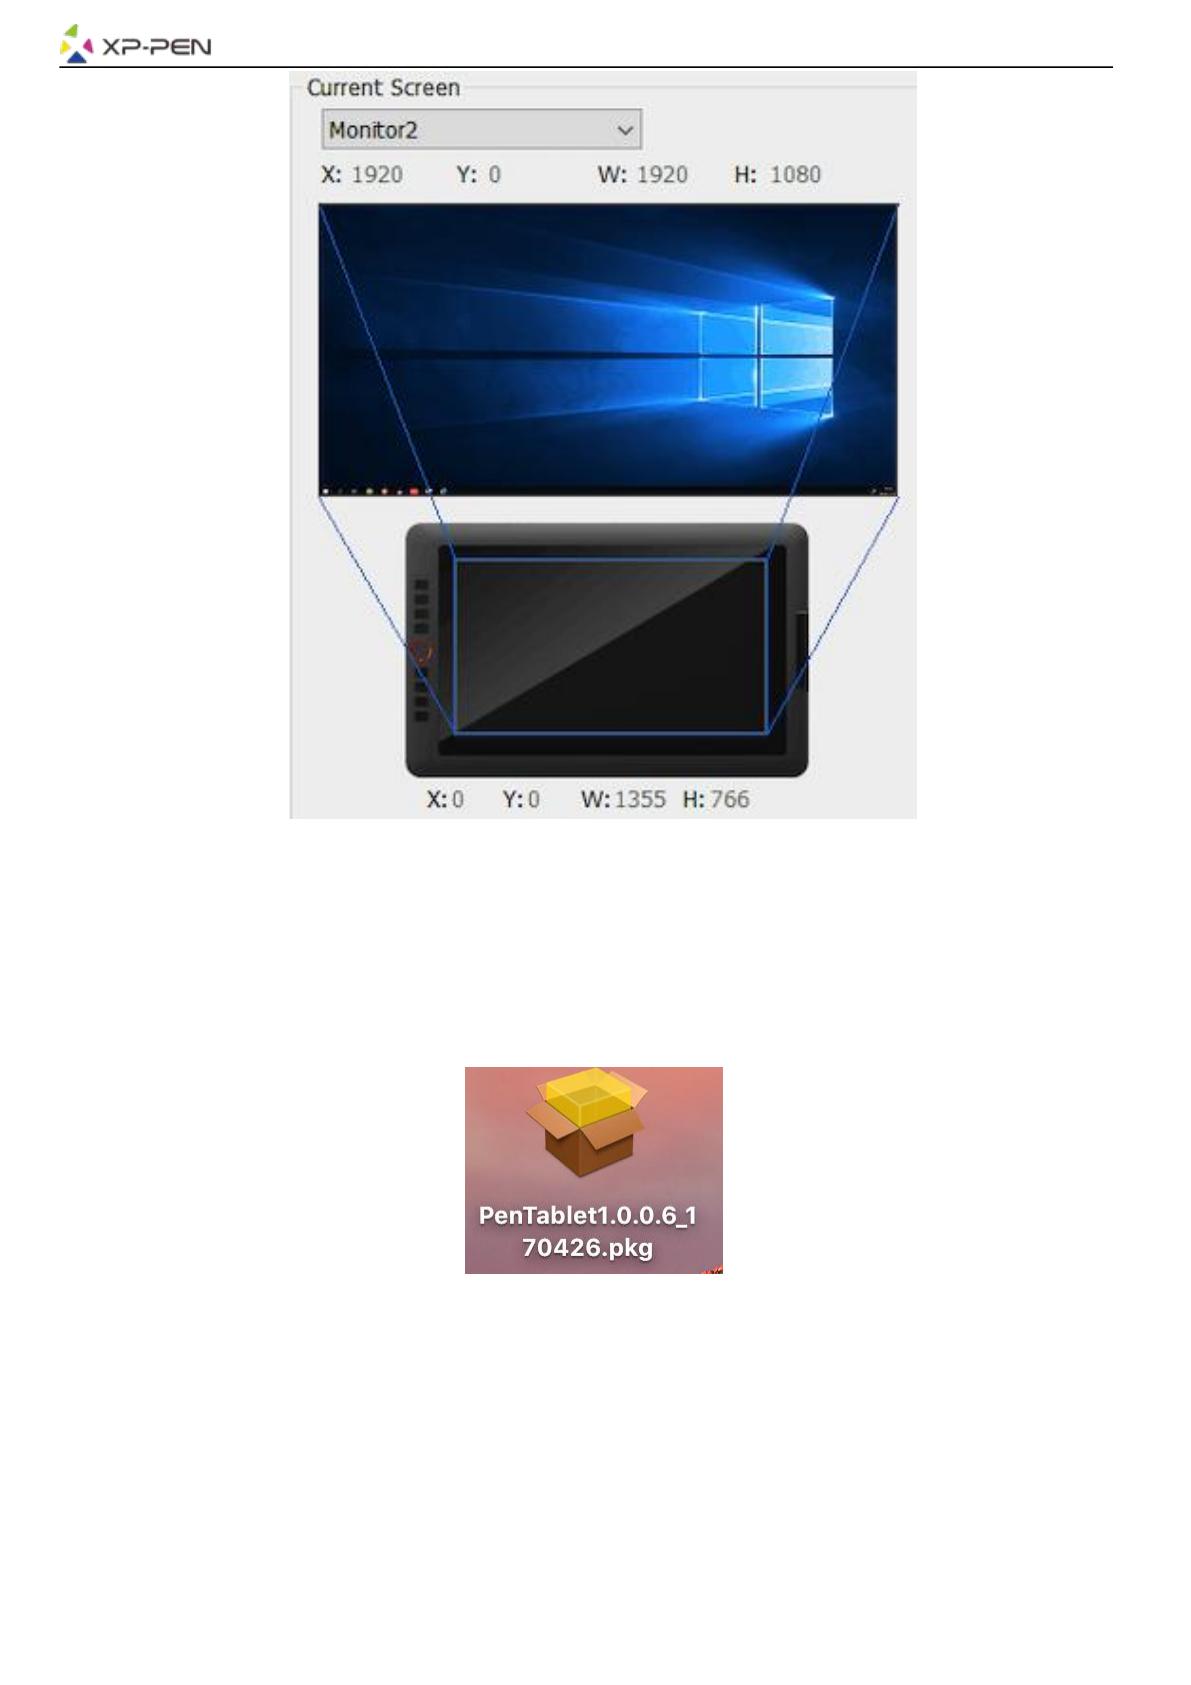
Рис. 3.3. Соответствие точек монитора и интерактивного дисплея
1. Вначале подключите USB кабель к Artist 12 Pro, 13.3 Pro или 15.6 Pro, а после подключите кабель HDMI
и кабели USB (черный и красный) к вашему компьютеру.
2. Загрузите последнюю версию драйвера с сайта XP-Pen и убедитесь, что вы распаковали содержимое
файла “zip” на ваш ПК перед запуском файла “.pkg”.
Рис. 3.4. Драйвер для Mac
3. Следуйте инструкциям на экране до завершения установки.
4. Откройте “Системные настройки”- “Дисплей”, а затем установите разрешение на “Для дисплея по
умолчанию”.
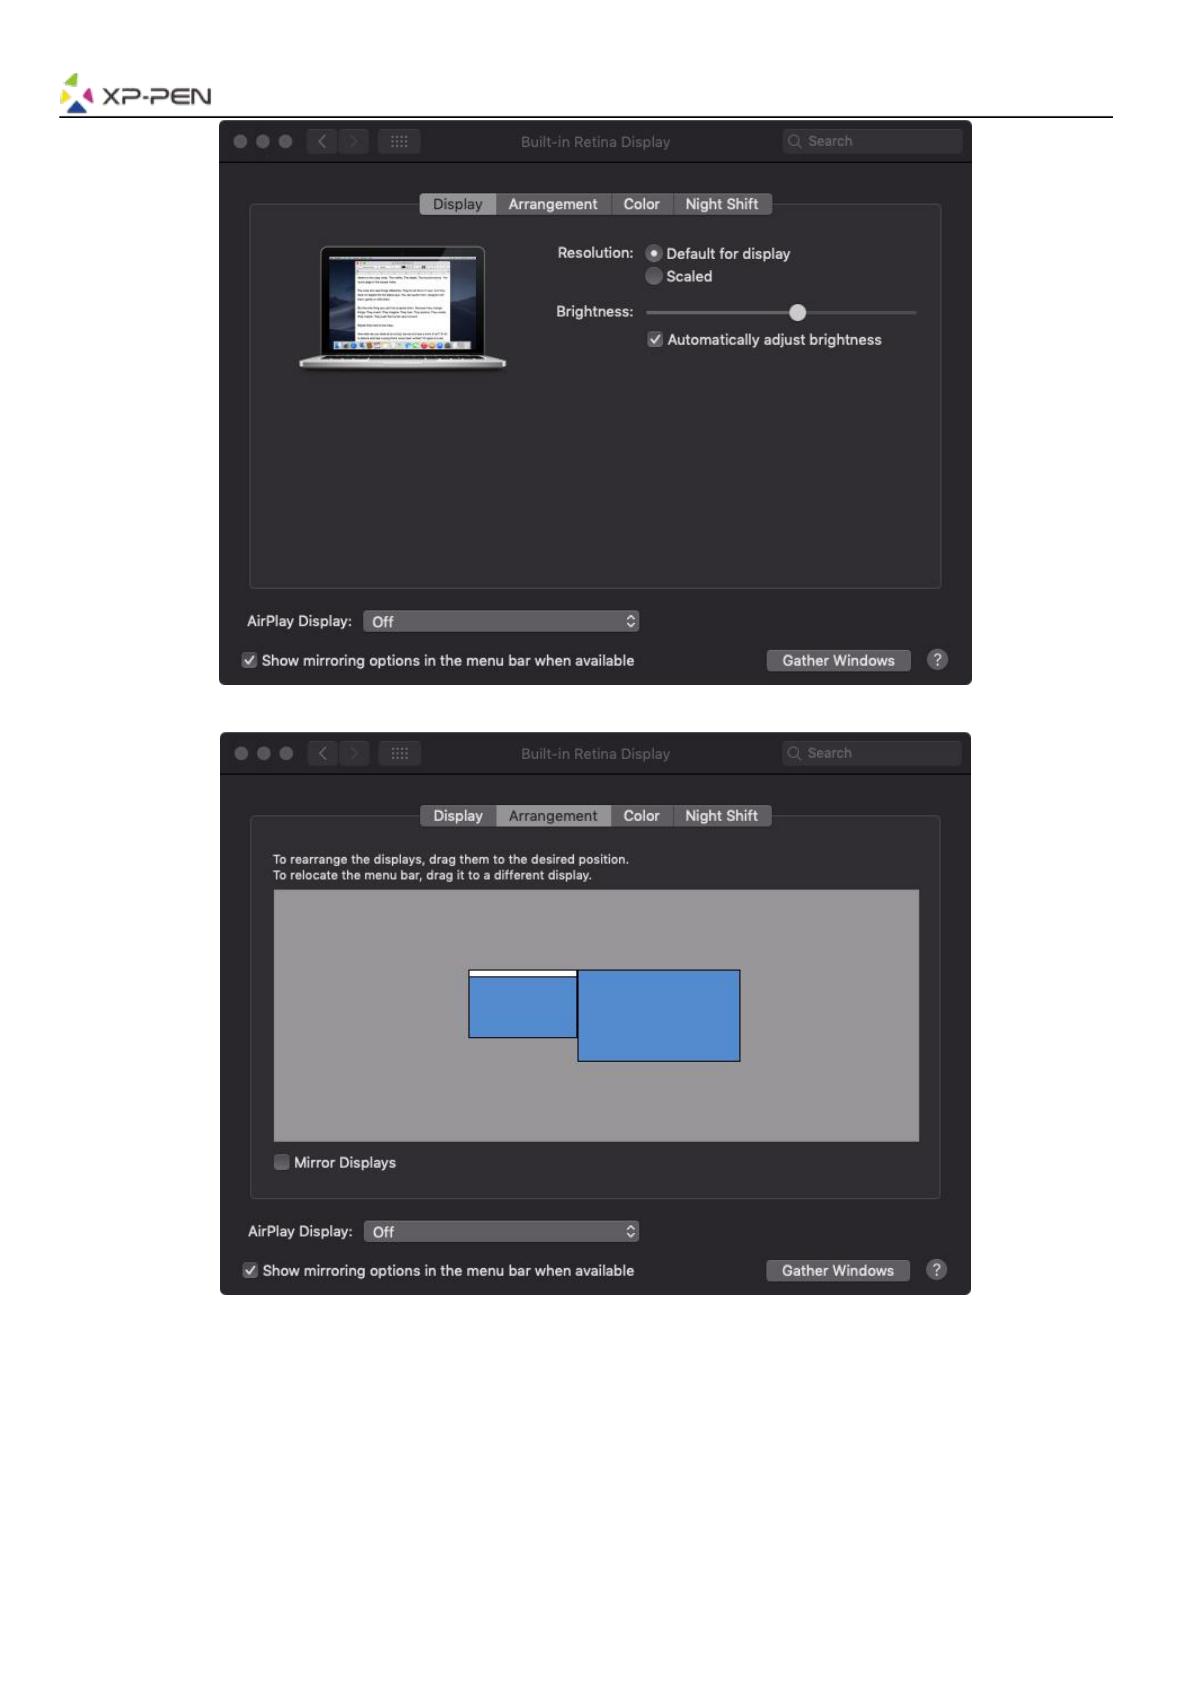
Рис. 3.5. Настройка разрешения
Рис. 3.6. Настройка зеркальногоотображения
5. Во вкладке Расположение вы можете выбрать Зеркальное отображение. При
включенном зеркальном отображении, разрешение обоих мониторов должно
быть одинаковым.
(5.1) Откройте “Finder” -” Приложения”- “PenTablet”- “Настройки PenTablet”.
(5.2) На вкладке Монитор, установите отображение монитора для iMac/Color LCD.
6. При отключенном зеркальном отображении установите разрешение 1920×1080 для вашего Artist 12
Pro, 13.3 Pro, 15.6 Pro.
(6.1) Откройте «Finder» — «Приложения» — «PenTable» — «Настройка PenTablet».
(6.2) На вкладке Монитор установите отображение монитора для Artist 12 Pro, 13.3 Pro или 15.6 Pro.
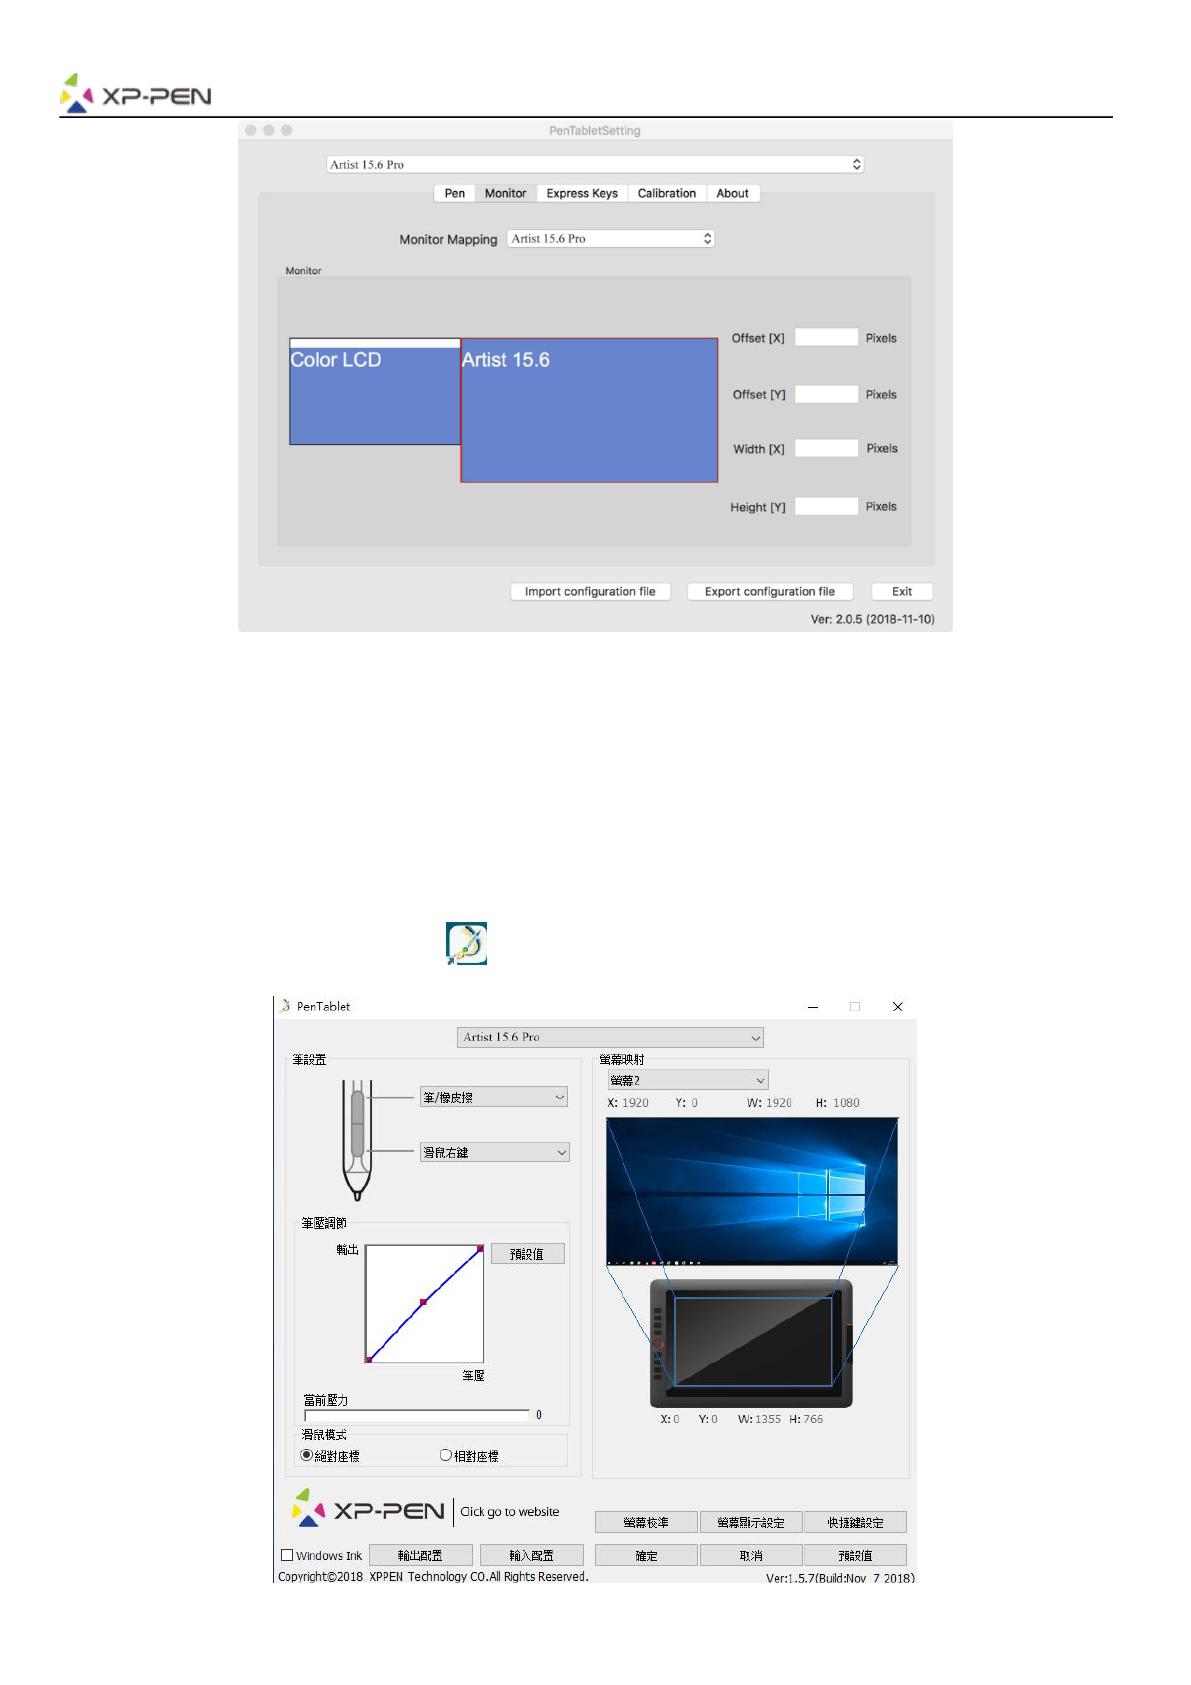
Рис. 3.7. Вкладка Монитор
{ IV. Настройка интерфейса
пользователя }
Windows
Дважды щелкните иконку драйвера ( ) на панели задач
Driver UI
Рис. 4.1. Интерфейс пользователя драйвера интерактивного дисплея
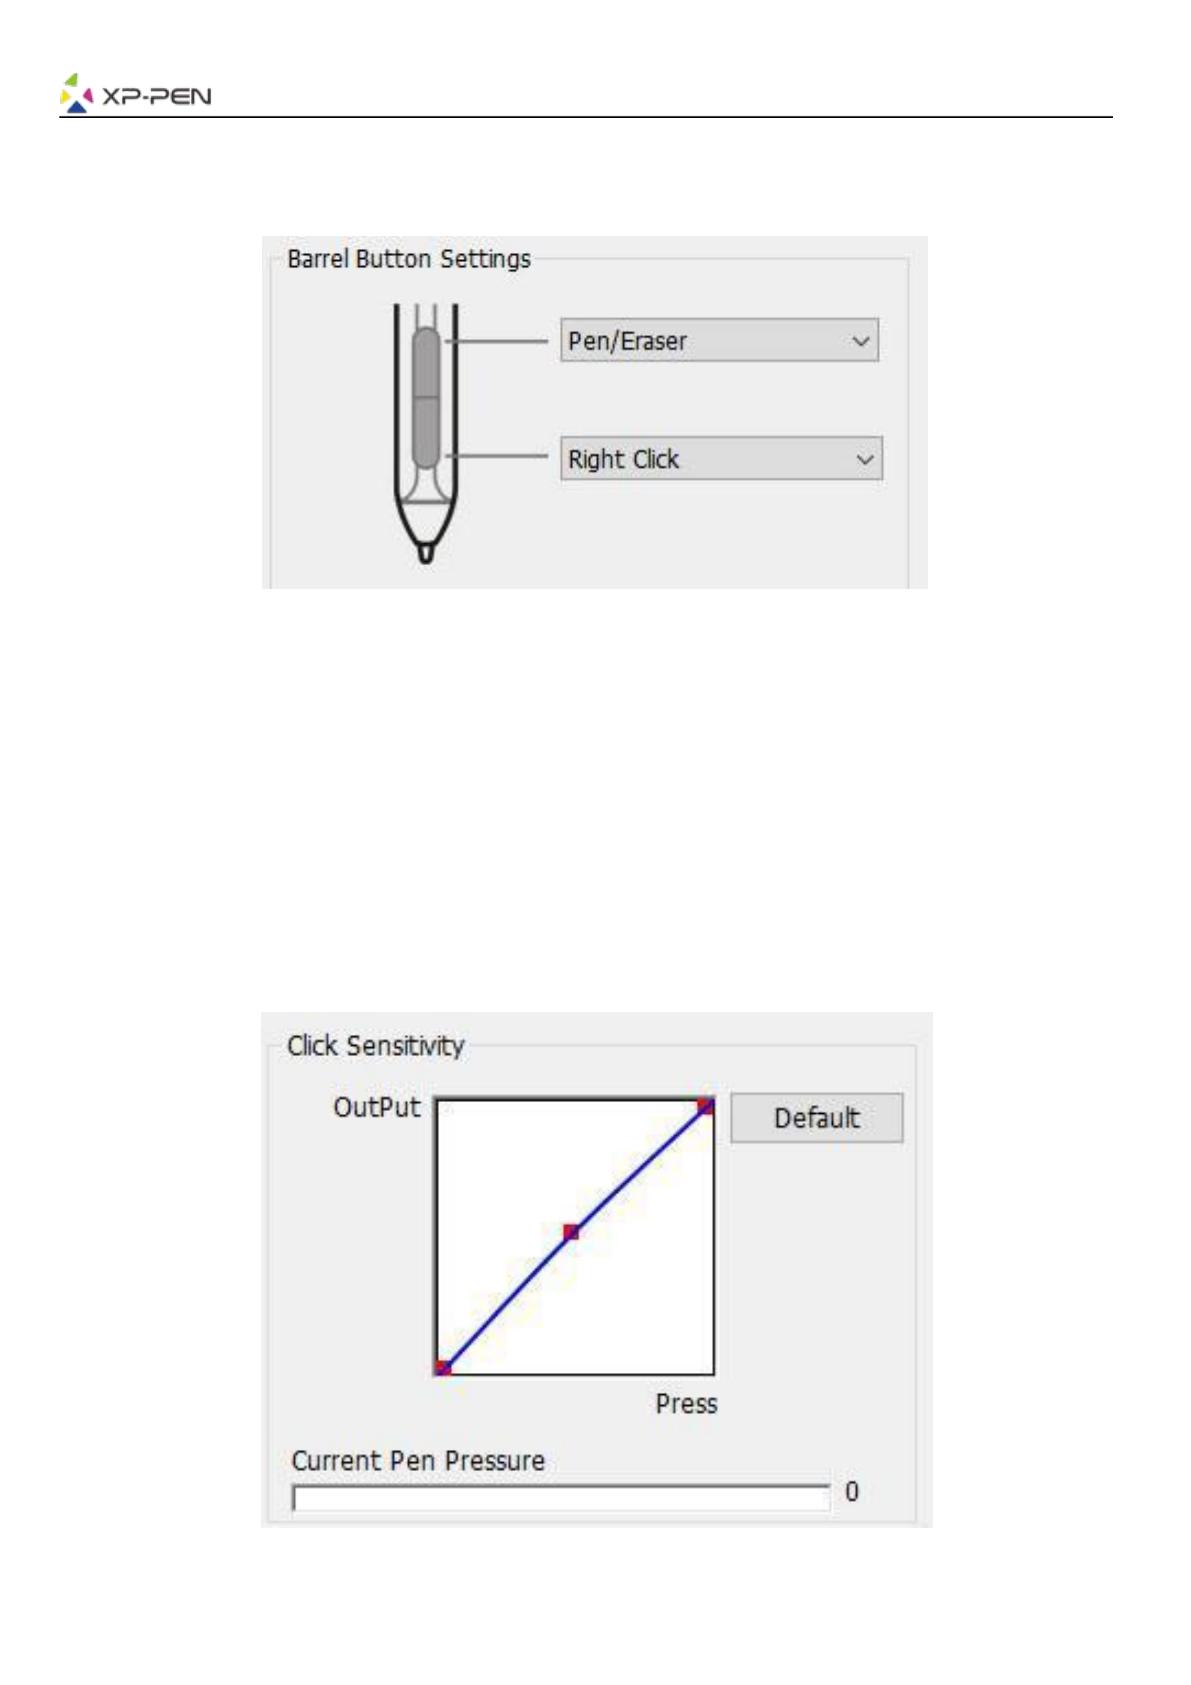
1.1. Настройка функций пера
Вы можете настроить функции кнопок пера. Используйте опцию «Функциональная клавиша» для
программирования пользовательских нажатий клавиш.
Рис. 4.2. Окно настройки пера
Примечание:
Перо: включение/выключение режима ластика
Чтобы переключаться между режимами пера и ластика в совместимом программном обеспечении
для рисования необходимо нажать назначенную на соответствующую функцию кнопку на пере. При
этом перо должно находится в рабочей зоне Artist12 Pro, 13.3 Pro или 15.6 Pro (до 1 см от рабочей
области интерактивного дисплея). Текущий режим будет отображаться на вашем мониторе.
1.2. Чувствительность пера и текущее давление пера
Возможна настройка динамической кривой давления пера и проверка работы пера.
Давление пера показывает текущий уровень давления на планшете и может быть использовано
для проверки уровней давления пера.
Рис. 4.3. Чувствительность давления пера и текущее давление пера
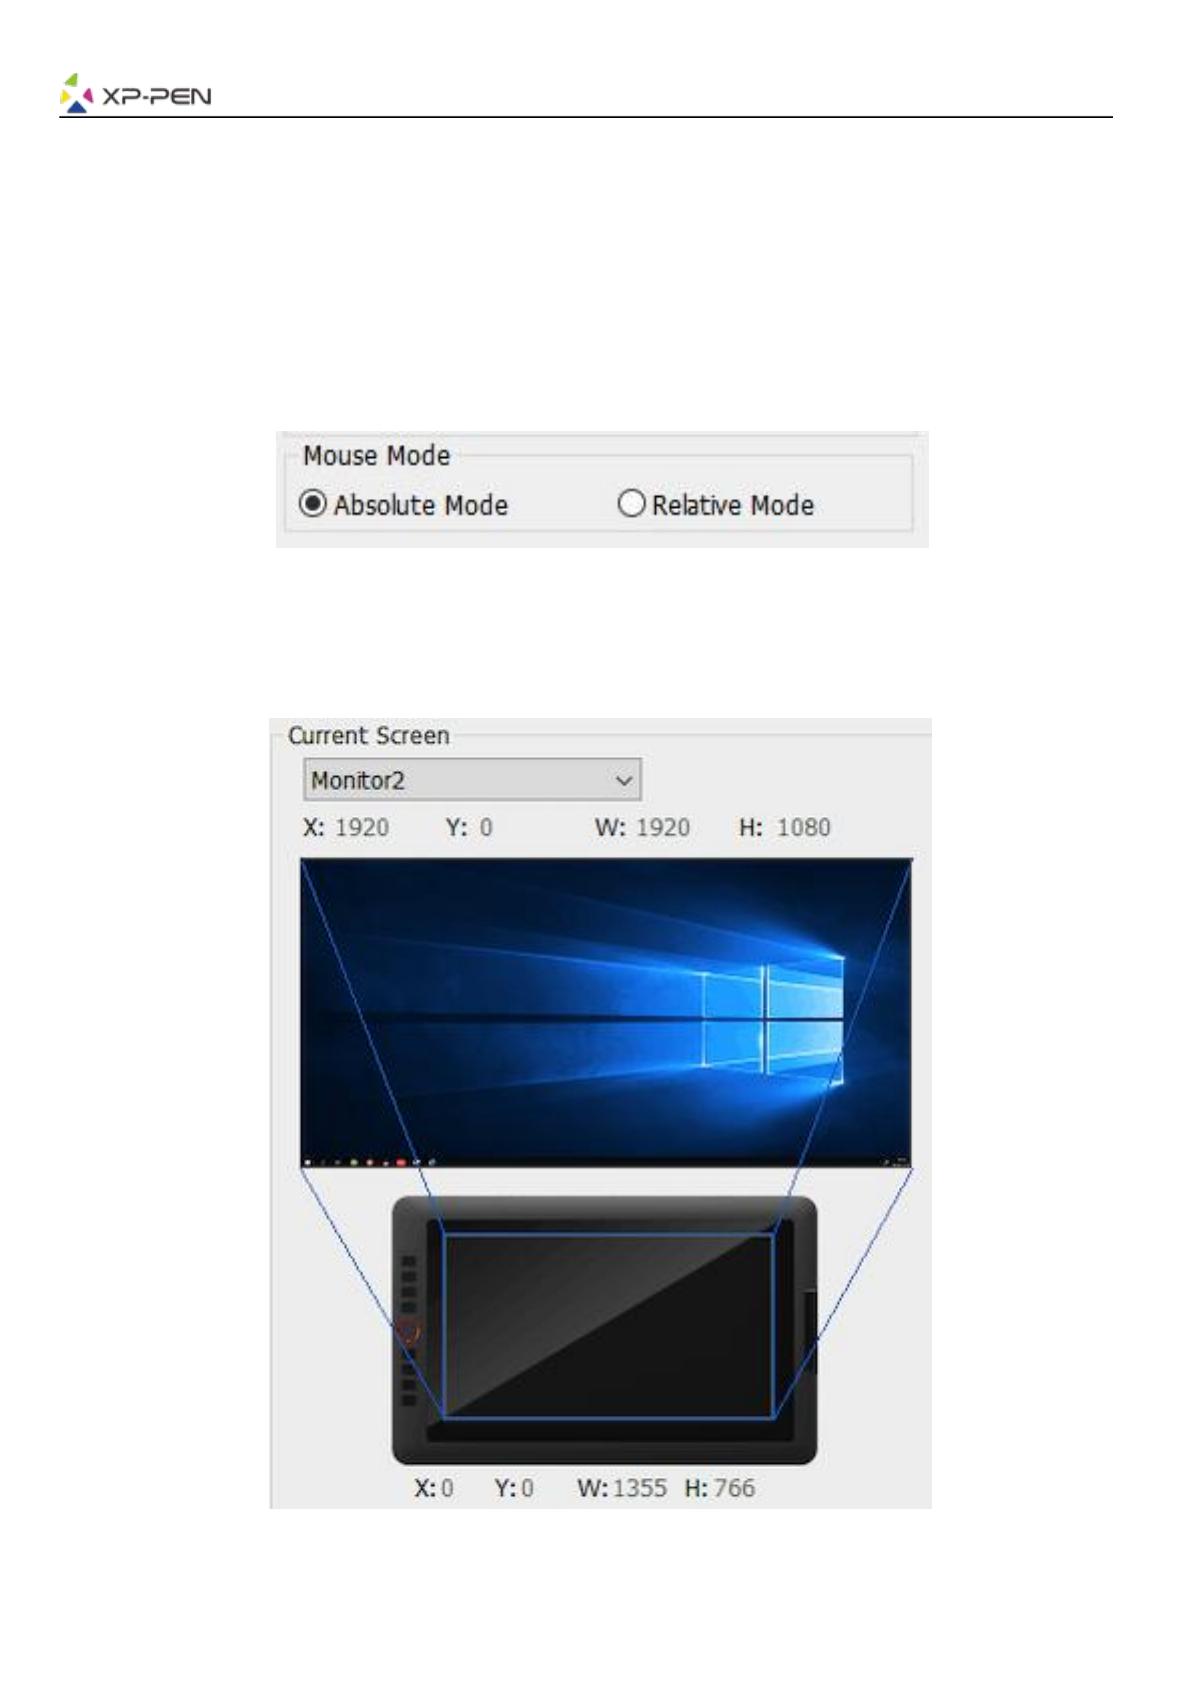
1.3. Режим мыши
Полный режим (перо): стандартный режим интерактивного дисплея; Каждая точка рабочей
области планшета соответствует абсолютной точке на дисплее компьютера.
Относительный режим (мышь): режим мыши; Рабочая область интерактивного дисплея не
соответствует абсолютным точкам на дисплее компьютера, а перо работает как стандартная
мышь.
Примечание:
Artist 12 Pro, 13.3 Pro и 15.6 Pro – это мониторы-планшеты (интерактивные дисплеи), поэтому,
установите его в Полный режим (пера), чтобы избежать проблемы смещения стилуса и курсора.
Рис. 4.4. Режим мыши
1.4. Текущий экран
Artist 12 Pro, 13.3 Pro и 15.6 Pro могут быть настроены для использования с одним или двумя
мониторами. Обычно, это устанавливается как на «Монитор 1» или «Монитор 2».
Рис. 4-5. Действующий экран
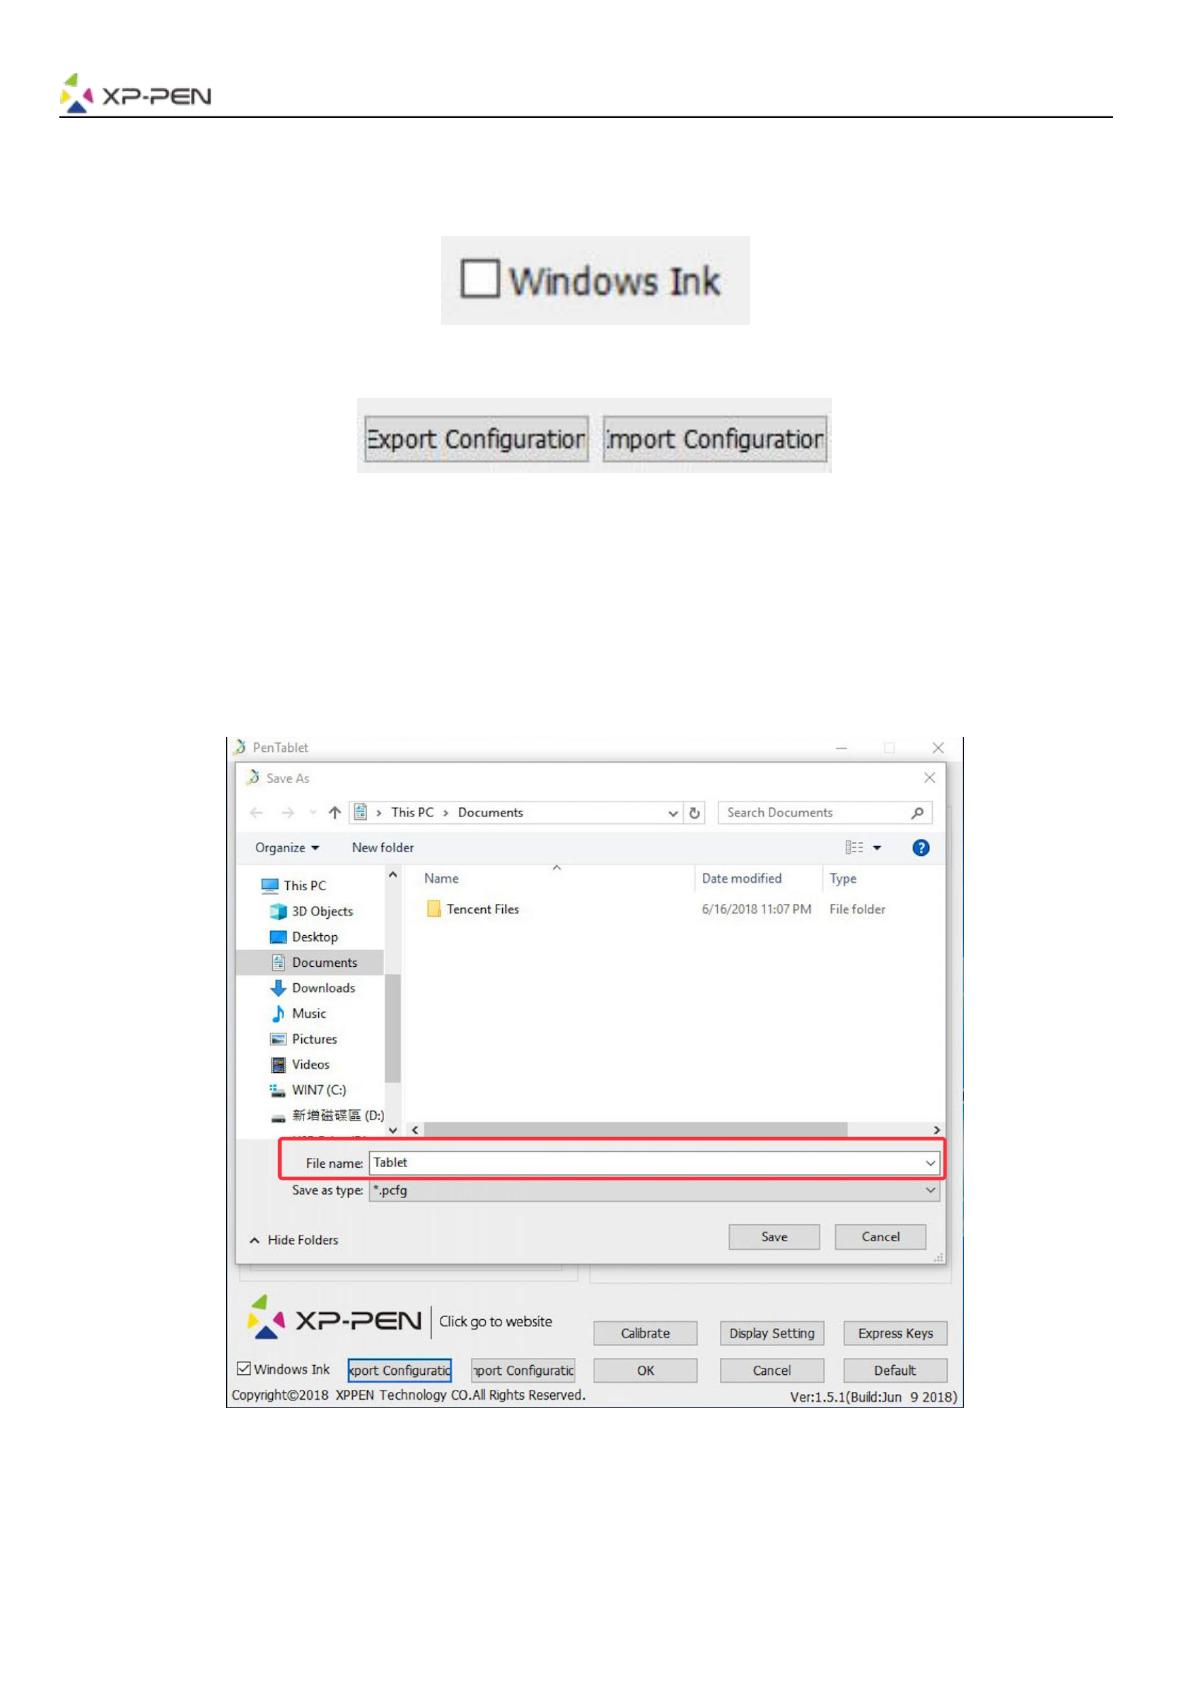
1.5. Windows Ink
Эта возможность может быть включена и выключена. Включение этого режима позволит
активировать поддержку Windows Ink и приложений, которые работают с использованием
Windows Ink.
Рис. 4.6. Windows Ink
1.6.Импорт и экспорт профилей
Рис. 4.7. Импорт и экспорт профилей
Вы можете использовать функцию Импорт и экспорт профиля для сохранения/загрузки настроек
ваших кнопок пера и настройки сочетаний клавиш быстрого доступа.
Примечание:
Когда вы закончите настройку кнопок пера и клавиш быстрого доступа, нажмите кнопку ОК, чтобы
сохранить и выйти из меню настроек интерактивного дисплея. Снова откройте настройки
интерактивного дисплея и нажмите Экспорт конфигурации.
Рис. 4.8. Профиль экспорта
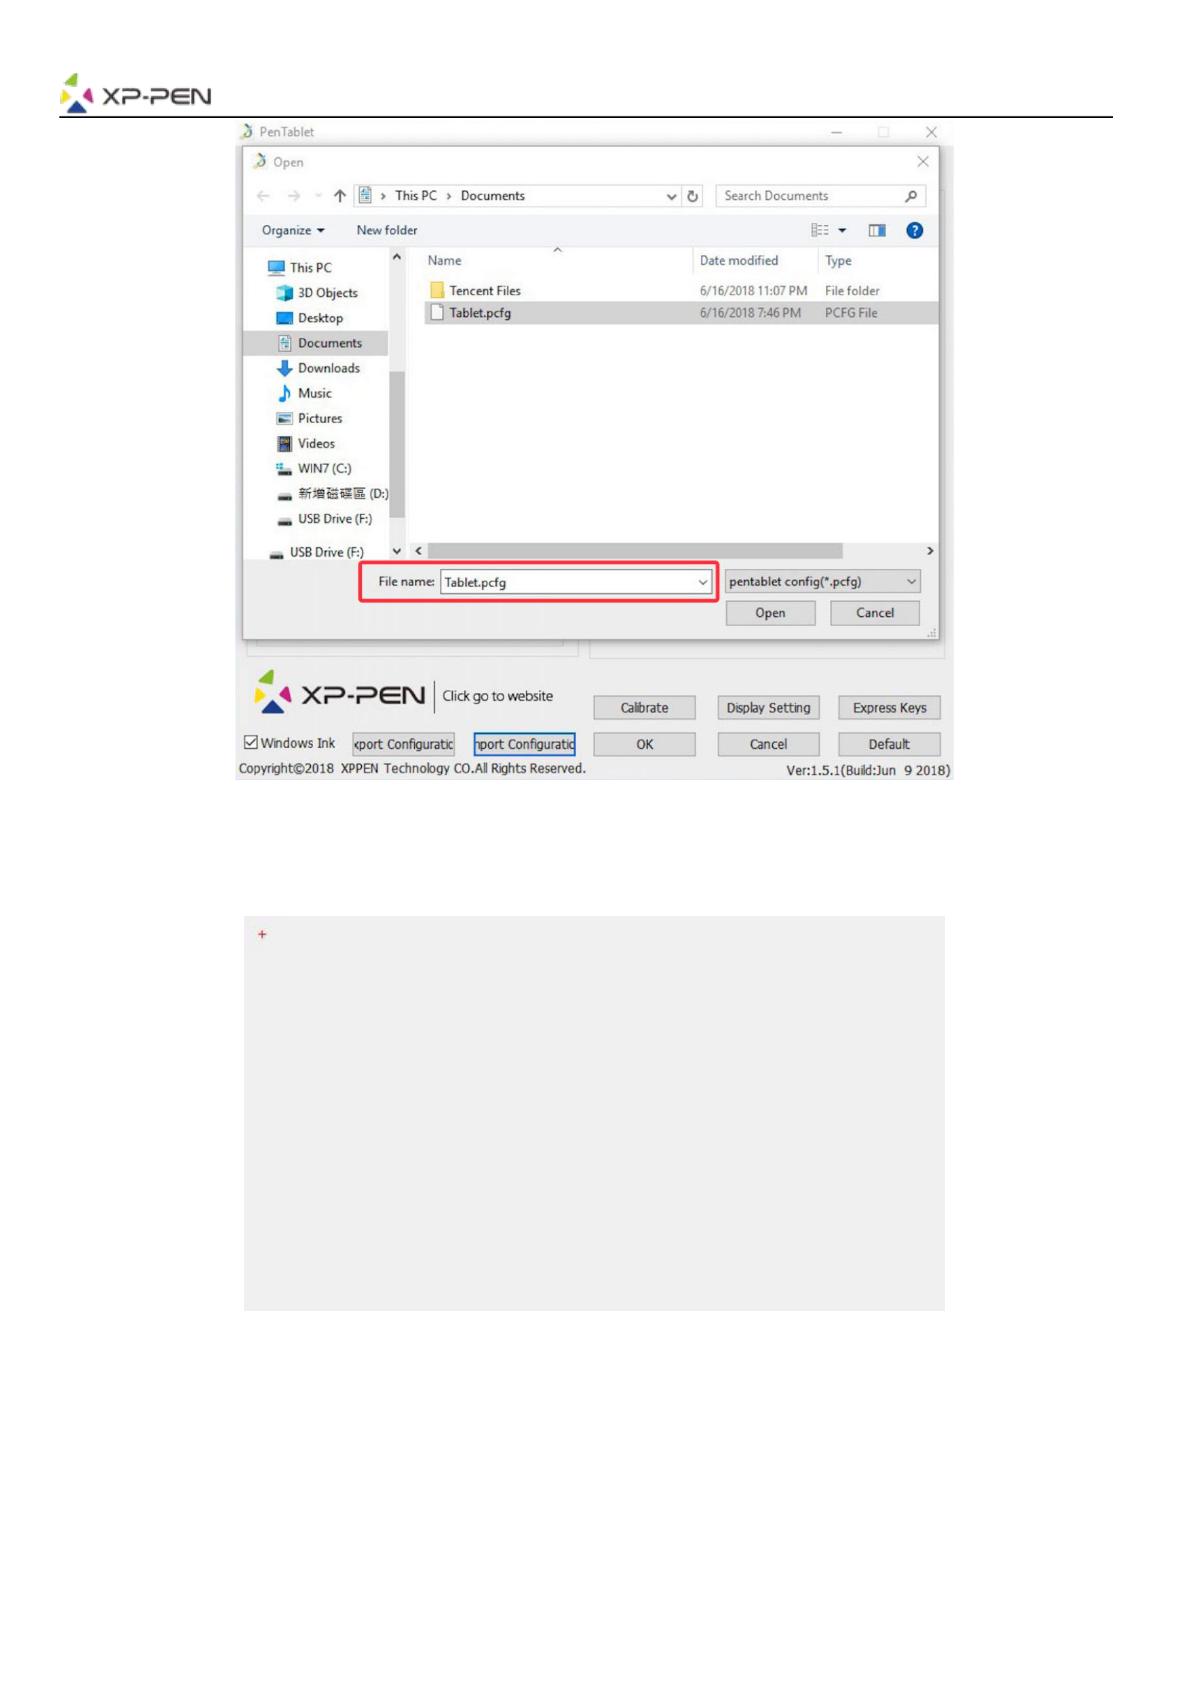
Рис. 4.9. Профиль импорта
1.7. Калибровка
Вкладка Калибровка позволяет вам откалибровать ваш интерактивный дисплей.
Рис. 4.10. Калибровка
1.8. Настройка экрана
a. Цветовая температура: используйте для регулировки цветового баланса Artist 12 Pro, 13.3 Pro и
15.6 Pro.
Б. Пользователь: используйте для регулировки уровней красного, зеленого и синего цветов на
дисплее Artist 12 Pro, 13.3 Pro и 15.6 Pro. Также здесь можно отрегулировать яркость и
контрастность.
c. Повернуть: на этой вкладке вы можете повернуть дисплей Artist 12 Pro, 13.3 Pro и 15.6 Pro (для
адаптации под левую руку используйте поворот на 1800).

Рис. 4.11. Настройки дисплея
Примечания:
а. Когда вы устанавливаете функцию поворота, вы также должны повернуть сам Artist 12 Pro, 13.3 Pro и
15.6 Pro.
б. Сначала необходимо в настройках Windows установить отображение рабочего стола на мониторе
Artist 12 Pro, 13.3 Pro и 15.6 Pro, после чего вы можете применить функцию вращения.
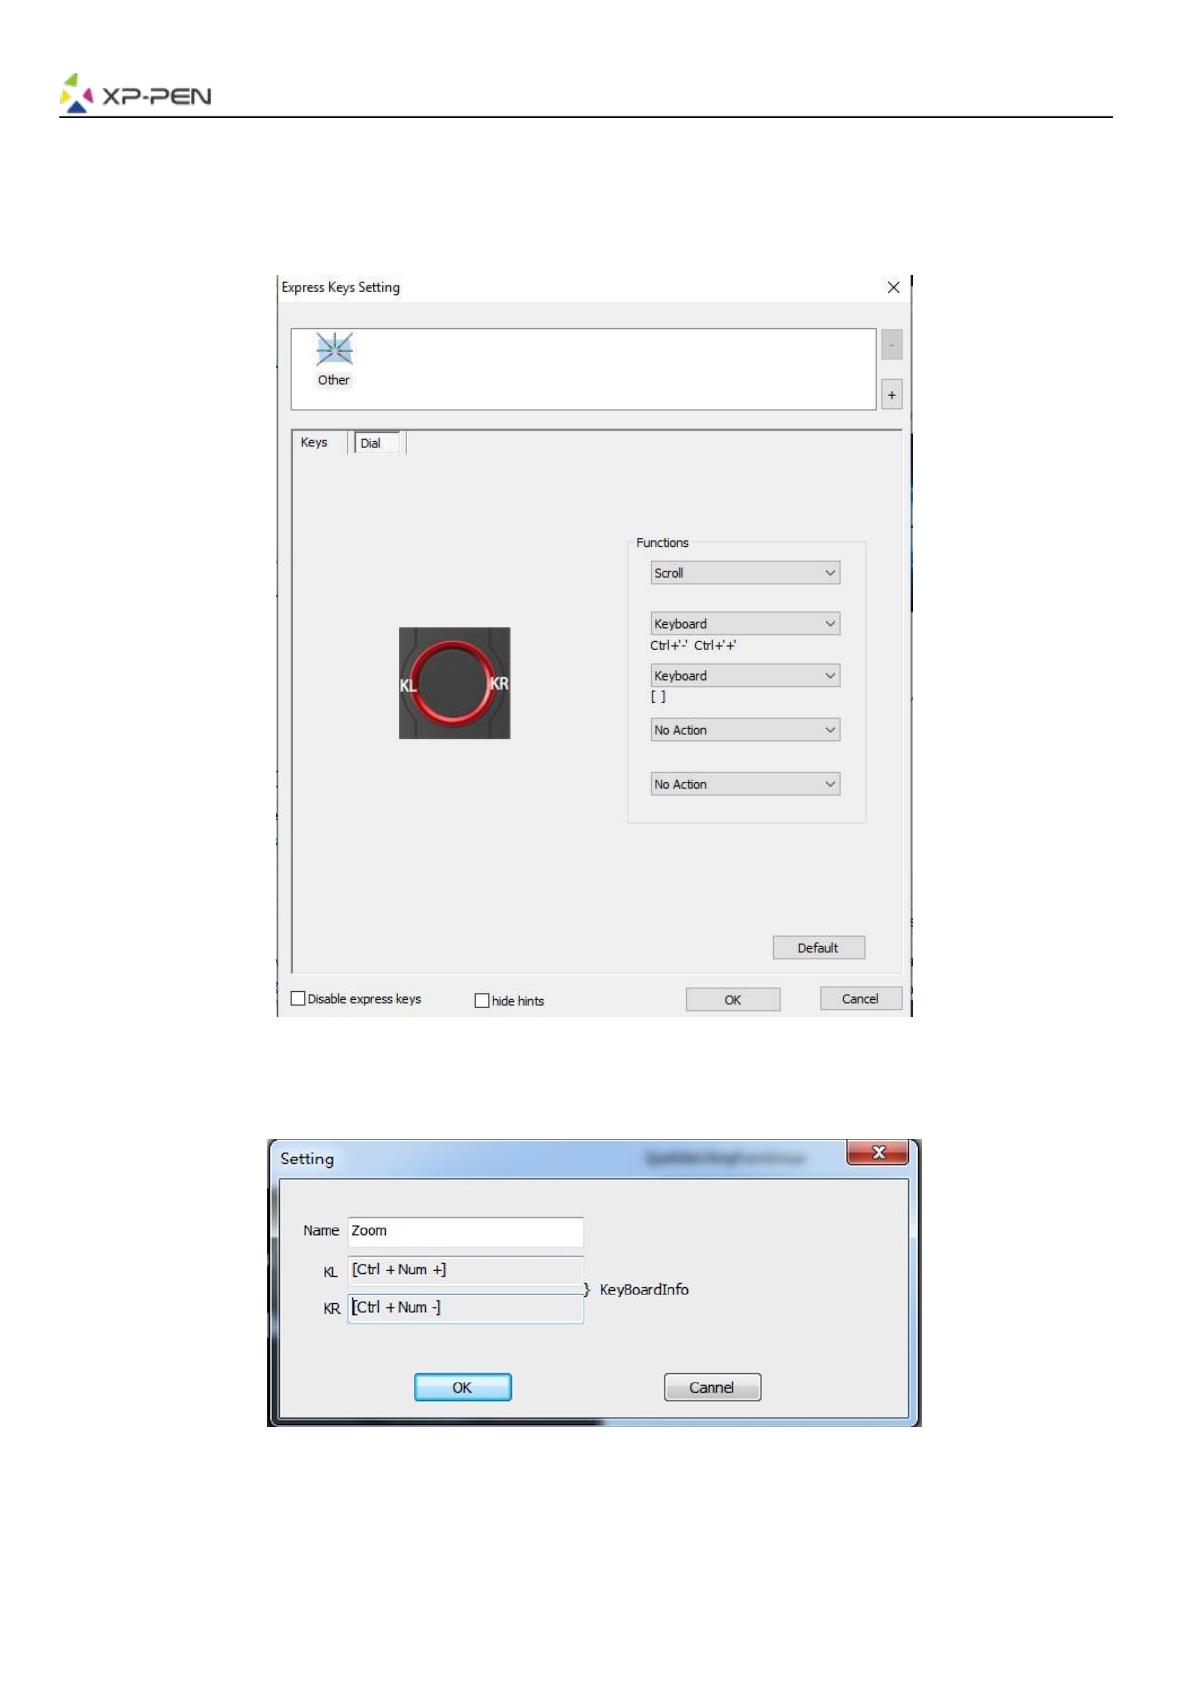
1.9. Настройка горячих клавиш (экспресс-клавиш)
Примечание:
а. Сочетания горячих клавиш Artist 12 Pro, 13.3 Pro и 15.6 Pro предназначены для работы с раскладкой
клавиатуры американского английского языка. С другими языками экспресс-клавиши могут
работать некорректно.
б. По умолчанию экспресс-клавиши Artist 12 Pro, 13.3 Pro и 15.6 Pro настроены на стандартные
сочетания клавиш Adobe Photoshop. Горячие клавиши могут быть настроены для эффективного
функционирования и в другом программном обеспечении.
c. Чтобы иметь возможность переключать функции колеса следует установить одну экспресс-
клавишу как переключение функций колеса.
Рис. 4.12. Язык клавиатуры

Примечание:
Режим поиска деталей позволяет рабочей области Artist 12 Pro, 13.3 Pro и 15.6 Pro сфокусироваться на
области небольшого размера, чтобы выполнить детальное рисование и редактирование.
Вы можете установить разные комбинации клавиш для разных программ.
а. Нажмите кнопку «+», чтобы перейти на вкладку Выбор программы.
Рис. 4.15. Выбор программы
б. Выбрате «По умолчанию» или «Обзор» для выбора программного обеспечения.
Рис. 4.16. Выбор программы
с. Вернитесь на вкладку настроек сочетания клавиш, нажмите значок планшета и настройте сочетания
клавиш. Когда вы закончите, нажмите кнопку ОК и выйдите из меню настроек планшета.
Вы можете установить разный набор горячих клавиш для разных программ.
а. Сначала нажмите иконку программного обеспечения, затем перейдите на вкладку «Ролик».
Рис. 4.17. Окно настройка колеса управления
б. Нажмите на каждую функцию кольца управления для ее установки.
с. На вкладке настроек вы можете настроить «KL» и «KR» для различных сочетаний клавиш, таких как
Ctrl + и Ctrl-.
Рис. 4.18. Настройка колеса управления
1.10.По умолчанию
Вы можете нажать кнопку «По умолчанию», чтобы восстановить настройки по умолчанию.
1.11. Логотип XP-Pen
Нажмите на наш логотип, чтобы посетить сайт.
Рис. 4.19. Логотип XP-Pen
Mac
Чтобы открыть настройки драйвера Artist 12 Pro, 13.3 Pro и 15.6 Pro, откройте Поиск — Приложения —
Настройки PenTablet.
Рис. 4.20. Настройки интрактивного дисплея
1.1. Перо
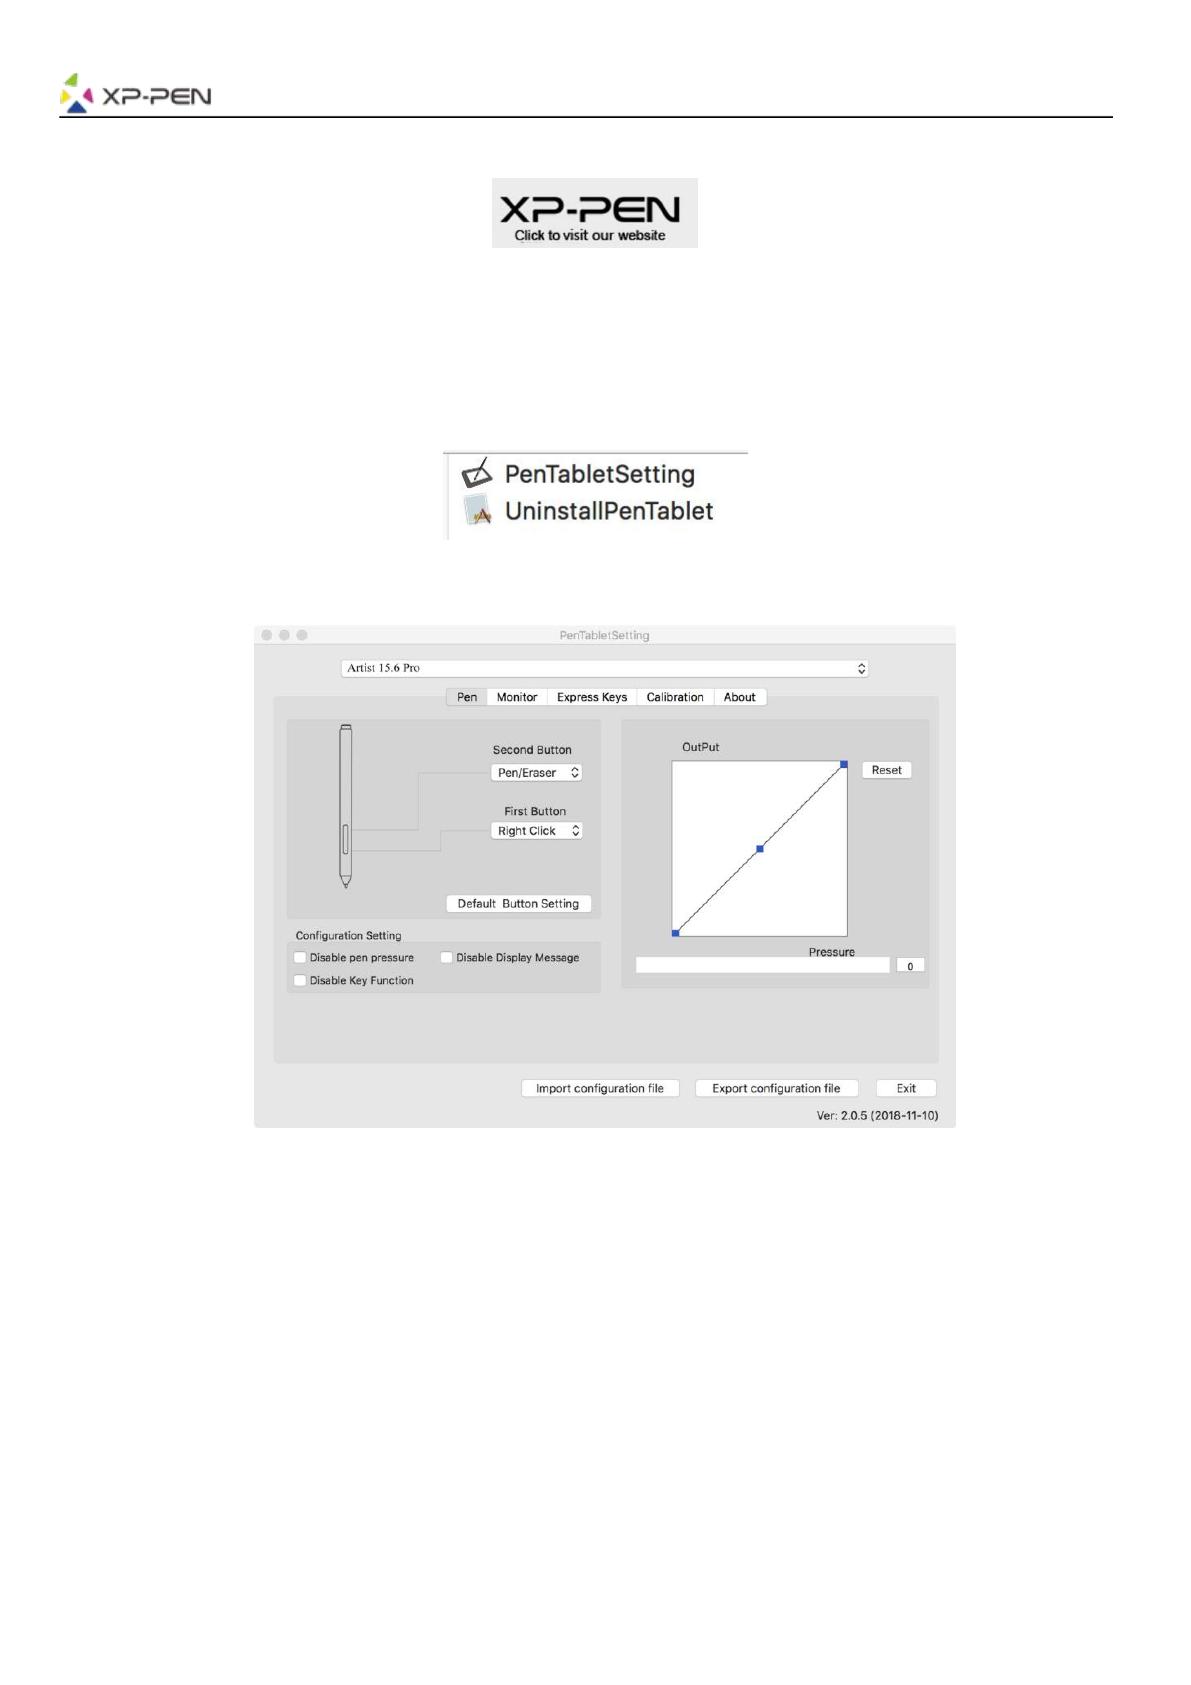
Рис. 4.21. Интрефейс пользователя драйвера для Mac
a.на этой вкладке вы можете настраивать функции кнопок пера, чувствительность к давлению и
проверить уровень давление пера.
б.нажмите «Настройка кнопки по умолчанию», чтобы вернуться к заводским настройкам.
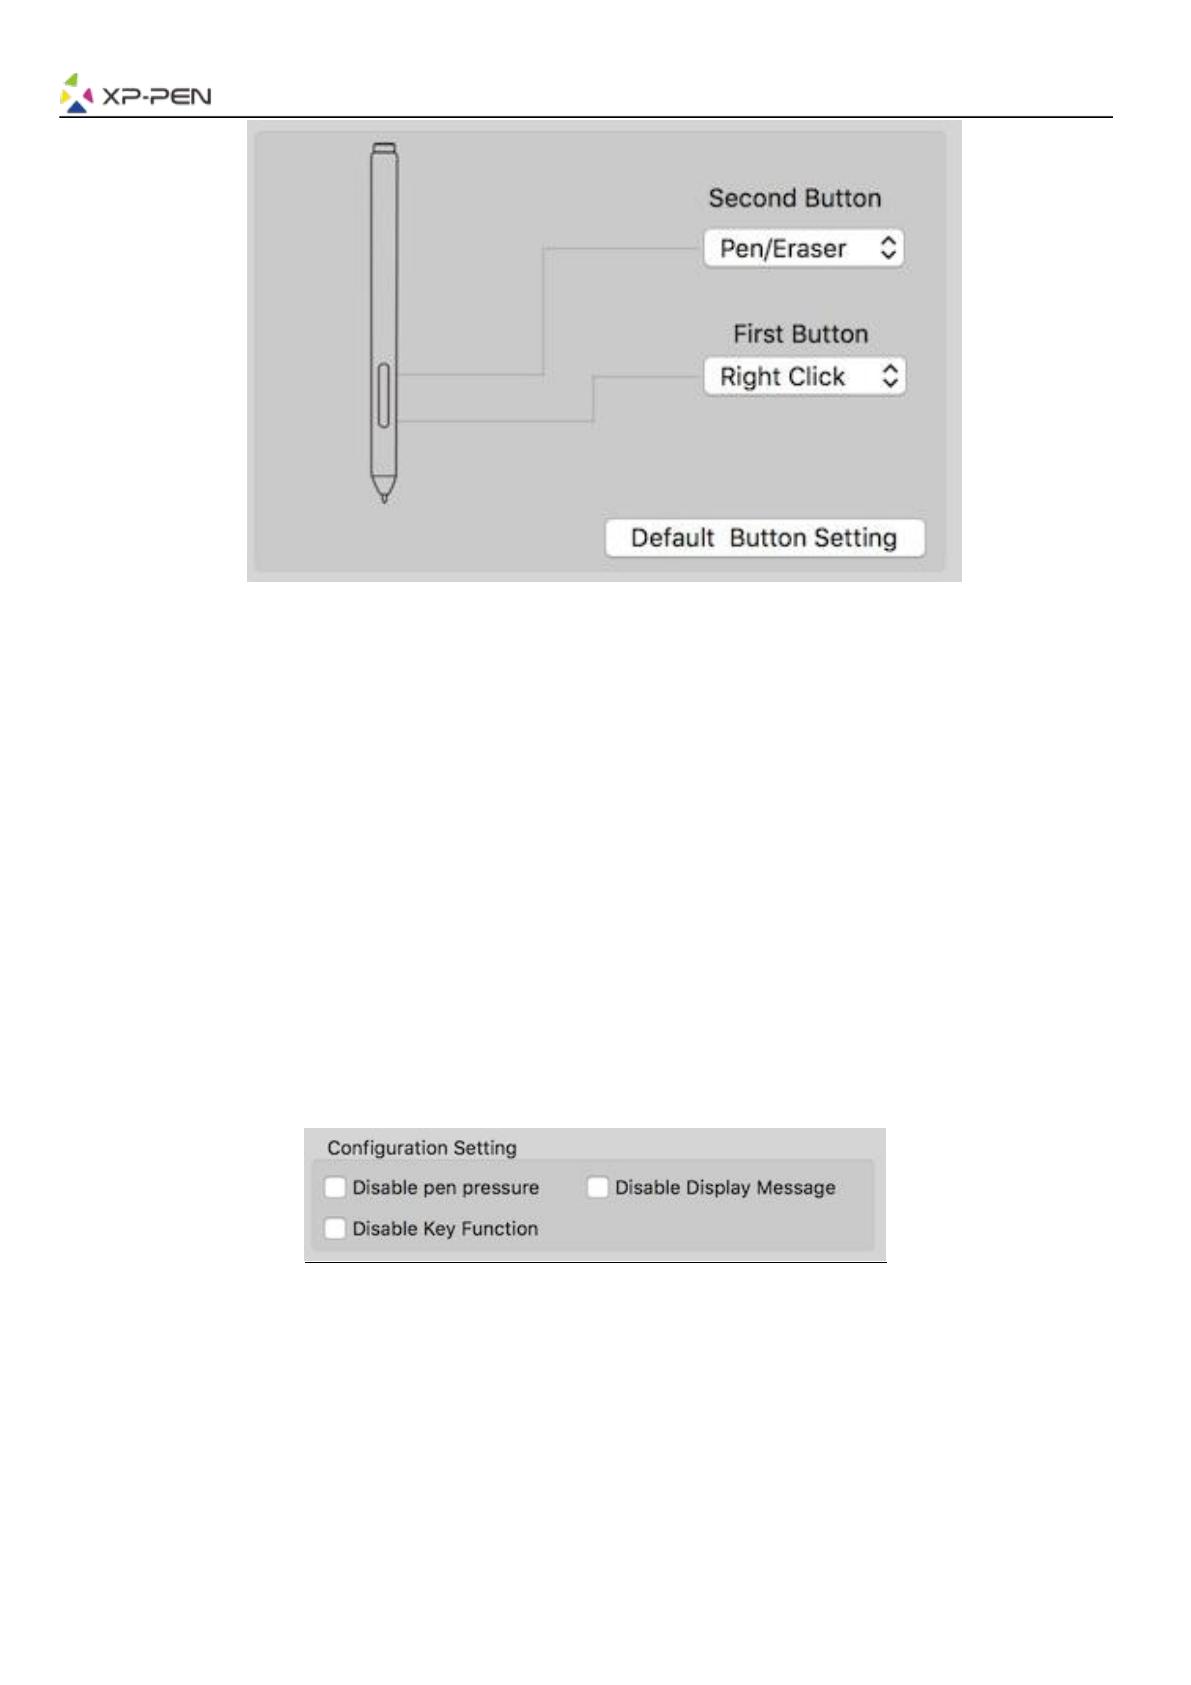
Рис. 4.22. Окно настройки пера
Примечания:
Перо: включение ластика
Чтобы переключаться между режимами пера и ластика в совместимом программном обеспечении
для рисования необходимо нажать назначенную на соответствующую функцию кнопку на пере. При
этом перо должно находится в рабочей зоне Artist12 Pro, 13.3 Pro или 15.6 Pro (до 1 см от рабочей
области интерактивного дисплея). Текущий режим будет кратковременно отображаться на вашем
мониторе.
c.Отключить давление пера: если активирована функция «Отключить давление пера», функция силы
нажатия пера отключена.
d.Отключить функцию клавиш: при активации все функции экспресс-клавиш будут отключены.
e.Отключить отображение сообщения: если вы активируете функцию и нажмете любую экспресс-
клавишу, всплывающее сообщение не появится в нижней части экрана.
Рис. 4.23. Настройки конфигурации
Здесь вы можете настроить динамическую кривую давления пера и проверить работу пера.
В окне отображена кривая с текущим уровнем давления и может использоваться для проверки
давления пера.
Графический планшет XP-PEN Artist 12
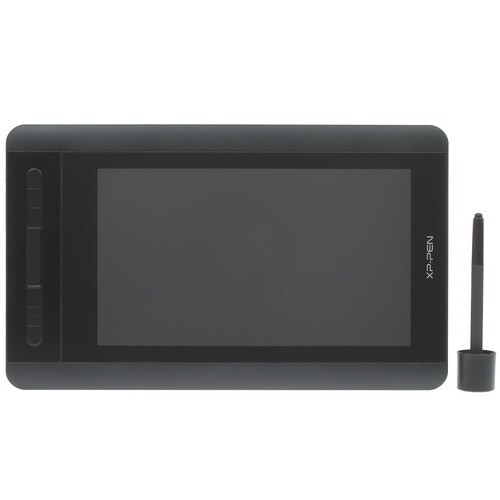
проводной, ввод — перьевой, 256×144 мм, 5080 lpi, перо — беспроводное, чувствительность — 8192 уровня, USB
подробнее

2
Код товара: 1286294