
RU
DIGITAL WORKSTATION
DIGITAL WORKSTATION
PSR-S91
0/
S710
U.R.G., Pro Audio & Digital Musical Instrument Division, Yamaha Corporation
© 2009 Yamaha Corporation
WR35380 906MWAPX.X-01A0
Printed in China
Yamaha Home Keyboards Home Page
http://music.yamaha.com/homekeyboard/
Yamaha Manual Library
http://www.yamaha.co.jp/manual/
DIC 300
Раздел: Бытовая, кухонная техника, электроника и оборудование
Тип: Синтезатор/фортепиано
Характеристики, спецификации
Тип инструмента:
синтезатор
Размер клавиш:
полноразмерные
Чувствительность клавиатуры:
есть
Разделение клавиатуры:
есть
Контроллер изменения высоты тона:
есть
Контроллер модуляции:
есть
Встроенная акустическая система:
есть
Мощность встроенного усилителя:
2×12 Вт
Размеры (ШxВxГ):
1003x148x433 мм
Количество стилей автоаккомпанемента:
232
Функция «Реверберация»:
есть
Количество записываемых песен:
5, до 16 треков в каждой
Количество выходов на наушники:
1
Количество линейных выходов:
2
Разъемы MIDI:
вход и выход
Наличие интерфейса «Ethernet»:
есть
Инструкция к Синтезатору/фортепиано Yamaha PSR-S710

2
Руководство пользователя PSR-S910/S710

OBSERVERA!
Серийный номер данного продукта приведен на нижней части
Apparaten kopplas inte ur växelströmskällan (nätet) så länge
устройства. Запишите этот серийный номер в данном пустом
поле и сохраните данное руководство как подтверждение
som den ar ansluten till vägguttaget, även om själva appa-
покупки; это поможет идентифицировать принадлежность
raten har stängts av.
устройства в случае кражи.
ADVARSEL:
Netspændingen til dette apparat er IKKE
Номер модели
afbrudt, sålæenge netledningen siddr i en stikkontakt, som er t
endt — også selvom der or slukket på apparatets afbryder.
VAROITUS:
Laitteen toisiopiiriin kytketty käyttökytkin ei irroita
Серийный номер
koko laitetta verkosta.
bottom
(standby)
Руководство пользователя PSR-S910/S710
3
Добро пожаловать в цифровую рабочую станцию
Использование демонстраций
Начало работы
Демонстрации иллюстрируют возможности тембров и стилей
инструмента и позволяют практиковаться в их использовании.
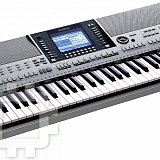
Воспроизведение разнообразных инструментальных тембров
Глава 1 Тембры
Инструмент предлагает не только
реалистичные фортепьянные тембры,
но и огромный набор тембров других
инструментов, как акустических, так и
электронных.
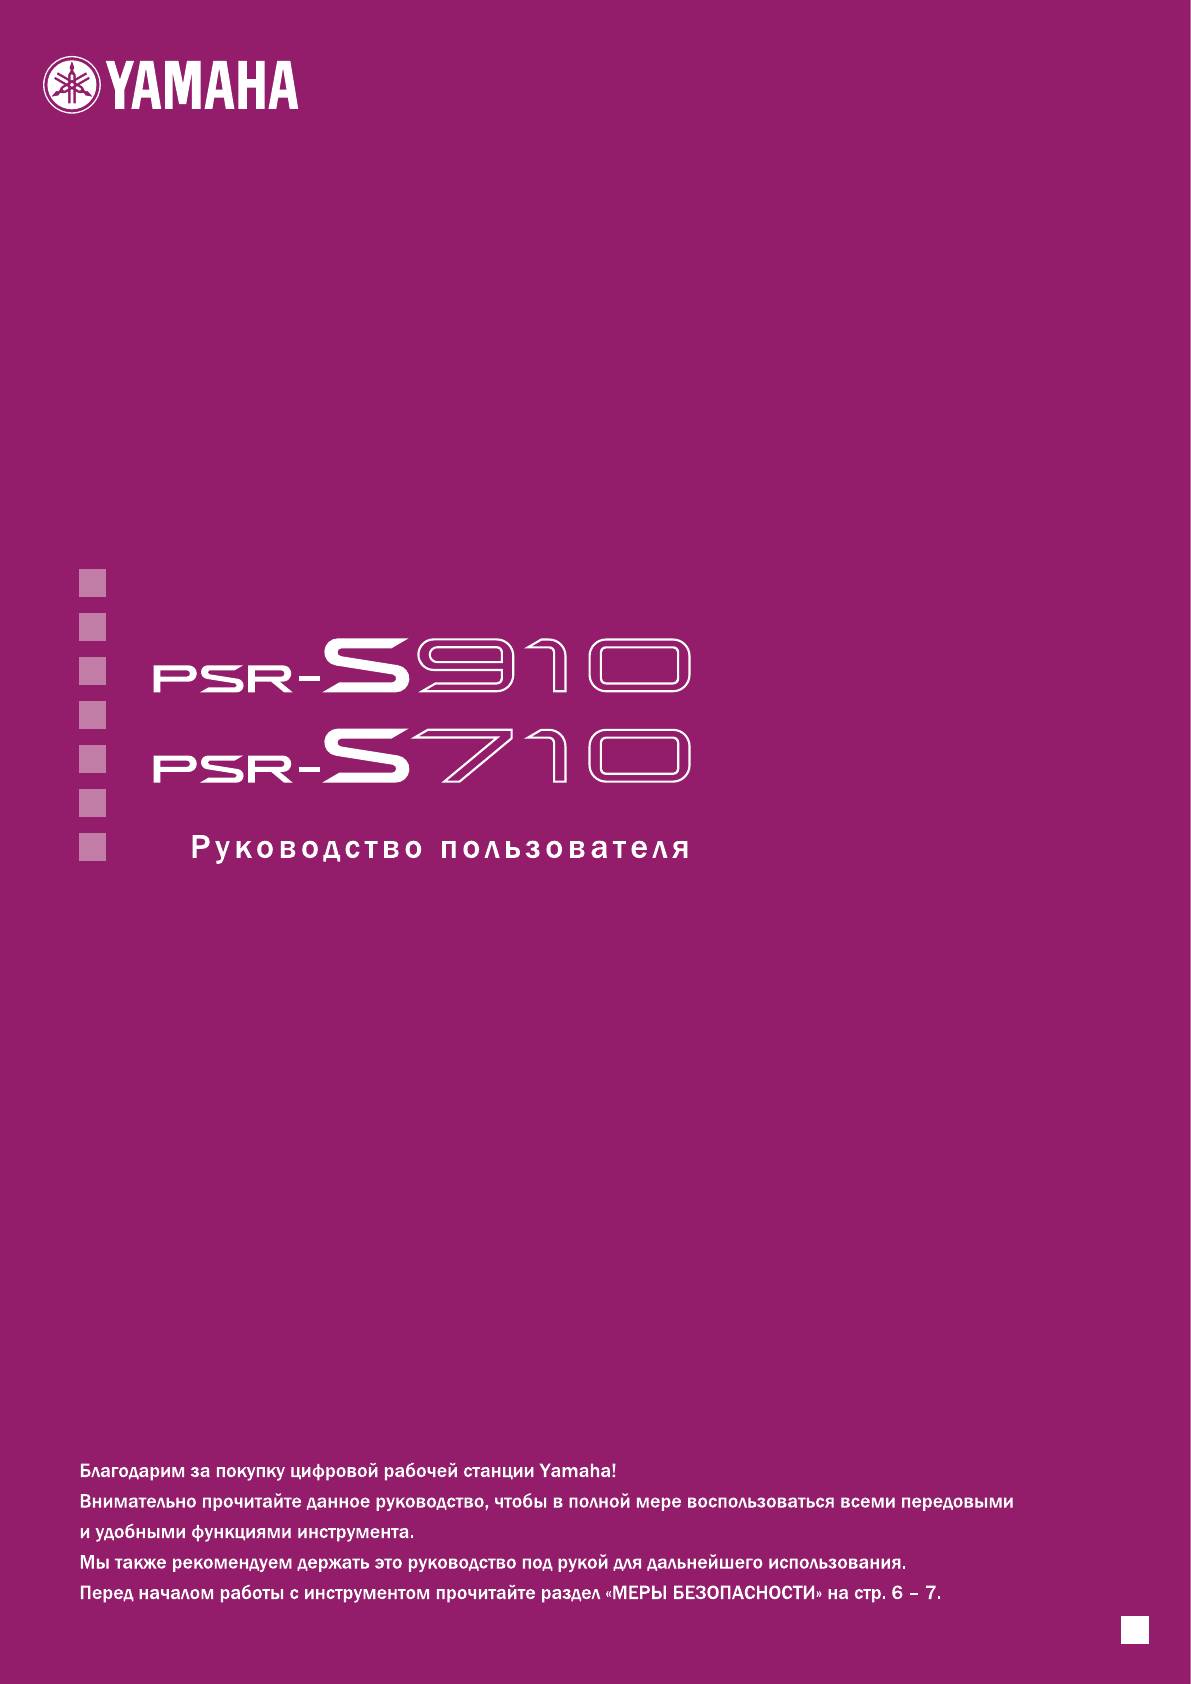
Исполнение с большим оркестром
Глава 2 Стили
Если взять аккорд левой рукой, партия
автоаккомпанемента начнет воспроизводиться
автоматически (функция стиля). Выберите стиль
аккомпанемента, например поп-музыку, джаз,
латиноамериканскую музыку и многие другие
музыкальные жанры, и инструмент заменит вам
целый оркестр!
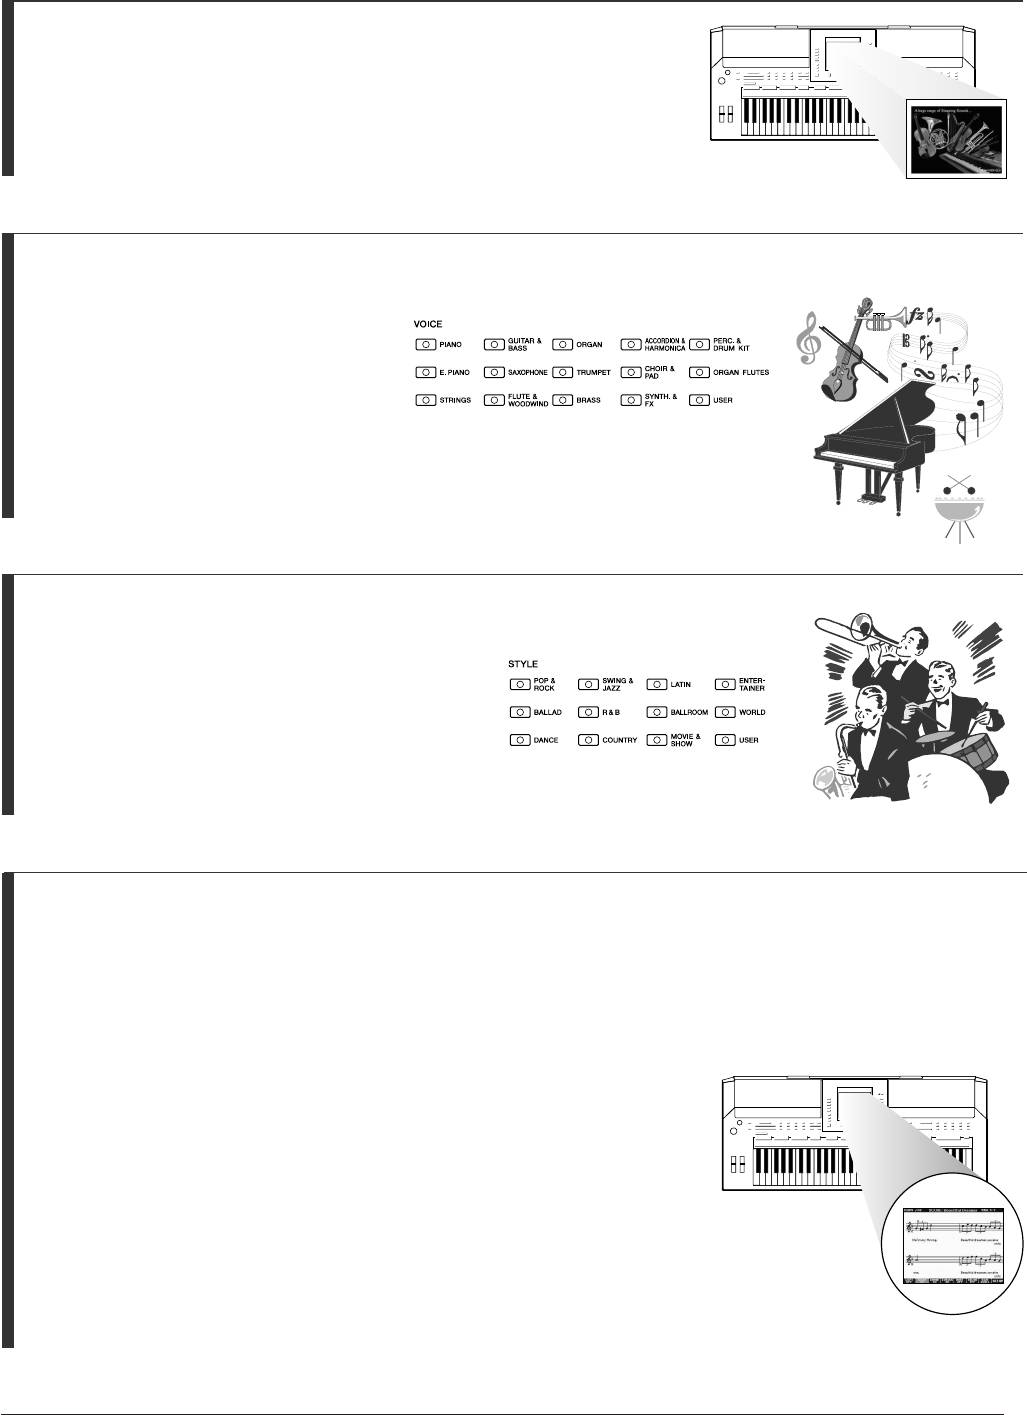
Игра с данными композиции
Глава 3 Композиции
Воспроизведение композиций …………….стр. 49
Вы можете играть одновременно с воспроизведением записи оркестрового исполнения, дополняя предварительно
записанное собственное исполнение сольной партии звучанием целого оркестра. Предлагается большой выбор
встроенных композиций. Можно также использовать композиции с дисков, приобретенных в магазинах.
Отображение партитуры …………….стр. 52
Во время проигрывания мелодии ноты могут автоматически отображаться
на экране, что чрезвычайно удобно для обучения и разучивания партий.
Запись собственного исполнения …………….стр. 56
Данный инструмент позволяет легко записать собственное исполнение и
сохранить его во внутренней памяти или на флэш-памяти USB. Инструмент
также позволяет прослушивать собственное исполнение и затем
редактировать его или использовать для создания музыки.
4
Руководство пользователя PSR-S910/S710

Добавление фраз и ритмов в собственное исполнение
Глава 4 Мультипэды
Инструмент позволяет добавлять выразительность в
исполнение с помощью коротких фраз и ритмов.
Вызов идеального тембра и стиля для каждой композиции
Глава 5 Функция Music Find
Руководство пользователя PSR-S910/S710
5
e
С помощью удобной функции Music Finder можно вызвать идеальный набор параметров панели, включая
наиболее подходящий тембр, стиль, эффекты и т. д. для каждой композиции. Регистрируя данные композиций/
аудио, сохраненные в разных местах в функции Music Finder, инструмент позволяет быстро вызывать данные
композиции по заголовку композиции. Более того, функция Music Finder Plus предоставляет дополнительные
возможности, подключая инструмент к Интернету или выполняя поиск через Интернет и добавление в инструмент
требуемых параметров панели и данных композиции.
Воспроизведение аудио и запись на флэш-память USB
Глава 7 USB-аудио
На инструменте можно воспроизводить аудиофайлы (WAV или
MP3*), сохраненные во флэш-памяти USB.
Более того, можно сохранять свое исполнение в виде аудиоданных
на устройстве флэш-памяти USB.
Подключите микрофон к инструменту PSR-S910 и наслаждайтесь
записью собственного пения и исполнения на клавиатуре.
* Формат MP3 поддерживается только в PSR-S910.
Прямое подключение к Интернету
Глава 9 Прямое подключение к Интернету
Инструмент может прямо подключаться к Интернету, что
позволяет загружать данные композиций и стилей со
специальных веб-сайтов и сохранять их во внутренней
памяти или на USB-устройстве хранения.
Глава 10 Подключения (Подключение
Добавление бэк-вокала к собственному пению (PSR-S910)
микрофона или гитары)
Потрясающая функция гармонизации вокала Vocal Harmony
автоматически создает партии бэк-вокала для ведущей вокальной
партии, которая исполняется через микрофон. При гармонизации
тембров имеется возможность изменения пола исполнителя, можно
добавлять женскую партию бэк-вокала к основному мужскому тембру
(и наоборот).
èêÄÇàãÄ íÖïçàäà ÅÖáéèÄëçéëíà
ÇçàåÄíÖãúçé èêéóàíÄâíÖ, èêÖÜÑÖ óÖå èêàëíìèÄíú ä ùäëèãìÄíÄñàà
* ï‡ÌËÚ ˝ÚÓ ÛÍÓ‚Ó‰ÒÚ‚Ó ‚ ·ÂÁÓÔ‡ÒÌÓÏ ÏÂÒÚÂ. éÌÓ ‚‡Ï ¢ ÔÓ̇‰Ó·ËÚÒfl.
èêÖÑìèêÖÜÑÖçàÖ
ÇÓ ËÁ·ÂʇÌË Ò¸ÂÁÌ˚ı Ú‡‚Ï Ë ‰‡Ê ÒÏÂÚË ÓÚ Û‰‡‡ ˝ÎÂÍÚ˘ÂÒÍËÏ ÚÓÍÓÏ, ‡ Ú‡ÍÊ ÍÓÓÚÍÓ„Ó Á‡Ï˚͇ÌËfl,
ÔÓ‚ÂʉÂÌËfl Ó·ÓÛ‰Ó‚‡ÌËfl, ÔÓʇ‡ Ë ‰Û„Ëı Ë̈ˉÂÌÚÓ‚ ‚Ò„‰‡ Òӷ≇ÈÚ ÒÎÂ‰Û˛˘Ë ÏÂ˚
·ÂÁÓÔ‡ÒÌÓÒÚË:
àÒÚÓ˜ÌËÍ ÔËÚ‡ÌËfl/‡‰‡ÔÚ ÔÂÂÏÂÌÌÓ„Ó ÚÓ͇
•
àÒÔÓθÁÛÈÚ ÚÓθÍÓ Ì‡ÔflÊÂÌËÂ, Á‡‰‡ÌÌÓ ‰Îfl ËÌÒÚÛÏÂÌÚ‡.
•
Å„ËÚ ËÌÒÚÛÏÂÌÚ ÓÚ ‰Óʉfl, Ì ËÒÔÓθÁÛÈÚÂ Â„Ó fl‰ÓÏ Ò ‚Ó‰ÓÈ,
ùÚÓ Ì‡ÔflÊÂÌË Û͇Á‡ÌÓ Ì‡ ËÌÒÚÛÏÂÌÚÂ.
‚ ÛÒÎÓ‚Ëflı Ò˚ÓÒÚË Ë ÔÓ‚˚¯ÂÌÌÓÈ ‚·ÊÌÓÒÚË; Ì ÒÚ‡‚¸Ú ̇ Ì„Ó
ÂÏÍÓÒÚË Ò ÊˉÍÓÒÚ¸˛, ÍÓÚÓ‡fl ÏÓÊÂÚ ‡ÁÎËÚ¸Òfl Ë ÔÓÔ‡ÒÚ¸ ‚ÌÛÚ¸.
•
àÒÔÓθÁÛÈÚ ÚÓθÍÓ Û͇Á‡ÌÌ˚È ‡‰‡ÔÚ (cÚ. 105). àÒÔÓθÁÓ‚‡ÌËÂ
Ç ÒÎÛ˜‡Â ÔÓÔ‡‰‡ÌËfl ÊˉÍÓÒÚË, ̇ÔËÏ ‚Ó‰˚, ‚ ËÌÒÚÛÏÂÌÚ
ÌÂÔ‡‚ËθÌÓ„Ó ‡‰‡ÔÚ‡ ÏÓÊÂÚ ÔË‚ÂÒÚË Í ÔÓ‚ÂʉÂÌ˲ ËÎË
ÌÂωÎÂÌÌÓ ÓÚÍβ˜ËÚ ÔËÚ‡ÌËÂ Ë ÓÚÒÓ‰ËÌËÚ ͇·Âθ ÔËÚ‡ÌËfl ÓÚ
ÔÂÂ„Â‚Û ËÌÒÚÛÏÂÌÚ‡.
˝ÎÂÍÚÓÒÂÚË. á‡ÚÂÏ Ó·‡ÚËÚÂÒ¸ Á‡ ÔÓÏÓ˘¸˛ Í Í‚‡ÎËÙˈËÓ‚‡ÌÌ˚Ï
•
èÂËӉ˘ÂÒÍË ÔÓ‚ÂflÈÚ ‚ËÎÍÛ ˝ÎÂÍÚÓËÌÒÚÛÏÂÌÚ‡ Ë Û‰‡ÎflÈÚ Ò
ÒÔˆˇÎËÒÚ‡Ï ˆÂÌÚ‡ ÚÂıÌ˘ÂÒÍÓ„Ó Ó·ÒÎÛÊË‚‡ÌËfl ÍÓÔÓ‡ˆËË Yamaha.
Ì „flÁ¸ Ë Ô˚θ.
•
çËÍÓ„‰‡ Ì ‚ÒÚ‡‚ÎflÈÚÂ Ë Ì ‚˚ÌËχÈÚ ‚ËÎÍÛ ˝ÎÂÍÚÓËÌÒÚÛÏÂÌÚ‡
•
òÌÛ ‡‰‡ÔÚ‡ ÔÂÂÏÂÌÌÓ„Ó ÚÓ͇ Ì ‰ÓÎÊÂÌ Ì‡ıÓ‰ËÚ¸Òfl fl‰ÓÏ Ò
ÏÓÍ˚ÏË Û͇ÏË.
ËÒÚÓ˜ÌË͇ÏË ÚÂÔ· (̇„‚‡ÚÂÎflÏË, ‡‰Ë‡ÚÓ‡ÏË Ë ‰.).
ç ‰ÓÔÛÒ͇ÈÚ ڇÍÊ ˜ÂÁÏÂÌÓ„Ó Ò„Ë·‡ÌËfl Ë ÔÓ‚ÂʉÂÌËfl ¯ÌÛ‡,
Ì ÒÚ‡‚¸Ú ̇ ÌÂ„Ó ÚflÊÂÎ˚ Ô‰ÏÂÚ˚ Ë ‰ÂÊËÚÂ Â„Ó ‚ Ú‡ÍÓÏ ÏÂÒÚÂ,
„‰Â ̇ ÌÂ„Ó ÌÂθÁfl ̇ÒÚÛÔËÚ¸, Á‡‰ÂÚ¸ ÌÓ„ÓÈ ËÎË ˜ÚÓ-ÌË·Û‰¸ ÔÓ ÌÂÏÛ
•
ç ÒÚ‡‚¸Ú ̇ ËÌÒÚÛÏÂÌÚ „Ófl˘Ë Ô‰ÏÂÚ˚, ̇ÔËÏ ҂˜Ë.
ÔÂÂ͇ÚËÚ¸.
ÉÓfl˘ËÈ Ô‰ÏÂÚ ÏÓÊÂÚ ÛÔ‡ÒÚ¸ Ë ‚˚Á‚‡Ú¸ ÔÓʇ.
ç ÓÚÍ˚‚‡Ú¸
•
ç ÓÚÍ˚‚‡ÈÚ ËÌÒÚÛÏÂÌÚ Ë Ì Ô˚Ú‡ÈÚÂÒ¸ ‡ÁÓ·‡Ú¸ ËÎË
•
Ç ÒÎÛ˜‡Â ËÁÌÓÒ‡ Ë ÔÓ‚ÂʉÂÌËfl ¯ÌÛ‡ ËÎË ‚ËÎÍË ‡‰‡ÔÚ‡
ÏÓ‰ËÙˈËÓ‚‡Ú¸ Â„Ó ‚ÌÛÚÂÌÌË ÍÓÏÔÓÌÂÌÚ˚. Ç ËÌÒÚÛÏÂÌÚ ÌÂÚ
ÔÂÂÏÂÌÌÓ„Ó ÚÓ͇, ‡ Ú‡ÍÊ ÔË ‚ÌÂÁ‡ÔÌÓÏ ËÒ˜ÂÁÌÓ‚ÂÌËË Á‚Û͇ ‚Ó
ÍÓÏÔÓÌÂÌÚÓ‚, ÍÓÚÓ˚ ‰ÓÎÊÂÌ Ó·ÒÎÛÊË‚‡Ú¸ ÔÓθÁÓ‚‡ÚÂθ. èË
‚ÂÏfl ˝ÍÒÔÎÛ‡Ú‡ˆËË, ÔË ÔÓfl‚ÎÂÌËË ÌÂÓ·˚˜ÌÓ„Ó Á‡Ô‡ı‡ Ë ‰˚χ
ÔÓfl‚ÎÂÌËË ÌÂËÒÔ‡‚ÌÓÒÚË ÌÂωÎÂÌÌÓ ÔÂ͇ÚËÚ ˝ÍÒÔÎÛ‡Ú‡ˆË˛ Ë
ÌÂωÎÂÌÌÓ ÓÚÍβ˜ËÚ ˝ÎÂÍÚÓÔËÚ‡ÌËÂ, ‚˚̸Ú ‚ËÎÍÛ ‡‰‡ÔÚ‡ ËÁ
Ó·‡ÚËÚÂÒ¸ Á‡ ÔÓÏÓ˘¸˛ Í Í‚‡ÎËÙˈËÓ‚‡ÌÌ˚Ï ÒÔˆˇÎËÒÚ‡Ï ˆÂÌÚ‡
ÓÁÂÚÍË Ë Ó·‡ÚËÚÂÒ¸ Á‡ ÔÓÏÓ˘¸˛ Í ÒÔˆˇÎËÒÚ‡Ï ˆÂÌÚ‡
ÚÂıÌ˘ÂÒÍÓ„Ó Ó·ÒÎÛÊË‚‡ÌËfl ÍÓÔÓ‡ˆËË Yamaha.
ÚÂıÌ˘ÂÒÍÓ„Ó Ó·ÒÎÛÊË‚‡ÌËfl ÍÓÔÓ‡ˆËË Yamaha.
ÇçàåÄçàÖ
ÇÓ ËÁ·ÂʇÌË ̇ÌÂÒÂÌËfl Ò¸ÂÁÌ˚ı Ú‡‚Ï ÒÂ·Â Ë ÓÍÛʇ˛˘ËÏ, ‡ Ú‡ÍÊ ÔÓ‚ÂʉÂÌËfl ËÌÒÚÛÏÂÌÚ‡ Ë
‰Û„Ó„Ó ËÏÛ˘ÂÒÚ‚‡, ÔÓÏËÏÓ ÔÓ˜Ëı ‚Ò„‰‡ Òӷ≇ÈÚ ÒÎÂ‰Û˛˘Ë ÓÒÌÓ‚Ì˚ ÏÂ˚ ·ÂÁÓÔ‡ÒÌÓÒÚË:
•
ÇÓ ËÁ·ÂʇÌË ÒÎÛ˜‡ÈÌÓ„Ó Ô‡‰ÂÌËfl ËÌÒÚÛÏÂÌÚ‡ Ì ÓÒÚ‡‚ÎflÈÚÂ Â„Ó ‚
ÌÂÛÒÚÓȘ˂ÓÏ ÔÓÎÓÊÂÌËË.
•
èË ÓÚÍβ˜ÂÌËË Í‡·ÂÎfl ÓÚ ËÌÒÚÛÏÂÌÚ‡ ËÎË ÓÚ ˝ÎÂÍÚÓÒÂÚË ·ÂËÚÂÒ¸
•
è‰ ÔÂÂÏ¢ÂÌËÂÏ ËÌÒÚÛÏÂÌÚ‡ ÓÚÒÓ‰ËÌËÚ ÔÓ‰Íβ˜ÂÌÌ˚È Í
Á‡ ‚ËÎÍÛ, ‡ Ì Á‡ ͇·Âθ.
ÌÂÏÛ ‡‰‡ÔÚÂ Ë ‰Û„Ë ͇·ÂÎË.
•
äÓ„‰‡ ËÌÒÚÛÏÂÌÚ Ì ËÒÔÓθÁÛÂÚÒfl, ‡ Ú‡ÍÊ ‚Ó ‚ÂÏfl „ÓÁ˚
•
è‰ ̇ÒÚÓÈÍÓÈ ËÁ‰ÂÎËfl ۷‰ËÚÂÒ¸, ˜ÚÓ ËÒÔÓθÁÛÂχfl
ÓÚÍβ˜‡ÈÚ ‡‰‡ÔÚ ÔÂÂÏÂÌÌÓ„Ó ÚÓ͇.
˝ÎÂÍÚÓÓÁÂÚ͇ ΄ÍÓ ‰ÓÒÚÛÔ̇. Ç ÒÎÛ˜‡Â ‚ÓÁÌËÍÌÓ‚ÂÌËfl ͇ÍËı-ÎË·Ó
•
ç ÔÓ‰Íβ˜‡ÈÚ ËÌÒÚÛÏÂÌÚ Í Ó‰ÌÓÈ ˝ÎÂÍÚ˘ÂÒÍÓÈ ÓÁÂÚÍ Ò
ÌÂÔÓ·‰ÓÍ ÌÂωÎÂÌÌÓ ‚˚Íβ˜ËÚ ËÌÒÚÛÏÂÌÚ Ë ÓÚÍβ˜ËÚÂ Â„Ó ÓÚ
‰Û„ËÏË ÛÒÚÓÈÒÚ‚‡ÏË (̇ÔËÏÂ, ˜ÂÂÁ ÚÓÈÌËÍ). ùÚÓ ÏÓÊÂÚ
˝ÎÂÍÚÓÒÂÚË. чÊ ÂÒÎË ÔËÚ‡ÌË ‚˚Íβ˜ÂÌÓ, ËÁ‰ÂÎË ÔÓ‰ÓÎʇÂÚ
ÔË‚ÂÒÚË Í ÒÌËÊÂÌ˲ ͇˜ÂÒÚ‚‡ Á‚Û͇ ËÎË ÔÂÂ„Â‚Û ÓÁÂÚÍË.
ÔÓÚ·ÎflÚ¸ ˝ÎÂÍÚÓ˝Ì„˲ ‚ ÏËÌËχθÌÓÏ ÍÓ΢ÂÒÚ‚Â. ÖÒÎË
ËÁ‰ÂÎË Ì ËÒÔÓθÁÛÂÚÒfl ‚ Ú˜ÂÌË ‰ÎËÚÂθÌÓ„Ó ‚ÂÏÂÌË, ÓÚÍβ˜ËÚÂ
¯ÌÛ ÔËÚ‡ÌËfl ÓÚ ˝ÎÂÍÚÓÒÂÚË.
•
àÒÔÓθÁÛÈÚ ÚÓθÍÓ ÔÓ‰ÒÚ‡‚ÍÛ, ÒÔˆˇθÌÓ Ô‰̇Á̇˜ÂÌÌÛ˛ ‰Îfl
•
ÇÓ ËÁ·ÂʇÌË ‰ÂÙÓχˆËË Ô‡ÌÂÎË Ë ÔÓ‚ÂʉÂÌËfl ‚ÌÛÚÂÌÌËı
ËÌÒÚÛÏÂÌÚ‡
. ÑÎfl ÍÂÔÎÂÌËfl ÒÚÓÈÍË ËÎË ÔÓ‰ÒÚ‡‚ÍË ËÒÔÓθÁÛÈ
ÚÂ
ÍÓÏÔÓÌÂÌÚÓ‚ ·Â„ËÚ ËÌÒÚÛÏÂÌÚ ÓÚ ˜ÂÁÏÂÌÓÈ Ô˚ÎË Ë ÒËθÌÓÈ
ÚÓθÍÓ ‚ËÌÚ˚, ÔÓÒÚ‡‚ÎflÂÏ˚ ‚ ÍÓÏÔÎÂÍÚÂ. Ç ÔÓÚË‚ÌÓÏ ÒÎÛ˜‡Â
‚Ë·‡ˆËË Ë Ì ËÒÔÓθÁÛÈÚÂ Â„Ó ÔË Ó˜Â̸ ‚˚ÒÓÍÓÈ ËÎË ÌËÁÍÓÈ
‚ÓÁ
ÏÓÊÌÓ ÔÓ‚ÂʉÂÌË ‚ÌÛÚÂÌÌËı ÍÓÏÔÓÌÂÌÚÓ‚ Ë Ô‡‰ÂÌËÂ
ÚÂÏÔ‡ÚÛ (̇Ô
ËÏÂ, ̇ ÒÓÎ̈Â, fl‰ÓÏ Ò Ì‡„‚‡ÚÂÎÂÏ ËÎË ‚
ËÌÒÚÛÏÂÌÚ‡.
χ¯ËÌ ‚ ‰Ì‚ÌÓ ‚ÂÏfl).
•
ç ‡ÁÏ¢‡ÈÚ Ô‰ÏÂÚ˚ Ô‰ ‚ÂÌÚËÎflˆËÓÌÌ˚ÏË ÓÚ‚ÂÒÚËflÏË
•
ç ËÒÔÓθÁÛÈÚ ËÌÒÚÛÏÂÌÚ ‚ ÌÂÔÓÒ‰ÒÚ‚ÂÌÌÓÈ ·ÎËÁÓÒÚË ÓÚ
ËÌÒÚÛÏÂÌÚ‡, ˝ÚÓ ÏÓÊÂÚ ÔÓϯ‡Ú¸ ‚ÂÌÚËÎflˆËË ‚ÌÛÚÂÌÌËı
ÚÂ΂ËÁÓ‡, ‡‰ËÓÔËÂÏÌË͇, ÒÚÂÂÓÓ·ÓÛ‰Ó‚‡ÌËfl, ÏÓ·ËθÌÓ„Ó
ÍÓÏÔÓÌÂÌÚÓ‚ Ë ÔË‚ÂÒÚË Í Ô„‚Û.
ÚÂÎÂÙÓ̇ Ë ‰Û„Ëı ˝ÎÂÍÚÓÔË·ÓÓ‚. Ç ÔÓÚË‚ÌÓÏ ÒÎÛ˜‡Â ‚ ËÌÒÚÛÏÂÌÚÂ,
ÚÂ΂ËÁÓ ËÎË ‡‰ËÓÔËÂÏÌËÍ ÏÓ„ÛÚ ‚ÓÁÌËÍÌÛÚ¸ ÔÓÏÂıË.
6
Руководство пользователя PSR-S910/S710
ظ ÓÚ ‚Ó‰˚
ظ ÓÚ Ó„Ìfl
Ç̯ڇÚÌ˚ ÒËÚÛ‡ˆËË
àÒÚÓ˜ÌËÍ ÔËÚ‡ÌËfl/‡‰‡ÔÚ ÔÂÂÏÂÌÌÓ„Ó ÚÓ͇
åÂÒÚÓ ÛÒÚ‡ÌÓ‚ÍË
(3)-13
1/2
èÓ‰Íβ˜ÂÌËÂ
•
è‰ ÔÓ‰Íβ˜ÂÌËÂÏ ËÌÒÚÛÏÂÌÚ‡ Í ‰Û„ËÏ ˝ÎÂÍÚÓÌÌ˚Ï
ëÓı‡ÌÂÌËÂ Ë ÂÁ‚ÌÓ ÍÓÔËÓ‚‡ÌË ‰‡ÌÌ˚ı
ÍÓÏÔÓÌÂÌÚ‡Ï ÓÚÍβ˜ËÚ Ëı ÔËÚ‡ÌËÂ. è‰ ‚Íβ˜ÂÌËÂÏ ËÎË
•
àÁÏÂÌÂÌÌ˚ ÍÓÏÔÓÁˈËË/ÒÚËÎË/ÚÂÏ·˚/ÏÛθÚËÔ˝‰˚ Ë Ô‡‡ÏÂÚ˚ MIDI
ÓÚÍβ˜ÂÌËÂÏ ˝ÎÂÍÚÓÌÌ˚ı ÍÓÏÔÓÌÂÌÚÓ‚ ÛÒÚ‡ÌÓ‚ËÚ ÏËÌËχθÌ˚È
ÚÂfl˛ÚÒfl ÔË ÓÚÍβ˜ÂÌËË ÔËÚ‡ÌËfl ËÌÒÚÛÏÂÌÚ‡. ëÓı‡ÌflÈÚ ‰‡ÌÌ˚Â
ÛÓ‚Â̸ „ÓÏÍÓÒÚË. ì·Â‰ËÚÂÒ¸ Ú‡ÍÊ ‚ ÚÓÏ, ˜ÚÓ Ì‡ ‚ÒÂı ÍÓÏÔÓÌÂÌÚ‡ı
̇ ‚Í·‰Í USER (ÒÚ. 58), USB-ÛÒÚÓÈÒÚ‚Â ı‡ÌÂÌËfl ‰‡ÌÌ˚ı (Ùν¯-
ÛÒÚ‡ÌÓ‚ÎÂÌ ÏËÌËχθÌ˚È ÛÓ‚Â̸ „ÓÏÍÓÒÚË, ‡ ‚Ó ‚ÂÏfl Ë„˚ ̇
Ô‡ÏflÚË USB Ë Ú. ‰.).
ËÌÒÚÛÏÂÌÚ ÔÓÒÚÂÔÂÌÌÓ Û‚Â΢¸Ú „ÓÏÍÓÒÚ¸ ‰Ó ÌÛÊÌÓÈ.
•
чÌÌ˚ ̇ ‚Í·‰Í (USER) ÏÓ„ÛÚ ·˚Ú¸ ÔÓÚÂflÌ˚ ËÁ-Á‡ Ò·Ófl ËÎË
ÌÂÔ‡‚ËθÌÓÈ ‡·ÓÚ˚. ëÓı‡ÌflÈÚ ‚‡ÊÌ˚ ‰‡ÌÌ˚ ‚ USB-ÛÒÚÓÈÒÚ‚Â
é·ÒÎÛÊË‚‡ÌËÂ
ı‡ÌÂÌËfl ‰‡ÌÌ˚ı.
•
ÑÎfl ˜ËÒÚÍË ËÌÒÚÛÏÂÌÚ‡ ÔÓθÁÛÈÚÂÒ¸ Ïfl„ÍÓÈ ÒÛıÓÈ Ú̸͇˛. çËÍÓ„‰‡
Ì ËÒÔÓθÁÛÈÚ ÔflÚÌÓ‚˚‚Ó‰ËÚÂÎË, ‡ÒÚ‚ÓËÚÂÎË, ÊˉÍË ӘËÒÚËÚÂÎË
При изменении параметров на странице экрана и выходе с этой
ËÎË ˜ËÒÚfl˘Ë ҇ÎÙÂÚÍË Ò ÔÓÔËÚÍÓÈ.
страницы стальные данные, кроме перечисленных выше
(измененные композиции/стили/тембры/мультипэды и параметры
åÂ˚ ·ÂÁÓÔ‡ÒÌÓÒÚË ÔË ˝ÍÒÔÎÛ‡Ú‡ˆËË
MIDI, и т. д.) автоматически сохраняются. Но при выключении
устройства без выполнения процедуры выхода все эти изменения
•
ç ‚ÒÚ‡‚ÎflÈÚ ԇθˆ˚ ËÎË ÛÍÛ ‚ ÓÚ‚ÂÒÚËfl ËÌÒÚÛÏÂÌÚ‡.
будут утеряны.
•
çËÍÓ„‰‡ Ì ‚ÒÚ‡‚ÎflÈÚÂ Ë Ì ÓÌflÈÚ ·ÛχÊÌ˚Â, ÏÂÚ‡Î΢ÂÒÍË Ë
ÔӘˠԉÏÂÚ˚ ‚ ÓÚ‚ÂÒÚËfl ̇ Ô‡ÌÂÎË Ë Í·‚ˇÚÛÂ. ÖÒÎË ˝ÚÓ
êÂÁ‚ÌÓ ÍÓÔËÓ‚‡ÌË ̇ USB-ÛÒÚÓÈÒÚ‚Ó ı‡ÌÂÌËfl
ÒÎÛ˜ËÎÓÒ¸, ÌÂωÎÂÌÌÓ ‚˚Íβ˜ËÚ ËÌÒÚÛÏÂÌÚ Ë ‚˚̸Ú ͇·Âθ
‰‡ÌÌ˚ı
ÔËÚ‡ÌËfl ËÁ ÓÁÂÚÍË. á‡ÚÂÏ Ó·‡ÚËÚÂÒ¸ Á‡ ÔÓÏÓ˘¸˛ Í ÒÔˆˇÎËÒÚ‡Ï
ˆÂÌÚ‡ ÚÂıÌ˘ÂÒÍÓ„Ó Ó·ÒÎÛÊË‚‡ÌËfl ÍÓÔÓ‡ˆËË Yamaha.
•
óÚÓ·˚ Á‡˘ËÚËÚ¸ ‰‡ÌÌ˚ ÓÚ ÔÓÚÂË ËÁ-Á‡ ÔÓ‚ÂʉÂÌËfl ÌÓÒËÚÂÎfl,
ÂÍÓÏẨÛÂÚÒfl ÒÓı‡ÌflÚ¸ ̇˷ÓΠ‚‡ÊÌ˚ ‰‡ÌÌ˚ ̇ ‰‚Ûı USB-
•
ç Í·‰ËÚ ̇ ËÌÒÚÛÏÂÌÚ Ô‰ÏÂÚ˚ ËÁ ‚ËÌË·, Ô·ÒÚχÒÒ˚ ËÎË
ÛÒÚÓÈÒÚ‚‡ı ı‡ÌÂÌËfl ‰‡ÌÌ˚ı.
ÂÁËÌ˚: ˝ÚÓ ÏÓÊÂÚ ‚˚Á‚‡Ú¸ ‚˚ˆ‚ÂÚ‡ÌË ԇÌÂÎË ËÎË Í·‚ˇÚÛ˚.
•
ç ӷÎÓ͇˜Ë‚‡ÈÚÂÒ¸ ̇ ËÌÒÚÛÏÂÌÚ, Ì ÒÚ‡‚¸Ú ̇ ÌÂ„Ó ÚflÊÂÎ˚Â
Ô‰ÏÂÚ˚ Ë Ì ÔËÍ·‰˚‚‡ÈÚ ÒÎ˯ÍÓÏ ·Óθ¯ÓÈ ÒËÎ˚ ÔË
ÔÓθÁÓ‚‡ÌËË ÍÌÓÔ͇ÏË, ‚˚Íβ˜‡ÚÂÎflÏË Ë ‡Á˙ÂχÏË.
•
ç ÒΉÛÂÚ ‰ÓÎ„Ó ‡·ÓÚ‡Ú¸ Ò ‚˚ÒÓÍËÏ ËÎË ÌÂÍÓÏÙÓÚÌ˚Ï ÛÓ‚ÌÂÏ
„ÓÏÍÓÒÚË ËÌÒÚÛÏÂÌÚ‡/ÛÒÚÓÈÒÚ‚‡ ËÎË Ì‡Û¯ÌËÍÓ‚, Ú‡Í Í‡Í ˝ÚÓ ÏÓÊÂÚ
ÔË‚ÂÒÚË Í ÔÓÚ ÒÎÛı‡. èË ÛıÛ‰¯ÂÌËË ÒÎÛı‡ ËÎË Á‚ÓÌ ‚ Û¯‡ı
Ó·‡ÚËÚÂÒ¸ Í ‚‡˜Û.
ÇÒ„‰‡ ‚˚Íβ˜‡ÈÚ ËÌÒÚÛÏÂÌÚ, ÂÒÎË Ì ËÒÔÓθÁÛÂÚ „Ó.
чÊ ‚ ÚÂı ÒÎÛ˜‡flı, ÍÓ„‰‡ ‚˚Íβ˜‡ÚÂθ ÔËÚ‡ÌËfl ̇ıÓ‰ËÚÒfl ‚ ÔÓÎÓÊÂÌËË «STANDBY», ËÌÒÚÛÏÂÌÚ ÔÓ‰ÓÎʇÂÚ ‚ ÏËÌËχθÌ˚ı ÍÓ΢ÂÒÚ‚‡ı ÔÓÚ·ÎflÚ¸
˝ÎÂÍÚÓ˝Ì„˲. ÖÒÎË ËÌÒÚÛÏÂÌÚ Ì ËÒÔÓθÁÛÂÚÒfl ‰ÎËÚÂθÌÓ ‚ÂÏfl, ÓÚÍβ˜ËÚ ‡‰‡ÔÚ ÔÂÂÏÂÌÌÓ„Ó ÚÓ͇ ÓÚ ÓÁÂÚÍË.
Руководство пользователя PSR-S910/S710
7
ëÓı‡ÌÂÌË ‰‡ÌÌ˚ı
äÓÔÓ‡ˆËfl Yamaha Ì ÌÂÒÂÚ ÓÚ‚ÂÚÒÚ‚ÂÌÌÓÒÚË Á‡ ÔÓ‚ÂʉÂÌËfl, ‚˚Á‚‡ÌÌ˚ ÌÂÔ‡‚ËθÌÓÈ ˝ÍÒÔÎÛ‡Ú‡ˆËÂÈ ËÎË ÏÓ‰ËÙË͇ˆËÂÈ
ËÌÒÚÛÏÂÌÚ‡, ‡ Ú‡ÍÊ Á‡ ÔÓÚÂflÌÌ˚ ËÎË ËÒÔÓ˜ÂÌÌ˚ ‰‡ÌÌ˚Â.
(3)-13
2/2
Уведомления и информация
Уведомление об авторских правах
• опирование коммерческих музыкальных данных, включая MIDI-данные и/или аудиоданные,
но не ограничиваясь ими, строго запрещается, за исключением использования в личных целях.
• Этот продукт включает компьютерные программы и содержимое, авторские права на которые принадлежат
корпорации Yamaha или право на использование которых получено по лицензии от других фирм. материалам,
защищенным авторскими правами, относятся все без ограничения компьютерные программы, файлы стиля,
файлы MIDI, данные WAVE и музыкальные звукозаписи. юбое несанкционированное использование таких
Уведомления и информация
программ и содержимого, выходящее за рамки личного пользования, запрещено соответствующими законами.
юбое нарушение авторских прав преследуется по закону. ОАА, АОАЯ
ОЬУ АО О.
Информация о функциях и данных, содержащихся в инструменте
• екоторые встроенные композиции были отредактированы с целью уменьшения продолжительности или
изменения аранжировки и, следовательно, могут не совпадать с оригиналом.
• этом устройстве могут использоваться различные типы или форматы музыкальных данных путем
преобразования их в музыкальные данные необходимого формата для дальнейшего использования.
аким образом, при воспроизведении данных устройством звучание может несколько отличаться от исходного.
• астровые шрифты, используемые в данном инструменте, предоставлены компанией Ricoh Co., Ltd. и являются ее
собственностью.
• анный продукт использует NF, встроенный интернет-браузер компании ACCESS Co., Ltd. NF не
может использоваться отдельно от данного продукта, продаваться, передаваться в пользование или
передаваться какими-либо иными способами. акже запрещается декомпилировать,
дизассемблировать, копировать и вскрывать технологии NF.
• анное программное обеспечение включает модуль, разработанный независимой группой JPEG
(Independent JPEG Group).
• Арфу, изображаемую на экранах цифровой станции PSR-S910/S710, можно увидеть в музее музыкальных
инструментов Hamamatsu.
• (PSR-S910) анный продукт произведен по лицензии, защищенной патентами А № 5231671,
№ 5301259, № 5428708 и № 5567901, принадлежащим IVL Audio Inc.
• (PSR-S910) ехнология кодирования звука MPEG Layer-3 используется по лицензии Fraunhofer IIS
и Thomson.
иже указаны обладатели авторских и других прав на две (2) композиции, встроенные в этот инструмент:
Beauty And The Beast
from Walt Disney’s BEAUTY AND THE BEAST
Lyrics by Howard Ashman
Music by Alan Menken
©1991 Walt Disney Music Company and Wonderland Music Company, Inc.
All Rights Reserved Used by Permission
Can’t Help Falling In Love
from the Paramount Picture BLUE HAWAII
Words and Music by George David Weiss, Hugo Peretti and Luigi Creatore
Copyright ©1961; Renewed 1989 Gladys Music (ASCAP)
Worldwide Rights for Gladys Music Administered by Cherry Lane Music Publishing Company, Inc.
International Copyright Secured All Rights Reserved
8
Руководство пользователя PSR-S910/S710
ополнительные принадлежности
• юпитр
• лок питания переменного тока*
• ополнительный компакт-диск для Windows
• уководство пользователя
• ополнительный компакт-диск с руководством по установке Windows
• уководство по интерактивной регистрации пользователя продукции Yamaha
* ожет не входить в комплект поставки для вашего региона. вяжитесь с региональным дилером Yamaha.
Инструмент поддерживает следующие форматы.
«GM (General MIDI)» – один из самых распространенных форматов тембра. «GM System Level 2» – это стандартная
спецификация, являющаяся улучшенным вариантом стандарта «GM», которая повышает совместимость данных
композиции. Этот стандарт обеспечивает улучшенную полифонию, обладает большим выбором тембров, расширяет
параметры тембров и делает возможной интегрированную обработку эффектов.
ормат XG является расширением формата General MIDI (GM System level 1). орпорация Yamaha разработала эту
спецификацию для увеличения числа доступных тембров и лучшего управления тембрами и эффектами, а также для
совместимости MIDI-данных в будущем.
ополнительные принадлежности
ормат GS был разработан корпорацией Roland. ак и стандарт XG корпорации Yamaha, формат GS – это значительно
усовершенствованное расширение стандарта GM, обеспечивающее большее количество доступных тембров, наборов
ударных инструментов и их вариаций, а также лучшее управление тембрами и эффектами.
ормат XF корпорации Yamaha совершенствует стандарт SMF (Standard MIDI File) за счет увеличения функциональности
и возможностей дальнейшего расширения. ри воспроизведении файла в формате XF, содержащего текст,
поддерживается отображение текста на экране инструмента.
«Style File Format» – это оригинальный формат файла стиля, разработанный корпорацией Yamaha, в котором используется
уникальная система преобразования, позволяющая автоматически создавать высококачественный аккомпанемент на
основе большого количества типов аккордов. «SFF GE (Guitar Edition)» – расширенный формат SFF, который использует
улучшенную систему транспонирования нот для гитарных дорожек.
(PSR-S910)
ункция VH (Vocal Harmony) использует современную встроенную технологию цифровой обработки звука для
автоматического добавления соответствующей гармонии к ведущему тембру при исполнении композиции.
Руководство пользователя PSR-S910/S710
9
Описание руководств
ля данного инструмента имеется следующая документация и инструкции:
Документы в комплекте поставки
уководство пользователя (данная книга)
одержит полное описание основных функций PSR-S910/S710. м. «О работе с данным уководством
пользователя» ниже.
уководство по установке
(Installation Guide)
одержит введение к содержимому прилагаемого компакт-диска и описание установки прилагаемого
программного обеспечения.
Описание руководств
Интерактивные материалы (можно загрузить с веб-сайта)
ля загрузки из библиотеки руководств корпорации Yamaha доступны следующие инструкции. Откройте библиотеку руководств
Yamaha, введите название модели (например, PSR-S910) в области «мя модели» (Model Name) для поиска руководств.
Библиотека руководств Yamaha
http://www.yamaha.co.jp/manual/
правочное руководство (Reference Manual)
(только на английском, французском, немецком и
испанском языках)
одержит описания дополнительных функций инструмента, отсутствующие в руководстве пользователя. апример,
здесь можно узнать, как создавать собственные стили, композиции или мультипэды, и найти подробные описания
определенных параметров.
уководство по подключению к нтернету (Internet Connection Guide)
(только на английском,
французском, немецком и испанском языках)
одержит подробное описание подключения инструмента к нтернету для использования функции прямого
подключения к нтернету.
борник таблиц
(Data List)
одержит различные списки важного встроенного содержимого, например тембров, стилей, эффектов, а также
информацию, относящуюся к MIDI.
Основные понятия MIDI (MIDI Basics)
(только на английском, французком, немецком и
испанском языках)
одробные сведения о формате MIDI и работе с ним можно найти в этой вводной книге.
О работе с данным
Содержит обзор
Руководством пользователя
содержимого глав.
Показывает, что эта
функция доступна только
для одной модели.
Показывает местопо-
ложение кнопок, которые
описаны в главе.
Пример. Эти значки
указывают, что эта
функция присутствует
только в PSR-S910,
Снимки экранов
но не в PSR-S710.
выполнены для модели
PSR-S910 и представ-
Название главы для
лены только на
удобства перемещения
английском языке.
по руководству.
(Они могут отличаться от
изображения на вашем
инструменте.)
Содержит дополни-
тельную полезную
информацию в рамке.
Содержит дополнительные
Представление дополнительных функций,
примечания и подробную
связанных с содержимым главы.
информацию.
Более подробные описания этих функций можно
найти в справочном руководстве (выше).
• ллюстрации и снимки -дисплеев приведены в данном руководстве только в качестве примеров.
действительности все может выглядеть несколько иначе.
• нимки экранов Operation Guide (руководства по эксплуатации), приведенные в данном руководстве,
выполнены для модели PSR-S910 и представлены только на английском языке.
азвания фирм и продуктов, используемые в данном руководстве, являются товарными знаками или
зарегистрированными товарными знаками соответствующих компаний.
10
Руководство пользователя PSR-S910/S710
одержание
Добро пожаловать в цифровую рабочую станцию 4
5 Функция Music Finder
– Вызов наиболее удачного аккомпанемента
Уведомления и информация………………………………………………….. 8
(тембр, стиль и т. д.) для каждой композиции – 65
Дополнительные принадлежности ………………………………………….. 9
Описание руководств……………………………………………………………10
Выбор требуемой композиции в параметрах панели……………67
Поиск параметров панели ……………………………………………………67
Панель управления 12
Регистрация данных композиции/аудио (SONG/AUDIO) ………..68
Начало работы 14
6 Регистрационная память
– Сохранение и вызов пользовательских
Включение питания ……………………………………………………………..14
параметров панели – 71
Крепление пюпитра ……………………………………………………………..15
Наушники …………………………………………………………………………….16
Регистрация настроек панели ………………………………………………71
Изменение языка ………………………………………………………………..16
Сохранение регистрационной памяти в виде файла банка …..72
Настройка контрастности экрана …………….………………………….17
одержание
Подтверждение информации о регистрационной памяти ……..74
Ввод имени пользователя на экране загрузки………………………17
Воспроизведение демонстраций ………………………………………….18
7 USB-аудио
Элементы управления на экране………………………………………….19
– Воспроизведение и запись аудиофайлов – 75
Сообщения, выводимые на экран………………………………………..22
Быстрый выбор экрана – функция прямого доступа……………..22
Воспроизведение аудиофайлов…………………………………………….75
Настройка главного экрана ………………………………………………….23
Запись собственного исполнения в формате аудио ………………77
Конфигурация экрана выбора файлов………………………………….25
8 Микшерный пульт
Ввод символов……………………………………………………………………..26
– Редактирование громкости
Восстановление исходных параметров…………………………………27
и тонального баланса – 79
Резервное копирование данных…………………………………………..28
Основные действия………………………………………………………………79
1
Тембры
Изменение тембра и регулировка панорамного звучания и
– Игра на клавиатуре – 29
громкости для каждой части………………………………………………….81
Воспроизведение встроенных тембров………………………………..29
Применение эффектов к каждой части …………………………………83
Транспонирование высоты звука клавиатуры ………………………34
9 Прямое подключение к Интернету
Использование дисков регулирования………………………………….34
– Подключение PSR-S910/S710
Применение эффектов тембра …………………………………………….35
Создание собственных тембров Organ Flutes ……………………….37
непосредственно к Интернету – 84
Запуск функции прямого подключения к Интернету………………84
2
Стили
Подключение инструмента к Интернету ………………………………..84
– Воспроизведение ритма и аккомпанемента – 39
Операции на специальном веб-сайте……………………………………86
Игра стиля с использованием функции автоаккомпанемента …39
10 Подключения
Воспроизведение текущего стиля …………………………………………42
Вызов настроек панели для соответствия стилю (Repertoire)…44
– Подключение внешних устройств
Настройки выбранного стиля (настройка «в одно касание»)….45
к инструменту – 88
Включение и выключение партий стиля и смена тембров…….47
Подключение аудиоустройств ……………………………………………….88
Регулировка баланса громкости стиля и клавиатуры …………….48
Подключение отдельного ТВ-монитора …………….………………….89
3 Композиции
Подключение микрофона или гитары …………….……………………90
Подключение педальных переключателей или ножных
– Исполнение, разучивание и запись
контроллеров ……………………………………………………………………….93
композиций – 49
Подключение USB-устройства хранения данных……………………94
Воспроизведение композиций……………………………………………..49
Подключение к Интернету …………………………………………………….95
Отображение партитуры (Score)……………………………………………52
Подключение к компьютеру………………………………………………….96
Отображение экрана Lyrics (Текст) ……………………………………….53
Подключение внешних MIDI-устройств………………………………….97
Включение/Выключение каналов композиции …………………….54
11 Дополнительные функции
Разучивание партии правой руки
(функция обучения Guide)…………………………………………………….54
– Настройка общих параметров – 98
Повторное воспроизведение………………………………………………..55
Основные действия………………………………………………………………98
Запись собственного исполнения (быстрая запись) ……………..56
Сохранение файлов ……………………………………………………………..58
Устранение неполадок 99
Работа с файлами ………………………………………………………………..59
Таблица кнопок панели 102
4 Мультипэды
– Добавьте «изюминку» в свое выступление – 63
Технические характеристики 104
Воспроизведение мультипэдов……………………………………………..63
Использование функции синхронного запуска мультипэда ……64
Предметный указатель 106
Функция Chord Match (Настройка на аккорд) ……………………….64
PSR-S910/S710 Руководство пользователя
11
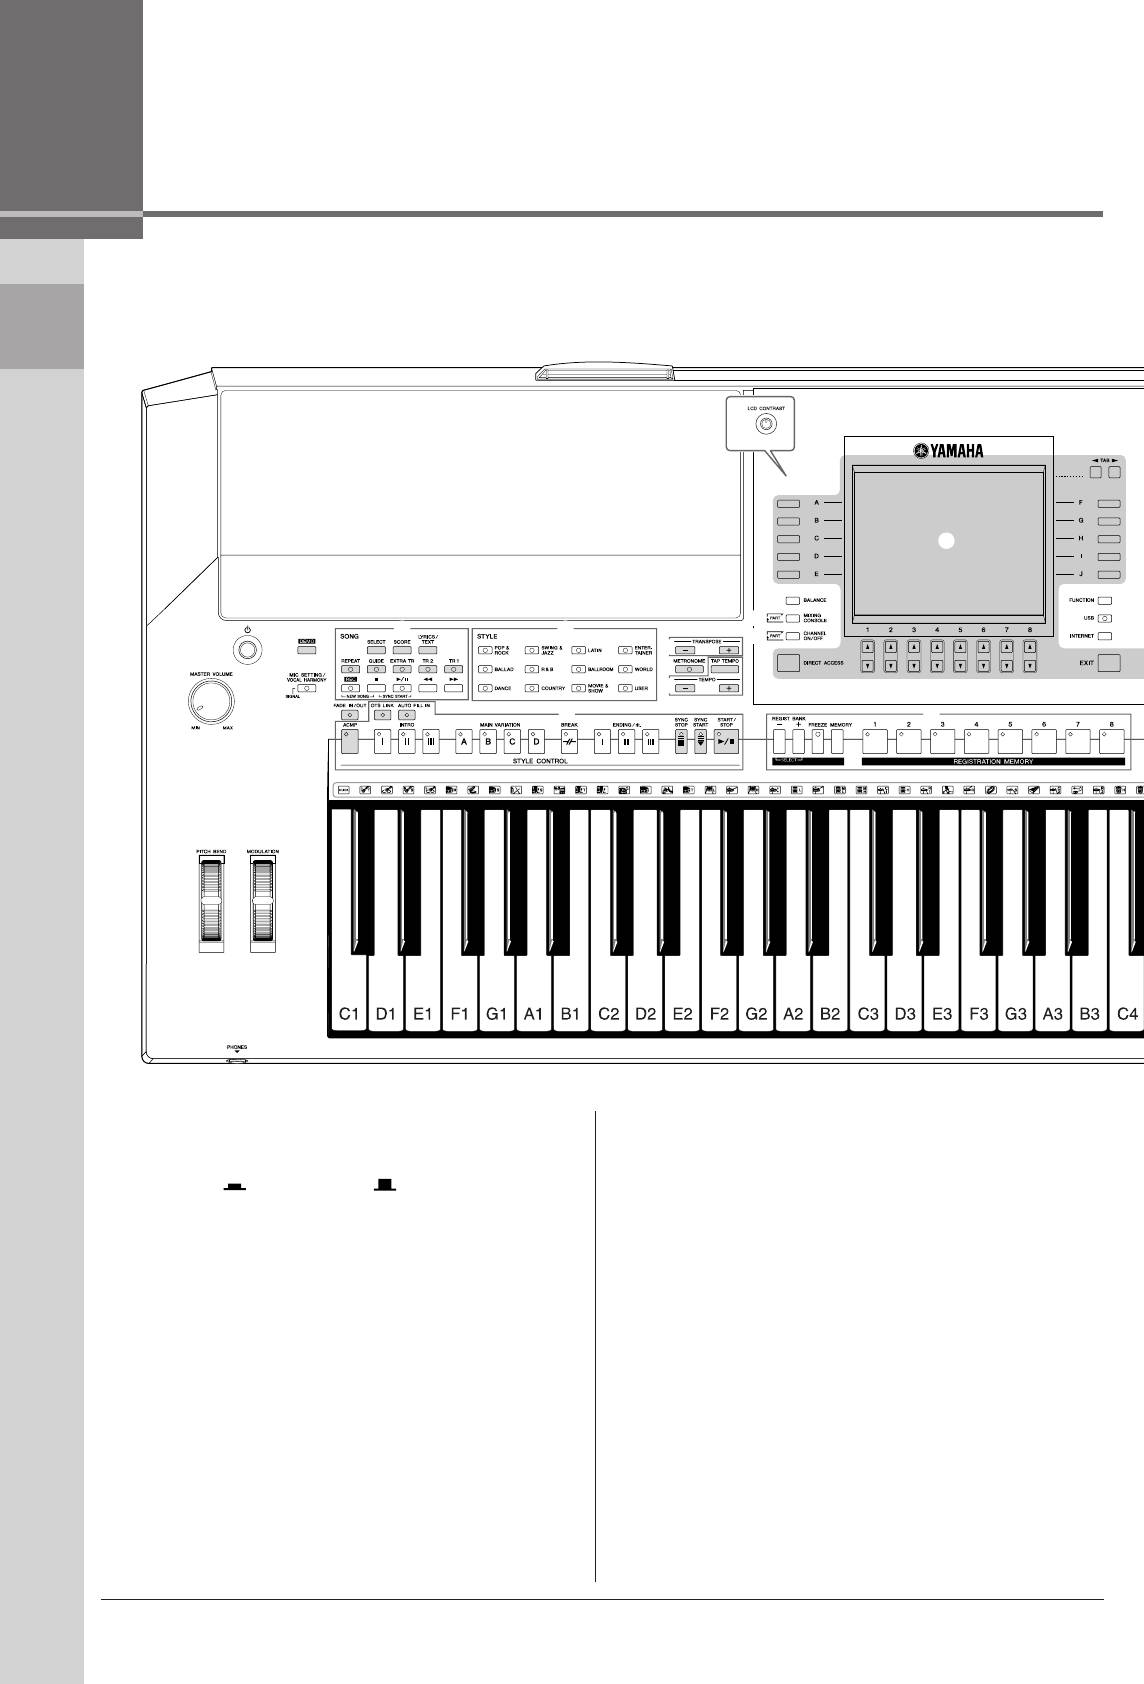
Панель управления
Панель управления
%
(PSR-S710)
^
&
º
*
¡
8 9
(
™
2
3
@
#
4
$
1
)
!
£
56
7
1
Регулятор [MASTER VOLUME] ………………………………….. Стр. 15
)
Кнопка [FADE IN/OUT] …………………………………………….. Стр. 44
астройка общей громкости.
Управляет временем усиления/затухания звука при
2
Кнопка [STANDBY/ON]…………………………………………….. Стр. 14
воспроизведении стиля/мелодии.
ключение () и выключение () питания инструмента.
!
Кнопки STYLE CONTROL ………………………………………….. Стр. 42
3
Кнопка [DEMO]………………………………………………………… Стр. 18
Управление воспроизведением стиля.
оспроизведение демонстраций.
@
Кнопки TRANSPOSE ………………………………………………… Стр. 34
4
Кнопка [MIC SETTING/VOCAL HARMONY] (PSR-S910)…….Стр. 91
егулировка изменения высоты звука с шагом в один полутон
обавление некоторых эффектов к входу с микрофона.
#
Кнопка [METRONOME]…………………………………………….. Стр. 56
5
Диск [PITCH BEND] ………………………………………………….. Стр. 34
ключение и выключение звука метронома.
мещение высоты текущего звука клавиатуры вверх или вниз.
$
Кнопки [TAP TEMPO]/TEMPO ………………………………….. Стр. 43
6
Диск [MODULATION] ………………………………………………… Стр. 35
Управление темпом воспроизведения стиля, композиции и
метронома.
рименение эффекта вибрато.
%
Регулятор [LCD CONTRAST] (PSR-S710) …………………….Стр. 17
7
Разъем [PHONES] ……………………………………………………. Стр. 16
астройка контрастности -дисплея.
лужит для подключения наушников.
^
ЖК-дисплей и относящиеся к нему элементы
8
Кнопки SONG…………………………………………………………… Стр. 49
управления ……………………………………………………………… Стр. 19
ыбор композиции и управление воспроизведением
композиции.
&
Кнопка [BALANCE]…………………………………………………… Стр. 48
9
Кнопки выбора категории STYLE……………………………. Стр. 39
астройка баланса громкости партий.
ыбор стиля.
*
Кнопка [MIXING CONSOLE] ……………………………………… Стр. 79
Управление всеми аспектами клавиатуры, в частях стиля
и мелодии.
12
Руководство пользователя PSR-S910/S710
¤
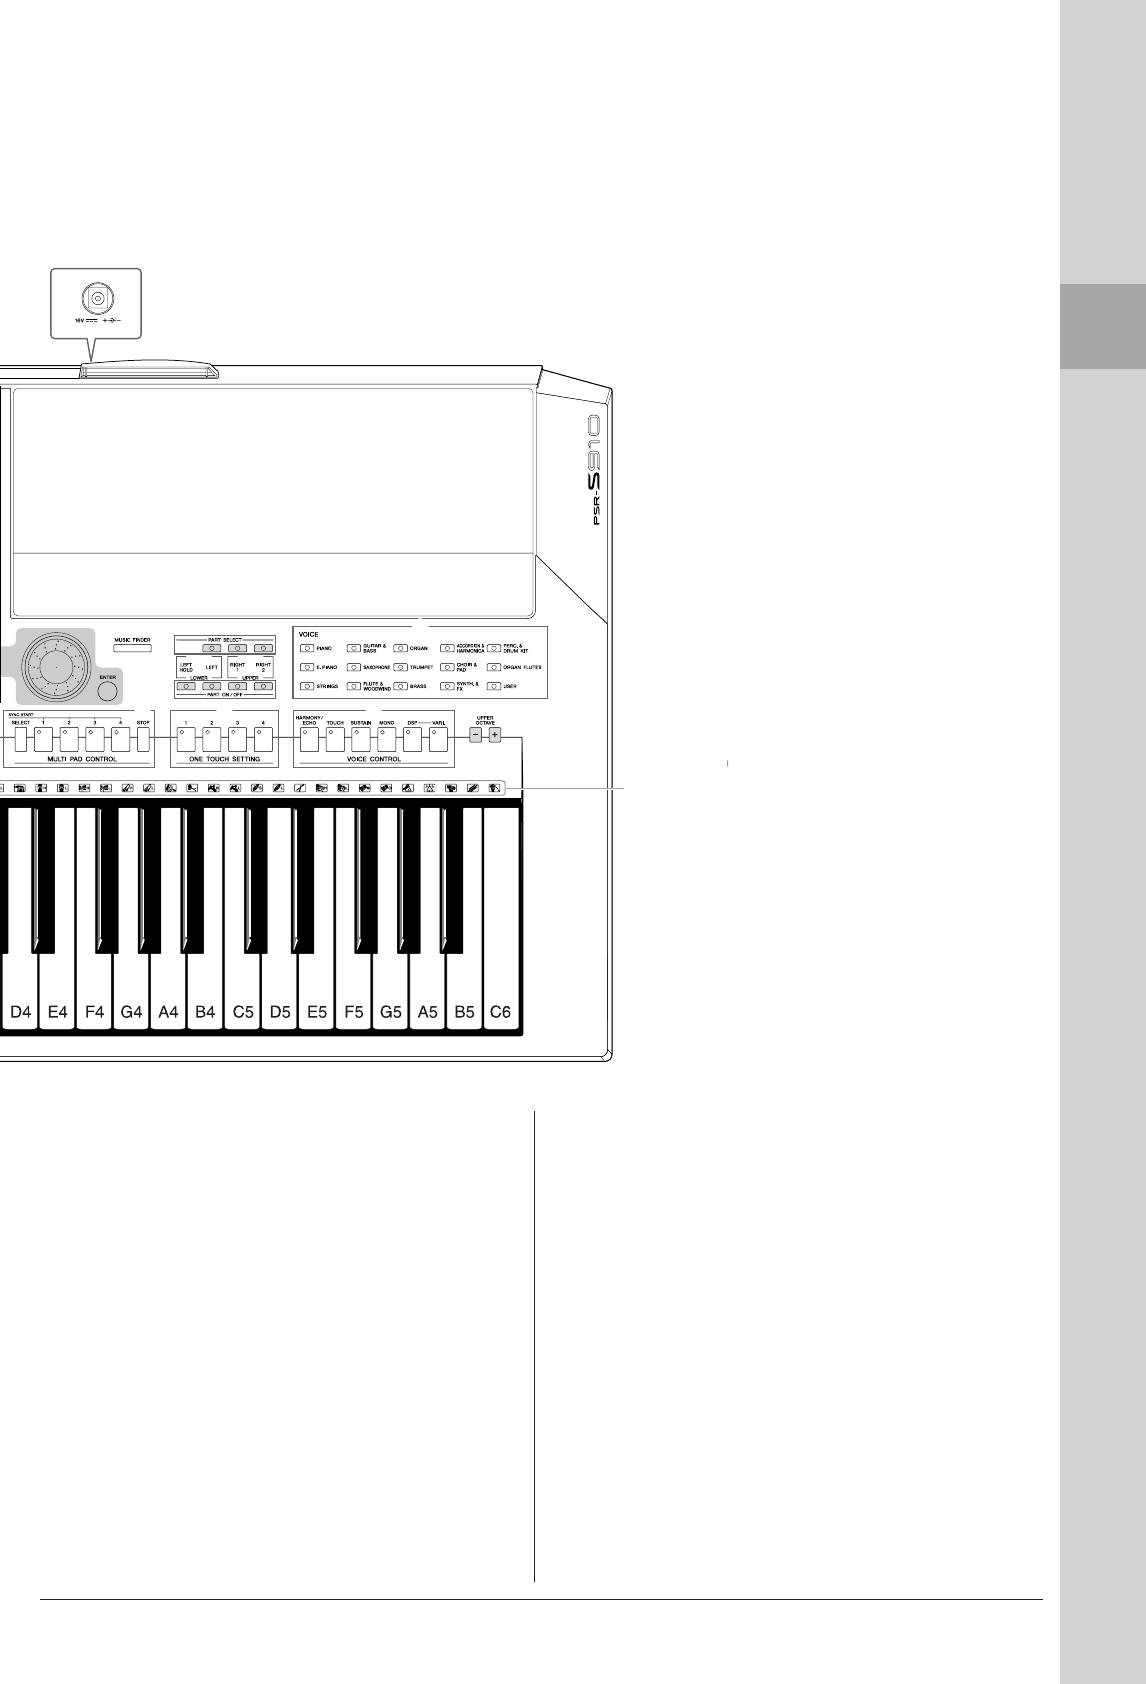
Панель управления
•
∞
§
¶
¢ ª ‚
⁄
Показаны обозначения ударных инструментов,
назначенных клавишам при выбранном стандартном
наборе «Standard Kit 1».
(
Кнопка [CHANNEL ON/OFF] ……………………… Cтраницы 47, 54
§
Кнопки PART SELECT ………………………………………………. Стр. 32
ключение и выключение каналов стиля/мелодии.
ыбор части клавиатуры.
º
Кнопка [FUNCTION]
¶
Кнопки PART ON/OFF ……………………………………………… Стр. 32
(см. Справочное руководство на веб-сайте.)
ключение и отключение частей клавиатуры.
озволяет создавать дополнительные настройки и создавать
•
Кнопки выбора категории VOICE ……………………………. Стр. 29
собственные стили, мелодии и мультипэды.
ыбор тембра.
¡
Кнопка [USB] ……………………………………………. Cтраницы 25, 75
ª
Кнопки ONE TOUCH SETTING …………………………………… Стр. 45
агрузка определенных данных в USB-устройство хранения
агрузка соответствующих настроек панели для стиля.
данных и разрешение записи исполнения в USB-устройство
хранения данных в формате аудио.
‚
Кнопки VOICE CONTROL ………………………………………….. Стр. 35
рименение некоторых эффектов при исполнении на
™
Кнопка [INTERNET] ………………………………………………….. Стр. 84
клавиатуре.
оступ к веб-сайту в нтернете.
⁄
Кнопки UPPER OCTAVE……………………………………………. Стр. 34
£
Кнопки REGISTRATION MEMORY …………………………….. Стр. 71
двиг высоты звука клавиатуры с шагом в октаву.
егистрация и загрузка настроек панели.
¤
Разъем [DC IN] ………………………………………………………… Стр. 14
¢
Кнопки MULTI PAD CONTROL…………………………………… Стр. 63
одключение прилагаемого блока питания.
ыбор и воспроизведение ритмической или мелодической
фразы мультипэда.
нформацию о разъемах, расположенных на задней панели,
∞
Кнопка [MUSIC FINDER] ………………………………………….. Стр. 65
см. на стр. 88 – 97.
оиск соответствующих настроек панели для требуемой
композиции.
Руководство пользователя PSR-S910/S710
13
Оглавление
Аннотации для Синтезатора/фортепиано Yamaha PSR-S710 в формате PDF
Топ 10 инструкций
Другие инструкции
Синтезаторы Yamaha PSR-S710 — инструкция пользователя по применению, эксплуатации и установке на русском языке. Мы надеемся, она поможет вам решить возникшие у вас вопросы при эксплуатации техники.
Вы можете скачать инструкцию к Yamaha PSR-S710 по ссылке ниже, если не хотите ждать загрузки. Если остались вопросы, задайте их в комментариях после инструкции.
«Загружаем инструкцию», означает, что нужно подождать пока файл загрузится и можно будет его читать онлайн. Некоторые инструкции очень большие и время их появления зависит от вашей скорости интернета.
Полезные видео
Характеристики
Остались вопросы?
Не нашли свой ответ в руководстве или возникли другие проблемы? Задайте свой вопрос в форме ниже с подробным описанием вашей ситуации, чтобы другие люди и специалисты смогли дать на него ответ. Если вы знаете как решить проблему другого человека, пожалуйста, подскажите ему


Часто задаваемые вопросы

Как посмотреть инструкцию к Yamaha PSR-S710?
Необходимо подождать полной загрузки инструкции в сером окне на данной странице или скачать кликнув по специальной кнопке.
Руководство на русском языке?
Все наши руководства представлены на русском языке или схематично, поэтому вы без труда сможете разобраться с вашей моделью
Как можно распечатать инструкцию?
Скачайте ее по специальной кнопке над формой чтения на ваше устройства и отправьте на печать.
- Manuals
- Brands
- Yamaha Manuals
- Electronic Keyboard
- PSR-S710
Manuals and User Guides for Yamaha PSR-S710. We have 9 Yamaha PSR-S710 manuals available for free PDF download: Service Manual, Bedienungsanleitung, Owner’s Manual, Reference Manual, Data List, Installation Manual, Connection Manual, User Manual
EN
This Reference Manual explains advanced features of the PSR-S910/S710 that are not explained in the
Owner’s Manual. Please read the Owner’s Manual first, before reading this Reference Manual.
Reference Manual
DIGITAL WORKSTATION
2 PSR-S910/S710 Reference Manual
Contents
1 Voices
– Playing the Keyboard – 3
Voice Characteristics ………………………………………………… 3
Selecting GM/XG or Other Voices from the Panel…………. 4
Effect-Related Settings ……………………………………………… 5
Pitch-Related Settings ………………………………………………. 8
Editing Voices (Voice Set) ……………………………………….. 10
Editing Organ Flutes Parameters………………………………. 15
2 Styles
– Playing Rhythm and Accompaniment – 16
Selecting the Chord Fingering Type ………………………….. 16
Style Playback Related Settings ……………………………….. 18
Split Point Settings………………………………………………….. 20
Memorizing the Original One Touch Setting ……………….. 21
Creating/Editing Styles (Style Creator) ………………………. 22
3 Songs
– Recording Your Performances and Creating Songs –
36
Editing Music Notation Settings ………………………………… 36
Editing Lyrics/Text Display Settings…………………………… 39
Using the Auto Accompaniment Features with
the Song Playback ………………………………………………….. 40
Song Playback Related Parameters (Repeat settings,
Channel settings, Guide Function)…………………………….. 41
Creating/Editing Songs (Song Creator) ……………………… 45
4 Multi Pads
– Adding Musical Phrases to Your Performance –
61
Multi Pad Creating (Multi Pad Creator) ………………………. 61
Multi Pad Editing …………………………………………………….. 63
5 Music Finder
– Calling Up Ideal Setups (Voice, Style, etc.) for Each Song –
64
Creating a Set of Favorite Records……………………………. 64
Editing Records………………………………………………………. 65
Saving the Record as a Single File……………………………. 66
Viewing Record Information on the Internet
(MUSIC FINDER Plus)…………………………………………….. 67
6 Registration Memory
– Saving and Recalling Custom Panel Setups –
68
Disabling Recall of Specific Items (Freeze) ………………… 68
Calling Up Registration Memory Numbers in Order
(Registration Sequence) …………………………………………..69
7 USB Audio
– Playback and Recording Audio Files – 72
8 Mixing Console
– Editing the Volume and Tonal Balance – 72
Editing VOL/VOICE Parameters ……………………………….. 72
Editing FILTER Parameters ……………………………………… 73
Editing TUNE Parameters…………………………………………74
Editing EFFECT Parameters…………………………………….. 75
Editing EQ Parameters …………………………………………….78
9 Internet Direct Connection
– Connecting the PSR-S910/S710 Directly to the Internet –
80
Editing the Browser Settings …………………………………….. 80
Registering Bookmarks of Your Favorite Pages ………….. 81
10 Connections
– Using Your Instrument with Other Devices – 83
Microphone Settings ………………………………….. 83
Footswitch/Foot Controller Settings …………………………… 90
MIDI Settings………………………………………………………….. 93
11 Utility
– Making Global Settings – 99
CONFIG1 ………………………………………………………………. 99
CONFIG2 …………………………………………………………….. 101
SCREEN OUT ………………………………………… 101
MEDIA…………………………………………………………………. 102
OWNER ………………………………………………………………. 103
SYSTEM RESET ………………………………………………….. 104
Index 106
* Each chapter in this Reference Manual corresponds to the relevant chapters in the Owner’s Manual.
• The illustrations and LCD screens as shown in this manual are for instructional purposes only, and may appear somewhat dif-
ferent from those on your instrument.
• The displays are taken from the PSR-S910, and in English.
• The company names and product names in this manual are the trademarks or registered trademarks of their respective companies.
Using the PDF manual
•To quickly jump to items and topics of interest, click on the desired items in the “Bookmarks” index to the left
of the main display window. (Click the “Bookmarks” tab to open the index if it is not displayed.)
• Click the page numbers that appear in this manual to go directly to the corresponding page.
• Select “Find” or “Search” from the Adobe Reader “Edit” menu and enter a keyword to locate related informa-
tion anywhere in the document.
NOTE The names and positions of menu items may vary according to the version of Adobe Reader being used.
1
Voices – Playing the Keyboard –
PSR-S910/S710 Reference Manual 3
Voices
– Playing the Keyboard –
Contents
Voice Characteristics . . . . . . . . . . . . . . . . . . . . . . . . . . . . . . . . . . . . . . . . . . . . . . . . . . . . . . . . . . . . 3
Selecting GM/XG or Other Voices from the Panel . . . . . . . . . . . . . . . . . . . . . . . . . . . . . . . . . . . . . 4
Effect-Related Settings . . . . . . . . . . . . . . . . . . . . . . . . . . . . . . . . . . . . . . . . . . . . . . . . . . . . . . . . . . 5
• Setting the Touch Sensitivity of the Keyboard . . . . . . . . . . . . . . . . . . . . . . . . . . . . . . . . . . . . . . . . 5
• Selecting the Harmony/Echo type . . . . . . . . . . . . . . . . . . . . . . . . . . . . . . . . . . . . . . . . . . . . . . . . . 6
Pitch-Related Settings . . . . . . . . . . . . . . . . . . . . . . . . . . . . . . . . . . . . . . . . . . . . . . . . . . . . . . . . . . . 8
• Fine-tuning the Pitch of the Entire Instrument . . . . . . . . . . . . . . . . . . . . . . . . . . . . . . . . . . . . . . . . 8
• Scale Tuning. . . . . . . . . . . . . . . . . . . . . . . . . . . . . . . . . . . . . . . . . . . . . . . . . . . . . . . . . . . . . . . . . . 8
• Changing the Part Assignment of the TRANSPOSE Buttons . . . . . . . . . . . . . . . . . . . . . . . . . . . . 9
Editing Voices (Voice Set) . . . . . . . . . . . . . . . . . . . . . . . . . . . . . . . . . . . . . . . . . . . . . . . . . . . . . . . 10
• Editable Parameters in the VOICE SET Displays. . . . . . . . . . . . . . . . . . . . . . . . . . . . . . . . . . . . . 11
• Disabling Automatic Selection of Voice Sets (Effects, etc.) . . . . . . . . . . . . . . . . . . . . . . . . . . . . . 14
Editing Organ Flutes Parameters . . . . . . . . . . . . . . . . . . . . . . . . . . . . . . . . . . . . . . . . . . . . . . . . . 15
The Voice type and its defining characteristics are indicated above the Voice name in the Voice Selection
display.
Voice Characteristics
Live! These acoustic instrument sounds were sampled in stereo, to produce a truly
authentic, rich sound—full of atmosphere and ambience.
Cool! These Voices capture the dynamic textures and subtle nuances of electric
instruments—thanks to a huge amount of memory and some very sophisticated
programming.
Sweet! These acoustic instrument sounds also benefit from Yamaha’s sophisticated
technology—and feature a sound so finely detailed and natural, you’ll swear
you’re playing the real thing!
Drums Various drum and percussion sounds are assigned to individual keys, letting
you play the sounds from the keyboard.
SFX Various special effect sounds are assigned to individual keys, letting you play
the sounds from the keyboard.
Organ Flutes! This authentic organ Voice lets you use the Voice Set to adjust the various foot-
ages and craft your own original organ sounds. See page 15 for details.
MegaVoice See the Owner’s Manual.
S.Art! (PSR-S910) See the Owner’s Manual.
4 PSR-S910/S710 Reference Manual
Voices – Playing the Keyboard –
1
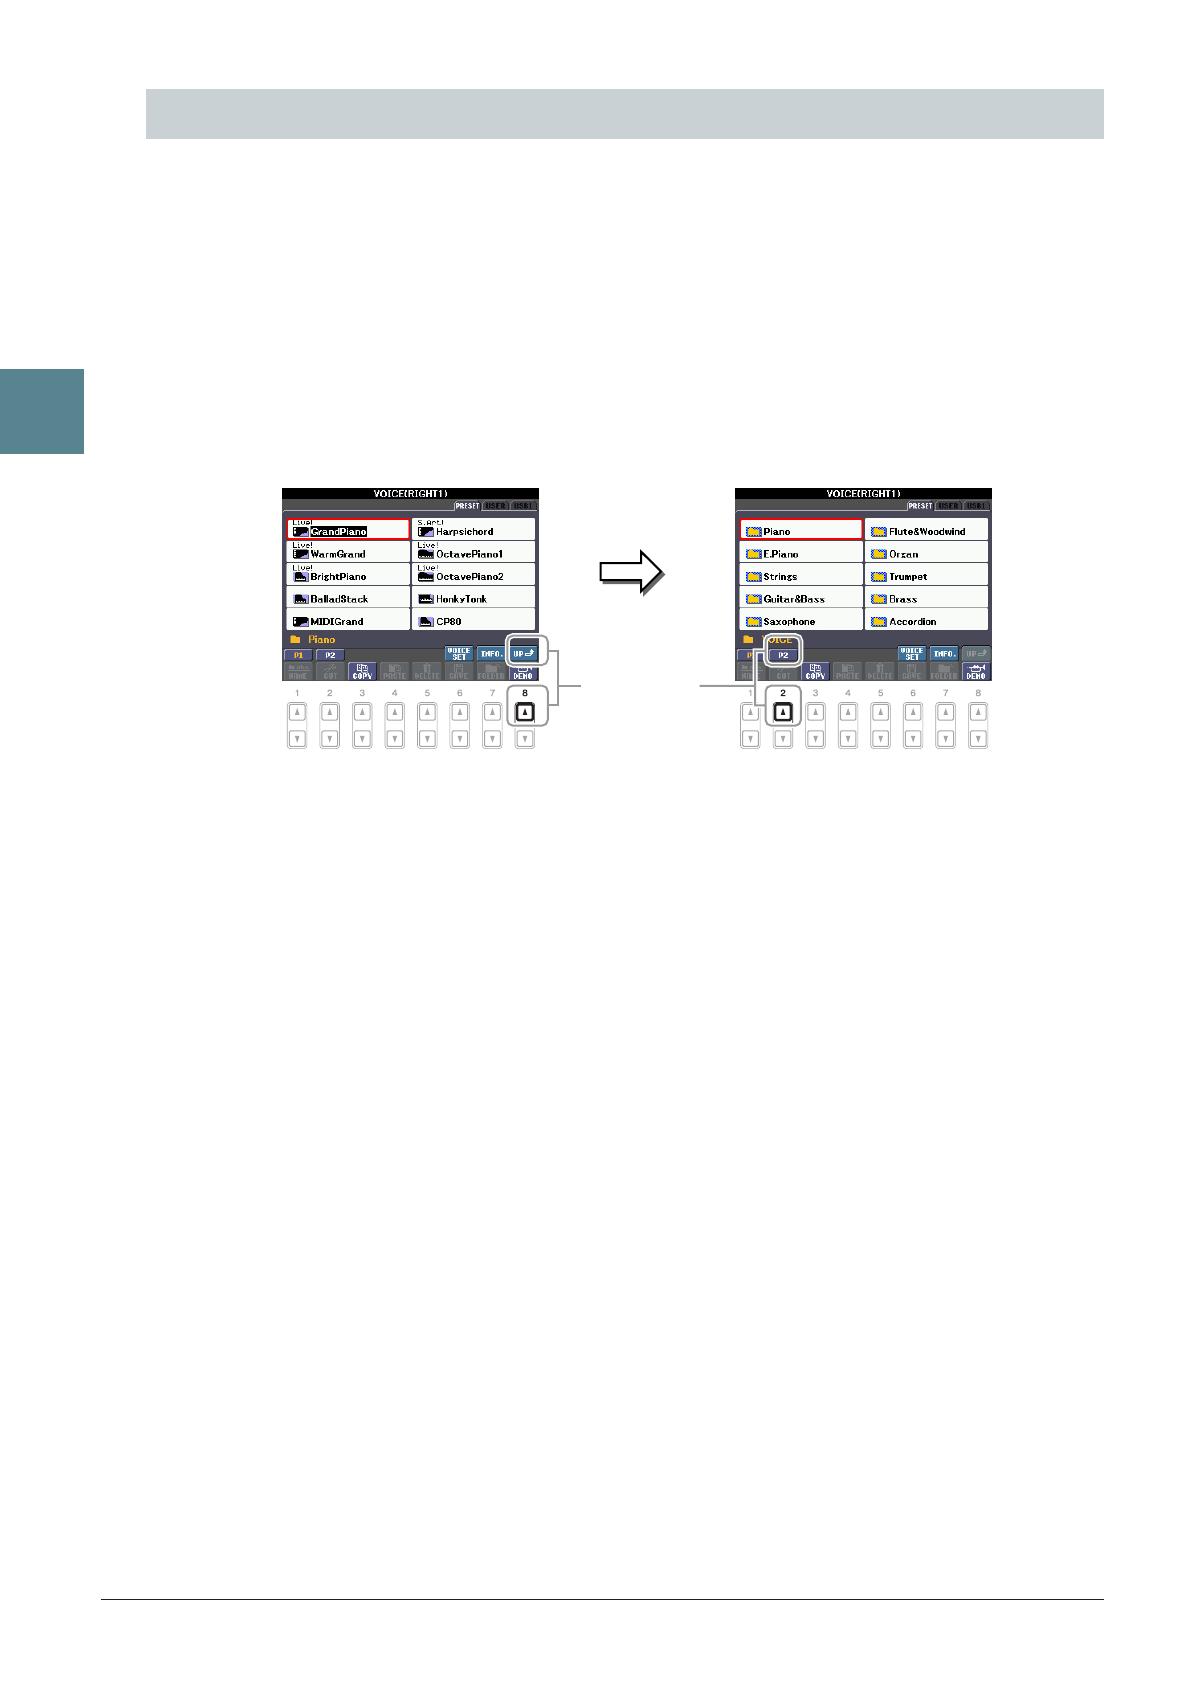
The GM/XG Voices cannot be directly called up from the VOICE category selection buttons. However, they
can be called up via panel operation by following the procedure below.
1 Press one of the PART SELECT button to which you want to call up the desired Voice.
2 Press one of the VOICE category selection buttons to call up the Voice Selection
display.
3 Press the [8 ▲] (UP) button to call up the Voice categories.
4 Press the [2 ▲] (P2) button to display Page 2.
5 Press the desired [A]–[J] button to call up the Voice Selection display of GM/XG
Voices, GM2 Voices, etc.
NOTE (PSR-S910) You can find the “Legacy” folder in this display. This folder contains previous Yamaha keyboards’ Voices (such as PSR-S900, PSR-S700,
etc.) for data compatibility with other models.
6 Select the desired Voice.
Selecting GM/XG or Other Voices from the Panel
43
PSR-S910/S710 Reference Manual 5
Voices – Playing the Keyboard –
1
Setting the Touch Sensitivity of the Keyboard
You can adjust the touch response of the instrument (how the sound responds to the way you play the keys).
The touch sensitivity type becomes the common setting for all Voices.
NOTE Some Voices are purposely designed without touch sensitivity, in order to emulate the true characteristics of the actual instrument (for example, conventional
organs, which have no touch response).
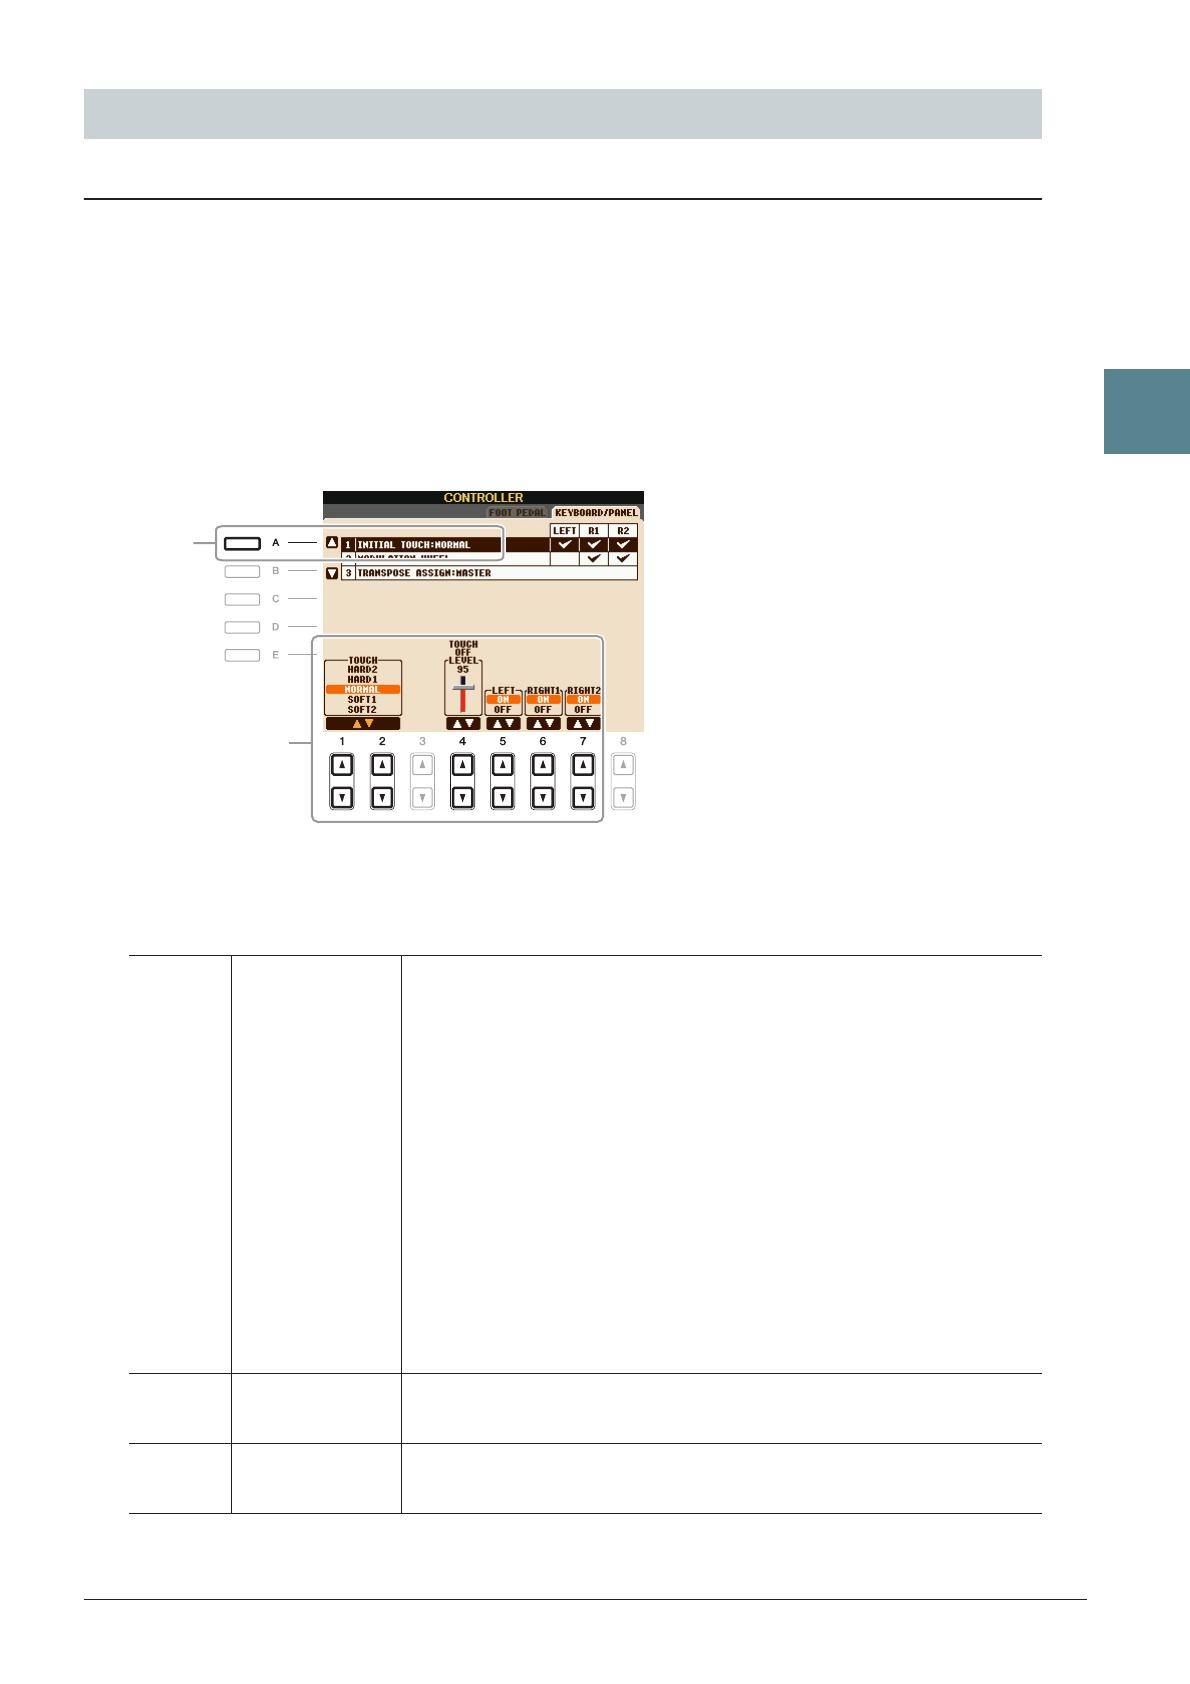
1 Call up the operation display.
[FUNCTION] → [D] CONTROLLER → TAB [E][F] KEYBOARD/PANEL
2 Use the [A] button to select “1 INITIAL TOUCH.”
3 Use the [1 ▲▼]–[7 ▲▼] buttons to specify the touch response.
1 INITIAL TOUCH
Effect-Related Settings
[1 ▲▼]/
[2 ▲▼]
TOUCH Determines the Initial Touch sensitivity setting.
HARD 2
Requires strong playing to produce high volume. Best for players with a
heavy touch.
HARD 1
Requires moderately strong playing for higher volume.
NORMAL
Standard touch response.
SOFT 1
Produces high volume with moderate playing strength.
SOFT 2
Produces relatively high volume even with light playing strength. Best for
players with a light touch.
[4 ▲▼]TOUCH OFF
LEVEL
Determines the fixed volume level when Touch is set to “OFF.”
[5 ▲▼]–
[7 ▲▼]
LEFT–RIGHT2 Turns Initial Touch on or off for each keyboard part.
2
3
6 PSR-S910/S710 Reference Manual
Voices – Playing the Keyboard –
1
Selecting the Harmony/Echo type
You can select the desired Harmony/Echo effect from a variety of types.
NOTE When the [MONO] button is turned to on or you use the Super Articulation Voices, the Harmony/Echo effect may not work properly.
1 Turn the [HARMONY/ECHO] button on.
2 Call up the operation display.
[FUNCTION] → [H] HARMONY/ECHO
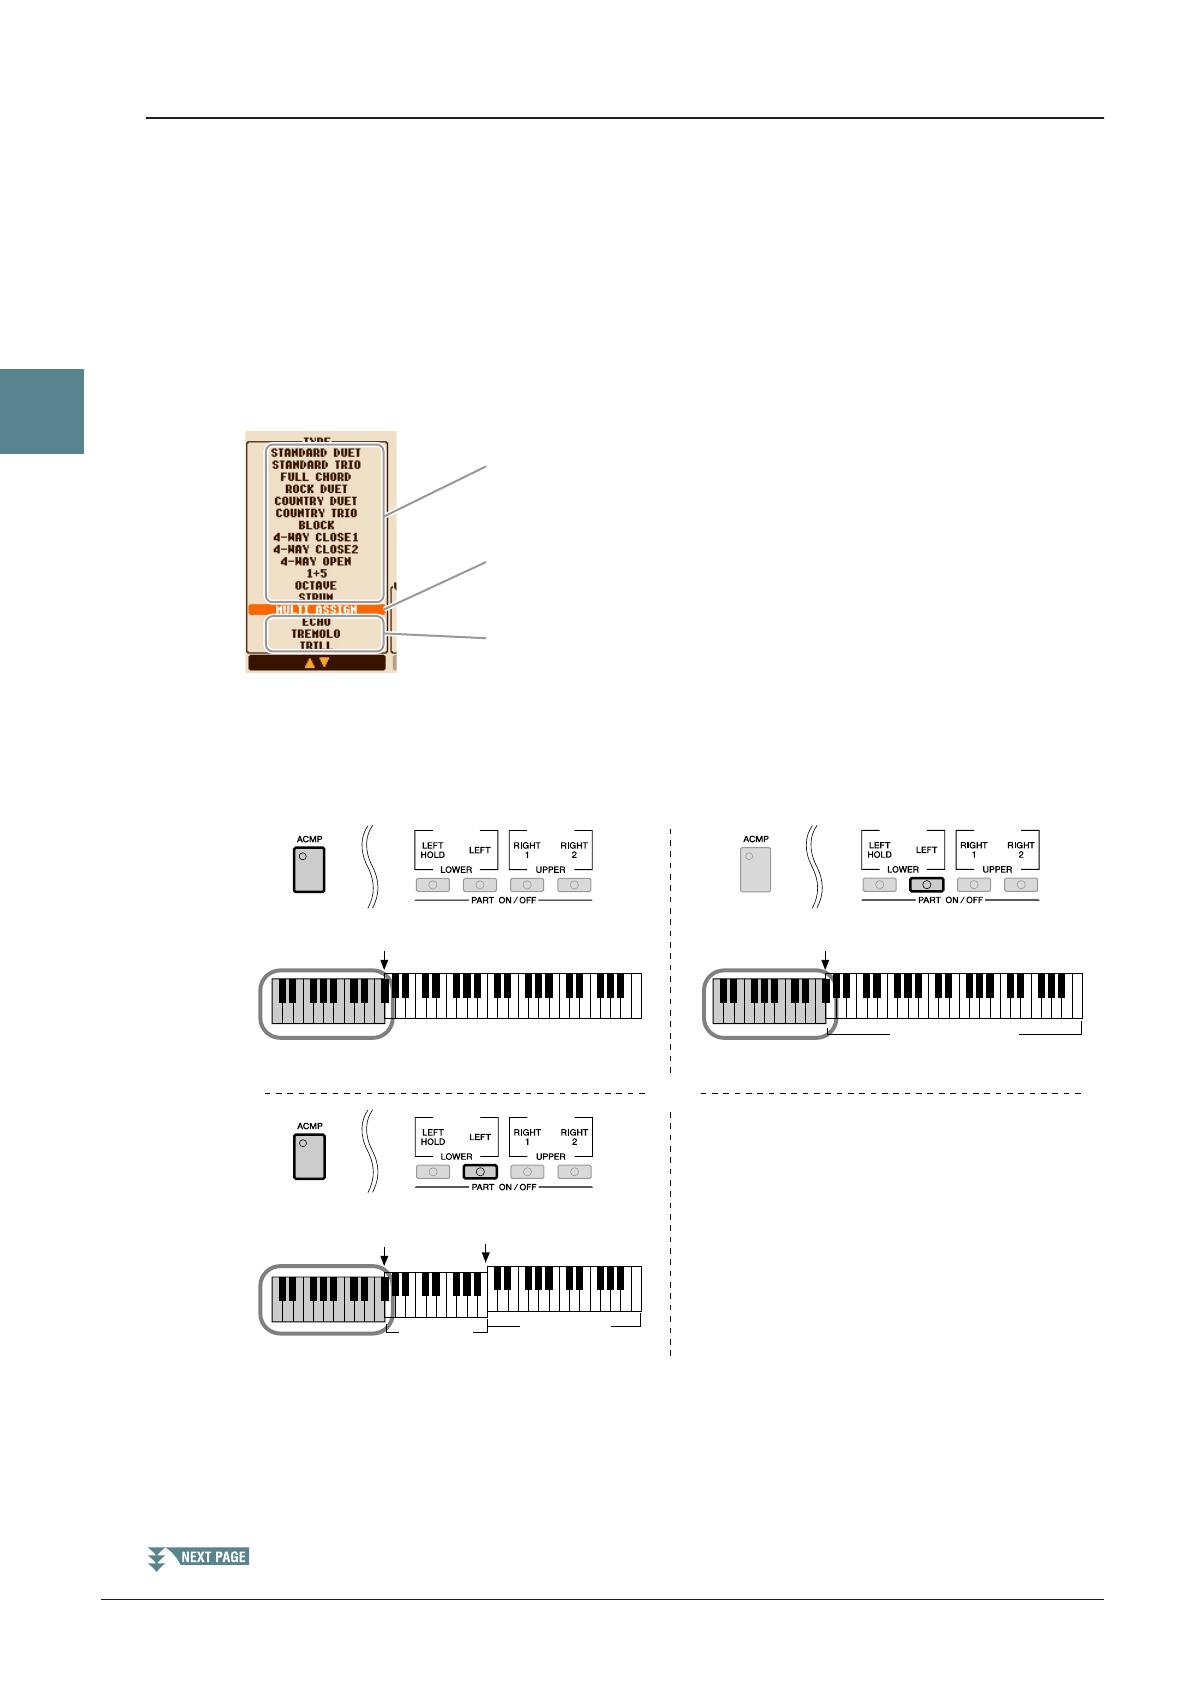
3 Use the [1 ▲▼]–[3 ▲▼] buttons to select the Harmony/Echo type.
The Harmony/Echo types are divided into the following groups, depending on the particular effect
applied.
■ Harmony Types
When one of the Harmony Types is selected, the Harmony effect is applied to the note played in the right-
hand section of the keyboard according to the type selected above and the chord specified in the chord
section of the keyboard shown below.
■ Multi Assign Type
The Multi Assign effect automatically assigns notes played simultaneously on the right-hand section of the
keyboard to separate parts (Voices). Both of the keyboard part [RIGHT 1] and [RIGHT 2] should be turn
on when using the Multi Assign effect. The Right 1 and Right 2 Voices are alternately assigned to the notes
in the order you play.
Harmony Types
These types apply the harmony effect to notes played in the right-hand sec-
tion of the keyboard according to the chord specified in the left-hand section
of the keyboard. (Note that the “1+5” and “Octave” settings are not affected
by the chord.)
Multi Assign Type
This type applies a special effect to chords played in the right-hand section
of the keyboard.
Echo Types
These types apply echo effects to notes played in the right-hand section of
the keyboard in time with the currently set tempo.
Split Point
(for the Voice)
LEFT Voice and chord section
for Harmony effect
RIGHT 1 and 2 Voices
Chord section for Style playback
and Harmony effect
Chord section for
Style playback and
Harmony effect
Split Point
Split Point
(for Style playback)
Split Point
LEFT Voice
RIGHT 1 and 2
Voices

PSR-S910/S710 Reference Manual 7
Voices – Playing the Keyboard –
1
■ Echo Types
When one of the Echo Types is selected, the corresponding effect (echo, tremolo, trill) is applied to the
note played in the right-hand section of the keyboard in time with the currently set tempo, regardless of the
[ACMP] and the LEFT part on/off status. Keep in mind that Trill works when you hold down two notes on
the keyboard simultaneously (last two notes if more than two notes are held), and it plays those notes
alternately.
4 Use the [4 ▲▼]–[8 ▲▼] buttons to select various Harmony/Echo settings.
The available settings differ depending on the Harmony/Echo type.
[4 ▲▼]VOLUME This parameter is available for all types with the exception of “Multi
Assign.” It determines the level of the harmony/echo notes generated by
the Harmony/Echo effect.
[5 ▲▼] SPEED This parameter is only available when Echo, Tremolo, or Trill is selected
in Type above. It determines the speed of the Echo, Tremolo, and Trill
effects.
[6 ▲▼] ASSIGN This parameter is available for all types with the exception of “Multi
Assign.” This lets you determine the keyboard part via which the har—
mony/echo notes will be sounded.
[7 ▲▼] CHORD NOTE
ONLY
This parameter is available when one of the Harmony Types is selected.
When this is set to “ON,” the Harmony effect is applied only to the note
(played in the right-hand section of the keyboard) that belongs to a chord
played in the chord section of the keyboard.
[8 ▲▼]TOUCH LIMIT This parameter is available for all types with the exception of “Multi
Assign.” It determines the lowest velocity value at which the harmony
note will sound. This allows you to selectively apply the harmony by your
playing strength, letting you create harmony accents in the melody. The
harmony effect is applied when you play the key strongly (above the set
value).
8 PSR-S910/S710 Reference Manual
Voices – Playing the Keyboard –
1
Fine-tuning the Pitch of the Entire Instrument
You can fine-tune the pitch of the entire instrument—useful when you play the PSR-S910/S710 along with
other instruments or CD music. Please note that the Tune function does not affect the Drum Kit or SFX Kit
Voices and audio files.
1 Call up the operation display.
[FUNCTION] → [A] MASTER TUNE/SCALE TUNE → TAB [E][F] MASTER TUNE
2 Use the [4 ▲▼]/[5 ▲▼] buttons to set the tuning in 0.2 Hz steps, from 414.8–466.8 Hz.
Press the both 4 or 5’s [
▲
] and [
▼
] buttons simultaneously to reset the value to the factory setting of 440.0 Hz.
Scale Tuning
You can select various scales for playing in custom tunings for specific historical periods or music genres.
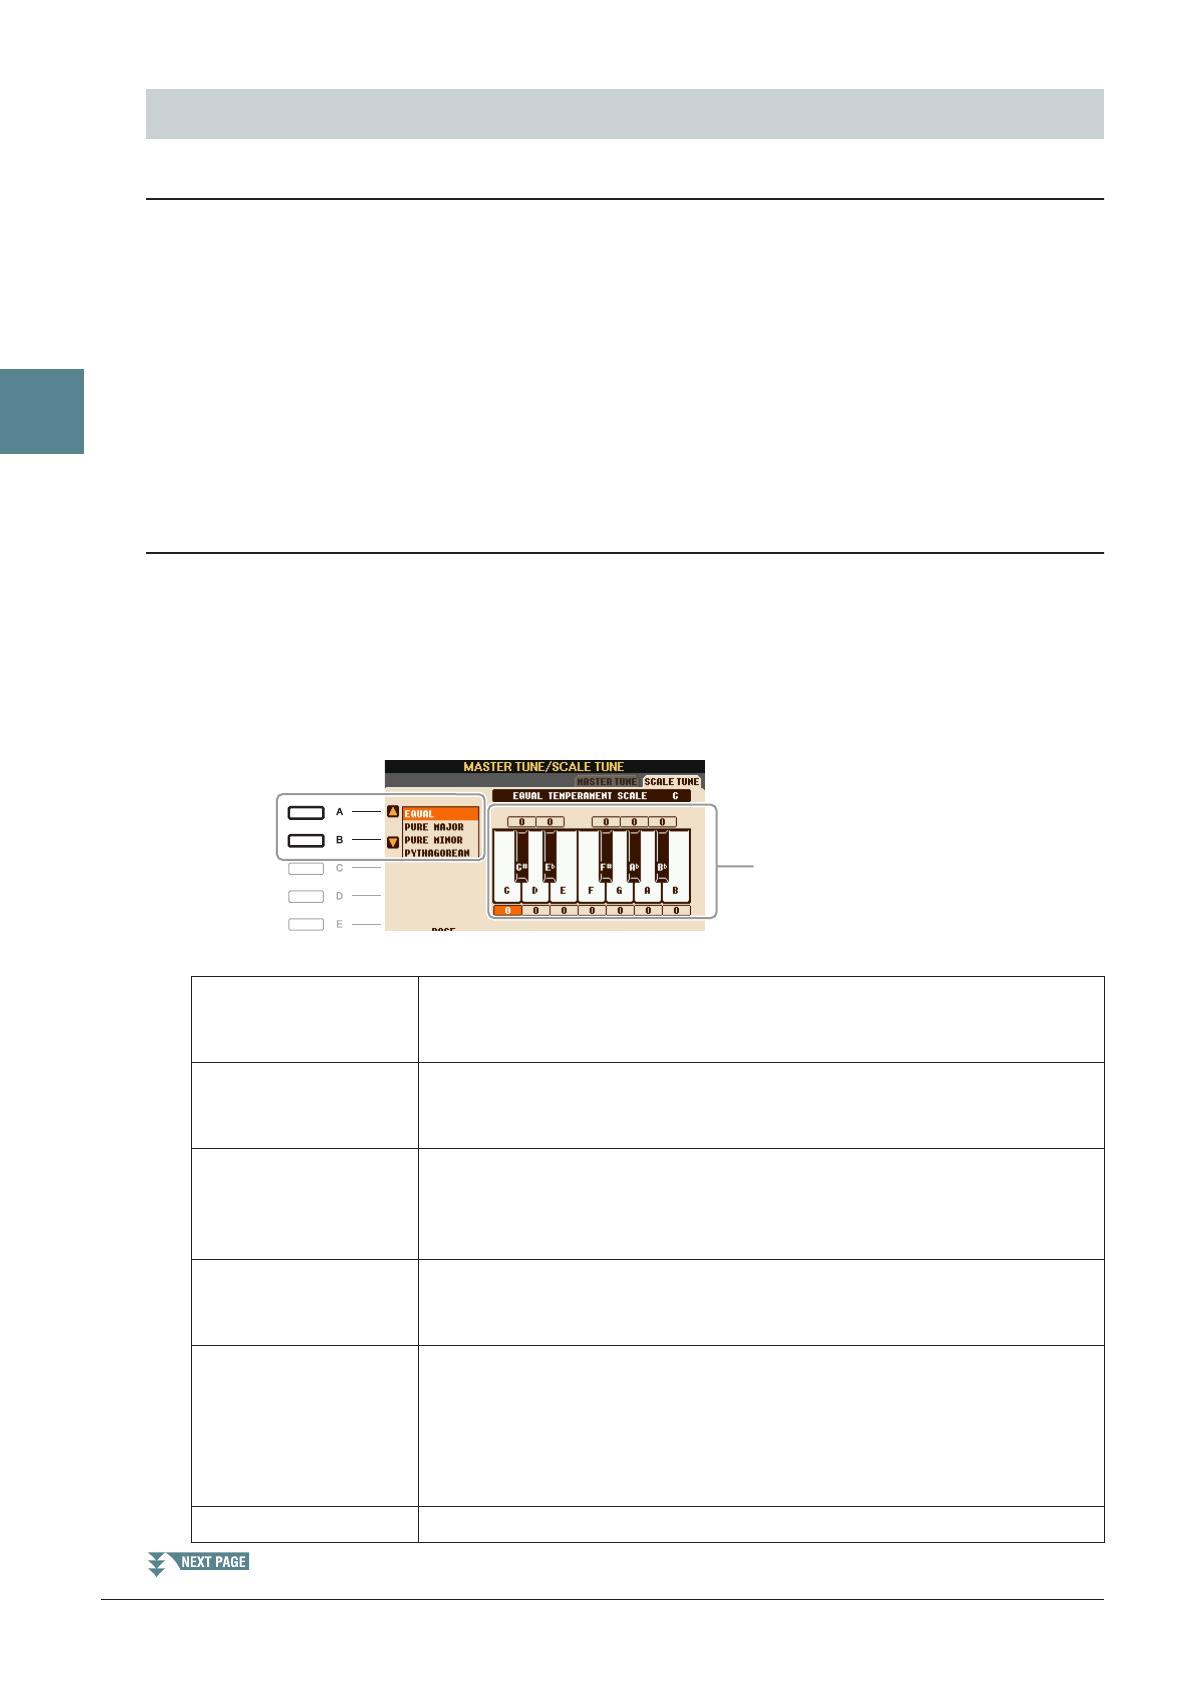
1 Call up the operation display.
[FUNCTION] → [A] MASTER TUNE/SCALE TUNE → TAB [E][F] SCALE TUNE
2 Use the [A]/[B] buttons to select the desired scale.
■ Preset Scale types
Pitch-Related Settings
EQUAL The pitch range of each octave is divided equally into twelve parts, with each
half-step evenly spaced in pitch. This is the most commonly used tuning in
music today.
PURE MAJOR, PURE
MINOR
These tunings preserve the pure mathematical intervals of each scale, espe-
cially for triad chords (root, third, fifth). You can hear this best in actual vocal
harmonies—such as choirs and a cappella singing.
PYTHAGOREAN This scale was devised by the famous Greek philosopher and is created from a
series of perfect fifths, which are collapsed into a single octave. The 3rd in this
tuning are slightly unstable, but the 4th and 5th are beautiful and suitable for
some leads.
MEAN-TONE This scale was created as an improvement on the Pythagorean scale, by making
the major third interval more “in tune.” It was especially popular from the 16th
century to the 18th century. Handel, among others, used this scale.
WERCKMEISTER,
KIRNBERGER
This composite scale combines the Werckmeister and Kirnberger systems,
which were themselves improvements on the mean-tone and Pythagorean
scales. The main feature of this scale is that each key has its own unique char-
acter. The scale was used extensively during the time of Bach and Beethoven,
and even now it is often used when performing period music on the harpsi-
chord.
ARABIC1, ARABIC2 Use these tunings when playing Arabic music.
The tuning of each note for the cur-
rently selected scale is shown.
PSR-S910/S710 Reference Manual 9
Voices – Playing the Keyboard –
1
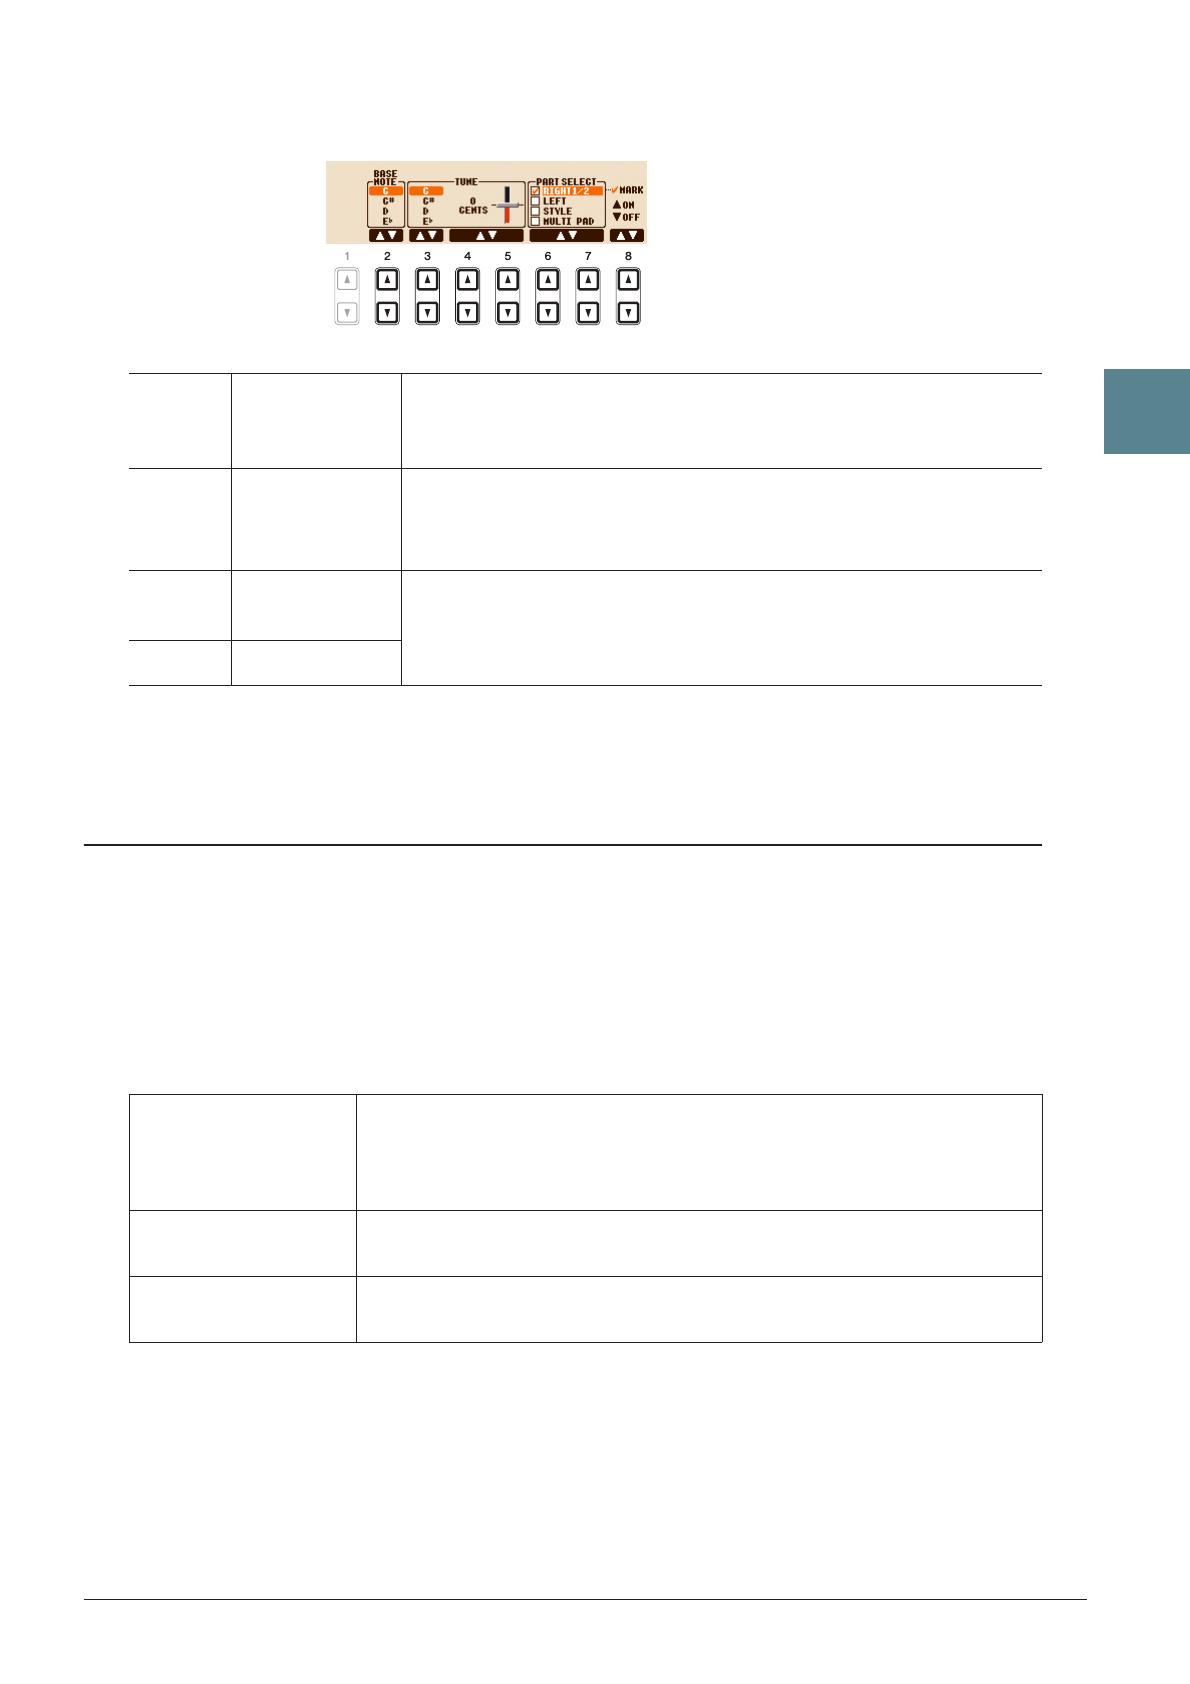
3 Change the following settings as necessary.
NOTE To register the Scale Tune settings to the Registration Memory, be sure to checkmark the SCALE item in the REGISTRATION MEMORY CONTENTS dis-
play.
Changing the Part Assignment of the TRANSPOSE Buttons
You can determine to which parts the TRANSPOSE [-]/[+] buttons are applied.
1 Call up the operation display.
[FUNCTION] → [D] CONTROLLER → TAB [E][F] KEYBOARD/PANEL
2 Use the [A]/[B] buttons to select “3. TRANSPOSE ASSIGN.”
3 Press the [4 ▲▼]/[5 ▲▼] buttons to select the desired transpose type.
You can confirm the setting here by viewing the pop-up window called up via the TRANSPOSE [-]/[+]
buttons.
[2 ▲▼]BASE NOTE Determines the base note for each scale. When the base note is changed,
the pitch of the keyboard is transposed, yet maintains the original pitch
relationship between the notes.
[3 ▲▼]–
[5 ▲▼]
TUNE Select the desired note to be tuned by using the [3 ▲▼] buttons and tune
it in cents by using the [4 ▲▼]/[5 ▲▼] buttons.
NOTE In musical terms a “cent” is 1/100th of a semitone. (100 cents equal one semitone.)
[6 ▲▼]/
[7 ▲▼]
PART SELECT Select the part to which the Scale Tune setting is applied by using the [6
▲▼]/[7 ▲▼] buttons. Then press the [8 ▲] button to add a checkmark or
press the [8 ▼] button to remove the checkmark.
[8 ▲▼] MARK ON/OFF
KEYBOARD When this is selected, the TRANSPOSE [-]/[+] buttons affect the pitch of key-
board played Voices, Style playback (controlled by the performance in the
chord section of the keyboard), and Multi Pad playback (when Chord Match is
on, and left-hand chords are indicated)—but they do not affect Song playback.
SONG When this is selected, the TRANSPOSE [-]/[+] buttons affect only the pitch of
Song playback.
MASTER When this is selected, the TRANSPOSE [-]/[+] buttons affect the overall pitch
of the instrument, except audio playback.

10 PSR-S910/S710 Reference Manual
Voices – Playing the Keyboard –
1
The instrument has a Voice Set feature that allows you to create your own Voices by editing some parameters
of the existing Voices. Once you’ve created a Voice, you can save it as a User Voice to the USER drive or
external devices for future recall.
1 Select the desired Voice (other than an Organ Flutes Voice).
The editing method is different for the ORGAN FLUTES Voices compared to other Voices. For
instructions on editing the ORGAN FLUTES Voices, see page 15.
2 Press the [6 ▲] (VOICE SET) button to call up the VOICE SET display.
3 Use the TAB [E][F] buttons to call up the relevant setting display.
For information on the available parameters in each display, see the “Editable Parameters in the VOICE
SET Displays” on page 11.
4 As necessary, use the [A]/[B] buttons to select the item (parameter) to be edited and
edit the Voice by using the [1 ▲▼]–[8 ▲▼] buttons.
By pressing the [D] (COMPARE) button, you can compare the sound of the edited Voice with the original
(unedited) Voice.
5 Press the [I] (SAVE) button to save your edited Voice as a User Voice.
CAUTION
The settings will be lost if you select another Voice or turn the power to the instrument off without executing the Save operation.
Editing Voices (Voice Set)
5
3
4
PSR-S910/S710 Reference Manual 11
Voices – Playing the Keyboard –
1
Editable Parameters in the VOICE SET Displays
The Voice Set parameters are organized into five different displays. The parameters in each display are
described separately, below.
NOTE The available parameters differ depending on the Voice.
■ COMMON Page
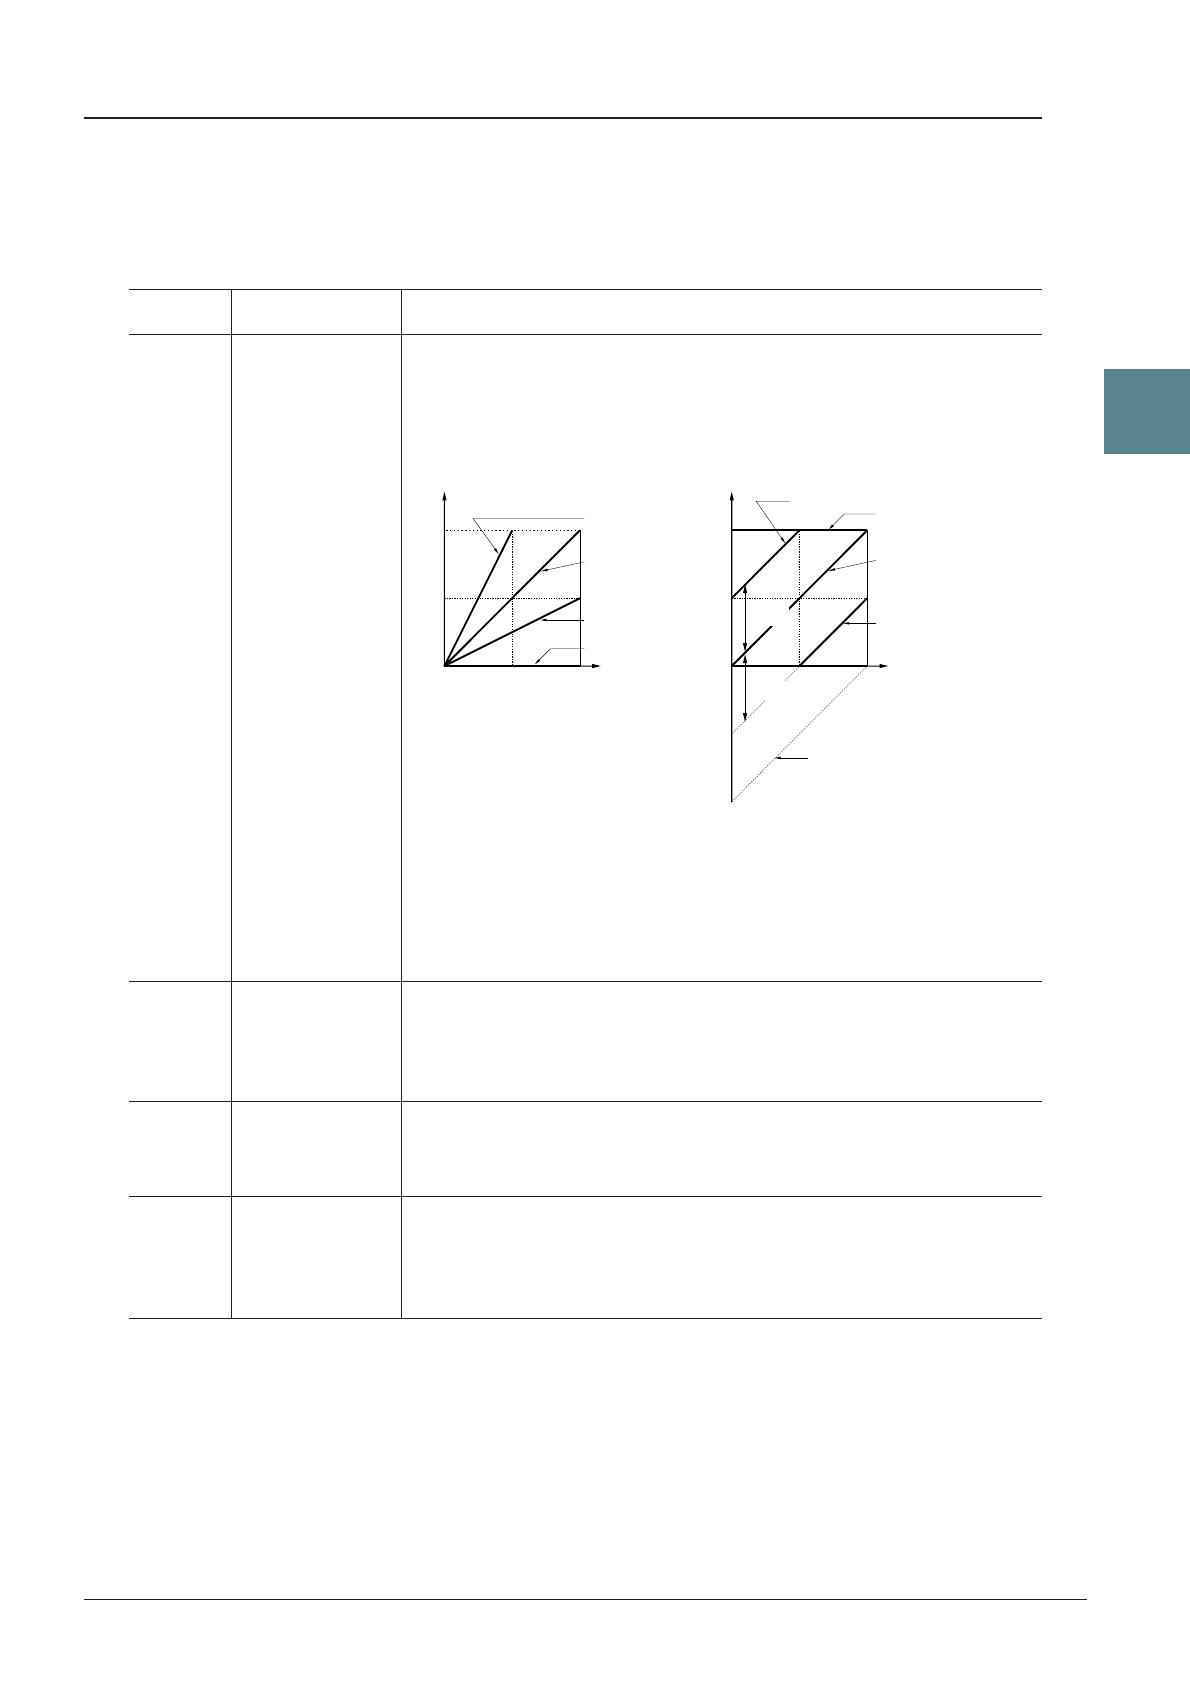
[1 ▲▼]VOLUME Adjusts the volume of the current edited Voice.
[2 ▲▼]/
[3 ▲▼]
TOUCH SENSE Adjusts the touch sensitivity (velocity sensitivity), or how greatly the vol-
ume responds to your playing strength.
DEPTH
Determines the velocity sensitivity, or how much the level of the Voice
changes in response to your playing strength (velocity).
OFFSET
Determines the amount by which received velocities are adjusted for the
actual velocity effect.
[4 ▲▼]/
[5 ▲▼]
PART OCTAVE Shifts the octave range of the edited Voice up or down in octaves. When
the edited Voice is used as any of the RIGHT 1–2 parts, the R1/R2 param-
eter is available; when the edited Voice is used as the LEFT part, the
LEFT parameter is available.
[6 ▲▼] MONO/POLY Determines whether the edited Voice is played monophonically or poly-
phonically. This setting can also be made from the VOICE CONTROL
[MONO] button on the panel.
[7 ▲▼] PORTAMENTO
TIME
Sets the portamento time (pitch transition time) when the edited Voice is
set to “MONO” above.
NOTE The Portamento Time determines the pitch transition time. Portamento is a function that creates a
smooth transition in pitch from the first note played on the keyboard to the next.
0
64 127
64
127
0
64 127
64
127
Actual Velocity for
tone generator
Depth=127 (twice)
Depth=64 (normal)
Depth=32 (half)
Depth=0
TOUCH SENSE DEPTH
Changes to velocity curve according to
VelDepth (with Offset set to 64)
Received Velocity
(Actual KeyOn speed)
TOUCH SENSE OFFSET
Changes to velocity curve according to
VelOffset (with Depth set to 64)
Actual Velocity for
tone generator
Received Velocity
(Actual KeyOn
speed)
Offset=96 (+64)
Offset=127 (+127)
Offset=64 (normal)
Offset=32 (-64)
Offset=0 (-127)
Depends
on offset
Depends
on offset
12 PSR-S910/S710 Reference Manual
Voices – Playing the Keyboard –
1
■ CONTROLLER Page
MODULATION
The MODULATION wheel can be used to modulate the parameters below as well as the pitch (vibrato).
Here, you can set the degree to which the MODULATION wheel modulates each of the following
parameters.
■ SOUND Page
FILTER
Filter is a processor that changes the timbre or tone of a sound by either blocking or passing a specific
frequency range. The parameters below determine the overall timbre of the sound by boosting or cutting a
certain frequency range. In addition to making the sound either brighter or mellower, Filter can be used to
produce electronic, synthesizer-like effects.
[2 ▲▼] FILTER Determines the degree to which the MODULATION wheel modulates the
Filter Cutoff Frequency. For details about the filter, see below.
[3 ▲▼] AMPLITUDE Determines the degree to which the MODULATION wheel modulates the
amplitude (volume).
[5 ▲▼] LFO PMOD Determines the degree to which the MODULATION wheel modulates the
pitch, or the vibrato effect.
[6 ▲▼] LFO FMOD Determines the degree to which the MODULATION wheel modulates the
Filter modulation, or the wah effect.
[7 ▲▼] LFO AMOD Determines the degree to which the MODULATION wheel modulates the
amplitude, or the tremolo effect.
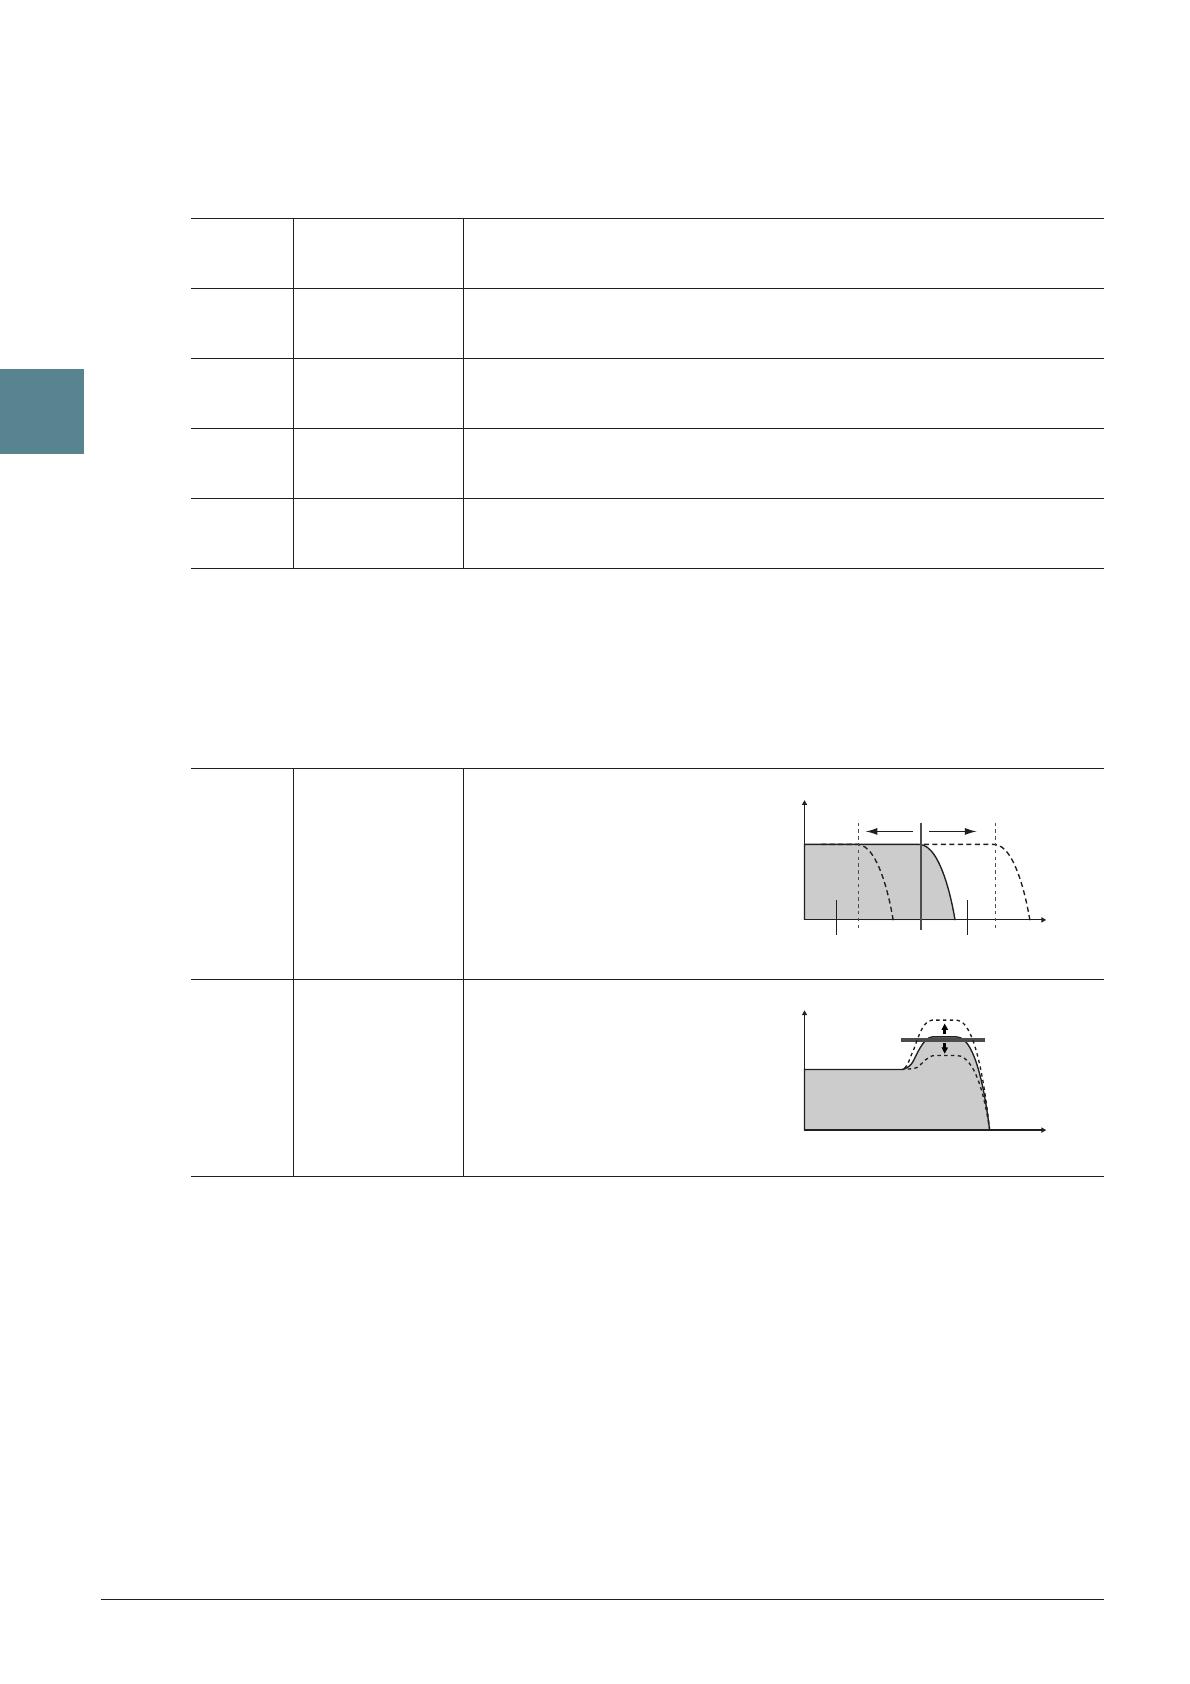
[1 ▲▼] BRIGHT.
(Brightness)
Determines the cutoff frequency or
effective frequency range of the fil-
ter (see diagram). Higher values
result in a brighter sound.
[2 ▲▼] HARMO. (Har-
monic Content)
Determines the emphasis given to
the cutoff frequency (resonance),
set in BRIGHT. above (see dia-
gram). Higher values result in a
more pronounced effect.
Volume
These frequencies are
“passed” by the filter.
Cutoff
range
Frequency
(pitch)
Cutoff Frequency
Volume
Frequency (pitch)
Resonance
PSR-S910/S710 Reference Manual 13
Voices – Playing the Keyboard –
1
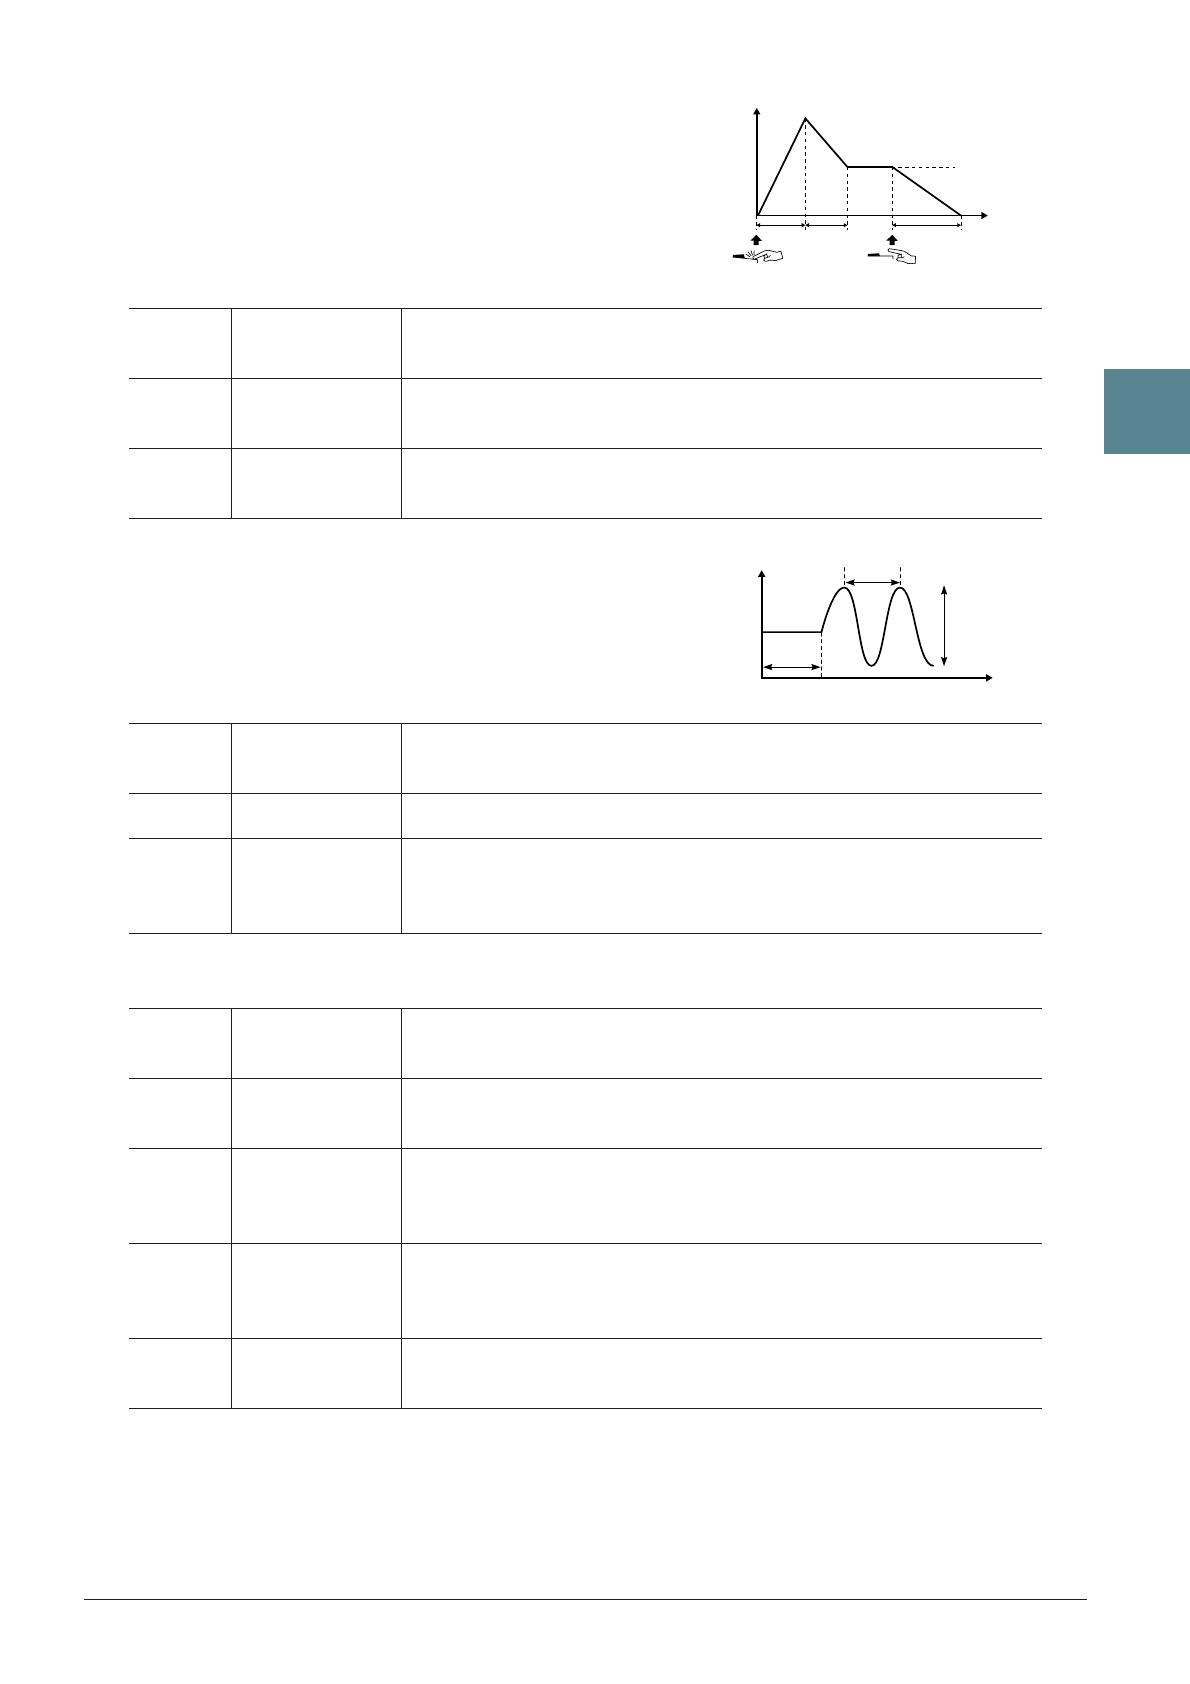
EG
The EG (Envelope Generator) settings determine how the level of the
sound changes in time. This lets you reproduce many sound
characteristics of natural acoustic instruments—such as the quick
attack and decay of percussion sounds, or the long release of a
sustained piano tone.
VIBRATO
Vibrato is a quavering, vibrating sound effect that is produced by
regularly modulating the pitch of the Voice.
■ EFFECT/EQ Page
1 REVERB DEPTH/CHORUS DEPTH/DSP DEPTH/PANEL SUSTAIN
[3 ▲▼]ATTACK Determines how quickly the sound reaches its maximum level after the
key is played. The lower the value, the quicker the attack.
[4 ▲▼] DECAY Determines how quickly the sound reaches its sustain level (a slightly
lower level than maximum). The lower the value, the quicker the decay.
[5 ▲▼] RELES.
(Release)
Determines how quickly the sound decays to silence after the key is
released. The lower the value, the quicker the decay.
[6 ▲▼] DEPTH Determines the intensity of the Vibrato effect. Higher settings result in a
more pronounced Vibrato.
[7 ▲▼] SPEED Determines the speed of the Vibrato effect.
[8 ▲▼] DELAY Determines the amount of time that elapses between the playing of a key
and the start of the Vibrato effect. Higher settings increase the delay of
the Vibrato onset.
[1 ▲▼]/
[2 ▲▼]
REVERB
DEPTH
Adjusts the reverb depth.
[3 ▲▼]/
[4 ▲▼]
CHORUS
DEPTH
Adjusts the chorus depth.
[5 ▲▼] DSP ON/OFF Determines whether the DSP is on or off.
This setting can also be made from the VOICE CONTROL [DSP] button
on the panel.
[6 ▲▼] DSP DEPTH Adjusts the DSP depth.
If you want to re-select the DSP type, you can do so in the “2 DSP” menu
explained on page 14.
[7 ▲▼]PANEL SUS-
TAIN
Determines the sustain level applied to the edited Voice when the VOICE
CONTROL [SUSTAIN] button on the panel is turned on.
Time
Level
Key on Key off
Sustain
Level
AT TACK DECAY RELEASE
Pitch
DELAY
SPEED
DEPTH
Time
14 PSR-S910/S710 Reference Manual
Voices – Playing the Keyboard –
1
2 DSP
3 EQ
Determines the Frequency and Gain of the Low and High EQ bands. For information about EQ, refer to
page 78.
■ HARMONY Page
Same as in the [FUNCTION] → [H] HARMONY/ECHO display. See “Selecting the Harmony/Echo
type” on page 6.
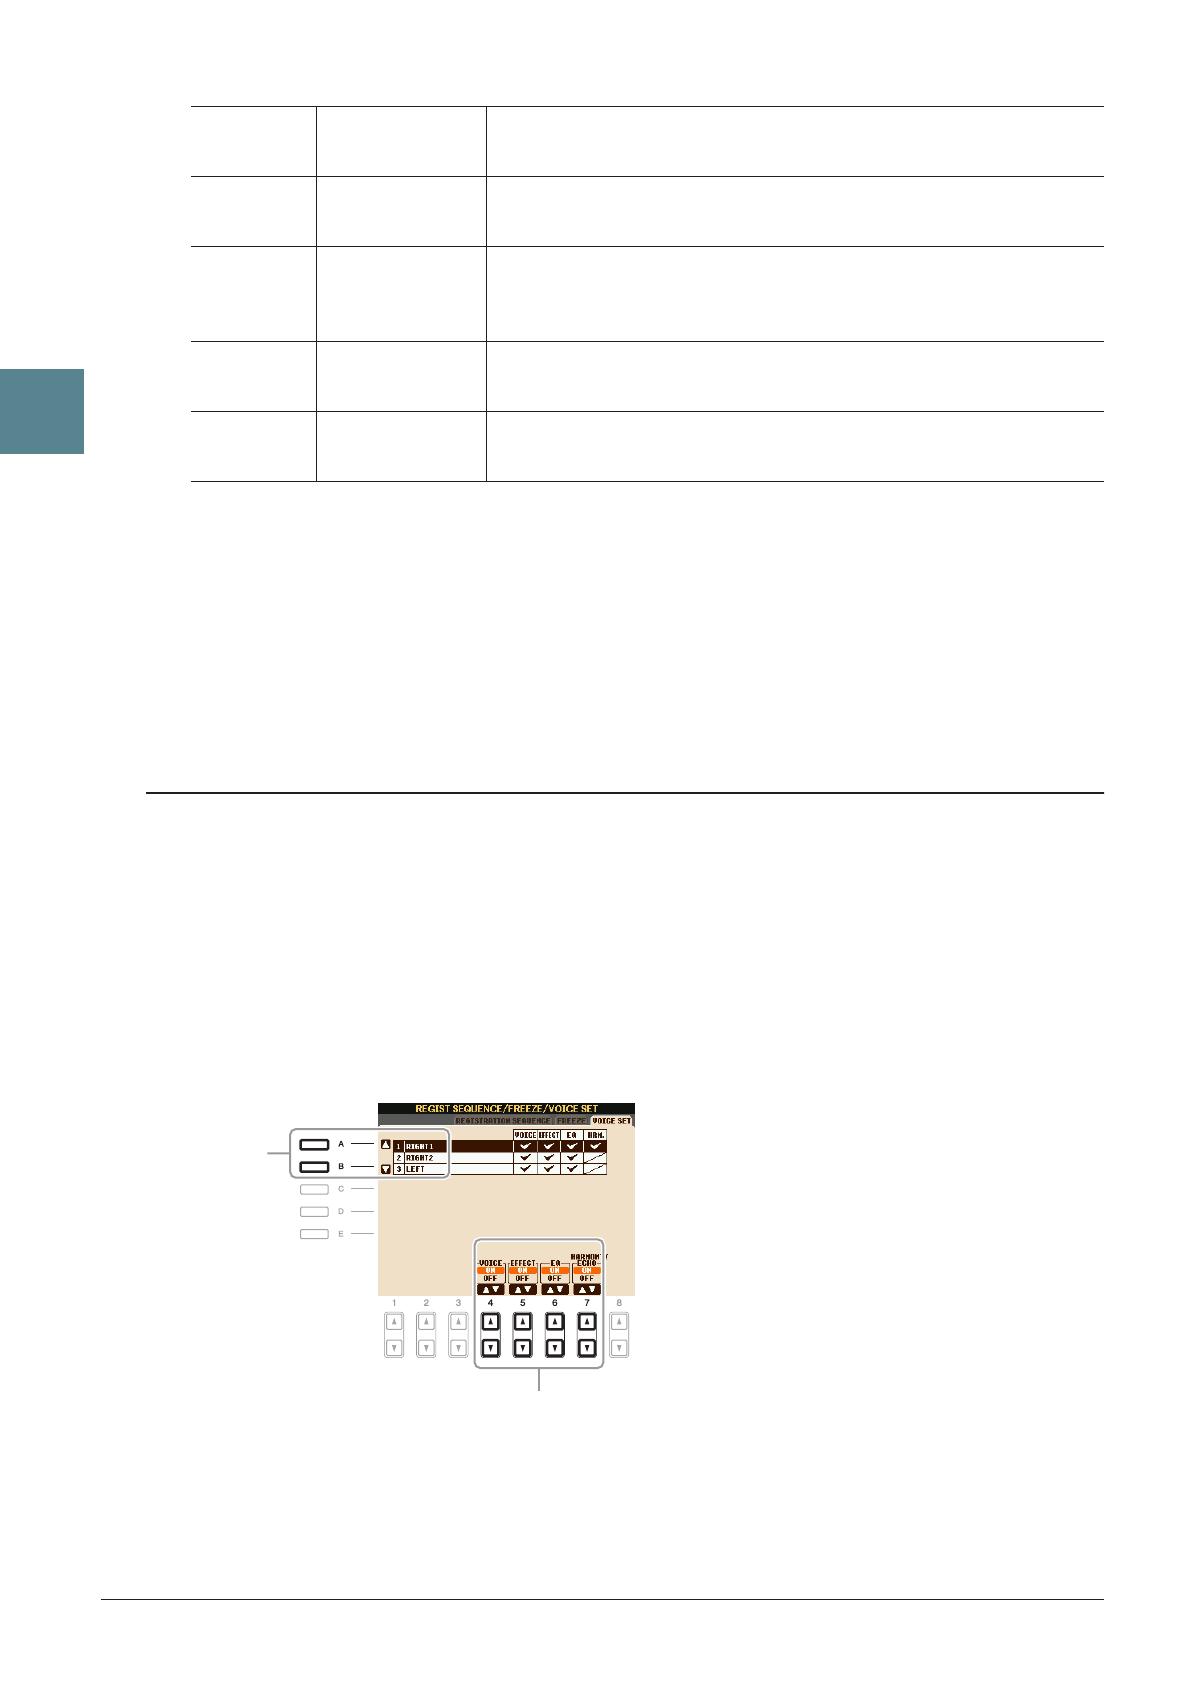
Disabling Automatic Selection of Voice Sets (Effects, etc.)
Each Voice is linked to its default VOICE SET parameter settings. Usually these settings are automatically
called up when a Voice is selected. However, you can also disable this feature by the operation in the relevant
display as explained below.
For example, if you want to change the Voice yet keep the same Harmony effect, set the HARMONY/ECHO
parameter to OFF (in the display explained below).
1 Call up the operation display.
[FUNCTION] → [E] REGIST SEQUENCE/FREEZE/VOICE SET → TAB [E][F] VOICE SET
2 Use the [A]/[B] buttons to select a keyboard part.
3 Use the [4 ▲▼]–[7 ▲▼] buttons to enable/disable automatic calling up of the settings
(ON or OFF) independently for each parameter group.
[1 ▲▼]–
[4 ▲▼]
DSP TYPE Selects the DSP effect category and type. Select a type after selecting a
category.
[5 ▲▼]–
[8 ▲▼]
VARIATION Two variations are provided for each DSP type. Here, you can edit the
VARIATION on/off status and variation’s parameter value setting.
[5 ▲▼] ON/OFF Turns the DSP Variation on or off for the selected Voice. This setting
can also be made from the VOICE CONTROL [DSP VARI.] button on
the panel. (This button is effective only when the [DSP] button is on.)
PARAMETER Displays the variation parameter. (This differs depending on the effect
type and cannot be changed.)
[6 ▲▼]
–[8 ▲▼]
VALUE Adjusts the value of the DSP variation parameter.
2
3
PSR-S910/S710 Reference Manual 15
Voices – Playing the Keyboard –
1
The Organ Flute Voices selected from the [ORGAN FLUTES] button can be edited by adjusting the footage
levers, adding the attack sound, applying effect and equalizer, etc.
CAUTION
After editing, go to the Voice Selection display by pressing the [I] (PRESETS) button and save the setting. The settings will be lost if you
select another Voice or turn the power to the instrument off without executing the Save operation.
■ FOOTAGE Page
Refer to the Owner’s Manual, chapter 1.
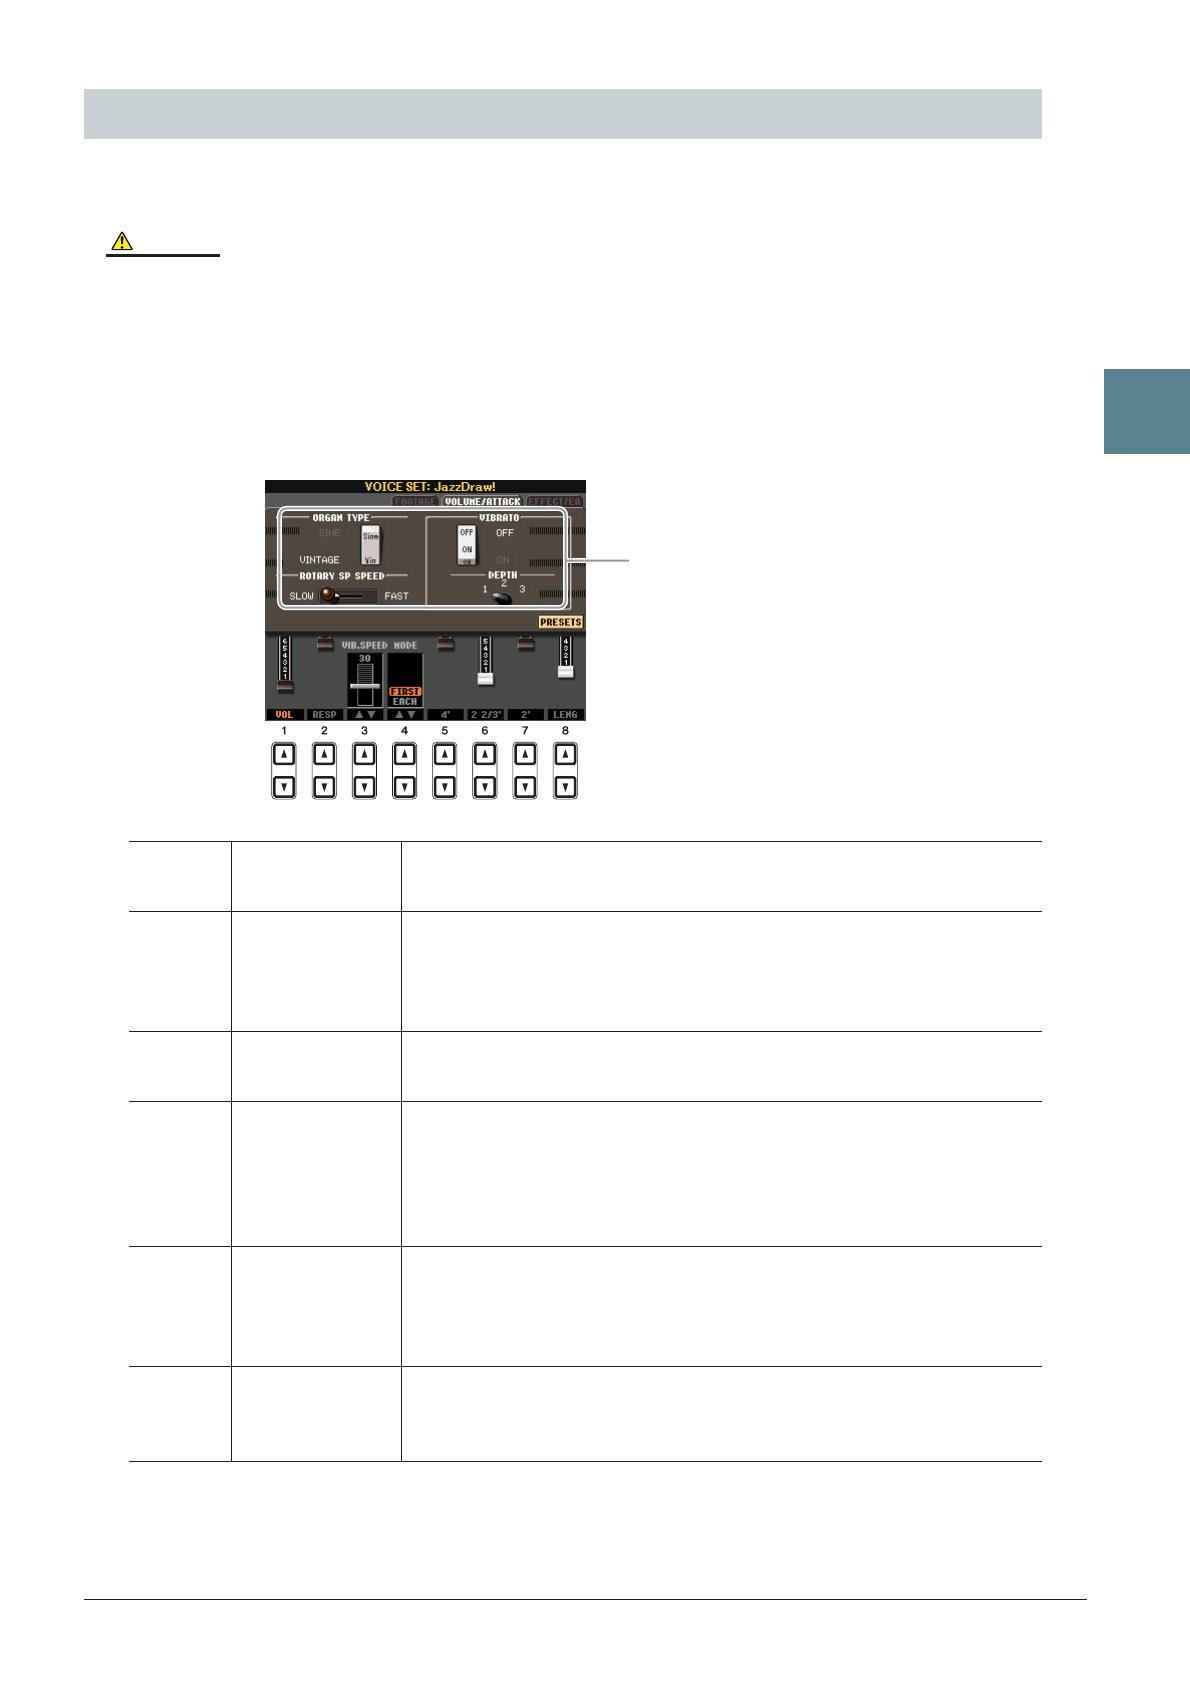
■ VOLUME/ATTACK Page
■ EFFECT/EQ Page
Same parameters as in the VOICE SET “EFFECT/EQ” Page explained on page 13.
Editing Organ Flutes Parameters
[1 ▲▼]VOL (Volume) Adjusts the overall volume of the Organ Flutes. The longer the graphic
bar, the greater the volume.
[2 ▲▼] RESP
(Response)
Affects both the attack and release (page 13) portion of the sound,
increasing or decreasing the response time of the initial swell and release,
based on the FOOTAGE controls. The higher the value, the slower the
swell and release.
[3 ▲▼] VIB. SPEED Determines the speed of the vibrato effect controlled by the Vibrato On/
Off ([F]/[G] buttons) and Vibrato Depth ([H] button).
[4 ▲▼] MODE The MODE control selects between two modes: FIRST and EACH. In the
FIRST mode, attack (percussive sound) is applied only to the first notes
played and held simultaneously; while the first notes are held, any subse-
quently played notes have no attack applied. In the EACH mode, attack is
applied equally to all notes.
[5 ▲▼]–
[7 ▲▼]
4’, 2 2/3’, 2’ These determine the attack sound volume of the ORGAN FLUTE Voice.
The 4’, 2-2/3’ and 2’ controls increase or reduce the volume of attack
sound at the corresponding footages. The longer the graphic bar, the
greater the attack sound volume.
[8 ▲▼] LENG (Length) Affects the attack portion of the sound producing a longer or shorter
decay immediately after the initial attack. The longer the graphic bar, the
longer the decay.
Same as the
FOOTAGE
Page.
2
16 PSR-S910/S710 Reference Manual
Styles – Playing Rhythm and Accompaniment –
Styles
– Playing Rhythm and Accompaniment –
Contents
Selecting the Chord Fingering Type . . . . . . . . . . . . . . . . . . . . . . . . . . . . . . . . . . . . . . . . . . . . . . . .16
Style Playback Related Settings . . . . . . . . . . . . . . . . . . . . . . . . . . . . . . . . . . . . . . . . . . . . . . . . . . .18
Split Point Settings . . . . . . . . . . . . . . . . . . . . . . . . . . . . . . . . . . . . . . . . . . . . . . . . . . . . . . . . . . . . .20
Memorizing the Original One Touch Setting . . . . . . . . . . . . . . . . . . . . . . . . . . . . . . . . . . . . . . . . .21
Creating/Editing Styles (Style Creator) . . . . . . . . . . . . . . . . . . . . . . . . . . . . . . . . . . . . . . . . . . . . .22
• Realtime Recording . . . . . . . . . . . . . . . . . . . . . . . . . . . . . . . . . . . . . . . . . . . . . . . . . . . . . . . . . . . .23
• Step Recording . . . . . . . . . . . . . . . . . . . . . . . . . . . . . . . . . . . . . . . . . . . . . . . . . . . . . . . . . . . . . . .26
• Style Assembly . . . . . . . . . . . . . . . . . . . . . . . . . . . . . . . . . . . . . . . . . . . . . . . . . . . . . . . . . . . . . . .26
• Editing the Rhythmic Feel . . . . . . . . . . . . . . . . . . . . . . . . . . . . . . . . . . . . . . . . . . . . . . . . . . . . . . .28
• Editing Data for Each Channel . . . . . . . . . . . . . . . . . . . . . . . . . . . . . . . . . . . . . . . . . . . . . . . . . . .30
• Making Style File Format Settings. . . . . . . . . . . . . . . . . . . . . . . . . . . . . . . . . . . . . . . . . . . . . . . . .31
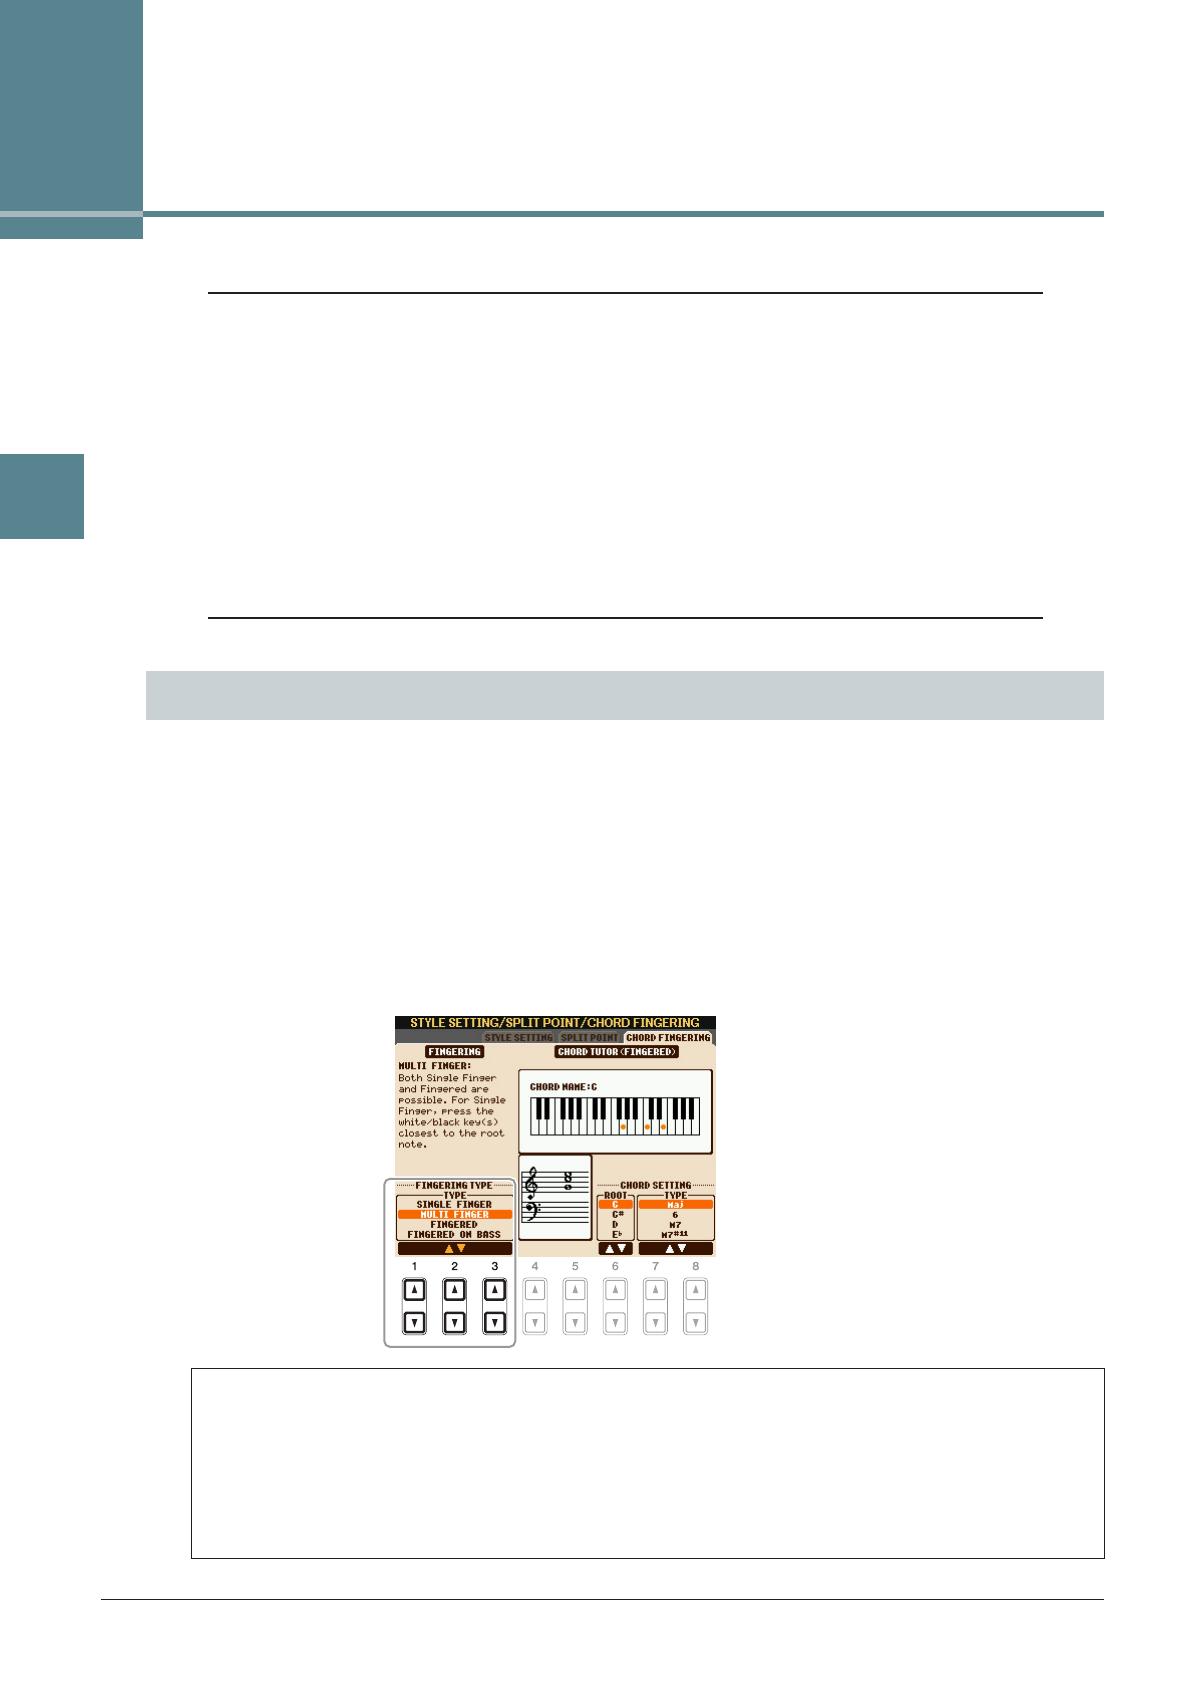
Style playback can be controlled by the chords you play in the chord section of the keyboard. There are seven
types of fingering.
1 Call up the operation display.
[FUNCTION] → [C] STYLE SETTING/SPLIT POINT/CHORD FINGERING → TAB [E][F] CHORD
FINGERING
2 Press the [1 ▲▼]–[3 ▲▼] buttons to select a fingering.
For information on each fingering type, see page 17.
Selecting the Chord Fingering Type
Chord Tutor
If you know the name of a chord but don’t know how to play, you can have the instrument show you the
notes to play. This is the Chord Tutor function.
On the CHORD FINGERING display, specify the Chord Root and Chord Type by using the [6 ▲▼]–[8
▲▼] button. The notes you need to play are shown in the display.
NOTE Depending on the chord, some notes may be omitted.
PSR-S910/S710 Reference Manual 17
Styles – Playing Rhythm and Accompaniment –
2
Chord Fingering Types
NOTE “AI” stands for “Artificial Intelligence.”
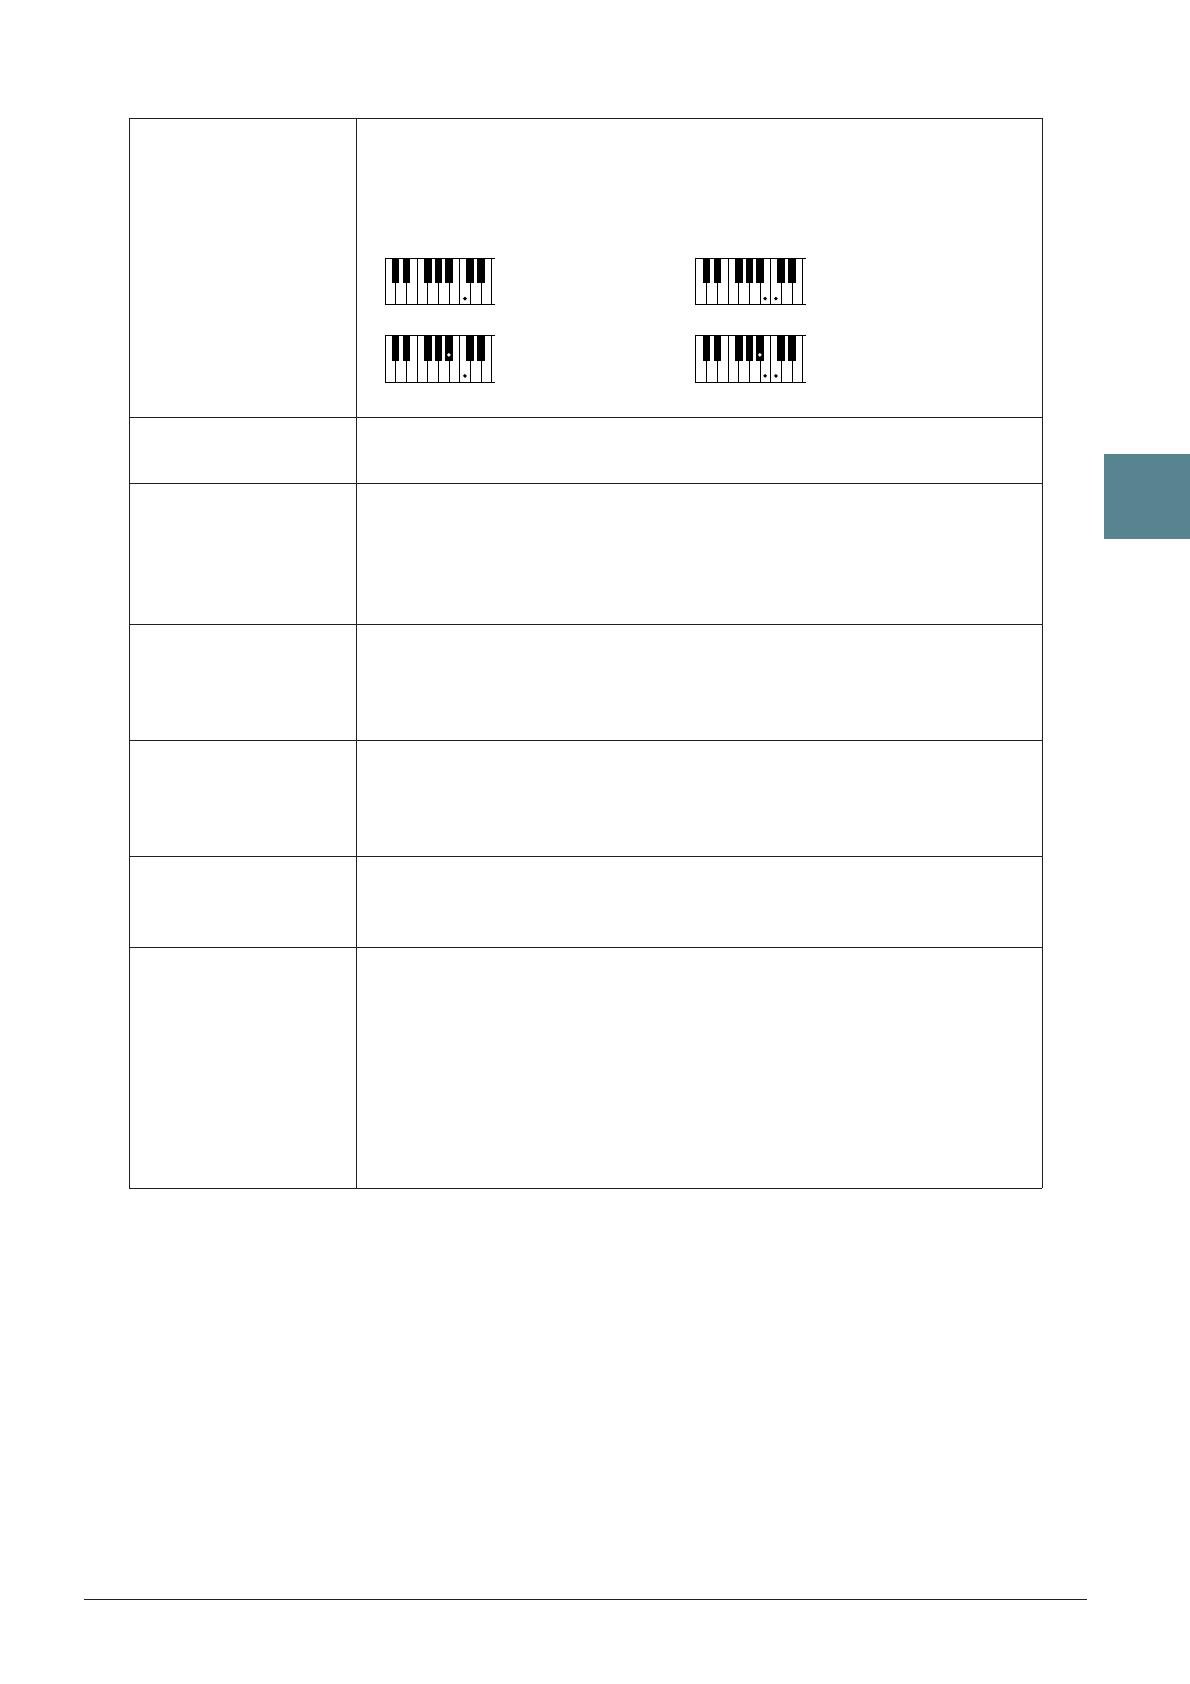
SINGLE FINGER Makes it simple to produce orchestrated accompaniment using major, seventh,
minor and minor-seventh chords by pressing a minimum number of keys on the
Chord section of the keyboard. This type is available only for Style playback.
The abbreviated chord fingerings described below are used:
MULTI FINGER Automatically detects Single Finger or Fingered chord fingerings, so you can
use either type of fingering without having to switch fingering types.
FINGERED Lets you finger your own chords on the chord section of the keyboard, while
the instrument supplies appropriately orchestrated rhythm, bass, and chord
accompaniment in the selected Style. The Fingered type recognizes the various
chord types which are listed on the Data List available at the Yamaha website
and can be looked up using the Chord Tutor function on page 16.
FINGERED ON BASS Accepts the same fingerings as Fingered, but the lowest note played in the
Chord section of the keyboard is used as the bass note, allowing you to play
“on bass” chords. (In the Fingered mode, the root of the chord is always used
as the bass note.)
FULL KEYBOARD Detects chords in the entire key range. Chords are detected in a way similar to
Fingered, even if you split the notes between your left and right hands—for
example, playing a bass note with your left hand and a chord with your right,
or by playing a chord with your left hand and a melody note with your right.
AI FINGERED Basically the same as Fingered, with the exception that less than three notes
can be played to indicate the chords (based on the previously played chord,
etc.).
AI FULL KEYBOARD When this advanced fingering type is engaged, the instrument will automati-
cally create appropriate accompaniment while you play just about anything,
anywhere on the keyboard using both hands. You don’t have to worry about
specifying the Style chords. Although the AI Full Keyboard type is designed to
work with many songs, some arrangements may not be suitable for use with
this feature. This type is similar to Full Keyboard, with the exception that less
than three notes can be played to indicate the chords (based on the previously
played chord, etc.). 9th, 11th and 13th chords cannot be played. This type is
available only for Style playback.
Cm
C
Cm
7
C
7
For a major chord, press
the root key only.
For a minor chord, simul-
taneously press the root
key and a black key to its
left.
For a seventh chord,
simultaneously press the
root key and a white key to
its left.
For a minor-seventh
chord, simultaneously
press the root key and both
a white and black key to its
left.
18 PSR-S910/S710 Reference Manual
Styles – Playing Rhythm and Accompaniment –
2
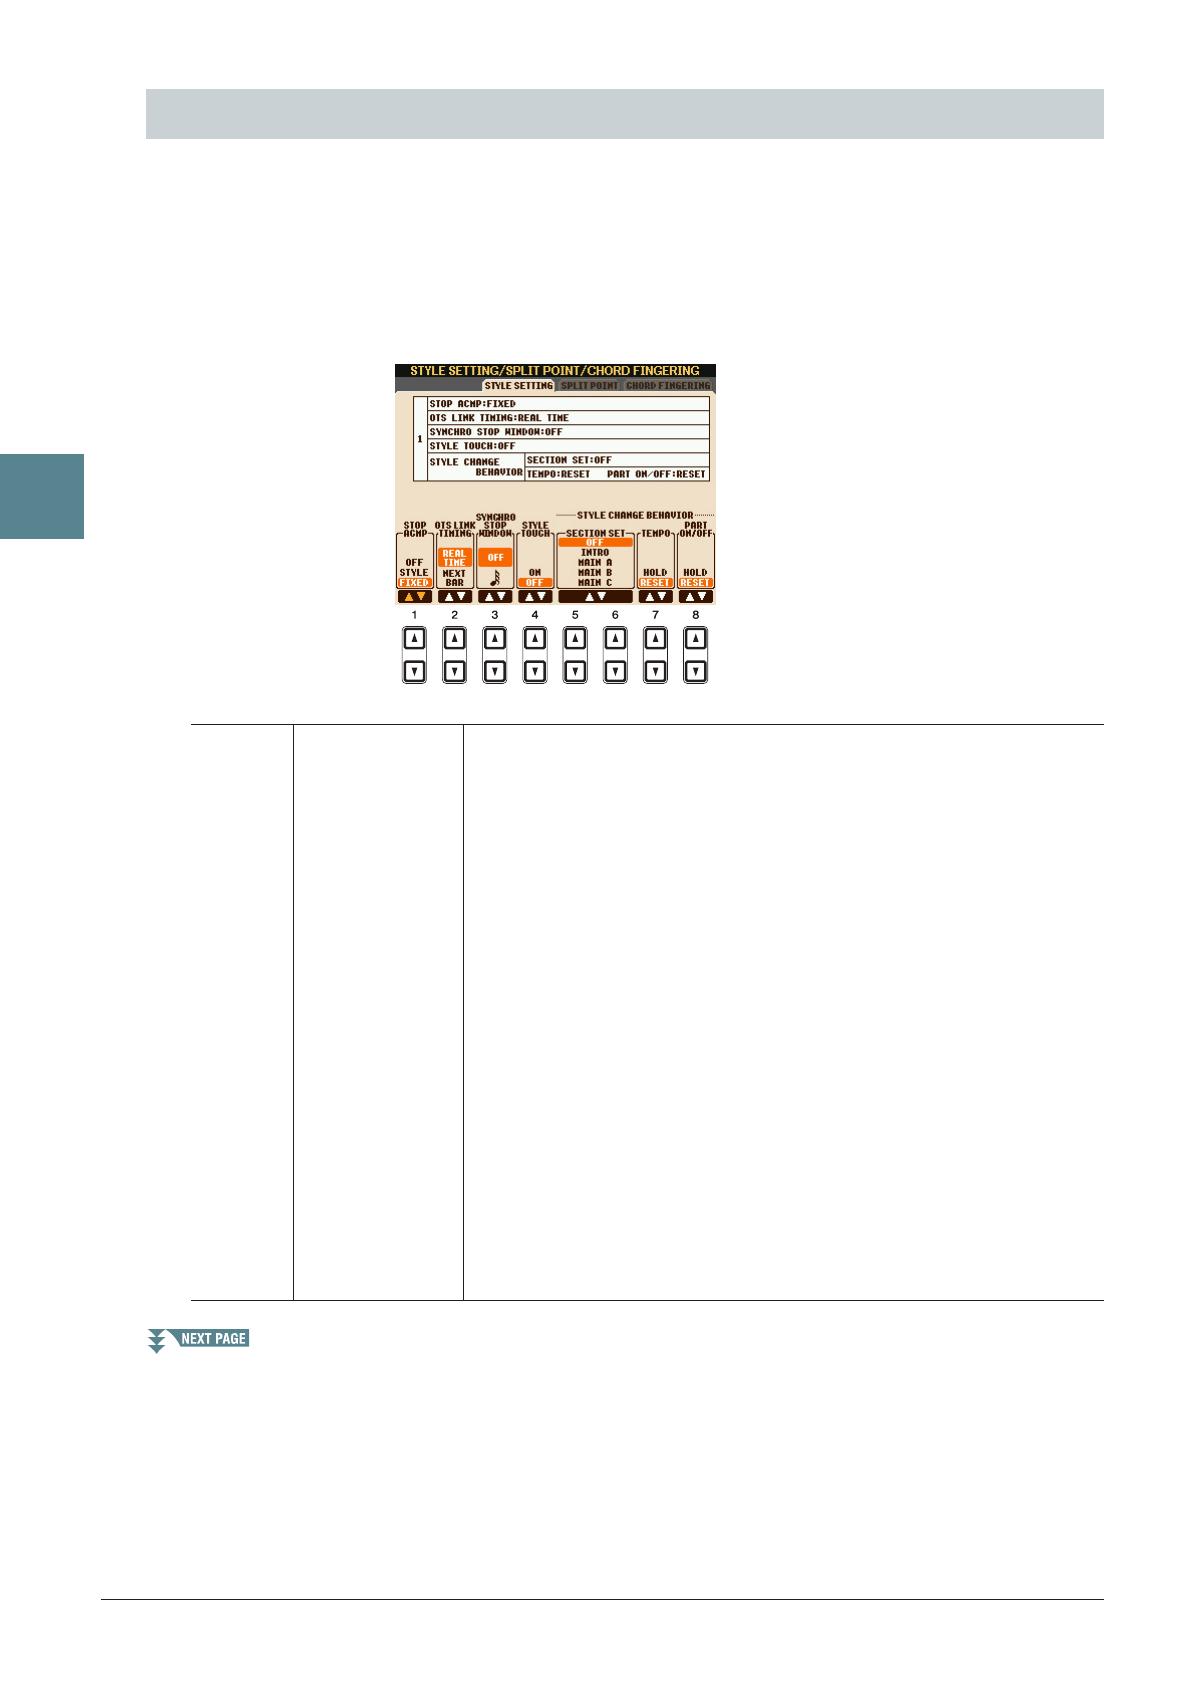
The instrument has a variety of Style playback functions which can be accessed in the display below.
1 Call up the operation display.
[FUNCTION] → [C] STYLE SETTING/SPLIT POINT/CHORD FINGERING → TAB [E][F] STYLE
SETTING
2 Use the [1 ▲▼]–[8 ▲▼] buttons for each setting.
Style Playback Related Settings
[1 ▲▼]STOP ACMP When [ACMP] is turned on and [SYNC START] is off, you can play
chords in the chord section of the keyboard with the Style stopped, and
still hear the accompaniment chord. In this condition—called “Stop
Accompaniment”—any valid chord fingerings are recognized and the
chord root/type are shown in the display. Here, you can determine
whether the chord played in the chord section will sound or not in the
Stop Accompaniment status.
OFF
The chord played in the chord section will not sound.
STYLE
The chord played in the chord section will sound via the Voices for the
Pad part and the Bass channel of the selected Style.
FIXED
The chord played in the chord section will sound via the specified Voice,
regardless of the selected Style.
NOTE When the selected Style contains MegaVoices, unexpected sounds may result when this is set to
“STYLE.”
NOTE When you record a song, the chord detected by playing the Stop Accompaniment can be recorded
regardless of the setting here. Please note that both the Voice that is sounded and the chord data
will be recorded when set to “STYLE,” and only the chord data will be recorded when set to “OFF”
or “FIXED.”
PSR-S910/S710 Reference Manual 19
Styles – Playing Rhythm and Accompaniment –
2
[2 ▲▼]OTS LINK TIM-
ING
This applies to the OTS Link function. This parameter determines the
timing in which the One Touch Settings change with the MAIN VARIA-
TION [A]–[D] change. (The [OTS LINK] button must be on.)
REAL TIME
One Touch Setting is immediately called up when you press a MAIN
VARIATION button.
NEXT BAR
One Touch Setting is called up at the next measure, after you press a
MAIN VARIATION button.
[3 ▲▼] SYNCHRO
STOP WIN-
DOW
This determines how long you can hold a chord before the Synchro Stop
function is automatically cancelled. When the [SYNC STOP] button is
turned on and this is set to a value other than “OFF,” this is automatically
cancels the Synchro Stop function if you hold a chord for longer than the
time set here. This conveniently resets Style playback control to normal,
letting you release the keys and still have the Style play. In other words, if
you release the keys sooner than the time set here, the Synchro Stop func-
tion works.
[4 ▲▼] STYLE TOUCH Turns touch response for the Style playback on/off. When this is set to
“ON,” the Style volume changes in response to your playing strength in
the chord section of the keyboard.
[5 ▲▼]/
[6 ▲▼]
SECTION SET Determines the default section that is automatically called up when
selecting different Styles (when Style playback is stopped). When set to
“OFF” and Style playback is stopped, the active section is maintained
even if the different Style is selected. When any of the MAIN A–D sec-
tions is not included in the Style data, the nearest section is automatically
selected. For example, when MAIN D is not contained in the selected
Style, MAIN C will be called up.
[7 ▲▼] TEMPO This determines whether the tempo changes or not when you change
Styles during Style playback.
HOLD
The tempo setting of the previous Style is maintained.
RESET
The tempo changes to that of the initial default tempo for the selected
Style.
[8 ▲▼]PART ON/OFF This determines whether the Style Channel On/Off status changes or not
when you change Styles.
HOLD
The Style Channel On/Off status of the previous Style is maintained.
RESET
All Style Channels are set to On.

20 PSR-S910/S710 Reference Manual
Styles – Playing Rhythm and Accompaniment –
2
These are the settings (there are two Split Points) that separate the different sections of the keyboard: the
Chord section, the LEFT part section and the RIGHT 1 and 2 section. The two Split Point settings (below)
are specified as note names.
1 Call up the operation display.
[FUNCTION] → [C] STYLE SETTING/SPLIT POINT/CHORD FINGERING → TAB [E][F] SPLIT
POINT
2 Set the Split Point.
Split Point Settings
[F] Split Point (S+L) Sets the Split Point (S) and Split Point (L) to the same note. Press the [F]
button and rotate the [DATA ENTRY] dial. You can also specify the Split
Point directly from the keyboard by pressing the desired key on the key-
board while holding the [F] button.
[G] Split Point (S) Sets each Split Point. Press one of the desired buttons and rotate the
[DATA ENTRY] dial. You can also specify the Split Point directly from
the keyboard by pressing the desired key on the keyboard while holding
the [G] or [H] button.
NOTE Split Point (L) cannot be set lower than Split Point (S).
[H] Split Point (L)
[1 ▲▼]/
[2 ▲▼]
STYLE You can specify each Split Point by note name. “STYLE” indicates Split
Point (S) and “LEFT” indicates Split Point (L).
[3 ▲▼]/
[4 ▲▼]
LEFT
Split Point (S)
Chord section
Voice RIGHT
1–2
Split Point (L)
Voice LEFT
Split Point (S+L)
Chord section
+ Voice LEFT
Voice RIGHT 1 and 2