-
Contents
-
Table of Contents
-
Troubleshooting
-
Bookmarks
Quick Links
Related Manuals for Yealink EXP40
Summary of Contents for Yealink EXP40
-
Page 2: Declaration Of Conformity
Copyright Copyright © 2017 YEALINK(XIAMEN) NETWORK TECHNOLOGY CO., LTD. Copyright © 2017 Yealink(Xiamen) Network Technology CO., LTD. All rights reserved. No parts of this publication may be reproduced or transmitted in any form or by any means, electronic or mechanical, photocopying, recording, or otherwise, for any purpose, without the express written permission of Yealink(Xiamen) Network Technology CO., LTD.
-
Page 3: Class B Digital Device Or Peripheral
Do not dispose of WEEE as unsorted municipal waste and have to collect such WEEE separately. Customer Feedback We are striving to improve our documentation quality and we appreciate your feedback. Email your opinions and comments to DocsFeedback@yealink.com.
-
Page 5: In This Guide
This guide provides everything you need to quickly set up and use the EXP40 expansion module. Be sure to read the Packaging Contents in this guide before you set up and use your EXP40 expansion module. This guide takes the working together of the Yealink SIP-T46G IP phone running firmware version 81 and the Yealink EXP40 expansion module as an example for reference.
-
Page 6
Changes for Guide Version 16.3 The following sections are new: LED Instructions on page Startup on page Using the Yealink EXP40 Expansion Module on page Major updates have occurred to the following section: Physical Features on page … -
Page 7: Table Of Contents
Packaging Contents …………………………1 Physical Features …………………………2 LED Instructions ………………………….. 4 Installation ……………………………. 5 Startup …………………………….7 Configuring the Yealink EXP40 Expansion Module ….8 Line ………………………………9 Speed Dial …………………………..10 Busy Lamp Field (BLF) ……………………….11 Voice Mail …………………………..12 Direct Pickup …………………………..
-
Page 8
Yealink EXP40 User Guide Directory …………………………….. 41 Using the Yealink EXP40 Expansion Module ……44 Using the Line Key …………………………44 Adjusting the Contrast ……………………….45 Adjusting the Backlight ……………………….46 Using the Busy Lamp Field ……………………..47 Resetting the Yealink EXP40 Expansion Module ………………47 Troubleshooting ……………. -
Page 9: Getting Started
Getting Started Getting Started This chapter provides basic installation instructions and information for obtaining the best performance with the EXP40 expansion module. The topics include: Packaging Contents Physical Features LED Instructions Installation Startup Packaging Contents…
-
Page 10: Physical Features
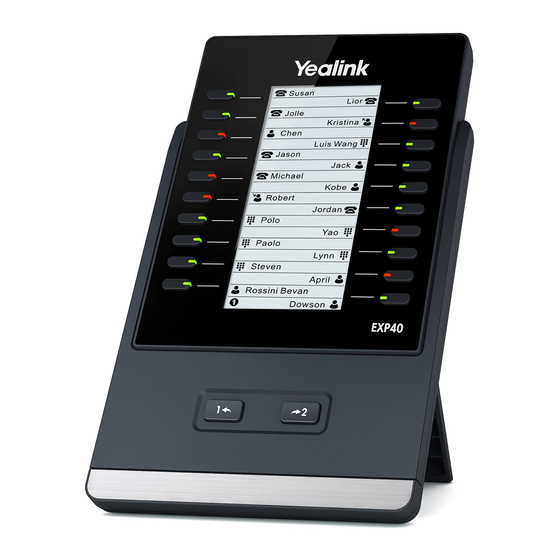
Check the list before installation. If you find anything missing, contact your reseller. Physical Features The main physical features of the EXP40 expansion module are LCD screen, Ext keys, LED indicators, Ext in jack, Ext out jack and power interface.
-
Page 11
Getting Started… -
Page 12: Led Instructions
Yealink EXP40 User Guide The main physical features of the EXP40 expansion module are described as below: Item Description Ext Keys Assign various features to these keys. ① Indicate the Ext key status. For more information, refer to LED Indicators ②…
-
Page 13: Installation
The monitored user does not exist. Installation The EXP40 expansion module applies to Yealink T46S, T46G, T48S and T48G IP phones. To easily connect the EXP40 to the phone, please unplug the phone stand from the IP phone. Note Up to six expansion modules can be connected to an IP phone.
-
Page 14
Yealink EXP40 User Guide Connect the Ext jack on the host phone and the Ext in jack on the expansion module using one supplied cord. If you connect two expansion modules, connect the Ext out jack on the prior expansion module and the Ext in jack on the next expansion module using another supplied cord. -
Page 15: Startup
Desk mount method Startup After the EXP40 expansion module is powered on, the LCD screen of the EXP40 expansion module will display “Loading…”. After a short time, the loading screen will disappear, and then you can assign the desired feature to the EXP40 expansion module.
-
Page 16: Configuring The Yealink Exp40 Expansion Module
Configuring the Yealink EXP40 Expansion Module The EXP40 expansion module supports 40 Ext keys. You can access additional 20 keys via page keys. Each key can be assigned a feature using the configuration files, via phone user interface or web user interface. For more information on using the configuration files to assign a feature, refer to Yealink Auto Provisioning Guide, available online: http://support.yealink.com/documentFront/forwardToDocumentFrontDisplayPage.
-
Page 17: Line
Configuring the Yealink EXP40 Expansion Module ReCall Record URL Record Multicast Paging Group Listening Private Hold Hot Desking Zero Touch Phone Lock Retrieve Park Directory …
-
Page 18: Speed Dial
Enter the desired number you want to dial out directly in the Value field (e.g., 1003). Enter the desired value in the Label field or leave it blank. If you leave this field blank, the LCD screen of the EXP40 expansion module will display the number specified in the Value field.
-
Page 19: Busy Lamp Field (Blf)
Enter the phone number you want to monitor in the Value field (e.g., 1001). Enter the desired value in the Label field or leave it blank. If you leave this field blank, the LCD screen of the EXP40 expansion module will display the value specified in the Value field.
-
Page 20: Voice Mail
Enter the voice mail access code in the Value field (e.g., *97). Enter the desired value in the Label field or leave it blank. If you leave this field blank, the LCD screen of the EXP40 expansion module will display the default label “Voice Mail”.
-
Page 21: Direct Pickup
Value field (e.g., *971003). Enter the desired value in the Label field or leave it blank. If you leave this field blank, the LCD screen of the EXP40 expansion module will display the default label “Pick Up”.
-
Page 22: Group Pickup
Enter the group call pickup code in the Value field (e.g., *98). Enter the desired value in the Label field or leave it blank. If you leave this field blank, the LCD screen of the EXP40 expansion module will display the default label “Group Pick Up”.
-
Page 23: Call Park
Enter the call park feature code in the Value field (e.g., *68). Enter the desired value in the Label field or leave it blank. If you leave this field blank, the LCD screen of the EXP40 expansion module will display the default label “Call Park”.
-
Page 24: Intercom
Enter the remote extension number in the Value field (e.g., 1006). Enter the desired value in the Label field or leave it blank. If you leave this field blank, the LCD screen of the EXP40 expansion module will display the default label “Intercom”.
-
Page 25: Dtmf
Configuring the Yealink EXP40 Expansion Module Select the desired line to apply this key from the pull-down list of Line. Click Confirm to accept the change. DTMF You can configure an Ext key as the DTMF key. If you press the DTMF key during an active call, the phone will send the pre-defined DTMF digits.
-
Page 26: Prefix
Yealink EXP40 User Guide If you leave this field blank, the LCD screen of the EXP40 expansion module will display the default label “DTMF”. Click Confirm to accept the change. Prefix You can configure an Ext key as the prefix key. If you press the prefix key when the phone is idle, the phone will enter into the dialing screen and display the prefix number which you specified.
-
Page 27: Local Group
In the desired Ext key field, select Local Group from the pull-down list of Type. Enter the desired value in the Label field or leave it blank. If you leave this field blank, the LCD screen of the EXP40 expansion module will display the selected group name.
-
Page 28: Xml Group
In the desired Ext key field, select XML Group from the pull-down list of Type. Enter the desired value in the Label field or leave it blank. If you leave this field blank, the LCD screen of the EXP40 expansion module will display the selected XML group name.
-
Page 29: Xml Browser
Configuring the Yealink EXP40 Expansion Module Select the desired XML group name from the pull-down list of Line. Click Confirm to accept the change. XML Browser XML browser is a simple browser feature, which is based on xml language and http/https service.
-
Page 30: Ldap
Yealink EXP40 User Guide If you leave this field blank, the LCD screen of the EXP40 expansion module will display the default label “XML Browser”. Click Confirm to accept the change. LDAP LDAP (Lightweight Directory Access Protocol) is an application protocol for accessing and maintaining information services of the distributed directory over an IP network.
-
Page 31: Conference
Configuring the Yealink EXP40 Expansion Module If you leave this field blank, the LCD screen of the EXP40 expansion module will display the default label “LDAP”. Click Confirm to accept the change. Conference You can configure an Ext key as the conference key. When you are in a call, you can press the conference key to invite a third party to join a conference.
-
Page 32: Forward
Yealink EXP40 User Guide If you leave this field blank, the LCD screen of the EXP40 expansion module will display the default label “Conference”. Click Confirm to accept the change. Forward You can configure an Ext key as the forward key. When the phone is idle, you can press the forward key to enter the setting screen of the call forward feature.
-
Page 33: Transfer
Configuring the Yealink EXP40 Expansion Module If you leave this field blank, the LCD screen of the EXP40 expansion module will display the default label “Forward”. Click Confirm to accept the change. Transfer You can configure an Ext key as the transfer key. Then you can perform a Blind, Semi-Attended or Attended Transfer by pressing the transfer key during a call.
-
Page 34: Hold
Yealink EXP40 User Guide If you leave this field blank, the LCD screen of the EXP40 expansion module will display the default label “Transfer”. Click Confirm to accept the change. Hold You can configure an Ext key as the hold key. You can hold a call or retrieve a held call by pressing the hold key.
-
Page 35: Dnd
Configuring the Yealink EXP40 Expansion Module If you leave this field blank, the LCD screen of the EXP40 expansion module will display the default label “Hold”. Click Confirm to accept the change. You can configure an Ext key as the DND key. If the DND key mode is configured to “phone”, press the DND key when the phone is idle to activate or deactivate DND on a per-phone basis.
-
Page 36: Recall
Yealink EXP40 User Guide If you leave this field blank, the LCD screen of the EXP40 expansion module will display the default label “DND”. Click Confirm to accept the change. ReCall You can configure an Ext key as the ReCall key. Then you can place a call back to the caller of the last incoming call by pressing the ReCall key when the phone is idle.
-
Page 37: Sms
Configuring the Yealink EXP40 Expansion Module If you leave this field blank, the LCD screen of the EXP40 expansion module will display the default label “ReCall”. Click Confirm to accept the change. You can configure an Ext key as the SMS key. Then you can access the text message screen more quickly and easily by pressing the SMS key.
-
Page 38: Record
Yealink EXP40 User Guide If you leave this field blank, the LCD screen of the EXP40 expansion module will display the default label “SMS”. Click Confirm to accept the change. Record Call recording allows users to record calls. Normally, there are 2 main methods to trigger a recording on a certain server.
-
Page 39: Url Record
Configuring the Yealink EXP40 Expansion Module If you leave this field blank, the LCD screen of the EXP40 expansion module will display the default label “Record” Click Confirm to accept the change. URL Record You can configure an Ext key as the URL record key. Then you can record calls using the URL record method by pressing the call record key.
-
Page 40: Multicast Paging
Yealink EXP40 User Guide If you leave this field blank, the LCD screen of the EXP40 expansion module will display the default label “URL Record”. Click Confirm to accept the change. Multicast Paging Multicast paging feature allows you to quickly and easily announce time sensitive announcements to people within the multicast group.
-
Page 41: Group Listening
Configuring the Yealink EXP40 Expansion Module The valid channel ranges from 0 to 30. Click Confirm to accept the change. Group Listening You can configure an Ext key as the group listening key. Then you can activate the Speakerphone mode and Handset/Headset mode at the same time by pressing the group listening key.
-
Page 42: Private Hold
Yealink EXP40 User Guide If you leave this field blank, the LCD screen of the EXP40 expansion module will display the default label “Group Listening”. Click Confirm to accept the change. Private Hold You can configure an Ext key as the private hold key. Then you can private hold a shared call by pressing the Private hold key when using Shared Call Appearance.
-
Page 43: Hot Desking
Configuring the Yealink EXP40 Expansion Module If you leave this field blank, the LCD screen of the EXP40 expansion module will display the default label “Private Hold”. Click Confirm to accept the change. Hot Desking Hot Desking is regularly used in places where not all the employees are in the office at the same time, or not in the office for a very long time, which means actual personal offices would be often vacant, consuming valuable space and resources.
-
Page 44: Acd
Yealink EXP40 User Guide If you leave this field blank, the LCD screen of the EXP40 expansion module will display the default label “Hot Desking”. Click Confirm to accept the change. ACD feature is often used in offices for customer service, such as call center. The ACD system handles large volumes of incoming calls from callers who have no need to talk to a specific person but who require assistance from any of multiple persons at the earliest opportunity.
-
Page 45: Zero Touch
Configuring the Yealink EXP40 Expansion Module If you leave this field blank, the LCD screen of the EXP40 expansion module will display the default label “ACD”. Click Confirm to accept the change. Zero Touch You can configure an Ext key as the zero touch key. Then you can configure auto provision and network parameters quickly by pressing the zero touch key when the phone is idle.
-
Page 46: Url
Yealink EXP40 User Guide If you leave this field blank, the LCD screen of the EXP40 expansion module will display the default label “Zero Touch”. Click Confirm to accept the change. You can configure an Ext key as the URL key. If you press the URL key, the phone will send HTTP requests to a web server.
-
Page 47: Phone Lock
Configuring the Yealink EXP40 Expansion Module If you leave this field blank, the LCD screen of the EXP40 expansion module will display the default label “URL”. Click Confirm to accept the change. Phone Lock You can configure an Ext key as the phone lock key. Then you can press the phone lock key to immediately lock the keypad of your phone instead of long pressing the pound key.
-
Page 48: Retrieve Park
Yealink EXP40 User Guide If you leave this field blank, the LCD screen of the EXP40 expansion module will display the default label “Phone Lock”. Click Confirm to accept the change. Note Phone lock feature is not applicable to SIP-T48S/T48G IP phones.
-
Page 49: Directory
Configuring the Yealink EXP40 Expansion Module If you leave this field blank, the LCD screen of the EXP40 expansion module will display the default label “Directory”. Click Confirm to accept the change. Directory You can configure an Ext key as the directory key. You can press the directory key to quickly access the local directory, call history, LDAP and remote phone book.
-
Page 50
Yealink EXP40 User Guide If you leave this field blank, the LCD screen of the EXP40 expansion module will display the default label “Directory”. Click Confirm to accept the change. -
Page 51
Configuring the Yealink EXP40 Expansion Module… -
Page 52: Using The Yealink Exp40 Expansion Module
Yealink EXP40 User Guide Using the Yealink EXP40 Expansion Module The use of Ext keys on the EXP40 expansion module and DSS keys on the IP phone are almost Yealink the same. For more information on using DSS keys on the IP phone, refer to…
-
Page 53: Adjusting The Contrast
4. Adjusting the Contrast You can adjust the contrast on the LCD screen of the EXP40 expansion module via the host phone. The contrast on the LCD screen of the EXP40 expansion module is synchronized with that of the host phone.
-
Page 54: Adjusting The Backlight
Adjusting the Backlight You can adjust the backlight on the LCD screen of the EXP40 expansion module via the host phone. The backlight on the LCD screen of the EXP40 expansion module is synchronized with that of the host phone.
-
Page 55: Using The Busy Lamp Field
The busy lamp field (BLF) feature allows you to monitor the status change of users through BLF LED indicators. For example, you can configure a BLF key on the connected EXP40 expansion module to monitor the status of a friend’s line (busy or idle). For more information on…
-
Page 56
Note Reset of the EXP40 expansion module can lead to resetting the host phone. And then all custom settings on the host phone and the EXP40 expansion module will be overwritten after resetting. For more information on resetting the phone, refer to the Troubleshooting section of Yealink phone-specific user guide, available online: http://support.yealink.com/documentFront/forwardToDocumentFrontDisplayPage. -
Page 57
Using the Yealink EXP40 expansion module… -
Page 58: Troubleshooting
If you require additional information or assistance with your EXP40, contact your system administrator. Why does the EXP40 LCD screen always display «Loading»? Ensure that the Ext in/out jacks of the EXP40 are properly plugged using the supplied connecting cord. For more information, refer to Installation on page 5.
Посмотреть инструкция для Yealink EXP40 бесплатно. Руководство относится к категории без категории, 1 человек(а) дали ему среднюю оценку 9.4. Руководство доступно на следующих языках: английский. У вас есть вопрос о Yealink EXP40 или вам нужна помощь? Задайте свой вопрос здесь
Не можете найти ответ на свой вопрос в руководстве? Вы можете найти ответ на свой вопрос ниже, в разделе часто задаваемых вопросов о Yealink EXP40.
Инструкция Yealink EXP40 доступно в русский?
Не нашли свой вопрос? Задайте свой вопрос здесь
Описание
Yealink EXP40 — модуль расширения c LCD-дисплеем. Предназначен для работы с IP-телефоном Yealink SIP-T48G, Yealink SIP-T48S, Yealink SIP-T46G и Yealink SIP-T46S.
Технические характеристики модуля
Возможности:
- 20 кнопок с двухцветным LED-индикатором.
- 2 дополнительные кнопки для переключения страниц экрана.
- Графический LCD-экран 160 х 320.
- Подсветка экрана.
- Возможность крепления на стену.
- Регулировка угла наклона.
- Двухцветный LED-индикатор (красный или зеленый) для обозначения информации о статусе абонента (BLF).
- Программирование клавиш на следующие сценарии: BLF, быстрый набор, интерком, URL, донабор, конференция, переадресация, трансфер, удержание, DND, повторный вызов, перезвонить, голосовая почта, захват группы, парковка, групповое прослушивание, SMS, общая линия, групповое удержание, личное удержание.
- Питание от телефона при использовании до 2-х модулей.
- 40 программируемых значений на 2-х страницах экрана
- Последовательное соединение до 6 модулей (при использовании более 2-х модулей требуется подключение дополнительного блока питания)
- Предназначен для телефона Yealink SIP-T48G, Yealink SIP-T48S, Yealink SIP-T46G и Yealink SIP-T46S.
Физические характеристики:
- LCD-экран: 160х320.
- 2 порта RJ12 (6P6C) для подключения к телефону и подключения дополнительного модуля.
- Вес: 290 г.
- Размеры: 127x213x167 мм.
- Допустимая влажность воздуха: 10~95%.
- Максимальная температура хранения: 60 °C.
Инструкции и файлы
Сертификаты
Упаковка и габариты
| Размеры индивидуальной упаковки, мм | 237x154x100 |
| Вес индивидуальной упаковки, кг | 0.670 |
| Размеры коробки, мм | 520х317х247 |
| Количество штук в коробке | 10 |
| Вес брутто коробки, кг | 7.12 |
| Объём коробки, куб.м | 0.04 |
Yealink EXP40


Гарантийный срок 18 месяцев.
Характеристики
Возможности:
- 20 кнопок с двухцветным LED-индикатором.
- 2 дополнительные кнопки для переключения страниц экрана.
- Графический LCD-экран 160 х 320.
- Подсветка экрана.
- Возможность крепления на стену.
- Регулировка угла наклона.
- Двухцветный LED-индикатор (красный или зеленый) для обозначения информации о статусе абонента (BLF).
- Программирование клавиш на следующие сценарии: BLF, быстрый набор, интерком, URL, донабор, конференция, переадресация, трансфер, удержание, DND, повторный вызов, перезвонить, голосовая почта, захват группы, парковка, групповое прослушивание, SMS, общая линия, групповое удержание, личное удержание.
- Питание от телефона при использовании до 2-х модулей.
- 40 программируемых значений на 2-х страницах экрана
- Последовательное соединение до 6 модулей (при использовании более 2-х модулей требуется подключение дополнительного блока питания)
- Предназначен для телефона Yealink SIP-T48G, Yealink SIP-T48S, Yealink SIP-T46G и Yealink SIP-T46S.
Физические характеристики:
- LCD-экран: 160х320.
- 2 порта RJ12 (6P6C) для подключения к телефону и подключения дополнительного модуля.
- Вес: 290 г.
- Размеры: 127x213x167 ьмм.
- Допустимая влажность воздуха: 10~95%.
- Максимальная температура хранения: 60 °C.
Упаковка
| Размеры индивидуальной упаковки, мм | 237x154x100 |
| Вес брутто индивидуальной упаковки, кг | 0.670 |
| Размеры коробки, мм | 520х317х247 |
| Количество штук в коробке | 10 |
| Вес брутто, кг | 7.12 |
Где купить?
Адреса интернет-магазинов и точек продаж в России, Беларуси, Казахстане и Узбекистане
Подробнее
Техническая поддержка
Драйверы, программное обеспечение, руководства пользователей, утилиты
Подробнее
Как стать дилером Yealink?
Получить гибкую систему скидок, доступ к маркетинговым материалам, тренингам и семинарам
Подробнее
Технологические партнеры
Информация о совместимости различного оборудования с Yealink
Подробнее
Артикул: Y2524-5981
Гарантия
- Обмен/возврат товара 14 дней
- Гарантия 18 месяцев
Доставка
- По Москве и области адресная доставка в течении 1-2 дней
- Курьерской службой во все регионы России
Способы оплаты
- Безналичный расчет
- Наличными при получении
- Оплату на карту/счет
Нет в наличии
15362 руб.
Цена:
с НДС 13358 руб.
- Описание товара
- Технические характеристики
- Инструкция
Модуль расширения Yealink EXP40 – это панель для увеличения количества функций и повышения удобства использования IP-телефонов. Устройство совместимо с современными телефонами Yealink:
- SIP-T46G, T46S;
- SIP-T48G, T48S.
Для работы с перечисленными моделями потребуется установка обновлений системы. Стабильное взаимодействие отмечается в версии свыше х.60.хх.хх.
Основные характеристики
Yealink EXP40 является панелью с 20 механическими клавишами, размещёнными по обе стороны лицевой части корпуса. Дополнительно встроено 2 кнопки для перехода между страницами. Между программируемыми клавишами находится жидкокристаллический дисплей с разрешением 160х320 пикселей. Экран монохромный с разнообразными оттенками серого цвета. Конструкция корпуса моноблочная, в основе используется чёрный пластик.
Устанавливается модель EXP40 на горизонтальные поверхности за счёт ножки с обратной стороны или крепится 4-я винтами к столу или стене. Для удобства пользования ножка имеет регулируемый угол наклона. Обладает габаритами 213х127х167 мм при весе 290 г.
Многообразие функций
Модуль расширения EXP40 имеет 20 программируемых кнопок, в каждой устроен LED-индикатор. Светодиод изменяет цвет с зелёного на красный и наоборот в зависимости от активности функций. Интерфейс выполнен из 2-х страниц, действие кнопок при изменении страниц отлаживается по отдельности. Метод позволяет запрограммировать до 40 сценариев работы.
На кнопки устанавливается:
- переадресация, трансфер вызовов;
- включение конференции, донабор и интерком;
- соединение со звуковой почтой и SMS;
- удержание собеседника или группы клиентов.
Представлено только часть функций, в сумме количество сценариев – 19. Используя 40 вспомогательных действий легко управлять вызовами, в одно касание пользователь позвонит по установленному номеру.
Сфера использования
Модуль EXP40 подходит для маленьких и больших офисов. При низких потребностях в общении к 1 IP-телефону подключают 1-2 модуля последовательным соединением. Синхронизация выполняется кабелями с разъёмами RJ-12. В аппарате устроено 2 порта: для телефона и для следующей панели. До 2-х модулей питаются от устройства, а 3 и больше – исключительно через блок питания.
Модель поддерживает последовательную установку до 6 модулей, создавая 240 сценариев или 120 программируемых кнопок. Применяется на предприятиях и компаниях, которые по роду деятельности обязаны обрабатывать большие объёмы звонков.
Ключевые возможности
- 20 клавиш с 2-цветными индикаторами;
- 40 сценариев работы;
- 2 вспомогательные кнопки для смены страниц макросов;
- LCD-дисплей с разрешением 160х320p;
- LED-подсветка;
- устанавливается на стену или стол;
- гибкая база;
- светодиодные индикаторы с зелёным и красным цветом информируют о состоянии вызова (BLF);
- питание от телефона до 2 элементов;
- от блока питания – до 6 элементов цепи.
Функции кнопок
- BLF/BLA, SMS, DND, URL;
- дополнительный набор, активация конференции, трансфер, подключение группы;
- звуковая почта, перезвон, повторный набор, прослушивание группой;
- удержание 1, 2 или больше абонентов;
- парковка, интерком, единая линия.
Физические параметры
- тип корпуса: моноблок;
- материал: пластик;
- цвет: чёрный;
- размер экрана: 160х320p;
- разъёмы: 2 шт. RJ12 к телефону и модулю;
- вес: 290 г;
- габариты: 127x213x167х45 мм;
- разрешённая влажность: от 10 до 95%;
- максимальная температура хранения: 60°С;
- гарантия: 1,5 года.