-
Contents
-
Table of Contents
-
Bookmarks
Quick Links
Related Manuals for Yealink SIP-T40P
Summary of Contents for Yealink SIP-T40P
-
Page 2: Declaration Of Conformity
Copyright Copyright © 2017 YEALINK(XIAMEN) NETWORK TECHNOLOGY CO., LTD Copyright © 2017 Yealink(Xiamen) Network Technology CO., LTD. All rights reserved. No parts of this publication may be reproduced or transmitted in any form or by any means, electronic or mechanical, photocopying, recording, or otherwise, for any purpose, without the express written permission of Yealink(Xiamen) Network Technology CO., LTD.
-
Page 3: Class B Digital Device Or Peripheral
Do not dispose of WEEE as unsorted municipal waste and have to collect such WEEE separately. Customer Feedback We are striving to improve our documentation quality and we appreciate your feedback. Email your opinions and comments to DocsFeedback@yealink.com.
-
Page 4: Gnu Gpl Information
GPL. Please refer to the GPL for the exact terms and conditions of the license. The original GPL license, source code of components licensed under GPL and used in Yealink products can be downloaded online:…
-
Page 5: About This Guide
About This Guide About This Guide Thank you for choosing the SIP-T40P IP phone, exquisitely designed to provide business telephony features, such as Call Hold, Call Transfer, Busy Lamp Field, Multicast Paging and Conference over an IP network. This guide provides everything you need to quickly use your new phone. First, verify with your system administrator that the IP network is ready for phone configuration.
-
Page 6
User Guide for the SIP-T40P IP Phone Auto Answer on page Do Not Disturb (DND) on page Call Forward on page Call Park/Retrieve on page Configuring Visual and Audio Alert for BLF Pickup on page … -
Page 7: Changes For Release 80, Guide Version 80.95
About This Guide Do Not Disturb (DND) on page Call Transfer on page Call Park on page Busy Lamp Field (BLF) on page Intercom on page Multicast Paging on page Changes for Release 80, Guide Version 80.95 The following section is new: Entering Data and Editing Fields on page…
-
Page 8: Table Of Contents
User Guide for the SIP-T40P IP Phone Table of Contents About This Guide …………..v In This Guide ……………………… v Summary of Changes ………………….v Changes for Release 81, Guide Version 81.70 …………..v Changes for Release 81, Guide Version 81.20 …………..vi Changes for Release 81, Guide Version 81.15 …………..
-
Page 9: Table Of Contents
Table of Contents Power Saving ……………………23 Backlight ……………………..26 Contrast ……………………..27 Language ……………………… 27 Time & Date ……………………28 Administrator Password ………………..30 Key As Send ……………………30 Phone Lock ……………………31 Audio Settings ……………………34 Volume ……………………..34 Ring Tones …………………….
-
Page 10
User Guide for the SIP-T40P IP Phone Call Mute ……………………..87 Muting a Call ……………………87 Muting While Dialing………………….88 Call Hold/Resume ……………………. 88 Do Not Disturb (DND) ………………….89 Call Forward …………………….. 94 Static Forwarding ………………….. 94 Dynamic Forwarding ………………….. 101 Call Transfer …………………… -
Page 11
Table of Contents Shared Call Appearance (SCA) ……………….. 145 Configuring SCA Feature on the IP Phone …………… 146 Using SCA Feature on the IP Phone …………….151 Bridged Line Appearance (BLA) ………………157 Configuring BLA Feature on the IP Phone …………… 158 Using BLA Feature on the IP Phone …………….. -
Page 13: Overview
User Interfaces Documentations If you require additional information or assistance with your new phone, contact your system administrator. Hardware Component Instructions The main hardware components of the SIP-T40P IP phone are the LCD screen and the keypad.
-
Page 14
User Guide for the SIP-T40P IP Phone Hardware component instructions of the SIP-T40P IP phone are: Item Description Shows information about calls, messages, soft keys, time, date and other relevant data: • Default account • Call information—caller ID, call duration ①… -
Page 15: Icon Instructions
Overview Icon Instructions Feature Status Icons Icons appearing on the status bar are described in the following table: Icons Description Network is unavailable Hands-free (speakerphone) mode Handset mode Headset mode Voice Mail Text Message Auto Answer Do Not Disturb (DND) Ringer volume is 0 Phone Lock Keep Mute…
-
Page 16: Other Icons
User Guide for the SIP-T40P IP Phone Icons Description Register failed Registering The shared/bridged line registers successfully DND is enabled on this line Call forward is enabled on this line Icon indicator (associated with ACD) Icon Description The ACD state is available…
-
Page 17: Led Instructions
Overview Icon indicator (associated with call history) Icons Description Missed Calls Placed Calls Received Calls Forwarded Calls Icon indicator (associated with contact) Icons Description The contact icon LED Instructions Power Indicator LED LED Status Description Solid red The phone is initializing. Fast-flashing red (300ms) The phone is ringing.
-
Page 18
User Guide for the SIP-T40P IP Phone Line key LED (configured as a BLF key or BLF List key) LED Status Description Solid green The monitored user is idle. Fast-flashing red (200ms) The monitored user receives an incoming call. The monitored user is busy. -
Page 19: User Interfaces
LED are configurable via web user interface. You can also customize the BLF key LED status and BLF key behavior. For more information, contact your system administrator. User Interfaces Two ways to customize configurations of your SIP-T40P IP phone: The user interface on the IP phone. …
-
Page 20
User Guide for the SIP-T40P IP Phone interface. In order to access the web user interface, you need to know the IP address of your new phone. To obtain the IP address, press the OK key on the phone when the phone is idle. -
Page 21
Overview Options Phone User Interface Web User Interface —Account Management √ —Dial Plan —Emergency Number —Live Dialpad —Hotline √ Basic Call Features —Recent Call In Dialing —Auto Answer √ —Auto Redial √ —Call Completion √ —ReCall √ — Do Not Disturb (DND) √… -
Page 22: Documentations
√ Note The table above lists most of the feature options. Please refer to the relevant sections for more information. Documentations The following table shows documentations available for the SIP-T40P IP phone. Name Contents Where found Language Basic call features…
-
Page 23: Getting Started
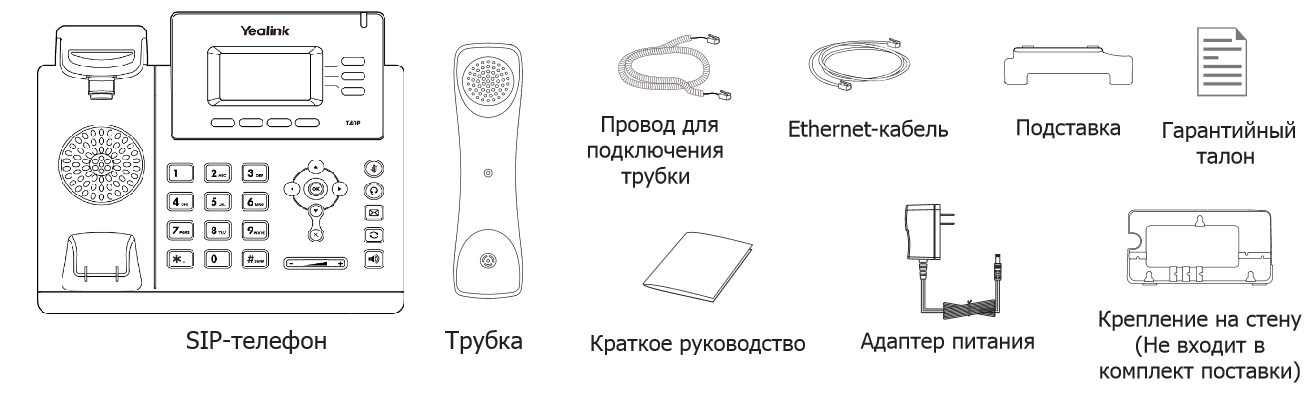
Idle Screen Entering Data and Editing Fields If you require additional information or assistance with your new phone, contact your system administrator. Packaging Contents The following components are included in your SIP-T40P IP phone package: SIP-T40P IP Phone …
-
Page 24: Optional Accessories
Quick Start Guide Check the list before installation. If you find anything missing, contact your system administrator. Optional Accessories The following items are optional accessories for your SIP-T40P IP phone. You need to purchase them separately if required.
-
Page 25: Phone Installation
Headset YHS32/YHS33 Wall Mount Bracket We recommend that you use the accessories provided or approved by Yealink. The use of Note unapproved third-party accessories may result in reduced performance. Phone Installation If your phone is already installed, proceed to Phone Initialization on page 16.
-
Page 26
User Guide for the SIP-T40P IP Phone Attach the stand or the optional wall mount bracket Desk Mount Method Wall Mount Method (Optional) The hookswitch tab has a lip which allows the handset to stay on-hook when the IP phone is Note mounted vertically. -
Page 27: Power Over Ethernet
The IP phone should be used with Yealink original power adapter (5V/600mA) only. The use of the third-party power adapter may cause the damage to the phone. Power over Ethernet With the included or a regular Ethernet cable, the SIP-T40P IP phone can be powered from a PoE-compliant switch or hub.
-
Page 28: Phone Initialization
The phone can also share the network with another network device such as a PC (personal computer). This is an optional connection. We recommend that you use the Ethernet cable provided by Yealink. The PC port may be disabled, contact your system administrator for more information.
-
Page 29
Getting Started Network status (IPv4 status or IPv6 status, IP mode and MAC address). IPv4 uses a 32-bit address. IPv6 is an updated version of the current Internet Protocol to meet the increased demands for unique IP addresses, using a 128-bit address. Phone status (product name, hardware version, firmware version, product ID, MAC address … -
Page 30: Basic Network Settings
User Guide for the SIP-T40P IP Phone The phone status is displayed on the first page of the web user interface. Note If IP mode of the phone is configured as IPv4 & IPv6, you can enter either of them in the browser’s address bar to view the phone status.
-
Page 31: Registration
The SIP-T40P IP phone supports up to 3 accounts. If your phone is not registered, you may have to register it. For more information on…
-
Page 32: Idle Screen
User Guide for the SIP-T40P IP Phone Idle Screen If the phone has successfully started up, the idle LCD screen will be displayed as below. The idle screen displays the label of default account, time and date, and four soft keys.
-
Page 33
Getting Started Input Mode Keypad (initials in capitals) ôõñ ôõñ ÒÓÔÕÑ 7pqrsPQRS pqrs7ß Ѕ pqrs7ß Ѕ PQRS7Ѕ TUV8ÙÚÛ 8tuvTUV tuv8ù ú û ü tuv8ù ú û ü Ü 9wxyzWXY wxyz9ý Þ wxyz9ý Þ WXYZ9Ý Þ space space space *.,’?!-()@/: *.,’?!-()@/: *.,’?!-()@/: *.,’?!-()@/: _;+&%=<>… -
Page 34
User Guide for the SIP-T40P IP Phone If you want to Then you can lowercase (abc soft key) input mode, is not available. Press the keypad key , or press Key: If it is in the uppercase (ABC soft key),… -
Page 35: Customizing Your Phone
Customizing Your Phone Customizing Your Phone You can customize your SIP-T40P IP phone by personally configuring certain settings, for example, contrast, language and time & date. You can add contacts to the phone’s local directory manually or from call history. You can also personalize different ring tones for different callers.
-
Page 36
User Guide for the SIP-T40P IP Phone Idle Timeout (minutes) The office hour and idle timeout (minutes) settings work only if the power saving feature is enabled. Power saving is configurable via web user interface only. Note Enabling the Power Saving To enable the power saving feature via web user interface: Click on Settings->Power Saving. -
Page 37
Customizing Your Phone Enter the starting time and ending time respectively in the desired day field. Click Confirm to accept the change. Configuring the Idle Timeout Idle Timeout specifies the period of time before the IP phone enters power-saving mode. The following three types of idle timeout you can configure: Office Hours Idle TimeOut: Configures the idle timeout for office hours. -
Page 38: Backlight
User Guide for the SIP-T40P IP Phone The default value is 10, you can set to 1-30. Click Confirm to accept the change. Backlight You can configure the backlight to adjust the brightness of the LCD screen. Backlight status on the LCD screen can be configured from the following options: Always On: Backlight is on permanently.
-
Page 39: Contrast
Customizing Your Phone Contrast You can configure the LCD screen contrast to a comfortable level. The intensity of contrast ranges from 1 to 10 and the highest intensity is 10. To configure the contrast via phone user interface: Press Menu->Settings->Basic Settings->Display->Contrast. Press , or the Switch soft key to increase or decrease the intensity of contrast.
-
Page 40: Time & Date
User Guide for the SIP-T40P IP Phone To change the language for the web user interface: Select the desired language from the pull-down list at the top-right corner of web user interface. Text displayed on the web user interface will change to the selected language.
-
Page 41
Customizing Your Phone Press the Save soft key to accept the change or the Back soft key to cancel. Note Please refer to Appendix A — Time Zones for the list of available time zones on the IP phone. To configure the time and date manually via phone user interface: Press Menu->Settings->Basic Settings->Time &… -
Page 42: Administrator Password
User Guide for the SIP-T40P IP Phone Example (2016-09-02) Date Format YYYY-MM-DD 2016-09-02 DD/MM/YYYY 02/09/2016 MM/DD/YY 09/02/16 DD MMM YYYY 02 Sep, 2016 WWW DD MMM Fri, 02 Sep Time and date are configurable via web user interface at the path Settings->Time & Date.
-
Page 43: Phone Lock
Customizing Your Phone Press , or the Switch soft key to select # or * from the Key As Send field, or select Disabled to disable this feature. Press the Save soft key to accept the change or the Back soft key to cancel. Key as send is configurable via web user interface at the path Features->General Information.
-
Page 44
User Guide for the SIP-T40P IP Phone Press , or the Switch soft key to select Enabled from the Lock Enable field. Press , or the Switch soft key to select the desired type from the Lock Type field. (Optional.) Enter the desired interval of automatic phone lock in the Lock Time Out field. -
Page 45
Customizing Your Phone Enter the desired value in the Old PIN, New PIN and Confirm PIN field respectively. Press the Save soft key to accept the change or the Back soft key to cancel. Note The unlock PIN length must be within 15 digits. To unlock the phone via phone user interface: Press any locked key, enter the “Phone Lock”… -
Page 46: Audio Settings
User Guide for the SIP-T40P IP Phone Press the Save soft key to accept the change. Phone lock is configurable via web user interface at the path Features->Phone Lock. Audio Settings Volume You can press the Volume key to adjust the ringer volume when the phone is idle or ringing.
-
Page 47: Ring Tones
Customizing Your Phone To adjust the volume when the phone is during a call: Press to adjust the volume of currently engaged audio device (handset, speakerphone or headset). Ring Tones Ring tones are used to indicate incoming calls. You can select different ring tones to distinguish different accounts registered on your phone, or to distinguish your phone from your neighbor’s.
-
Page 48: Key Tone
User Guide for the SIP-T40P IP Phone If Common is selected, this account will use the ring tone selected for the phone. (Optional.) Press to adjust the ringer volume. Press the Save soft key to accept the change or the Back soft key to cancel.
-
Page 49: Contact Management
Customizing Your Phone To configure key tone via phone user interface: Press Menu->Settings->Basic Settings->Sound->Key Tone. Press , or the Switch soft key to select Enabled or Disabled from the Key Tone field. Press the Save soft key to accept the change or the Back soft key to cancel. Key tone is configurable via web user interface at the path Features->Audio.
-
Page 50: Local Directory
User Guide for the SIP-T40P IP Phone The LCD screen displays the list(s) in the adjusted order. Click Confirm to accept the change. Note The list(s) to access for the Dir soft key is configurable via web user interface only.
-
Page 51: Adding Groups
Customizing Your Phone store up to 1000 contacts and 48 groups in your phone’s local directory. You can add new groups and contacts, edit, delete or search for a contact, or simply dial a contact number from the local directory. Note Local directory can be backed up on the provisioning server.
-
Page 52
User Guide for the SIP-T40P IP Phone The IP phone enters the local directory directly as there is only Local Directory enabled in the directory by default. If Local Directory is removed from the (refer to Directory on page 37), press directory Menu->Directory->Local Directory to enter the local directory. -
Page 53: Adding Contacts
Customizing Your Phone The LCD screen prompts the following warning: Press the OK soft key to confirm the deletion or the Cancel soft key to cancel. You can also delete all groups by pressing the Option soft key, and then select Delete All. Adding Contacts You can add contacts to the local directory in the following ways: Manually…
-
Page 54
User Guide for the SIP-T40P IP Phone Enter the name and the office, mobile or other numbers in the corresponding fields. Press , or the Switch soft key to select the desired account from the Account field. If Auto is selected, the phone will use the default account when placing calls to the contact from the local directory. -
Page 55: Editing Contacts
Customizing Your Phone Adding Contacts from Remote Phone Book To add a contact to the local directory from remote phone book: Press Menu->Directory->Remote Phone Book. If Remote Phone Book is added to the directory refer to Directory on page , press Dir->Remote Phone Book to enter the remote phone book.
-
Page 56: Deleting Contacts
User Guide for the SIP-T40P IP Phone Press to highlight the contact information and then edit. Press the Save soft key to accept change or the Back soft key to cancel. Deleting Contacts To delete a contact from the local directory: Press the Dir soft key.
-
Page 57: Searching For Contacts
Customizing Your Phone The IP phone enters the local directory directly as there is only Local Directory enabled in the directory by default. If Local Directory is removed from the (refer to Directory on page 37), press directory Menu->Directory->Local Directory to enter the local directory. Select the desired contact group and then press the Enter soft key.
-
Page 58
User Guide for the SIP-T40P IP Phone Enter a few continuous characters of the contact name or continuous numbers of the contact number (office, mobile or other number) using the keypad. The contacts whose name or phone number matches the characters entered will appear on the LCD screen. -
Page 59: Blacklist
Customizing Your Phone (Optional.) Check the Show Title checkbox. It will prevent importing the title of the contact information which is located in the first line of the CSV file. Click Import CSV to import the contact list. (Optional.) Mark the On radio box in the Delete Old Contacts field. It will delete all existing contacts while importing the contact list.
-
Page 60
User Guide for the SIP-T40P IP Phone Press the Add soft key. Enter the name and the office, mobile or other numbers in the corresponding fields. Press , or the Switch soft key to select the desired account from the Account field. -
Page 61: Remote Phone Book
Customizing Your Phone the blacklist directory, refer to the operating instructions of Editing Contacts on page 43, Deleting Contacts on page 44, Placing Calls to Contacts on page and/or Searching for Contacts on page 45. Remote Phone Book You can add new contacts to the local directory, search for a contact, or simply dial a contact number from the remote phone book.
-
Page 62: Call History Management
Click Confirm to accept the change. Call History Management The SIP-T40P IP phone maintains call history lists of Placed Calls, Received Calls, Missed Calls and Forwarded Calls. Each call history list supports up to 100 entries. You can view call history,…
-
Page 63: Viewing History Records
Customizing Your Phone History record feature is enabled by default. If you don’t want to save the call history, you can disable the feature. Viewing History Records To view the call history: Press the History soft key. The LCD screen displays all call records. Press to switch among All Calls, Missed Calls, Placed Calls, Received Calls and Forwarded Calls.
-
Page 64: Deleting History Records
User Guide for the SIP-T40P IP Phone Deleting History Records To delete an entry from the call history list: Press the History soft key. Press to switch among All Calls, Missed Calls, Placed Calls, Received Calls and Forwarded Calls. Press to select the desired entry.
-
Page 65: Search Source List In Dialing
Customizing Your Phone Search Source List in Dialing You can search for a contact from the desired lists when the phone is on the dialing screen. The lists can be Local Directory, History, Remote Phone Book and LDAP. Note LDAP is disabled by default. For more information, contact your system administrator. To configure search source list in dialing via web user interface: Click on Directory->Setting.
-
Page 66: System Customizations
User Guide for the SIP-T40P IP Phone Enter a few continuous characters of the entry’s name or continuous numbers of the entry’s phone number (office, mobile or other number) using the keypad. The entries in the enabled search source lists whose name or phone number matches the characters entered will appear on the LCD screen.
-
Page 67: Headset Use
Customizing Your Phone Click Upload to upload the file. custom logo, you can click Delete item will appear after you upload a Delete to delete the Note custom logo. The logo file format must be *.dob, contact your system administrator for more information. Logo customization is configurable via web user interface only.
-
Page 68: Dual Headset
User Guide for the SIP-T40P IP Phone To enable headset prior via web user interface: Click on Features->General Information. Select Enabled from the pull-down list of Headset Prior. Click Confirm to accept the change. To use headset prior feature, you should activate the headset mode in advance: Physically connect the headset.
-
Page 69: Dss Keys
Dual headset is configurable via web user interface only. DSS Keys There are two types of DSS keys: Line Keys and Programable Keys. The details will be introduced in the following. The SIP-T40P IP phone supports 3 line keys and 11 programable keys. Line Keys You can assign predefined functionalities to line keys.
-
Page 70
User Guide for the SIP-T40P IP Phone (Optional.) Enter the corresponding value in the Extension field. Press the Save soft key to accept the change or the Back soft key to cancel. Line key is configurable via web user interface at the path Dsskey->Line Key. -
Page 71
Customizing Your Phone Account ID (the account this feature will be applied to) Label (key label displayed on the LCD screen) Usage: When the phone receives an incoming call, the Line key LED flashes green: Press the Line key to accept the incoming call. Press the Line key to place a new call and the active call is placed on hold. -
Page 72
User Guide for the SIP-T40P IP Phone own group. Type (Key Event) Dependencies: Key Type (GPickup) Account ID (the account this feature will be applied to) Label (key label displayed on the LCD screen) Value (the group call pickup code) Usage: Press the Group Pickup key on your phone when a phone number in the group receives an incoming call. -
Page 73
Customizing Your Phone XML Group You can use this key feature to quickly access a remote group in your remote phone book. You should configure remote phone book in advance. For more information, refer to Remote Phone Book on page 49. Type (Key Event) Dependencies: Key Type (XML Group) -
Page 74
User Guide for the SIP-T40P IP Phone Label (key label displayed on the LCD screen) Value (the number you want to add to the conference) Usage: Press the Conference key during an active call to set up a conference with the number specified in the Value field. -
Page 75: Do Not Disturb (Dnd) On
Customizing Your Phone When the transfer mode on DSS key is New Call, press the Transfer key to place a new call to the number specified in the Value field. Transfer mode via DSS key is configurable via web user interface at the path Features->Transfer. Note If the Value field is left blank, the Transfer key performs the same as the Tran soft key during a call.
-
Page 76
User Guide for the SIP-T40P IP Phone Type (Key Event) Dependencies: Key Type (SMS) Label (key label displayed on the LCD screen) Usage: Press the SMS key when the phone is idle to access text message. Group Listening You can use this key feature to activate the Speakerphone and Handset/Headset mode at the same time. -
Page 77: Phone Lock On
Customizing Your Phone Usage: Press the URL key to trigger the phone to send an HTTP GET request containing the URL specified in the Value field. Phone Lock You can use this key feature to immediately lock your phone instead of long pressing .
-
Page 78
User Guide for the SIP-T40P IP Phone To customize the programable keys via web user interface: Click on Dsskey->Programable Key. Customize specific features for these keys. (Optional.) Enter the string that will appear on the LCD screen in the Label field. -
Page 79: Account Management
Customizing Your Phone Account Management You can register one or multiple accounts on the SIP-T40P IP phone. You can also configure each line key to associate with an account or configure multiple line keys to associate with an account. Account Registration To register an account via phone user interface: Press Menu->Settings->Advanced Settings (default password: admin) ->Accounts.
-
Page 80: Dial Plan
Dial Plan Dial plan is a string of characters that governs the way your SIP-T40P IP phone processes the inputs received from your phone keypad. The SIP-T40P IP phone supports the following dial plan features: Replace Rule …
-
Page 81: Replace Rule
Customizing Your Phone “[5-7]” would match the number”5”, ”6”or ”7”. The square brackets «[]» can be used as a placeholder for a single character which matches any of a set of characters. Example: «91[5-7]1234» would match «9151234», «9161234», «9171234». The parentheses «( )» can be used to group together patterns, for instance, to logically combine two or more patterns.
-
Page 82: Dial Now
User Guide for the SIP-T40P IP Phone Enter the desired line ID in the Account field or leave it blank. Click Add to add the replace rule. When you enter the number “1” using the keypad and then press the Send soft key, the phone will dial out “1234”…
-
Page 83
Customizing Your Phone number matches the dial now string, the number will be dialed out automatically. For example, a dial now rule is configured as «1xx», any entered three-digit string beginning with 1 will then be dialed out automatically on the phone. To add a dial now rule via web user interface: Click on Settings->Dial Plan->Dial Now. -
Page 84: Area Code
User Guide for the SIP-T40P IP Phone The default value is “1”. Click Confirm to accept the change. Note Time out for dial now rule is configurable via web user interface only. Area Code Area codes are also known as Numbering Plan Areas (NPAs). They usually indicate geographical areas in a country.
-
Page 85: Block Out
Customizing Your Phone For more information on the valid values for the Account field, refer to Replace Rule page 69. Click Confirm to accept the change. The default value of minimum and maximum length is 1 and 15 respectively. Note Area code is configurable via web user interface only.
-
Page 86: Emergency Number
User Guide for the SIP-T40P IP Phone Click Confirm to add the block out number. Note Block out number is configurable via web user interface only. Emergency Number Public telephone networks in countries around the world have a single emergency telephone number (emergency services number), that allows a caller to contact local emergency services for assistance when necessary.
-
Page 87: Live Dialpad
Customizing Your Phone Live Dialpad You can enable live dialpad feature on the SIP-T40P IP phone, which enables the IP phone to automatically dial out a phone number without pressing the send key. You can also configure a delay, and then the phone will dial out the phone number automatically after the designated period of time.
-
Page 88
User Guide for the SIP-T40P IP Phone Enter the delay time in the Hotline Delay field. The valid values range from 0 to 10 (seconds) and the default value is “4”. Press the Save soft key to accept the change or the Back soft key to cancel. -
Page 89: Basic Call Features
Basic Call Features Basic Call Features The SIP-T40P IP phone is designed to be easily used like a regular phone on a public switched telephone network (PSTN). You can place calls, answer calls, transfer a call to someone else, or conduct a conference call.
-
Page 90: Placing Calls
User Guide for the SIP-T40P IP Phone Placing Calls You can place a call in one of three ways using your SIP-T40P IP phone: Using the handset Using the speakerphone Using the headset You can also dial the number first, and then choose the way you want to speak to the other party.
-
Page 91
The SIP-T40P IP phone can handle a maximum of 50 calls at one time. To place multiple calls: You can have more than one call on your SIP-T40P IP phone. To place a new call during an active call, do one of the following: Press the line key. -
Page 92: Answering Calls
User Guide for the SIP-T40P IP Phone Answering Calls When you are not in another call, you can answer a call in one of three ways: Using the handset Using the speakerphone Using the headset You can reject incoming calls by pressing the Reject soft key or the X key. You can also activate Note Do Not Disturb mode to ignore all incoming calls without ring on your phone.
-
Page 93: Ending Calls
Basic Call Features Answering When in Another Call If you have an active call, and an incoming call arrives on the phone, do one of the following: Press the Answer soft key. The incoming call is answered and the original call is placed on hold. Press to access the new call.
-
Page 94: Recent Call In Dialing
User Guide for the SIP-T40P IP Phone To redial a previously dialed number from your phone: Press when the phone is idle. Press to select the desired entry from the placed calls list, and then press or the Send soft key.
-
Page 95: Auto Answer
Basic Call Features To view placed calls list when the phone is on the dialing screen: Pick up the handset, press the Speakerphone key or press the line key. The LCD screen displays the placed calls list. You can also enter a few continuous characters of the contact name or continuous numbers of the contact number (office, mobile or other number) to search from placed calls list.
-
Page 96: Auto Redial
User Guide for the SIP-T40P IP Phone The icon appears on the LCD screen only when the auto answer feature is enabled for the default account. Auto answer is configurable via web user interface at the path Account->Basic. Auto answer only takes effect when there is no other call in progress on the phone. If there is a…
-
Page 97: Call Completion
Basic Call Features To use auto redial: When the called party is busy, the LCD screen prompts the following: Press the OK soft key to activate auto redial. The following prompt will appear on the LCD screen of the phone: Wait for the designated period of time or press the OK soft key to redial the phone number.
-
Page 98: Recall
User Guide for the SIP-T40P IP Phone To use call completion: When the called party is busy, the following prompt will appear on the LCD screen of the phone: Press the OK soft key, the phone returns to the idle screen and call completion is activated.
-
Page 99: Call Mute
Basic Call Features Recall key is configurable via web user interface at the path Dsskey->Line Key. Call Mute You can mute the microphone of the active audio device during an active call so that the other party cannot hear you. You can also mute the microphone while dialing so that the other party cannot hear you when the call is set up.
-
Page 100: Muting While Dialing
User Guide for the SIP-T40P IP Phone Muting While Dialing To mute the microphone while dialing: Press on the pre-dialing, dialing or calling screen. The call is muted automatically when setting up successfully. To un-mute the microphone while dialing: Press again on the pre-dialing, dialing or calling screen.
-
Page 101: Do Not Disturb (Dnd)
Basic Call Features If more than one call is placed on hold, a numbered prompt appears on the LCD screen, for example “2/3”, indicating that this is the second call out of three calls. Do Not Disturb (DND) You can use DND to reject incoming calls automatically on the phone. The prompt message «n New Missed Call(s)»…
-
Page 102
User Guide for the SIP-T40P IP Phone To configure the DND mode via web user interface: Click on Features->Forward&DND. In the DND block, mark the desired radio box in the Mode field. Click Confirm to accept the change. Note DND mode is configurable via web user interface only. -
Page 103
Basic Call Features To activate DND in custom mode: Press the DND soft key when the phone is idle. The LCD screen displays a list of accounts registered on the phone. You can activate it for a specific account: Press to select the desired account and then press the Enter soft key. -
Page 104
User Guide for the SIP-T40P IP Phone If you activate DND for the default account, the associated line icon will change to , and the icon will appear on the status bar. If you activate DND for the non-default account, only the associated line icon will change… -
Page 105
Basic Call Features For multiple numbers, enter a comma between every two numbers. Click Confirm to accept the change. When DND is activated on the phone, the phone can still receive incoming calls from the numbers specified in the DND Authorized Numbers field. Note DND authorized number is configurable via web user interface only. -
Page 106: Call Forward
User Guide for the SIP-T40P IP Phone Call Forward You can configure your phone to forward incoming calls to another party (static forwarding). You can also forward calls while your phone is ringing (dynamic forwarding). Note When the phone forwards a call, a prompt window will pop up by default. If you want to disable the feature, contact your system administrator for more information.
-
Page 107
Basic Call Features In the Forward block, mark the desired radio box in the Mode field. Click Confirm to accept the change. Call forward mode is configurable via web user interface only. Note To activate call forward in phone mode: Press Menu->Features->Call Forward. -
Page 108
User Guide for the SIP-T40P IP Phone Press , or the Switch soft key to select Enabled from the Busy Forward field. Enter the destination number you want to forward incoming calls to when the phone is busy in the Forward to field. -
Page 109
Basic Call Features Press to select the desired forwarding type, and then press the Enter soft key. Depending on your selection: If you select Always Forward, you can activate it for a specific account. Press , or the Switch soft key to select Enabled from the Always Forward field. -
Page 110
User Guide for the SIP-T40P IP Phone You can also activate busy forward for all accounts, do the following: Press to highlight the Busy Forward field. Press the All Lines soft key. The LCD screen prompts “Copy to all lines?”. -
Page 111
Basic Call Features The LCD screen prompts “Copy to all lines?”. Press the OK soft key to accept the change or the Cancel soft key to cancel. Press the Save soft key to accept the change or the Back soft key to cancel. If you activate call forward for the default account, the associated line icon will change to and the icon will appear on the status bar. -
Page 112
User Guide for the SIP-T40P IP Phone Call forward is configurable via web user interface at the path Features->Forward&DND. Note You can also enter the SIP URI or IP address in the Forward to field. For more information on using the SIP URI or IP address, refer to Placing Calls on page 78. -
Page 113: Dynamic Forwarding
Basic Call Features To deactivate call forward in custom mode: Press Menu->Features->Call Forward. Press to select the desired account and then press the Enter soft key. Press to select the desired forwarding type and then press the Enter soft key. Press , or the Switch soft key to select Disabled to deactivate the call forward.
-
Page 114: Blind Transfer
User Guide for the SIP-T40P IP Phone Select Enabled from the pull-down list of Allow Trans Exist Call. Click Confirm to accept the change. Blind Transfer Before performing a blind transfer (except you use dial number method), make sure that the transfer mode on DSS key is configured as Blind Transfer.
-
Page 115
Basic Call Features Press or the Send soft key to complete the transfer. Press the Dir soft key, and then select History. Select the desired list and then press to select the entry (Directory should be configured in advance. Refer to Directory on page for more information). -
Page 116: Semi-Attended Transfer
User Guide for the SIP-T40P IP Phone Press or the Send soft key to complete the transfer. Press the Dir soft key, and then select History. Select the desired list and then press to select the entry (Directory should be configured in advance.
-
Page 117: Attended Transfer
Basic Call Features Attended Transfer Before performing an attended transfer (except you use dial number method), make sure that the transfer mode on DSS key is configured as New Call or Attended Transfer. For more information on how to configure it, refer to Configuring Transfer Mode on DSS Key on page 123.
-
Page 118: Conference
Local Conference The SIP-T40P IP phone supports up to 3 parties (including yourself) in a conference call. This is the default method of conference called Local Conference. To set up a local conference call, make sure local conference feature is enabled. For more Note information, contact your system administrator.
-
Page 119: Network Conference
Press the EndCall soft key to drop the conference call. Network Conference You can use network conference feature on the SIP-T40P IP phone to conduct a conference with multiple participants.
-
Page 120
User Guide for the SIP-T40P IP Phone This feature allows you to perform the following: Join two calls together into a conference call. Invite another party into an active conference call. To use this feature, contact your system administrator for the network conference URI in advance. -
Page 121: Call Park/Retrieve
Basic Call Features conference. Repeat steps 5 to 7 until you have added all intended parties. The procedures to set up a network conference call on specific servers may be different from introduced above. Contact your system administrator for more information. Call Park/Retrieve You can use call park feature to place a call on hold, and then retrieve the call from another phone in the system (for example, a phone in another office or conference room).
-
Page 122: Fac Mode
User Guide for the SIP-T40P IP Phone Select the desired line key. Press , or the Switch soft key to select Retrieve Park from the Type field. Press , or the Switch soft key to select the desired line from the Account ID field.
-
Page 123
Basic Call Features It is configured for the Retrieve soft key. This park retrieve code will also apply to the call park key. Click Confirm to accept the change. Note If the Park or Retrieve soft key doesn’t appear on the LCD screen, please select Disabled from the pull-down list of Custom Softkey via web user interface at path Settings->Softkey Layout. -
Page 124: Transfer Mode
User Guide for the SIP-T40P IP Phone Do one of the following: If you want to park the call against the local extension. Press If the call is parked successfully, you will hear a voice prompt confirming that the call is parked.
-
Page 125
Basic Call Features If Enabled is selected, the Park soft key will display on the LCD screen during a call, and the Retrieve soft key will display on the dialing screen. (Optional.) Enter the call park number in the Call Park Code field. It is configured for the Park soft key. -
Page 126: Call Pickup
The phone will retrieve the parked call from the shared parking lot. Call Pickup You can use call pickup to answer someone else’s incoming call on your phone. The SIP-T40P IP phone supports directed call pickup and group call pickup. Directed call pickup is used for picking up a call that is ringing at a target phone number.
-
Page 127
Basic Call Features To configure the directed call pickup code on a per-line basis via web user interface: Click on Account->Advanced. Select the desired account from the pull-down list of Account. Enter the directed call pickup code in the Directed Call Pickup Code field. Click Confirm to accept the change. -
Page 128: Group Call Pickup
User Guide for the SIP-T40P IP Phone Group Call Pickup To enable group call pickup and configure the group call pickup code on a global basis via web user interface: Click on Features->Call Pickup. Select Enabled from the pull-down list of Group Call Pickup.
-
Page 129: Anonymous Call
Basic Call Features To pick up a call in the group: Pick up the handset, press the Speakerphone key or press the line key. The GPickup soft key appears on the LCD screen. Press the GPickup soft key on your phone when a phone in the group receives an incoming call.
-
Page 130: Anonymous Call Rejection
User Guide for the SIP-T40P IP Phone Press , or the Switch soft key to select Enabled from the Local Anonymous field. (Optional.) Press , or the Switch soft key to select the desired value from the Send Anony Code field.
-
Page 131
Basic Call Features Press , or the Switch soft key to select Enabled from the Anony Rejection field. (Optional.) Press , or the Switch soft key to select the desired value from the Send Reject Code field. The phone will send the configured on code or off code depending on your selection when you enable or disable anonymous call rejection feature on the phone. -
Page 132
User Guide for the SIP-T40P IP Phone… -
Page 133: Advanced Phone Features
Advanced Phone Features Advanced Phone Features This chapter provides operating instructions for the advanced features of the SIP-T40P IP phone. Topics include: Busy Lamp Field (BLF) BLF List Call Recording Hot Desking Intercom Multicast Paging …
-
Page 134
User Guide for the SIP-T40P IP Phone Press , or the Switch soft key to select BLF from the Type field. Press , or the Switch soft key to select the desired line from the Account ID field. (Optional.) Enter the string that will appear on the LCD screen in the Label field. -
Page 135
Advanced Phone Features To configure BLF ring type via phone user interface: Press Menu->Settings->Basic Settings->Sound->BLF Ring Type. Press to select the desired ring tone. (Optional.) Press to adjust the ringer volume. Press the Save soft key to accept the change or the Back soft key to cancel. BLF ring type is configurable via web user interface at the path Features->Call Pickup. -
Page 136
User Guide for the SIP-T40P IP Phone If you enable visual alert feature, you can also pick up the monitored user’s incoming call by pressing DPickup soft key. To use DPickup soft key to pick up the call, the call pickup code can only be configured on a global or per-line basis via web user interface. -
Page 137
Advanced Phone Features Enter the desired pickup code in the Directed Call Pickup Code field. Click Confirm to accept the change. Configuring Transfer Mode on DSS Key When there is an active call on the IP phone, you can handle the active call differently depending on the configuration of transfer mode via Dsskey with the BLF key. -
Page 138: Using Blf Feature On The Phone
User Guide for the SIP-T40P IP Phone Click Confirm to accept the change. Note Transfer Mode on DSS Key is also applicable to BLF list feature. Using BLF Feature on the Phone You can use the BLF key in the following ways: Place a call to the monitored user.
-
Page 139
Advanced Phone Features Press the BLF key of the monitored user again or the Tran soft key to complete the transfer when receiving ringback. To perform an attended transfer: Press the BLF key of the monitored user which you want to transfer this call to. The phone will dial the number of the monitored user. -
Page 140: Blf List
User Guide for the SIP-T40P IP Phone Press the desired BLF key to retrieve a call that is parked to the monitored user. Make sure that the call park code/park retrieve code is configured via web user interface at the Note path: Feature->Call Pickup.
-
Page 141: Call Recording
BLF List key will directly call the monitored user when he/she receives an incoming call. For more information on pickup code, refer to Call Pickup on page 114. Call Recording You can record calls by pressing a record key on the phone. The SIP-T40P IP phone supports record and URL record.
-
Page 142: Configuring A Record Key
User Guide for the SIP-T40P IP Phone Two ways of call recording: Record: The phone sends SIP INFO message containing a specific header “Record: on/off” to trigger a recording. URL Record: The phone sends HTTP URL request to trigger a recording. Contact your …
-
Page 143: Configuring A Url Record Key
Advanced Phone Features Configuring a URL Record Key To configure a URL record key via phone user interface: Press Menu->Features->DSS Keys. Select the desired DSS key. Press , or the Switch soft key to select URL Record from the Type field. (Optional.) Enter the string that will appear on the LCD screen in the Label field.
-
Page 144: Hot Desking
You can use hot desking on the SIP-T40P IP phone to log out of the existing accounts and then log into a new account. As a result, many users can share the phone resource at different times.
-
Page 145: Intercom
Advanced Phone Features To use hot desking: Press the hot desking key when the phone is idle. The LCD screen prompts the following warning: Press the OK soft key, registration configurations of all accounts on the phone will be cleared immediately. The login wizard will be displayed as below: Enter the login information in each field.
-
Page 146: Incoming Intercom Calls
Intercom key is configurable via web user interface at the path Dsskey->Line Key. Incoming Intercom Calls The SIP-T40P IP phone supports automatically to answer an incoming intercom call by default. The phone automatically plays a warning tone when it receives an incoming intercom call. In addition, you can enable the phone to mute the microphone when it automatically answers an incoming intercom call.
-
Page 147
Advanced Phone Features disabled, the phone will handle an incoming intercom call like a normal call instead of directly rejecting it. Intercom Allow is enabled by default. Your administrator can set a period of delay time before the phone automatically answers Note intercom calls. -
Page 148: Using Intercom
User Guide for the SIP-T40P IP Phone Using Intercom You can use the intercom key in the following ways: Place a call to the target extension Pick up an incoming call of the target extension To use the intercom key to pick up an incoming call, make sure the intercom subscription feature Note is enabled.
-
Page 149: Sending Rtp Stream
Advanced Phone Features The following describes 31 paging channels: 0: You can broadcast audio to channel 0. Note that the Yealink IP phones running old firmware version (old paging mechanism) can be regarded as listening to channel 0. It is the default channel.
-
Page 150
User Guide for the SIP-T40P IP Phone Press , or the Switch soft key to select Paging List from the Key Type field. (Optional.) Enter the string that will appear on the LCD screen in the Label field. Press the Save soft key to accept the change or the Back soft key to cancel. -
Page 151
Advanced Phone Features Paging list is configurable via web user interface at the path Directory->Multicast IP. To delete a paging group via phone user interface: Press the paging list key when the phone is idle. Press to select a desired paging group. Press the Option soft key, and then select Delete soft key. -
Page 152: Receiving Rtp Stream
User Guide for the SIP-T40P IP Phone Click Confirm to accept the change. If G722 codec is used for multicast paging, the LCD screen will display the icon to indicate Note that it is providing high definition voice. Default codec for multicast paging is configurable via web user interface only.
-
Page 153
Advanced Phone Features Paging Priority Active The paging priority active parameter decides how the phone handles incoming multicast paging calls when there is already a multicast paging call on the phone. If enabled, the phone will ignore incoming multicast paging calls with lower priorities, otherwise, the phone will answer incoming multicast paging calls automatically and place the previous multicast paging call on hold. -
Page 154: Using Multicast Paging
User Guide for the SIP-T40P IP Phone Using Multicast Paging To send RTP stream via a multicast paging key when the receiver’s phone is idle: Press the multicast paging key when the phone is idle. The phone sends RTP to a preconfigured multicast address (IP: Port).
-
Page 155: Music On Hold (Moh)
Advanced Phone Features To place the current multicast RTP session on hold, press the Hold soft key. The sender’s phone places the multicast RTP session on hold and receiver’s phone releases the session. To resume the held multicast RTP session, press the Resume soft key. The multicast RTP session is established again.
-
Page 156: Automatic Call Distribution (Acd)
ACD on the SIP-T40P IP phone allows the ACD system to distribute large volumes of incoming calls to the registered ACD users. To use this feature, you should configure an ACD key in advance.
-
Page 157: Shared Call Appearance (Sca)
Advanced Phone Features User ID: the identity used to log into the queue. Password: the password used to log into the queue. Press the Login soft key to log in. Note Contact your system administrator for the User ID and Password to access the ACD system. After configuring an ACD key, you can press the ACD key to log into the .
-
Page 158: Configuring Sca Feature On The Ip Phone
User Guide for the SIP-T40P IP Phone the secretary can answer the call. Calls on the shared line can be placed on hold, barged in or retrieved from another shared phone. Configuring SCA Feature on the IP Phone You can configure a primary account on the IP phone and other alternate accounts on the other IP phones.
-
Page 159
Advanced Phone Features Auto LineKeys is you can automatically assign multiple DSS keys with Line type enabled, for a registered shared line on the phone. Click Confirm to accept the change. To configure the shared line settings and the number of line key on phone A via web user interface: Register the primary account 4603. -
Page 160
User Guide for the SIP-T40P IP Phone Enter the desired number in the Number of line key field. This field appears only if Auto Linekeys is enabled. The default value is 1. In this example, the value is set to 2. -
Page 161
Advanced Phone Features (Enter the primary account 4603 in the Register Name field.) Click on Advanced, and then select Shared Call Appearance from the pull-down list of Shared Line. Enter the desired number in the Number of line key field. This field appears only if Auto Linekeys is enabled. -
Page 162
User Guide for the SIP-T40P IP Phone Click Confirm to accept the change. The phone B will automatically configure the line keys from the first unused DSS key, according to the configured number in the Number of line key field. -
Page 163: Using Sca Feature On The Ip Phone
Click Confirm to accept the change. The phone will dial out “*11” automatically when you press the CallPull soft key. Using SCA Feature on the IP Phone This section provides you with detailed information on using the SIP-T40P IP phone in a SCA…
-
Page 164
User Guide for the SIP-T40P IP Phone Hybrid Key System scenario. In a SCA Hybrid Key System scenario, the status of the line key LED which associates with a shared line will change. For more information on line key LED indicators,… -
Page 165
The LED indicators of the line key 2 on both phone A and phone B will fast flash green. You can answer the incoming call on either phone A or phone B. The LCD screen of phone A displays the information of the incoming call (e.g., ”Incoming call: 4604 Yealink”). Note Make sure call waiting feature is enabled on phone A. -
Page 166
User Guide for the SIP-T40P IP Phone illuminate solid green and phone B will illuminate solid red indicating that there is an active call on the line key 2. You can also answer the call on phone B. Do one of the following on phone B: Press the line key 2. -
Page 167: Retrieving A Held Call
Advanced Phone Features Retrieving a Held Call To retrieve a call placed on public hold: You can retrieve the public held call on either phone A or phone B. To retrieve the call on phone A: Press the line key with the slow-flashing green LED indicator or the Resume soft key. The conversation between phone A and phone C is retrieved.
-
Page 168
User Guide for the SIP-T40P IP Phone Press the Hold or the EndCall soft key. If any party in the conference call presses the Hold soft key, two-way voice can be heard between the remaining parties. If party A or party B presses the EndCall soft key, the remaining parties are still connected. -
Page 169: Bridged Line Appearance (Bla)
Advanced Phone Features The Cancel, CallPull, NewCall and BargeIn soft keys appear on the LCD screen of phone Press the CallPull soft key. The active call has been retrieved from the phone A successfully. If there is a held call between phone A and phone C, do the following: Long press the desired line key on phone B.
-
Page 170: Configuring Bla Feature On The Ip Phone
User Guide for the SIP-T40P IP Phone Configuring BLA Feature on the IP Phone You can share a BLA number on two or more phones. For example, phone A registers the account 14019833020 and assigns BLA number, phone B registers the account 10462190020 and assigns BLA number, phone C registers the account 14755608020.
-
Page 171
Advanced Phone Features Click on Advanced, and then select Draft BLA from the pull-down list of Shared Line. Enter the desired number in the BLA Number field. Click Confirm to accept the change. To register an account and configure BLA feature on phone B via web user interface: Register the account 10462190020. -
Page 172: Using Bla Feature On The Ip Phone
Using BLA Feature on the IP Phone This section provides you with detailed information on using the SIP-T40P IP phone in a BLA scenario. In a BLA scenario, the status of the line key LED which associates with a bridged line will change.
-
Page 173
Advanced Phone Features Press the line key when the phone is idle to enter the dialing screen. Enter the desired number using the keypad and then press , or the Send soft key. The phone will dial the entered number. To place multiple calls on the bridged line: You can have more than one call on the bridged line. -
Page 174: Messages
Messages Short Message Service (SMS) You can send and receive text messages using the SIP-T40P IP phone. New text messages can be indicated both acoustically and visually. When receiving a new text message, the phone will play a warning tone. The power indicator LED will slowly flash red, and the LCD screen will prompt “n New Text Message(s)”…
-
Page 175
Advanced Phone Features To read a text message: Press Menu->Message->Text Message->Inbox. Select the desired message and then press the View soft key. If the phone prompts receiving new text messages, you can also press the View soft key to read Note the new messages directly. -
Page 176: Voice Mail
Voice Mail You can leave voice mails for someone else using the SIP-T40P IP phone. You can also listen to voice mails that are stored in a voice mailbox. This feature is set up on the server side. It is not available on all servers.
-
Page 177
Advanced Phone Features If the voice mail pop-up message box disappears, it won’t pop up again unless the user receives a new voice mail or the user re-registers the account that has unread voice mail(s). You can configure the phone not to display the pop-up prompt, contact your system Note administrator for more information. -
Page 178: Message Waiting Indicator (Mwi)
LED slowly flashes red. This will be cleared when you retrieve all voice mails or delete them. The MWI service is unsolicited for some servers, so the SIP-T40P IP phone only handles the MWI messages sent from the server. But for other servers, the MWI service is solicited, so the SIP-T40P IP phone must enable subscription for MWI.
-
Page 179
Advanced Phone Features Select the desired account from the pull-down list of Account. Select Enabled from the pull-down list of Subscribe for MWI field. Enter the period time in the MWI Subscription Period(Seconds) field. Click Confirm to accept the change. The IP phone will subscribe to the account number for MWI service by default. -
Page 180
User Guide for the SIP-T40P IP Phone Enter the desired voice mail number in the Voice Mail field. Click Confirm to accept the change. The IP phone will subscribe to the voice mail number for MWI service using Subscribe MWI To Voice Mail. -
Page 181: Regulatory Notices
Without prior written consent, no organization or individual is permitted to make any change to the structure or the safety design of the device. Yealink is under no circumstance liable to consequences or legal issues caused by such changes.
-
Page 182
User Guide for the SIP-T40P IP Phone Do not place the device on or near any inflammable or fire-vulnerable object, such as rubber-made materials. Keep the device away from any heat source or bare fire, such as a candle or an … -
Page 183: Appendix
Appendix Appendix Appendix A — Time Zones Time Zone Time Zone Name Samoa United States-Hawaii-Aleutian, United States-Alaska-Aleutian -9:30 French Polynesia United States-Alaska Time Canada(Vancouver,Whitehorse), Mexico(Tijuana,Mexicali), United States-Pacific Time Canada(Edmonton,Calgary), Mexico(Mazatlan,Chihuahua), United States-MST no DST, United States-Mountain Time Canada-Manitoba(Winnipeg), Chile(Easter Islands), Mexico(Mexico City,Acapulco), United States-Central Time Bahamas(Nassau), Canada(Montreal,Ottawa,Quebec), Cuba(Havana), United States-Eastern Time…
-
Page 184
User Guide for the SIP-T40P IP Phone Time Zone Time Zone Name Japan(Tokyo), Korea(Seoul), Russia(Yakutsk,Chita) +9:30 Australia(Adelaide), Australia(Darwin) Australia(Brisbane), Australia(Hobart), Australia(Sydney,Melboume,Canberra), Russia(Vladivostok) +10:30 Australia(Lord Howe Islands) New Caledonia(Noumea), Russia(Srednekolymsk Time) +11:30 Norfolk Island New Zealand(Wellington,Auckland), Russia(Kamchatka Time) +12:45 New Zealand(Chatham Islands) -
Page 185: Appendix B — Menu Structure
Appendix Appendix B – Menu Structure…
-
Page 186
User Guide for the SIP-T40P IP Phone… -
Page 187: Index
Index Index Configuring BLA Feature on the IP Phone About This Guide Configuring SCA Feature on the IP Phone Accessing the Remote Phone Book Account Management Configuring the Intercom Features on the IP Account Registration Phone Adding a Contact to the Local Contact Management Directory/Blacklist Contrast…
-
Page 188
User Guide for the SIP-T40P IP Phone Placing Calls to Contacts Phone Lock Icon Instructions Power Saving Idle Screen Programable Keys Importing/Exporting Contact lists In This Guide Incoming Intercom Calls Intercom ReCall Receiving RTP Stream Recent Call In Dialing Redialing Numbers…
This manual is also suitable for:
Sip-t27p
- 2253visibility

Руководство пользователя Yealink SIP-T40P
share
- Дата публикации: 10.06.2018
- Ссылка на публикацию: скопировать
- Скачать: Руководство пользователя Yealink SIP-T40P (452.57KB)cloud_download
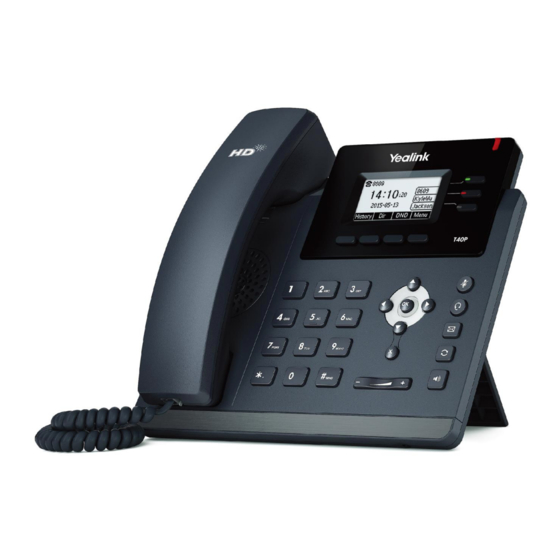
Yealink SIP-T40P
– младшая модель в линейке ультраэлегантных IP-телефонов Yealink T4. Телефон отлично подходит для установки на рабочие места сотрудников младшего и среднего звена. Широкий функционал в сочетании с простотой использования повышает эффективность бизнес-процессов и уровня коммуникаций, а передовой дизайн всей линейки Т4 поможет выдержать единый стиль вашего офиса.
Краткое руководство
Назначение устройства
Абонентское оборудование (SIP-телефон) применяется для подключения к телефонной сети через линии широкополосного доступа Ethernet по протоколу SIP
Комплектация
Установка телефона
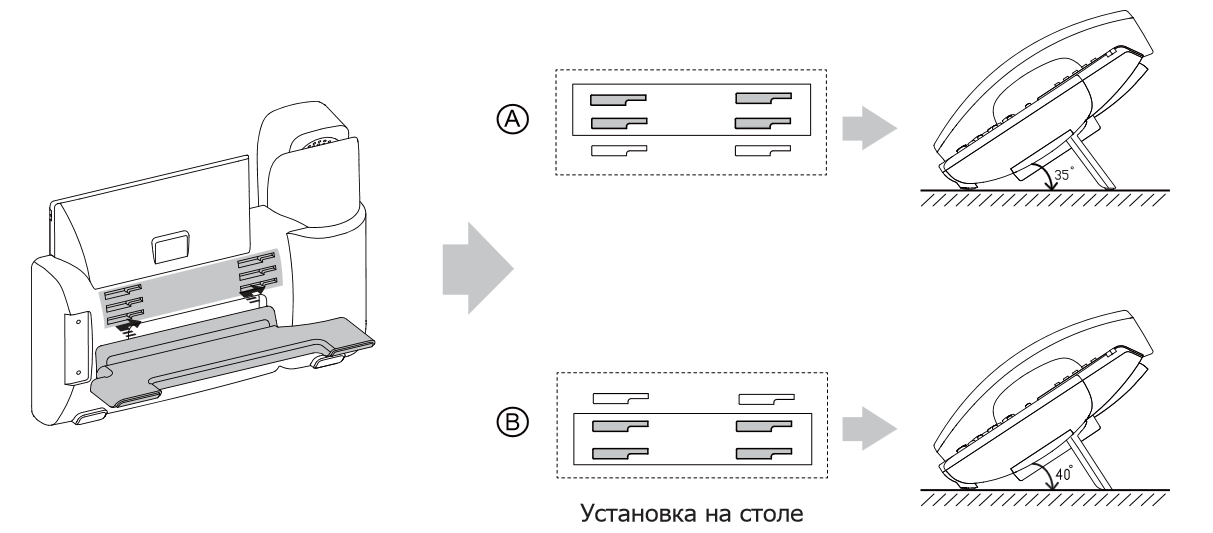
Прикрепите подставку как показано на рис:
Подключение сети и питания
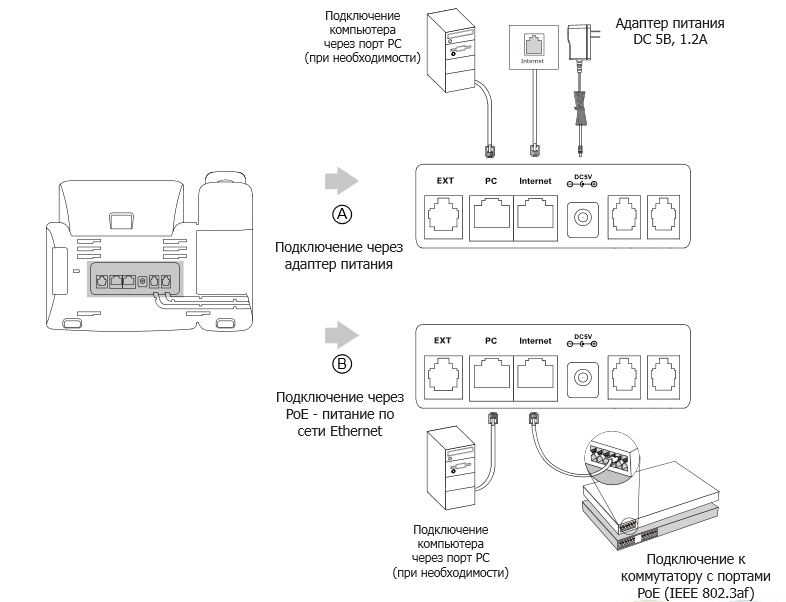
Подключить локальную сеть и питание можно двумя способами. При выборе проконсультируйтесь с системным администратором.
Примечание 1: в линиях с поддержкой PoE (питание по сети Ethernet) подключать адаптер питания категорически запрещено!
Примечание 2: Используйте адаптер питания от производителя. Используя другой адаптер питания, Вы рискуете повредить телефон и будете лишены гарантии производителя.
Технические характеристики
- 3 SIP-аккаунта с независимой настройкой
- Удержание, отключение микрофона, DND («Не беспокоить»)
- Быстрый набор, горячая линия
- Переадресация, режим ожидания, трансфер
- Групповое прослушивание, SIP SMS, экстренные вызовы
- 3-сторонняя конференция
- Выбор мелодии/загрузка/удаление
- Настройка времени: автоматически или вручную
- Правила набора
- XML-браузер, Action URL/URI
- Встроенные скриншоты
- RTCP-XR (RFC3611), VQ-RTCPXR (RFC6035)
Кодеки и настройки голоса
- HD голос: HD трубка, HD микрофон громкой связи
- Широкополосный кодек: G.722
- Кодеки: G.711(A/u), G.729AB, G.726
- DTMF: In-band, Out-of-band (RFC2833), SIP INFO и Auto or SIP INFO
- Full-duplex (полнодуплексная) громкая связь с AEC (подавление эха)
- VAD (обнаружение активности голоса), CNG (генератор комфортного шума), AEC (подавление эха), PLC (маркирование потери пакета с медиа-данными), AJB (адаптивный буфер для голосовых пакетов), AGC (автоматическая регулировка чувствительности микрофона)
- Локальная записная книга до 1000 контактов
- Черный список
- Удаленная записная книга XML и LDAP
- Интеллектуальный поиск
- Поиск по записным книгам, импорт/экспорт локальной записной книги
- История вызовов: набранные/принятые/пропущенные/переадресованные
- BLF (мониторинг состояния абонента), BLA (Bridged Line Apperance)
- Анонимный вызов, отклонение анонимных вызовов
- Hot-desking
- MWI (Message Waiting Indicator)
- Голосовая почта
- Парковка вызова, захват вызова
- Интерком, paging
- Music on hold
- Графический 2,3″ LCD-экран с разрешением 132х64 с подсветкой
- LED-индикатор питания и MWI
- Клавиши линий с двухцветными светодиодами с возможностью программирования. Отображение статуса абонента (BLF)
- Поддержка несколько языков
- Caller ID с именем и номером
Функциональные кнопки
- Клавиатура с русскими и английскими буквами
- 3 клавиши линий с двухцветными светодиодами с возможностью программирования
- 4 контекстно-зависимые динамически программируемые XML-клавиши
- 6 навигационных клавиш с возможностью перепрограммирования
- Клавиши регулировки громкости
- 1 функциональная клавиша с возможностью программирования: отключение звука
- 4 функциональные клавиши без возможности перепрограммирования: доступ к голосовой почте, гарнитура, повторный набор номера, громкая связь
Физические характеристики
- Крепление к стене Кронштейн для T42G/T41P/T40P (Не входит в комплект поставки )
- Блок питания: Вход 100-240В~50/60Гц, 250мА, Выход 5В, 0.6А. (Не входит в комплект поставки)
- Потребление через блок питания: 1.05 – 3.23Вт
- Потребление через PoE: 1.7 – 3.2Вт
- Размеры (Ш*Г*В*Т): 212мм*189мм*175мм*54мм
- Цвет: черный
- Рабочая влажность: 10~95%
- Рабочая температура: -10~50˚C
Интерфейсы
- 2хRJ45 Ethernet-порта 10/100Мбит/с
- 1хRJ9 для подключения трубки
- 1хRJ9 для подключения гарнитуры
- 1xRJ12 для подключения адаптера беспроводных гарнитур (EHS36)
- Поддержка PoE (IEEE 802.3af) Class 2
- Настройка телефона: веб-интерфейс/экран телефона/Autoprovision
- FTP/TFTP/HTTP/HTTPS/PnP Autoprovision
- Zero-sp-touch, TR069
- Блокировка клавиатуры
- Сброс к настройкам по умолчанию, перезагрузка
- Логи: PCAP Trace, system log
- 3 уровня доступа к веб-интерфейсу: admin/user/VAR
Сетевые характеристики и безопасность
- SIPv1 (RFC2543), SIPv2 (RFC3261)
- Способы вызова: Proxy и peer-to-peer (по IP-адресу)
- Режимы работы с сетью: Статический/DHCP/PPPoE
- HTTP/HTTPS-сервер
- Синхронизация времени и даты через NTP
- UDP/TCP/DNS-SRV (RFC3263)
- QoS: 802.1p/Q tagging (VLAN), Layer 3 ToS DSCP
- OpenVPN (Внимание! В продуктах, предназначенных для стран-участников Таможенного Cоюза, данный функционал отсутствует)
- Поддержка TLS
- Управление HTTPS-сертификатами
- AES шифрование конфигурационных файлов
- Поддержка стандартов шифрования и идентификации (MD5 и MD5-sess)
- SRTP (Внимание! В продуктах, предназначенных для стран-участников Таможенного Cоюза, данный функционал отсутствует)
- Поддержка IEEE802.1X
- Поддержка IPv6
10 доводов в пользу Asterisk
Распространяется бесплатно.
Asterisk – программное обеспечение с открытым исходным кодом, распространяется по лицензии GPL. Следовательно, установив один раз Asterisk вам не придется дополнительно платить за новых абонентов, подключение новых транков, расширение функционала и прочие лицензии. Это приближает стоимость владения станцией к нулю.
Безопасен в использовании.
Любое программное обеспечение может стать объектом интереса злоумышленников, в том числе телефонная станция. Однако, сам Asterisk, а также операционная система, на которой он работает, дают множество инструментов защиты от любых атак. При грамотной настройке безопасности у злоумышленников нет никаких шансов попасть на станцию.
Надежен в эксплуатации.
Время работы серверов некоторых наших клиентов исчисляется годами. Это значит, что Asterisk работает несколько лет, ему не требуются никакие перезагрузки или принудительные отключения. А еще это говорит о том, что в районе отличная ситуация с электроэнергией, но это уже не заслуга Asterisk.
Гибкий в настройке.
Зачастую возможности Asterisk ограничивает только фантазия пользователя. Ни один конструктор шаблонов не сравнится с Asterisk по гибкости настройки. Это позволяет решать с помощью Asterisk любые бизнес задачи, даже те, в которых выбор в его пользу не кажется изначально очевидным.
Имеет огромный функционал.
Во многом именно Asterisk показал какой должна быть современная телефонная станция. За многие годы развития функциональность Asterisk расширилась, а все основные возможности по-прежнему доступны бесплатно сразу после установки.
Интегрируется с любыми системами.
То, что Asterisk не умеет сам, он позволяет реализовать за счет интеграции. Это могут быть интеграции с коммерческими телефонными станциями, CRM, ERP системами, биллингом, сервисами колл-трекинга, колл-бэка и модулями статистики и аналитики.
Позволяет телефонизировать офис за считанные часы.
В нашей практике были проекты, реализованные за один рабочий день. Это значит, что утром к нам обращался клиент, а уже через несколько часов он пользовался новой IP-АТС. Безусловно, такая скорость редкость, ведь АТС – инструмент зарабатывания денег для многих компаний и спешка во внедрении не уместна. Но в случае острой необходимости Asterisk готов к быстрому старту.
Отличная масштабируемость.
Очень утомительно постоянно возвращаться к одному и тому же вопросу. Такое часто бывает в случае некачественного исполнения работ или выбора заведомо неподходящего бизнес-решения. С Asterisk точно не будет такой проблемы! Телефонная станция, построенная на Asterisk может быть масштабируема до немыслимых размеров. Главное – правильно подобрать оборудование.
Повышает управляемость бизнеса.
Asterisk дает не просто набор полезных функций, он повышает управляемость организации, качества и комфортности управления, а также увеличивает прозрачность бизнеса для руководства. Достичь этого можно, например, за счет автоматизации отчетов, подключения бота в Telegram, санкционированного доступа к станции из любой точки мира.
Снижает расходы на связь.
Связь между внутренними абонентами IP-АТС бесплатна всегда, независимо от их географического расположения. Также к Asterisk можно подключить любых операторов телефонии, в том числе GSM сим-карты и настроить маршрутизацию вызовов по наиболее выгодному тарифу. Всё это позволяет экономить с первых минут пользования станцией.
Характеристики
-
Свойства IP-телефонов
-
100 Мбит/с, Fast Ethernet
-
2 порта Ethernet, Поддержка PoE, HD звук, Крепление на стену
-
Программируемые BLF клавиши
-
Участников конференц-вызова
(чел.)
Описание
Данная модель телефона снята с производства. Аналог — Yealink SIP-T31P без БП
Yealink SIP-T40P — бюджетный IP-телефон топовой 4-й серии. SIP-T40P обеспечивает HD аудио звучание через трубку и динамик громкой связи. Высочайшее качество звонков поддерживается благодаря технологии Yealink Оптима HD с подавлением эха, адаптивный буфером джиттера и использованию широкополосных кодеков. Yealink SIP-T40P также имеет гнездо для подключения гарнитуры и порт EHS для поддержки беспроводной гарнитуры. IP-телефон прекрасно подготовлен для работы с самыми популярными телефонными системами, такими как Asterisk, 3CX и др.
Yealink SIP-T40P поддерживает 3 SIP линии и оснащен тремя клавишами линий с двойной цветной индикацией, которые можно использовать по усмотрению для различных функций, таких как доступность линии, BLF, быстрый набор и информация о присутствия абонента. Пять полноценных функциональных клавиш отвечают за доступ к сообщением, ответ через гарнитуру, отключение звука, повторный набор и ответ по громкой связи. SIP-T40P обеспечен двойным сетевым коммуникатором с поддержкой PoE.
Адаптер питания в комплект поставки не входит!
Технические характеристики телефона
Основные функции телефона
- 3 SIP-аккаунта
- Удержание, отключение микрофона, DND («Не беспокоить»)
- Быстрый набор, горячая линия
- Переадресация, режим ожидания, трансфер
- Групповое прослушивание, SIP SMS, экстренные вызовы
- 3-сторонняя конференция
- Выбор мелодии/загрузка/удаление
- Настройка времени: автоматически или вручную
- Правила набора
- XML-браузер, Action URL/URI
- RTCP-XR, VQ-RTCPXR
Экран и индикаторы
- Графический 2.3″ LCD-экран с разрешением 132х64
- LED-индикатор питания и MWI
- Индикаторы состояния линий с красно-зеленой подсветкой
- Поддержка нескольких языков
- Caller ID с именем и номером
- Энергосбережение
Функциональные кнопки
- Клавиатура с русскими и английскими буквами
- 3 кнопки линий с индикаторами
- 6 навигационных клавиш
- Клавиши регулировки громкости
- 5 функциональных клавиш: гарнитура, повторный набор номера, громкая связь, голосовая почта, вкл/откл микрофона
Кодеки и настройки голоса
- HD voice
- Широкополосные кодеки: G.722, Opus
- Кодеки: G.711 (A/u), G.729AB, G.726, iLBC
- DTMF: In-band, Out-of-band (RFC2833), SIP INFO
- Full-duplex (полнодуплексная) громкая связь с AEC (подавление эха)
- VAD (обнаружение активности голоса), CNG (генератор комфортного шума), AEC (подавление эха), PLC (маркирование потери пакета с медиа-данными), AJB (адаптивный буфер для голосовых пакетов), AGC (автоматическая регулировка чувствительности микрофона)
Записные книги
- Локальная записная книга до 1000 контактов
- Черный список
- Удаленная записная книга XML, LDAP
- Интеллектуальный поиск
- Поиск по записным книгам, импорт/экспорт локальной записной книги
- История вызовов: набранные/принятые/пропущенные/переадресованные
Интеграция с IP-АТС
- Анонимный вызов, отклонение анонимных вызовов
- BLF
- BLA
- Hot-desking, экстренный вызов, интерком, paging, music on hold, напоминание
- MWI, напоминание, запись разговора
- Голосовая почта, парковка вызова, захват вызова
Управление
- Настройка телефона: веб-интерфейс/экран телефона/Autoprovision
- FTP/TFTP/HTTP/HTTPS/PnP Autoprovision
- Zero-sp-touch, TR069
- Блокировка клавиатуры
- Сброс к настройкам по умолчанию, перезагрузка
- Логи: PCAP Trace, system log
Сетевые характеристики и безопасность
- SIPv1 (RFC2543), SIPv2 (RFC3261)
- NAT, STUN
- Способы вызова: Proxy и peer-to-peer (по IP-адресу)
- Получение IP: Статический/DHCP
- HTTP/HTTPS-сервер
- Синхронизация времени и даты через SNTP
- UDP/TCP/DNS-SRV (RFC3263)
- QoS: 802.1p/Q tagging (VLAN), Layer 3 ToS DSCP
- Поддержка TLS
- Управление HTTPS-сертификатами
- AES шифрование конфигурационных файлов
- Поддержка стандартов шифрования и идентификации (MD5 и MD5-sess)
- SRTP (Внимание! В продуктах, предназначенных для стран-участников Таможенного союза, данный функционал отсутствует.)
- Поддержка IEEE802.1X
- Поддержка IPv6
- LLDP/CDP/DHCP VLAN
Физические характеристики
- Крепление к стене
- 2хRJ45 Ethernet-порта 10/100Мбит/с
- POE (IEEE 802.3af), class 2
- 1хRJ9 для подключения трубки
- 1хRJ9 для подключения гарнитуры
- 1xRJ12 EHS-порт
- Блок питания: Вход 100-240V AC, Выход 5V, 0.6А
- Потребление через блок питания: 1.0 – 1.3W
- Потребление через POE: 1.4 — 3.2W
- Размеры (Ш*Г*В*Т): 212мм*189мм*175мм*54мм
- Рабочая влажность: 10~95%
- Рабочая температура: -10~50˚C
Упаковка и габариты
| Размеры индивидуальной упаковки, мм | 246x223x120 |
| Вес индивидуальной упаковки, кг | 1.355 |
| Размеры коробки, мм | 620x256x233 |
| Количество штук в коробке | 5 |
| Вес брутто коробки, кг | 6.4 |
| Объём коробки, куб.м | 0.04 |