
9650-0209-29
Бифазный — 1
Версия А
ПРЯМОУГОЛЬНЫЙ ДВУХФАЗНЫЙ
ДЕФИБРИЛЛЯЦИОННЫЙ ИМПУЛЬС
Общая информация
Введение
Существуют дефибрилляторы M Series
®
с усовершенствованной электрической конструкцией, обеспечивающей
уникальную бифазную форму импульса дефибрилляции и кардиоверсии. В этой опции электроэнергия
дефибриллятора передается в двух последовательных фазах тока (напряжения) противоположной полярности. Этот
тип формы волны дефибриллятора обычно называется «бифазным» в противопоставление более ранней
«монофазной» демпфированной синусоидальной волне, присущей для большинства имеющихся в продаже
дефибрилляторов.
Прямолинейный бифазный импульс дефибриллятора ZOLL M Series имеет уникальные характеристики,
предназначенные для получения оптимальных клинических результатов и проверенные в многоцентровых
клинических испытаниях. Клинические испытания продемонстрировали, что эта форма дефибрилляционного
импульса клинически эффективна как для дефибрилляции, так и для синхронизированной кардиоверсии.
В настоящем вкладыше объясняется, чем прямоугольный бифазный импульс дефибриллятора M Series отличается
от монофазного импульса в виде демпфированной синусоиды других приборов M Series. Его следует использовать
совместно с руководством по эксплуатации для дефибрилляторов M Series. Важная информация по технике
безопасности, относящаяся к общему использованию M Series, дается в разделе «Рекомендации по технике
безопасности» руководства по эксплуатации дефибрилляторов M Series.
Показания к применению M Series с прямолинейным бифазным импульсом
Приборами ZOLL M Series с бифазным импульсом должен пользоваться только квалифицированный медицинский
персонал для проведения преобразования жизнеугрожающих аритмий: вентикулярной фибрилляции (VF) и/или
вентикулярной тахикардии (VT), в нормальный синусовый ритм или другие сердечные ритмы, обеспечивающие
гемодинамическую стабильность.
Кроме того, этот прибор должен использоваться в синхронизированном режиме только квалифицированным
медицинским персоналом для устранения фибрилляции предсердий (AF) на более низких значениях дозы энергии и
силы тока, чем у монофазных дефибрилляторов. Квалифицированный врач должен решить самостоятельно, когда
необходима синхронизированная кардиоверсия.
Этот прибор также должен использоваться в синхронизированном режиме только квалифицированным медицинским
персоналом для электроимпульсной терапии вентикулярной тахикардии (VT). Квалифицированный врач должен
решить, когда необходима синхронизированная кардиоверсия.
Прямолинейный бифазный импульс (RBW) прошел успешную проверку в многоцентровых рандомизированных
клинических испытаниях эффективности трансторакальной дефибрилляции VT/VF и AF, которые подтвердили
возможность и эффективность проведения бифазной дефибрилляции и кардиоверсии у взрослых пациентов при
более низких значениях дозы энергии и силы тока, чем у существующих монофазных приборов. Бифазный импульс
M Series имеет широкий диапазон доз энергии, выбираемых пользователем, включая более низкие значения
энергии, чем те, которые были использованы во время клинических испытаний.
Автоматический (АНД) и консультативный режимы дефибрилляции следует использовать только при
подтвержденном диагнозе фибрилляции желудочков у пациентов со следующими симптомами:
пациент должен быть без сознания.
у пациента должна быть остановка дыхания (не дышит).
у пациента должен отсутствовать пульс.
ВНИМАНИЕ
Нельзя использовать автоматический режим для пациентов младше
8 лет (В соответствии с Рекомендациями АНА по сердечно-легочной
реанимации взрослых и автоматической дефибрилляции 3-5, 1998 г.)
- Manuals
- Brands
- ZOLL Manuals
- Medical Equipment
- M Series
- Service manual
-
Contents
-
Table of Contents
-
Troubleshooting
-
Bookmarks
Quick Links
M Series
®
Service Manual
9650-0450-01 Rev.U
Related Manuals for ZOLL M Series
Summary of Contents for ZOLL M Series
-
Page 1
M Series ® Service Manual 9650-0450-01 Rev.U… -
Page 2
Service Manual (REF 9650-0450-01 Rev. U) is July, 2014. If more than 3 years have elapsed since this date, contact ZOLL Medical Corporation to determine if additional product information updates are available. Copyright © 2013 by ZOLL Medical Corporation. All rights reserved. AutoPulse, Base Power Charger, CPR-D-padz, M Series, Pedi-padz, Protocol Assist Code Markers, Real CPR Help, Rectilinear Biphasic, RescueNet, See-Thru CPR, SmartAlarms, Stat-padz, SurePower, and ZOLL, are trademarks or registered trademarks of ZOLL Medical Corporation in the United States and/or other countries. -
Page 3: Table Of Contents
Overview …………………………….1-1 Before You Begin the Maintenance Tests………………….. 1-2 Equipment that You Need to Perform the M Series Maintenance Tests ………….. 1-3 Equipment You Need for the M Series Options Maintenance Tests…………..1-3 Physical Inspection of the Unit ……………………..1-5 Front Panel Button Test ……………………….
-
Page 4
Troubleshooting………………………….. 2-2 ZOLL M Series Error Messages……………………..2-5 Chapter 3 Replacement Parts Replacement Parts…………………………3-2 Parts Diagrams…………………………..3-9 Chapter 4 Functional Description Main System Board…………………………4-2 Main System Board Functions ……………………..4-4 Power Supply …………………………..4-5 ECG Front End …………………………..4-6 Multifunction Electrode (MFE)/PADS (System Board and High Voltage Module) ………. -
Page 5
Chapter 5 Disassembly Procedures Required Equipment…………………………5-2 Safety Precautions…………………………5-2 ZIF Keeper Instructions……………………….5-3 Upper Housing Removal ……………………….5-12 System Board Assembly Removal……………………5-13 Battery Interconnect Board Assembly Removal………………..5-15 Biphasic High Voltage Module Removal………………….. 5-16 AC/DC Charger Removal……………………….5-19 Bridge Assembly Removal……………………….. -
Page 6
9650-0450-01 Rev. U… -
Page 7
Chapter 3—Disassembly Procedures describes step-by-step procedures for removing subassemblies from the M Series unit. Chapter 4—Replacement Parts List displays a complete list of ZOLL part numbers for field replaceable parts available for the M Series unit, allowing the service person to identify and order replacement parts from ZOLL. -
Page 8
ZOLL Battery Charging/Testing unit. Do not use the M Series in the presence of flammable agents (such as gasoline), oxygen-rich atmospheres, or flammable anesthetics. Using the unit near the site of a gasoline spill may cause an explosion. -
Page 9
• Purchase Order for a unit with an expired warranty. If the unit needs to be sent to ZOLL Medical Corporation, obtain a service order request number from the Technical Service representative. Return the unit in its original container to: ZOLL Medical Corporation… -
Page 10
Technical Service for International Customers International customers should return the unit in its original container to the nearest authorized ZOLL Medical Corporation Service Center. To locate an authorized service center, contact the International Sales Department at ZOLL Medical at the above address. -
Page 11: Chapter 1 Maintenance Tests
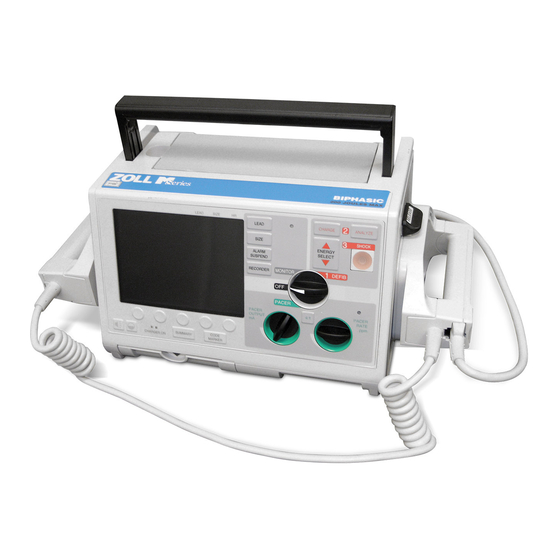
The M Series has two checkout procedures: the operator’s shift checklist and the extensive six-month maintenance tests checkout procedures. Because the M Series units must be maintained ready for immediate use, it is important for users to conduct the Operator’s Shift Checklist procedure at the beginning of every shift.
-
Page 12: Before You Begin The Maintenance Tests
Assemble the tools or specialized testing equipment listed in the “Equipment You Need to Perform the Maintenance Tests” section shown below. • Keep an extra fully charged ZOLL M Series compatible battery available. • Schedule an hour to conduct the entire maintenance test.
-
Page 13: Equipment That You Need To Perform The M Series Maintenance Tests
Be sure to follow the manufacturer’s recommendations for conducting the maintenance tests. We recommend the use of the following equipment when performing M Series Maintenance Tests: ZOLL Medical Electrode Adapter from Fluke Biomedical (ZOLL Part Number 3010-0378).
-
Page 14
Fluke Biomedical Cufflink Analyzer (if NIBP option is installed) IBP Temperature Simulator 9100-0402-TF • DNI Nevada 214B Patient SImulator, with M Series interface cable • The Fluke Biomedical BP Pump NIBP Monitor Analyzer and the Fluke Biomedical BP Pump NIBP Analyzer use different technologies for testing NIBP monitors and therefore, the manual provides two different procedures for performing the NIBP Volume Leak test with each of these types of test equipment. -
Page 15: Physical Inspection Of The Unit
M Series Service Manual 1.0 Physical Inspection of the Unit Tools Needed: Battery. Test Setup: None. Observe this… Pass/Fail/NA Housing Is the unit clean and undamaged? Does the unit show signs of excessive wear? Does the handle work properly? Does the recorder door open and close properly?
-
Page 16
M Series Service Manual Observe this… Pass/Fail/NA 1.15 Is the battery seated in the battery well correctly? Record your results on the Maintenance Test Checklist. 9650-0450-01 Rev. U… -
Page 17: Front Panel Button Test
M Series Service Manual 2.0 Front Panel Button Test Tools Needed: QED 6 Defibrillator Analyzer Test Setup: Install strip chart paper into the recorder tray. Install the battery in the unit or connect the A/C power cord to the unit and then plug the cord into an electrical outlet.
-
Page 18
M Series Service Manual Do this… Verify that… Pass/Fail/ Press the INC softkey. The bar graph appears on the display, indicating an increase in volume. Note: This action does not increase the volume of the unit’s audio prompts. 2.10 Press the DEC softkey. -
Page 19
M Series Service Manual Do this… Verify that… Pass/Fail/ Press and release the ENERGY SELECT up The following selections appear: Verify the following energy amounts display 2.22 o o o arrow 19 times. incrementally: Biphasic:2-10, 15, 20,30, 50, 75, 100,120, 150, 200J Monophasic (DSW): 2-10, 15,20,30,50,75, 100, 150, 200, 300, 360J. -
Page 20: 3, 5, And 12 Leads Test
Tools Needed: 3 lead, 5 lead, and 12 lead cables. Test each cable separately. QED 6 Defibrillator Analyzer. Test Setup: The M Series unit must be configured to display ECG LEAD OFF message. Connect the lead wires appropriate to each test to the QED 6 Defibrillator Analyzer .
-
Page 21: Power Supply Test (Optional)
Set the power supply voltage to 7V. Caution Be sure to connect the power supply properly to the M Series battery well terminals or damage to the unit may result. Do NOT raise the power supply voltage above 12V .
-
Page 22
M Series Service Manual 15 Amp Battery Well Supply Black Do this… Verify that… Pass/Fail Turn the selector switch to MONITOR. The unit does not turn on. (For AED units, turn the selector switch to ON and select Manual mode.) Turn the selector switch to the OFF position. -
Page 23
M Series Service Manual Test Setup: Remove red lead from power supply and connect to 0.1ohm resistor. Connect other end of resistor to “+” terminal of power supply using a second red label. Connect multimeter across the resistor. Set voltage scale (if DVM is not autoranging) to 220mV. -
Page 24
M Series Service Manual Do this… Verify that… Pass/Fail Turn the selector switch to MONITOR. (For Voltage across resistor should be 80 mV or less (<800 mA of ON current). AED units, turn the selector switch to ON and Note: Without optional parameters. -
Page 25: Leakage Current Test
M Series Service Manual 5.0 Leakage Current Test Tools Needed: See the manufacturer’s instructions or supplied specifications for the leakage tester you use. Test Setup: See the manufacturer’s instructions or supplied specifications for the leakage tester you use. Repeat leakage test with accessories: MFC, external paddles, and anterior/posterior paddles.
-
Page 26: Paddles Test (If Applicable)
M Series Service Manual 6.0 Paddles Test (If applicable) Tools Needed: QED 6 Defibrillator Analyzer. Test Setup: If applicable, connect the universal cable to the paddles and place the paddles in paddle wells. Do this… Verify that… Pass/Fail/NA Turn the selector switch to DEFIB (For AED The energy selection decreases to 1J.
-
Page 27: Heart Rate Display Test
M Series Service Manual 7.0 Heart Rate Display Test Tools Needed: ECG Cable (3 or 5 leads). • QED 6 Defibrillator Analyzer. • Test Setup: Turn the selector switch to MONITOR (For AED units, turn the selector switch to ON and select Manual override.) Press LEAD button until “I”…
-
Page 28: Calibrating Pulses On Strip Chart Test
M Series Service Manual 8.0 Calibrating Pulses on Strip Chart Test Tools Needed: None Test Setup: None Do this… Verify that… Pass/Fail/NA Press the RECORDER button. Press and hold SIZE button to activate the The strip chart displays a signal of 300 ppm with an amplitude of 10 mm +/- 1 o o o calibration signal.
-
Page 29: Notch Filter Test
M Series Service Manual 9.0 Notch Filter Test Tools Needed: QED 6 Defibrillator Analyzer. Test Setup: Connect the ECG cable to the QED 6 Defibrillator Analyzer. Connect the ECG cable to the unit Do this… Verify that… Pass/Fail/NA Turn the selector switch to MONITOR mode.
-
Page 30: Heart Rate Alarm Test
M Series Service Manual 10.0 Heart Rate Alarm Test Tools Needed: QED 6 Defibrillator Analyzer Do this… Verify that… Pass Fail/NA 10.1 Turn the selector switch to MONITOR mode. The monitor screen displays the Lead II message and the waveform for NSR o o o ECG at 120 BPM +/- 2…
-
Page 31
M Series Service Manual Do this… Verify that… Pass Fail/NA 10.13 Press the ALARM SUSPEND button on the M The alarm is suspended for 90 seconds. The unit displays the alarm symbol o o o Series unit. with an “X” through it, and the heart symbol flashes with each QRS wave. -
Page 32: Defibrillator Self Test
M Series Service Manual 11.0 Defibrillator Self Test WARNING! SHOCK HAZARD! TAKE THE NECESSARY PRECAUTIONS TO GUARD AGAINST SHOCK OR INJURY BEFORE YOU START CONDUCTING THE DEFIBRILLATOR TESTS. Keep hands and all other objects clear of the multi-function cable connections and defibrillator analyzer when discharging the defibrillator.
-
Page 33
M Series Service Manual Note: The universal cable should not be connected to any equipment at the beginning of this test. Do this… Verify that… Pass/Fail 11.1 Turn the selector switch to DEFIB mode. The unit displays the CHECK PADS/POOR PAD CONTACT message. -
Page 34: Synchronized Cardioversion Test
M Series Service Manual 12.0 Synchronized Cardioversion Test Tools Needed: QED 6 Defibrillator Analyzer. Test Setup: 1. Connect the universal cable via the adapter (D.N.I #3010-0378) to the defibrillator analyzer. Set ECG on analyzer to 60 -120 BPM. Do this…
-
Page 35: Shock Test
M Series Service Manual 13.0 Shock Test Tools Needed: QED 6 Defibrillator Analyzer, Stop Watch. Test Setup: Connect the universal cable via the adapter (D.N.I #3010-0378) to the defibrillator analyzer. Ensure that a fully charged battery is installed in the unit.
-
Page 36
M Series Service Manual Do this… Verify that… Pass/Fail/NA 13.10 Press the SHOCK button. The unit discharges 83J-122J (monophasic 85J-115J) into the simulator. o o o 13.11 Press the ENERGY SELECT up arrow until the The unit displays the message, DEFIB 200J SEL. -
Page 37
M Series Service Manual Do this… Verify that… Pass/Fail/NA 13.23 Press the SHOCK button. On the strip chart, the Patient Current is between 20-24 Amps, and the Defib o o o Impedance is between 46-54 Ohms. Note: This will occur if configured to Auto-Generate Strips on event. -
Page 38: Summary Report Test
M Series Service Manual 14.0 Summary Report Test Tools Needed: QED 6 Defibrillator Analyzer. Test Setup: Connect the universal cable to the QED 6 analyzer. If you are using paddles, place the paddles on the analyzer’s discharge plates. Do this…
-
Page 39: Advisory Message Test
M Series Service Manual 15.0 Advisory Message Test Tools Needed: QED 6 Defibrillator Analyzer. Test Setup: 1. Connect the universal cable via the adapter (D.N.I #3010-0378). Attach the M Series to the QED 6 Defibrillator Analyzer. Do this… Verify that… Pass/Fail 15.1 Turn the selector switch to DEFIB mode.
-
Page 40: Pacer Test
Note: The following tests are to be performed only on M Series units equipped with the optional pacing function. The pacer output can be measured using an oscilloscope set to DC coupling connected across a load resistor. (See diagram in column for universal cable connector polarity.) The load resistor is a 100 ohm, 5 watt or greater.
-
Page 41
Pacer rate on QED 6 analyzer is 177-183 ppm. 16.10 Connect the ECG cable to the M Series and The unit displays ECG at 60 BPM with no stimulus markers. QED 6 analyzer. Select the ECG at 58 BPM on the QED 6 analyzer. -
Page 42: Spo2 Monitor Test
17.3 Press the 02+ or 02- softkey of the simulator The SpO reading of 98 +/- 1% appears on the M Series monitor. until the SpO output is at 98%. Note: You may need to wait up to 2 minutes for the information to appear on the ZOLL display.
-
Page 43
The SpO simulator screen displays an SpO saturation rate of 70-74%. BPM- softkey until the heart rate is at 230 BPM. The M Series monitor displays a heart rate in the heart position of 226-234 BPM. 17.10 Remove the Masimo patient cable. -
Page 44: Etco2 Monitor Test
The EtCO reading of 34-42mmHg displays on the M Series monitor. The Respiration Rate (RR) of 22-24 displays on the M Series monitor. Note that you may need to wait up to 10 seconds for the unit to stabilize. 1-34…
-
Page 45
M Series Service Manual Do this… Verify that… Pass/Fail 18.5 Press WAVE 2 softkey Verify the EtCO waveform displays. For CCT units: Press the Trace softkey, select SET TRACE 2, and press Enter. Select EtCO press Enter. 18.6 Press the RECORDER button. -
Page 46: Temperature Test
Test Setup: None Do this… Verify that… Pass/Fail 19.1 Connect the 2-channel Y adapter to the temperature connector (T1/T2) on the M Series CCT Unit. 19.2 Connect the Temperature Probe Simulator cables to the 2-channel Y adapter. 19.3 On the Temperature Simulator, set the T1 Verify that the value displayed for the T1 temperature channel between 59.0…
-
Page 47: Ibp Monitoring Test
M Series Service Manual 20.0 IBP Monitoring Test Tools Needed: DNI Nevada 214B Patient Simulator with M Series interface cables, FOGG Transducer Simulator Test Setup: Set the BP output sensitivity scale to 5 uV/V/mmHg on the Patient Simulator Connect the Patient Simulator to the IBP connector on the M Series CCT unit Do this…
-
Page 48
Verify the unit displays the Traces menu. o o o 20.14 Select the Set Trace 2 option and press the Verify the M Series CCT unit displays the Trace Options menu. o o o Enter softkey. 1-38 9650-0450-01 Rev. U… -
Page 49
M Series Service Manual Do this… Verify that… Pass/Fail 20.15 Verify the M Series CCT unit displays the Trace Verify the unit assigns the P1 waveform to the second trace display area and o o o Options menu. returns to the main menu. -
Page 50
M Series Service Manual Do this… Verify that… Pass/Fail 20.28 Set the input and output resistance to 350 ohms on the Transducer Simulator, and set the gain to x10. Connect the Transducer Simulator cable to the P1 connector on the unit and on the Pressure Transducer Simulator, set the pressure polarity to positive, and select a pressure of 200 mmHg. -
Page 51
-200 mmHg. 20.38 Zero the pressure channel. The M Series CCT unit calibrates the pressure channel against a negative o o o pressure of -200 mmHg and displays the P2 ZEROED message. 20.39… -
Page 52: Nibp Volume Leak Test With Fluke Biomedical Nibp Analyzer
Verify that… Pass/Fail 21.1 Turn the Selector Switch to OFF. The M Series unit powers on in the NIBP Service Mode. o o o After 10 seconds, press and hold the fourth softkey from the left and turn the Selector Switch to MONITOR (For AED units, turn the selector switch to ON).
-
Page 53
• Displays no Volume Leak reading, but maintains a stable pressure reading at or above 200 mmHg, then the M Series unit has passed the test; there is no volume leak. In addition, the M Series unit displays the simulator’s pressure reading in the “Cuff Pressure”… -
Page 54: Nibp Transducer Calibration Test
0 mmHg. The field adjacent to the 0 mmHg value changes to PASS. pressure reading. Note: If the M Series unit displays a FAIL reading, verify the NIBP simulator’s pressure setting and connection to the M Series and repeat the step.
-
Page 55
(for example, 205 mmHg). 22.8 On the M Series unit, press the Read Cuff The value that the M Series unit displays is accurate within +/- 3mmHg of the o o o softkey when the simulator’s Measured screen pressure parameter value set on the NIBP simulator. -
Page 56: Nibp Monitor Test
NIBP Simulators may produce a reading on the NIBP monitor that is shifted from the simulator’s setting. The offset value must be established based on a statis- tical sample of monitors and readings. Please contact ZOLL Technical Support if you require assistance establishing the offset of the simulator and test set-up that you are utilizing.
-
Page 57
These values only apply for test set-ups utilizing the BP Pump 2 Simulator. Variations of the test set-up or different simulators may produce readings outside the provided values and will require end-user facility to establish the appropriate offset and tolerances. Please contact ZOLL Technical Support i f you require assistance establishing the offset o f y o u r simulator and test set-up. -
Page 58: Bluetooth Test
24.0 Bluetooth Test Tools Needed: USB Bluetooth dongle with driver CD. Bluetooth application software BlueSoleil. Test Setup: Verify that the M Series unit is configured as follows: Bluetooth — INSTALLED; Bluetooth Baud Rate — 115200. Do this… Verify that… Pass/Fail 24.1…
-
Page 59
M Series Service Manual Do this… Verify that… Pass/Fail 24.9 Click on the Serial Port Icon that is highlighted Verify the following: o o o at the bottom of the window At the bottom of the window it states Connected, The file transfer window pops up and the file upload progress bar goes to 100%. -
Page 60
M Series Service Manual 1-50 9650-0450-01 Rev. U… -
Page 61: Overview
Troubleshooting tables for ECG Leads Off Messages and Monitor Displays • ZOLL M Series Error Messages • If the problems you encounter are not listed below, call ZOLL Medical Corporation’s Technical Service Department for further assistance. (See page vii for contact information.) 9650-0450-01 Rev. U…
-
Page 62
M Series Service Manual Troubleshooting The following tables show the most common troubleshooting issues and their solutions. First, attempt to solve the problem with “Recommended User Action.” If these steps do not solve the problem, follow the steps listed in the “Recommended Technical Action”… -
Page 63
• Remove and replace the system board. defibrillator cable. • Call ZOLL Technical Support for • If the DEFIB PAD SHORT message does not display, assistance. remove the defibrillator from service. -
Page 64
Electronic interference. Check for possible excessive radio frequency interference. • Turn off sources of excessive RFI. Move patient cables away from other electrical equipment. • Move M Series unit away from RFI source. 9650-0450-01 Rev. U… -
Page 65: Zoll M Series Error Messages
ZOLL M Series Error Messages The following is a list of ZOLL M Series error messages that may appear on your display. The “User Advisory” column informs you about an action in progress or provides feedback on a user correctable situation that typically does not require further technical support. The “Technical Action” column describes what you as a technician can do to correct the situation.
-
Page 66
M Series Service Manual User Error Message Explanation Technical Action Advisory AUDIO NOT Audio is not recording. Install PCMCIA card. Replace RECORDING system board. AUDIO QUEUE FULL Indicates that the audio output queue is full. Additional None. voice prompts can’t be queued at this time. -
Page 67
M Series Service Manual User Error Message Explanation Technical Action Advisory BRIDGE TEST FAILED Biphasic module not operating properly while charging. Charge again. Attempt to clear the message by turning the Selector switch to OFF, then back to the desired operating mode. -
Page 68
M Series Service Manual User Error Message Explanation Technical Action Advisory CHECK PADS Message displayed in conjunction with either POOR PAD Ensure pads are coupled to CONTACT or DEFIB PAD SHORT. patient. Check /replace pads and universal cable. Replace system board. -
Page 69
M Series Service Manual User Error Message Explanation Technical Action Advisory CONFIRM MANUAL Displayed when manual mode is entered. Alerts user to MODE confirm that manual mode is desired. DEFIB DISABLED User prompt issued simultaneously with other faults if defib Possible configuration problem. -
Page 70
M Series Service Manual User Error Message Explanation Technical Action Advisory DEFIB FAULT 85 “Lower” discharge transistor shorted (measured via Replace high voltage module. applicable A/D channel). DEFIB FAULT 86 One discharge switch closed during power up test. Replace paddles, control board or system board. -
Page 71
M Series Service Manual User Error Message Explanation Technical Action Advisory ECG FAULT 4 Communication fault between ECG processor and main Turn off unit and then turn on to processor. reset. If fault persists, replace system board. ECG FAULT 5 ECU RAM test failure, or ROM checksum test failure. -
Page 72
Turn off unit and then turn on to reset. If fault persists, replace system board. EtCO COM ERROR No or invalid communication from EtCO module. Return unit for service to ZOLL Technical Service Department. FAX DIALING Preparation for sending fax. FAX DONE Transmission complete. -
Page 73
M Series Service Manual User Error Message Explanation Technical Action Advisory PACER DISABLED User prompt issued simultaneously with other pace faults if Replace high voltage module or pacing is disabled. system board. PACER FAULT 115 Flyback pulse width control circuit is not under proper Replace high voltage module, control of the processor and gate array. -
Page 74
M Series Service Manual User Error Message Explanation Technical Action Advisory POOR LEAD CONTACT One or more ECG leads are poorly connected or not Check electrode attachment to connected to patient. (User configurable.) patient, cable connector to electrode, cable to unit connector. -
Page 75
M Series Service Manual User Error Message Explanation Technical Action Advisory RELEASE BUTTONS Simultaneous external paddle button presses detected before Release buttons. unit reached full defib charge (ready state). RELEASE SHOCK Discharge switch(es) closed when pressing charge button. -
Page 76
M Series Service Manual User Error Message Explanation Technical Action Advisory SET CLOCK Real time clock failure: invalid date or time. Set date and time and/or replace system board. SET PACE mA Multiple copy errors are the product of intended software or Set pace current. -
Page 77
M Series Service Manual User Error Message Explanation Technical Action Advisory SYSTEM FAULT 5 ECU RAM test failure or ROM checksum test failure. Turn off unit and then turn on to reset. If fault persists, replace system board. SYSTEM FAULT 6 No communications received from ECU for 4 seconds. -
Page 78
M Series Service Manual User Error Message Explanation Technical Action Advisory USE ROOM AIR Adapter zeroing started with EtCO in the adapter or the Place CO sensor on adapter in ADAPTER adapter is on the REF or “0” cell. -
Page 79: Replacement Parts
This section contains a listing of the replacement parts available for the ZOLL M Series devices. Replacement parts may be ordered through an authorized ZOLL distributor or directly from ZOLL Medical Corporation. The prices for parts are available from ZOLL Medical Corporation’s Technical Service Department.
-
Page 80
M Series Service Manual Replacement Parts Item numbers correspond to the parts diagrams beginning on page 3-9. Description Part Number Item # SHIELD, HOUSING, IPX4 9330‐0294 ASSEMBLY, SEQ‐5, PREP CHASSIS, M SERIES 1011‐0090 SCR,#4‐40,MCH,3/8″,PNH,PHL,STL,ZNC,EXT, RoHS 0163‐0992 PLATE, SUPPORT, PCMCIA 9320‐0304 ASSEMBLY, PCMCIA, W/PLATE, IPX4 1001‐0421 PIVOT, LOWER LATCH, REVIVER 9320‐0065 SPACER, LOWER LATCH 9320‐0315 PADDLE, LOWER LATCH, REVIVER 9310‐0511 ASSY, BEZEL W/ SHIELDS, IPX4 1001‐0420 HEATSINK, ISOLATOR, M‐SERIES… -
Page 81
M Series Service Manual Description Part Number Item # NUT, KEPS, 4‐40, SS, RoHS 0163‐0285 CABLE, RECORDER 9500‐0400 GASKET, PRINTHEAD CABLE 9330‐0314 SUPPORT, PRINT HEAD 9310‐0510 SCR,#6‐32,MCH,3/8″,PNH,PHL,STL,ZNC,EXT, RoHS 0163‐0912 ASSY, PRINT HEAD 1001‐0101 PIVOT, PRINTHEAD 9320‐0401 ASSY,PAPER TRAY‐OUT SENSOR 1001‐0131 REWORK, LEAFSPRING, PRINTHEAD, M SERIES 9320‐0300‐99 BRUSH, STATIC DISSIPATION, REVIVER 9340‐0102 SCR,#4‐40,MCH,3/8″,PNH,PHL,SST, RoHS 0163‐0153 WASHER, FLAT, #4, SS, RoHS 0163‐0016 Spring Tension, Recorder Drawer 0190‐0101 ASSY,CABLE,LAMINATE JUMPER,A67,MILITARY 9500‐0573 ASSY,CABLE,LAMINATE JUMPER,A51,MILITARY 9500‐0572 CLIP, CONNECTOR 9310‐0573… -
Page 82
M Series Service Manual Description Part Number Item # GASKET, CONN PANEL, M‐SERIES 9330‐1334 ASSY, PAPER TRAY 1001‐0103 CAPACITOR SUPPORT, BI‐PHASIC 9320‐0170 CABLE, FLAT 20POS, SHIELDED, BIPHASIC, M‐SERIES 9500‐0550‐90 TAPE KAPTON, 1 ¼» WIDE, 0.0025″ THICK 36 YDS LONG 0550‐0003 ASSY, BRIDGE/CAP, BI‐PHASIC 1001‐0182 ASSY, EPAC, BI‐PHASIC 1001‐0181 ASSY, SPO MODULE, W/HEATSINK, MSERIES 1001‐0205 ASSY, CABLE, INTERNAL, SPO , OVERMOLDED 1001‐0160 CABLE, MFC TO HVM, M SERIES 9500‐0782 ASSY, CABLE, INTERNAL, ETC02 9500‐0541 ASSY, MODULE 2,EtCO /ISO POWER 1001‐0015 CABLE ISOLATED POWER TO SPO 9500‐0102 ASSY ISOLATOR HV FOLDED 1001‐0146 ASSY, PCB, CONNECTOR, EtCO… -
Page 83
M Series Service Manual Description Part Number Item # NUT.HEX.0.3125‐32X0.375″.BRS.NI.0.0937″THK 0163‐0274 CABLE, ACCESS DETECT, RS232, AND LOW LEVEL SIGNAL 9500‐0552‐02 ADHESIVE LOCTITE THREADLOCKER 222 0550‐0118 ORING.BUNA‐N.0.354″.0.032″ DIA.70 DURO 0160‐6833 ASSY, PCB, OUTPUT ESD, RS232 9301‐0354 ASSY, GROUND WIRE 9500‐0302 NUT, KEPS, 6‐32, STL, ZI, SM PATTERN EXT STAR, RoHS 0163‐0284 GROUNDING POST (CUSTOM SCREW MACHINE) 9320‐0301 SCR.PPH.6‐32X.0.375″..ZI.HI/LO RoHS 0163‐1230 ASSY, AC RECEPTACLE 1001‐0114 STDF.F/F.0.025″RND.0.125″..NYL.. 0160‐0002 GASKET, AC/DC RECEPTACLE, M‐SERIES 9330‐0316 ASSY, AC CHARGER W/HEATSINK 1001‐0108‐02 GASKET, BATTERY PIN 9330‐0317 ASSY BATTERY INTERCONNECT,PCB,COATED 9301‐0303 CABLE, LAMINATE JUMPER 9500‐0511… -
Page 84
M Series Service Manual Description Part Number Item # ADHESIVE, BARRIER, SPEAKER 9330‐0324 BRACKET, SPEAKER MOUNT 9320‐0409 ASSY, UPPER HOUSING 1001‐0126 ASSY, HEAT SPREADER, UPPER HSG, M‐SERIES 1001‐0206 WASHER, EXT, #6, SS, RoHS 0163‐0027 STANDOFF W/EXT.THREAD 9160‐0010 SCR,#6‐32,MCH,3/8″,PNH,PHL,STL,ZNC,INT, RoHS 0163‐0922 ASSY, EXTERNAL MODULE, BLUETOOTH, M‐SERIES 1001‐0502 PANEL, FRONT, PUSHBUTTON, REVIVER 9310‐0549 DIFFUSER, REVIVER 9310‐0590 CLIP, CONNECTOR 9310‐0573 CABLE, FLEX CIRCUIT 9500‐0519 SCR,#6‐32,MCH,1‐3/4″,PNH,PHL,SST,EXT, RoHS 0163‐0211 SCR.PPH.6‐32X.0.500″.SS..SELF SEAL 0163‐2000 ASSY, CABLE, MULTI FUNCTION AND TEST PORT 0163‐2000 ORING.70 BUNA‐N.0.984″..0.050″THK 0160‐6950… -
Page 85
M Series Service Manual Description Part Number Item # FOAM STRIP, .031 X .30 X 5.00 9330‐0400 FOAM STRIP,.375 X .32 X 3.42 9330‐0416 FOAM STRIP,.375 X .32 X 5.22 9330‐0418 REWORKED, EL DISPLAY BRACKET 9310‐0302‐99 SHIELD, W/CONDUCTIVE ADHESIVE 9330‐0374 ASSY, CABLE, EL DISPLAY 1001‐0212 FOAM STRIP,.375 X .30 X 3.38 9330‐0415 DISPLAY, 320X240,ELECTROLUMINESCENT, NO EARS 9355‐0505 FOAM STRIP, .094 X .30 X 5.00 9330‐0404 FOAM STRIP,.094 X .20 X .625 9330‐0402 ADHESIVE ULTRA LIGHT‐WELD UV CURING 0550‐0135 CUP, PACER 9310‐0519 Front Panel Membrane Contact Tech Support Front Panel, EL Display 9310-0559-02 117a Front Panel, FED/LCD Display 9310-0559-01 117b WASHER, ANTI‐ROTATION… -
Page 86
M Series Service Manual Description Part Number Item # SEAL, MICROPHONE 9330‐0339 LABEL, FILLER, EXPANSION MODULE, NIBP 9305‐0703 LABEL, FRONT PANEL, NIBP 9305‐0726‐01 LABEL,EXPANSION MODULE,NIBP,M‐SERIES,NON‐UL 9305‐0725‐01 LABEL, FILLER, RS232 PORT, NIBP 9305‐0701 9650-0450-01 Rev. U… -
Page 87: Parts Diagrams
M Series Service Manual Parts Diagrams 9650-0450-01 Rev. U…
-
Page 88
M Series Service Manual 3-10 9650-0450-01 Rev. U… -
Page 89
M Series Service Manual 9650-0450-01 Rev. U 3-11… -
Page 90
M Series Service Manual 3-12 9650-0450-01 Rev. U… -
Page 91
M Series Service Manual 9650-0450-01 Rev. U 3-13… -
Page 92
M Series Service Manual 3-14 9650-0450-01 Rev. U… -
Page 93
M Series Service Manual 9650-0450-01 Rev. U 3-15… -
Page 94
M Series Service Manual 3-16 9650-0450-01 Rev. U… -
Page 95
M Series Service Manual 9650-0450-01 Rev. U 3-17… -
Page 96
M Series Service Manual 3-18 9650-0450-01 Rev. U… -
Page 97
M Series Service Manual 9650-0450-01 Rev. U 3-19… -
Page 98
M Series Service Manual 3-20 9650-0450-01 Rev. U… -
Page 99
M Series Service Manual 9650-0450-01 Rev. U 3-21… -
Page 100
M Series Service Manual 3-22 9650-0450-01 Rev. U… -
Page 101
M Series Service Manual 9650-0450-01 Rev. U 3-23… -
Page 102
M Series Service Manual 3-24 9650-0450-01 Rev. U… -
Page 103
M Series Service Manual 9650-0450-01 Rev. U 3-25… -
Page 104
M Series Service Manual 3-26 9650-0450-01 Rev. U… -
Page 105
M Series Service Manual 9650-0450-01 Rev. U 3-27… -
Page 106
M Series Service Manual 3-28 9650-0450-01 Rev. U… -
Page 107
M Series Service Manual 9650-0450-01 Rev. U 3-29… -
Page 108
M Series Service Manual 3-30 9650-0450-01 Rev. U… -
Page 109
M Series Service Manual 9650-0450-01 Rev. U 3-31… -
Page 110
M Series Service Manual 3-32 9650-0450-01 Rev. U… -
Page 111
M Series Service Manual 9650-0450-01 Rev. U 3-33… -
Page 112
M Series Service Manual 3-34 9650-0450-01 Rev. U… -
Page 113
M Series Service Manual 9650-0450-01 Rev. U 3-35… -
Page 114
M Series Service Manual 3-36 9650-0450-01 Rev. U… -
Page 115
M Series Service Manual 9650-0450-01 Rev. U 3-37… -
Page 116
M Series Service Manual 3-38 9650-0450-01 Rev. U… -
Page 117
M Series Service Manual 9650-0450-01 Rev. U 3-39… -
Page 118
M Series Service Manual 3-40 9650-0450-01 Rev. U… -
Page 119: Functional Description
M Series Service Manual Chapter 4 Functional Description This chapter provides functional descriptions of the components contained in the ZOLL M Series and the M Series options. Refer to the interconnect diagram that delineates the different components of the defibrillator. This chapter includes:…
-
Page 120: Main System Board
Main System Board The M Series electrical circuitry consists of several functional modules. Each module is physically located on one or more of the printed wiring board assemblies (PWBA). In some cases, a functional module is distributed across several assemblies within the unit. The main components of…
-
Page 121
M Series Service Manual Refer to the M Series Interconnect diagram to identify unit components described in this manual. ODULE OCATION Main Central Processing Unit (CPU) and ECU Main System PWBA Pacer/Defib Charging and High Voltage High Voltage Module Control (Defib/Pace) -
Page 122: Main System Board Functions
Main System Board Functions The Main System Board contains the major computing and control elements for the M Series unit. The printed wiring board assembly (PWBA) receives signals from the front panel control switches, ECG input connectors and functional modules, such as the AC/DC charger, pacer/…
-
Page 123: Power Supply
Power Supply The power supply converts DC power from a removable battery or the AC/DC Battery Charger module to voltages required by the M Series hardware. The power supply circuit converts the raw battery or the Charger PWBA output voltages of +8.5 VDC to +16 VDC into the voltages shown in the table below, including load and line regulation.
-
Page 124: Ecg Front End
M Series Service Manual 3_3REF + 3.3 VDC Reference Linear ECG Front End The ECG front end provides an electrically isolated serial interface between the main system board functions and patient interface ECG connectors. It performs the following: • Analog ECG amplification and signal conditioning.
-
Page 125: Cpu And Epu
M Series Service Manual CPU and EPU The Main System Board contains two microprocessors. A Motorola HC-11 single chip microprocessor is used to acquire, convert and process ECG signals, (ECU). An Hitachi SH-3 RISC microprocessor acts as the system’s main CPU. The SH-3 CPU and has an integrated on-chip multiplier, a cache memory, a memory management unit as well as data protection and virtual memory functions.
-
Page 126: Defibrillator Charging And Discharging
Unlike previous ZOLL designs that isolated the patient from defib circuitry via an electromechanical patient relay, the M Series utilizes a bank of silicon-controlled rectifiers (SCRs). As the defibrillator capacitor is charged, the voltage is monitored via R1 — R4, which drive differential amplifiers referred to the system ground.
-
Page 127: High Voltage Capacitor Monitor
If the M Series is in the self test mode, the energy is delivered internally. The microprocessor calculates the actual delivered energy from the current waveform and displays a TEST OK message on the display, if the self test meets the appropriate criteria. If the criteria are not met, a TEST FAILED message displays.
-
Page 128: Pacer/Defibrillator Control Signals
M Series Service Manual The Pacer circuit produces and delivers user-controllable pace pulses to the pacing electrodes. To initiate pacing, the front panel switch is turned to PACER and the OUTPUT and RATE controls are set. Pacing current amplitude is constant during the pulse and is determined by the position of the front panel PACER OUTPUT dial.
-
Page 129
M Series Service Manual NALOG OLTAGE PERATION OMMENT FET_MON Analog voltage monitors the Provides a signature condition of the discharge voltage in case of a fault. transistors. PAT_CUR Bound on the range of 0 — 2.5 Analog signal representing V and accommodates defib… -
Page 130: Internal Discharge Resistor Module
(for a mains input), AC-DC and DC-DC conversion and isolation barrier between the M Series and power sources. This module also provides the power necessary to run the M Series in any mode of operation, as well as providing additional charging current to the battery. When the M Series is turned off but connected to an external AC or DC source, the charger module controls battery charging currents and voltages needed to charge the M Series battery.
-
Page 131: Stripchart Recorder
The Controls PWBA is physically located in the front panel assembly. Units that are equipped for voice recording include a microphone and audio signal conditioning circuitry on the Controls PWBA. M Series Options This section describes four options for the M Series unit. 9650-0450-01 Rev. U 4-13…
-
Page 132: Isolated Power Supply Module
The 12 lead cable is required to produce 12 lead reports. M Series unit must have the 12 lead option installed. All limb leads and at least one V- lead must be connected to initiate a 12 lead acquisition. Printed 12 Lead bandwidth is user configurable to be either 0.05-150 Hz (per AAMI EC11) or 0.05-40 Hz.
-
Page 133: Pulse Oximetry (Spo2)
, and respiration rate data. The M Series software formats the data for output to the display and strip chart recorder. In addition, the M Series software performs range checking of the Novametrix data to determine the presence of low or high EtCO and respiration rate alarm limit violations.
-
Page 134: Biphasic Waveform
The ZOLL Biphasic units produce a rectilinear waveform whose shape remains essentially constant from patient to patient. The rectilinear biphasic waveform consists of a 6 millisecond, essentially constant current first phase followed by a 4 millisecond, truncated exponential second phase. The…
-
Page 135
The following Rectilinear Biphasic Waveform is produced when the M Series with Biphasic option is discharged into a 50 ohm load at the default energy setting of 120 joules. The vertical axis is in amperes; the horizontal axis is in milliseconds. (See following diagram.) 9650-0450-01 Rev. -
Page 136
M Series Service Manual 4-18 9650-0450-01 Rev. U… -
Page 137
M Series Service Manual Chapter 5 Disassembly Procedures This chapter provides instructions on how to disassemble and reassemble the M Series unit, and includes the following sections: “ZIF Keeper Instructions” on page 5-3 “Front Panel Removal” on page 5-5 “CCT Front Panel Removal” on page 5-8 “Upper Housing Removal”… -
Page 138: Required Equipment
M Series Service Manual “NIBP Assembly Removal” on page 5-37 “NIBP/IBP/Temp Assembly Removal” on page 5-40 Required Equipment #1 Philips head screwdriver • #2 Philips head screwdriver • Wooden stick • Needlenose pliers • Wire Cutters • Exacto Knife •…
-
Page 139: Zif Keeper Instructions
M Series Service Manual ZIF Keeper Instructions Caution It is important to know this procedure before you start disassembling the unit. Removing of the ZIF (Zero Insertion Force) Keeper Please follow these instructions when you come across a ZIF Keeper.
-
Page 140
M Series Service Manual 4. To reconnect cable, place the ZIF Keeper over the laminate 5. Lower the left end of the ZIF Keeper over the connector end cable and insert the flex cable into the connector. Secure cable until it touches the printed wire assembly. The other end of in place by closing the latch. -
Page 141
M Series Service Manual Front Panel Removal Note: For CCT units skip to page 5-8 1. Remove 2 screws from lower housing. 2. Flip unit over. Using your thumb push up on the outer rim of the main selector knob to release panel from housing. Lay front panel down. -
Page 142
M Series Service Manual 5. Bend lower portion of front panel to release display, then pull 6. To remove front panel membrane, disconnect flex cable by display out. lifting tab straight up and pulling on cable. 7. Using an exacto knife, lift corner of front panel membrane. -
Page 143
M Series Service Manual 9. Remove 1/2” nut from the main selector knob, then remove the 10. (Unit with pace option) Remove the pacer controls knobs, anti-rotation washer. and then remove 10mm nut and washer. 11. While carefully lifting up on the control board, use exacto knife to cut beeper gasket as board is being removed. -
Page 144
M Series Service Manual CCT Front Panel Removal 1. Remove 2 screws from the bottom of the housing. 2. Using a flat head screwdriver, place in notch and gently pry front panel cover out. 3. Gently push tab around carry handle to remove. -
Page 145
M Series Service Manual 5. Push front panel assembly from the bottom to release it. 6. Remove video cable (beige connector), by pulling straight out. Then remove control board flex cable from system board. Follow steps 1-3 of the ZIF Connector Instructions on page 5-3. -
Page 146
M Series Service Manual 9. Remove 5 screws from rear of front panel. 10. Gently pry rear cover of front panel assembly up and remove. 11. Remove copper tab from ground tab of front panel membrane 12. Gently remove 8 tabs holding the video frame around the and unplug cable from control board. -
Page 147
M Series Service Manual 13. Remove LED display from display frame. 14. Remove membrane cable from control board. 15. Remove screw from control board. Gently lift up on the control board and cut gasket. 9650-0450-01 Rev. U 5-11… -
Page 148: Upper Housing Removal
M Series Service Manual Upper Housing Removal 1. Remove 3 screws on the front of upper housing. 2. Remove 2 screws from the rear of upper housing. Note: Remove multifunction cable (MFC) if still connected 3. While supporting the main chassis, lift up on the upper housing.
-
Page 149: System Board Assembly Removal
M Series Service Manual System Board Assembly Removal 1. Remove access detect cable by gently pulling straight out from 2. Remove MFC signal cable by gently pulling out towards the system board. side of the board. 3. Unplug speaker cable (if present) by gently pulling straight out 4.
-
Page 150
M Series Service Manual 5. Remove the 2 system interconnect cables, by lifting ZIF 6. Remove biphasic flex cable and EtCO /SPO cable by connectors. lifting up on tabs, and pulling straight out. 7. Remove NIBP flex cable by lifting up on tabs and pulling straight 8. -
Page 151: Battery Interconnect Board Assembly Removal
M Series Service Manual Battery Interconnect Board Assembly Removal 1. Remove black rivet by pulling straight up. 2. Lift Battery Interconnect board; disconnect cable going to AC/DC charger board. 3. Disconnect HV control cable from the backside of the HV 4.
-
Page 152: Biphasic High Voltage Module Removal
M Series Service Manual Biphasic High Voltage Module Removal units, skip to page 5-22 Note: For monophasic 1. Remove tape, unplug 2 spade connectors, and remove ground 2. Using a pair of needle nose pliers, squeeze the locking tabs screw from AC charger frame. Then lift ECG connector and and push the MFC connector through the connector panel.
-
Page 153
M Series Service Manual 5. If present remove EtCO and SPO connectors from the 6. Cut tie wrap holding HV cable to connector panel. Then connector panel by lifting straight out. remove HV cables from wire loop. Note: During reassembly of the SPO… -
Page 154
M Series Service Manual 9. Remove tape from Epac 10. Gently bend Epac to the side, and pull HV module out. 5-18 9650-0450-01 Rev. U… -
Page 155: Ac/Dc Charger Removal
M Series Service Manual AC/DC Charger Removal 1. Lift charger assembly straight up and out of the device. 2. Pull connector panel straight out of the charger assembly. Note: During reassembly, make sure that the charger assembly lines up with slots on bottom and post on the top on main chassis 9650-0450-01 Rev.
-
Page 156: Bridge Assembly Removal
M Series Service Manual Bridge Assembly Removal 1. Disconnect biphasic flex cable, by pulling down on the tabs and 2. Lift up on the bridge board first, then lift the assembly pulling cable straight down. straight up. 3. Flip assembly over and remove lower isolator.
-
Page 157
M Series Service Manual WARNING! This unit may contain lethal voltages. You MUST completely discharge the high voltage capacitor before removing from unit. DO NOT SHORT THE TERMINAL ENDS OF THE CAPACITOR UNTIL AFTER DISCHARGED. 5. Bleed the excess voltage using a resistor with values of 6. -
Page 158: Monophasic: High Voltage Assembly Removal
M Series Service Manual Monophasic: High Voltage Assembly Removal 1. Lift out HV module/AC charger assembly straight up off of upper 2. Lift up on capacitor and remove from main chassis. housing mounting studs, and roll backwards and place on flat surface.
-
Page 159
M Series Service Manual 5. Pull wire through connector panel, and then remove HV cable 6. Separate HV module assembly from AC charger assembly. from wire loom. 7. Pull connector panel straight out of the charger assembly. 8. Remove HV isolator. -
Page 160
M Series Service Manual 9. Remove tape and unplug MFC signal cable. 10. Gently bend Epac to the side, and pull HV module out. 5-24 9650-0450-01 Rev. U… -
Page 161: Monophasic: High Voltage Capacitor Disassembly
M Series Service Manual Monophasic: High Voltage Capacitor Disassembly WARNING! This unit may contain lethal voltages. You MUST completely discharge the high voltage capacitor before removing from unit. DO NOT SHORT THE TERMINAL ENDS OF THE CAPACITOR UNTIL AFTER DISCHARGED.
-
Page 162
M Series Service Manual 3. Unplug spade connectors, and remove choke assembly. 4. Bleed the excess voltage using a resistor with values of approximately 5k ohms, 25 watts for 10-20 seconds. Measure the voltage on the capacitor terminals. 5. Remove plastic spacer and disconnect 2 spade connectors on 6. -
Page 163: System Interconnect Board Removal
M Series Service Manual System Interconnect Board Removal 1. Disconnect paper sensor cable, print head cable, and printer 2. Remove 2 screws holding board to main chassis. motor cable. 3. Lift board straight out of main chassis. Note: During reassembly, push down on right side of board to fully seat on PCIMCIA assembly.
-
Page 164: Printer Motor Removal
M Series Service Manual Printer Motor Removal 1. Remove screw holding motor to chassis. 2. Using exacto knife, slide knife between printer motor frame and main chassis. 3. Pull printer motor and spacer straight out. 5-28 9650-0450-01 Rev. U…
-
Page 165: Lower Housing Removal
M Series Service Manual Lower Housing Removal 1. Remove screw from modem bezel, and remove bezel. Remove 2. Remove 3 screws from lower housing. paper tray by pushing on release tab on tray. 3. Lift the back of the lower housing up and slide forward around PCMCIA assembly.
-
Page 166: Print Head Assembly Removal
M Series Service Manual Print Head Assembly Removal 1. Remove 2 screws from print head support, and lift support 2. Lift up on print head and disconnect print head cable. straight out. 3. Remove pivot pin for reuse. 4. Lift the paper sensor board out, and pull wire through the access hole.
-
Page 167
M Series Service Manual 5. To remove leaf spring, remove screw (some units have a nut on 6. Remove leaf spring and static brush. bottom). Note: Use caution when removing screw; material beneath screw is used as a grounding path. -
Page 168: Pcmcia Assembly Removal
M Series Service Manual PCMCIA Assembly Removal 1. Remove 2 screws, and lift plate out. 2. Lift PCMCIA assembly straight up to remove. 5-32 9650-0450-01 Rev. U…
-
Page 169: Paddle Release Latch Removal
M Series Service Manual Paddle Release Latch Removal 1. Using an exacto knife, remove the latch seal. 2. Insert the screwdriver into the opening under the adhesive seal. Gently push the screwdriver until the latch dislodges. 3. Pull paddle release latch away from the unit.
-
Page 170: Lower Latch Assembly Removal
M Series Service Manual Lower Latch Assembly Removal 1. From the bottom of the main chassis, use a pick to push pin 2. Remove latch and spacer. through chassis. 3. To remove paddle shorting wire, pull up on spring clip and disconnect spade from clip at each end.
-
Page 171: Spo2/Etco2 Module Removal
M Series Service Manual /EtCO Module Removal 1. Remove clear isolator by removing tape. 2. To remove SPO module, cut tape top and bottom, then lift module out of Epac slightly. 3. Disconnect SPO power cable. 4. Remove SPO connector cable.
-
Page 172
M Series Service Manual 5. Disconnect the SPO power cable from isolated power supply, 6. Flip Epac and cut tape. Lift out EtCO module and isolated then disconnect EtCO cable from module. power supply from Epac. 7. Split power supply and module, and disconnect EtCO cable by pulling straight out. -
Page 173: Nibp Assembly Removal
M Series Service Manual NIBP Assembly Removal 1. Remove 6 screws holding NIBP module to housing. 2. Split NIBP housing from main chassis, then slide cable out of NIBP housing. Note: During reassembly, slide flex cable back inside of NIBP housing.
-
Page 174
M Series Service Manual 5. Lift NIBP frame half way out of housing and disconnect hose. 6. Lift up on pump and remove the assembly. 7. To disconnect pump, disconnect pump cable and isolated 8. Gently push out on the 2 locking tabs, and lift NIBP power cable from pump assembly. -
Page 175
M Series Service Manual 9. Gently push out on the locking tabs, lift the isolated power supply, 10. Using an exacto knife, lift up on label. and disconnect cable. 11. Remove 3 screws. 12. Slide connector panel out. 9650-0450-01 Rev. U… -
Page 176: Nibp/Ibp/Temp Assembly Removal
M Series Service Manual NIBP/IBP/Temp Assembly Removal 1. Remove 6 screws holding NIBP module to housing. 2. Split NIBP housing from main chassis, then slide cable out of NIBP housing. Note: During reassembly, slide flex cable back inside of NIBP housing.
-
Page 177
M Series Service Manual 5. Remove 3 cables by gently pulling cable out of connectors. 6. Lift up on pump assembly and disconnect hose. 7. Remove tape securing hose in channel. Then remove pump 8. To disconnect pump, disconnect pump cable and isolator. -
Page 178
M Series Service Manual 9. Remove ground cable, and gently push out on the 2 locking 10. Gently push out on the 2 locking tabs, and lift the isolated tabs, and lift NIBP assembly out. power supply, and disconnect cable. -
Page 179
M Series Service Manual 13. Using a 1/2 nut driver, remove temp port nut. Then remove 3 14. Slide connector panel out. screws holding connector panel. 15. Slide out temperature and IBP connectors out of housing. 16. Remove 5 screws to remove grounding plate. -
Page 180
M Series Service Manual 5-44 9650-0450-01 Rev. U… -
Page 181: Appendix A Overview
Interconnect Diagram for the M Series Monophasic Unit • ZOLL M Series Maintenance Test Checklist • Photocopy the checklists and use the copies to record the results of the maintenance tests performed on the M Series equipment; keep them for your records. 9650-0450-01 Rev. U…
-
Page 182
M Series Service Manual Interconnect Diagram for the M Series Biphasic Unit 9650-0450-01 Rev. U… -
Page 183
M Series Service Manual Interconnect Diagram for the M Series CCT Biphasic Unit 9650-0450-01 Rev. U… -
Page 184
M Series Service Manual Interconnect Diagram for the M Series Monophasic Unit 9650-0450-01 Rev. U… -
Page 185
ZOLL M Series Serial No. Location Maintenance Test Checklist Tester Signature Date 1.0 Physical Inspection 2.0 Front Panel Button 3.0 Leads Test 7.0 Heart Rate Display 11.0 Defibrillator Test Test Self Test Result of Check: Pass Fail Pass Fail… -
Page 186
ZOLL M Series Serial No. Location Maintenance Test Checklist Tester Signature Date 13.0 Shock Test 14.0 Summary Report 17.0 SpO Monitor Test 20.0 IBP Monitoring Test 20.32 23.0 NIBP Monitor Test Test Pass Fail Pass Fail Pass Fail Pass Fail 20.33…
(скачивание инструкции бесплатно)
Формат файла: PDF
Доступность: Бесплатно как и все руководства на сайте. Без регистрации и SMS.
Дополнительно: Чтение инструкции онлайн

Мониторирование ЭКГ в
12
отведениях
9650-0215-29 Rev A
Страница:
(1 из 23)
навигация

1

2

3

4

5

6

7

8

9

10

11

12

13

14

15

16

17

18

19

20

21

22

23
Оглавление инструкции
- Страница 1 из 24
Мониторирование ЭКГ в 12 отведениях 9650-0215-29 Rev A - Страница 2 из 24
Этот вопрос даты ZOLL AED Plus Руководство Aдминистратора, Revision A, является Января 2012 года. По истечению трех лет с указанной даты, обратитесь в ZOLL Medical Corporation в отношении дополнительной информации, касающейся изделия. ZOLL и M Series являются товарными знаками ZOLL Medical - Страница 3 из 24
МОНИТОРИРОВАНИЕ ЭКГ В 12 ОТВЕДЕНИЯХ Электроды для ЭКГ являются способом подсоединения типа CF к пациенту с защитой от дефибрилляции. ОБЩАЯ ИНФОРМАЦИЯ Описание изделия Дефибриллятор ZOLL M Series для снятия ЭКГ в 12 отведениях позволяет одновременно осуществить снятие, сохранение, отображение и - Страница 4 из 24
ВКЛАДЫШ ПО ОПЦИАМ МЕРЫ БЕЗОПАСНОСТИ Перед использованием прибора внимательно прочтите Руководство для оператора электрокардиости-муляторов M Series и настоящие инструкции. Дефибриллятор M Series с аналитической программой 12SL предназначен для снятия и анализа данных ЭКГ, полученного от - Страница 5 из 24
12-отведений Наложение электродов Предсердечные электроды расположите следующим образом: Местоположение Маркировка AHA Маркировка МЭК Правая рука RA (белый) R (красный) Левая рука LA (черный) L (желтый) V1: Четвертая межреберная зона, с правой стороны грудной дуги. V2: Четвертая межреберная зона, с - Страница 6 из 24
ВКЛАДЫШ ПО ОПЦИАМ СНЯТИЕ ЭКГ В 12 ОТВЕДЕНИЯХ Функциональная клавиша 12 отв. Прикрепите электроды к пациенту (См. раздел «Наложение электродов»). Подсоедините кабель на 12 отведений к электродам на пациенте. Прикрепите V-кабель к кабелю на 12 отведений ЭКГ. (Если V-кабели не используются, - Страница 7 из 24
12-отведений ПЕРЕДАЧА ДАННЫХ 12 ОТВЕДЕНИЙ ЭКГ Дефибриллятор M Series можно установить на передачу данных 12 отведений ЭКГ на факс или информационную систему Catalyst MUSE. Описание системы Catalyst MUSE и условий ее использования можно найти в Приложении В. Чтобы отправить факс в формате 2×6, - Страница 8 из 24
ВКЛАДЫШ ПО ОПЦИАМ умолчанию (см. Руководство по конфигурации приборов М Series, P/N 9650-0201-29). распечатываются вместе, будут электроды, ранее запрограммированные в режиме конфигурации прибора M Series. (См. Руководство по настройке дефибрилляторов М Series, P/N 9650-0201-29). Стандарт При - Страница 9 из 24
12-отведений Кнопка Пациент Для получения доступа к информации о пациенте нажмите кнопку Пациент. Нажимая на кнопку Пациент, можно высветить следующие кнопки: ИН №, Возраст, Пол, Записи Пациента или Возврат. Примечание: Если информация о пациенте отсутствует, на дисплее над кнопкой Возраст по - Страница 10 из 24
ВКЛАДЫШ ПО ОПЦИАМ Итоговые отчеты ЭКГ в 12 отведениях Данные ЭКГ в 12 отведениях распечатываются сразу же после снятия ЭКГ в следующем порядке: 1. Кривые ЭКГ в 12 отведениях 2. Информация о пациенте 3. Анализ ЭКГ с использованием программы анализа 12 SL от компании GE Medical Systems Information - Страница 11 из 24
12-отведений Срединные комплексы в формате 4×3 В этом формате распечатывается единственная средняя систола для каждого из 12 отведений. Средняя систола рассчитывается алгоритмом программы 12SL и обозначается знаком тильда в конце каждого электрода. Можно настроить отчет либо для стандартного - Страница 12 из 24
ВКЛАДЫШ ПО ОПЦИАМ Информация о пациенте Normal sinus rhythm Normal ECG DEVICE ID: MEDIC_1 RECORDED: 11:33:01 15 DEC 99 *** Unconfirmed *** PATIENT NAME : JOE SMITH PATIENT ID: 199912150932 PATIENT AGE: 41 PATIENT SEX: Male Vent. Rate : PR interval QRS Duration: QT/QTc P-R-T axes 72 146 ms 84 ms 374 - Страница 13 из 24
12-отведений Измерения в программе 12SL После выделения P, QRS и T комплексов производится идентификация соответствующих им волн, которая выполняется отдельно для каждого электрода. Программа находит точки, в которых сигнал пересекает базовую линию каждого комплекса. Если точки пересечения - Страница 14 из 24
ВКЛАДЫШ ПО ОПЦИАМ Ежедневная проверка исправности прибора 1. Подсоедините кабель с V-отведением к кабелю 12 отведений. 2. Подсоедините провода кабеля на 12 отведений и кабеля с V-отведением к пациенту или симулятору с 12 отведениями. При подсоединении к пациенту соблюдайте рекомендации по наложению - Страница 15 из 24
12-отведений Устранение неисправностей Руководство по устранению неисправностей предназначено для того, чтобы помочь вам идентифицировать и устранить проблемы, возникающие в ходе эксплуатации прибора. Если меры, принятые в соответствии с содержащимися здесь указаниями, не позволяют устранить - Страница 16 из 24
ВКЛАДЫШ ПО ОПЦИАМ 3. Не удается передать данные на факс (т.е. передача прерывается до завершения, пропадает сигнал и т.д.) 1. Проверьте подсоединение модема (карты и удлинительного кабеля) к дефибриллятору M Series. 2. Проверьте подсоединение модема к телефонной розетке или сотовому телефону. 3. - Страница 17 из 24
12-отведений 7. Сообщение “РАЗРЫВ СВЯЗИ” или “РАЗРЫВ СВЯЗИ С MUSE” Принимающий телефон не принимает передачу. Прибор M Series автоматически повторяет передачу до успешного завершения или до тех пор, пока оператор не нажмет кнопку Отмена. Если для передачи в систему Сatalyst MUSE задано несколько - Страница 18 из 24
ВКЛАДЫШ ПО ОПЦИАМ ПРИЛОЖЕНИЕ A НАСТРОЙКА МОДЕМА И ТЕЛЕФОНА Дефибрилятор M Series с возможностью снятия ЭКГ в 12 отведениях может включать в комплект поставки модем для передачи данных ЭКГ в 12 отведениях на удаленное принимающее устройство через наземную телефонную линию или по сотовой связи. В - Страница 19 из 24
12-отведений Модем, входящий в комплект поставки прибора M Series, совместим с некоторыми телефонами стандарта AMPS: (аналоговые) или двухмодовые телефоны в США, и с некоторыми сотовыми телефонами стандарта GSM в Европе, в зависимости от модели модема. Каждая из моделей телефонии требует - Страница 20 из 24
ВКЛАДЫШ ПО ОПЦИАМ ВНИМАНИЕ Передача данных с помощью сотового телефона может оказаться менее надежной, чем передача по наземной телефонной линии. Сильный сигнал и стабильная передача увеличивают вероятность успеха передачи. Соблюдайте инструкции, прилагающиеся к Вашему сотовому телефону. Многие - Страница 21 из 24
12-отведений Помехи ПРЕДУПРЕЖДЕНИЕ Изменения или модификации прибора в случае отсутствия их официального одобрения со стороны, ответственной за их согласование, может привести к потере пользователем права на работу с оборудованием. Данное оборудование создает, использует и может излучать - Страница 22 из 24
ВКЛАДЫШ ПО ОПЦИАМ Экранированные кабели В случае использования неэкранированного кабеля система излучает больше радиочастотных помех, чем разрешено правилами Федерального агентства по связи, увеличивая, таким образом, вероятность нарушения связи из-за помех. Следовательно, для соблюдения правил - Страница 23 из 24
12-отведений ПРИЛОЖЕНИЕ B ПЕРЕДАЧА ДАННЫХ ЭКГ В 12 ОТВЕДЕНИЯХ В СИСТЕМУ Catalyst™ MUSE® Дефибриллятор фирмы ZOLL M Series для снятия ЭКГ в 12 отведениях с интерфейсом связи с аналитической системой Catalyst™ MUSE® позволяет напрямую передавать данные ЭКГ в 12 отведениях в кардиологическую - Страница 24 из 24
Инструкции и руководства похожие на ZOLL M Series Defibrillator Rev A 12 Lead
Другие инструкции и руководства из категории Здоровье гигиена
© 2023 manuals-help.ru, Все права защищены
SERVICE MANUAL
ZOLL MEDICAL CORPORATION
9650-0450-01 Rev P
©
Zoll Medical Corporation, 2004. All rights reserved.
Warranty (U.S. Only)
(a) ZOLL Medical Corporation warrants to the original equipment purchaser that beginning on the date of installation, or thirty (30) days after the date of shipment from
ZOLL Medical Corporation’s facility, whichever first occurs, the equipment (other than accessories and electrodes) will be free from defects in material and workmanship under normal use and service for the period of one (1) year. During such period ZOLL Medical Corporation will, at no charge to the customer, either repair or replace (at
ZOLL Medical Corporation’s sole option) any part of the equipment found by ZOLL Medical Corporation to be defective in material or workmanship. If ZOLL Medical
Corporation’s inspection detects no defects in material or workmanship, ZOLL Medical Corporation’s regular service charges shall apply. (b) ZOLL Medical Corporation shall not be responsible for any equipment defect, the failure of the equipment to perform any function, or any other nonconformance of the equipment, caused by or attributable to: (i) any modification of the equipment by the customer, unless such modification is made with the prior written approval of ZOLL Medical Corporation; (ii) the use of the equipment with any associated or complementary equipment, (iii) installation or wiring of the equipment other than in accordance with ZOLL Medical
Corporation’s instructions. (c) This warranty does not cover items subject to normal wear and burnout during use, including but not limited to lamps, fuses, batteries, patient cables and accessories. (d) The foregoing warranty constitutes the exclusive remedy of the customer and the exclusive liability of ZOLL Medical Corporation for any breach of any warranty related to the equipment supplied hereunder. (e) Limitation of Liability: ZOLL shall not in any event be liable to Purchaser, nor shall Purchaser recover, for special, incidental or consequential damages resulting from any breach of warranty, failure of essential purpose, or under any other legal theory including but not limited to lost profits, lost savings, downtime, goodwill, damage to or replacement of equipment and property, even if ZOLL has been advised of the possibility of such damages.
THE WARRANTY SET FORTH HEREIN IS EXCLUSIVE AND ZOLL MEDICAL CORPORATION EXPRESSLY DISCLAIMS ALL OTHER WARRANTIES
WHETHER WRITTEN, ORAL, IMPLIED, OR STATUTORY, INCLUDING BUT NOT LIMITED TO ANY WARRANTIES OF MERCHANTABILITY OR FITNESS
FOR A PARTICULAR PURPOSE.
For additional information, please call ZOLL Medical Corporation at 1-800-348-9011 (in Massachusetts 1-978-421-9655). International customers should call the nearest authorized ZOLL Medical Corporation service center.
Software License
Read this License agreement carefully before operating any of the M Series products.
Software incorporated into the system is protected by copyright laws and international copyright treaties as well as other intellectual property laws and treaties. This software is licensed, not sold. By taking delivery of and using this system, the Purchaser signifies agreement to and acceptance of the following terms and conditions:
Grant of License: In consideration of payment of the software license fee which is part of the price paid for this product ZOLL Medical Corporation grants the Purchaser a non-exclusive license, without right to sublicense, to use the system software in object-code form only.
Ownership of Software/Firmware: Title to, ownership of and all rights and interests in the system software and all copies thereof remain at all times vested in the manufacturer, and Licensors to ZOLL Medical Corporation and they do not pass to Purchaser.
Assignment: Purchaser agrees not to assign, sub-license or otherwise transfer or share its rights under the license without the express written permission of ZOLL Medical
Corporation.
Use Restrictions: As the Purchaser, you may physically transfer the products from one location to another provided that the software/firmware is not copied. You may not disclose, publish, translate, release or distribute copies of the software/firmware to others. You may not modify, adapt, translate, reverse engineer, decompile, crosscompile, disassemble or create derivative works based on the software/firmware.
No Implied License
Possession or purchase of this device does not convey any express or implied license to use the device with replacement parts which would, alone, or in combination with this device, fall within the scope of one or more of the patents relating to this device.
T
A B L E O F
C
O N T E N T S
P
REFACE
…………………………………………………………………………………………………………………………………………………………………
V
Overview ……………………………………………………………………………………………………………………………………………………………………….v
Safety Considerations ………………………………………………………………………………………………………………………………………………………v
Additional Reference Material ……………………………………………………………………………………………………………………………………….. vi
Conventions ………………………………………………………………………………………………………………………………………………………………… vii
Service Policy Warranty ……………………………………………………………………………………………………………………………………………….. vii
Technical Service ………………………………………………………………………………………………………………………………………………………… vii
Technical Service for International Customers ……………………………………………………………………………………………………………….. viii
C
HAPTER
1 M
AINTENANCE
T
ESTS
……………………………………………………………………………………………………………………………1
Overview ……………………………………………………………………………………………………………………………………………………………………….1
Before You Begin the Maintenance Tests …………………………………………………………………………………………………………………………..2
Equipment You Need to Perform the Maintenance Tests ……………………………………………………………………………………………………..2
Equipment You Need for the M Series Options Maintenance Tests ……………………………………………………………………………………….3
C
HAPTER
2 T
ROUBLESHOOTING
………………………………………………………………………………………………………………………………37
Overview ……………………………………………………………………………………………………………………………………………………………………..37
Troubleshooting …………………………………………………………………………………………………………………………………………………………….38
Zoll M Series Error Messages …………………………………………………………………………………………………………………………………………42
C
HAPTER
3 D
ISASSEMBLY
P
ROCEDURES
………………………………………………………………………………………………………………….59
Overview ……………………………………………………………………………………………………………………………………………………………………..59
Required Equipment ………………………………………………………………………………………………………………………………………………………60
Parts That May Need Replacing After Disassembly …………………………………………………………………………………………………………..60
Safety Precautions …………………………………………………………………………………………………………………………………………………………61
Overview of Modules …………………………………………………………………………………………………………………………………………………….62
1. Removing the ZIF Keeper …………………………………………………………………………………………………………………………..65
2. Removing the Front Panel …………………………………………………………………………………………………………………………..66
2A.Removing the Display ……………………………………………………………………………………………………………………………….67
2B.Removing the Control Board ……………………………………………………………………………………………………………………..68
3. Removing the Upper Housing Assembly ………………………………………………………………………………………………………70
i
M Series Service Manual
4. Removing the System Board Assembly ………………………………………………………………………………………………………..71
5. Removing the Battery Interconnect Board Assembly ……………………………………………………………………………………..73
6. Removing the High Voltage/Charger Assembly ……………………………………………………………………………………………74
7. Removing the High Voltage Module Assembly …………………………………………………………………………………………….76
8. Removing the High Voltage Capacitor Assembly ………………………………………………………………………………………….77
9. Removing the System Interconnect Board …………………………………………………………………………………………………….78
10.Removing the Printer/Recorder Motor …………………………………………………………………………………………………………79
11.Removing the Lower Housing Assembly ……………………………………………………………………………………………………..80
12.Removing the Print Head Assembly …………………………………………………………………………………………………………….81
13.Removing the PCMCIA Card Slot Assembly ……………………………………………………………………………………………….82
14.Removing the Paddle Release Latch ……………………………………………………………………………………………………………83
C
HAPTER
4 R
EPLACEMENT
P
ARTS
………………………………………………………………………………………………………………………….85
Overview ……………………………………………………………………………………………………………………………………………………………………..85
Replacement Parts …………………………………………………………………………………………………………………………………………………………86
Field Replacement Parts …………………………………………………………………………………………………………………………………………………90
C
HAPTER
5 F
UNCTIONAL
D
ESCRIPTION
…………………………………………………………………………………………………………………..93
Overview ……………………………………………………………………………………………………………………………………………………………………..93
Main System Board ……………………………………………………………………………………………………………………………………………………….94
Main System Board Functions ………………………………………………………………………………………………………………………………………..96
Power Supply ………………………………………………………………………………………………………………………………………………………………..98
ECG Front End ……………………………………………………………………………………………………………………………………………………………..99
Multifunction Electrode (MFE)/PADS (System Board and High Voltage Module) ……………………………………………………………….99
CPU and EPU ……………………………………………………………………………………………………………………………………………………………….99
High Voltage Module …………………………………………………………………………………………………………………………………………………..100
Defibrillator Charging and Discharging ………………………………………………………………………………………………………………………….101
High Voltage Capacitor Monitor ……………………………………………………………………………………………………………………………………102
Pacer/Defibrillator Control Signals ………………………………………………………………………………………………………………………………..103
Internal Discharge Resistor Module ……………………………………………………………………………………………………………………………….105
AC/DC Charger Module ……………………………………………………………………………………………………………………………………………….105
System Interconnect Module …………………………………………………………………………………………………………………………………………105
Stripchart Recorder ………………………………………………………………………………………………………………………………………………………106
PCMCIA Slots …………………………………………………………………………………………………………………………………………………………….106
Front Panel and Controls PWBA ……………………………………………………………………………………………………………………………………106
M Series Options …………………………………………………………………………………………………………………………………………………………106
ii
M Series Service Manual
Isolated Power Supply Module ………………………………………………………………………………………………………………………………………107
12 Lead Option ……………………………………………………………………………………………………………………………………………………………107
Pulse Oximetry (SpO2) ………………………………………………………………………………………………………………………………………………..108
End Tidal Carbon Dioxide (EtCO2) ……………………………………………………………………………………………………………………………….108
Biphasic Waveform ……………………………………………………………………………………………………………………………………………………..109
I
NDEX
……………………………………………………………………………………………………………………………………………………………………113
A
PPENDIX
……………………………………………………………………………………………………………………………………………………………..117
Overview ……………………………………………………………………………………………………………………………………………………………………117
Interconnect Diagram for the M Series Monophasic Unit …………………………………………………………………………………………………118
Interconnect Diagram for the M Series Biphasic Unit ………………………………………………………………………………………………………119
Interconnect Diagram for the M Series CCT Biphasic Unit ………………………………………………………………………………………………120
iii
M Series Service Manual iv
M Series Service Manual
Preface
Overview
ZOLL Medical Corporation’s M Series Service Manual is intended for the service technician whose responsibility is to identify malfunctions and/or make repairs at the subassembly level. The Zoll M Series Service Manual has five main sections and one appendix.
Preface—Contains safety warnings and an overview of the manual’s contents. Be sure to review this section thoroughly before attempting to use or service the M Series unit.
Chapter 1—Maintenance Tests explains how to check the defibrillator’s performance using a series of recommended checkout procedures to be conducted every six months.
Chapter 2—Troubleshooting provides a listing of the procedures and error messages to help the service technician detect faults and repair them.
Chapter 3—Disassembly Procedures describes step-by-step procedures for removing subassemblies from the
M Series unit.
Chapter 4—Replacement Parts List displays a complete list of ZOLL part numbers for field replaceable parts available for the M Series unit, allowing the service person to identify and order replacement parts from ZOLL.
Chapter 5—Functional Description provides technical descriptions for the M Series major subassembly modules.
Appendix A—M Series Operator’s Manual.
Safety Considerations
The following section describes general warnings and safety considerations for operators and patients. Service technicians should review the safety considerations prior to servicing any equipment and read the manual carefully before attempting to disassemble the unit. Only qualified personnel should service the M Series unit.
Federal (U.S.A.) law restricts this unit for use by or on the order of a physician.
Safety and effectiveness data submitted by ZOLL Medical Corporation to the Food and Drug Administration (FDA) under section 510(K) of the Medical Device Act to obtain approval to market is based upon the use of ZOLL accessories such as disposable electrodes, patient cables and batteries. The use of external pacing/defibrillation v
M Series Service Manual
WARNING!
NOTE
electrodes and adapter units from sources other than ZOLL is not recommended. ZOLL makes no representations or warranties regarding the performance or effectiveness of its products when used in conjunction with pacing/ defibrillation electrodes and adapter units from other sources. If unit failure is attributable to pacing/defibrillation electrodes or adapter units not manufactured by ZOLL, this may void ZOLL’s warranty.
Only qualified personnel should disassemble the M Series unit.
This unit can generate up to 4500 volts with sufficient current to cause lethal shocks.
All persons near the equipment must be warned to “STAND CLEAR” prior to discharging the defibrillator.
Do not discharge the unit’s internal energy more than three times in one minute or damage to the unit may result.
Do not discharge a battery pack except in a Base PowerCharger
4×4
or compatible ZOLL Battery Charging/Testing unit.
Do not use the M Series in the presence of flammable agents (such as gasoline), oxygen-rich atmospheres, or flammable anesthetics. Using the unit near the site of a gasoline spill may cause an explosion.
Do not use the unit near or within puddles of water.
The M Series is protected against interference from radio frequency emissions typical of two-way radios and cellular phones (digital and analog) used in emergency service/public safety activities. Users of the M Series should assess the unit’s performance in their typical environment of use for the possibility of radio frequency interference from high-power sources. Radio Frequency Interference (RFI) may be observed as shifts in monitor baseline, trace compression, or transient spikes on the display.
Additional Reference Material
In addition to this guide, there are several other components to the Zoll M Series documentation. They include:
• Operator’s Guide — A comprehensive reference work that describes all the user tasks needed to operate the M Series.
• Configuration Guide — Describes the M Series features and functions whose operation can be customized by authorized users.
vi
M Series Service Manual
WARNING!
Conventions
Warning statements describe conditions or actions that can result in personal injury or death.
CAUTION
NOTE
Caution statements describe conditions or actions that can result in damage to the unit.
Notes contain additional information
on using the defibrillator.
Service Policy Warranty
In North America: Consult your purchasing agreement for terms and conditions associated with your warranty. Outside of North America, consult ZOLL authorized representative.
In order to maintain this warranty, the instructions and procedures contained in this manual must be strictly followed.
For additional information, please call the ZOLL Technical Service Department 1-800-348-9011 in North America.
Technical Service
If the ZOLL M Series unit requires service, contact the ZOLL Technical Service Department:
Telephone: 1-978-421-9655; 1-800-348-9011
Fax 1-978-421-0010
Have the following information available for the Technical Service representative:
• Unit serial number.
• Description of the problem.
• Department where equipment is used.
• Sample chart recorder strips documenting the problem, if applicable.
• Purchase Order to allow tracking of loan equipment.
• Purchase Order for a unit with an expired warranty.
vii
M Series Service Manual
If the unit needs to be sent to ZOLL Medical Corporation, obtain a service order request number from the Technical
Service representative. Return the unit in its original container to:
ZOLL Medical Corporation
269 Mill Road
Chelmsford, Massachusetts 01824-4105
Attn: Technical Service Department
Telephone: 1-800-348-9011; 1-978-421-9655 FAX: 978-421-0010
Technical Service for International Customers
International customers should return the unit in its original container to the nearest authorized ZOLL Medical
Corporation Service Center. To locate an authorized service center, contact the International Sales Department at
ZOLL Medical at the above address.
Units are available on loan while your unit is being repaired.
viii
M Series Service Manual
Chapter 1
Maintenance Tests
Overview
The M Series has two checkout procedures: the operator’s shift checklist and the extensive six-month maintenance tests checkout procedures.
Because the M Series units must be maintained ready for immediate use, it is important for users to conduct the
Operator’s Shift Checklist procedure at the beginning of every shift. This procedure can be completed in a few minutes and requires no additional test equipment. (See the ZOLL M Series Operator’s Guide for the Operator’s Shift
Checklist.)
A qualified biomedical technician must perform a more thorough maintenance test checkout every six months to ensure that the functions of the M Series unit work properly. This chapter describes the step by step procedures for performing the six month maintenance test checkout. Use the checklist at the back of this document (ZOLL M Series
Maintenance Tests Checklist) to record your results of the maintenance tests.
This chapter describes the following maintenance tests:
• 1. Physical Inspection of the Unit
• 2. Front Panel Button Test
• 3. 3, 5, and 12 Leads Test
• 4. Power Supply Test
• 5. Leakage Current Test
• 6. Paddles Test
• 7. Heart Rate Display Test
• 8. Calibrating Pulses on Strip Chart Test
• 9. Notch Filter Test
• 10. Heart Rate Alarm Test
1
M Series Service Manual
• 11. Defibrillator Self Test
• 12. Synchronized Cardioversion Test
• 13. Shock Test
• 14. Summary Report Test
• 15. Advisory Message Test
• 16. Pacer Test
• 17. SpO
2
Monitor Test
• 18. EtCO
2
Monitor Test
Before You Begin the Maintenance Tests
• Assemble the tools or specialized testing equipment listed in the “Equipment You Need to Perform the Maintenance
Tests” section shown below.
• Keep an extra fully charged ZOLL M Series battery available.
• Schedule an hour to conduct the entire maintenance test.
• Photocopy the checklist at the back of this document and use the copy to record your results. As you conduct each step of a procedure, mark the Pass/Fail/NA check boxes on your checklist and then save it for your maintenance file.
• Perform the tests in the order presented.
• Perform all the steps of each test procedure.
• Complete all the steps of the procedure before evaluating the test results.
Equipment You Need to Perform the Maintenance Tests
For testing purposes, you can substitute an equivalent device.
• Zoll Medical Electrode Adapter from Dynatech Nevada Inc. (DNI part number 3010-0378).
• Dynatech Impulse 4000 Defibrillator Analyzer with 1.06 software or higher.
• Bio-Tek
®
601 Pro Series International Safety Analyzer.
• Bio-Tek
®
Index 2PFE SpO
2
Simulator or equivalent. (For SpO
2 units only.)
• Novametrix Medical Systems, Inc. Capnostat Simulator TB1265/7100 or equivalent. (For EtCO
2 units only.)
2
M Series Service Manual
• ECG Simulator; 12 Lead Simulator for 12 Lead test (e.g., Symbio CS1201).
• Stop watch.
• Standard series II PC flash memory cards.
• PCMCIA card reader and PC.
• Zoll Data Control (ZDC) for Windows
® software from Pinpoint Technologies, Version 1.5 or higher (no equivalent) or Zoll Data Control (ZDC) for DOS software, Version 5.5 or higher (no equivalent).
• Phillips #1 screwdriver.
• Phillips #2 screwdriver.
• Flatblade screwdriver.
• Needle nose pliers without teeth.
• Orange (wooden) sticks.
Equipment You Need for the M Series Options Maintenance
Tests
• SpO
2 cable and sensor (if option is installed).
• EtCO
2 cable and sensor (if option is installed).
• Paddles.
• Printer Paper.
• Battery.
• AC line cord.
• 3 lead, 5 lead and 12 lead ECG cables. (12 lead cable needed if 12 lead option is installed.)
3
M Series Service Manual
Tools Needed
Test Setup
1.0 Physical Inspection of the Unit
None.
None.
Observe this…
1.1
Housing
Is the unit clean and undamaged?
1.2
Does the unit show signs of excessive wear?
1.3
Does the handle work properly?
1.4
Does the recorder drawer open and close properly?
1.5
Are input connectors clean and undamaged?
1.6
Are there any cracks in the housing?
1.7
Do the front panel or selector switches have any damage or cracks?
1.8
Are there any loose housing parts?
1.9
Do the paddle latches work properly?
1.10
Paddles
Do the adult and pedi plates have major scratches or show signs of damage?
1.11
Do the adult shoes slide on and off easily to expose the covered pedi plates?
1.12
Are the paddles clean (e.g., free of gel) and undamaged? (if applicable)
1.13
Cables
Are all cables free of cracks, cuts, exposed or broken wires?
1.14
Are all bend/strain reliefs undamaged and free of excessive cable wear?
Pass/Fail
o o o o o o o o o o o o o o o o o o o o o o o o o o o o
4
M Series Service Manual
Observe this…
1.15
Battery
Is the ZOLL battery fully charged?
1.16
Is the battery seated in the battery well correctly?
Record your results on the Maintenance Test Checklist.
Pass/Fail
o o o o
5
M Series Service Manual
Tools Needed
Test Setup
2.0 Front Panel Button Test
None.
Do the following:
• Install strip chart paper into the recorder tray.
• Install the battery in the unit or connect the A/C power cord to the unit and then plug the cord into an electrical outlet.
• Connect the universal cable and ECG cable (3 lead, 5 lead, or 12 lead) to the ZOLL simulator, or Dynatech Impulse
4000 Analyzer (or equivalent).
2.1
2.2
Do this…
Turn the selector switch to
MONITOR.
(For AED units, turn the selector switch to ON and select Manual mode.)
Press the LEAD button; three times for the 3 lead cable and seven times for the 5 lead cable.
Observe this…
Listen for 4 beep tones. PADS and MONITOR display on the monitor.
NOTE: PADS is a factory default setting.
Each time you press the LEAD button, a different lead number appears under the LEAD heading on the display.
PADS, I, II, III will display a 3 lead ECG cable if connected or no
ECG cable is connected.
PADS, I, II, III, AVR, AVL, AVF, V1 will display a 5 lead ECG cable.
Pass/Fail/NA
o o o o
2.3
2.4
Connect the 12 lead cable to unit and simulator. Press the
LEAD button and select the lead for each of the 12 lead settings.
Set the simulator to NSR of
120 BPM. To check the size of the ECG waveform, press the SIZE button.
A 12 Lead cable will display PADS, I, II, III, AVR, AVL, AVF,
VI, V2, V3, V4, V4, V5, V6.
As you press the SIZE button five times (0.5, 1.0, 1.5, 2.0, 3.0), note that the size of the ECG waveform appropriately changes on the display.
o o o o o o
6
M Series Service Manual
2.7
2.8
2.9
2.10
2.5
2.6
2.11
2.12
Do this…
Observe this…
Press the ALARM
SUSPEND button.
Press the RECORDER button (if equipped).
Bell changes from disabled to enabled. If the alarm sounds, press the ALARM SUSPEND button to turn it off. The alarm will only be suspended for 90 seconds at this point. Press and hold the
ALARM SUSPEND button for 3 seconds to disable alarms.
The strip chart paper moves out of the unit from the paper tray.
Check that the correct time, date, ECG lead annotation and waveform are recorded on the paper. (Set Time and Date, if necessary.)
Open the paper tray.
Press RECORDER button.
Close the paper tray.
Press RECORDER button.
CHECK RECORDER message appears on the monitor.
Strip chart paper flows out of paper tray. Verify that the CHECK
RECORDER message no longer displays.
Press RECORDER button.
Strip chart paper stops flowing out of paper tray.
Pass/Fail/NA
o o o o o o o o o o o o
Press the VOLUME softkey.
The volume bar graph displays.
o o o o o
To increase the volume of the beep, press the Inc. softkey.
To decrease the volume of the beep, press the Dec. softkey.
Press the CONTRAST button.
Audible beep when the QRS wave displays. The bar graph increases on the display indicating an increase in volume. This action does not increase the volume which is normal.
Note: The QRS tone is on or off. There is no gradual change in volume. If equipped, voice prompts are gradual. Note: The voice volume has 5 settings. Setting 3 is in the mid-range.
The bar graph decreases on the display indicating a decrease in volume. The volume shuts off at the last bar; otherwise, the volume is the same as originally set.
Contrast menu displays.
o o o o
7
M Series Service Manual
2.15
2.16
2.17
2.13
2.14
Do this…
(For LCD monitors only.)
Press the CONTRAST button.
To increase the contrast of the display, press the Inc. softkey.
Observe this…
Background light and characters display.
The contrast increases on the monitor display (LCD).
The brightness increases on the monitor display (EL).
To decrease the contrast of the display, press the Dec. softkey.
Press the SUMMARY button (if available).
Press the
CODEMARKER
button (if available).
Connect A/C current and install the battery. Turn the unit off.
The bar graph increases on the display indicating an increase in contrast.
NOTE Electro luminescence (EL) displays have only two settings independent of the bar graph without any gradual changes.
If EL brightness is already set to its highest level, brightness will not change.
The bar graph decreases on the display indicating a decrease in contrast (LCD) and brightness (EL). The display contrast and brightness changes.
Summary menu displays on the monitor showing the summary report options.
Code marker menu displays.
CHARGER ON indicator lights.
The amber or green lights illuminate.
Note: If both lights flash ON/OFF, the unit is defective or no battery is installed.
Pass/Fail/NA
For LCD monitors o o o o o o o o o o o o o o o o o
2.18
2.19
2.20
If applicable, connect D/C current and install the battery. Turn the unit off.
Remove the battery.
CHARGER ON indicator lights.
The amber or green lights illuminate.
The yellow light indicates the battery is being charged. The green light indicates the battery is fully charged to present capacity.
NOTE If both lights flash ON/OFF, the unit is defective or no battery is installed.
Note that both charge lights (green and amber) flash alternately.
Replace the battery and the turn unit on.
Note that the yellow charge light illuminates. o o o o o o o
8
M Series Service Manual
Do this…
Observe this…
2.21
2.22
Press the ANALYZE button (if available).
Move the selector switch to
DEFIB. Select 2J. Press the
CHARGE button.
SELECT DEFIB MODE message appears on the monitor. (For manual devices.)
The display shows that the unit is charging. The SHOCK button lights when the unit is charged. Ready tone for DEFIB sounds.
2.23
2.24
2.25
2.26
Press and hold the
ENERGY SELECT down arrow.
Press and release the
ENERGY SELECT up arrow 19 times.
Unit discharges internally and selected energy decrements to 1J.
The following energy amounts display incrementally 2, 3, 4, 5, 6,
7, 8, 9, 10, 15, 20, 30, 50, 75, 100, 150, 200, 300, 360J (for DSW).
Biphasic: 1-10, 15, 20, 30, 50, 75, 100, 120, 150, 200J.
Press the CHARGE button.
Note the display shows the unit charged up to 360J (200J —
Biphasic) and the SHOCK button lights.
Press the SHOCK button.
The unit discharges and the SHOCK button is no longer lit. A 15 second strip chart automatically prints, displaying the number of joules delivered (if equipped with recorder).
Record your results on the Maintenance Test Checklist.
Pass/Fail/NA
o o o o o o o o o o o o o o o o o o
9
M Series Service Manual
Tools Needed
Test Setup
3.0 3, 5, and 12 Leads Test
3 lead, 5 lead, and 12 lead cables.
Test each cable separately.
Note: The M Series unit must be configured to display ECG LEAD OFF message.
Connect the lead wires appropriate to each test to the Dynatech Impulse 4000 or equivalent (Symbio CS1201).
3.1
3.2
Do this…
Turn the selector switch to
MONITOR. Select leads.
Disconnect one lead from the simulator.
Observe this…
NO ECG LEADS OFF message displayed.
The ECG LEAD OFF message displays within 3 seconds (if configured).
Pass/Fail/NA
o o o o o o
3.3
3.4
Reconnect the lead. Repeat step 3.2 with the remaining leads.
Repeat 3.2 and 3.3 for 5 lead and 12 lead cables.
Wait for ECG LEAD OFF message to clear from the display (if configured).
NOTE: If heart rate alarm sounds, press and hold the ALARM
SUSPEND button for 4 seconds to disable the alarms.
NOTE: When testing the 12 lead cable, the ECG LEAD OFF message displays when you pull off a limb lead. When you pull off a V lead, the ECG VX LEAD OFF message displays where
“X” is the number between 1 and 6.
Record your results on the Maintenance Tests Checklist.
o o o o o o
10
Tools Needed
Test Setup
CAUTION
M Series Service Manual
4.0 Power Supply Test (Optional)
2 red miniature alligator to miniature alligator leads.
1 black miniature alligator to miniature alligator test lead.
DC power supply (15 Amp minimum).
0.1
Ω
1%
resistor (
¼
W or greater).
1000
Ω
1%
¼
W resistor.
Fluke 75 multimeter or equivalent.
Make sure the unit and power supply are turned off.
Connect one end of the black lead to the “-” terminal in the battery well.
Connect the other end of the black lead to the “-” terminal of the power supply.
Connect the red lead to “+” terminal socket of the battery well. Use the middle pin with the plastic guard around it.
Connect the other end of the red lead to the “+” terminal of the power supply.
Set the power supply voltage to 7V.
Be sure to connect the power supply properly to the M Series battery well terminals or damage to the unit may result.
Do NOT raise the power supply voltage above 12V.
Red
+
Black
_
Battery Well
+
_
15 Amp
Supply
11
M Series Service Manual
4.1
Do this…
Turn the selector switch to
MONITOR.
(For AED units, turn the selector switch to ON and select Manual mode.)
Turn the unit off.
Observe this…
The unit should not turn on.
4.2
4.3
4.4
Adjust the power supply voltage to 10.3V and turn the selector switch to
MONITOR (for AED units, turn the selector switch to ON).
Low Battery Test
Set voltage to 9.8V.
Set voltage to 9.3V.
The unit should turn on.
No LOW BATTERY message displays.
4.5
LOW BATTERY message displays within 30 seconds.
4.6
Shut Down Voltage Test
Set voltage to 8.5V.
Unit should shut off within 30 seconds.
Record your results on the Maintenance Tests Checklist.
Pass/Fail
o o o o o o o o o o o o
12
M Series Service Manual
Test Setup
Remove red lead from power supply and connect to 0.1
Ω resistor.
Connect other end of resistor to “+” terminal of power supply using a second red lead.
Connect multimeter across the resistor.
Set voltage scale (if DVM is not autoranging) to 220 mV.
Red
+
_
+
DMM
Battery Well
Black
_
+
_
15 Amp
Supply
4.7
4.8
Do this…
System Current Test
Set power supply to 10.3V.
Turn the selector switch to
MONITOR.
(For AED units, turn the selector switch to ON and select Manual mode.)
Observe this…
Voltage across resistor should be 80 mV or less (<800 mA of ON current). NOTE: Without optional parameters.
a) With green screen or LCD and no options <80mV b) With yellow screen and no options <81mV c) With yellow screen and SpO
2
<104mV d) With yellow screen and voice recording <91mV e) With yellow screen, voice recording and SpO
2
<114mV f) All devices with EtCO
2
<121mV
Pass/Fail/NA
o o o o o o o o o o o o o o o o o o o o o
4.9
Turn unit off.
Record your results on the Maintenance Tests Checklist.
o o
13
M Series Service Manual
Test Setup for Off Current
Test
Remove 0.1
Ω
resistor and replace with 1K
Ω
.
Connect DMM across resistor.
Set voltage scale to DCV.
Measure voltage across resistor.
Do this…
Observe this…
Voltage should be less than 450 mV (<450
µ
A of current).
4.10
Off Current Test
Measure across resistor with unit turned off.
Record your results on the Maintenance Tests Checklist.
Pass/Fail
o o
14
Tools Needed
Setup
M Series Service Manual
5.0 Leakage Current Test
See the manufacturer’s instructions or supplied specifications for the leakage tester you use.
See the manufacturer’s instructions or supplied specifications for the leakage tester you use. Repeat leakage test with accessories: MFC, external paddles, internal paddles, and anterior/posterior paddles.
ECG
MFC
Earth
Maximum Leakage Acceptance Limits
Normal Condition
10
µ
100
500
Α
µ
µ
Α
Α
*Single fault considered AC mains on applied part.
Single Fault Condition*
50
µ
Α
100
µ
Α
1000
µ
Α
15
M Series Service Manual
Tools Needed
Test Setup
6.0 Paddles Test
None.
If applicable, connect the universal cable to the paddles. Place paddles in paddle wells.
Do this…
Observe this…
6.1
6.2
6.3
6.4
6.5
Turn the selector switch to
DEFIB. Press and hold the
ENERGY DOWN button on the sternum paddle.
Press and release the
ENERGY UP button on the sternum paddle for each setting.
Press and release the
RECORDER button on the sternum paddle.
Select 30J using the paddle
ENERGY button. Press the
CHARGE button on the
Apex paddle.
The energy selection decreases to 1J.
The energy selection increases incrementally to 360J (2, 3, 4, 5, 6,
7, 8, 9, 10, 15, 20, 30, 50, 75, 100, 150, 200, 300, 360J).
Biphasic: 1-10, 15, 20, 30, 50, 75, 100, 120, 150, 200J.
The recorder turns on. Press and release again to turn off.
The unit charges to 30J, then the red LED charge indicator illuminates and the charge tone sounds. (Note that the front panel shock button does not illuminate).
Press and release the APEX
SHOCK button.
No discharge.
6.6
Press and release the
STERNUM SHOCK button.
No discharge.
6.7
Press and hold both paddles
SHOCK buttons.
The unit discharges. The TEST OK message displays and the red
LED turns off. The recorder runs.
Record your results on the Maintenance Tests Checklist.
Pass/Fail/NA
o o o o o o o o o o o o o o o
16
M Series Service Manual
Tools Needed
Test Setup
7.0 Heart Rate Display Test
Calibrated ECG simulator with 60Hz sine wave output capability.
Mini-phone plug for measuring output signal from 1 Volt ECG OUT jack (optional).
ECG Cable (3 or 5 leads).
Turn the selector switch to MONITOR. Press LEAD button until “I” displays.
Connect the ECG leads to the DYNATECH Impulse 4000 or equivalent.
Connect the ECG cable to the unit.
Do this…
Observe this…
7.1
Set the ECG Simulator to
120BPM.
The Heart Rate displays as 120 +/- 2 bpm
Record your results on the Maintenance Tests Checklist.
Pass/Fail/NA
o o o
17
M Series Service Manual
Tools Needed
Test Setup
8.0 Calibrating Pulses on Strip Chart Test
None.
None.
Do this…
Observe this…
8.1
Press the RECORDER button.
8.2
Press and hold SIZE button to activate the calibration signal.
The strip chart displays a signal of 300 ppm with an amplitude of
10 mm +/- 1 mm. The signal also appears on the video display.
Record your results on the Maintenance Tests Checklist.
Pass/Fail/NA
o o o
18
Tools Needed
Test Setup
M Series Service Manual
9.0 Notch Filter Test
Dynatech Impulse 4000 (or equivalent).
Connect the ECG cable to the DYNATECH Impulse 4000 or equivalent.
Connect the ECG cable to the unit
.
Do this…
Observe this…
9.1
Turn the selector switch to
MONITOR mode.
(For AED units, turn the selector switch to ON and select Manual mode.)
9.2
Select lead I, size 3x.
Select 60Hz (or 50 Hz for a
50Hz unit) on the Dynatech
Impulse 4000.
9.3
Press RECORDER button.
Verify that the waveform amplitude on the strip chart is less than
1.5 mm.
9.4
Turn the ECG simulator off.
Record your results on the Maintenance Tests Checklist.
Pass/Fail/NA
o o o
19
M Series Service Manual
Tools Needed
10.0 Heart Rate Alarm Test
Dynatech Impulse 4000.
10.2
10.3
10.4
10.5
10.6
10.7
10.1
10.8
10.9
Do this…
Turn the selector switch to
MONITOR mode.
(For AED units, turn the selector switch to ON and select Manual mode.)
Connect the ECG leads to the
Dynatech Impulse 4000. Set the simulator to 120 BPM and the defibrillator to lead II.
Press ALARMS.
Set LOW limit to 30, HIGH limit to
150 then, press the RETURN softkey.
Press ALARM SUSPEND button.
Remove a lead wire from the
Dynatech Impulse 4000.
Observe this…
Lead II message displays.
NSR ECG at 120 BPM +/- 2 displayed.
The alarm menu displays.
Press SELECT PARAM softkey until ECG HR displays.
Press INC> for state.
Cursor scrolls through parameters.
Cursor scrolls through ENABLE, AUTO and
DISABLE.
Press DEC>for state.
Cursor scrolls through ENABLE, DISABLE, AND
AUTO.
Press INC> until ENABLE displays.
ENABLE displays.
MONITOR displays.
No alarm sounds.
The bell symbol flashes and the heart symbol stops flashing. The ECG LEAD OFF alarm tone sounds.
Recorder prints a stripchart showing a low heart rate, if enabled.
Pass Fail/NA
o o o o o o o o o o o o o o o o o o o o o o o o o o o
20
M Series Service Manual
Do this…
Observe this…
10.10
10.11
10.12
Reattach ECG Lead wire to
Dynatech Impulse 4000 and hold the
ALARM SUSPEND button on unit for 4 seconds.
The bell symbol has an “X through it.
The heart symbol flashes with each QRS wave.
Press the ALARM SUSPEND button.
Alarm is enabled. Bell symbol (without “X”) displays.
Set simulator to 160 BPM or higher.
Heart Rate Value is highlighted, alarm tone sounds, the bell and the heart symbol both flash.
10.13
Press the ALARM SUSPEND button in the unit.
Alarm is suspended for 90 seconds. The bell symbol has an “X” through it. The heart symbol flashes with each
QRS wave.
10.14
Press and hold ALARM SUSPEND for 4 seconds to disable alarms.
Record your results on the Maintenance Tests Checklist.
Pass Fail/NA
o o o o o o o o o o o o o o o
21
M Series Service Manual
11.0 Defibrillator Self Test
SHOCK HAZARD!
TAKE THE NECESSRY PRECAUTIONS TO GUARD AGAINST SHOCK OR INJURY BEFORE YOU
START CONDUCTING THE DEFIRBILLATOR TESTS.
Keep hands and all other objects clear of the multi-function cable connections and defibrillator analyzer when discharging the defibrillator.
Before you discharge the defibrillator, warn everyone near the equipment to STAND CLEAR.
CAUTION
Tools Needed
Test Setup
Do NOT internally discharge the unit more than 3 times in 1 minute. Note that multiple rapidly repeating internal discharges at more than 30 Joules may damage the unit.
MFC Test Port Connector 1004-0053-99 with universal cable.
MFC Test Adaptor Connector (Dynatech Nevada Part Number 3010-0378 or equivalent).
Dynatech Impulse 4000 or equivalent defibrillator analyzer.
ECG Cable.
Stop watch.
Ensure the unit is turned off and the ECG cable is connected to the unit and analyzer. The universal cable should not be connected to any equipment at the beginning of this test.
11.1
Do this…
Turn the selector switch to
DEFIB mode.
(For AED units, turn the selector switch to ON and select Manual mode.)
Set leads to PADS.
Observe this…
CHECK PADS/POOR PAD CONTACT message displays.
Pass/Fail
o o
22
M Series Service Manual
11.2
11.3
11.4
Do this…
Observe this…
Connect the universal cable to the MFC test port.
DEFIB PAD SHORT message displays.
Select energy level of 100J and press the CHARGE button.
The charge time is >2 second and <10 seconds and SELECT 30J
FOR TEST is displayed.
Press the SHOCK button.
Unit does not discharge. DEFIB PAD SHORT message displays.
Pass/Fail
o o o o o o o o o o
11.5
Set energy level to 30J.
Unit internally discharges.
11.6
Press the CHARGE button.
Unit charges to 30J and displays DEFIB 30J READY. The charge ready tone sounds.
11.7
Press and hold SHOCK button. Unit discharges. TEST OK message and number of joules delivered message displays. For example, using the message at the top of the printed strip chart would read as follows:
For monophasic unit:
30 JOULES TEST OK. 37-47A JOULES DEL=30 IMPED=0.
For Biphasic Unit:
30 JOULES TEST OK. TEST_CUR=10-14A DEFIB_IMPED=0.
NOTE The impedance value may range from 0 to 5
Ω.
Record your results on the Maintenance Tests Checklist.
o o
23
M Series Service Manual
Tools Needed
Test Setup
12.0 Synchronized Cardioversion Test
Dynatech Impulse 4000 or equivalent defibrillator analyzer.
Connect the universal cable via the adapter (D.N.I #3010-0378) to the defibrillator analyzer.
Select cardioversion on analyzer. Input 1mV ECG signal at 60 -120 BPM.
Do this…
Observe this…
12.1
Press LEAD button to select
PADS and Size X1.
12.2
Press the SYNC softkey on the defibrillator. Enter synchronized cardioversion timing test mode on the defibrillator analyzer.
Sync appears on display.
Sync markers display on the monitor. The sync marker appears as a down arrow over the ECG R-wave peaks on strip chart and display.
12.3
Select 360J (200J for Biphasic unit).
12.4
Press the CHARGE button.
When the SHOCK button lights, press and hold the
SHOCK button.
Observe that the R-wave to shock delay (sync delay) is less than
60 milliseconds on the analyzer display.
Defibrillator discharges.
Record your results on the Maintenance Tests Checklist.
Pass/Fail
o o o o
24
Tools Needed
Test Setup
M Series Service Manual
13.0 Shock Test
Dynatech Impulse 4000 or equivalent defibrillator analyzer.
Stop watch.
Connect the universal cable via the adapter (D.N.I #3010-0378) to the defibrillator analyzer.
Ensure that a fully charged battery is installed in the unit.
NOTE:
If your M Series AED does not have manual override capability, do not perform this test.
13.1
13.2
13.3
13.4
13.5
13.6
Do this…
Observe this…
Turn the selector switch to DEFIB mode.
(For AED units, turn the selector switch to ON and select Manual mode.)
Press the ENERGY SELECT down arrow until 1J displays.
Press the CHARGE button.Wait for the SHOCK button to illuminate.
DEFIB 1J SEL displays.
DEFIB 1J RDY displays.
Press the SHOCK button.
Repeat for all settings 1-300J
(DSW); 1-150J (Biphasic)
Press the ENERGY SELECT up arrow until 360J (200J for Biphasic) displays.
Unit discharges 0J-2J into the simulator. (Note: The displayed rhythm may change shape for 30 seconds before it returns to an original rhythm. This is caused by the operation of the adaptive bandwidth defibrillator recovery circuit.)
Energy delivered is within + /- 15% or 2J of setting which ever is greater.
DEFIB 360J SEL displays or
DEFIB 200J SEL displays (for Biphasic unit).
Pass/Fail/NA
o o o o o o o o o o o o o o o o o o
25
M Series Service Manual
Do this…
Observe this…
13.7
Press the CHARGE button and start timing with a stopwatch. Stop timing when the SHOCK button illuminates.
Observe and record the value of the charge time on the stop watch.
Charge time (DSW) 4.0-8.0 sec.
Charge time (Biphasic) 3.0-6.0 sec.
13.8
Press the SHOCK button.
Record the value of the discharge energy that is displayed on the analyzer.
360J discharge energy (DSW) 306-414J.
200J discharge energy (Biphasic)170-230J.
13.9
(Biphasic unit only) Note the Patient
Current and Defib Impedance on the strip chart.
Patient Current 22-24A.
Defib Impedance 46-54 Ohms.
13.10
(AED unit only) Disconnect the cable from the analyzer.
CHECK PADS audio prompt.
Record your results on the Maintenance Tests Checklist.
Pass/Fail/NA
o o o o o o o o o o o o
26
Tools Needed
Test Setup
M Series Service Manual
14.0 Summary Report Test (if applicable)
None.
Connect the universal cable to the defibrillator analyzer. If you are using paddles, place the paddles on the analyzer’s discharge plates.
Do this…
Observe this…
14.1
14.2
14.3
Press and hold the
SUMMARY softkey for 4 to 8 seconds to erase any previously stored data.
Set selector switch to
DEFIB. Select 300J (200J for Biphasic) using the
ENERGY SELECT
button, and press the
CHARGE button. When charged, press the SHOCK button to discharge into the defibrillator analyzer.
Wait 18 seconds, then press the Code Marker softkey.
Press the CPR softkey.
ERASING REPORT displays.
The unit successfully discharges and prints a strip chart.
The Code Markers display.
14.4
Turn the unit off. Wait 10 seconds and then turn the unit on. Press the
SUMMARY softkey, then press the PRINT CHART softkey.
Summary report prints. The report displays the correct date, time, the shock delivered and Code Marker event.
Record your results on the Maintenance Tests Checklist.
Pass/Fail
o o o o o o o o
27
M Series Service Manual
Tools Needed
Test Setup
15.0 Advisory Message Test (for AED and Manual/Advisory Units)
None.
Connect the universal cable via the adapter (D.N.I #3010-0378), then attach to the defibrillator analyzer.
Do this…
Observe this…
15.1
15.2
Connect universal cable to the simulator.
Turn the selector switch to
DEFIB mode.
(For AED units, turn the selector switch to ON.)
Select VF (ventricular fibrillation) on the simulator, then press the
ANALYZE button.
ANALYZING ECG message displays.
STAND CLEAR message displays.*
SHOCK ADVISED message displays.*
PRESS SHOCK message displays*+
*AED’s audio prompts are standard. Advisory audio prompts are user configurable on later manufactured units.
+If configured for auto charge.
Unit discharges.
15.3
Press the SHOCK button.
15.4
Select the NSR (normal sinus rhythm) on the simulator, then press the
ANALYZE button.
ANALYZING ECG message.
STAND CLEAR message.*
NO SHOCK ADVISED message.*
*AED’s audio prompts are standard.
Record your results on the Maintenance Tests Checklist.
Pass/Fail
o o o o o o
28
Tools Needed
_
Test Setup
+
M Series Service Manual
16.0 Pacer Test
Dynatech Impulse 4000
Analyzer (software 1.06 or higher) with optional external plug in pacing module (TQA-17) or equivalent.
Note: The following tests are to be performed only on M Series units equipped with the optional pacing function.
The pacer output can be measured using an oscilloscope set to DC coupling connected across a load resistor. (See diagram in column for universal cable connector polarity.) The load resistor is a 100 ohm, 5 watt or greater. The pacer output is a positive going pulse, 40 +/- 2 ms duration with an amplitude of 0.1 volt per milliamp of selected output
(e.g., 40 milliamps of selected output has an amplitude of 4 +/- 0.5 volts the specified tolerance displayed on the oscilloscope).
If an external non-invasive pacer analyzer is being used, then follow the manufacturer’s guidelines for measuring the frequency (ppm), output (mA) and the pulse width measured in milliseconds. Note that the analyzer pace load resistor must be less than 250 ohms.
Connect the universal cable from the M Series to the External Pacer Load (TQA-17) of the Impulse 4000.
Turn the Main Selector knob of the M Series to the Pacer mode.
16.1
16.2
16.3
16.4
Do this…
Observe this…
Set the PACER OUTPUT to
14 mA and disconnect MFC connector from the Dynatech
Impulse 4000.
Reconnect the universal cable to the Dynatech Impulse 4000.
Press Clear Pace Alarm softkey.
CHECK PADS AND POOR PAD CONTACT message displays.
The pace alarm is active.
CHECK PADS AND POOR PAD CONTACT message disappears. The pace alarm is cleared.
No output appears on the Dynatech Impulse 4000.
Set rate to 180 ppm; output to
0mA.
Increase the output to 20mA.
Output on the Dynatech Impulse 4000 is 20mA +/- 5mA. Pulse width is 40mS +/-2mS.
Pass/Fail
o o o o o o o o
29
M Series Service Manual
16.12
16.13
16.14
16.15
16.16
16.17
16.18
16.5
16.6
16.7
16.8
16.9
16.10
16.11
Do this…
Observe this…
Increase the output to 40mA.
Increase the output to 60mA.
Increase the output to 80mA
Output on the Dynatech Impulse 4000 is 40mA +/- 5 mA. Pulse width is 40mS +/-2mS.
Output on the Dynatech Impulse 4000 is 60mA or +/- 5mA. Pulse width is 40mS +/-2mS.
Output on the Dynatech Impulse 4000 is 80mA or +/- 5mA. Pulse width is 40mS +/-2mS.
Increase the output to 100mA.
Output on the Dynatech Impulse 4000 is 100mA or +/- 5mA.
Pulse width is 40mS +/-2mS.
Increase the output to 120mA.
Output on the Dynatech Impulse 4000 is 120mA or +/- 6mA.
Pulse width is 40mS +/-2mS.
Increase the output to 140mA.
Output on the Dynatech Impulse 4000 is 140mA or +/- 7mA.
Pulse width is 40mS +/-2mS.
Decrease the output to 60mA.
Decrease the rate to 30 ppm.
Pacer rate on Dynatech is 29-31 ppm.
Increase the rate to 40ppm.
Pacer rate on Dynatech is 39-41 ppm.
Pass/Fail
o o o o o o o o o o o o o o
Increase the rate to 60ppm.
Increase the rate to 80ppm.
Increase the rate to 100ppm.
Increase the rate to 120ppm.
Increase the rate to 180ppm.
Decrease the rate to 50 ppm.
Pacer rate on is Dynatech is 59-61 ppm.
Pacer rate on Dynatech is 78-82 ppm.
Pacer rate on Dynatech is 98-102 ppm.
Pacer rate on Dynatech is 118-122 ppm.
Pacer rate on Dynatech is 177-183 ppm.
Pacer rate on Dynatech is 49-51 ppm.
o o o o o o o o o o o o o o
30
M Series Service Manual
16.19
16.20
16.21
16.22
Do this…
Observe this…
Connect the ECG cable to the
M Series and Dynatech
Impulse 4000. Select the ECG at 60 BPM on the Dynatech
Impulse 4000.
ECG at 60 BPM is seen on the display and no stimulus markers.
Press the Async Pace softkey.
ECG at 60 BPM seen on the display with the pace stimulus markers displayed. Async pace message displays.
Observe the pace stimulus markers every 15mm +/-1mm.
Turn off Dynatech. Set Pacer
Rate to 100ppm. Press the
RECORDER ON button.
Press and hold 4:1 button.
Observe the pace stimulus markers every 60 mm+/- 1.5 mm.
Record your results on the Maintenance Tests Checklist.
Pass/Fail
o o o o o o o o
31
M Series Service Manual
Tools Needed
Test Setup
17.0 SpO
2
Monitor Test for SpO
2
Option
Masimo
®
Reusable Sensor.
Masimo
®
Patient Cable.
Bio-Tek Index 2PFE SpO
2
Simulator (or equivalent).
Connect the universal cable to the MFC test plug.
DO NOT connect the ECG cable to the simulator.
Install the Masimo
®
Patient Cable and attach the Masimo
®
sensor to the patient cable.
Connect the Masimo
®
sensor to the finger simulation post.
Place a fully charged battery into the battery well or connect to AC power (DC power, if equipped).
Ensure that the SpO
2
Simulator is off.
17.1
17.2
17.3
Do this…
Observe this…
Turn the selector switch to
MONITOR.
(For AED units, turn the selector switch to ON and select Manual mode.)
Wait ten seconds.
Turn on the SpO
2 simulator.
Press the SIM softkey on the
Index SpO
2
Simulator. Press the MAN softkey.
Press the 02+ or 02- softkey of the simulator until the SpO
2 output is at 98%.
The SpO
2
saturation percentage appears as a dashed line on the monitor.
The SpO
2
PULSE SEARCH message displays.
The M Series
SpO
2
reading of 98 +/- 1% appears on the M Series monitor. Note that you may need to wait up to 2 minutes for the information to appear on the ZOLL display.
Pass/Fail
o o o o o o
32
M Series Service Manual
17.4
17.5
17.6
17.7
17.8
Do this…
Using the Index
SpO
2
Simulator, press the BPM+ or
BPM- softkey until the heart rate is 230 BPM.
Observe this…
The
SpO
2
rate 230 BPM displays on the simulator screen.
Note that you may need to wait up to 2 minutes for the information to appear on the ZOLL display.
The
SpO
2
saturation of 96-100% appears on the M Series display.
The heart rate of 226-234 BPM displays on the M Series monitor.
The
SpO
2 saturation of 96-100% displays on the unit.
The heart rate of 46-54 BPM displays on the M Series monitor.
Pass/Fail
o o o o o o
Using the Index
SpO
2
Simulator, press the BPM- softkey until the heart rate is
50 BPM
Using the Index
SpO
2
Simulator, press the 02+ softkey until the SpO
2 output is at 72%.
Press Wave 2 softkey.
Select the SpO
2
waveform.
Press RECORDER.
The
SpO
2 saturation of 70-74% displays on the unit.
The heart rate of 46-54 BPM displays on the M Series monitor.
Plethysmographic waveform appears on the ZOLL display.
The plethysmographic waveform prints on the strip chart paper.
o o o o o o o o o o 17.9
Using the Index
SpO
2
Simulator, press the BPM- softkey until the heart rate is at
230 BPM.
The
SpO
2 saturation rate of 70-74% displays on the unit.
The heart rate in the heart position of 226-234 BPM displays on the monitor.
17.10
Select Wave 2
SpO
2
.
Verify that the waveform is displayed at the correct rate.
Print the waveform.
17.11
Remove the Masimo
®
patient cable.
Record your results on the Maintenance Tests Checklist.
o o
33
M Series Service Manual
Tools Needed
Test Setup
18.0 EtCO
2
Monitor Test (for EtCO
2
Option)
Novametrix Capnostat Simulator Tb 1265/7100.
Install the battery.
On the Novatrix Simulator, set the following:
Set inspired CO
2
to OFF.
Set% CO
2
to 0.
Set Sensor Location to ZERO CELL.
Set Source Current to NORMAL.
Set CO
2
mode to CONTINUOUS.
Set Temperature to NORMAL.
18.1
18.2
18.3
Do this…
Observe this…
Turn the selector switch to
MONITOR mode.
(For AED units, turn the selector switch to ON and select Manual mode.)
Attach the EtCO
2
simulator to the M Series input connections.
On the Novametrix
Simulator, set SENSOR
LOCATION to REF
CELL.
CO
2
SENSOR WARMUP message displays.
Note: You may need to wait up to 5 minutes for the warm-up message to disappear.
If the message REPLACE CO
2
SENSOR displays, reinsert the
Novametrix Simulator Cable.
Note that the message ZEROING CO
2
SENSOR may display for an additional 20 seconds. Automatic zeroing will occur if the unit had not been zeroed at the time of its last use.
The EtCO
2
reading of 36-40 mmHg displays on the monitor.
Note that you may need to wait up to 10 seconds for the unit to stabilize.
Pass/Fail
o o o o
34
M Series Service Manual
Do this…
Observe this…
18.4
On the Novametrix
Simulator, set SENSOR
LOCATION to AA CELL.
Set% CO
2
to 10.
Set CO
2
mode to
RESPIRATION.
The EtCO
2
reading of 74-84 mmHg appears on the M Series display. Note that you may need to wait up to 10 seconds for the unit to stabilize.
18.5
On the Novametrix
Simulator, set% CO
2
to 5.
The EtCO
2
reading of 34-42 mmHg displays on the M Series monitor.
Note that you may need to wait up to 10 seconds for the unit to stabilize. The Respiration Rate (RR) of 22-24 displays on the M
Series monitor. Press WAVE 2 softkey. The EtCO
2
waveform displays. Press RECORDER button. The EtCO
2 waveform prints.
Note that the CO
2
waveform is displayed and printed at 12.5 millimeters per second scale.
Record your results on the Maintenance Tests Checklist.
Pass/Fail
o o o o
35
M Series Service Manual
36
M Series Service Manual
Chapter 2
Troubleshooting
Overview
This chapter describes the most common technical problems that biomedical technicians experience when checking the M Series during routine maintenance or when there is a malfunction of the unit. It also contains a list of error messages that users may see if the unit is not operating properly.
This chapter contains the following:
• Troubleshooting tables for ECG Leads Off Messages and Monitor Displays
• Zoll M Series Error Messages
If the problems you encounter are not listed below, call ZOLL Medical Corporation’s Technical Service Department for further assistance. (See page iii for contact information.)
37
M Series Service Manual
Troubleshooting
The following tables show the most common troubleshooting issues and their solutions.
First, attempt to solve the problem with “Recommended User Action.” If these steps do not solve the problem, follow the steps listed in the “Recommended Technical Action” column.
Reported Problem
ECG LEAD OFF message displays.
(3, 5, 12 lead cable)
Recommended User Action Recommended Technical Action
•
Check preparation of ECG electrode site by cleaning the site, lightly abrading the patient’s skin and/or clipping the patient’s hair at the electrode site.
•
If electrode gels are dry, replace electrodes with new ones from a freshly opened package.
•
Verify that all leads are attached.
•
Set monitor to another lead.
•
Verify that the electrodes have not exceeded their expiration date.
•
Try to reproduce the problem using a simulator.
•
Inspect the ECG cables looking for corrosion or broken connector pins.
•
Check the cable for intermittent connections by flexing the cable at the yoke and snap connectors.
•
Check the cable connection to the defibrillator.
•
Inspect the ECG input connector and its pins. Replace it, if necessary.
•
Inspect the ECG cable connection to the system board.
•
Inspect the system board ECG shielding.
•
Remove and replace the system board.
38
M Series Service Manual
Reported Problem Recommended User Action Recommended Technical Action
V LEADS OFF message displays.
CHECK PADS/POOR PAD
CONTACT message displays.
•
If the user is not using V leads, attach V lead connector terminator plug to the cable’s V lead connector.
•
If a V1 lead wire metal snap comes in contact with the patient’s skin, then the system will show all V leads as OFF.
•
Remove V1 leads and others away from the patient. Turn off the unit and wait ten seconds before turning it back on.
•
Remove and reinsert PADS connector into the universal cable.
•
Check for damaged defibrillator pads, wires and or connector.
•
Check for dried out or expired defibrillator pads.
•
Clip (not shave) the patient’s hair and wipe pad contact area dry.
•
Connect the cable to the test plug. The DEFIB PAD
SHORT message displays to indicate that the cable is functioning properly.
•
If the DEFIB PAD SHORT message displays, then check the connections of the pads to the patient and to the defibrillator cable.
•
If the DEFIB PAD SHORT message does not display, remove the defibrillator from service.
•
Connect universal cable to the shorting plug. The DEFIB PAD
SHORT message should display, when you SELECT PADS. If the message does not display, then:
•
Try another universal cable.
•
Check the cable from the universal cable connector to the High
Voltage Module.
•
Check the cable from the High
Voltage Module to the system board.
•
Remove and replace the High
Voltage Module.
•
Remove and replace the system board.
•
Call ZOLL Technical Support for assistance.
39
M Series Service Manual
Reported Problem Recommended User Action Recommended Technical Action
Flash or arcing under defibrillator pad.
Displayed HR not accurate.
No artifact present.
•
Avoiding using alcohol and betadine in and around the treatment area because these skin preparations may lead to increased conductivity and/or bonding between the electrode’s adhesive and skin.
•
Check for gel droop. If the gel has leaked out of the gel treatment area, replace the electrode.
•
Ensure pads are coupling to the patient’s skin and connected to the universal cable.
•
Check for dried out gel on the defibrillator pad.
•
Clip patient’s excessive hair. Do not shave hair.
•
Check expiration date. Replace pad if date has expired.
•
Do not conduct chest compression through the pads because the pads could be damaged leading to the possibility of arcing and skin burns.
•
Apply the back electrode first. If the front electrode is already in place when the patient is being maneuvered for placement on the back, the front may become partially lifted, possibly causing arching and skin burns.
Verify heart rate flashes with each QRS on display.
•
Change lead selection.
•
Change ECG size.
•
Reposition ECG electrodes.
•
Ensure that wet gel pads are stored flat.
40
M Series Service Manual
Reported Problem Recommended User Action
Displayed HR not accurate; artifact present.
Wandering baseline.
Electronic interference.
•
Reduce or eliminate ECG artifact due to electrode or patient cable movement. Route cables so that they don’t pull on electrodes or swing excessively.
•
Ensure patient is motionless.
•
Check for possible excessive radio frequency interference.
•
Verify a good connection of electrodes to the patient.
•
Prepare the patient’s skin prior to the electrode attachment.
•
Move patient cables away from other electrical equipment, especially any RFI source.
•
Ensure ECG cable fits snugly in unit.
•
Change ECG cable.
•
Replace/reposition ECG electrodes.
See “Displayed HR not accurate.” above. Note that in 90% of electrode issues, size and lead changes don’t help.
Check for possible excessive radio frequency interference.
Move patient cables away from other electrical equipment.
Recommended Technical Action
•
Check for contamination on snaps.
Ensure springs are intact.
•
Check for intermittent ECG patient cable or connector wiring.
•
Replace ECG input connector.
•
Replace ECG connector to the system board cable.
•
Replace system board.
Same as above example.
•
Turn off sources of excessive RFI.
•
Move M Series unit away from
RFI source.
41
M Series Service Manual
Zoll M Series Error Messages
The following is a list of Zoll M Series error messages that may appear on your display. The “User Advisory” column informs you about an action in progress or provides feedback on a user correctable situation that typically does not require further technical support. The “Technical Action” column describes what you as a technician can do to correct the situation. Note that these messages will sometimes overlap part of the waveform display.
First, attempt to clear the message by turning the Selector Switch to OFF for ten seconds, then back to the desired operating mode. If the fault persists, call ZOLL Technical Service.
Error Message
200J MAX BIPHASIC
50J MAX
ADJUST ECG
ANALYSIS HALTED
ANALYSIS RESTARTED
Explanation
User attempted to set defibrillation energy >200J on
Biphasic Unit. No higher energy is available.
Energy < 50J for internal paddles. No higher energy is available.
Unit is in sync mode and heart rate is < 20 BPM.
Or, QRS size set too small for proper synchronization.
•
ECG analysis halted due to user interaction such as:
•
Lead/size change
•
Analyze button was pressed again
•
Impedance fault
•
Charging error detected in auto defib mode
This is a user prompt issued simultaneously with
ECG TOO LARGE or ECG TOO SMALL. Device detected ECG signals out of range, automatically adjusted ECG size and is now restarting its shockable rhythm analysis sequence.
User
Advisory
9
9
9
9
9
Technical Action
42
M Series Service Manual
Error Message
AUDIO FAULT 136
AUDIO NOT
RECORDING
AUDIO QUEUE FULL
BATT HIGH CURRENT
BATT HIGH VOLTAGE
BATT LOW CURRENT
BATT LOW VOLTAGE
BATT OVERCHARGE
Explanation
Audio DSP hardware error.
Audio is not recording.
Indicates that the audio output queue is full.
Additional voice prompts can’t be queued at this time.
Battery is charged and battery current is >.1 A or:
Battery is not charged and battery current is > 1.6 A.
User
Advisory
Technical Action
Replace audio board.
Replace system board.Turn unit off and back on again.
Install PCMCIA card.
Replace system board.
None.
Battery voltage > 15.5 v.
Battery is not charged and battery current is <.35 A.
Battery voltage < 9.5 v.
Charger on for > 4 hours.
Unplug from A/C.
Remove the battery for
20 seconds. Reconnect all above. If the problem persists, replace battery and or charger.
Replace battery and or charger
Replace battery and or charger.
Replace battery and or charger.
Replace battery and or charger.
43
M Series Service Manual
Error Message
BRIDGE SHORT
BRIDGE TEST FAILED
CABLE FAULT
CANNOT CHARGE
REPLACE CARD
Explanation
Current higher than expected was detected during the
Biphasic bridge test or immediately following a discharge.
User
Advisory
Technical Action
Ensure pads/paddles are used properly.
Attempt to clear the message by turning the
Selector switch to off then back to the desired operating modes.
Biphasic module not operating properly while charging.
Replace bridge or high voltage module.
Charge again.
(Auto defib mode only.)
Incorrect A/D reading for paddle ID (similar to
PADDLE FAULT).
Cannot charge when charge button pressed.
Write errors during manual or semi-automated modes.
9
9
Attempt to clear the message by turning the
Selector switch to OFF, then back to the desired operating mode.
Replace bridge or high voltage module.
Replace paddle set, universal cable and/or system board.
Replace high voltage module or capacitor.
May have configuration card installed or write protection on.
44
M Series Service Manual
Error Message
CARD FULL
CHECK CO
2
SENSOR
CHECK CO
2
ADAPTER
Explanation
Memory Card Full.
EtCO
2
Sensor is unplugged or defective.
Airway adapter is removed, occluded or adapter zeroing needs to be performed or was performed incorrectly.
CHECK MEMORY CARD No card detected during manual or semi-automated modes.
CHECK PADS Message displayed in conjunction with either POOR
PAD CONTACT or DEFIB PAD SHORT.
9
User
Advisory
9
9
Technical Action
9
Check that sensor cable is plugged in and seated properly. Check that sensor is not exposed to excessive heat. If problem persists, replace the sensor.
Replace/Clean airway adapter. Zeroing performed automatically.
Ensure pads are coupled to patient.
Check /replace pads and universal cable.
Replace system board.
CHECK PATIENT
CHECK PULSE
CHECK RECORDER
Background ECG analysis detects shockable rhythm.
Alternate message for NO SHOCK ADVISED message.Message also shown after delivering third shock when auto analyze 3 times option is enabled.
Produced when paper tray is empty, paper jams or recorder door is opened.
9
9
Replace paper sensor board, system interconnect board, and/or system board.
45
M Series Service Manual
Error Message
CHECK SPO
2
SITE
CHECK SPO
2
SENSOR
CLOCK FAULT 11
CLOCK FAULT 12
CLOCK FAULT 13
CO
2
COMM ERROR
CO
2
SENSOR WARM UP
CONFIRM MANUAL
MODE
DEFIB DISABLED
DEFIB FAULT 71
Explanation
Low or no perfusion in monitored finger or toe.
Reposition SpO
2
sensor on patient.
Real time clock oscillator failure.
Real time clock back-up power supply failure. Found oscillator stopped at power-up, but oscillator now running when the system is running. (Oscillator only runs when main power is applied).
One of the set time units (seconds, minutes, year, etc.) is out of range.
No or invalid communication from the EtCO
2 module.
EtCO
2
Sensor warming up.
9
User
Advisory
9
Technical Action
Replace system board.
Replace system board.
Replace system board.
Replace EtCO
2
module and or system board.
Wait for sensor to warm up. This process takes up to approximately one minute.
Displayed when manual mode is entered. Alerts user to confirm that manual mode is desired.
User prompt issued simultaneously with other faults if defib is disabled.
9
More than 50 internal dumps occurred in less than 20 minutes.
Possible configuration problem. Replace high voltage module. Call
ZOLL Technical
Support.
Turn the unit to OFF and back on. If fault persists, replace high voltage module.
46
M Series Service Manual
Error Message
DEFIB FAULT 72
DEFIB FAULT 76
DEFIB FAULT 77
DEFIB FAULT 78
DEFIB FAULT 79
DEFIB FAULT 80
DEFIB FAULT 81
DEFIB FAULT 84
DEFIB FAULT 85
DEFIB FAULT 86
DEFIB FAULT 87
Explanation
General defib error.
Capacitor voltage too high for selected energy.
Capacitor voltage > than absolute rated max.
Unable to charge defib cap.
Defibrillator charging too slowly.
4 defibrillator faults detected within 20 second period.
Discharge switch in undefined state.
“Upper” discharge transistor shorted (measured via applicable A/D channel).
“Lower” discharge transistor shorted (measured via applicable A/D channel).
One discharge switch closed during power up test.
Both discharge switches closed during power up test.
User
Advisory
Technical Action
Turn the unit to OFF and back on. If fault persists, replace high voltage module.
Replace high voltage module or capacitor.
Replace high voltage module or capacitor.
Replace high voltage module or capacitor.
Replace high voltage module or capacitor.
Replace high voltage module or capacitor.
Replace high voltage module or capacitor.
Replace high voltage module.
Replace high voltage module.
Replace paddles, control board or system board.
Replace paddles, control board or system board.
47
M Series Service Manual
Error Message
DEFIB FAULT 94
DEFIB FAULT 95
DEFIB FAULT 96
DEFIB FAULT 108
DEFIB FAULT 109
DEFIB FAULT 111
DEFIB NOT CHARGED
DEFIB PAD SHORT
DISABLE SYNC
DISCHARGE FAULT
Explanation
Processor fault causing safety monitor port to be non-functional.
Safe or shutdown line is not functional.
XPATREL or XPAT_ENABLE is faulted or one of the discharge transistors has shorted.
VMON voltage is less than the target energy during charging.
Defib capacitor voltage is greater than selected energy when defibrillator is charging or ready.
Defib capacitor voltage has exceeded the absolute maximum acceptable voltage.
Discharge button is pressed but the unit is not charged.
Measured impedance between high voltage leads of
MFC.
9
9
User
Advisory
Technical Action
Replace system board, high voltage module or capacitor.
Replace high voltage module.
Replace high voltage module.
Replace high voltage module or capacitor.
Replace high voltage module or capacitor.
Replace high voltage module, capacitor, and or system board.
Ensure pads are coupled to patient.
Check /replace pads or universal cable.
Replace system board.
Sync mode active when analyze pressed in defib.
Defib capacitor voltage is not decreasing.
9
Replace high voltage module, capacitor, and/ or system board.
48
M Series Service Manual
Error Message
ECG FAULT 4
ECG FAULT 5
ECG LEAD OFF
ECG TOO LARGE
ECG TOO SMALL
ECG V1 LEAD OFF
ECG V2 LEAD OFF
ECG V3 LEAD OFF
ECG V4 LEAD OFF
ECG V5 LEAD OFF
Explanation
Communication fault between ECG processor and main processor.
ECU RAM test failure, or ROM checksum test failure.
One or more ECG leads are not properly connected when leads are selected as input.
ECG signal too large for accurate shockable rhythm analysis.
ECG signal too small for accurate shockable rhythm analysis.
Chest lead V1 is not properly attached to patient.
9
9
9
User
Advisory
Technical Action
9
Turn off unit and then turn on to reset. If fault persists, replace system board.
Turn off unit and then turn on to reset. If fault persists, replace system board.
Check cable and patient connection. Change electrodes. Prepare patient’s skin.
Reduce ECG size.
Increase ECG size.
Chest lead V2 is not properly attached to patient.
Chest lead V3 is not properly attached to patient.
Chest lead V4 is not properly attached to patient.
Chest lead V5 is not properly attached to patient.
9
9
9
9
Reattach V lead. Check cable.
Reattach V lead.
Check cable.
Reattach V lead.
Check cable.
Reattach V lead.
Check cable.
Reattach V lead.
Check cable.
49
M Series Service Manual
Error Message
ECG V6 LEAD OFF
ENTER ACCESS CODE
ERASING REPORT
ECU CRC FAULT
EtCO
2
COM ERROR
FAX DIALING
FAX DONE
FAX PREPARING
FAX SENDING
INSERT CARD
Check memory card
LOW BATTERY
NO QRS DETECT
Explanation
Chest lead V6 is not properly attached to patient.
Manual mode access code needed.
Summary report being erased.
Invalid ECG samples detected over a one second period.
No or invalid communication from EtCO
2
module.
Preparation for sending fax.
Transmission complete.
Preparing fax for transmission.
Transmitting fax.
No card installed in unit during manual or semiautomated modes.
Low battery.
9
9
9
9
9
User
Advisory
9
Technical Action
9
Reattach V lead. Check cable.
Enter access code to enter manual mode with AED.
9
Turn off unit and then turn on to reset. If fault persists, replace system board.
Return unit for service to ZOLL Technical
Service Department.
9
Unit is in sync mode and heart rate is < 20 BPM or
QRS amplitude is too low for proper synchronization.
9
Replace battery or plug into AC power. Replace charger.
Increase ECG size and/ or change lead.
50
M Series Service Manual
Error Message
NO SHOCK ADV
NOISY ECG
OPEN AIR DISCHARGE
PACER DISABLED
PACER FAULT 115
PACER FAULT 116
PACER FAULT 117
PACER FAULT 121
PACER FAULT 122
Explanation
No shock advised. Advisory message when analysis finds non-shockable rhythm.
Number of noisy analysis intervals exceeds threshold.
User
Advisory
9
9
Cap voltage too high after discharge attempt, e.g., full energy discharge did not occur.
User prompt issued simultaneously with other pace faults if pacing is disabled.
Flyback pulse width control circuit is not under proper control of the processor and gate array.
Failure to detect XPACE_ON.
Pace relay is stuck closed.
During pace, the pace pulse width <30ms or >50ms.
Pace current is more than 15mA above and below selected value.
Technical Action
Stop all patient movement. Check connections. Press
Analyze button again.
Replace paddles, and, or high voltage module and system board.
Replace high voltage module or system board.
Replace high voltage module, capacitor, or system board.
Replace high voltage module, capacitor, and/ or system board.
Replace high voltage module, capacitor, and/ or system board.
Replace high voltage module, or system board.
Replace high voltage module, or system board.
51
M Series Service Manual
Error Message
PACER FAULT 123
PACER FAULT 126
PADDLE FAULT
PERFORM CPR
PLACE ON ZERO CELL
Advisory message in AED auto defib mode.
EtCO
2
sensor cable plugged into unit for the first time. Zeroing error or probe drift error detected.
POOR LEAD CONTACT One or more ECG leads are poorly connected or not connected to patient. (User configurable.)
9
9
POOR PAD CONTACT
Explanation
Measured pace rate is too fast compared to selected rate.
Issued in conjunction with message 122. Pace current is more than 15mA and below selected value.
User
Advisory
Technical Action
Replace high voltage module or system board.
Replace high voltage module.
Cannot detect type of accessory attached to the universal cable.
Replace paddles, internal paddles, system board, high voltage module and/or universal cable.
Electrode impedance exceeds threshold.
Zero sensor. Replace sensor. Return to ZOLL for service.
Check electrode attachment to patient, cable connector to electrode, cable to unit connector. Broken unit.
Ensure pads are coupled to patient.
Check /replace pads or universal cable.
Check impedance circuit calibration.
Replace system board.
PRESS ANALYZE Alternate message for check patient prompt.
9
52
M Series Service Manual
Error Message
PRESS CHARGE
PRESS SHOCK
RECORDER FAULT 142
RECORDER FAULT 143
RECORDER FAULT 147
RELEASE BUTTONS
RELEASE SHOCK
REPLACE BATTERY
Explanation
Advisory message in conjunction with shock advised.
Prompt issued in AED auto defib mode when defib is charged (ready).
Strip chart system error.
User
Advisory
9
9
Strip chart failed power-up echo test.
Communications error.
Strip chart printhead over temperature.
Technical Action
Check paper tray and paper path. Replace the print head, system interconnect board and or the system board.
Check paper tray and paper path. Replace the system interconnect board and/or the system board. Turn unit off and back on again.
Check paper tray and paper path. Replace the print head, system interconnect board and/ or the system board.
Release buttons.
Simultaneous external paddle button presses detected before unit reached full defib charge (ready state).
Discharge switch(es) closed when pressing charge button. Discharge button pressed before defib reached ready state.
Battery voltage is less than absolute minimum.
Shutdown imminent.
9
9
9
Release shock button.
Check paddles.
Replace controls board.
Replace with charged battery.
53
M Series Service Manual
Error Message
REPLACE EtCO
2
SENSOR
REPORT FULL
REPORT HALTED
RESERVED 1
RETRY ANALYSIS
SELECT 30J FOR TEST
SELECT DEFIB MODE
SELECT LIMB LEADS
SELECT PADS
SET CLOCK
SET PACE mA
Explanation
EtC0
2
SENSOR WARM UP message displays for more than five minutes. Sensor defective.
Summary report memory full.
Summary report stops printing unexpectedly.
The watchdog timer is not functional in the unit.
Advisory message in conjunction with noisy ECG.
Analysis halted.
Attempt to run a self test at an energy other than 30J.
Analyze button pressed in pace or monitor mode.
9
9
9
9
Paddles or augmented ECG leads selected when continuous analysis active or started.
Lead I, II, or III selected when analyze pressed.
9
Real time clock failure: invalid date or time.
Multiple copy errors are the product of intended software or memory errors. If error reoccurs other than on entering pace the first time or after more than
10 minutes in other mode, the unit could be broken.
User
Advisory
9
Technical Action
Replace sensor cable.
9
Erase summary report.
Turn unit off and then back on again. Print
Summary again. If fault persists, replace system board.
Turn off unit and then turn on to reset. If fault persists, replace system board.
9
Select limb leads I, II,
III or MFE
Set date and time and/ or replace system board.
Set pace current. If broken, replace system board.
54
M Series Service Manual
Error Message
SET PACE RATE
SHOCK ADVISED
SpO
2
AMBIENT LIGHT
SpO
2
COMM ERR
SpO
2
PULSE SEARCH
SpO
2
SENSOR FAULT 1
Explanation
Multiple copy errors are the product of intended software or memory errors. Multiple copies of pace rate don’t match. If error persists, unit could be broken
Advisory message when analysis finds a shockable rhythm.
Ambient light is too bright.
9
User
Advisory
9
Technical Action
Set pace rate. If broken, replace system board.
Shield sensor from ambient light. Replace
Sp0
2 sensor. Replace
Sp0
2
module
Replace Sp0
2
module and/or system board.
No transmissions from SpO
2 unit received.
Communication error or no communication from
Sp0
2 module.
Pulse search in progress.
Defective sensor.
9
Replace Sp0
2
sensor.
Replace Sp0
2
sensor.
SpO
2
SENSOR FAULT 5 Unrecognized sensor.
STAND CLEAR
SYSTEM FAULT 2
(Auto defib mode only.) Single analysis mode just turned on and defib idle. Patient rhythm is being analyzed.
MCU ROM checksum test failure or MCU RAM test failure.
9
Turn off unit and then turn on to reset. If fault persists, replace system board.
55
M Series Service Manual
Error Message
SYSTEM FAULT 5
SYSTEM FAULT 6
SYSTEM FAULT 7
SYSTEM FAULT 36
SYSTEM FAULT 37
SYSTEM FAULT 38
TEST FAILED
TEST OK
USE PADDLE DISCHG
Explanation
ECU RAM test failure or ROM checksum test failure.
No communications received from ECU for 4 seconds.
The A/D converter is not performing conversions in a timely manner.
P1MON is less than 412 counts or greater than 612
A/D counts. Pace/defib is disabled as long as condition exits.
Disable pace/defib and MFE monitoring.
Failure to shutdown after “shutdown order” is written to the RTC.
MCU performed ipeak test (defib peak current) and unit failed during 30J self test.
9
User
Advisory
Technical Action
Turn off unit and then turn on to reset. If fault persists, replace system board.
Turn off unit and then turn on to reset. If fault persists, replace system board.
Replace system board.
Replace system board.
Replace system board.
Replace system board.
Replace universal cable, paddles or high voltage module, capacitor, or system board.
9
MCU performed ipeak test (defib peak current) and unit passed 30J self test.
Front Panel discharge button is pressed when either external paddles or internal spoons with discharge buttons are connected.
9
56
M Series Service Manual
Error Message
USE PADS
USE PADS TO PACE
USE ROOM AIR
ADAPTER
USER SETUP REQ
VF ALARMS OFF
VX LEADS OFF
ZERO CO
2
SENSOR
ZERO CO
2
ADAPTER
Explanation
(AUTO DEFIB MODE ONLY.)
Attempt to defib with paddles in auto defib (AED) mode. Defib only allowed using PADS in AED modes.
External paddles detected in pace mode.
Adapter zeroing started with EtCO
2
in the adapter or the adapter is on the REF or “0” cell.
Both copies of stored cal/config data are bad or have never been programmed.
VF alarms disabled in pace mode or when paddles are selected as leads.
V lead not properly attached to patient. “X” denotes lead number.
New EtCO
2
sensor needs to be zero calibrated.
New EtCO
2
airway adapter needs to be zero calibrated.
9
9
9
9
9
9
9
User
Advisory
9
Technical Action
Place CO
2
sensor on adapter in room air.
Perform configuration setup.
Reattach V lead.
Zero EtCO
2
sensor.
Zero EtCO
2
adapter.
57
M Series Service Manual
58
M Series Service Manual
Chapter 3
Disassembly Procedures
Overview
This chapter provides instructions on how to disassemble and reassemble the M Series unit, and includes the following sections:
• Required Equipment
• Parts That May Need Replacing After Disassembly
• Safety Precautions
• Overview of Modules
• 1. Removing the ZIF Keeper
• 2. Removing the Front Panel
• 2A. Removing the Display
• 2B. Removing the Control Board
• 3. Removing the Upper Housing Assembly
• 4. Removing the System Board Assembly
• 5. Removing the Battery Interconnect Board Assembly
• 6. Removing the High Voltage/Charger Assembly
• 7. Removing the High Voltage Module Assembly
• 8. Removing the High Voltage Capacitor Assembly
• 9. Removing the System Interconnect Board
• 10. Removing the Printer/Recorder Motor
• 11. Removing the Lower Housing Assembly
• 12. Removing the Print Head Assembly
59
M Series Service Manual
• 13. Removing the PCMCIA Card Slot Assembly
• 14. Removing the Paddle Release Latch
Required Equipment
• No. 1 Phillips screwdriver.
• No. 2 Phillips screwdriver.
• Exacto-knife.
• Orange wooden stick. (Available from H.A. Stiles: 1-800-447-8537)
• 90° dental pick.
• Needle nose pliers.
• Kapton tape.
• 3M copper adhesive tape, or equivalent.
• 1/2” nut driver.
• Large diagonal cutters.
• Strong glue, such as Loctite 420 or equivalent.
• Loctite needle tip dispenser.
Parts That May Need Replacing After Disassembly
If you are removing the Control Board from the Front Panel, you need to have:
• Main Selector knob replacement (ZOLL Part Number 9310-0521)
• Pacer/Output/Rate knob replacement (ZOLL Part Number 9310-0520)
If you are removing the Battery Interconnect Board, you may need to replace it with a new one, using ZOLL Part
Number 9301-0302, if connectors have been UV welded as in older M Series models.
60
M Series Service Manual
WARNING!
Safety Precautions
SHOCK HAZARD!
CAUTION
TAKE THE NECESSARY PRECAUTIONS TO GUARD AGAINST SHOCK OR INJURY BEFORE YOU CONDUCT
DEFIBRILLATOR TESTS OR REPAIRS.
• Only properly trained technicians should service the unit.
• The unit can contain deadly voltages even if the unit is turned off.
• Make sure to discharge the unit before working with it.
• Make sure you take the necessary precautions when working with static sensitive units. For example, you must wear a conductive wrist strap (which touches your skin) connected to a grounding mat and to the earth ground. You must remove the wrist strap when you discharge high voltage or when you are working on energized equipment.
61
M Series Service Manual
Overview of Modules
The M Series unit contains 14 modules, as shown below.
Isolated Power Supply with EtCO
2
SpO
2
module with bracket for EtCO
2
System Board Assembly
System Interconnect Board Battery Interconnect Board Assembly with 3 Battery
Pin Gaskets
AC Charger Assembly
62
M Series Service Manual
Control Board (from Front Panel) High Voltage Module Assembly High Voltage Capacitor Assembly
PCMCIA Card Slot Recorder Motor SpO
2
Module (without bracket)
Isolated Power Supply for SpO
2
Module Biphasic Capacitor and Bridge Assembly
63
M Series Service Manual
64
Latch
Keeper
M Series Service Manual
1. Removing
Step 1: The connector must be facing you as shown in the diagram.
the ZIF
Keeper
Tools Required
• Orange stick
Note: It is important to know this procedure before you start disassembling the unit.
Removing the ZIF (Zero Insertion Force)
Keeper incorrectly can damage the unit’s system board.
To reinstall the ZIF Keeper:
1. Place the ZIF Keeper over the laminate cable and insert the flex cable into the connector. Latch the connector.
2. Lower the left end of the ZIF Keeper over the connector end until it touches the printed wire assembly (PWBA). The other end of the connector should be angled.
3. Press the end of the ZIF Keeper down over the end of the connector. Be careful that the ZIF Keeper snaps over the end of the connector.
Latch
Step 2: Angle and lift up the right end of the ZIF
Keeper from the connector and the board. Slide the Keeper approximately 1 mm to the left, then gently lift the left side to clear the connector.
Lift here
Step 3: Gently pull the ZIF (Zero Insertion
Force) Keeper over the laminate cable and rotate the latch upwards.
65
M Series Service Manual
2. Removing
Step 1: Remove the battery from the battery well and place it in front of the unit.
the Front
Panel
Tools Required
• No. 2 Phillips screwdriver
• Orange stick
To reinstall the Front Panel:
1. Reinstall the laminate cable first with the black band facing up and towards the system circuit board.
2. Reconnect the multi-wire cable from the display.
3. Reverse steps 1, 2, and 3 above to reinstall the front panel.
Step 3: Place your thumbs in the main selector switch cup and push up on the front panel to release the panel from the unit. After the front panel is removed, use the battery as a support for the panel. Do not use the main selector switch as
point of leverage.
Step 2: Rotate unit on to its back side. Remove the two Phillips head screws located on the left and right sides on the bottom of the unit.
Step 4: Disconnect the multi-wire cable from the system board by gently pulling the beige connector by its sides towards the front of the unit. Remove the ZIF keeper from the laminated ribbon cable and then disconnect it. Lift the right side first with the unit facing you.
Multi-wire cable
66
M Series Service Manual
2A.
Removing the
Display
Step 1: Remove the grounding copper tape from the outer display shield.
Tools Required
• No. 2 Phillips Screwdriver
• Exacto-Knife
• 3M Copper Adhesive Tape
To reinstall the Display
Reverse steps 1 through 3.
Step 3: Remove the Video Display Assembly.
Step 2: Remove the Video Display Assembly by rotating the display upwards from the lower portion of the display panel assembly.
video display assembly
67
wooden stick
M Series Service Manual
2B.
Removing
Step 1: (Caution: The knob will be damaged during this step.) Gently insert the cutters at the edge of the main selector knob and pry outward until the knob is removed. Then carefully remove the 1/2” nuts without damaging the Selector
Switch.
the
Control
Board
Tools Required
• No. 2 Phillips Screwdriver
• Orange (Wooden) Stick
• 1/2” Nut Driver
• Large Diagonal Cutters
• Strong Glue, such as Loctite 420 or equivalent
Note: If you are removing the Control Board from the Front Panel you may need to replace the following parts:
• Main Selector knob replacement (ZOLL Part
Number 9310-0521)
• Pacer Output/Rate knob replacement (ZOLL
Part Number 9310-0520).
Step 3: Rock the foam packaging back and forth from the control panel board to remove the foam.
foam packaging
Step 2: Gently insert the cutters at the edge of the pacer knobs and pry outward until the knobs are removed. Then carefully remove the 1/2” nuts without damaging the Pacer Switches and green pace cups.
Step 4: Remove the panel overlay circuit cable from the control board by lifting the sides of the lock lever located under the front of the control board. (See 1. Removing the ZIF Keeper.) panel overlay circuit cable
68
M Series Service Manual
2B.
Removing
Step 5: Disconnect the speaker microphone cable.
Remove the Control Panel Board from the Front
Panel Assembly. Important: Note the position of the dip switches because they must be in the same position for reinstallation.
the
Control
Board
(Continued
)
To reinstall the Control Board
1.
Set the dip switches and attach the SHOCK button LED actuator.
2.
Place a small amount of strong glue on the end of the mode selector switch. Slide the replacement knob on. After the glue dries, rotate the selector knob to ensure that it is properly glued in place.
3.
Replace the Pacer Output/Rate knobs, if applicable.
Step 6: Remove the 50 pin laminate cable from the control board. See 1.0 Removing the ZIF
Keeper.
50 pin laminate cable
69
M Series Service Manual
3. Removing
Step 1: Remove two screws from the back side of the Upper Housing Assembly and three screws from the front.
the Upper
Housing
Assembly
Tool Required
• No. 1 and 2 Phillips screwdriver
Set-up
Remove Front Panel (See Step 2.)
1. Remove the two screws securing the universal cable.
2. Do not lose the O-ring when removing the universal cable.
3. Remove the three Phillips screws in the front of the Upper Housing.
To reinstall the Upper Housing Assembly, reverse the above steps.
Ensure the battery pin gaskets are properly set.
Step 3: Make sure that the rubber gaskets are covering the battery contact pins. If the gaskets are still seated in the housing, remove and place them onto the contact pins. Before installing the
Upper Housing ensure that the battery pin gaskets are set properly.
battery pin gasket
Step 2: Secure lower housing to the table by pressing downward in the paddle well. Using the carry handle, lift the Upper Housing upward.
70
M Series Service Manual
4. Removing
2. Remove the Front Panel Assembly.
3. Remove the Upper Housing Assembly.
To reinstall the System Board Assembly, reverse the steps.
the
System
Board
Assembly
Tools Required
• #1 and #2 Phillips Screwdriver
• Grounding Mat
• Grounding Wrist Strap
• Needle Nose Pliers
• Orange Stick
WARNING! You can damage the hardware of the unit. You must use ESD grounding before you handle any printed circuit boards on the unit.
Setup
Before you begin this procedure, make sure you are grounded.
1. Know or review 1.0 Removing the ZIF
Keeper procedure.
71
M Series Service Manual
Step 1: Using needle nose pliers, remove left and right multi-wire cables on the back side of the system board. To avoid damage to the cable, do not pull the wires. Hold system board securely with one hand. DO NOT let it fall forward to prevent excess tension on the unit’s wires.
Step 2: Remove the two wire speaker cable (if applicable).
Step 3: Lower the system board with one hand and remove the battery interconnect laminate cable from the center of the system board. (See 1.
Removing the ZIF Keeper.)
battery interconnect laminate cable
Step 4: Gently roll the system board forward and rest it on the battery.
72
M Series Service Manual
Step 5: Remove the ZIF Keeper. (See 1.
Removing the ZIF Keeper.)
Step 6: For Biphasic M Series units only:
Remove the 20 pin power cable by lifting the slide locking tab upwards.
Step 7: For M Series units with the SpO
2
SpO
2
with EtCO
2
and/or
only: Remove the 20 pin power cable by lifting the slide locking tab upwards.
73
M Series Service Manual
5. Removing
Step 1: Identify the Battery Interconnect Board.
the
Battery
Interconn ect Board
Assembly
Step 3: Remove the push pin and small insert collar.
Tools Required
• Orange stick
Setup
1. Remove the Front Panel Assembly.
2. Remove the Upper Housing Assembly
3. Remove the System Board Battery Cable.
To reinstall the Battery Interconnect Board, reverse the steps.
NOTE For Step 4, remember to carefully remove the cable from the Charger Assembly when disassembling and reinstalling it.
Step 2: Remove the wide laminate cable from the high voltage module connector by lifting the cable vertically.
Step 4: Rotate the unit around so that the rear of the unit faces you. Rotate the Battery Interconnect
Board upwards toward the front of the device.
Hold the board vertically while removing the 10pin laminate cable from connectors by lifting the connector lock.
10 pin laminate cable charger cable
74
M Series Service Manual
6. Removing
DO NOT SHORT THE TERMINAL ENDS OF THE CAPACITOR. Refer to Section 8, Step 2.
the High
Voltage/
Charger
Assembly
Tools Required
• #2 Phillips screwdriver
• Orange stick
• Small needle nose pliers
Setup
1. Remove the Front Panel Assembly.
2. Remove the Upper Housing Assembly.
3. Remove the System Board.
4. Remove the Battery Interconnect Board.
To reinstall the High Voltage Charger
Assembly, reverse the steps.
WARNING! This unit may contain lethal voltages. You MUST completely discharge the high voltage capacitor before removing from unit.
75
M Series Service Manual
Step 1: Remove the High Voltage/Charger
Assembly from the main housing by lifting the
High Voltage/Charger Assembly upwards and rotating it towards the back of the unit.
Step 2: Set the Assembly on the table. Pull apart the High Voltage Module from the Charger
Assembly. These three components are referred to as the “Module Cluster”.
High voltage capacitor
High voltage module
Charger assembly
Step 3: Depress the lever on the High Voltage
Cable to remove it from the mounting panel. Cut the tie wrap attached to the mounting bracket that secures the cables.
Step 4: (SpO
2 units only) To remove the SpO
2 module from the Isolated Power Supply, remove the Mylar ® tape. EtCO
2 module and power supply are one assembly at the same location.
high voltage cable
76
M Series Service Manual
Step 5: Lift the SpO
2 module straight up from the foam and disconnect the ribbon cable from the
Isolated Power Supply.
Step 6: (Biphasic units only) Disconnect the biphasic defibrillator capacitor from the rear panel connector.
Biphasic defibrillator capacitor
Step 7: (Biphasic units only) Disconnect the
Molex connector from the biphasic module.
Molex connector
Step 8: (EtCO
2 units only) Remove the EtCO
2 connector by gently lifting the connector away from the back panel. To remove the EtCO
2 isolated power supply, refer to Step 5.
and
EtCO
2 connector
Biphasic module
77
M Series Service Manual
5. Remove the High Voltage/Charger Assembly.
7. Removing
To reinstall the High Voltage Module Assembly, reverse the steps.
the High
Voltage
Module
Assembly
Tools Required
• #2 Phillips screwdriver
• Exacto-Knife
WARNING! This unit may contain lethal voltages.
You must completely discharge the high voltage capacitor by changing the energy selection during the charge cycle of the defibrillator. Power off unit.
Wait three minutes before disassembly.
DO NOT SHORT THE TERMINAL ENDS OF
THE CAPACITOR. Refer to Section 8, Step 2.
Setup
1. Remove the Front Panel Assembly.
2. Remove the Upper Housing Assembly.
3. Remove the System Board.
4. Remove the Battery Interconnect Board.
78
M Series Service Manual
Step 1: Remove the signal cable from the High
Voltage module.
Step 2: Remove the Kapton tape on the bottom of the foam surrounding the High Voltage Module.
Step 3: Separate the High Voltage Module from the foam.
79
M Series Service Manual
8. Removing
To reinstall the High Voltage Capacitor Assembly, reverse the steps.
WARNING! This unit may contain lethal voltages. You MUST completely discharge the high voltage
the High
capacitor before removing from unit. DO NOT SHORT THE TERMINAL ENDS OF THE
CAPACITOR.
Voltage
Step 1: Open the High Voltage Capacitor plastic isolator by lifting the
Mylar tape
.
Step 2: Bleed the excess voltage using a resistor with values of approximately 5 kohms, 25 watts for 10-20 seconds. Measure the voltage on the capacitor terminals.
Capacitor
Assembly
Tools Required
• #2 Phillips screwdriver
• Exacto-Knife
• Mylar
®
tape
Setup
1. Remove the Front Panel Assembly.
2. Remove the Upper Housing Assembly.
3. Remove the System Board.
4. Remove the Battery Interconnect Board.
5. Remove the High Voltage Charger
Assembly.
6. Lift the Capacitor Assembly upwards from the chassis. (The Capacitor Assembly is still connected to the High Voltage Module
Assembly.)
Step 3: When the capacitor voltage is at 0 VDC, disconnect the inductor wires and capacitor terminal wires.
80
M Series Service Manual
81
M Series Service Manual
9. Removing
3. Install two screws.
4. Reconnect all the cables and reverse the steps.
the
System
Interconn ect Board
Tools Required
• #2 Phillips screwdriver
Setup
1. Remove the Front Panel Assembly.
2. Remove the Upper Housing Assembly.
3. Remove the System Board.
4. Remove the Battery Interconnect Board.
5. Remove the High Voltage/Charger module.
6. Remove the clear plastic print head isolater.
7. Remove the motor cable, cable print head and paper sensor cable.
To reinstall the System Interconnect Board:
1. Install the laminate cables and keepers.
2. Ensure that the PCMCIA slots with gaskets are located to the right rear of the board and seated properly.
82
M Series Service Manual
Step 1: Remove the clear plastic head isolater. Step 2: Remove two screws from each side of the
System Interconnect Board.
Step 3: Disconnect the cables and lift the System
Interconnect Board out of the unit.
paper sensor cable cable print head motor cable
83
M Series Service Manual
10. Removing
To reinstall the Printer/Recorder Motor, reverse the steps.
the
Printer/
Recorder
Motor
Tools Required
• #2 Phillips screwdriver
• Exacto-Knife
• Kapton tape
Setup
1. Remove the paper tray, pull out and press up on the locking tab at the rear of the tray.
2. Remove the Front Panel Assembly.
3. Remove the Upper Housing Assembly.
4. Remove the System Board.
5. Remove the Battery Interconnect Board.
6. Remove the High Voltage Module
Assembly.
7. Remove the sensor, printhead and motor cables.
8. Remove the System Interconnect Board.
84
M Series Service Manual
Step 1: Using the needle nose pliers, carefully lift the spacer block upwards.
Step 2: Remove the motor bracket mounting screw.
cable motor spacer block
Step 3: Lift the motor upward by prying on the motor bracket with the screwdriver.
motor bracket
85
M Series Service Manual
11. Removing
Step 1: Remove the paper tray by pulling it out and pressing the locking tab upwards at the rear of the tray.
the Lower
Housing
Assembly
Tools Required
• #2 Phillips screwdriver
Setup
• Remove all power sources, such as the battery and power cord.
To reinstall the Lower House Assembly, reverse the steps.
Step 3: Remove the remaining screws from the bottom of the unit.
Step 2: Remove the screw at the bottom of the unit to remove the PCMCIA FAX/Modem card’s plastic protector.
Step 4: Lift the lower housing assembly straight up and out from the unit
86
M Series Service Manual
12. Removing
Step 1: Remove two screws from the paper tray guide and remove the paper tray guide.
the Print
Head
Assembly
Tools Required
• #1 Phillips screwdriver
Setup
• Remove the Lower Housing Assembly.
To reinstall the Print Head Assembly, reverse the steps.
Step 3: Remove the pivot pin for re-use.
print head pivot pin
Step 2: Disconnect the ribbon cable from the print head.
ribbon cable print head
87
M Series Service Manual
13. Removing
Step 1: Remove the two screws holding the card slot retainer. Lift up card slot assembly.
the
PCMCIA
Card Slot
Assembly
Tools Required
• #2 Phillips screwdriver
Setup
• Remove the Lower Housing.
To reinstall the PCMCIA card slot, reverse the step.
88
M Series Service Manual
14. Removing
Step 1:
Using the Exacto Knife, remove the adhesive seal on the unit’s chassis
.
the
Paddle
Release
Latch
Step 3: Gently push the screwdriver until the
Paddle Release Latch is dislodged.
Tools Required
• #2 Phillips screwdriver
• Exacto-Knife
• Upper Latch Seal (9330-0304)
Setup
1. Remove the Front Panel Assembly.
2. Remove the Upper Housing Assembly.
To reinstall the Paddle Release Latch, reverse the steps.
Step 2: Insert the screwdriver into the opening under the adhesive seal.
Step 4: Pull Paddle Release button away from the unit.
89
M Series Service Manual
90
M Series Service Manual
Note
Chapter 4
Replacement Parts
Overview
This section contains a listing of the replacement parts available for the ZOLL M Series devices.
Replacement parts may be ordered through an authorized ZOLL distributor or directly from ZOLL Medical
Corporation. The prices for parts are available from ZOLL Medical Corporation’s Technical Service Department.
When ordering parts, please provide the following information:
• ZOLL M Series device model and serial number
• Field Replaceable unit part number
• Description of the replacement part
To order by mail from ZOLL Medical Corporation, address your request to:
ZOLL Medical Corporation
269 Mill Road
Chelmsford, MA. 01824-4105
Attention: Technical Service Department
1-978-421-9655; 1-800-348-9011; Fax: 1-978-421-0010
ZOLL reserves the right to substitute different parts to reflect modifications and improvements in ZOLL M Series circuitry and design.
91
M Series Service Manual
Replacement Parts
Description
12 Lead ECG Cable
3M 12 Conductor Cable — LCD
4-40 x 1/4, System Interconnect Board, Mounting Screw
4-40 x 3/8 Modem Bezel Screw
6/32 x 3/8 Screws, Housings
AC Power cord with ferrite
AC Receptical Assembly
Access/Detect Cable
Adhesive Barrier, Speaker
AED Non-Pacing Membrane
Assembly Cable, EL (Yellow) Display
Assembly Cable, ECG out, Cable Sense
Assembly Capacitor & Choke (DSW)
Assembly Paddle Test Harness
B/W LCD Cable Assembly
Barrier, Isolation, Chassis, Print Head Cable
Barrier, Moisture, Speaker
Bezel, Modem, Center Open
Bracket, Speaker Mount
Part Number
1001-0031-01
0500-6000
0163-0626
0163-0153
0163-0912
1001-0195-01
1001-0114
9500-0500
9330-0324
1001-0187-01
1001-0171
9500-0500
1001-0134
1001-0102
1001-0173
9330-0332
9330-0305
9310-0512
9320-0409
92
M Series Service Manual
Description
Brush, Static Dissipation
Bumper, Chassis, High Voltage, Capacitor
Cable Flex CRT. 312 TO System Board
Cable Laminate, 50 Pin
Cable, Laminate, ECG Connector to System Board
Cable, Recorder Print Head
Configuration Manual
Connector Assembly SPO2 (din connector)
ECG Connector 12 Lead
ECG Input Connector Assembly
ECG Laminated Cable
EL (Yellow) Display only
EL Display
FED Display
Front Panel Membrane Switch Assembly
Front Panel Screw, 6-32x 1 3/4
Gasket, Battery Pin
Gasket, Die Cut, Printer Motor
Gasket, MPPM Port and Motor Support, Chassis
Gasket, PCMCIA Connector, System Interconnect Board
Part Number
9340-0102
9330-0205
9500-0519
9500-0501
9500-0506
9500-0400
9650-0201-01
1001-0160
1001-0232
1001-0132
9500-0506
9355-0505
1011-0029
0208-0011
1001-0135-01
0163-0211
9330-0317
9340-0101
9330-0303
9330-0312
93
M Series Service Manual
Description
Gasket, Print Head Cable
Handle (Part One)
Handle Insert (Part Two)
Isolator, High Voltage Module, Folded
Isolator, Left Side Chassis
Keeper, 50 Pin Laminate Cable
Knob, Main Selector
Knob, Pace Control
Latch Paddle Release
Latch Spring
LCD Display
LCD Frame
Leafspring, Print Head
Lower Housing
Lower Latch, Paddle
Lower Latch, Pivot
Main Chassis
MFC Signal Cable
Motor Support (Teflon Piece)
M Series Main Label Set
94
Part Number
9330-0314
9310-0545
9310-0546
1001-0146v
9310-0552
9310-0573
9310-0521
9310-0520
9310-1514
0190-0100
9355-0510-99
9310-0595
9320-0300
1001-0124
9310-0511
9320-0065
9310-2502-90
9500-0517
9330-0355
9305-0527-01
M Series Service Manual
Description
Noncharger Substitute Board
O-ring, MFC, M Series
Paddle Shoes
Paper Tray Assembly
PCMCIA Conn., Assembly
PCMCIA Stabilizer Board
Pivot Rod, Printhead
Print Head Assembly
Print Head Support/Paper Tray Guide
Recorder Motor Assembly
Retainer, Latch Paddle Release
Rubber Foot x 4
Seal, Pace and Main Selector Knobs
Snap Rivet, Battery Interconnect Board
Spacer, Lower Latch, Paddle well
Speaker Assembly
Spring, Recorder Tray
Tape, Copper Adhesive, Roll (54′)
Tape, Kapton, Roll (108′)
Tape, Yellow Mylar, Roll (108′)
95
Part Number
9301-0311
1001-0104
9310-1515
0310-0311
9310-0548
0163-1709
9320-0315
1001-0115
0190-0101
0160-6950
1001-0148
1001-0103
3001-0101
9320-0304
9320-0401
1001-0101
9310-0510
0550-0037
0550-0003
0550-0125
M Series Service Manual
Description
Universal cable
Upper Housing
Upper Latch Seal
Part Number
1001-0196-01
1001-0126
9330-0304
Field Replacement Parts
Description
Battery Interconnect for uni ts EtC0
2
HV Assembly Module (DSW) Defib Only
System Board 50 MHz 9301-0300-01
System Board 50 MHz (LCD only) 9301-0300-02
System Board 3/5 lead with audio 9301-0337-02
System Board 12 lead with audio 9301-0337-02 and 9301-0304
LCD Interface PWB for use with New Inverter
Biphasic Bridge Cap Assembly
Biphasic HV Module
AC Charger with
EtCO
2
Heatsink
HV Assembly Module (DSW) Pace/Defib
Battery Interconnect for uni ts EtC0
2
Part Number
9301-0303
1001-0105-03
1001-0130-01
1001-0130-02
1001-0130-14
1001-0130-15
9301-0313
1001-0181
1001-0182
1001-0108-02
1001- 0105
9301-0303
96
M Series Service Manual
Description
HV Assembly Module (DSW) Defib Only
Battery Interconnect (pre
EtCO
2)
Paper Sensor Board
System Interconnect
AC Charger Board with Heatsink
Control Board with Pace
LCD Display Interface Board
SpO
2
Board (Masimo)
Power Supply, Isolated, SpO
2
DC Charger Board with Heatsink
100 Mhz AED/SpO
2
non 12 Lead (901-0300-04)
System PCB. (Biphasic only 9301-0300-03)
100 Mhz 12 Lead/SpO
2
(9301-0307)
System Interconnect 12 Lead Faxing
PCB Control with Pace Non-AED
Assy PCB Connector EtCO
2
EtCO
2
Isolated power supply
EtCO
2
Isolated power supply (with EtCO2 PCB)
PCB control no pace
PCB control AED with pace
97
Part Number
1001-0105-03
9301-0302
1001-0131
9301-0306
1001-0108
9301-0312
9301-0308
1001-0158
1001-0159
1001-0107
1001-0130-04
1001-0130-03
1001-0130-05
9301-030602
9301-0312-05
9301-0325
1001-0015
3001-0103
9301-0312-02
9301-0312-03
M Series Service Manual
Description
PCB control AED no pace
12 Lead Based (9301-0337-01)
3/5 Lead With Audio 9301-03 37-02 and 9301-0304
12 Lead (9301-0307-01)
3/5 Lead/Biphasic (9301-0307-02)
System Interconnect Board with Faxing Capability
PCB control without pace non AED
PCB control with pace AED
PCB control without pace
Part Number
9301-0312-04
1001-0130-09
1001-0130-10
1001-0130-06
1001-0130-07
9301-0306-03
9301-0312-06
9301-0312-07
9301-0312-08
98
M Series Service Manual
Chapter 5
Functional Description
Overview
This chapter provides functional descriptions of the components contained in the ZOLL M Series and the M Series options. Refer to the interconnect diagram that delineates the different components of the defibrillator.
This chapter includes:
Main System Board
Main System Board Functions
Power Supply
User Interface
Audio I/O Module
ECG Front End
Multifunction (MFE) Paddles
Main CPU and EPU
High Voltage Module
Defibrillator Charging and Discharging
High Voltage Capacitor Module
Pacer and Defibrillator Control Signals
Internal Discharge Resistor Module
AC/DC Charger
AC/DC Charger Module
99
M Series Service Manual
System Interconnect Board
Stripchart Recorder
PCMCIA Slots
Front Panel and Display
M Series Options
12 Lead Monitoring
Pulse Oximetry (SpO
2)
End Tidal Carbon Dioxide (EtCO
2)
Biphasic Module
Main System Board
The M Series electrical circuitry consists of several functional modules. Each module is physically located on one or more of the printed wiring board assemblies (PWBA). In some cases, a functional module is distributed across several assemblies within the unit. The main components of the M Series include:
• Display
• Main System Board
• High Voltage Module
• AC/DC Charger
• Battery Interconnect Module
• System Interconnect Module
• High Voltage Capacitor
Some units are equipped with M Series options. These options include:
• 12 Lead ECG
• Pulse Oximetry (SpO
2
)
• End Tidal Carbon Dioxide (EtCO
2
)
• Biphasic Defibrillation Waveform
100
M Series Service Manual
Refer to the M Series Interconnect diagram to identify unit components described in this manual.
M
ODULE
L
OCATION
Main Central Processing Unit (CPU) and ECU Main System PWBA
Pacer/Defib Charging and High Voltage
Control (Defib/Pace)
Internal Discharge Resistor
AC or DC Power Supply/Battery Charger
High Voltage Module
Biphasic Bridge Module
HV Module
AC Charger PWBA
DC Charger PWBA
Main System PWBA
ECG Front End Signal Acquisition
Battery Pack or Smart Battery™
User Interface and Controls
PCMCIA Interface
Stripchart Recorder
Audio I/O (optional)
Main System PWBA
Battery Interconnect PWBA
Controls PWBA
System Interconnect, Main System
SpO
2
EtCO
(optional)
2
(optional)
12 Lead (optional)
System Interconnect, Main System
Main System PWBA
Audio Display PWBA
Controls PWBA
Pulse Oximetry PWBA
Isolated Power Supply PWBA
EtCO
2
PWBA
Isolated Power Supply PWBA
Main System PWBA
101
M Series Service Manual
Main System Board Functions
The Main System Board contains the major computing and control elements for the M Series unit. The printed wiring board assembly (PWBA) receives signals from the front panel control switches, ECG input connectors and functional modules, such as the AC/DC charger, pacer/defibrillator modules, stripchart recorder and PCMCIA card interfaces, and if applicable, the SpO
2
and EtCO
2
modules. The Main System Board monitors and processes these input signals to produce other signals that: 1) control the operation of other modules within the system; 2) drive the unit’s front panel display and audio outputs and; 3) store data for retrieval via Summary Reports, PCMCIA cards and/ or a modem.
The electronic circuitry and software contained on the main system board performs the following major M Series functions:
1.
Main CPU and memory.
2.
ECG signal acquisition and processing for ECG leads including,
•
A/D conversion.
•
ECG signal filtering.
•
QRS detection.
•
Implanted pacemaker detection.
•
Heart Rate counting.
•
Shockable ECG rhythm analysis.
3.
Data communications with and control over the SpO
2
and EtCO
2
modules.
4.
Control over and safety monitoring of pacer and defibrillator functions performed by the High Voltage module and
Biphasic Bridge module.
5.
Physiological alarm processing.
6.
Control switch monitoring for the front panel, accessory connection monitoring and control over the system response to switch activation or accessory connection to the M Series.
7.
Format and updating of the front panel display.
8.
Primary power supplies for the unit.
9.
Audio output generation and control (e.g., alarms, voice prompts, warning tones).
10.
Audio signal processing, data compression and storage of voice recording data.
11.
Real time clock and other time keeping functions.
12.
Summary Report, 12 Lead ECG Reports data storage.
102
M Series Service Manual
13.
Monitoring of battery status and control over Battery Charging functions performed by the AC or DC Charger
PWBA.
14.
Data transmission to and control over the System Interconnect PCB functions, including the stripchart recorder and the PCMCIA slot functions.
103
M Series Service Manual
Power Supply
The power supply converts DC power from a removable battery or the AC/DC Battery Charger module to voltages required by the M Series hardware.
The power supply circuit converts the raw battery or the Charger PWBA output voltages of +8.5 VDC to +16 VDC into the voltages shown in the table below, including load and line regulation.
VOLTAGE DESCRIPTION VOLTAGE VDC
(Nominal)
12
COMMENTS
FUSE_PWR Fused Input Power from
Battery/Charger
SW_PWR
3VDD
Switched Input Power after Power Switch
+ 3.3 VDC Power for
Digital circuits
5VDD
-5VSS
+ 5.0 VDC Power for
Digital circuits
— 5.0 VDC Power for
Analog circuits
12VEE
15VDD
LCD_BS
3_3REF
+ 12.0 VDC Power for
Analog circuits
+ 15.0 VDC Power for
VPP and 12VEE
LCD BIAS Power for
LCD display
+ 3.3 VDC Reference
12
3.3
5.0
-5.0
12.0
15.0
— 18
3.3
Switching @ 300 kHz
Switching @ 300 kHz
Linear
Linear
Switching @ 300 kHz
Switching @ 100 kHz
Linear
104
M Series Service Manual
ECG Front End
The ECG front end provides an electrically isolated serial interface between the main system board functions and patient interface ECG connectors. It performs the following:
• Analog ECG amplification and signal conditioning.
• Pacemaker pulse detection.
• ECG signals acquisition and analog to digital conversion.
• ECG 3/5/12-lead detection.
• ECG leads off detection.
• Front-end defibrillator protection.
• Isolated power conditioning.
• Patient impedance measurement via MFE or paddles.
Multifunction Electrode (MFE)/PADS (System Board and High
Voltage Module)
Selected for optimal performance for the application, a dedicated ECG amplifier with a limited bandwidth processes the signal. It is then chopper modulated and coupled to the system side via an isolation transformer. On the system side, the signal is synchronously demodulated, converted by a 10 bit A/D at 250 samples per second and digitally processed by the main control unit of the system board.
To measure thoracic impedance, a high frequency (HF) measuring current passes through the patient’s chest and measures the resulting voltage across the electrodes. After amplification, the impedance signal is synchronously demodulated. It is then converted to a stream of pulses with frequency proportional to the measured impedance.
CPU and EPU
The Main System Board contains two microprocessors. A Motorola HC-11 single chip microprocessor is used to acquire, convert and process ECG signals, (ECU). An Hitachi SH-3 RISC microprocessor acts as the system’s main
CPU. The SH-3 CPU and has an integrated on-chip multiplier, a cache memory, a memory management unit as well
105
M Series Service Manual as data protection and virtual memory functions. It also has a timer, a real time clock, an interrupt controller, a serial communication interface (SCI), and other peripheral functions necessary for the system operation. The memory circuitry includes Flash ROM, internal flash non-volatile memory and DRAM.
The EPU acquires ECG data and runs the A/D convertor that sends data in the form of a serial stream to the CPU.
High Voltage Module
The High Voltage (HV) module includes the high voltage circuitry required for pacing and defibrillation, including the defib charge circuitry, solid state patient relay, safety relay, defib capacitor, defib choke and front end protection circuitry for the MFC ECG. There are two different types of HV Modules: a damped sinusoidal waveform HV module and a Biphasic (HV) module.
The following table describes the high voltage board components:
Component Function
Solid State Patient Relay
Safety Relay
Defibrillator Capacitor
Defibrillator Choke
Front End Protection Circuitry for the MFC ECG
Monophasic HV
Biphasic HV
Controls the delivery of therapeutic energy to patient.
Discharges Defib capacitor into the internal discharge resistor when defibrillator is not in use.
Stores energy for therapy.
Conditions waveform delivered to the patient.(DSW)
Protects ECG front end against defibrillator pulses.
Provides damped sinusoidal waveform therapeutic energy. (Monophasic units only.)
Provides biphasic waveform therapeutic energy.
(Biphasic units only.)
106
Charging
M Series Service Manual
Defibrillator Charging and Discharging
The defibrillator charges and discharges high voltage capacitor energy. A user can initiate a charge in three ways by
1) pressing the charge button on the front panel; or (2) pressing the charge button on the paddles; or (3) configuring unit to charge automatically when it detects a shockable rhythm following an ECG analysis. To initiate a discharge, a user depresses both shock buttons on the paddles or depresses a single shock button on the front panel.
The defibrillator circuit charges the high voltage capacitor to the energy level the user specifies.This circuit also provides feedback to the main system board on the high voltage capacitor’s voltage level and discharges the high voltage capacitor energy through paddles or the universal cable. The defibrillator portion of the high voltage circuitry is active only when the front panel selector switch is set to DEFIB.
The charging process starts when the Main System Board detects a charge request. The defibrillator circuits begin charging the high voltage capacitor to the target voltage or energy that the user selects on the front panel display. The
Main System Board continuously monitors the capacitor voltage signal to ensure that the high voltage capacitor charges at the proper rate. When the target voltage is reached, the Main System Board initiates a continuous beeper tone to indicate that defibrillator is ready to discharge. The target energy level displays on the display screen.
The defibrillator holds the energy for 60 seconds for manual units and 15 seconds for AED units, refreshing the energy level as necessary. An intermittent beep tone sounds during the last ten seconds (five seconds for AED unit) of the hold period. After the 60 second period, if the defibrillator has not been discharged, the energy is dissipated into the internal discharge resistor by closing the safety relay (XSAFREL). The unit discharges internally and displays a warning message if it is not functioning properly.
Unlike previous ZOLL designs that isolated the patient from defib circuitry via an electromechanical patient relay, the
M Series utilizes a bank of silicon-controlled rectifiers (SCRs). As the defibrillator capacitor is charged, the voltage is monitored via R1 — R4, which drive differential amplifiers referred to the system ground. These resistor dividers split the capacitor voltage more or less equally above and below ground in order that the positive capacitor terminal is approximately 2500 volts above ground, and the negative capacitor terminal is approximately 2500 volts below ground
(at 360J setting). The voltage at the patient electrodes is set by the divider RN1 and RN2. These networks are each 5X
25 M (125 M total) whose total resistance is specified to be 125 M +- 1%. As a result, the patient is nominally at ground and the hot switch bank is split into a ‘positive’ side and a ‘negative’ side.
107
M Series Service Manual
Discharging
Initiating a discharge provides voltage to the solid state patient relay and notification to the Main System Board through the PADMON signal. The Main System Board then controls activation of the solid state patient relay (for
DSW only). Energy delivered to the patient goes through a wave shaping inductor to create a defibrillation waveform compliant with AAMI Standards. When the patient discharge SCRs are deactivated, the safety relay closes to internally dissipate any remaining energy.
If the M Series is in the self test mode, the energy is delivered internally. The microprocessor calculates the actual delivered energy from the current waveform and displays a TEST OK message on the display, if the self test meets the appropriate criteria. If the criteria are not met, a TEST FAILED message displays.
High Voltage Capacitor Monitor
Before charging the defibrillator, the High Voltage Capacitor monitor runs a self test to check the pace relay. The pace relay controls the high voltage circuitry configuration either for generating pace pulses or for charging the high voltage defibrillation capacitor.
The defibrillator capacitor is shunted for safety reasons with a resistor and relay to internally dissipate any energy remaining. When the Main System Board initiates a charge, this relay opens by providing a low level on signal
XSAFREL. The safety relay is a biased reed switch. The relay is driven by Q318.
The pace relay driver is a grounded source switch Q308 that is biased on by R593. It is held off by Q330 when
XPACEREL is ‘1’ false. When XPACEREL comes true, Q330 is turned off, and Q308 is no longer clamped off.
The high voltage capacitor is charged by converting the system battery voltage to a pulsed high voltage by way of transformer T1. The basic operating frequency signal that is used to switch transistor Q1 providing current in the primary windings of the transformer T1 originates in the system board’s gate array.
When the high voltage capacitor is charging, the Main System Board independently monitors the capacitor voltage through signal VMON. If the Main System Board detects an improper level, it halts operation by setting SAFE high.
This disables the SCR discharge circuitry and flyback transformer drive.
The solid state patient relay discharges via the signal PATREL_DRV generated by XPATREL and Q304, Q323, and
Q322. PATREL_DRV is disabled when XPACE_SEL is at a logic low.
When the solid state patient relay activation completes, the Main System Board releases the XPATREL signal. Several hundred milliseconds later, the safety relay closes to ensure the high voltage capacitor energy is completely dissipated.
108
M Series Service Manual
The Pacer circuit produces and delivers user-controllable pace pulses to the pacing electrodes. To initiate pacing, the front panel switch is turned to PACER and the OUTPUT and RATE controls are set. Pacing current amplitude is constant during the pulse and is determined by the position of the front panel PACER OUTPUT dial. Pacing pulse rate is determined by the position of the front panel PACER RATE dial. The pacing pulse duration is fixed at 40 milliseconds.
Pacer/Defibrillator Control Signals
The Pacer/Defibrillator Control charges the high voltage capacitor to a voltage requested by the main system board in response to user energy selections. It delivers defibrillator energy to the patient through the patient connector to the paddles and pacer electrodes or multi-function electrodes (PADS). This control also generates pacing pulses at rates and amplitudes requested by the main system board in response to user selections, controls damped sinusoidal waveform and biphasic waveform defibrillation, and measures pace current and high voltage capacitor voltage by two independent channels.
The following signals control the operation of the Pacer/Defibrillator subsystem:
A
NALOG
V
OLTAGE
VCAP
VMON
VSENS
VCTL
O
PERATION
Analog voltage spanning 0 —
2.5 V for 0 — 5000V capacitor voltage.
Analog voltage spanning 0 —
2.5 V for 0 — 5000V capacitor voltage.
Pace duty cycle voltage, scaled as 0 — 2.5 V for 0 —
100% duty cycle.
Analog control voltage scaled
0 — 2.5 V for pace current of 0
— 140 ma.
C
OMMENT
Used by the defib charging controller.
Used by the defib monitor.
When multiplied by the pulse width (as read from
PW_READ) battery voltage is proportional to the actual pace current.
Only active in pace mode.
109
M Series Service Manual
A
NALOG
V
OLTAGE
FET_MON
PAT_CUR
L
OGIC
C
ONTROL
S
IGNAL
O
PERATION
Analog voltage monitors the condition of the discharge transistors.
Bound on the range of 0 — 2.5
V and accommodates defib currents of -50 to +100 A
C
OMMENT
Provides a signature voltage in case of a fault.
Analog signal representing the patient current during a defib discharge.
O
PERATION
SAFE:
SHUTDOWN:
XPACE_ON:
XSAFREL:
XPACEREL:
XPAT_ENABLE: when true, and inhibits the charging circuit when false.
This logic control signal is generated by the Main System Board to halt the pace/defib function in the event of a detected fault.
This logic signal is true during reset and fault conditions. (VCC error, watchdog error, etc.) and halts operation of the PD generator.
This logic signal is generated by an optocoupler, and indicates that the pace output circuit is active. It is ‘0’ true when pace current is flowing.
Logic signal from the GA that operates the safety relay when ‘0’ true.
Logic signal from the GA that operates the pace relay when ‘0’ true. XPATREL: Logic signal from the GA that operates the solid state patient relay when ‘0’ true.
Logic signal from the processor controlled by the monitor that grants operation of the solid state patient relay. It is false during pacing.
110
M Series Service Manual
L
OGIC
C
ONTROL
S
IGNAL
XPACE_SEL:
O
PERATION
Hardware only signal from the front panel switch that is at ‘0’ during pace. Used as an additional safety interlock on the solid state patient relay so that operation of the relay during pacing is additionally disabled.
Internal Discharge Resistor Module
The Internal Discharge Resistor Module contains the internal discharge resistor, and a means for dissipating the heat generated by the internal discharge.
AC/DC Charger Module
The AC/DC Power/Battery Charger provides a universal (IEC 320) connection to the AC mains or to a DC source, input line filtering and double-pole fusing (for a mains input), AC-DC and DC-DC conversion and isolation barrier between the M Series and power sources. This module also provides the power necessary to run the M Series in any mode of operation, as well as providing additional charging current to the battery. When the M Series is turned off but connected to an external AC or DC source, the charger module controls battery charging currents and voltages needed to charge the M Series battery. These voltages and currents are controlled in response to the main CPU signals that manage the battery charging process.
System Interconnect Module
The system interconnect PWBA receives signals from the Main System Board and in turn controls operation of the stripchart recorder and PCMCIA functions.
111
M Series Service Manual
Stripchart Recorder
The Stripchart Recorder module includes a microprocessor, serial interface to the main system board and circuitry which drive the stripchart recorder’s motor and printhead in response to the main CPU signals. Based upon signals sent by the main CPU, the recorder’s main processor drives the recorder stripchart motor, formats data for printing on the chart and drives the printhead. It also detects when the sensor drawer is not properly fitted into the unit, when the paper supply is out and needs to be refilled and the print head temperature.
PCMCIA Slots
The PCMCIA interface module supports two PCMCIA slots which accept Type I and/or Type II PCMCIA cards.
These cards may be read or written to. Data sent by the main CPU is passed to the installed PCMCIA card via the system interconnect PWBA.
Front Panel and Controls PWBA
User Interface Module provides several functions that enable the user to operate the unit. The user interface has a display monitor and three rotary selector switches. One selector switch is for three modes: pacer, monitor and defibrillation. The two other knobs are for pacer output and pacer rate. The unit interface also has specific buttons for defibrillation, including the ENERGY SELECT button, the CHARGE button, the ANALYZE button and the SHOCK button. The five softkeys underneath the display provide specific operations depending on the unit’s configuration. The other push buttons (from left to right) are used for volume control, monitor illumination, summary report, and code markers. The CHARGER ON indicator displays the status of the unit’s power supply.
This input module on the front panel and the Main System Board provides a beeper for the AC/DC Power/Battery
Charger.
The Controls PWBA is physically located in the front panel assembly. Units that are equipped for voice recording include a microphone and audio signal conditioning circuitry on the Controls PWBA.
M Series Options
This section describes four options for the M Series unit.
112
M Series Service Manual
Isolated Power Supply Module
The Isolated Power Supply Module provides electrically isolated power to the EtCO
2 and SpO
2 modules. It also provides the electrically isolated serial communications and isolated control signals between the EtCO
2 and SpO
2 modules and the main system PWBA.
12 Lead Option
The ZOLL M Series 12 lead option is used to acquire ECG data needed to assist in the diagnosis of myocardial infarction (“heart attack”), often caused by a coronary artery occlusion. The 12 lead ECG can be viewed on the display one lead at a time in monitoring and diagnostic bandwidths and printed in the standard 4×3 format with 12 simultaneously acquired leads.
The 12 lead option provides for the recording, printing and automated analysis of 12 lead ECG using GE Marquette
12SL
™ Analysis and supports the transmission of these reports by fax to a remote location, such as a hospital. In the pre-hospital environment, the 12 lead reports can be faxed to a physician as the patient is en route to the Emergency
Department. As a result, the physician can initiate hospital accommodations immediately, such as activating the staff of the cardiac catheterization lab, prior to the patient’s arrival and subsequent treatment. Or the patient may be treated in the pre-hospital environment with thrombolytic agents.
The 12 lead cable is required to produce 12 lead reports. M Series unit must have the 12 lead option installed. All limb leads and at least one V-lead must be connected to initiate a 12 lead acquisition. Printed 12 Lead bandwidth is user configurable to be either 0.05-150 Hz (per AAMI EC11) or 0.05-40 Hz. The 0.05-40 Hz bandwidth selection is used to reduce noise artifact in the high end of the diagnostic frequency range. Reports can be printed in a standard 4×3 or
Cabrera format. Faxed reports can be configured in a 2×6 format in addition to 4×3 and Cabrera formats.
The GE Marquette 12SL
™ Analysis algorithm provides measurements of the 12 lead waveforms along with interpretive statements. The algorithm is interpretive, not “diagnostic.” (A physician should always confirm interpretive statements. A diagnosis requires a complete clinical assessment including other modalities, such as a physical examination.) 12SL
™ produces global waveform measurements as well as a measurement matrix containing measurements on each lead. Both the interpretive statements and measurement matrix are configurable to be printed or not printed.
113
M Series Service Manual
The acquired 12 lead with 12SL
™ may be faxed to a remote location using landline or cellular phone technology.
Several PCMCIA fax modems are supported and the modem determines the specific phone compatibility. Cellular phone support includes analog AMPS phones (in the U.S.) and GSM phones (internationally). The M-Series supports
Group 3 facsimile, Class 1 and Class 2. 12 lead reports may be re-printed or re-transmitted using the Patient Records capability. Individual patient records may be selected based on patient ID, date, and time.
Pulse Oximetry (S
P
O
2
)
The ZOLL M Series pulse oximetry option enables the user to continuously, noninvasively, and painlessly monitor the percentage of oxygen saturation of arterial hemoglobin at a peripheral measurement site (i.e.foot, toe or finger.)
The oximetry sensor contains two light emitting diodes, or LEDs, that transmit red and infrared light through the body’s extremities. A photodetector receives the transmitted light. Oxygen saturated blood absorbs light differently than unsaturated blood. Thus the amount of red and infrared light absorbed by the blood flowing through a suitable peripheral area of the body, such as the finger in adults and the foot in neonates, can be used to calculate the ratio of oxygenated hemoglobin to total hemoglobin in the arterial blood. The monitor displays this ratio as percent SpO
2
.
Normal values typically range from 95% to 100% at sea level.
The M Series uses a Masimo
®
Pulse Oximetry Circuit Board which features a fundamentally distinct method of acquiring, processing and reporting arterial oxygen saturation and pulse rate. The M Series’ SpO
2
module (Masimo
®
Circuit Board) connects to the Masimo sensors and reports monitoring results (oxygen saturation, pulse rate, pulse waveform, etc.) via a serial digital interface to the M Series system board. The M Series system provides isolated DC power and serial communication to the SpO
2
Board via the Isolated Power Supply board.
End Tidal Carbon Dioxide (EtCO
2
)
The ZOLL M Series EtCO
2
Novametrix technology and Capnostat
®
sensor option continually and noninvasively monitors the patient’s carbon dioxide in respiratory gases and from these measurements computes End Tidal CO
2
and respiration rate. The unit can display and print a recording of EtCO
2
readings, respiration rates, and capnograph waveforms. In addition, the unit can configure an alarm to sound when the unit detects EtCO
2
values and respiration rates that are above or below acceptable ranges as set by the user. This option is intended for use in all critical monitoring environments including ventilator support, patient transport, and anesthesia and is intended for monitoring all patient types, including adult, pediatric, and neonatal.
114
M Series Service Manual
The EtCO
2
option incorporates, without modification, the Novametrix respiratory carbon dioxide technology, including a printed circuit board, and a patented and proprietary mainstream CO
2 sensor and reusable/disposable airway adapters. Carbon dioxide measurements are monitored by using a solid-state infrared Capnostat
®
sensor which works on the principles of infrared absorption.
The M Series system board software transmits commands to the Novametrix board to set parameters (averaging mode, oxygen, and nitrous oxide compensation) and retrieves CO
2
waveform, EtCO
2
, and respiration rate data. The M Series software formats the data for output to the display and strip chart recorder. In addition, the M Series software performs range checking of the Novametrix data to determine the presence of low or high EtCO
2
and respiration rate alarm limit violations. If the limits have been violated, the software issues audio and visual alarms.
The Capnostat
® mainstream sensor is attached to an airway adapter that connects to an endotracheal tube, similar airway, or disposable mouthpiece. The sensor generates infrared light and beams it through the airway adapter to a detector on the opposite side of the airway. As a result of respiration, CO
2
flowing through the airway adapter absorbs some of this infrared energy. The monitor relates the amount of detected energy to the amount of CO
2 in the airway adapter. The CO
2 display reflects the maximum concentration of CO
2
detected during expiration. End-Tidal Carbon
Dioxide (EtCO
2
) displays as a numerical value in millimeters of mercury (mmHg), percent (%), or kilopascals (kPa) on the unit. In addition, a capnogram waveform may display underneath the ECG waveform.
The EtCO
2
option uses Non-Dispersive Infrared (NDIR) absorption and dual wavelength ratiometric-True Single
Beam Optics. The Capnostat
®
sensor contains the NDIR light source. Carbon dioxide, flowing in the airway adapter as a result of respiration, absorbs some of this light energy.
Biphasic Waveform
The M Series Biphasic Waveform Defibrillator produces a rectilinear biphasic defibrillator waveform similar to the chart shown at the end of this section. The electrical energy is delivered in two successive current phases of opposite polarity. As compared to the monophasic waveform, the biphasic waveform typically defibrillates with substantially less current than the earlier monophasic waveform used by most defibrillators.
The M Series Biphasic Defibrillator system consists of circuitry and software located on the following assemblies:
1. Main System PWBA.
2. High Voltage Module.
3) Biphasic Bridge PWBA Module.
115
M Series Service Manual
The High Voltage module controls the monitoring, charging, and internal discharges of the defibrillator capacitor. The
Bridge module controls capacitor discharge, including waveform polarity control, patient current and voltage monitoring during discharge and real-time control over defibrillator internal impedance to create the rectilinear waveshape. The main CPU controls the waveform timing and resistor switching performed by the Bridge Module based upon measured patient transthoracic impedance.
The Biphasic Bridge Assembly is constructed as two printed wire board assemblies (PWBAs) containing the power and isolation circuits required to deliver a biphasic defibrillation pulse. These boards produce a defibrillation pulse consisting of a positive current pulse followed by a negative current pulse. The positive portion of the pulse is shaped to be rectilinear by switching resistors in series with the patient to compensate for droop in the capacitor voltage as it delivers energy to the patient load.
The ZOLL Biphasic units produce a rectilinear waveform whose shape remains essentially constant from patient to patient. The rectilinear biphasic waveform consists of a 6 millisecond, essentially constant current first phase followed by a 4 millisecond, truncated exponential second phase. The first and second phases of the defibrillation waveform are of opposite polarity and their amplitudes vary based on the user selected therapeutic energy level. The initial amplitude of this waveform’s second phase is approximately equal to the first phases’s final amplitude. This wavefrom has an integrated patient impedance measurement sensing pulse at the beginning of the waveform. The positive and negative phases are separated by 100
µsec.
Electronics and software control the shape of the waveform’s first phase and compensate for different transthoracic impedances to maintain an essentially constant current throughout the first phase.When the highest energy setting is selected and patient impedance exceeds 85 ohms, the first phase of the waveform will droop. All other waveform parameters (phase duration, inter-phase delay and integrated impedance measurement sensing pulse) remain the same.
116
M Series Service Manual
The following Rectilinear Biphasic Waveform is produced when the M Series with Biphasic option is discharged into a 50 ohm load at the default energy setting of 120 joules. The vertical axis is in amperes; the horizontal axis is in milliseconds. (See following diagram.)
117
M Series Service Manual
118
M Series Service Manual
Appendix
Overview
This appendix includes:
• Interconnect Diagram for the M Series Monophasic Unit
• Interconnect Diagram for the M Series Biphasic Unit
• Interconnect Diagram for the M Series CCT Biphasic Unit
This appendix also includes the ZOLL M Series Maintenance Tests Checklist. Photocopy the checklist and use the copy to record the results of the maintenance tests performed on the M Series equipment.
119
M Series Service Manual
Interconnect Diagram for the M Series Monophasic Unit
120
M Series Service Manual
Interconnect Diagram for the M Series Biphasic Unit
121
M Series Service Manual
Interconnect Diagram for the M Series CCT Biphasic Unit
122
M Series Service Manual
Index
Numerics
200J MAX BIPHASIC message 42
2PFE SpO2 Simulator 2
50J MAX message 42
A
AC Charger photograph 62
AC or DC Power Supply 95
AC/DC Charger module 105
ADJUST ECG message 42
Advisory message test 28
ANALYSIS 42
ANALYSIS HALTED message 42
ANALYSIS RESTARTED message 42
AUDIO FAULT 13 message 43
AUDIO FAULT 136 43
AUDIO FAULT 136 message 43
Audio I/O 95
AUDIO NOT RECORDING message 43
AUDIO QUEUE FULL message 43
B
BATT 43
BATT HIGH CURRENT message 43
BATT LOW CURRENT message 43
BATT LOW VOLTAGE 43
BATT LOW VOLTAGE message 43
BATT OVERCHARGE message 43
Battery Interconnect Board removing and reinstalling 73
Battery Interconnect Board Assembly 62
Battery Pack 95
Biphasic Bridge Assembly 63
Biphasic Module 100
BRIDGE TEST FAILED message 44
C
CABLE FAULT 44
CABLE FAULT message 44
CANNOT CHARGE 44
CANNOT CHARGE message 44
CHECK 45
CHECK PADS/POOR PAD CONTACTmessage 39
CHECK PULSE 45
CHECK PULSE message 45
CHECK RECORDER message 45
CHECK SPO2 SENSOR message 46
CHECK SPO2 SITE message 46
CLOCK FAULT 11 message 46
CLOCK FAULT 12 message 46
CLOCK FAULT 13 46
CLOCK FAULT 13 message 46
CO2 COMM ERROR message 46
CO2 SENSOR WARM UP 46
CO2 SENSOR WARM UP Message 46
CO2 SENSOR WARM UP message 46
CONFIRM MANUAL MODE message 46
Contacting Technical Service vii
Control Board Panel 68, 69
Conventions vii
Cracks 4
D
Damage 4
DEFIB 39
Defib Capacitor 100
DEFIB DISABLED message 46
DEFIB FAULT 108 message 48
DEFIB FAULT 109 message 48
DEFIB FAULT 111 message 48
DEFIB FAULT 71 message 46
DEFIB FAULT 72 message 47
DEFIB FAULT 76 message 47
DEFIB FAULT 77 message 47
DEFIB FAULT 78 message 47
DEFIB FAULT 79 message 47
DEFIB FAULT 80 message 47
DEFIB FAULT 81 message 47
DEFIB FAULT 84 message 47
DEFIB FAULT 85 message 47
DEFIB FAULT 86 message 47
123
DEFIB FAULT 87 message 47
DEFIB FAULT 94 message 48
DEFIB FAULT 95 message 48
DEFIB FAULT 96 message 48
DEFIB NOT CHARGED message 48
DEFIB PAD SHORT 39
DEFIB PAD SHORT message 48
Defibrillator charging and discharging 101 energy levels 101
Defibrillator Choke 100
Defibrillator self test 22
DISABLE SYNC message 48
DISCHARGE FAULT message 48
Discharging 102
Display 67
Dissassembly procedures modules to disassemble 62
E
ECG FAULT 4 message 49
ECG FAULT 5 message 49
ECG Front End 99
ECG Front End Signal Acquisition 95
ECG LEAD OFF message 49
ECG LEADS OFF message 38
ECG TOO LARGE message 49
ECG TOO SMALL message 49
ECG V LEADS OFF message 49
ECG V2 LEAD OFF message 49
ECG V3 LEAD OFF message 49
ECG V4 LEAD OFF message 49
ECG V5 LEAD OFF message 49
ECG V6 LEAD OFF message 50
ECU CRC FAULT message 50
ENTER ACCESS CODE message 50
Equipment You Need for the Maintenance Tests
Testing Equipment 2
ERASING REPORT message 50
Error Message
50J MAX 42
ANALYSIS HALTED 42
ANALYSIS RESTARTED 42
AUDIO FAULT 136 43
AUDIO NOT RECORDING 43
BATT HIGH CURRENT 43
M Series Service Manual
BATT OVERCHARGE 43
BRIDGE TEST FAILED 44
CABLE FAULT 44
CANNOT CHARGE 44
CHECK RECORDER 45
CLOCK FAULT 12 46
CLOCK FAULT 13 46
CONFIRM MANUAL MODE 46
DEFIB DISABLED 46
DEFIB FAULT 108 48
DEFIB FAULT 109 48
DEFIB FAULT 111 48
DEFIB FAULT 71 46
DEFIB FAULT 72 47
DEFIB FAULT 76 47
DEFIB FAULT 77 47
DEFIB FAULT 78 47
DEFIB FAULT 79 47
DEFIB FAULT 80 47
DEFIB FAULT 81 47
DEFIB FAULT 84 47
DEFIB FAULT 85 47
DEFIB FAULT 86 47
DEFIB FAULT 87 47
DEFIB FAULT 94 48
DEFIB FAULT 95 48
DEFIB FAULT 96 48
DEFIB NOT CHARGED 48
DEFIB PAD SHORT 48
DISABLE SYNC 48
DISCHARGE FAULT 48
ECG FAULT 5 49
ECG LEAD OFF 49
ECG TOO LARGE 49
ECG V2 LEAD OFF 49
ECG V3 LEAD OFF 49
ECG V4 LEAD OFF 49
ECG V6 LEAD OFF 50
ECU CRC FAULT 50
ENTER ACCESS CODE 50
ERASING REPORT 50
EtCO2 COM ERROR 50
FAX DIALING 50
FAX DONE 50
FAX PREPARING 50
FAX SENDING 50
INSERT CARD 50
LOW BATTERY 50
NO QRS DETECT 50
RETRY ANALYSIS 54
EtCO2
Isolated Power Supply Assembly 107
EtCO2 COM ERROR message 50
EtCO2 Isolated Power Supply Assembly 95
F
FAX DIALING message 50
FAX DONE message 50
FAX PREPARING message 50
FAX SENDING message 50
Front End Protection Circuitry
High Voltage Module 100
Front Panel 4
G
Gel droop 40
H
High Voltage Capacitor monitor 102
High Voltage Module 100
Reinstalling 74, 76, 77
High Voltage Module Assembly 100 removing 76
High Voltage/Charger Assembly removing 74
HV 100
I
INSERT CARD message 50
Interference radio and cell phone vi
Internal Discharge Resistor Module 105
Components of Charge 105
Isolated Power Supply
EtCO2 module 62 function 107
L
Lead cables 10
124
Logic Control Signal 104
LOW BATTERY message 50
M
M Series 62 description 93 main components 94
Main Selector Knob 60
Main System Board 95
Maintenance Tests 1 equipment 3
Messages 39
Module types 62
Monitoring
User interface module 106
Monophasic
High Voltage Module 100
N
NO QRS DETECT message 50
NO SHOCK AD message 51
NOISY ECG message 51
Notch filter test 19
O
Ordering Replacement Parts part numbers 90
P
PACER 103
Pacer Defibrillator function 103
PACER OUTPUT knob pacing 103
Pacer/Output/Rate knob 60
Paddle Release Latch
Reinstalling 83
Removing 83
PCMCIA card slot removing and reinstalling 82
PCMCIA Interface 95
Power Supply
MCU 98
Power supply function 98
M Series Service Manual
Print Head Assembly 81
Printer/Recorder Motor removing and reinstalling 79
R
Radio frequency emissions vi
Radio Frequency Interference vi reinstall 74, 76, 77, 83
Reinstalling
Control Board 69
High Voltage Module 74, 76, 77
Paddle Release Latch 83
System Interconnect Board 78
Upper Housing Assembly 70
ZIF Keeper 66 remove 74
Removing 77, 78
Battery Interconnect Board 73
High Voltage Capacitor Assembly 77
High Voltage Module Assembly 76
High Voltage/Charger Assembly 74
Paddle Release Latch 83
Printer/Recorder Motor 79
System Interconnect Board 78
RETRY ANALYSIS message 54
S
Safety Consideration v
Safety Precautions 61
Safety Relay 100
Safety Warnings v
SELECT 30J FOR TEST message 54
SELECT DEFIB MODE message 54
SELECT LIMB LEADS message 54
SELECT PADS message 54
Selector switches 4
Service
Address viii
Service Policy Warranty vii
United States
Outsideof the United States vii
SET CLOCK message 54
SET PACE RATE message 55
SHOCK ADVISED message 55
Software license 2
Solid State Patient Relay
High Voltage Module 100
SpO2 and EtCO2 modules with bracket photograph 62
SpO2 Isolated Power Supply Assembly
95
SpO2 Module (without bracket) photograph 63
STAND 55
STAND CLEAR 55
Storing pads 40
Strip Chart Recorder 95
System Board Assembly 71 photograph 62
SYSTEM FAULT 2 message 55
SYSTEM FAULT 5 message 56
SYSTEM FAULT 6 message 56
SYSTEM FAULT 7 message 56
System Interconnect Board 78 photograph 62 removing and reinstalling 78
T
Technical Service Department
Address 85
Test 6, 10, 11
3, 5, and 12 Leads 10
Advisory Message 28
Calibrating Pulses on Strip Chart 18
Check Summary Report 27
Defibrillator Self Test 22
EtCO2 Monitor 34
Front Panel Button 6
Heart Rate Alarm 20
Heart Rate Display 17
Leakage Current 15
Notch Filter 19
Pacer 29
Paddles 16
Power Supply 11
Shock 25
SpO2 Monitor 32
Synchronized Cardioversion 24
Troubleshooting
Displayed HR not accurate 41
Electronic interference 41
Wandering baseline 41
U
User Interface Module 106
V
V LEADS OFF Messages 39
Voltage
Power supply 98
W
Warnings v
Warranty 2
Z
ZERO CO2 ADAPTER message 57
ZERO CO2 SENSOR message 57
Zoll M Series Text Messages 38
ZOLL Medical Corporation
Address
Ordering parts for M Series 85
Service request number viii
ZOLL Technical Service Department vii
Fax number vii
Telephone number vii
125
M Series Service Manual
126
ZOLL M Series
Maintenance Test Checklist
Serial No.
Tester
Location
Signature Date
Use this checklist to record the results of the
M Series maintenance tests, and keep it for your records.
Result of Check:
o No action required o Minor problems corrected o Disposable supplies replaced o Major problems identified
(unit out of service)
Additional Remarks
1.0
Physical Inspection 2.0
Front Panel Button
Pass Fail N/A
Test
1.1
o o o
Pass Fail N/A
1.2
o o o
2.1
o o o
1.3
o o o
2.2
o o o
1.4
o o o
2.3s
o o o
1.5
o o o
2.4
o o o
1.6
o o o
2.5
o o o
1.7
o o o
2.6
o o o
1.8
o o o
2.7
o o o
1.9
o o o
2.8
o o o
1.10
o o o
2.9
o o o
1.11
o o o
2.10
o o o
1.12
o o o
2.11
o o o
1.13
o o o
2.12
o o o
1.14
o o o
2.13a
o o o
1.15
o o o
2.13b
o o o
1.16
o o o
2.14
o o o
2.15
o o o
2.16
2.17
o o o o o o
2.18
2.19
2.20
2.21
o o o o o o o o o o o o
2.22
2.23
2.24
2.25
2.26
o o o o o o o o o o o o o o o
3.0
Leads Test
Pass Fail N/A
3.1
o o o
3.2
o o o
3.3
o o o
3.4
o o o
4.0
Power Supply Test
Pass Fail N/A
4.1
o o o
4.3
4.4
o o o o o o
4.5
4.6
4.8
4.10
o o o o o o o o o o o o
5.0
Leakage Current
Test
Pass Fail N/A
5.1
o o o
6.0
Paddles Test
Pass Fail N/A
6.1
o o o
6.2
o o o
6.3
o o o
6.4
6.5
6.6
o o o o o o o o o
6.7
o o o
7.0
Heart Rate Display
Test
Pass Fail N/A
7.1
o o o
8.0
Pulse Calibration
Test
Pass Fail N/A
8.2
o o o
9.0
Notch Filter Test
Pass Fail N/A
9.3
o o o
11.0 Defibrillator
Self Test
Pass Fail N/A
11.1
o o o
11.2
11.3
o o o o o o
11.4
11.5
11.6
11.7
o o o o o o o o o o o o
12.0 Synchronized
Cardioversion Test
Pass Fail N/A
12.2
o o o
12.4
o o o
10.0 Heart Rate Alarm
Test
Pass Fail N/A
10.1
o o o
10.2
10.3
o o o o o o
10.4
10.5
10.6
10.7
o o o o o o o o o o o o
10.8
10.9
10.10
10.11
10.12
10.13
10.14
o o o o o o o o o o o o o o o o o o o o o
13.0 Shock Test
Pass Fail N/A
13.1
o o o
13.2
13.3
o o o o o o
13.4
o o o
13.5
13.6
13.7
o o o o o o o o o
13.8
13.9
13.10
o o o o o o o o o
(Sheet 1 of 2)
ZOLL M Series
Maintenance Test Checklist
Serial No.
Tester
Location
Signature Date
14.0 Summary Report
Test
Pass Fail N/A
14.1
o o o
14.2
14.3
o o o o o o
14.4
o o o
15.0 Advisory Message
Test
Pass Fail N/A
15.2
o o o
15.3
o o o
15.4
o o o
16.0 Pacer Test
Pass Fail N/A
16.1
o o o
16.2
o o o
16.3
o o o
16.4
16.5
16.6
o o o o o o o o o
16.7
16.8
16.9
o o o o o o o o o
16.10
16.11
16.12
o o o o o o o o o
16.13
16.14
16.15
o o o o o o o o o
16.16
16.17
16.18
o o o o o o o o o
16.19
16.20
16.21
o o o o o o o o o
16.22
o o o
17.0 SpO
2
Monitor Test
17.1
Pass Fail N/A o o o
17.2
17.3
17.4
17.5
o o o o o o o o o o o o
17.6
17.7
17.8
17.9
17.10
o o o o o o o o o o o o o o o
20.0 NIBP Volume Leak
Test
Pass Fail N/A
20.1
o o o
20.2
20.3
o o o o o o
20.4
20.5
20.6
20.7
o o o o o o o o o o o o
18.0 EtCO
2
Monitor Test
18.2
Pass Fail N/A o o o
18.3
18.4
18.5
o o o o o o o o o
19.0 NIBP Monitor Test
Pass Fail N/A
19.1
19.2
19.3
19.4
19.5
o o o o o o o o o o o o o o o
21.0 NIBP Transducer
Calibration
Pass Fail N/A
21.1
o o o
21.2
o o o
21.3
o o o
21.4
o o o
21.5
o o o
21.6
o o o
21.7
o o o
21.8
o o o
21.9
o o o
21.10
o o o
22.0 VGA Output Test
Pass Fail N/A
22.1
22.2
22.3
22.4
o o o o o o o o o o o o
23.0 IBP Monitor Test
Pass Fail N/A
23.1
o o o
23.2
o o o
23.3
o o o
23.4
23.5
23.6
o o o o o o o o o
23.7
23.8
o o o o o o
24.0 IBP Noise Test
Pass Fail N/A
24.1
o o o
24.2
24.3
o o o o o o
24.4
24.5
24.6
24.7
o o o o o o o o o o o o
24.8
24.9
24.10
24.11
24.12
o o o o o o o o o o o o o o o
25.0 IBP Static Pressure
Test
Pass Fail N/A
25.1
o o o
25.2
25.3
o o o o o o
25.4
25.5
25.6
25.7
o o o o o o o o o o o o
25.8
25.9
25.10
o o o o o o o o o
26.0 Temperature
Monitor Test
Pass Fail N/A
26.1
o o o
26.2
o o o
26.3
o o o
26.4
o o o
26.5
o o o
26.6
o o o
(Sheet 2 of 2)

9650-0209-29
Бифазный — 1
Версия А
ПРЯМОУГОЛЬНЫЙ ДВУХФАЗНЫЙ
ДЕФИБРИЛЛЯЦИОННЫЙ ИМПУЛЬС
Общая информация
Введение
Существуют дефибрилляторы M Series
®
с усовершенствованной электрической конструкцией, обеспечивающей
уникальную бифазную форму импульса дефибрилляции и кардиоверсии. В этой опции электроэнергия
дефибриллятора передается в двух последовательных фазах тока (напряжения) противоположной полярности. Этот
тип формы волны дефибриллятора обычно называется «бифазным» в противопоставление более ранней
«монофазной» демпфированной синусоидальной волне, присущей для большинства имеющихся в продаже
дефибрилляторов.
Прямолинейный бифазный импульс дефибриллятора ZOLL M Series имеет уникальные характеристики,
предназначенные для получения оптимальных клинических результатов и проверенные в многоцентровых
клинических испытаниях. Клинические испытания продемонстрировали, что эта форма дефибрилляционного
импульса клинически эффективна как для дефибрилляции, так и для синхронизированной кардиоверсии.
В настоящем вкладыше объясняется, чем прямоугольный бифазный импульс дефибриллятора M Series отличается
от монофазного импульса в виде демпфированной синусоиды других приборов M Series. Его следует использовать
совместно с руководством по эксплуатации для дефибрилляторов M Series. Важная информация по технике
безопасности, относящаяся к общему использованию M Series, дается в разделе «Рекомендации по технике
безопасности» руководства по эксплуатации дефибрилляторов M Series.
Показания к применению M Series с прямолинейным бифазным импульсом
Приборами ZOLL M Series с бифазным импульсом должен пользоваться только квалифицированный медицинский
персонал для проведения преобразования жизнеугрожающих аритмий: вентикулярной фибрилляции (VF) и/или
вентикулярной тахикардии (VT), в нормальный синусовый ритм или другие сердечные ритмы, обеспечивающие
гемодинамическую стабильность.
Кроме того, этот прибор должен использоваться в синхронизированном режиме только квалифицированным
медицинским персоналом для устранения фибрилляции предсердий (AF) на более низких значениях дозы энергии и
силы тока, чем у монофазных дефибрилляторов. Квалифицированный врач должен решить самостоятельно, когда
необходима синхронизированная кардиоверсия.
Этот прибор также должен использоваться в синхронизированном режиме только квалифицированным медицинским
персоналом для электроимпульсной терапии вентикулярной тахикардии (VT). Квалифицированный врач должен
решить, когда необходима синхронизированная кардиоверсия.
Прямолинейный бифазный импульс (RBW) прошел успешную проверку в многоцентровых рандомизированных
клинических испытаниях эффективности трансторакальной дефибрилляции VT/VF и AF, которые подтвердили
возможность и эффективность проведения бифазной дефибрилляции и кардиоверсии у взрослых пациентов при
более низких значениях дозы энергии и силы тока, чем у существующих монофазных приборов. Бифазный импульс
M Series имеет широкий диапазон доз энергии, выбираемых пользователем, включая более низкие значения
энергии, чем те, которые были использованы во время клинических испытаний.
Автоматический (АНД) и консультативный режимы дефибрилляции следует использовать только при
подтвержденном диагнозе фибрилляции желудочков у пациентов со следующими симптомами:
пациент должен быть без сознания.
у пациента должна быть остановка дыхания (не дышит).
у пациента должен отсутствовать пульс.
ВНИМАНИЕ
Нельзя использовать автоматический режим для пациентов младше
8 лет (В соответствии с Рекомендациями АНА по сердечно-легочной
реанимации взрослых и автоматической дефибрилляции 3-5, 1998 г.)